European Resuscitation Council Guidelines for Resuscitation 2010 ...
European Resuscitation Council Guidelines for Resuscitation 2010 ...
European Resuscitation Council Guidelines for Resuscitation 2010 ...

Create successful ePaper yourself
Turn your PDF publications into a flip-book with our unique Google optimized e-Paper software.
1224 J.P. Nolan et al. / <strong>Resuscitation</strong> 81 (<strong>2010</strong>) 1219–1276<br />
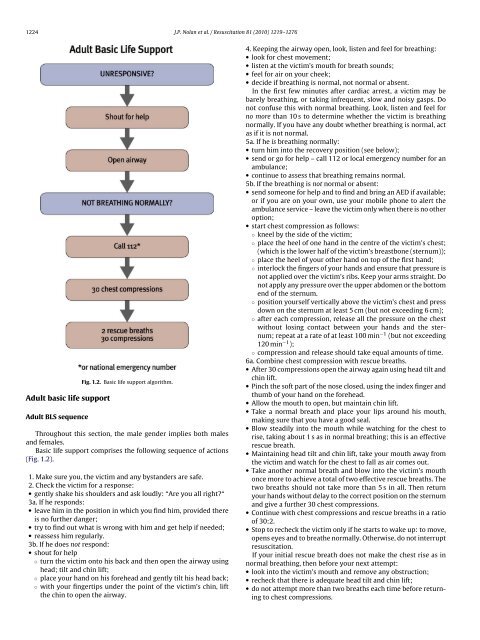
Adult basic life support<br />
Adult BLS sequence<br />
Fig. 1.2. Basic life support algorithm.<br />
Throughout this section, the male gender implies both males<br />
and females.<br />
Basic life support comprises the following sequence of actions<br />
(Fig. 1.2).<br />
1. Make sure you, the victim and any bystanders are safe.<br />
2. Check the victim <strong>for</strong> a response:<br />
• gently shake his shoulders and ask loudly: “Are you all right?“<br />
3a. If he responds:<br />
• leave him in the position in which you find him, provided there<br />
is no further danger;<br />
• try to find out what is wrong with him and get help if needed;<br />
• reassess him regularly.<br />
3b. If he does not respond:<br />
• shout <strong>for</strong> help<br />
◦ turn the victim onto his back and then open the airway using<br />
head; tilt and chin lift;<br />
◦ place your hand on his <strong>for</strong>ehead and gently tilt his head back;<br />
◦ with your fingertips under the point of the victim’s chin, lift<br />
the chin to open the airway.<br />
4. Keeping the airway open, look, listen and feel <strong>for</strong> breathing:<br />
• look <strong>for</strong> chest movement;<br />
• listen at the victim’s mouth <strong>for</strong> breath sounds;<br />
• feel <strong>for</strong> air on your cheek;<br />
• decide if breathing is normal, not normal or absent.<br />
In the first few minutes after cardiac arrest, a victim may be<br />
barely breathing, or taking infrequent, slow and noisy gasps. Do<br />
not confuse this with normal breathing. Look, listen and feel <strong>for</strong><br />
no more than 10 s to determine whether the victim is breathing<br />
normally. If you have any doubt whether breathing is normal, act<br />
as if it is not normal.<br />
5a. If he is breathing normally:<br />
• turn him into the recovery position (see below);<br />
• send or go <strong>for</strong> help – call 112 or local emergency number <strong>for</strong> an<br />
ambulance;<br />
• continue to assess that breathing remains normal.<br />
5b. If the breathing is not normal or absent:<br />
• send someone <strong>for</strong> help and to find and bring an AED if available;<br />
or if you are on your own, use your mobile phone to alert the<br />
ambulance service – leave the victim only when there is no other<br />
option;<br />
• start chest compression as follows:<br />
◦ kneel by the side of the victim;<br />
◦ place the heel of one hand in the centre of the victim’s chest;<br />
(which is the lower half of the victim’s breastbone (sternum));<br />
◦ place the heel of your other hand on top of the first hand;<br />
◦ interlock the fingers of your hands and ensure that pressure is<br />
not applied over the victim’s ribs. Keep your arms straight. Do<br />
not apply any pressure over the upper abdomen or the bottom<br />
end of the sternum.<br />
◦ position yourself vertically above the victim’s chest and press<br />
down on the sternum at least 5 cm (but not exceeding 6 cm);<br />
◦ after each compression, release all the pressure on the chest<br />
without losing contact between your hands and the sternum;<br />
repeat at a rate of at least 100 min −1 (but not exceeding<br />
120 min −1 );<br />
◦ compression and release should take equal amounts of time.<br />
6a. Combine chest compression with rescue breaths.<br />
• After 30 compressions open the airway again using head tilt and<br />
chin lift.<br />
• Pinch the soft part of the nose closed, using the index finger and<br />
thumb of your hand on the <strong>for</strong>ehead.<br />
• Allow the mouth to open, but maintain chin lift.<br />
• Take a normal breath and place your lips around his mouth,<br />
making sure that you have a good seal.<br />
• Blow steadily into the mouth while watching <strong>for</strong> the chest to<br />
rise, taking about 1 s as in normal breathing; this is an effective<br />
rescue breath.<br />
• Maintaining head tilt and chin lift, take your mouth away from<br />
the victim and watch <strong>for</strong> the chest to fall as air comes out.<br />
• Take another normal breath and blow into the victim’s mouth<br />
once more to achieve a total of two effective rescue breaths. The<br />
two breaths should not take more than 5 s in all. Then return<br />
your hands without delay to the correct position on the sternum<br />
and give a further 30 chest compressions.<br />
• Continue with chest compressions and rescue breaths in a ratio<br />
of 30:2.<br />
• Stop to recheck the victim only if he starts to wake up: to move,<br />
opens eyes and to breathe normally. Otherwise, do not interrupt<br />
resuscitation.<br />
If your initial rescue breath does not make the chest rise as in<br />
normal breathing, then be<strong>for</strong>e your next attempt:<br />
• look into the victim’s mouth and remove any obstruction;<br />
• recheck that there is adequate head tilt and chin lift;<br />
• do not attempt more than two breaths each time be<strong>for</strong>e returning<br />
to chest compressions.