European Resuscitation Council Guidelines for Resuscitation 2010 ...
European Resuscitation Council Guidelines for Resuscitation 2010 ...
European Resuscitation Council Guidelines for Resuscitation 2010 ...

You also want an ePaper? Increase the reach of your titles
YUMPU automatically turns print PDFs into web optimized ePapers that Google loves.
D. Biarent et al. / <strong>Resuscitation</strong> 81 (<strong>2010</strong>) 1364–1388 1367<br />
For both infants and children, if you have difficulty achieving an<br />
effective breath, the airway may be obstructed:<br />
• Open the child’s mouth and remove any visible obstruction. Do<br />
not per<strong>for</strong>m a blind finger sweep.<br />
• Ensure that there is adequate head tilt and chin lift but also that<br />
the neck is not over extended.<br />
• If head tilt and chin lift has not opened the airway, try the jaw<br />
thrust method.<br />
• Make up to five attempts to achieve effective breaths, if still<br />
unsuccessful, move on to chest compressions.<br />
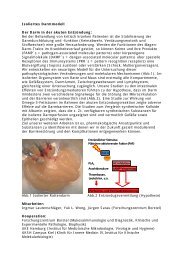
Fig. 6.2. Mouth-to-mouth ventilation – child.<br />
• Blow steadily into the mouth over about 1–1.5 s watching <strong>for</strong><br />
chest rise.<br />
• Maintain head tilt and chin lift, take your mouth away from the<br />
victim and watch <strong>for</strong> his chest to fall as air comes out.<br />
• Take another breath and repeat this sequence five times. Identify<br />
effectiveness by seeing that the child’s chest has risen and fallen in<br />
a similar fashion to the movement produced by a normal breath.<br />
Rescue breaths <strong>for</strong> an infant (Fig. 6.3):<br />
• Ensure a neutral position of the head (as an infant’s head is usually<br />
flexed when supine, this may require some extension) and a chin<br />
lift.<br />
• Take a breath and cover the mouth and nose of the infant with<br />
your mouth, making sure you have a good seal. If the nose and<br />
mouth cannot be covered in the older infant, the rescuer may<br />
attempt to seal only the infant’s nose or mouth with his mouth<br />
(if the nose is used, close the lips to prevent air escape).<br />
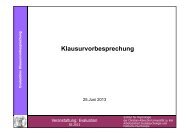
• Blow steadily into the infant’s mouth and nose over 1–1.5 s, sufficient<br />
to make the chest visibly rise.<br />
• Maintain head position and chin lift, take your mouth away from<br />
the victim and watch <strong>for</strong> his chest to fall as air comes out.<br />
• Take another breath and repeat this sequence five times.<br />
Fig. 6.3. Mouth-to-mouth and nose ventilation – infant.<br />
6. Assess the child’s circulation.<br />
Take no more than 10 s to:<br />
• Look <strong>for</strong> signs of life – this includes any movement, coughing or<br />
normal breathing (not abnormal gasps or infrequent, irregular<br />
breaths).<br />
If you check the pulse, ensure you take no more than 10 s.<br />
In a child over 1 year – feel <strong>for</strong> the carotid pulse in the neck.<br />
In an infant – feel <strong>for</strong> the brachial pulse on the inner aspect of<br />
the upper arm.<br />
The femoral pulse in the groin, which is half way between the<br />
anterior superior iliac spine and the symphysis pubis, can also<br />
be used in infant and children.<br />
7A. If you are confident that you can detect signs of life within 10 s:<br />
• Continue rescue breathing, if necessary, until the child starts<br />
breathing effectively on his own.<br />
• Turn the child on to his side (into the recovery position) if he<br />
remains unconscious.<br />
• Re-assess the child frequently.<br />
7B. If there are no signs of life, unless you are CERTAIN you can feel<br />
a definite pulse of greater than 60 beats min −1 within 10 s:<br />
• Start chest compressions.<br />
• Combine rescue breathing and chest compressions:<br />
Chest compressions:<br />
For all children, compress the lower half of the sternum: To avoid<br />
compressing the upper abdomen, locate the xiphisternum by finding<br />
the angle where the lowest ribs join in the middle. Compress the<br />
sternum one finger’s breadth above this; the compression should be<br />
sufficient to depress the sternum by at least one third of the depth<br />
of the chest. Don’t be afraid to push too hard: “Push Hard and Fast”.<br />
Release the pressure completely and repeat at a rate of at least<br />
100 min −1 (but not exceeding 120 min −1 ). After 15 compressions,<br />
tilt the head, lift the chin, and give two effective breaths. Continue<br />
compressions and breaths in a ratio of 15:2. The best method <strong>for</strong><br />
compression varies slightly between infants and children.<br />
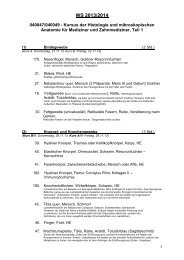
Chest compression in infants (Fig. 6.4): The lone rescuer compresses<br />
the sternum with the tips of two fingers. If there are two<br />
or more rescuers, use the encircling technique. Place both thumbs<br />
flat side by side on the lower half of the sternum (as above) with<br />
the tips pointing towards the infant’s head. Spread the rest of both<br />
hands with the fingers together to encircle the lower part of the<br />
infant’s rib cage with the tips of the fingers supporting the infant’s<br />
back. For both methods, depress the lower sternum by at least one<br />
third of the depth of the infant’s chest.<br />
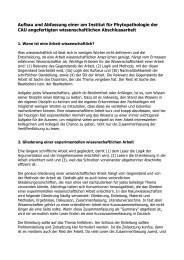
Chest compression in children over 1 year of age (Figs. 6.5 and 6.6):<br />
Place the heel of one hand over the lower half of the sternum (as<br />
above). Lift the fingers to ensure that pressure is not applied over<br />
the child’s ribs. Position yourself vertically above the victim’s chest<br />
and, with your arm straight, compress the sternum to depress it<br />
by at least one third of the depth of the chest. In larger children or<br />
<strong>for</strong> small rescuers, this is achieved most easily by using both hands<br />
with the fingers interlocked.