Citibank ® Custom Reporting System User Guide
Citibank ® Custom Reporting System User Guide
Citibank ® Custom Reporting System User Guide

You also want an ePaper? Increase the reach of your titles
YUMPU automatically turns print PDFs into web optimized ePapers that Google loves.
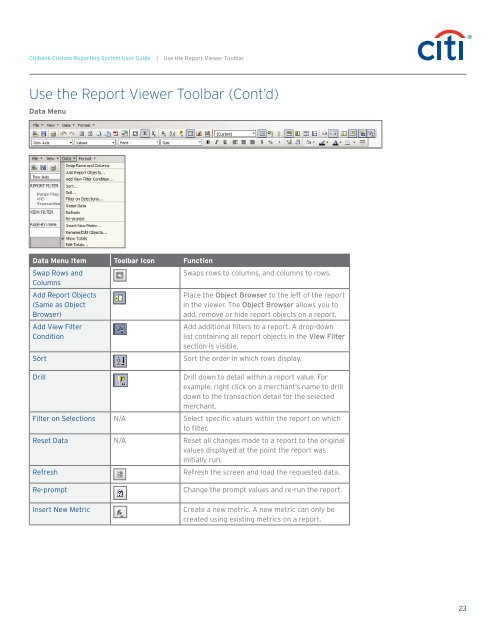
<strong>Citibank</strong> <strong>Custom</strong> <strong>Reporting</strong> <strong>System</strong> <strong>User</strong> <strong>Guide</strong> | Use the Report Viewer Toolbar<br />
Use the Report Viewer Toolbar (Cont’d)<br />
Data Menu<br />
Data Menu Item Toolbar Icon Function<br />
Swap Rows and<br />
Columns<br />
Add Report Objects<br />
(Same as Object<br />
Browser)<br />
Add View Filter<br />
Condition<br />
Sort<br />
Drill<br />
Swaps rows to columns, and columns to rows.<br />
Place the Object Browser to the left of the report<br />
in the viewer. The Object Browser allows you to<br />
add, remove or hide report objects on a report.<br />
Add additional filters to a report. A drop-down<br />
list containing all report objects in the View Filter<br />
section is visible.<br />
Sort the order in which rows display.<br />
Drill down to detail within a report value. For<br />
example, right click on a merchant’s name to drill<br />
down to the transaction detail for the selected<br />
merchant.<br />
Filter on Selections N/A Select specific values within the report on which<br />
to filter.<br />
Reset Data N/A Reset all changes made to a report to the original<br />
values displayed at the point the report was<br />
initially run.<br />
Refresh<br />
Refresh the screen and load the requested data.<br />
Re-prompt<br />
Insert New Metric<br />
Change the prompt values and re-run the report.<br />
Create a new metric. A new metric can only be<br />
created using existing metrics on a report.<br />
23