Apollo 16 Hardware Manual.pdf - Universal Audio
Apollo 16 Hardware Manual.pdf - Universal Audio
Apollo 16 Hardware Manual.pdf - Universal Audio

Create successful ePaper yourself
Turn your PDF publications into a flip-book with our unique Google optimized e-Paper software.
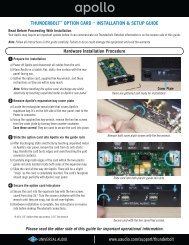
Registration & Authorization<br />
Note: Simplified procedures for registration and authorization are below. For complete and detailed<br />
procedures, refer to the UAD System <strong>Manual</strong> (see “About <strong>Apollo</strong> <strong>16</strong> Documentation” on page 8).<br />
<strong>Apollo</strong> <strong>16</strong> must be registered and authorized at my.uaudio.com to unlock its UAD-2 functionality and run UAD<br />
Powered Plug-Ins. <strong>Apollo</strong> <strong>16</strong> can be used as a “regular” audio interface (bypassing all UAD-2 plug-in features)<br />
without registration and authorization. Unlicensed UAD-2 plug-ins can be used in demo mode for 14 days<br />
without authorization.<br />
Registration only needs to be completed once, however authorization must be completed each time the UAD<br />
software is updated. <strong>Apollo</strong> <strong>16</strong>, like all UAD-2 devices, stores its authorization and UAD licenses in the device<br />
itself, so the unit can be connected to a different computer without repeating the authorization process.<br />
Important: Registration and authorization can only be accomplished after successful software<br />
installation.<br />
Registration & Authorization Procedure<br />
Registration is part of the initial authorization process (it’s not a separate procedure). Note that the following<br />
steps require an Internet connection to the host computer. To authorize from a system that is not online, refer to<br />
the UAD System <strong>Manual</strong>.<br />
To register and authorize <strong>Apollo</strong> <strong>16</strong> when connected to the Internet:<br />
1. Ensure that the <strong>Apollo</strong> <strong>16</strong> software is installed and <strong>Apollo</strong> <strong>16</strong> is powered and connected to the computer<br />
via FireWire or Thunderbolt. The hardware and software systems must be communicating properly.<br />
2. Open the UAD Meter & Control Panel application. It can be accessed from the Dock (Mac) or Start Menu<br />
(Windows).<br />
3. Open the Plug-Ins panel. The panel can be accessed by typing ⌘-P (Mac) or Ctrl-P (Windows) when<br />
the application is in the foreground, or click the UAD Meter window’s Menu button then select “Plug-<br />
Ins” from the drop menu, as shown here:<br />
4. Click the “Authorize Plug-Ins…” button to begin the registration/authorization process. Our web pages<br />
will guide you; follow the instructions on screen.<br />
5. Double-click the authorization file that is automatically downloaded. The authorization is loaded into<br />
<strong>Apollo</strong> <strong>16</strong>, and after a few seconds the “Authorizations Updated Successfully” window appears.<br />
Registration and authorization is complete and <strong>Apollo</strong> <strong>16</strong> is ready for use.<br />
What Next?<br />
• See “About <strong>Apollo</strong> <strong>16</strong> Documentation” on page 8 to learn how to find the information you need.<br />
• Contact our technical support team (see page 9) if you need assistance.<br />
<strong>Apollo</strong> <strong>16</strong> <strong>Hardware</strong> <strong>Manual</strong><br />
18<br />
Registration & Authorization