bx_digital V2 Mono Manual.pdf
bx_digital V2 Mono Manual.pdf
bx_digital V2 Mono Manual.pdf

You also want an ePaper? Increase the reach of your titles
YUMPU automatically turns print PDFs into web optimized ePapers that Google loves.
x_<strong>digital</strong> <strong>V2</strong> mono manual
x_<strong>digital</strong> <strong>V2</strong> mono manual<br />
Index<br />
1. What is <strong>bx</strong>_<strong>digital</strong> <strong>V2</strong> mono?3<br />
3.12. Settings (A/B/C/D)8<br />
3.13. <strong>Manual</strong> & Help8<br />
2. Features of the <strong>bx</strong>_<strong>digital</strong> <strong>V2</strong> mono:3<br />
3. Overview and Details3<br />
3.1. EQ-Section4<br />
3.2. Input Gain and Output Gain4<br />
3.3. The Brainworx logos in the GUI4<br />
3.4. Auto Listen, EQ on/off, Phase Reverse4<br />
3.5. Window switch 6<br />
3.6. Level LEDs6<br />
3.7. Bass Shift6<br />
3.8. Presence Shift6<br />
3.9. De-Esser7<br />
3.10. EQ-Panel7<br />
Mouse Wheel - Control:7<br />
3.11. Bypass7<br />
2
x_<strong>digital</strong> <strong>V2</strong> mono manual<br />
1. What is <strong>bx</strong>_<strong>digital</strong> <strong>V2</strong> mono?<br />
<strong>bx</strong>_<strong>digital</strong> <strong>V2</strong> mono is an 11-band EQ and De-Esser.<br />
It is based upon the “modern classic” <strong>bx</strong>_<strong>digital</strong> <strong>V2</strong> and the analog <strong>bx</strong>1 EQ.<br />
3. Overview and Details<br />
<strong>bx</strong>_<strong>digital</strong> <strong>V2</strong> now offers additional features that neither the original <strong>bx</strong>1 analog<br />
EQ nor the v1 plug-in offered.<br />
tt<br />
Details: see chapter 2.<br />
2. Features of the <strong>bx</strong>_<strong>digital</strong> <strong>V2</strong> mono:<br />
<strong>bx</strong>1:<br />
• 7-band mastering quality EQ with Shelving, Bell and Pass-Filters.<br />
• Auto Listen” Mode<br />
• Input and Output Gain to adjust levels<br />
• Filter section includes Lo-Shelving, Hi-Shelving, full-parametric<br />
Bell type, new „anti cruh“ Lo-Pass & Hi-Pass filters. All 7 bands<br />
have been adjusted in frequency-range and type-selection by<br />
international mix- and mastering engineers to help you get<br />
professional results for your mixes instantly.<br />
• New mouse wheel control (place the cursor above any knob and use the<br />
mouse wheel…)<br />
<strong>bx</strong>2:<br />
• 4 more EQ bands (in the Shifter EQs)<br />
• Image Shifters for your bass frequencies and high frequencies. Tune your<br />
lo-end and hi-end of your mix for a „bigger“ overall sound with „more air“<br />
at the same time and control potential harsh frequencies in your mixes.<br />
• De-Esser/dynamic EQs. Solo buttons let you listen to what you cut away<br />
separated from the mix.<br />
EQ-Panel:<br />
• shows up to 11 bands of EQ<br />
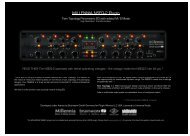
<strong>bx</strong>_<strong>digital</strong> <strong>V2</strong> mono - Screenshot<br />
3
x_<strong>digital</strong> <strong>V2</strong> mono manual<br />
3.1. EQ-Section<br />
3.2. Input Gain and Output Gain<br />
7 Bands, 5 of them with<br />
G (Gain),<br />
f (Frequency) and<br />
Q (Quality) pots,<br />
plus Hi-Pass and Lo-Pass filters<br />
• LF: switchable from shelving (1st order) to peak via Q-pot<br />
• LMF: peak<br />
• MF: peak<br />
• HMF: peak<br />
• HF: switchable from shelving (1st order) to peak via Q-pot<br />
• Lo-Pass: 1st order („anti crush“ anaog style filters)<br />
• Hi-Pass: 1st order („anti crush“ anaog style filters)<br />
• Gain In: Input Gain adjustment<br />
• Gain Out: Output Gain adjustment<br />
3.3. The Brainworx logos in the GUI<br />
3.4. Auto Listen, EQ on/off, Phase Reverse<br />
Click them to get credit info, release<br />
versions, etc.<br />
Please notice that each EQ band can be activated and bypassed (on/off) individually<br />
by clicking the labeled buttons.<br />
A bright name indicates ON.<br />
= off = on<br />
• EQ on/off:<br />
Here you can switch ALL EQ bands on or off, this will not bypass the<br />
De-Esser, though.<br />
tt<br />
If you need to bypass the whole <strong>bx</strong>_<strong>digital</strong> please use the dedicated Bypass<br />
switch in the top left corner or use your audio sequencer´s plug-in bypass.<br />
• Phase Reverse<br />
tt<br />
If you need to change the channel´s phase please use the phase reverse<br />
button. This can be very helpful when mixing drums, etc.<br />
4
x_<strong>digital</strong> <strong>V2</strong> mono manual<br />
• AUTO LISTEN MODE(s):<br />
One of the new features of <strong>bx</strong>_<strong>digital</strong> <strong>V2</strong> mono and a powerful tool to select<br />
proper center frequencies in audio material that is hard to judge (Tom<br />
Toms, Vocals, Bass sounds, etc.).<br />
• The AUTO LISTEN POP-UP MENU:<br />
When you click on the letters next to the blue Auto Listen LED a<br />
pop-up menu will appear. In this menu you may choose which Auto<br />
Solo Listening features you want to use. 3 different functions of<br />
each EQ band can be switched to Auto Listen Mode:<br />
tt<br />
Mouse wheel control:<br />
Notice that changing knobs using the mouse wheel (just place the cursor<br />
above any knob of <strong>bx</strong>_<strong>digital</strong> <strong>V2</strong> mono and turn the wheel!) will not engage<br />
the Auto Listen Mode. This is a nice way to avoid bypassing the Auto Listen<br />
Mode for small changes that you prefer to do without this mode.<br />
Whenever <strong>bx</strong>_<strong>digital</strong> boosts AUTO bands to +12 dB<br />
temporarily the overall output volume is always<br />
being controlled and adjusted intelligently to avoid<br />
clipping automatically!<br />
t t “Q f G” (initial setting):<br />
Will make <strong>bx</strong>_<strong>digital</strong> <strong>V2</strong> mono auto solo all EQ features each time you click<br />
on either a G (Gain), f (Frequency) or Q (Quality) knob.<br />
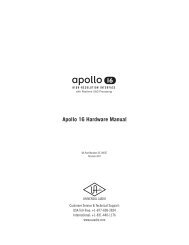
Auto listen “Q” with<br />
with<br />
positive gain<br />
Auto listen “Q”<br />
NEGATIVE gain<br />
t t “- f -”:<br />
For example will only enable the Auto Listen features for the f (Frequency)<br />
knobs, but not automate G & Q, and so on…<br />
AUTO LISTEN MODE “Q”<br />
AUTO LISTEN MODE “f”<br />
This auto listen mode will play a very steep (narrow) and inversed<br />
notch filter sound of the actual audio signal as long as you click a knob<br />
or grab a (touch sensitive) controller pot or fader.<br />
This auto listen mode will boost or cut the respective EQ band´s gain to either<br />
(+12dB with positive Gain settings and “zero”) or (-12dB with negative Gain<br />
settings) whenever the Q knob is being clicked or touched (via a touch sensitive<br />
controller). As soon as you release the EQ band´s Q knob the gain setting will<br />
jump back to the actual G (Gain) setting. Clipping is avoided automatically.<br />
Notice that the temporarily EQ setting of the AUTO LISTEN MODE is always<br />
being displayed in ORANGE color while the actual EQ band´s gain setting is still<br />
being displayed in RED color.<br />
tt<br />
This lets you hear the center frequency you are searching for exactly<br />
– and all this without the multiple mouse clicks or controller moves<br />
that needed to be done without the Auto Listen feature.<br />
Gain up to the max, Q to a very narrow setting, sweep through the<br />
frequencies, re-adjust the Q, re-adjust the gain, etc… you know what we´re<br />
talking about… :-)<br />
tt<br />
You HEAR the ORANGE setting when you see it.<br />
5
x_<strong>digital</strong> <strong>V2</strong> mono manual<br />
AUTO LISTEN MODE “G”<br />
This AUTO LISTEN MODE finally is pretty easy to explain… as long as you click a<br />
Gain knob (or grab a touch sensitive controller pot or fader) all other bands of<br />
that EQ will be bypassed. This way all you hear is the touched EQ band solo-ed,<br />
without other EQ bands eventually effecting / overlaying your EQ setting.<br />
This may or may not be wanted, so remember: you have the choice to activate<br />
or deactivate each and every AUTO feature (Q, f or G) or any combination of<br />
these 3 features using the Auto Listen pop up menu. (see -12- above)<br />
The Auto Listen Mode can be switched off using the blue LED.<br />
3.5. Window switch<br />
3.6. Level LEDs<br />
You may hide the graphic EQ curves if you want to save some screen<br />
space (we know <strong>bx</strong>_<strong>digital</strong> is not a small plug-in…), or if you simply prefer<br />
EQ-ing without seeing the EQ curves. Just click the “arrow” symbol.<br />
We have included a <strong>digital</strong> level control in <strong>bx</strong>_<strong>digital</strong> <strong>V2</strong> mono that the<br />
hardware does not have. Red LEDs indicate potentially distorted signals in<br />
the respective signal-path and should be avoided…<br />
3.7. Bass Shift<br />
The Bass Shift is an „intelligent“ EQ band for the bass<br />
frequencies of your mix. We call it Bass Shift because 2<br />
different frequencies will be „shifted“ against each other with<br />
the turn of just one knob. The frequencies have been pre-set<br />
and cannot be changed. If you are looking for a sweepable<br />
Bass- (and Presence-) Shifter please check out <strong>bx</strong>_hybrid<br />
(available individually).<br />
The Bass Shift EQ can be used to easily adjust the overall bass sound of your<br />
recordings in a professional yet easy & fast way… turning the Bass Shift to the<br />
right will „push“ your bass down one octave by boosting one part of your bass<br />
frequencies while at the same time cutting other (higher) bass frequencies.<br />
Turning the BASS SHIFT to the left will cause the opposite…<br />
tt<br />
Please check the EQ panels to actually see what you are doing when<br />
working with the Bass Shift!<br />
Turning your BASS SHIFT to the right will result in a more „indirect“ and „deep<br />
soft“ bass sound, while turning to the left will result in a „dryer“ bass sound.<br />
tt<br />
A lot of contemporary pop & rock productions can be enhanced with<br />
„phatter“ guitar / keys sounds by turning the Bass Shift to the right up to<br />
2 or 3, and the same setting will make your bass drums sound huge!<br />
3.8. Presence Shift<br />
A similar function to what the Bass Shift EQ does to your<br />
bass signals for the high end of your recordings.<br />
Turning the Presence Shift EQ to the right will put more „air“<br />
into your signals without making them harsh!<br />
6
x_<strong>digital</strong> <strong>V2</strong> mono manual<br />
tt<br />
The Presence Shift boosts frequencies above the ones that usually cause<br />
sibilance problems with voices.<br />
3.9. De-Esser<br />
The <strong>bx</strong>_<strong>digital</strong> De-Esser works with dynamic<br />
EQs that you can adjust to the needs of your<br />
mix. With the Solo button of the De-Esser<br />
section it is possible to listen to only the<br />
frequencies that you want to filter out of your<br />
mix.<br />
• Solo the De-Esser on the <strong>bx</strong>2 panel. Turn up the De-Esser knob until you<br />
start hearing some high frequencies. Adjust the frequency to be filtered<br />
with the „f DSR“ knob and set the De-Esser knob to a value where the<br />
De-Esser will deduct as many high frequencies as you need to be filtered<br />
out.<br />
• Use the De-Esser´s LEDs to control the De-Esser´s gain deduction.<br />
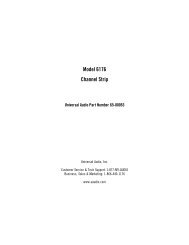
3.10. EQ-Panel<br />
The EQ panel show you all<br />
the EQ curves of <strong>bx</strong>_<strong>digital</strong><br />
<strong>V2</strong> mono. Unlike a lot of<br />
other EQ plug-ins we have<br />
not included any possibility<br />
to change your EQ settings<br />
via the graphic panel, and we<br />
did that on purpose.<br />
There are simply too many<br />
EQ-bands (if you keep in mind that the BASS SHIFT and PRESENCE SHIFT are<br />
displayed additionally to the 7 „regular“ EQ bands.<br />
Otherwise we feel that mixing, mastering and recording music (the main applications<br />
for <strong>bx</strong>_<strong>digital</strong>) is all about making cautious changes to your mix (unless<br />
the mix you work on was completely screwed up…), and when we tested<br />
<strong>bx</strong>_<strong>digital</strong> EQ-ing in the panels often led us to making pretty big changes very<br />
quickly.<br />
In the end we also wanted to give you the “feel“ of the hardware as authentically<br />
as possible, so we decided to make the EQ panel only a visual control tool for<br />
what you do with the knobs of the <strong>bx</strong>_<strong>digital</strong> – or your mouse:<br />
Mouse Wheel - Control:<br />
It is possible to use the mouse wheel to control all knobs of the EQ! Just place<br />
the cursor above any knob and turn the mouse wheel up or down… no clicking<br />
needed ever…<br />
This is also a very cool alternative when working with Auto Listen Modes. In<br />
case you want to make some changes using the Auto Listen Mode and some<br />
without just use the mouse wheel for the latter – and the Auto Listen Mode<br />
will not be engaged.<br />
tt<br />
Type in exact values:<br />
Please notice that it is also very easy to type in exact values to any<br />
parameter of the <strong>bx</strong>_<strong>digital</strong> by simply clicking on the text fields below each<br />
knob. This makes it particularly comfortable to tune your EQ-bands to<br />
certain frequencies.<br />
3.11. Bypass<br />
With the BYPASS button you can bypass the whole <strong>bx</strong>_<strong>digital</strong><br />
plug-in to compare your original mix and your corrections /<br />
improvements with the <strong>bx</strong>_<strong>digital</strong>.<br />
7
x_<strong>digital</strong> <strong>V2</strong> mono manual<br />
3.12. Settings (A/B/C/D)<br />
ENJOY WORKING WITH <strong>bx</strong>_<strong>digital</strong> <strong>V2</strong> mono!<br />
You can store up to 4 Settings of <strong>bx</strong>_<strong>digital</strong> <strong>V2</strong> without using the audio<br />
sequencer´s “Preset window” (most of them are not really fast and intuitive to<br />
use…).<br />
Start with one Setting (A by default), copy it to B (press “copy”, click B, click<br />
“Paste”, done!), then compare A and B. The same goes for C and D, of course.<br />
Also, you can Reset single Settings.<br />
Using Automation in mixing can be helpful to get the maximum out of your<br />
mixes. Maybe your mix needs different EQ-settings for various parts of the<br />
song?<br />
Settings are the way to go…<br />
tt<br />
Presets: (in your audio sequencer host program)<br />
It´s still a good and professional idea to store one preset for every song<br />
that you mix, even if you use settings, maybe even make folders for certain<br />
projects, albums, etc.<br />
All 4 Settings of <strong>bx</strong>_<strong>digital</strong> <strong>V2</strong> mono will be stored with each preset!<br />
This way you can easily recall any preset you made to change settings after<br />
you checked your mixes on other stereo systems (outside the studio).<br />
Keep in mind: if YOU don´t do it…. your customers WILL! :-)<br />
3.13. <strong>Manual</strong> & Help<br />
Press <strong>Manual</strong> to open the PDF version of the manual<br />
which will be saved on your computer during installation.<br />
Help will open a small splash screen in the plug-in window with links to help<br />
resources.<br />
Hitdorfer Straße 10<br />
40764 Langenfeld<br />
Germany<br />
info@brainworx-music.de<br />
www.brainworx-music.de<br />
www.brainworx-usa.com<br />
8