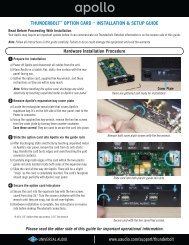
Softube Bass Amp Room Manual
Softube Bass Amp Room Manual
Softube Bass Amp Room Manual

Create successful ePaper yourself
Turn your PDF publications into a flip-book with our unique Google optimized e-Paper software.
User <strong>Manual</strong><br />
<strong>Bass</strong> <strong>Amp</strong> <strong>Room</strong><br />
User <strong>Manual</strong> for Version 1.3.15<br />
Rev. Jan 10, 2013
<strong>Softube</strong> User <strong>Manual</strong><br />
© 2007-2013. <strong>Amp</strong> <strong>Room</strong> is a registered trademark of <strong>Softube</strong> AB, Sweden. <strong>Softube</strong> is a registered<br />
trademark of <strong>Softube</strong> AB, Sweden. All visual and aural references to the Valley People Dyna-mite, Trident<br />
A-Range, Tonelux and Tilt are trademarks being made with written permission from PMI Audio. The<br />
Tonelux and Tilt logo, the Valley People, Dyna-mite and associated logos, and the Trident, A-Range and<br />
Triangle logo are trademarks of PMI Audio Group, used under license. Tube -Tech is a registered trademark<br />
of Lydkraft ApS, Denmark. All specifications subject to change without notice. All Rights Reserved.<br />
Other company and product names mentioned herein are trademarks of their respective companies. Mention<br />
of third-party products is for informational purposes only and constitutes neither an endorsement<br />
nor a recommendation. <strong>Softube</strong> assumes no responsibility with regard to the performance or use of these<br />
products.<br />
<strong>Softube</strong> products are protected by patents SE526523 and SE525332, and related patents/patent applications,<br />
including WO06054943, US11/667360, US2004 0258250, EP1492081, EP1815459, and<br />
JP2004 183976.<br />
Your rights to the software are governed by the accompanying software license agreement (End User License<br />
Agreement).<br />
Disclaimer<br />
Every effort has been made to ensure that the information in this manual is accurate. However, there are a<br />
chance that we have made mistakes, and we hope that you understand that we are only humans. Please let<br />
us know about the mistake, and we’ll fix it in the mix (or in the next version of this manual).<br />
Support<br />
On the <strong>Softube</strong> website (www.softube.com) you will find answers to common questions (FAQ) and other<br />
topics that might interest you.<br />
Support questions can be posted at http://www.softube.com, where we will help you as fast as we can!<br />
Web: www.softube.com<br />
E-mail: info@softube.com<br />
Phone: +46 13 21 1623 (9 am – 5 pm CET)
SOFTUBE USER’S GUIDE | iii<br />
Contents<br />
1 User Interface 5<br />
Menu Row. . . . . . . . . . . . . . . . . . . . . . . 5<br />
Key Commands. . . . . . . . . . . . . . . . . . . . 6<br />
2 <strong>Bass</strong> <strong>Amp</strong> <strong>Room</strong> 7<br />
Introduction . . . . . . . . . . . . . . . . . . . . . . 7<br />
User Interface. . . . . . . . . . . . . . . . . . . . . 8<br />
The <strong>Amp</strong>lifier. . . . . . . . . . . . . . . . . . . . . 9<br />
The Cabinets. . . . . . . . . . . . . . . . . . . . . 10<br />
The Mix Panel. . . . . . . . . . . . . . . . . . . . 11<br />
Bypassing <strong>Amp</strong>s or Cabs. . . . . . . . . . . . . . . 12<br />
Block Diagram. . . . . . . . . . . . . . . . . . . . 13<br />
Buying Recommendations. . . . . . . . . . . . . . 14<br />
Credits. . . . . . . . . . . . . . . . . . . . . . . 14
iv | Table of Contents
| 5<br />
1<br />
User Interface<br />
<strong>Softube</strong> plug-ins are “what you see is what you<br />
get” products. You should be able to intuitively learn<br />
the products within minutes, so that you can work<br />
fast and efficient with them. There are a couple of<br />
things that remain the same for all of our plug-ins,<br />
such as the menu row. These will be explained in<br />
this chapter. For detailed information of a particular<br />
plug-in, please see its chapter.<br />
Menu Row<br />
In the bottom of the plug-in interface, you will see<br />
a thin black row with some buttons. We’ll use the<br />
Dyna-mite plug-in as example, but the same goes<br />
for all plug-ins.<br />
About Box Opens the “About” Box with<br />
version info.<br />
Value Display Displays the knob value when<br />
the mouse is hovering over a<br />
control.<br />
Enable<br />
Enable Enable/Activate the plug-in.<br />
Set to off for bypass.<br />
Setup Changes global options for all<br />
instances of that plug-in.<br />
When the Enable switch is set to on (I), the plugin<br />
is active and will process audio. When set to off<br />
(0), it will be bypassed and not process any audio. It<br />
will take considerably less CPU when it is bypassed.<br />
“About” Box<br />
Value Display<br />
Enable<br />
Setup
6 | USER INTERFACE<br />
Setup<br />
In the Setup window you can change settings that<br />
will affect all instances of that particular plug-in. If<br />
you for example de-select the “Show Value Display”<br />
option in the <strong>Bass</strong> <strong>Amp</strong> <strong>Room</strong> plug-in the value<br />
display will be off for all <strong>Bass</strong> <strong>Amp</strong> <strong>Room</strong>s on your<br />
system until you select that option again.<br />
The different options vary between Windows and<br />
Mac, and also different formats and plug-ins. The<br />
most common options are:<br />
Show Value Display: Enables the parameter and<br />
value display in the bottom row of the plug-in.<br />
Reverse Mouse Wheel Direction: (Mac OS<br />
Only) Changes if the a knob is turned up or down<br />
when the mouse wheel is turned up or down. (Mac<br />
OS Only)<br />
You need to restart your host software (DAW) before the<br />
changes to fully take effect!<br />
If you messed something up and manually need to<br />
set these options, you’ll find them in text format in<br />
the following locations:<br />
Mac OS: ~/Library/Application Support/<br />
<strong>Softube</strong><br />
Windows: username\Application Data\<br />
Key Commands<br />
All numbers and labels in the plug-in are clickable.<br />
This allows you to easy select a setting by clicking<br />
on the wanted value. Hovering above a label will<br />
turn the mouse pointer into a pointing hand.<br />
Mouse<br />
Keyboard<br />
Up/Down or<br />
Mouse Wheel Change a parameter, such as a<br />
knob or a switch.<br />
Fine Adjust ⌘ (Mac) or Ctrl (Win),<br />
while changing the parameter<br />
value.<br />
Reset to Default Alt, while clicking on the<br />
knob or fader.<br />
Plug-In Specific Key Commands<br />
In many plug-ins, you can shift-click on a knob or<br />
a switch to get some extra functionality<br />
Metal <strong>Amp</strong> <strong>Room</strong><br />
Shift-click and drag a mic will move both mics<br />
simultaneously.<br />
All <strong>Amp</strong> <strong>Room</strong>s<br />
Shift-click in the cabinet background will change<br />
cabinet (or amp) without any animations
| 7<br />
2<br />
<strong>Bass</strong> <strong>Amp</strong> <strong>Room</strong><br />
Introduction<br />
WHEN WE DESIGNED BASS AMP ROOM we had<br />
two goals in mind. The first goal was to give the user<br />
the best possible sound quality and state- of- the- art<br />
physical modeling. The other, equally important goal<br />
was to give the user a plug in that was intuitive and<br />
allowed for a really fast work flow. Time is money,<br />
but cutting down on time shouldn’t have to mean<br />
that you need to accept poor results. At least not<br />
with <strong>Bass</strong> <strong>Amp</strong> <strong>Room</strong>. And having an amp model<br />
that behaves just like the real thing will definitely<br />
speed up the work process, since you probably<br />
already know how to use it.<br />
In short, you need the same<br />
skills to master this software<br />
as you need when dealing with<br />
the real studio set up. You can<br />
get back to doing what you do<br />
best, because music production<br />
should be about using your ears,<br />
not your computer skills.<br />
WE HAVE IMAGINED TWO<br />
TYPES OF USERS. The first<br />
wants the best possible amp<br />
modeling and is willing to<br />
spend time tweaking the sound<br />
of each bass track. By working<br />
the mics, amp and D.I. tone<br />
controls, and, perhaps most<br />
importantly, the blend between<br />
the D.I. and amp, this user gets<br />
full control over the sound without ever losing it’s<br />
authenticity.<br />
The second user is one who, just like the previous<br />
user, wants the best possible amp modeling, but recognizes<br />
the fact that he/she cannot spend too much<br />
time tweaking it. That is why we have, for example,<br />
only a single tone control knob on the D.I. and a<br />
one- knob limiter. Don’t be fooled by the simplicity,<br />
however; you still have the ability to create a unique<br />
signature sound. The strength lies in the very easy<br />
individual blocks (the amp, the D.I., the cabs and<br />
mics) and the ability to mix and match between<br />
them.
8 | BASS AMP ROOM<br />
User Interface<br />
Apart from a good sound, work flow is a crucial<br />
element of our design – the amps and mics should<br />
work just as they do in a real studio. We have tried<br />
to imi tate this as much as it is possible in a computer<br />
environment, and if you have experience working<br />
in real studios, you will notice that <strong>Bass</strong> <strong>Amp</strong> <strong>Room</strong><br />
handles and sounds just the way you expect it to.<br />
<strong>Amp</strong> Panel (Top Area)<br />
In the <strong>Amp</strong> Panel, you can alter the settings of the<br />
amp by clicking the knob and dragging the mouse<br />
up and down, or left to right. Switches can be<br />
switched either by clicking on them, or by click and<br />
dragging the mouse. In some hosts you can change<br />
the behavior of the mouse, but the default behavior<br />
of <strong>Bass</strong> <strong>Amp</strong> <strong>Room</strong> is the one described above.<br />
<strong>Room</strong> View (Middle Area)<br />
In the <strong>Room</strong> View you can do two things: select the<br />
other cabinet or change the mic’s position.<br />
Clicking on the background while holding the Shift- key<br />
toggles through the cabs without any sliding animations.<br />
Mix Panel (Bottom Area)<br />
In the mix panel, you can change the balance between<br />
the amplifier signal and the D.I. signal. The<br />
tonality of the D.I. signal can be changed with the<br />
three EQ knobs and the compressor/limiter. You<br />
can also change the phase of the amplifier signal<br />
and adjust the output volume.<br />
<strong>Amp</strong> Panel<br />
<strong>Room</strong> View<br />
Mic Position<br />
When the mouse is located over a mic stand, the<br />
mouse pointer changes to an “up down” arrow and<br />
the mic gets a copper/goldish glow. Click -and- drag<br />
the mouse up or down to change the position of the<br />
mic stand. The microphone moves along a predetermined<br />
path, so you only need to move the mouse up<br />
or down, not to the left or right.<br />
Cabinet Selection<br />
You can change the cabinet by clicking on the<br />
background and dragging the mouse to the left or<br />
right. The mouse pointer becomes a “left -right”-<br />
arrow when you are pointing at the background to<br />
indicate that it is possible to change cabinet.<br />
DI and Mix Panel
SOFTUBE USER’S GUIDE | 9<br />
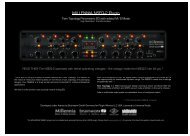
High/Low Normal Volume <strong>Bass</strong> Middle<br />
Treble Master Volume<br />
The <strong>Amp</strong>lifier<br />
The amplifier that we chose to model is actually a<br />
guitar amplifier, but because of its very characteristic<br />
“non- fizzy” distortion and special sounding tone<br />
stack, it’s been very popular among bass players during<br />
the last decades. When the High/Low switch is<br />
set to HIGH, the amplifier will work and act just like<br />
the real thing. The LOW mode is the same amplifier<br />
with a slightly different input stage, one which<br />
lowers the input gain a little bit while adding some<br />
warmth to the signal. The LOW mode gives you a fat<br />
bass sound without too much distortion.<br />
Use the two “volume” controls as a means of dialing in<br />
the right amount of distortion, not to change the actual<br />
volume. More Normal Volume gives you greater<br />
preamp distortion, and more Master Volume gives<br />
you greater power amp distortion.<br />
High/Low Use this switch to select either<br />
the attenuated channel (LOW)<br />
or the regular channel (HIGH).<br />
the amount of distortion you<br />
want.<br />
<strong>Bass</strong>, Middle, Treble These knobs are the tone controls<br />
of the amplifier. A common<br />
setting is <strong>Bass</strong> on full,<br />
Middle on min, and Treble<br />
somewhere in between.<br />
Master Volume Adjusts the amount of power<br />
amp distortion. With a massive<br />
amount of Master and<br />
Normal Volume, the amp will<br />
start sound like it’s about to<br />
break. Unless you really want<br />
that kind of distortion you’ll<br />
find that a Master Volume<br />
at 12 o’clock will suit most of<br />
your needs.<br />
Master Volume won’t distort much unless you<br />
increase the Normal Volume. Just like the real amp.<br />
Normal Volume This knob controls the amount<br />
of preamp distortion, and is<br />
usually called “Gain” on more<br />
modern amps. Use it to dial in
10 | BASS AMP ROOM<br />
The Cabinets<br />
Click and drag left/right on the background to<br />
change cabinets.<br />
Positioning the Mic<br />
By changing the mic position, you can get lots of<br />
different sounds from a single cabinet. How the<br />
sound changes depends on the cabinet and the<br />
room, but there are some common features for all<br />
the cabs in <strong>Bass</strong> <strong>Amp</strong> <strong>Room</strong>:<br />
Close Off Axis: The position with most bass and<br />
the least amount of highs.<br />
Close On Axis: Moving the mic towards the onaxis<br />
position will gradually give you more highs and<br />
a more pronounced mid. Usually the most “focused”<br />
sound.<br />
8x10<br />
The industry standard 8x10” doesn’t need much<br />
presentation. With a fat sound and lots of low end,<br />
this is the go to cabinet for many bass players.<br />
4x12<br />
The regular 4x12” cabinet is preferred by many bass<br />
players over the industry standard 8x10”. It has a<br />
more focused sound than the 8x10”, and although<br />
it’s a bit thinner than the 8x10”, it is often easier to<br />
work with in a mix.<br />
Far Field: Moving away from the cabinet will<br />
give you more room ambiance and often (but not<br />
always) a thinner sound.<br />
If you find that the selection of cabinets isn’t enough<br />
for you, you can always bypass the cabinet in <strong>Bass</strong> <strong>Amp</strong><br />
<strong>Room</strong> and use the cabinets from one of our other <strong>Amp</strong><br />
<strong>Room</strong> plug ins (with the amp modeling bypassed).<br />
1x12<br />
This is the odd bird among the cabinets. While<br />
trying out cabinets for <strong>Bass</strong> <strong>Amp</strong> <strong>Room</strong>, we felt<br />
that we needed to listen to something completely<br />
different just to clear our minds. We found this old<br />
open back 1x12”, plugged it in, and immediately<br />
fell in love with the sound. Some sort of ‘60s sound<br />
with lots of room. And you can dial in more low<br />
end if you need it just by moving the mic more to<br />
the off axis position.
SOFTUBE USER’S GUIDE | 11<br />
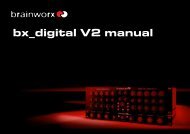
Low Cut Tone High Cut Limiter<br />
DI/<strong>Amp</strong> Balance<br />
Output Volume<br />
The Mix Panel<br />
SO, WHAT ELSE DO YOU NEED EXCEPT a good<br />
sounding amp? Since a lot of engineers and producers<br />
prefer to work with both the raw D.I. signal and<br />
the mic:ed signal (using the amp signal for character<br />
and the D.I. signal for focus or low end), we decided<br />
to incorporate that work flow into <strong>Bass</strong> <strong>Amp</strong><br />
<strong>Room</strong>. But instead of having two tracks (one with<br />
the microphone signal and one with the direct bass<br />
line), you can easily blend the two signals directly in<br />
<strong>Bass</strong> <strong>Amp</strong> <strong>Room</strong>. And, to make life easier, we added<br />
a couple of very powerful tone controls and a stateof<br />
the art single knob compressor in the D.I. section.<br />
That way you will be able to get a really good bass<br />
sound just by using the D.I!<br />
Direct Inject (D.I.) Knobs<br />
Low Cut A 12dB/octave low cut filter.<br />
This control is intended for<br />
filtering out unwanted frequencies,<br />
but can, of course,<br />
be used more creatively. Keep<br />
increasing the knob until you<br />
cannot hear any difference in<br />
the sound. When you start to<br />
Solo DI<br />
Solo <strong>Amp</strong><br />
Phase Invert (<strong>Amp</strong>)<br />
lose the low end, stop and go<br />
back a couple of millimeters<br />
(yes, we are metric).<br />
High Cut Same as the Low Cut, but for<br />
high frequencies.<br />
Tone When this knob is set at<br />
12 o’clock (FLAT), it doesn’t<br />
change the sound at all. Turning<br />
it clockwise will give you a<br />
fatter and more scooped sound<br />
much like the tone stack in the<br />
amplifier. Turning it counterclockwise<br />
will give you a sound<br />
with lots of mid.<br />
Changing the Low Cut and High Cut will drastically<br />
change the characteristics of the Tone knob.<br />
Technically speaking, the center frequencies of the Tone<br />
knob filters will change when you change the bandwidth<br />
(the settings of Low and High Cut combined).<br />
Limiter Use the limiter to increase the<br />
amount of compression. This<br />
function can, for instance, be
12 | BASS AMP ROOM<br />
used to limit the peaks of the<br />
D.I. signal, and would then<br />
be set somewhere around 12<br />
o’clock, depending on the level<br />
of the input signal. With a<br />
higher setting you will get a<br />
longer sustain on each note.<br />
makes a big difference to the<br />
sound.<br />
Phase invert! If you have the balance fader somewhere<br />
in the middle, you should make it a habit to toggle the<br />
Phase Invert switch. It can make a huge difference<br />
to the sound.<br />
Mix Knobs<br />
Limiter LED The LED on the top right of<br />
the Limiter knob indicates<br />
when the limiter is working<br />
(like a gain reduction meter).<br />
D.I./<strong>Amp</strong> Balance This fader sets the balance<br />
between the D.I. signal and<br />
the amp signal. Use the Solo<br />
knobs to audition each channel<br />
(post fader).<br />
Solo Click the Solo texts to solo<br />
either the Direct Inject channel<br />
or the <strong>Amp</strong>lifier (and<br />
cabinet) channel. You can only<br />
solo one channel at a time, so<br />
by soloing one channel you automatically<br />
un -solo the other<br />
channel.<br />
Phase Invert (<strong>Amp</strong>) Inverts the phase of the amp<br />
signal. Changing the relative<br />
phase between the D.I. signal<br />
and amp signal will often<br />
completely change the sound.<br />
If you have a hard time trying<br />
to find a good blend between<br />
the two signals, try flipping<br />
the Phase Invert. It usually<br />
Output Sets the output volume. It goes<br />
from 32 dB to +32 dB, except<br />
at the minimum position<br />
where it turns off the output<br />
signal completely.<br />
Output Peak LED The Output Peak LED indicates<br />
when the output signal<br />
peaks at 0 dBFS. <strong>Bass</strong> <strong>Amp</strong><br />
<strong>Room</strong> will not clip the peaks,<br />
it is only an indication.<br />
Bypassing <strong>Amp</strong>s or Cabs<br />
You can choose to bypass the amp or the cabinet<br />
by selecting amp bypass or cab bypass from the<br />
small box in the lower right corner.<br />
This is very useful if you want to use <strong>Bass</strong> <strong>Amp</strong><br />
<strong>Room</strong> with an external speaker (or speaker plug in)<br />
or if you just want to add a cabinet simulation to a<br />
track, such as a recorded line out from your amplifier.<br />
This will not bypass the D.I. section, since that can<br />
be easily done by setting the D.I./<strong>Amp</strong>lifier Fader<br />
all the way to the right (on AMPLIFIER).<br />
By bypassing the cabinets in <strong>Bass</strong> <strong>Amp</strong> <strong>Room</strong>, you can<br />
use the cabinets from the other <strong>Amp</strong> <strong>Room</strong> plug ins. Just<br />
insert, for example, Metal <strong>Amp</strong> <strong>Room</strong> (with bypassed<br />
amplifier) on the track after <strong>Bass</strong> <strong>Amp</strong> <strong>Room</strong> (with a<br />
bypassed cabinet).
SOFTUBE USER’S GUIDE | 13<br />
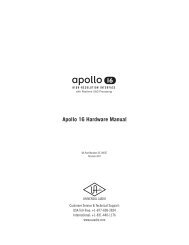
Block Diagram<br />
The bass signal (Main Input) is split up into two<br />
identical signals, one that goes to the amp (top section)<br />
and one to the D.I. (bottom section). The two<br />
signals are mixed with the D.I./<strong>Amp</strong> Balance fader.<br />
HIGH/LOW,<br />
NORMAL VOLUME,<br />
BASS, MIDDLE, TREBLE,<br />
MASTER VOLUME<br />
CAB SWITCH,<br />
MIC POSITION<br />
PHASE INVERT<br />
AMPLIFIER<br />
CABINET<br />
PHASE<br />
INVERT<br />
MAIN INPUT BYPASS AMP BYPASS CAB<br />
MAIN OUTPUT<br />
DI<br />
LIMITER<br />
DI<br />
TONE CTRL<br />
D.I./AMP BALANCE<br />
SOLO BUTTONS<br />
OUTPUT<br />
VOLUME<br />
LIMITER<br />
LOW CUT,<br />
HIGH CUT,<br />
TONE
14 | BASS AMP ROOM<br />
Buying Recommendations<br />
If you like the sound from <strong>Bass</strong> <strong>Amp</strong> <strong>Room</strong> and<br />
would like to get that sound using the real deal (let’s<br />
face it, a real amp is always sexier than a plug -in),<br />
here are some buying recommendations.<br />
<strong>Amp</strong>lifier<br />
If you like this characteristic fat distortion and<br />
scooped- out tone stack, I would suggest that you<br />
get a two -channel Hiwatt DR 103 from the late<br />
‘70s/early ‘80s.<br />
Credits<br />
Niklas Odelholm – modeling and sound design.<br />
Oscar Öberg – compressor modeling, framework<br />
programming. Torsten Gatu – interface programming.<br />
Arvid Rosén – framework programming. Ulf<br />
Ekelöf – 3D rendering.<br />
Cabinets and Mic<br />
The leftmost cabinet was modeled after the industry<br />
standard of bass cabinets: the <strong>Amp</strong>eg 8x10”<br />
SVT810. If you like the 4x12 sound, I’d suggest that<br />
you try out a couple of different 4x12s, because we<br />
have absolutely no clue what kind of 4x12 we measured.<br />
It sounded excellent, had no labels on, and<br />
wasn’t for sale... The small cabinet was a half- open<br />
1x12” cabinet with a Celestion 20W/15ohm driver.<br />
But you will also need a good sounding mic to get a<br />
good bass sound, and in our opinion nothing beats<br />
the Sennheiser MD421!<br />
D.I. and Mix Panel<br />
The tone controls of the D.I. and limiter was made<br />
by us and have no hardware counterpart.<br />
<strong>Room</strong><br />
If you like the sound of the room, make sure to<br />
schedule a session at Care Of Sound in Norrköping.<br />
Brand names are trademarks or registered<br />
trademarks of their respective<br />
owners.
<strong>Softube</strong> AB, S:t Larsgatan 10c, 582 24 Linköping, Sweden. www.softube.com