Installation & Setup Guide - Universal Audio
Installation & Setup Guide - Universal Audio
Installation & Setup Guide - Universal Audio

You also want an ePaper? Increase the reach of your titles
YUMPU automatically turns print PDFs into web optimized ePapers that Google loves.
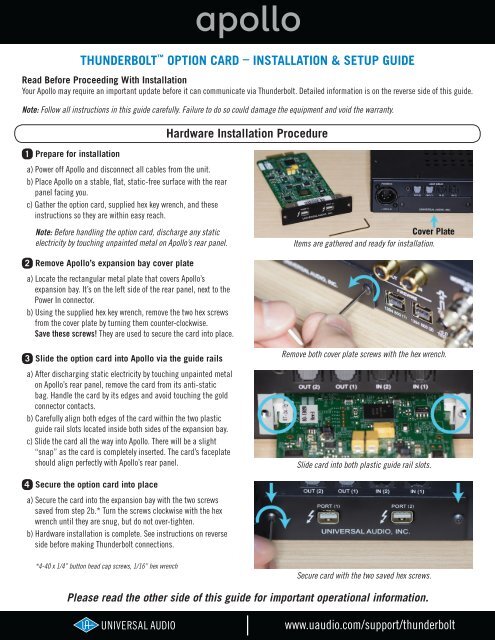
THUNDERBOLT OPTION CARD – INSTALLATION & SETUP GUIDE<br />
Read Before Proceeding With <strong>Installation</strong><br />
Your Apollo may require an important update before it can communicate via Thunderbolt. Detailed information is on the reverse side of this guide.<br />
Note: Follow all instructions in this guide carefully. Failure to do so could damage the equipment and void the warranty.<br />
Hardware <strong>Installation</strong> Procedure<br />
1 Prepare for installation<br />
a) Power off Apollo and disconnect all cables from the unit.<br />
b) Place Apollo on a stable, flat, static-free surface with the rear<br />
panel facing you.<br />
c) Gather the option card, supplied hex key wrench, and these<br />
instructions so they are within easy reach.<br />
Note: Before handling the option card, discharge any static<br />
electricity by touching unpainted metal on Apollo’s rear panel.<br />
Items are gathered and ready for installation.<br />
2<br />
Remove Apollo’s expansion bay cover plate<br />
a) Locate the rectangular metal plate that covers Apollo’s<br />
expansion bay. It’s on the left side of the rear panel, next to the<br />
Power In connector.<br />
b) Using the supplied hex key wrench, remove the two hex screws<br />
from the cover plate by turning them counter-clockwise.<br />
Save these screws! They are used to secure the card into place.<br />
3<br />
Slide the option card into Apollo via the guide rails<br />
a) After discharging static electricity by touching unpainted metal<br />
on Apollo’s rear panel, remove the card from its anti-static<br />
bag. Handle the card by its edges and avoid touching the gold<br />
connector contacts.<br />
b) Carefully align both edges of the card within the two plastic<br />
guide rail slots located inside both sides of the expansion bay.<br />
c) Slide the card all the way into Apollo. There will be a slight<br />
“snap” as the card is completely inserted. The card’s faceplate<br />
should align perfectly with Apollo’s rear panel.<br />
Remove both cover plate screws with the hex wrench.<br />
Slide card into both plastic guide rail slots.<br />
4<br />
Secure the option card into place<br />
a) Secure the card into the expansion bay with the two screws<br />
saved from step 2b.* Turn the screws clockwise with the hex<br />
wrench until they are snug, but do not over-tighten.<br />
b) Hardware installation is complete. See instructions on reverse<br />
side before making Thunderbolt connections.<br />
*4-40 x 1/4” button head cap screws, 1/16” hex wrench<br />
Secure card with the two saved hex screws.<br />
Please read the other side of this guide for important operational information.<br />
www.uaudio.com/support/thunderbolt
IMPORTANT! Visit the Thunderbolt support page for the latest software & information:<br />
www.uaudio.com/support/thunderbolt<br />
Connecting Apollo to the computer<br />
• Connect Apollo to the computer with a standard Thunderbolt cable (not included) in either option card port.<br />
• See the Thunderbolt support page for details about connecting multiple Thunderbolt devices together and connecting Thunderbolt while<br />
devices are powered. Instructions may vary depending on the device(s) and the computer’s operating system.<br />
Avoid these Apollo connections<br />
• Don’t connect Apollo to the computer with Thunderbolt and FireWire simultaneously. Use only one cable to connect to the host computer.<br />
• Don’t connect Apollo to more than one computer simultaneously. This applies to both Thunderbolt and/or FireWire connections.<br />
• Don’t connect Thunderbolt devices to Apollo while FireWire is used for Apollo’s computer connection.<br />
Quit audio software before disconnecting Apollo<br />
• Important: To avoid software errors, quit all audio software applications that are using Apollo and/or UAD Powered Plug-Ins before<br />
disconnecting Apollo from the computer.<br />
FireWire connections with Thunderbolt<br />
Before Connecting the Thunderbolt Option Card<br />
Apollo updates may be required via FireWire to enable Thunderbolt connectivity<br />
• Apollo units with older firmware require a firmware update. This update must be performed while connected via FireWire. Subsequent<br />
updates can be applied via Thunderbolt.<br />
• The required firmware is in the latest UAD Powered Plug-Ins installer. To enable Thunderbolt on these earlier units, follow the update<br />
instructions below. Connect Apollo to the computer via FireWire instead of Thunderbolt for the initial update. If Apollo is not recognized<br />
while connected to the computer via Thunderbolt, perform this update via FireWire.<br />
Update Apollo using the latest UAD Powered Plug-Ins installer<br />
• After connecting Apollo to the computer and powering it on, install the latest version of UAD Powered Plug-Ins software. The latest<br />
software installer is available on our website via the Thunderbolt support page: www.uaudio.com/support/thunderbolt<br />
• Update Apollo’s firmware if prompted by the UAD software. If a firmware update is performed, turn down any connected speakers then<br />
power off and power on Apollo. After power cycling, Apollo is ready to be used with Thunderbolt.<br />
About Thunderbolt Connections<br />
Using Apollo with Thunderbolt<br />
• While Apollo is connected to the computer via Thunderbolt, Apollo’s FireWire ports remain active and they can be connected to FireWire<br />
peripheral devices such as UAD-2 Satellite and hard drives. Note that Apollo’s FireWire ports do not supply bus power.<br />
Detailed operational instructions and updated technical information<br />
• This guide contains only basic information to get started with the Thunderbolt Option Card. Please see the Thunderbolt support page for<br />
the latest instructions about installing and using Apollo with Thunderbolt: www.uaudio.com/support/thunderbolt<br />
Technical Support<br />
Telephone Support<br />
USA toll-free: +1-877-MY-UAUDIO (1-877-698-2834)<br />
International: +1-831-440-1176<br />
(9am to 5pm, Monday through Friday, Pacific Standard Time)<br />
Online Support<br />
For support via email, visit the Thunderbolt support page at<br />
www.uaudio.com/support/thunderbolt then click the “Submit Support<br />
Ticket” button on the right side of the page to create a help request.<br />
©2012 <strong>Universal</strong> <strong>Audio</strong>, Inc. All rights reserved worldwide. The “<strong>Universal</strong> <strong>Audio</strong>” name, UA “diamond” logo, “Apollo,” “UAD-2,” UAD-2 logo, and “Powered<br />
Plug-Ins,” are trademarks or registered trademarks of <strong>Universal</strong> <strong>Audio</strong>, Inc. “Thunderbolt” and the Thunderbolt logo are trademarks of Intel Corporation in<br />
the U.S. and/or other countries. All other products and trademarks herein are the property of their respective owners. UAD Plug-Ins sold separately.<br />
65-40494-Art Rev 1