AMT P-1 Manual English Ver - AMT Electronics
AMT P-1 Manual English Ver - AMT Electronics
AMT P-1 Manual English Ver - AMT Electronics

Create successful ePaper yourself
Turn your PDF publications into a flip-book with our unique Google optimized e-Paper software.
Contents<br />
Important instructions 1<br />
Complete set 1<br />
Introduction 2<br />
Before you start 2<br />
Specifications 2<br />
Controls 3<br />
Top panel 3<br />
Right panel 3<br />
Only for qualified service personnel 3<br />
Batteries installation 3<br />
Audio connections and switching 3<br />
Audio connections (1-channel preamp) 3<br />
Audio connections (2-channel preamp) 3<br />
Audio connections (4-channel preamp) 4<br />
Block diagram 4<br />
Safety precautions.<br />
CAUTION! There are no user serviceable parts inside. Repair of the device<br />
can be carried out only by qualified experts. If the device is not used it must be<br />
disconnected from mains.<br />
WARNING! In order to avoid fire or electric shock the device must not be<br />
exposed to rain or moisture. Do not let water or other liquid get inside the device.<br />
Do not place vessels such as vases filled with liquid on top of the device.<br />
This symbol indicates important information related to the<br />
device maintenance and servicing contained in the<br />
accompanying documentation.<br />
Please read the instruction manual very carefully.<br />
1. Keep the user's guide at hand.<br />
2. Pay attention to warnings.<br />
3. Follow all instructions related to device operation.<br />
4. To clean the device, use only a dry cloth having<br />
disconnected the device from mains prior to that.<br />
5. Do not place the device near heat sources, keep it from<br />
direct sunlight.<br />
6. Lay the mains cable so that it is not stepped on and avoid its<br />
contact with sharp corners, etc. If you use the plug or outlet<br />
for switching the device off they should be easily accessible.<br />
7. Use only additional devices and accessories recommended<br />
by the manufacturer.<br />
8. Disconnect the device from mains in case of thunder-storm<br />
or when the device is not in use for prolonged time.<br />
9. All works related to the device repair must be done only by<br />
qualified service personnel.<br />
10. WARNING! All service instructions are intended only for<br />
qualified personnel in order to avoid electric shock; do not<br />
carry out any repair works which are not described in the<br />
instruction manual. Repair works must be carried out only by<br />
qualified experts.<br />
IMPORTANT INSTRUCTIONS!<br />
NON-OBSERVANCE OF THE FOLLOWING INSTRUCTIONS CAN CAUSE<br />
DAMAGE OF THE DEVICE. THE DAMAGES RESULTED BY NON-<br />
OBSERVANCE OF THESE INSTRUCTIONS MAKE THE WARRANTY VOID.<br />
‣ After transportation or storage of the product under<br />
negative temperatures, before switching the device on it is<br />
necessary to leave the device under room temperature in<br />
its original package for AT LEAST 2 hours!<br />
‣ To connect the guitar preamp to other devices use only the<br />
cables intended for such connections.<br />
‣ You must not use other cables types such as speaker, etc.<br />
SWITCHING ON the guitar preamp:<br />
‣ Switch the device on ONLY AFTER YOU HAVE DONE all<br />
audio connections!<br />
‣ Before connecting the preamp to mains make sure that the<br />
case, the connecting cable and the of the power adapter<br />
have no damages such as cuts, cracks, dents, etc. and are<br />
operational.<br />
‣ To switch the preamp on first insert the low-voltage<br />
connector of the power adapter into corresponding jack on<br />
the rear panel of the guitar preamp and only then plug the<br />
adapter into the mains outlet.<br />
SWITCHING OFF the guitar preamp:<br />
‣ To switch the preamp off first disconnect the power<br />
adapter from mains and then disconnect its low-voltage<br />
connector from the jack on the rear panel of the guitar<br />
preamp.<br />
COMPLETE SET<br />
The complete set includes:<br />
1. The guitar preamp 1<br />
2. Instruction manual 1<br />
3. Packaging 1<br />
4. Warranty card 1<br />
www.amtelectronics.com<br />
www.amtelectronics.com<br />
1 1
INTRODUCTION<br />
Legend Amps P-1 GUITAR PREAMP is intended for studio recording and live<br />
shows.<br />
“<strong>AMT</strong> Legend Amps” is a novelty revolutionary series of 1-<br />
channel JFET preamps from <strong>AMT</strong> <strong>Electronics</strong> based on the<br />
completely new approach to the guitar sound shaping.<br />
The new series of guitar preamps is based on the technology using analog<br />
modeling of physical processes occurring in the real vacuum triode during guitar<br />
signal limitation.<br />
It was realized due to the use of original circuitry design.<br />
The overdrive channels construction corresponds to the processes occurring in<br />
real tube-based devices.<br />
Thanks to that we achieved formation of limitation, dynamics and range similar to<br />
popular tube amplifiers.<br />
While having minimum size and power consumption inherent in semi-conductor<br />
elements, the effects of <strong>AMT</strong> Legend amps series possess a number of unique<br />
properties characteristic to authentic tube preamps and amplifiers:<br />
The preamps of <strong>AMT</strong> Legend Amps series provide great playing dynamics<br />
characteristic to tube devices.<br />
With limitation range similar to tube the effects of the series offer<br />
tremendous density and power of sound. Using <strong>AMT</strong> Legend Amps you<br />
won’t feel the necessity to cut out the most informative mid-frequencies that<br />
provide good readability of your guitar in a mix.<br />
<strong>AMT</strong> Legend preamps like tube ones provide gradual increase in the<br />
number of limiting cascades with sensitivity enhancement.<br />
The preamps of the series use passive circuits of tone formation fully<br />
corresponding to the adjustments of original tube overdrives.<br />
High output level of <strong>AMT</strong> Legend Amps effects (+10dB at maximum Level)<br />
corresponds to tube preamps output levels. In this way you have the<br />
adjustable signal level which allows to connect the preamp to any input<br />
(RETURN, DIRECT, LINE etc.), including INPUT POWER AMP.<br />
Architecture and features of <strong>AMT</strong> Legend Amps series preamps:<br />
The preamps of the series are single-channel devices with passive bypass.<br />
Legend amps have two outputs: direct OUT of the preamp and a separate<br />
CAB.SIM line output.<br />
The sound features of guitar preamps of “<strong>AMT</strong> Legend Amps”<br />
series:<br />
<strong>AMT</strong> Legend Amps B-1<br />
This preamp is intended for the admirers of a "clanking" sound with elastic punch.<br />
Legend Amps B-1 emulates Sharp channel of such legend as Bogner Triple<br />
Giant. <strong>AMT</strong> Legend Amps B-1 has the same sharpness, the same exactingness<br />
of sound production, the same dynamism and the same sound brightness as the<br />
original.<br />
<strong>AMT</strong> Legend Amps M-1<br />
It emulates the "forefather" of the majority of amplifiers created for heavy styles,<br />
legendary Marshall JCM800. As well as the legendary "forefather", <strong>AMT</strong> Legend<br />
Amps M-1 is perfectly on friendly terms with boosters.<br />
<strong>AMT</strong> Legend Amps P-1<br />
This device emulates one of the most esteemed one for its super heavy sound -<br />
Peavey 5150. The sound of <strong>AMT</strong> Legend Amps P-1 is monstrous density and<br />
aggression and huge amount of gain.<br />
<strong>AMT</strong> Legend Amps R-1<br />
This device embodies all the power and grace of Red-channel overdrive used in<br />
one of the most popular hi-gain amps by Mesa Boogie.<br />
<strong>AMT</strong> Legend Amps S-1<br />
The device is intended for the production of sound peculiar to «drive» channels of<br />
Soldano amps. It is distinguished by specific type of overdrive: open, wide and at<br />
the same time tough and dynamic.<br />
<strong>AMT</strong> Legend Amps F-1<br />
The basic sounds of <strong>AMT</strong> F-1 are classic amps of Fender Twin series. <strong>AMT</strong> F-1<br />
offer crystal clear sound with slight warm overdrive at high sensitivity.<br />
<strong>AMT</strong> F-1 is a pioneer of the basic modules of the entire <strong>AMT</strong> LA series.<br />
You can build around <strong>AMT</strong> F-1 your own complex of multi-channel preamp<br />
consisting of <strong>AMT</strong> LA mono channels: P-1, B-1, M-1, R-1, S-1. The series is<br />
constantly expanding to provide you with unique 100% analog tool forming the<br />
sound of your guitar.<br />
<strong>AMT</strong> F-1 is supplied with power adapter (unlike the other pedals of the series).<br />
Before you start<br />
For the purpose of transportation the device was carefully packed by the<br />
manufacturer. However, if cardboard packaging is damaged, it is necessary to<br />
check the device for the presence of external damages.<br />
‣ In case of damages do not send the device to us, but<br />
inform the seller and transport agency since otherwise you<br />
lose the right to damage compensation.<br />
‣ In order to avoid damages during storage and<br />
transportation always use original packaging.<br />
‣ Do not allow children to play with the device and<br />
packaging materials.<br />
‣ Please recycle all packaging materials in the way harmless<br />
to environment.<br />
‣ In order to avoid the device overheating provide sufficient<br />
air flow, do not cover and do not place it near other heatgenerating<br />
devices.<br />
‣ Operating the device next to powerful radio transmitters<br />
and sources of high-frequency signals can lead to<br />
significant sound distortion. In this case increase the<br />
distance between the device and the transmitter and use<br />
the screened cables for all interconnections.<br />
WARNING!<br />
Please be aware that high sound volume can harm your hearing<br />
and / or to damage the speakers of your PA system. Before<br />
switching the device on turn the controls "Volume" into<br />
extreme left position (counter-clockwise). Always try to adhere<br />
to moderate level of volume.<br />
Specifications<br />
Input<br />
Impedance<br />
Nom. sensitivity<br />
Output<br />
Output impedance<br />
Output signal level<br />
CAB.SIM. output<br />
Output impedance<br />
Output signal level<br />
Power supply<br />
Voltageе<br />
Current consumption<br />
Power adapter<br />
Voltage<br />
Dimensions / Weight<br />
Net dimensions (WхHхD).<br />
Net weight (without battery)<br />
Overall dimensions (WхHхD).<br />
Weight (without battery)<br />
1,0 MOhm<br />
-20dB<br />
10 kOhm<br />
+10dB<br />
10 kOhm<br />
-10dB<br />
6F22 battery<br />
DC 9V<br />
Approx. 6.0mA<br />
Recommended:<br />
AC/DC Adapter SA09DC-9V 1,11A;<br />
AC/DC Adapter SA12DC-12V 1,25A<br />
DC 9V or DC 12V<br />
111х58х73 mm.<br />
0,23 kg.<br />
Approx. 125х83х103 mm.<br />
Approx. 0,3 kg.<br />
Use only auxiliary devices and accessories<br />
recommended by the manufacturer.<br />
CAUTION!<br />
The preamps of <strong>AMT</strong> Legend Amps series like many other<br />
top-class devices are sensitive to power adapters’ quality.<br />
We urgently recommend using either 9V battery 6F22 or the<br />
quality adapter such as AC/DC Adapter SA09DC-9V 1,11A or<br />
AC/DC Adapter SA12DC-12V 1,25A.<br />
www.amtelectronics.com<br />
www.amtelectronics.com<br />
2 2
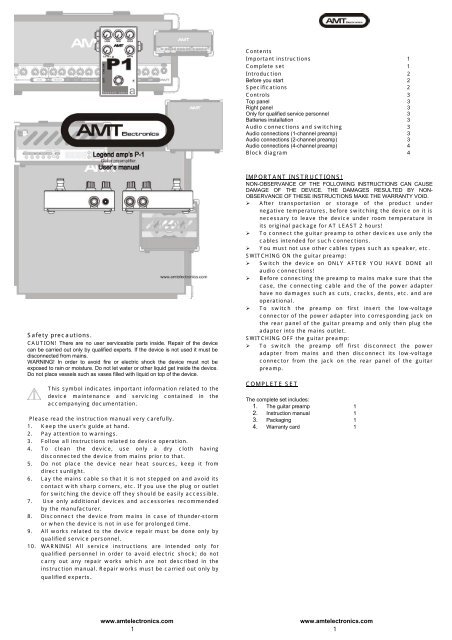
CONTROLS<br />
Front panel<br />
AUDIO CONNECTIONS AND SWITCHING<br />
WARNING! All cable connections must be made ONLY<br />
WITH GUITAR PREAMP SWITCHED OFF! (“BYPASS”<br />
mode)!<br />
The diagram of possible audio connections of the preamp with external units:<br />
1. Guitar preamp operation indicator.<br />
2. LEVEL – adjusts the preamp output signal level.<br />
3. OUT – output for connection to an input of the power amplifier.<br />
4. CAB.SIM. - output to Line input of a mixer.<br />
5. LOW – adjusts low frequencies.<br />
6. MID – adjusts middle frequencies.<br />
7. HIGH – adjusts high frequencies.<br />
8. IN – electric guitar input.<br />
9. GAIN – adjusts the guitar preamp sensitivity level.<br />
10. FOOT SWITCH – switches operating modes PREAMP / BYPASS<br />
Right panel<br />
11. DC 9V – jack for connecting power adapter of the guitar preamp.<br />
12. Bottom cover of the preamp.<br />
WARNING! All cable connections must be made ONLY<br />
WITH GUITAR PREAMP SWITCHED OFF! (“BYPASS” mode)!<br />
Only for qualified personnel<br />
There are no user serviceable parts inside the device. The<br />
repair of the device can only be carried out by qualified<br />
personnel. If the device has not been in use for prolonged time<br />
period it is necessary to remove the batteries from the device.<br />
To prevent possible damages or injuries resulted by fire or<br />
electric sort circuit do not let foreign objects and liquids get<br />
inside the device.<br />
Battery replacement<br />
Use only the batteries recommended by the manufacturer.<br />
To replace the batteries:<br />
1. Remove the bottom cover of the preamp by unscrewing 4 (four)<br />
fastening screws.<br />
2. Remove the old battery and disconnect it from connector.<br />
3. Connect the new battery to the connector and put in place.<br />
4. Replace the bottom cover of the device and fasten it by means of 4<br />
(four) fastening screws.<br />
www.amtelectronics.com<br />
www.amtelectronics.com<br />
3 3
All used names, names and trade marks are the property of their owners.<br />
______________________________________________________<br />
<strong>AMT</strong> <strong>Electronics</strong> reserves the right to make changes in the design and appearance of the<br />
device which in no way violate the product’s consumer properties without prior notification.<br />
Therefore specifications and appearance of the product can differ from the ones shown in the<br />
given document.<br />
www.amtelectronics.com<br />
www.amtelectronics.com<br />
4 4