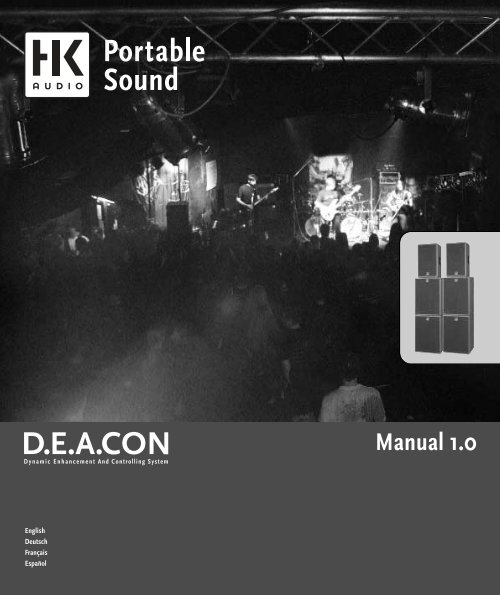
Manual 1.0
Manual 1.0
Manual 1.0

You also want an ePaper? Increase the reach of your titles
YUMPU automatically turns print PDFs into web optimized ePapers that Google loves.
English<br />
Deutsch<br />
Français<br />
Español<br />
<strong>Manual</strong> <strong>1.0</strong>
D.E.A.CON <strong>Manual</strong> <strong>1.0</strong><br />
Welcome to the HK AUDIO ®<br />
family!<br />
Thank you for choosing an HK AUDIO ® product.<br />
D.E.A.CON consists of a 12"/2" mid/high-range<br />
enclosure with integrated DDO system controller,<br />
a Sub A subwoofer with integrated 1000 W RMS<br />
Class D amplifier and the Sub B subwoofer, the<br />
passive addition to the Sub A.<br />
There’s no need to adjust or tweak levels – just set<br />
up the system components, connect the mains and<br />
signal cables and you’re ready to roll.<br />
An HK AUDIO ® active system is more than just two<br />
active speakers – it’s an all-inclusive sound<br />
reinforcement solution comprising a subwoofer,<br />
enclosure, and meticulously integrated electronics.<br />
To make these advantages possible, our engineers<br />
specially developed new technologies for these systems.<br />
The unique features make active HK AUDIO ®<br />
sound systems stand out from other active speakers.<br />
Your HK AUDIO ® team says: Enjoy your D.E.A.CON!<br />
Guarantee<br />
Register your D.E.A.CON using the enclosed<br />
registration card and your warranty will be extended<br />
by five years free of charge!<br />
Use the convenient Online Registration on<br />
www.hkaudio.com.<br />
If you cannot register online, please fill out the<br />
enclosed guarantee card completely, and send it to<br />
us by post or fax. The registration is only valid if the<br />
fully completed registration card is sent to<br />
HK AUDIO ® within 30 days of the date of purchase,<br />
or if registration via the Internet has been effected<br />
within the period stipulated. Furthermore, we would<br />
like to know more about who uses our equipment<br />
and where. This information supports future product<br />
development. Your personal data is, of course,<br />
assured by data protection.<br />
Thank you!<br />
HK AUDIO ®<br />
Technical Service<br />
Postfach 1509<br />
66595 St. Wendel<br />
Germany<br />
Contents<br />
1. D.E.A.CON system components . . . . . . . . . . . . . .6<br />
2. Transport . . . . . . . . . . . . . . . . . . . . . . . . . . . . . . .6<br />
3. Installation and wiring . . . . . . . . . . . . . . . . . . . . .6<br />
4. Connections and control functions . . . . . . . . . . .8<br />
5. Tips and tricks . . . . . . . . . . . . . . . . . . . . . . . . . .10<br />
6. Accessories for D.E.A.CON . . . . . . . . . . . . . . . .10<br />
7. Troubleshooting . . . . . . . . . . . . . . . . . . . . . . . . .11<br />
8. Technical specifications . . . . . . . . . . . . . . . . . . .12
5<br />
Digital amping<br />
More efficiency and dynamics.<br />
With an extremely high efficiency of over 90%<br />
Class-D digital amps are considerably smaller,<br />
lighter, and more compact than conventional amps.<br />
The lower thermal load of the components enhances<br />
reliability. The considerably faster slew rate and the<br />
higher damping factor are audible in the system’s<br />
transient response and more accurate performance.<br />
MultiBand limiting and<br />
companding<br />
Optimised for every frequency range.<br />
Various perfectly matched limiters and companders<br />
process different frequency bands. This processing<br />
of signals independent of the loudspeakers ensures a<br />
natural dynamic response and thus a tighter, more<br />
well-balanced sound across the entire frequency<br />
spectrum.<br />
DuoTilt<br />
Making the most of sonic energy<br />
The new DuoTilt speaker stand mounting collars<br />
allow for a more efficient use of sound energy. With<br />
two possible downward angles (7,5°, 15°) to better<br />
aim the satellite speakers directly at the audience,<br />
troublesome ceiling reflections are minimized for a<br />
tighter, clearer sound.<br />
Easy setup and handling<br />
Less pre-gig stress<br />
Like all HK AUDIO ® active systems, D.E.A.CON<br />
was designed as a cohesive unit consisting of<br />
perfectly matched components. It was developed to<br />
ensure that D.E.A.CON is easy to transport and can<br />
be swiftly set up. Operation is easy and there’s no<br />
need for complicated tweaking.<br />
DDO controller technology<br />
The DDO controller offsets the loudspeakerdependent<br />
differences in the dynamics of the PA<br />
components (bass, mid/high speakers, amps,<br />
crossovers, etc.) for an integrated, dynamically<br />
homogeneous system.<br />
English
D.E.A.CON <strong>Manual</strong> <strong>1.0</strong><br />
D.E.A.CON mid/high<br />
D.E.A.CON Sub A D.E.A.CON Sub B<br />
[Mid/High]<br />
Input<br />
[Sub A]<br />
To Sub A<br />
[Sub B]<br />
To Sub B<br />
Connection diagram for standard system<br />
[Mid/High]<br />
Input<br />
Mute<br />
Connection diagram for full-range setup<br />
[Mid/High]<br />
Input<br />
1 D.E.A.CON system components<br />
Mid/high enclosure<br />
Equipped with a 12" HK AUDIO ® custom speaker<br />
and a 2" B&C compression driver with 60° x 40° CD<br />
horn. The Class D amp delivers 600 watts of RMS<br />
power and is housed in a separate chamber with the<br />
DDO controller.<br />
The newly developed, integrated HK AUDIO ® Duo-<br />
Tilt speaker stand mounting collars allow sonic<br />
energy to be used more efficiently. Troublesome<br />
ceiling reflections are minimized for tight, clear<br />
sound. The cabinet is always balanced – no<br />
wobbling, tipping, or unintended twisting.<br />
Sub A subwoofer<br />
The D.E.A.CON Sub A cabinet is divided into two<br />
chambers. The front chamber serves as the actual<br />
loudspeaker cabinet for the directly loaded 18"<br />
speaker. It has a load capacity of 500 W RMS and<br />
an 8-ohm nominal impedance. Separate from and<br />
behind this is the chamber for the amp.<br />
Sub B subwoofer<br />
The D.E.A.CON Sub B cabinet and speaker<br />
equipment match those of the Sub A. Sub B is the<br />
passive version of Sub A.<br />
2 Transport<br />
To transport the system, just stand the subwoofer on<br />
its casters and place the mid/high-range enclosure<br />
with Styrofoam grid onto the subwoofer. Use original<br />
HK AUDIO ® ‚ D.E.A.CON protective covers to prepare<br />
your personal system for tough on-the-road use.<br />
Well-padded and kept dry, your D.E.A.CON system<br />
will give you satisfaction for years.<br />
3 Installation und wiring<br />
3.1 Standard D.E.A.CON system<br />
The standard system comprises 2x D.E.A.CON<br />
mid/high units, 2x D.E.A.CON Sub A subwoofers,<br />
and 2x D.E.A.CON Sub B.<br />
D.E.A.CON is always wired from top to bottom (see<br />
illustration/diagram on reverse of the D.E.A.CON<br />
component)! This may seem confusing at first, since<br />
generally active systems can often be wired in any<br />
order since the signal is routed via the Through socket.<br />
D.E.A.CON has a DDO system controller in the<br />
mid/high-range enclosure, so basic settings such as<br />
gain and subwoofer level only need to be adjusted on<br />
the enclosure. The DDO subwoofer signal paths<br />
are then routed from the mid/high-range enclosure<br />
to the Sub A subwoofer.<br />
Note: Make sure to follow the correct wiring order.<br />
Never connect the signal from the sound mixer<br />
directly to the subwoofer – this would mean<br />
bypassing the DDO system controller! Always<br />
connect the signal sources to the input socket of<br />
the D.E.A.CON mid/high-range enclosure!<br />
3.2 D.E.A.CON full-range setup<br />
The full-range setup comprises 2x D.E.A.CON<br />
mid/high-range enclosures. Turn the mode switch to<br />
full-range for a power bandwidth that reaches down<br />
to 80 Hz. In this case the subwoofer output (DDO<br />
controlled) is muted to avoid malfunctioning.<br />
3.3 D.E.A.CON club set<br />
The club set comprises 2x D.E.A.CON mid/high<br />
units and 2x D.E.A.CON Sub A subwoofers. It is also<br />
possible to use just one Sub A, connected either to<br />
the left or right mid/high-range enclosure. This is<br />
possible because bass frequencies are not<br />
recognized as stereo perspective and instruments<br />
such as bass drums and bass guitar are generally<br />
in mono.<br />
[Sub A]<br />
To Sub A<br />
Connection diagram for club set
7<br />
3.4 Double D.E.A.CON system<br />
The double system comprises 4x D.E.A.CON<br />
mid/high units, 4x D.E.A.CON Sub A, and<br />
4x D.E.A.CON Sub B.<br />
Wiring also follows the “top-to-bottom” order<br />
described above. To route the sound mixer signal to<br />
the second D.E.A.CON stack, use the Through socket<br />
on the first mid/high-range enclosure. Use a microphone<br />
cable. The XLR jacks should be configured as<br />
follows: 1= ground, 2= +, 3= -<br />
Installation:<br />
With the double D.E.A.CON system, it is especially<br />
important to pay attention to the installation of the<br />
two stacks. The cabinets are constructed so that the<br />
bevelled sides of the enclosure indicate the correct<br />
installation (at a splay angle—see illustration). This<br />
is essential to ensure an optimal acoustic coupling<br />
of the two enclosures. Otherwise undesired nulls or<br />
phasing effects in the power bandwidth may result.<br />
The subwoofers can, of course, also be placed sideby-side.<br />
3.5 Flying the D.E.A.CON mid/high unit<br />
For flying the enclosure, use the special HK AUDIO ®<br />
flying mount for the D.E.A.CON mid/high-range<br />
enclosure. For mounting, loosen the laterally sunken<br />
M10 pins. Tightly screw the flying mount via its<br />
flanges to the cabinet. The enclosure may be tilted at<br />
any angle. Just loosen the lateral knob and manually<br />
screw it tight. The dovetailed synthetic plates will<br />
ensure that the enclosure does not inadvertently<br />
swivel.<br />
Note: To ensure safety, only use separate lifting<br />
accessories that have been tested (e.g. half-couplers,<br />
TV spigots, collars, etc.)!<br />
The supports or tripods used must be designed to<br />
bear the corresponding load (weight of D.E.A.CON<br />
mid/high unit = 39.7 kg).<br />
3.6 Using the D.E.A.CON tilt unit<br />
Mounting the optionally available tilt unit is<br />
extremely easy:<br />
Just place the D.E.A.CON tilt unit with its bottom<br />
plate onto the upper subwoofer, then place the<br />
D.E.A.CON mid/high-range enclosure onto the<br />
flange with the flange-holders (7.5° or 15°), just as<br />
if you were placing the cabinet onto a tripod.<br />
[Mid/High]<br />
[Mid/High]<br />
Input<br />
[Sub A]<br />
[Sub A]<br />
To Sub A<br />
To Sub A<br />
[Sub B]<br />
[Sub B]<br />
To Sub B<br />
To Sub B<br />
Connection diagram for double system<br />
Installation angles for two D.E.A.CON<br />
stacks<br />
D.E.A.CON mid/high unit with<br />
mounting bracket<br />
English<br />
Question<br />
Can I connect enclosures other than the D.E.A.CON<br />
Subwoofer Sub A or Sub B to the D.E.A.CON<br />
mid/high-range enclosure?<br />
Answer<br />
The system components are acoustically perfectly<br />
matched and can only be operated in the indicated<br />
configurations. The use of other subwoofers can<br />
have a negative effect on the sound, and may result<br />
in damage to the enclosure (e.g. Sub A).<br />
Sub A’s speaker output socket is designed for a<br />
(total) nominal impedance of 4 ohm, and under no<br />
circumstances should anything less be used. Always<br />
connect only one Sub B to the Sub A’s speaker<br />
output socket.<br />
Use of the D.E.A.CON tilt unit
D.E.A.CON <strong>Manual</strong> <strong>1.0</strong><br />
1<br />
2<br />
3<br />
4<br />
5 6<br />
9<br />
7<br />
8<br />
10<br />
12<br />
11<br />
4 Connections and control<br />
functions<br />
D.E.A.CON Mid/High<br />
1 Power switch<br />
Operation: This is the on/off switch for the active<br />
system. The power LED lights up red when the<br />
system is switched on. The D.E.A.CON active system<br />
should always be the last component to be switched<br />
on (i.e. after all other components), and the first to<br />
be switched off (of all the equipment two which it is<br />
connected).<br />
depressed, the ground is separated. If this does not<br />
resolve the problem, check the cables leading to<br />
D.E.A.CON and all signals arriving at the sound<br />
mixer for deficiencies (also see Tips and tricks).<br />
6 Mode switch<br />
Operation: Configures the controller for the satellite<br />
and full-range modes. In the satellite configuration,<br />
the D.E.A.CON mid/high unit works as an enclosure<br />
in connection with Sub A (and Sub B). In the fullrange<br />
configuration, the enclosure is used as a selfsufficient<br />
full-range speaker (from 80 Hz and up),<br />
e.g. for speech or to play music.<br />
D.E.A.CON Mid/High<br />
13<br />
2 Mains Input<br />
Connection: Hook up this connection socket to the<br />
mains power supply via the included Powercon ®<br />
cable. Caution! Make sure that the local mains<br />
voltage matches the voltage specified. Connection to<br />
incorrect mains voltage may damage or destroy the<br />
electronics of the D.E.A.CON system.<br />
3 Mains Link<br />
Connection:<br />
The Powercon ® Link socket is wired in parallel to<br />
the mains input. Connect additional devices (e.g.<br />
another D.E.A.CON mid/high-range enclosure or a<br />
D.E.A.CON Sub A) here using a suitable connection<br />
cable.<br />
A current of no more than 11,6 A – or a maximum<br />
capacity of 2780 W (at 230 volts) – may be drawn<br />
from the Powercon Link socket. Therefore, it should<br />
be used to operate at most two additional<br />
D.E.A.CON components.<br />
Note: Always switch on the D.E.A.CON components<br />
separately one after another to maintain a relatively<br />
low inrush current as a high combined inrush<br />
current could trip the circuit breaker.<br />
4 Power On LED<br />
This LED lights up when the power switch is On and<br />
the appropriate connection to the mains exists.<br />
5 Ground<br />
Ground lift switch to separate signal ground and<br />
chassis ground when hum occurs. Use the ground<br />
lift switch when low frequency hum occurs. When<br />
Note: The subwoofer output (DDO controlled) is<br />
muted when the system is switched to full-range.<br />
7 Line In<br />
Connection: Connect the mixing console (Master<br />
Left/Right, Line Out, etc.) to the D.E.A.CON<br />
balanced input socket using a microphone cable.<br />
The XLR jacks should be configured as follows:<br />
1= ground, 2= +, 3= -.<br />
8 Line Through<br />
Connection: Parallel output for routing the input line<br />
signal via an XLR cable to additional D.E.A.CON<br />
systems, a recorder, or other individual components.<br />
9 Limiter status LEDs<br />
The active system’s “tachometer.” Indicates the<br />
operational status.<br />
10 Gain<br />
Operation: Prior to turning on the system, turn off<br />
the gain control (completely counter-clockwise).<br />
Prior to powering up, make sure that the system is<br />
connected to the subwoofer(s) Sub A (and, if applicable,<br />
Sub B) and that all other components which<br />
are connected to the system are already on. That is,<br />
the mixing console which is feeding the D.E.A.CON<br />
system, as well as any signal sources connected to<br />
the console’s inputs, such as keyboards, instrument<br />
amplifiers, effects, etc., should be turned on before<br />
the D.E.A.CON system is.<br />
After you have turned on the D.E.A.CON system,<br />
turn its Gain control to the right (clockwise).<br />
Should distortion or overdriving occur, first check
9<br />
the signal sources and reduce the output signal<br />
there, if possible. Should this fail to alter the signal<br />
leading to D.E.A.CON, adjust the system’s input<br />
levels using the Gain controls (also see Tips and<br />
Tricks).<br />
11 Subwoofer Output<br />
Connection: Output of the subwoofer signal from the<br />
DDO controller to the D.E.A.CON Sub A via an<br />
XLR cable. The XLR jacks should be configured as<br />
follows: 1 = ground, 2 = +, 3 = -.<br />
12 Subwoofer Level<br />
Operation: In mid position, the volume of the subwoofer<br />
is matched to the mid/high-range enclosure<br />
in such a way as to create a good, homogeneous<br />
balance of bass, midrange and treble. By turning the<br />
subwoofer level control to the left or right, the<br />
volume of the subwoofer can be lowered down to<br />
-12 dB or raised up to +6 dB as necessary.<br />
Tip: Before reaching for the master EQ on your<br />
mixing console to adjust the low end below 100 Hz,<br />
adjust the subwoofer Level control.<br />
13 Flying points<br />
For the mounting of M10 eyebolts or the D.E.A.CON<br />
mid/high flying mount for flying the enclosure in a<br />
truss system, etc.<br />
D.E.A.CON Sub A<br />
1 Power switch<br />
Operation: This is the on/off switch for the active<br />
system. The power LED lights up red when the<br />
system is switched on.<br />
The D.E.A.CON active system should always be the<br />
last component to be switched on (i.e. after all other<br />
components), and the first to be switched off (of all<br />
the equipment it is connected to).<br />
3 Power On LED<br />
This LED lights up when the power switch is On and<br />
the appropriate connection to the mains exists.<br />
4 Subwoofer Input<br />
Connection: Hook up the signal path coming from<br />
the D.E.A.CON DDO controller ( = subwoofer output<br />
of the mid/high-range enclosure) to the<br />
balanced subwoofer input socket via an XLR microphone<br />
cable. The XLR jacks should be configured as<br />
follows: 1 = ground, 2 = +, 3 = -.<br />
Important: Never connect the line or master signal<br />
from the mixing console directly to the subwoofer<br />
input of Sub A. The latter would then be running<br />
without a controller – that is, without crossovers,<br />
frequency compensation or any system protection –<br />
and could be severely damaged.<br />
For further information, please also see Chapter 3,<br />
Installation and Wiring.<br />
5 Subwoofer Through<br />
Connection: Parallel output for routing the DDO<br />
subwoofer signal to an additional D.E.A.CON Sub A<br />
via a XLR cable. The XLR jacks should be configured<br />
as follows: 1 = ground, 2 = +, 3 = -.<br />
6 To Sub B Speaker Output<br />
Connection: Parallel Speakon ® output for connecting<br />
the passive D.E.A.CON Sub B<br />
Note: The Speakon ® plugs must be turned clockwise<br />
to click into place! Before pulling these plugs out,<br />
the lock must be released by pulling the bayonet lock<br />
toward the cable.<br />
The pin configuration is: pin 1+ = +, pin 1- = -.<br />
Of course, you can also use a cable with four leads;<br />
however, the subwoofer socket’s pin 2+ and pin 2-<br />
are not wired.<br />
1 3<br />
2<br />
D.E.A.CON Sub A<br />
1<br />
D.E.A.CON Sub B<br />
4<br />
5<br />
6<br />
English<br />
2 Mains Input<br />
Connection: Hook up this connection socket to the<br />
mains power supply via the included Powercon ®<br />
cable. Caution! Make sure that the local mains<br />
voltage matches the voltage specified. Connection to<br />
an incorrect mains voltage may damage or destroy<br />
the electronics of the D.E.A.CON system.<br />
D.E.A.CON Sub B<br />
1 Sub B In<br />
Connection: Connect the Speakon ® input socket of<br />
Sub B to the speaker output of the D.E.A.CON Sub A<br />
using a suitable Speakon ® -style speaker cable.<br />
Pin configuration<br />
The configuration of the XLR socket conforms to<br />
the international norm IEC 268-12. In accordance<br />
with this norm, pin 1 carries the ground, pin 2 the<br />
positive signal, and pin 3 the negative.
D.E.A.CON <strong>Manual</strong> <strong>1.0</strong><br />
5 Tips and tricks<br />
1 Keep electronics away from moisture! When using<br />
the system outdoors, make sure it is installed safe<br />
from rain. Soft drinks, beer, and other liquids must<br />
not come into contact with the electronics as this<br />
may cause short-circuiting.<br />
2 Make sure that the ventilation slits on the back of<br />
the equipment are always free of dust and that air<br />
can always circulate freely. It is crucial to prevent the<br />
electronics from overheating so that they do not<br />
suffer damage.<br />
3 D.E.A.CON provides optimum sound, so you<br />
should provide it with optimum input signals! Hum<br />
is generally caused by defective or the wrong type of<br />
cables, or unbalanced signals routed into the mixing<br />
console. Check all signal and mains cables, use DI<br />
boxes to balance unbalanced signals, and do everything<br />
you can to keep on-stage noise to a minimum.<br />
4 Avoid distortion! Not only is it unpleasant to the<br />
ears of your audience, it’s also dangerous for your<br />
system. Make sure that all components connected<br />
directly or indirectly to the D.E.A.CON system have<br />
sufficient power at their disposal and never produce<br />
distortion because they are being operated at or beyond<br />
their limit. Provide a strong and clean signal to<br />
the system that doesn’t have to be cleaned up by<br />
backing off the Gain control.<br />
5 Avoid ground loops! If, for example, the mixing<br />
console is earthed via the mains cable and is not<br />
connected to the same electrical circuit as<br />
D.E.A.CON, this can lead to so-called “ground<br />
loops.” To prevent this problem, always connect the<br />
D.E.A.CON system and the mixing console to the<br />
same circuit (same phase!). Should you nonetheless<br />
encounter hum problems with your system, the<br />
ground lift switch may help.<br />
Caution: Never tape over the earth contact on the<br />
mains plug – this endangers lives!<br />
6 Accessories for D.E.A.CON<br />
HK AUDIO D.E.A.CON tilt unit<br />
Tilt unit for the D.E.A.CON mid/high-range<br />
enclosure. The tilt unit is placed on the subwoofer.<br />
Possible angles are preset at 7.5 and 15°.<br />
HK AUDIO protective covers for D.E.A.CON<br />
Comprises subwoofer protective covers and<br />
mid/high protective cover. Extremely tear-resistant,<br />
water repellent, and thickly padded to provide lasting<br />
protection for the D.E.A.CON system during<br />
transport.<br />
HK AUDIO D.E.A.CON mid/high flying mount<br />
Easy-to-mount U-bracket for mounting half-couplers,<br />
TV spigots or clamps. Flying speakers couldn’t be<br />
easier.<br />
For further information about original HK AUDIO ®<br />
accessories, please consult your HK AUDIO ® dealer<br />
or visit our website at www.hkaudio.com.<br />
Info regarding limiter status LEDs<br />
The limiter status of the mid/high signal paths and<br />
of the subwoofer are indicated respectively via<br />
individual LEDs.<br />
How do I read the indicator?<br />
The green LED indicates that there is a signal at the<br />
corresponding input socket. As long as the LED<br />
lights up green the system is in the lower to middle<br />
working range and there is enough headroom<br />
available for the amps. Yellow means that the system<br />
is in the upper working range. There is no need to<br />
worry if the yellow LED flashes intermittently, yet<br />
under no circumstances should it remain lit up<br />
continually. Should this occur, lower the output<br />
volume coming from the mixing console.<br />
If the LED lights up red continually, there is a defect<br />
in the amp and the system will shut down. In this<br />
case, the equipment should be inspected by an<br />
authorized service technician.
11<br />
7 Troubleshooting<br />
The Power-On LED doesn’t light up red when<br />
switched on.<br />
1 Check that the mains cable is connected to the<br />
mains input.<br />
2 Make sure that the mains itself has power.<br />
3 Check whether the circuit breaker has tripped.<br />
Bothersome hum<br />
1 Check the cables connecting the signal source<br />
to the D.E.A.CON. Replace damaged cables.<br />
Should you be unable to determine the cause of the<br />
hum, press the ground lift switch. In most cases,<br />
this resolves the problem.<br />
The Power-On LED lights up red, but there’s no<br />
sound coming from the D.E.A.CON system.<br />
1 With system power off, check the cables that you<br />
connected to the system’s input connectors.<br />
2 With system power off, check that the signal<br />
sources (keyboard, CD-player, mixing console, etc.)<br />
are switched on.<br />
3 With system power off, check the speaker cables<br />
for possible damage.<br />
4 Make sure that the Speakon ® plugs are properly<br />
locked into the speaker jacks (turned all the way to<br />
the right).<br />
5 With system power on, are the system’s Input Gain<br />
controls turned up sufficiently?<br />
The subwoofer is not producing much bass.<br />
1 Check the setting of the subwoofer Level control<br />
and adjust if needed.<br />
2 Check whether the mode switch is set to Full-range<br />
mode. (In Full-range mode the subwoofer is completely<br />
muted.)<br />
Sound coming from the system seems distorted.<br />
1 Check the LED indicators on your mixing console.<br />
They should not be continually in the red zone.<br />
If necessary, lower the input or output volume on<br />
the mixing console.<br />
2 If the LEDs on your mixing console are in the green<br />
area (indicating reasonable level), turn down the<br />
Gain Left and Gain Right controls on the<br />
D.E.A.CON.<br />
3 Monitor the Limiter indicator LEDs in the<br />
operation area of the D.E.A.CON mid/high.<br />
These should only briefly light up yellow.<br />
Under no circumstances should they continually<br />
light up yellow. Should this be the case, turn down<br />
the gain controls.<br />
English
D.E.A.CON <strong>Manual</strong> <strong>1.0</strong><br />
8 Technical specifications<br />
D.E.A.CON Mid/High<br />
Connectors:<br />
1x XLR line in<br />
1x XLR line through<br />
1x XLR subwoofer output<br />
Line in: XLR female (pin 1= ground; 2= +, 3= -)<br />
Input design:<br />
Electronically symmetrical & floating<br />
Input impedance:<br />
20 k Ohm<br />
Sensitivity:<br />
+10 dBu (turned up to the max)<br />
Max. input level:<br />
+22 dBu<br />
Frequency response +/- 3dB:1)<br />
80 Hz–19 kHz fullrange mode<br />
130 Hz–19 kHz satellite mode<br />
Sensitivity 1W@1m:*)<br />
104 dB<br />
Maximum SPL @1m: *)<br />
130 dB@10% THD<br />
Mid/high power amp:<br />
1x 600 W RMS/ Class D<br />
Active protection circuitry:<br />
DDO controller multiband limiter, subsonic filter<br />
MF speaker: 12"<br />
HF horn/driver: 2"<br />
Directivity:<br />
60° x 40° CD horn<br />
Crossover frequency:<br />
900 Hz, 12 dB/ octave<br />
Speaker stand mounting collar: HK AUDIO ® DuoTilt, 36 mm, 7.5°, 15°<br />
Flying points:<br />
4x M10 screw thread for optional flying mount<br />
Accessories: D.E.A.CON tilt-unit, 7.5°, 15°<br />
Dimensions (WxHxD): 40 cm x 66 cm x 50 cm / 15-3/4" x 26" x 19-3/4"<br />
Weight:<br />
39.7 kg/ 87.3 lbs.<br />
D.E.A.CON Sub A<br />
Connectors:<br />
1x XLR subwoofer input, 1x XLR subwoofer through<br />
1x Speakon ® parallel out<br />
Subwoofer input: XLR female (pin 1= ground; 2= +, 3= -)<br />
Input design:<br />
Electronically symmetrical & floating<br />
Input impedance:<br />
20 k Ohm<br />
Sensitivity:<br />
+10 dBu (turned up to the max)<br />
Max. input level:<br />
+22 dBu<br />
Frequency response +/- 3dB: 1) 44 Hz- 130 Hz<br />
Sensitivity 1W@1m: *)<br />
102 dB<br />
Maximum SPL @1m: *)<br />
134 dB<br />
Subwoofer amp:<br />
1x 1000 W RMS/ Class D<br />
Active protection circuitry:<br />
DDO controller, multiband limiter, subsonic filter<br />
Bass speaker: 18"<br />
Speaker stand mounting collar: M20 thread plate<br />
Casters:<br />
4x 80 mm casters on the reverse<br />
Dimensions (WxHxD): 52 cm x 72.5 cm x 71.5 cm / 20-1/2" x 28-1/2" x 28-1/8"<br />
Weight:<br />
49.5 kg/ 109 lbs.
13<br />
General electrical specifications:<br />
Protection class 1 (protectively earthed)<br />
Max. electric current: 4.4 A (230 V)<br />
8 A (117 V)<br />
8 A (100 V)<br />
Max. power input:<br />
1000 VA<br />
Mains voltage range: +/- 10%<br />
Surrounding temperature range: -10° C to +60° C<br />
Internal fuse:<br />
T8A<br />
D.E.A.CON Sub B<br />
Connector:<br />
1x Speakon ® input<br />
Power handling nominal:<br />
500 W RMS/ 8 Ohm<br />
Frequency response +/- 3dB: 1) 44 Hz- 130 Hz<br />
Sensitivity 1W@1m: *)<br />
102 dB<br />
Maximum SPL @1m: *)<br />
134 dB<br />
Bass speaker: 18"<br />
Speaker stand mounting collar: -<br />
Casters:<br />
4x 80 mm casters on the reverse<br />
Dimensions (WxHxD): 52 cm x 72.5 cm x 71.5 cm / 20-1/2" x 28-1/2" x 28-1/8"<br />
Weight:<br />
47 kg/ 103.4 lbs.<br />
*) all specifications indicate half-space measurements<br />
1) active crossover activated<br />
This is to certify that<br />
HK AUDIO ® D.E.A.CON<br />
complies with the provisions of the Directive of<br />
the Council of the European Communities on the<br />
approximation of the laws of the Member States<br />
relating to electromagnetic compatibility<br />
(EMC Directive 89/336/EEC) and the low voltage<br />
Directive (73/23/EEC).<br />
This declaration of conformity of the European<br />
Communities is the result of an examination carried<br />
out by the Quality Assurance Department of<br />
STAMER GmbH in accordance with European<br />
Standards EN 50081-1, EN 50082-1and EN 60065<br />
for low voltage, as laid down in Article 10 of the<br />
EMC Directive.<br />
Stamer Musikanlagen<br />
GmbH*<br />
Magdeburger Str. 8<br />
66606 St.Wendel<br />
Lothar Stamer Dipl.Ing.<br />
Managing Director<br />
St.Wendel, 03/03/04<br />
* Stamer Musikanlagen manufactures exclusively<br />
for HK AUDIO ® .<br />
English