
Create successful ePaper yourself
Turn your PDF publications into a flip-book with our unique Google optimized e-Paper software.
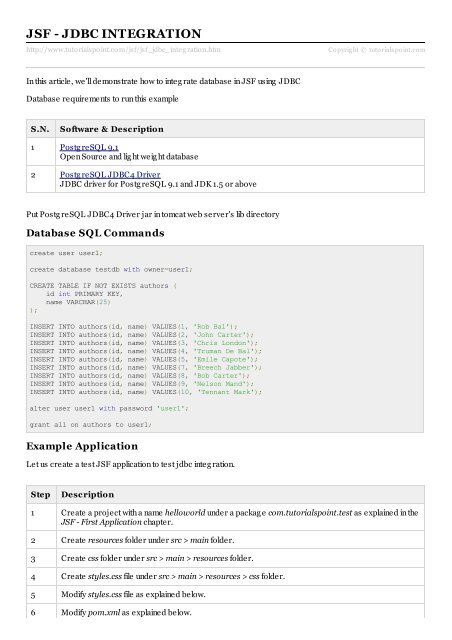
JSF - JDBC INTEGRATION<br />
http://www.tuto rialspo int.co m/jsf/jsf_jdbc_integ ratio n.htm<br />
Copyrig ht © tutorialspoint.com<br />
In this article, we'll demonstrate how to integ rate database in JSF using JDBC<br />
Database requirements to run this example<br />
S.N.<br />
Software & Description<br />
1 Postg reSQL 9.1<br />
Open Source and lig ht weig ht database<br />
2 Postg reSQL JDBC4 Driver<br />
JDBC driver for Postg reSQL 9.1 and JDK 1.5 or above<br />
Put Postg reSQL JDBC4 Driver jar in tomcat web server's lib directory<br />
Database SQL Commands<br />
create user user1;<br />
create database testdb with owner=user1;<br />
CREATE TABLE IF NOT EXISTS authors (<br />
id int PRIMARY KEY,<br />
name VARCHAR(25)<br />
);<br />
INSERT INTO authors(id, name) VALUES(1, 'Rob Bal');<br />
INSERT INTO authors(id, name) VALUES(2, 'John Carter');<br />
INSERT INTO authors(id, name) VALUES(3, 'Chris London');<br />
INSERT INTO authors(id, name) VALUES(4, 'Truman De Bal');<br />
INSERT INTO authors(id, name) VALUES(5, 'Emile Capote');<br />
INSERT INTO authors(id, name) VALUES(7, 'Breech Jabber');<br />
INSERT INTO authors(id, name) VALUES(8, 'Bob Carter');<br />
INSERT INTO authors(id, name) VALUES(9, 'Nelson Mand');<br />
INSERT INTO authors(id, name) VALUES(10, 'Tennant Mark');<br />
alter user user1 with password 'user1';<br />
grant all on authors to user1;<br />
Example Application<br />
Let us create a test JSF application to test jdbc integ ration.<br />
Step<br />
Description<br />
1 Create a project with a name helloworld under a packag e com.tutorialspoint.test as explained in the<br />
JSF - First Application chapter.<br />
2 Create resources folder under src > main folder.<br />
3 Create css folder under src > main > resources folder.<br />
4 Create styles.css file under src > main > resources > css folder.<br />
5 Modify styles.css file as explained below.<br />
6 Modify pom.xml as explained below.
7 Create Author.java under packag e com.tutorialspoint.test as explained below.<br />
8 Create UserData.java under packag e com.tutorialspoint.test as explained below.<br />
9 Modify home.xhtml as explained below. Keep rest of the files unchang ed.<br />
10 Compile and run the application to make sure business log ic is working as per the requirements.<br />
11 Finally, build the application in the form of war file and deploy it in Apache Tomcat Webserver.<br />
12 Launch your web application using appropriate URL as explained below in the last step.<br />
styles.css<br />
.authorTable{<br />
border-collapse:collapse;<br />
border-bottom:1px solid #000000;<br />
}<br />
.authorTableHeader{<br />
text-align:center;<br />
background:none repeat scroll 0 0 #B5B5B5;<br />
border-bottom:1px solid #000000;<br />
border-top:1px solid #000000;<br />
padding:2px;<br />
}<br />
.authorTableOddRow{<br />
text-align:center;<br />
background:none repeat scroll 0 0 #FFFFFFF;<br />
}<br />
.authorTableEvenRow{<br />
text-align:center;<br />
background:none repeat scroll 0 0 #D3D3D3;<br />
}<br />
pom.xml<br />
<br />
4.0.0<br />
com.tutorialspoint.test<br />
helloworld<br />
war<br />
1.0-SNAPSHOT<br />
helloworld Maven Webapp<br />
http://maven.apache.org<br />
<br />
<br />
junit<br />
junit<br />
3.8.1<br />
test<br />
<br />
<br />
com.sun.faces<br />
jsf-api<br />
2.1.7<br />
<br />
<br />
com.sun.faces<br />
jsf-impl<br />
2.1.7<br />
javax.servlet<br />
jstl<br />
1.2<br />
<br />
<br />
postgresql<br />
postgresql<br />
9.1-901.jdbc4<br />
<br />
<br />
<br />
helloworld<br />
<br />
<br />
org.apache.maven.plugins<br />
maven-compiler-plugin<br />
2.3.1<br />
<br />
1.6<br />
1.6<br />
<br />
<br />
<br />
maven-resources-plugin<br />
2.6<br />
<br />
<br />
copy-resources<br />
validate<br />
<br />
copy-resources<br />
<br />
<br />
${basedir}/target/helloworld/resources<br />
<br />
<br />
<br />
src/main/resources<br />
true<br />
<br />
<br />
<br />
<br />
<br />
<br />
<br />
<br />
<br />
Author.java<br />
package com.tutorialspoint.test;<br />
public class Author {<br />
int id;<br />
String name;<br />
public String getName() {<br />
return name;<br />
}<br />
public void setName(String name) {<br />
this.name = name;<br />
}<br />
public int getId() {<br />
return id;<br />
}<br />
public void setId(int id) {<br />
this.id = id;<br />
}<br />
}
UserData.java<br />
package com.tutorialspoint.test;<br />
import java.io.Serializable;<br />
import java.sql.Connection;<br />
import java.sql.DriverManager;<br />
import java.sql.PreparedStatement;<br />
import java.sql.ResultSet;<br />
import java.sql.SQLException;<br />
import java.util.ArrayList;<br />
import java.util.List;<br />
import javax.faces.bean.ManagedBean;<br />
import javax.faces.bean.SessionScoped;<br />
import javax.faces.event.ComponentSystemEvent;<br />
@ManagedBean(name = "userData", eager = true)<br />
@SessionScoped<br />
public class UserData implements Serializable {<br />
private static final long serial<strong>Version</strong>UID = 1L;<br />
public List getAuthors(){<br />
ResultSet rs = null;<br />
PreparedStatement pst = null;<br />
Connection con = getConnection();<br />
String stm = "Select * from authors";<br />
List records = new ArrayList();<br />
try {<br />
pst = con.prepareStatement(stm);<br />
pst.execute();<br />
rs = pst.getResultSet();<br />
}<br />
while(rs.next()){<br />
Author author = new Author();<br />
author.setId(rs.getInt(1));<br />
author.setName(rs.getString(2));<br />
records.add(author);<br />
}<br />
} catch (SQLException e) {<br />
e.printStackTrace();<br />
}<br />
return records;<br />
public Connection getConnection(){<br />
Connection con = null;<br />
}<br />
}<br />
String url = "jdbc:postgresql://localhost/testdb";<br />
String user = "user1";<br />
String password = "user1";<br />
try {<br />
con = DriverManager.getConnection(url, user, password);<br />
System.out.println("Connection completed.");<br />
} catch (SQLException ex) {<br />
System.out.println(ex.getMessage());<br />
}<br />
finally{<br />
}<br />
return con;<br />
home.xhtml<br />
<br />
<br />
xmlns:h="http://java.sun.com/jsf/html"><br />
<br />
JSF Tutorial!<br />
<br />
<br />
JDBC Integration Example<br />
<br />
Author ID<br />
#{c.id}<br />
<br />
Name<br />
#{c.name}<br />
<br />
<br />
<br />
<br />
Once you are ready with all the chang es done, let us compile and run the application as we did in JSF - First<br />
Application chapter. If everything is fine with your application, this will produce following result: