4065 / 4066 / 4067 / 4088 - DPA Microphones
4065 / 4066 / 4067 / 4088 - DPA Microphones
4065 / 4066 / 4067 / 4088 - DPA Microphones
Create successful ePaper yourself
Turn your PDF publications into a flip-book with our unique Google optimized e-Paper software.
www.dpamicrophones.com<br />
Introduction<br />
Both the <strong>DPA</strong> <strong>4065</strong>/66/67 (omnidirectional) and the<br />
<strong>DPA</strong> <strong>4088</strong> (cardioid) microphones provide a uniquely<br />
natural and open sound. Ultra-lightweight and adjustable,<br />
<strong>DPA</strong> Headset Mics ensure a secure and comfortable fit in live<br />
performance environments. To ensure optimal performance of<br />
your <strong>DPA</strong> Headset Mics, please follow the simple instructions<br />
below.<br />
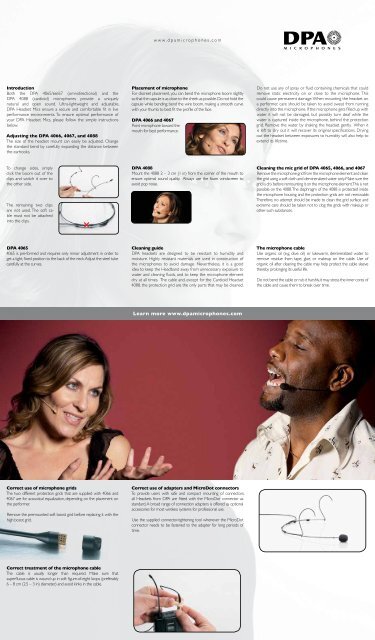
Adjusting the <strong>DPA</strong> <strong>4066</strong>, <strong>4067</strong>, and <strong>4088</strong><br />
The size of the headset mount can easily be adjusted. Change<br />
the standard bend by carefully expanding the distance between<br />
the earhooks.<br />
Placement of microphone<br />
For discreet placement, you can bend the microphone boom slightly<br />
so that the capsule is as close to the cheek as possible. Do not hold the<br />
capsule while bending; bend the wire boom, making a smooth curve<br />
with your thumb to best fit the profile of the face.<br />
<strong>DPA</strong> <strong>4066</strong> and <strong>4067</strong><br />
Point microphone toward the<br />
mouth for best performance.<br />
Do not use any of spray or fluid containing chemicals that could<br />
remove static electricity on or close to the microphone. This<br />
could cause permanent damage. When mounting the headset on<br />
a performer, care should be taken to avoid sweat from running<br />
directly into the microphone. If the microphone gets filled up with<br />
water it will not be damaged, but possibly turn deaf while the<br />
water is captured inside the microphone, behind the protection<br />
grid. Remove the water by shaking the headset gently. When it<br />
is left to dry out it will recover its original specifications. Drying<br />
out the headset between exposures to humidity will also help to<br />
extend its lifetime.<br />
To change sides, simply<br />
click the boom out of the<br />
clips and switch it over to<br />
the other side.<br />
The remaining two clips<br />
are not used. The soft cable<br />
must not be attached<br />
into the clips.<br />
<strong>DPA</strong> <strong>4088</strong><br />
Mount the <strong>4088</strong> 2 – 3 cm (1 in) from the corner of the mouth to<br />
ensure optimal sound quality. Always use the foam windscreen to<br />
avoid pop noise.<br />
Cleaning the mic grid of <strong>DPA</strong> <strong>4065</strong>, <strong>4066</strong>, and <strong>4067</strong><br />
Remove the microphone grid from the microphone element and clean<br />
the grid using a soft cloth and demineralized water only. Make sure the<br />
grid is dry before remounting it on the microphone element. This is not<br />
possible on the <strong>4088</strong>. The diaphragm of the <strong>4088</strong> is protected inside<br />
the microphone housing and the protection grids are not removable.<br />
Therefore, no attempt should be made to clean the grid surface and<br />
extreme care should be taken not to clog the grids with makeup or<br />
other such substances.<br />
<strong>DPA</strong> <strong>4065</strong><br />
<strong>4065</strong> is pre-formed and requires only minor adjustment in order to<br />
get a tight, fixed position to the back of the neck. Adjust the steel tube<br />
carefully at the curves.<br />
Cleaning guide<br />
<strong>DPA</strong> headsets are designed to be resistant to humidity and<br />
moisture. Highly resistant materials are used in construction of<br />
the microphones to avoid damage. Nevertheless, it is a good<br />
idea to keep the Headband away from unnecessary exposure to<br />
water and cleaning fluids, and to keep the microphone element<br />
dry at all times. The cable and, except for the Cardioid Headset<br />
<strong>4088</strong>, the protection grid are the only parts that may be cleaned.<br />
The microphone cable<br />
Use organic oil (e.g. olive oil) or lukewarm, demineralized water to<br />
remove residue from tape, glue, or makeup on the cable. Use of<br />
organic oil after cleaning the cable may help protect the cable sleeve<br />
thereby prolonging its useful life.<br />
Do not bend the cable or rub it harshly, it may stress the inner cores of<br />
the cable and cause them to break over time.<br />
Learn more www.dpamicrophones.com<br />
Correct use of microphone grids<br />
The two different protection grids that are supplied with <strong>4066</strong> and<br />
<strong>4067</strong> are for acoustical equalization, depending on the placement on<br />
the performer.<br />
Remove the premounted soft boost grid before replacing it with the<br />
high boost grid.<br />
Correct use of adapters and MicroDot connectors<br />
To provide users with safe and compact mounting of connectors,<br />
all Headsets from <strong>DPA</strong> are fitted with the MicroDot connector as<br />
standard. A broad range of connection adapters is offered as optional<br />
accessories for most wireless systems for professional use.<br />
Use the supplied connector-tightening tool whenever the MicroDot<br />
connector needs to be fastened to the adapter for long periods of<br />
time.<br />
Correct treatment of the microphone cable<br />
The cable is usually longer than required. Make sure that<br />
superfluous cable is wound up in soft figure-of-eight loops (preferably<br />
6 – 8 cm (2.5 – 3 in) diameter) and avoid kinks in the cable.
DPZ-<strong>4066</strong>-3<br />
Specifications<br />
<strong>4065</strong>/<strong>4066</strong>/<strong>4067</strong>/<strong>4088</strong><br />
Directional characteristics<br />
<strong>4065</strong>/66/67: Omnidirectional<br />
<strong>4088</strong>: Cardioid<br />
Principle of operation<br />
<strong>4065</strong>/66/67: Pressure<br />
<strong>4088</strong>: Pressure gradient<br />
Cartridge type<br />
Pre-polarized condenser element with vertical diaphragm<br />
Total harmonic distortion (THD)<br />


