

SL280DFV Gas Furnace Installation Manual - Lennox
SL280DFV Gas Furnace Installation Manual - Lennox
SL280DFV Gas Furnace Installation Manual - Lennox

Create successful ePaper yourself
Turn your PDF publications into a flip-book with our unique Google optimized e-Paper software.
2011 <strong>Lennox</strong> Industries Inc.<br />
Dallas, Texas, USA<br />
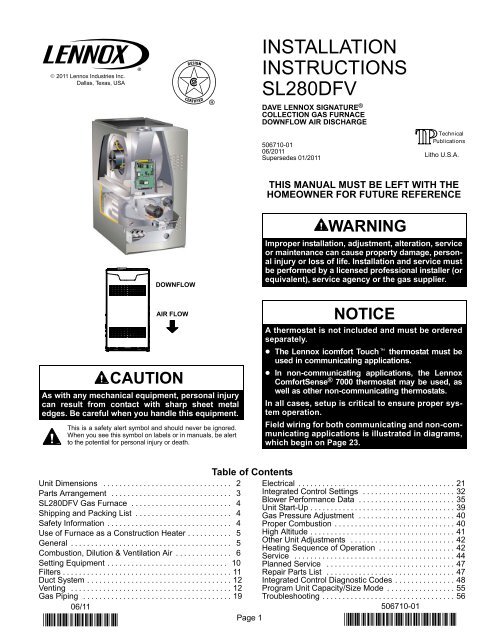
INSTALLATION<br />
INSTRUCTIONS<br />
<strong>SL280DFV</strong><br />
DAVE LENNOX SIGNATURE ®<br />
COLLECTION GAS FURNACE<br />
DOWNFLOW AIR DISCHARGE<br />
506710−01<br />
06/2011<br />
Supersedes 01/2011<br />
Litho U.S.A.<br />
THIS MANUAL MUST BE LEFT WITH THE<br />
HOMEOWNER FOR FUTURE REFERENCE<br />
DOWNFLOW<br />
WARNING<br />
Improper installation, adjustment, alteration, service<br />
or maintenance can cause property damage, personal<br />
injury or loss of life. <strong>Installation</strong> and service must<br />
be performed by a licensed professional installer (or<br />
equivalent), service agency or the gas supplier.<br />
AIR FLOW<br />
CAUTION<br />
As with any mechanical equipment, personal injury<br />
can result from contact with sharp sheet metal<br />
edges. Be careful when you handle this equipment.<br />
This is a safety alert symbol and should never be ignored.<br />
When you see this symbol on labels or in manuals, be alert<br />
to the potential for personal injury or death.<br />
NOTICE<br />
A thermostat is not included and must be ordered<br />
separately.<br />
The <strong>Lennox</strong> icomfort Touch thermostat must be<br />
used in communicating applications.<br />
In non−communicating applications, the <strong>Lennox</strong><br />
ComfortSense ® 7000 thermostat may be used, as<br />
well as other non−communicating thermostats.<br />
In all cases, setup is critical to ensure proper system<br />
operation.<br />
Field wiring for both communicating and non−communicating<br />
applications is illustrated in diagrams,<br />
which begin on Page 23.<br />
Table of Contents<br />
Unit Dimensions . . . . . . . . . . . . . . . . . . . . . . . . . . . . . . . . 2 Electrical . . . . . . . . . . . . . . . . . . . . . . . . . . . . . . . . . . . . . . . 21<br />
Parts Arrangement . . . . . . . . . . . . . . . . . . . . . . . . . . . . . . 3 Integrated Control Settings . . . . . . . . . . . . . . . . . . . . . . . 32<br />
<strong>SL280DFV</strong> <strong>Gas</strong> <strong>Furnace</strong> . . . . . . . . . . . . . . . . . . . . . . . . . 4<br />
Blower Performance Data . . . . . . . . . . . . . . . . . . . . . . . . 35<br />
Unit Start−Up . . . . . . . . . . . . . . . . . . . . . . . . . . . . . . . . . . . . 39<br />
Shipping and Packing List . . . . . . . . . . . . . . . . . . . . . . . . 4 <strong>Gas</strong> Pressure Adjustment . . . . . . . . . . . . . . . . . . . . . . . . 40<br />
Safety Information . . . . . . . . . . . . . . . . . . . . . . . . . . . . . . . 4 Proper Combustion . . . . . . . . . . . . . . . . . . . . . . . . . . . . . . 40<br />
Use of <strong>Furnace</strong> as a Construction Heater . . . . . . . . . . . 5 High Altitude . . . . . . . . . . . . . . . . . . . . . . . . . . . . . . . . . . . . 41<br />
General . . . . . . . . . . . . . . . . . . . . . . . . . . . . . . . . . . . . . . . . 5<br />
Other Unit Adjustments . . . . . . . . . . . . . . . . . . . . . . . . . . 42<br />
Heating Sequence of Operation . . . . . . . . . . . . . . . . . . . 42<br />
Combustion, Dilution & Ventilation Air . . . . . . . . . . . . . . 6 Service . . . . . . . . . . . . . . . . . . . . . . . . . . . . . . . . . . . . . . . . 44<br />
Setting Equipment . . . . . . . . . . . . . . . . . . . . . . . . . . . . . . 10 Planned Service . . . . . . . . . . . . . . . . . . . . . . . . . . . . . . . . 47<br />
Filters . . . . . . . . . . . . . . . . . . . . . . . . . . . . . . . . . . . . . . . . . . 11 Repair Parts List . . . . . . . . . . . . . . . . . . . . . . . . . . . . . . . . 47<br />
Duct System . . . . . . . . . . . . . . . . . . . . . . . . . . . . . . . . . . . . 12 Integrated Control Diagnostic Codes . . . . . . . . . . . . . . . 48<br />
Venting . . . . . . . . . . . . . . . . . . . . . . . . . . . . . . . . . . . . . . . . 12 Program Unit Capacity/Size Mode . . . . . . . . . . . . . . . . . 55<br />
<strong>Gas</strong> Piping . . . . . . . . . . . . . . . . . . . . . . . . . . . . . . . . . . . . . 19 Troubleshooting . . . . . . . . . . . . . . . . . . . . . . . . . . . . . . . . . 56<br />
06/11<br />
<br />
Page 1<br />
506710−01
Unit Dimensions − inches (mm)<br />
3−1/8<br />
(79)<br />
9/16<br />
(14)<br />
D<br />
FLUE OUTLET<br />
(Top)<br />
B<br />
RETURN AIR<br />
OPENING<br />
19−7/16<br />
(494)<br />
9/16<br />
(14)<br />
9/16<br />
(14)<br />
TOP VIEW<br />
A<br />
B<br />
9/16<br />
(14)<br />
1−1/2 (38)<br />
Front Panel<br />
27−3/4<br />
(7705)<br />
19−7/16<br />
(494)<br />
9/16<br />
(14)<br />
33<br />
(838)<br />
5−3/8 (137) Right<br />
2−1/8 (54) Left<br />
ELECTRICAL INLET<br />
(Either Side)<br />
GAS PIPING INLET<br />
(Either Side)<br />
6−5/8 (168) Right<br />
7−1/8 (181) Left<br />
C<br />
Supply<br />
Air<br />
3/4<br />
(19)<br />
19−1/4<br />
(489)<br />
Supply<br />
Air<br />
FRONT VIEW<br />
SIDE VIEW<br />
Model No.<br />
A B C D<br />
in. mm in. mm in. mm in. mm<br />
SL280DF070V36A 14−1/2 368 13−3/8 340 13 330 4−3/4 121<br />
SL280DF090V48B 17−1/2 446 16−3/8 416 16 406 6−1/4 159<br />
SL280DF090V60C<br />
SL280DF110V60C<br />
21 533 19−7/8 504 19−1/2 495 8 203<br />
Page 2
Parts Arrangement<br />
FLUE CHASE<br />
CONTROL BOX<br />
(Includes two−stage integrated control,<br />
transformer and circuit breaker)<br />
BLOWER ASSEMBLY<br />
GASKET SECONDARY LIMIT<br />
INTERNAL FLUE<br />
PIPE ASSEMBLY<br />
DOOR INTERLOCK SWITCH<br />
PRIMARY LIMIT LOCATION<br />
ROLLOUT SWITCH<br />
HEAT EXCHANGER<br />
COMBUSTION AIR INDUCER<br />
PRESSURE SWITCHES<br />
COMBUSTION AIR INDUCER<br />
GAS VALVE<br />
INNER BLOWER ACCESS PANEL<br />
BURNER BOX ASSEMBLY<br />
ACCESS PANEL<br />
FIGURE 1<br />
Page 3
<strong>SL280DFV</strong> <strong>Gas</strong> <strong>Furnace</strong><br />
The <strong>SL280DFV</strong> gas furnace is equipped with a two−stage,<br />
variable speed integrated control. the control is compatible<br />
with:<br />
Communicating thermostats − icomfort Touch ® .<br />
Non−communicating thermostats − ComfortSense or other<br />
conventional thermostats.<br />
Control systems − Harmony III Zone Control System<br />
(non−communicating). Each <strong>SL280DFV</strong> unit is shipped<br />
ready for installation in the downflow position.<br />
Shipping and Packing List<br />
Package 1 of 1 contains<br />
1 − Assembled <strong>SL280DFV</strong> unit<br />
1 − Bag assembly containing the following:<br />
2 − Screws<br />
1 − Snap bushing<br />
1 − Snap plug<br />
1 − Wire tie<br />
1 − Vent warning label<br />
1 − Owner’s manual and warranty card<br />
The following items may be ordered separately:<br />
1 − Thermostat<br />
1 − Propane/LP changeover kit<br />
1 − Combustible flooring base<br />
Check equipment for shipping damage. If you find any<br />
damage, immediately contact the last carrier.<br />
Safety Information<br />
DANGER<br />
Danger of explosion.<br />
There are circumstances in which odorant used with<br />
LP/propane gas can lose its scent. In case of a leak,<br />
LP/propane gas will settle close to the floor and may<br />
be difficult to smell. An LP/propane leak detector<br />
should be installed in all LP applications.<br />
WARNING<br />
Improper installation, adjustment, alteration, service<br />
or maintenance can cause property damage, personal<br />
injury or loss of life. <strong>Installation</strong> and service must<br />
be performed by a licensed professional installer (or<br />
equivalent), service agency or the gas supplier.<br />
CAUTION<br />
As with any mechanical equipment, personal injury<br />
can result from contact with sharp sheet metal<br />
edges. Be careful when you handle this equipment.<br />
Certifications<br />
<strong>SL280DFV</strong> units are CSA International certified.<br />
In the USA, installation of gas furnaces must conform with<br />
local building codes. In the absence of local codes, units<br />
must be installed according to the current National Fuel<br />
<strong>Gas</strong> Code (ANSI-Z223.1). The National Fuel <strong>Gas</strong> Code is<br />
available from the following address:<br />
American National Standards Institute, Inc.<br />
11 West 42nd Street<br />
New York, NY 10036<br />
Clearances<br />
Adequate clearance must be made around the air openings<br />
into the vestibule area. In order to ensure proper unit<br />
operation, combustion and ventilation air supply must be<br />
provided according to the current National Fuel <strong>Gas</strong> Code.<br />
Vent installations must be consistent with the venting<br />
tables (in this instruction) and applicable provisions of local<br />
building codes.<br />
This furnace is CSA International certified for installation<br />
clearances to combustible material as listed on the unit<br />
nameplate and in the tables in figure 13. Accessibility and<br />
service clearances must take precedence over fire protection<br />
clearances.<br />
Installed Locations<br />
For installation in a residential garage, the furnace must<br />
be installed so that the burner(s) and the ignition source<br />
are located no less than 18 inches (457 mm) above the<br />
floor. The furnace must be located or protected to avoid<br />
physical damage by vehicles. When a furnace is installed<br />
in a public garage, hangar, or other building that has a hazardous<br />
atmosphere, the furnace must be installed according<br />
to recommended good practice requirements and current<br />
National Fuel <strong>Gas</strong> Code.<br />
NOTE − <strong>Furnace</strong> must be adjusted to obtain a temperature<br />
rise (high and low fire) within the range(s) specified on the unit<br />
nameplate. Failure to do so may cause erratic limit operation<br />
and may also result in premature heat exchanger failure.<br />
This <strong>SL280DFV</strong> furnace must be installed so that its electrical<br />
components are protected from water.<br />
Installed in Combination with a Cooling Coil<br />
When this furnace is used with cooling units, it shall be<br />
installed in parallel with, or on the upstream side of, cooling<br />
units to avoid condensation in the heating compartment.<br />
With a parallel flow arrangement, a damper (or other<br />
means to control the flow of air) must adequately prevent<br />
Page 4
chilled air from entering the furnace (see figure 1). If the<br />
damper is manually operated, it must be equipped to prevent<br />
operation of either the heating or the cooling unit, unless<br />
it is in the full HEAT or COOL setting.<br />
GAS UNIT<br />
Dampers<br />
(open during heating<br />
operation only)<br />
FIGURE 1<br />
AIR HANDLER<br />
Dampers<br />
(open during cooling<br />
operation only)<br />
When installed, this furnace must be electrically grounded<br />
according to local codes. In addition, in the United States,<br />
installation must conform with the current National Electric<br />
Code, ANSI/NFPA No. 70. The National Electric Code<br />
(ANSI/NFPA No. 70) is available from the following address:<br />
National Fire Protection Association<br />
1 Battery March Park<br />
Quincy, MA 02269<br />
NOTE − This furnace is designed for a minimum continuous<br />
return air temperature of 60°F (16°C) or an intermittent<br />
operation down to 55°F (13°C) dry bulb for cases<br />
where a night setback thermostat is used. Return air temperature<br />
must not exceed 85°F (29°C) dry bulb.<br />
The <strong>SL280DFV</strong> furnace may be installed in alcoves, closets,<br />
attics, basements, garages, and utility rooms in the<br />
downflow position.<br />
This furnace design has not been CSA International certified<br />
for installation in mobile homes, recreational vehicles,<br />
or outdoors.<br />
Use of <strong>Furnace</strong> as Construction Heater<br />
<strong>Lennox</strong> does not recommend the use of <strong>SL280DFV</strong> units<br />
as a construction heater during any phase of construction.<br />
Very low return air temperatures, harmful vapors and operation<br />
of the unit with clogged or misplaced filters will damage<br />
the unit.<br />
<strong>SL280DFV</strong> units may be used for heating of buildings or<br />
structures under construction, if the following conditions<br />
are met:<br />
The vent system must be permanently installed per<br />
these installation instructions.<br />
A room thermostat must control the furnace. The use of<br />
fixed jumpers that will provide continuous heating is not<br />
allowed.<br />
The return air duct must be provided and sealed to the<br />
furnace.<br />
Return air temperature range between 60°F (16°C) and<br />
80°F (27°C) must be maintained.<br />
Air filters must be installed in the system and must be<br />
maintained during construction.<br />
Air filters must be replaced upon construction completion.<br />
The input rate and temperature rise must be set per the<br />
furnace rating plate.<br />
One hundred percent (100%) outdoor air must be provided<br />
for combustion air requirements during construction.<br />
Temporary ducting may supply outdoor air to the<br />
furnace. Do not connect duct directly to the furnace.<br />
Size the temporary duct following these instructions in<br />
section for Combustion, Dilution and Ventilation Air in a<br />
confined space with air from outside.<br />
The furnace heat exchanger, components, duct system,<br />
air filters and evaporator coils must be thoroughly<br />
cleaned following final construction clean−up.<br />
All furnace operating conditions (including ignition, input<br />
rate, temperature rise and venting) must be verified<br />
according to these installation instructions.<br />
General<br />
These instructions are intended as a general guide and do<br />
not supersede local codes in any way. Consult authorities<br />
having jurisdiction before installation.<br />
In addition to the requirements outlined previously, the following<br />
general recommendations must be considered<br />
when installing a <strong>SL280DFV</strong> furnace:<br />
Place the furnace as close to the center of the air distribution<br />
system as possible. The furnace should also be<br />
located close to the chimney or vent termination point.<br />
Do not install the furnace where drafts might blow directly<br />
into it. This could cause improper combustion and unsafe<br />
operation.<br />
Do not block the furnace combustion air openings with<br />
clothing, boxes, doors, etc. Air is needed for proper<br />
combustion and safe unit operation.<br />
When the furnace is installed in an attic or other insulated<br />
space, keep insulation away from the furnace.<br />
NOTE − The Commonwealth of Massachusetts stipulates<br />
these additional requirements:<br />
<strong>Gas</strong> furnaces shall be installed by a licensed plumber<br />
or fitter only.<br />
Page 5
The gas cock must be T handle" type.<br />
When a furnace is installed in an attic, the passageway<br />
to and service area surrounding the equipment<br />
shall be floored.<br />
WARNING<br />
Product contains fiberglass wool.<br />
Disturbing the insulation in this product during<br />
installation, maintenance, or repair will expose you<br />
to fiberglass wool. Breathing this may cause lung<br />
cancer. (Fiberglass wool is known to the State of California<br />
to cause cancer.)<br />
Fiberglass wool may also cause respiratory, skin,<br />
and eye irritation.<br />
To reduce exposure to this substance or for further<br />
information, consult material safety data sheets<br />
available from address shown below, or contact your<br />
supervisor.<br />
<strong>Lennox</strong> Industries Inc.<br />
P.O. Box 799900<br />
Dallas, TX 75379−9900<br />
Combustion, Dilution & Ventilation Air<br />
In the past, there was no problem in bringing in sufficient outdoor<br />
air for combustion. Infiltration provided all the air that<br />
was needed. In today’s homes, tight construction practices<br />
make it necessary to bring in air from outside for combustion.<br />
Take into account that exhaust fans, appliance vents,<br />
chimneys, and fireplaces force additional air that could be<br />
used for combustion out of the house. Unless outside air is<br />
brought into the house for combustion, negative pressure<br />
(outside pressure is greater than inside pressure) will build<br />
to the point that a downdraft can occur in the furnace vent<br />
pipe or chimney. As a result, combustion gases enter the living<br />
space creating a potentially dangerous situation.<br />
In the absence of local codes concerning air for combustion<br />
and ventilation, use the guidelines and procedures in<br />
this section to install <strong>SL280DFV</strong> furnaces to ensure efficient<br />
and safe operation. You must consider combustion air<br />
needs and requirements for exhaust vents. A portion of this<br />
information has been reprinted with permission from the<br />
National Fuel <strong>Gas</strong> Code (ANSI-Z223.1). This reprinted material<br />
is not the complete and official position of the ANSI on<br />
the referenced subject, which is represented only by the<br />
standard in its entirety.<br />
CAUTION<br />
Do not install the furnace in a corrosive or contaminated<br />
atmosphere. Meet all combustion and ventilation<br />
air requirements, as well as all local codes.<br />
CAUTION<br />
Insufficient combustion air can cause headaches,<br />
nausea, dizziness or asphyxiation. It will also cause<br />
excess water in the heat exchanger resulting in rusting<br />
and premature heat exchanger failure. Excessive<br />
exposure to contaminated combustion air will result<br />
in safety and performance related problems. Avoid<br />
exposure to the following substances in the combustion<br />
air supply:<br />
Permanent wave solutions<br />
Chlorinated waxes and cleaners<br />
Chlorine base swimming pool chemicals<br />
Water softening chemicals<br />
De-icing salts or chemicals<br />
Carbon tetrachloride<br />
Halogen type refrigerants<br />
Cleaning solvents (such as perchloroethylene)<br />
Printing inks, paint removers, varnishes, etc.<br />
Hydrochloric acid<br />
Cements and glues<br />
Antistatic fabric softeners for clothes dryers<br />
Masonry acid washing materials<br />
All gas-fired appliances require air for the combustion process.<br />
If sufficient combustion air is not available, the furnace<br />
or other appliances will operate inefficiently and unsafely.<br />
Enough air must be provided to meet the needs of all<br />
fuel-burning appliances and appliances such as exhaust<br />
fans which force air out of the house. When fireplaces, exhaust<br />
fans, or clothes dryers are used at the same time as<br />
the furnace, much more air is necessary to ensure proper<br />
combustion and to prevent a downdraft. Insufficient air<br />
causes incomplete combustion which can result in carbon<br />
monoxide.<br />
In addition to providing combustion air, fresh outdoor air<br />
dilutes contaminants in the indoor air. These contaminants<br />
may include bleaches, adhesives, detergents, solvents<br />
and other contaminants which can corrode furnace<br />
components.<br />
The requirements for providing air for combustion and ventilation<br />
depend largely on whether the furnace is installed in<br />
an unconfined or a confined space.<br />
Unconfined Space<br />
An unconfined space is an area such as a basement or<br />
large equipment room with a volume greater than 50 cubic<br />
feet (1.42 m 3 ) per 1,000 Btu (.29 kW) per hour of the combined<br />
input rating of all appliances installed in that space.<br />
This space also includes adjacent rooms which are not<br />
separated by a door. Though an area may appear to be unconfined,<br />
it might be necessary to bring in outdoor air for<br />
combustion if the structure does not provide enough air by<br />
infiltration. If the furnace is located in a building of tight<br />
construction with weather stripping and caulking around<br />
the windows and doors, follow the procedures in the air<br />
from outside section.<br />
Page 6
Confined Space<br />
A confined space is an area with a volume less than 50 cubic<br />
feet (1.42 m 3 ) per 1,000 Btu (.29 kW) per hour of the<br />
combined input rating of all appliances installed in that<br />
space. This definition includes furnace closets or small<br />
equipment rooms.<br />
When the furnace is installed so that supply ducts carry air<br />
circulated by the furnace to areas outside the space containing<br />
the furnace, the return air must be handled by ducts<br />
which are sealed to the furnace casing and which terminate<br />
outside the space containing the furnace. This is especially<br />
important when the furnace is mounted on a platform in a<br />
confined space such as a closet or small equipment room.<br />
Even a small leak around the base of the unit at the platform<br />
or at the return air duct connection can cause a potentially<br />
dangerous negative pressure condition. Air for combustion<br />
and ventilation can be brought into the confined space either<br />
from inside the building or from outside.<br />
CHIMNEY<br />
OR GAS<br />
VENT<br />
FURNACE<br />
EQUIPMENT IN CONFINED<br />
SPACE ALL AIR FROM INSIDE<br />
WATER<br />
HEATER<br />
OPENINGS<br />
(To Adjacent<br />
Room)<br />
NOTE − Each opening shall have a free area of at least one square<br />
inch (645 mm 2 ) per 1,000 Btu (.29 kW) per hour of the total input rating<br />
of all equipment in the enclosure, but not less than 100 square<br />
inches (64516 mm 2 ).<br />
FIGURE 2<br />
Air from Inside<br />
If the confined space that houses the furnace adjoins a<br />
space categorized as unconfined, air can be brought in by<br />
providing two permanent openings between the two<br />
spaces. Each opening must have a minimum free area of 1<br />
square inch (645 mm 2 ) per 1,000 Btu (.29 kW) per hour of<br />
total input rating of all gas−fired equipment in the confined<br />
space. Each opening must be at least 100 square inches<br />
(64516 mm 2 ). One opening shall be within 12 inches (305<br />
mm) of the top of the enclosure and one opening within 12<br />
inches (305 mm) of the bottom. See figure 2.<br />
Air from Outside<br />
If air from outside is brought in for combustion and ventilation,<br />
the confined space must have two permanent openings.<br />
One opening shall be within 12 inches (305 mm) of the<br />
top of the enclosure and one opening within 12 inches (305<br />
mm) of the bottom. These openings must communicate directly<br />
or by ducts with the outdoors or spaces (crawl or attic)<br />
that freely communicate with the outdoors or indirectly<br />
through vertical ducts. Each opening shall have a minimum<br />
free area of 1 square inch (645 mm 2 ) per 4,000 Btu (1.17<br />
kW) per hour of total input rating of all equipment in the enclosure.<br />
See figures 3 and 4. When communicating with<br />
the outdoors through horizontal ducts, each opening shall<br />
have a minimum free area of 1 square inch (645 mm 2 ) per<br />
2,000 Btu (.56 kW) per total input rating of all equipment in<br />
the enclosure. See figure 5.<br />
When ducts are used, they shall be of the same cross−sectional<br />
area as the free area of the openings to which they<br />
connect. The minimum dimension of rectangular air ducts<br />
shall be no less than 3 inches (75 mm). In calculating free<br />
area, the blocking effect of louvers, grilles, or screens must<br />
be considered. If the design and free area of protective covering<br />
is not known for calculating the size opening required,<br />
it may be assumed that wood louvers will have 20 to 25 percent<br />
free area and metal louvers and grilles will have 60 to<br />
75 percent free area. Louvers and grilles must be fixed in the<br />
open position or interlocked with the equipment so that they<br />
are opened automatically during equipment operation.<br />
Page 7
EQUIPMENT IN CONFINED SPACE<br />
ALL AIR FROM OUTSIDE<br />
(Inlet Air from Crawlspace and Outlet Air to Ventilated Attic)<br />
CHIMNEY OR<br />
GAS VENT<br />
VENTILATION LOUVERS<br />
(Each end of attic)<br />
FURNACE<br />
OUTLET<br />
AIR<br />
WATER<br />
HEATER<br />
VENTILATION<br />
LOUVERS<br />
(For unheated crawl space)<br />
INLET<br />
AIR<br />
NOTE−The inlet and outlet air openings shall each have a free area of at least one square inch (645<br />
mm 2 ) per 4,000 Btu (1.17 kW) per hour of the total input rating of all equipment in the enclosure.<br />
FIGURE 3<br />
CHIMNEY<br />
OR GAS<br />
VENT<br />
EQUIPMENT IN CONFINED SPACE<br />
ALL AIR FROM OUTSIDE<br />
(All Air Through Ventilated Attic)<br />
VENTILATION LOUVERS<br />
(Each end of attic)<br />
CHIMNEY<br />
OR GAS<br />
VENT<br />
WATER<br />
HEATER<br />
EQUIPMENT IN<br />
CONFINED SPACE<br />
ALL AIR FROM<br />
OUTSIDE<br />
OUTLET<br />
AIR<br />
OUTLET AIR<br />
FURNACE<br />
FURNACE<br />
INLET AIR<br />
(Ends 12 in.<br />
above bottom)<br />
INLET AIR<br />
WATER<br />
HEATER<br />
NOTE−The inlet and outlet air openings shall each have a<br />
free area of at least one square inch (645 mm 2 ) per 4,000<br />
Btu (1.17 kW) per hour of the total input rating of all equipment<br />
in the enclosure.<br />
FIGURE 4<br />
NOTE − Each air duct opening shall have a free area of at least<br />
one square inch (645 mm 2 ) per 2,000 Btu (.59 kW) per hour of<br />
the total input rating of all equipment in the enclosure. If the<br />
equipment room is located against an outside wall and the air<br />
openings communicate directly with the outdoors, each opening<br />
shall have a free area of at least one square inch (645 mm 2 )<br />
per 4,000 Btu (1.17 kW) per hour of the total input rating of all<br />
other equipment in the enclosure.<br />
FIGURE 5<br />
Page 8
Downflow <strong>Installation</strong><br />
Downflow unit installs in three ways: on non−combustible<br />
flooring, on combustible flooring using a downflow combustible<br />
flooring base, or on a reverse−flow cooling cabinet.<br />
Do not drag the unit across the floor.<br />
<strong>Installation</strong> on Non−Combustible Flooring (Figure 6)<br />
CAUTION<br />
The furnace and downflow combustible flooring<br />
base shall not be installed directly on carpeting, tile,<br />
or other combustible material other than wood flooring.<br />
1 − Cut floor opening keeping in mind clearances listed on<br />
unit rating plate. Also keep in mind gas supply connections,<br />
electrical supply, flue and air intake connections<br />
and sufficient installation and servicing clearances.<br />
See table 1 for correct floor opening size.<br />
2 − Flange warm air plenum and lower the plenum into the<br />
opening.<br />
3 − Set the unit over the plenum and seal the plenum to<br />
the unit.<br />
4 − Ensure that the seal is adequate.<br />
<strong>SL280DFV</strong> UNIT<br />
PROPERLY<br />
SIZED FLOOR<br />
OPENING<br />
SUPPLY AIR PLENUM<br />
DOWNFLOW<br />
COMBUSTIBLE<br />
FLOORING BASE<br />
<strong>SL280DFV</strong> UNIT<br />
OPENING<br />
SUPPLY AIR<br />
PLENUM<br />
FIGURE 7<br />
TABLE 2<br />
COMBUSTIBLE FLOOR OPENING SIZE<br />
Front to Rear Side to Side<br />
Cabinet Width<br />
in. mm in. mm<br />
A (14.5") 22 559 15−3/4 400<br />
B (17.5") 22 559 18−3/4 476<br />
C (21") 22 559 22−3/4 578<br />
NOTE − Floor opening dimensions listed are 1/4 inch (6 mm) larger than<br />
unit opening. See unit dimensions on page 2.<br />
FIGURE 6<br />
TABLE 1<br />
NON−COMBUSTIBLE FLOOR OPENING SIZE<br />
Front to Rear Side to Side<br />
Cabinet Width<br />
in. mm in. mm<br />
A (14.5") 19−3/4 502 13−1/4 337<br />
B (17.5") 19−3/4 502 16−1/4 413<br />
C (21") 19−3/4 502 19−3/4 502<br />
NOTE − Door opening dimensions listed are 1/4 inch (6 mm) larger than<br />
the unit opening. See unit dimensions on page 2.<br />
<strong>Installation</strong> on Combustible Flooring (Figure 7)<br />
1 − When unit is installed on a combustible floor, a downflow<br />
combustible flooring base must be installed between<br />
the furnace and the floor. The base must be ordered<br />
separately.<br />
See table 2 for opening size to cut in floor.<br />
2 − After opening is cut, set combustible flooring base into<br />
opening.<br />
3 − Check sealing strips on combustible flooring base to<br />
make sure they are properly glued and positioned.<br />
4 − Lower supply air plenum into downflow combustible<br />
flooring base until plenum flanges seal against the<br />
strips.<br />
NOTE − Be careful not to damage sealing strips. Check<br />
for a tight seal.<br />
5 − Set the furnace over the plenum.<br />
6 − Ensure that the seal between the furnace and plenum<br />
is adequate.<br />
<strong>Installation</strong> on Cooling Cabinet (Figure 8)<br />
1 − Refer to reverse−flow coil installation instructions for<br />
correctly sized opening in floor and installation of cabinet.<br />
NOTE − Downflow combustible flooring kit is not used<br />
2 − When cooling cabinet is in place, set and secure the<br />
furnace according to the instructions that are provided<br />
with the cooling coil. Secure the furnace to the cabinet.<br />
3 − Seal the cabinet and check for air leaks.<br />
Page 9
Setting Equipment<br />
PROPERLY<br />
SIZED FLOOR<br />
OPENING<br />
<strong>SL280DFV</strong> UNIT<br />
COOLING COIL<br />
PLENUM<br />
WARNING<br />
Do not install the furnace on its front, back or in the<br />
horizontal position. See figure 12. Do not connect the<br />
return air ducts to the back of the furnace. Doing so<br />
will adversely affect the operation of the safety control<br />
devices, which could result in personal injury or<br />
death.<br />
Install the <strong>SL280DFV</strong> gas furnace as shipped in the<br />
downflow position only. Do not install the furnace horizontally.<br />
FIGURE 8<br />
Return Air Opening −− Downflow Units<br />
The following steps should be taken when installing plenum:<br />
1 − Bottom edge of plenum should be flanged with a<br />
hemmed edge (See figure 9).<br />
Side View<br />
PLENUM<br />
SEALING STRIP<br />
(Field Provided)<br />
SECURE FROM<br />
OUTSIDE CABINET<br />
HEMMED EDGE<br />
Select a location that allows for the required clearances<br />
that are listed on the unit nameplate. Also consider gas<br />
supply connections, electrical supply, vent connection,<br />
and installation and service clearances [24 inches (610<br />
mm) at unit front]. The unit must be level.<br />
NOTE − Units with 1/2 hp blower motors are equipped with<br />
three flexible legs and one rigid leg. See figure 11. The rigid<br />
leg is equipped with a shipping bolt and a flat white plastic<br />
washer (rather than the rubber mounting grommet used<br />
with a flexible mounting leg). The bolt and washer must<br />
be removed before the furnace is placed into operation.<br />
After the bolt and washer have been removed, the rigid<br />
leg will not touch the blower housing.<br />
CABINET SIDE PANEL<br />
FIGURE 9<br />
2 − Sealing strip should be used.<br />
3 − In all cases, plenum should be secured to top flanges<br />
of furnace with sheet metal screws.<br />
SECURE FROM IN-<br />
SIDE CABINET<br />
PLENUM<br />
HEMMED EDGE<br />
Side View<br />
<strong>SL280DFV</strong>07036A WITH 1/2 HP<br />
BLOWER MOTOR<br />
RIGID LEG<br />
remove shipping bolt and washer<br />
FIBERGLASS<br />
SEALING STRIP<br />
(Field Provided)<br />
CABINET SIDE<br />
PANEL<br />
FIGURE 10<br />
4 − In closet installations, it may be impossible to install<br />
sheet metal screws from the outside. In this case,<br />
make plenum with a removable front and install<br />
screws from the inside (See figure 10).<br />
5 − Make certain that an adequate seal is made.<br />
FIGURE 11<br />
WARNING<br />
The blower access panel must be securely in place<br />
when the blower and burners are operating. <strong>Gas</strong><br />
fumes, which could contain carbon monoxide, can<br />
be drawn into living space resulting in personal injury<br />
or death.<br />
Page 10
Front<br />
Back<br />
Horizontal<br />
Downflow Application<br />
Allow for clearances to combustible materials as indicated<br />
on the unit nameplate. Minimum clearances for<br />
closet or alcove installations are shown in figure 13.<br />
Downflow Application <strong>Installation</strong> Clearances<br />
Top<br />
Left Side<br />
Type of Vent<br />
Connector<br />
Bottom<br />
Type C<br />
Right Side<br />
Type B1<br />
Top 1 in. (25 mm) 1 in. (25 mm)<br />
*Front 2−1/4 in. (57 mm)** 2−1/4in. (57 mm)<br />
Back 0 0<br />
Sides 0† 0<br />
Vent 6 in. (152 mm) 1 in. (25 mm)<br />
Floor NC†† NC††<br />
*Front clearance in alcove installation must be 24 in. (610 mm).<br />
Maintain a minimum of 24 in. (610 mm) for front service access.<br />
** 3−1/4 in. if single wall vent pipe is used.<br />
†Left side requires 3 in. if a single wall vent is used on 14 −1/2 in. cabinets,<br />
or 2 in. if a single wall vent is used on 17 − 1/2 in. cabinets.<br />
††The furnace may be installed on a combustible wood floor if an<br />
optional additive base is installed between the furnace and the<br />
combustible floor.<br />
FIGURE 13<br />
FIGURE 12<br />
WARNING<br />
Improper installation of the furnace can result in personal<br />
injury or death. Combustion and flue products<br />
must never be allowed to enter the return air system<br />
or the living space. Use screws and joint tape to seal<br />
the return air system to the furnace.<br />
In platform installations with bottom return air, the<br />
furnace should be sealed airtight to the return air plenum.<br />
A door must never be used as a portion of the<br />
return air duct system. The base must provide a<br />
stable support and an airtight seal to the furnace. Allow<br />
absolutely no sagging, cracks, gaps, etc.<br />
The return and supply air duct systems must never<br />
be connected to or from other heating devices such<br />
as a fireplace or stove, etc. Fire, explosion, carbon<br />
monoxide poisoning, personal injury and/or property<br />
damage could result.<br />
Filters<br />
This unit is not equipped with a filter or rack. A field−provided<br />
high−velocity filter is required for the unit to operate<br />
properly. Table 3 lists recommended filter sizes.<br />
A filter must be in place any time the unit is operating.<br />
TABLE 3<br />
Cabinet Width Return Air Filter Size (inches)<br />
A (14−1/2") 14 x 25 x 1 (1)<br />
B (17−1/2") 16 x 25 x 1 (1)<br />
C (21") 20 x 25 x 1 (1)<br />
Page 11
Duct System<br />
Use industry-approved standards (such as those published<br />
by Air Conditioning Contractors of America or American<br />
Society of Heating, Refrigerating and Air Conditioning<br />
Engineers) to size and install the supply and return air duct<br />
system. This will result in a quiet and low-static system that<br />
has uniform air distribution.<br />
NOTE − Do not operate the furnace in the heating mode<br />
with an external static pressure that exceeds 0.8 inches<br />
w.c. Higher external static pressures may cause erratic limit<br />
operation.<br />
Ensure that you have made a seal between the supply air<br />
plenum and the furnace and between the furnace and the<br />
return air plenum.<br />
Return Air Plenum<br />
Return air must not be drawn from a room where this<br />
furnace, or any other gas−fueled appliance (i.e., water<br />
heater), or carbon monoxide−producing device (i.e.,<br />
wood fireplace) is installed. When return air is drawn<br />
from a room, a negative pressure is created in the room. If<br />
a gas appliance is operating in a room with negative pressure,<br />
the flue products can be pulled back down the vent<br />
pipe and into the room. This reverse flow of the flue gas<br />
may result in incomplete combustion and the formation<br />
of carbon monoxide gas. This toxic gas might then be distributed<br />
throughout the house by the furnace duct system.<br />
Venting<br />
A 4−inch diameter flue transition is factory-installed on all<br />
models. Modifying or removing the flue transition will<br />
cause the unit to operate unsafely and will void the unit<br />
certification. The vent connector does not require insulation.<br />
The <strong>SL280DFV</strong> series units are classified as fan−assisted<br />
Category I furnaces when vertically vented according to<br />
the latest edition of National Fuel <strong>Gas</strong> Code (NFPA 54 /<br />
ANSI Z223.1). A fan−assisted Category I furnace is an appliance<br />
equipped with an integral mechanical means to either<br />
draw or force combustion products through the combustion<br />
chamber and/or heat exchanger.<br />
NOTE − Use these instructions as a guide. They do not supersede<br />
local codes. This furnace must be vented according<br />
to all local codes, these installation instructions, and the<br />
provided venting tables in these instructions<br />
The venting tables in this manual were extracted from the<br />
National Fuel <strong>Gas</strong> Code (NFPA 54 / ANSI Z223.1) and are<br />
provided as a guide for proper vent installation. Proper application,<br />
termination, construction and location of vents<br />
must conform to local codes having jurisdiction. In the absence<br />
of local codes, the NFGC serves as the defining document.<br />
Refer to the tables and the venting information contained in<br />
these instructions to properly size and install the venting<br />
system.<br />
IMPORTANT<br />
Once the venting system is installed, attach the Disconnected<br />
Vent" warning sticker to a visible area of<br />
the plenum near the vent pipe. The warning sticker<br />
is provided in the bag assembly. Order kit 66W04 for<br />
additional stickers.<br />
WARNING<br />
Asphyxiation hazard. The exhaust vent for this furnace<br />
must be securely connected to the furnace flue<br />
transition at all times.<br />
VENT CONNECTION<br />
FLUE TRANSITION<br />
COLLAR<br />
FIGURE 14<br />
“DISCONNECTED VENT”<br />
WARNING<br />
STICKER<br />
Use self−drilling sheet metal screws or a mechanical fastener<br />
to firmly secure the vent pipe to the round collar of the<br />
flue transition. If self−drilling screws are used to attach the<br />
vent pipe, it is recommended that three be used. Drive one<br />
self−drilling screw through the front and one through each<br />
side of the vent pipe and collar. See figure 14.<br />
Masonry chimneys used to vent Category I central furnaces<br />
must be either tile-lined or lined with a listed metal<br />
lining system or dedicated gas vent. Unlined masonry<br />
chimneys are prohibited. See figures 15 and 16 for common<br />
venting.<br />
Page 12
Common Venting Using Tile−Lined Interior Masonry Chimney and Combined Vent Connector<br />
NOTE− Refer to provided venting<br />
tables for installations.<br />
MINIMUM LENGTH = AS SHORT AS PRACTICAL.<br />
FOR MAXIMUM LENGTH SEE NOTE TO LEFT<br />
INTERIOR TILE−LINED<br />
MASONRY CHIMNEY<br />
NOTE − the chimney must be properly<br />
sized per provided venting tables or<br />
lined with listed metal lining system.<br />
OTHER<br />
APPLIANCE<br />
VENT<br />
CONNECTOR<br />
PERMANENTLY<br />
SEALED FIREPLACE<br />
OPENING<br />
FURNACE<br />
Venting Using a Masonry Chimney<br />
The following additional requirements apply when a lined<br />
masonry chimney is used to vent this furnace.<br />
A chimney with one or more sides exposed to the outside of<br />
the structure is considered to be an exterior chimney.<br />
An exterior masonry chimney that is not tile−lined must be<br />
lined with B1 vent or a listed insulated flexible metal vent.<br />
An exterior tile−lined chimney that is sealed and capped<br />
may be lined with a listed uninsulated flexible metal vent.<br />
If the existing chimney will not accommodate a listed metal<br />
liner, either the chimney must be rebuilt to accommodate<br />
one of these liners or an alternate approved venting method<br />
must be found.<br />
Insulation for the flexible vent pipe must be an encapsulated<br />
fiberglass sleeve recommended by the flexible vent<br />
pipe manufacturer. See figure 16.<br />
Common Venting Using Metal−Lined Masonry Chimney<br />
5 ft. (1.5 m)<br />
minimum<br />
4 in. (102 mm)<br />
minimum<br />
MAX. LENGTH<br />
−− SEE NOTE<br />
BELOW.<br />
MIN. LENGTH −− AS<br />
SHORT AS PRACTICAL<br />
VENT CONNECTOR<br />
OTHER<br />
APPLIANCE<br />
FURNACE<br />
FIGURE 16<br />
SEALED<br />
EXTERIOR<br />
CHIMNEY WITH<br />
METAL<br />
LINER<br />
PERMANENTLY<br />
SEALED FIREPLACE<br />
OPENING<br />
NOTE 1 − Refer to the provided venting tables for installations.<br />
FIGURE 15<br />
DO NOT insulate the space between the liner and the<br />
chimney wall with puffed mica or any other loose granular<br />
insulating material<br />
IMPORTANT<br />
SINGLE appliance venting of a fan-assisted furnace<br />
into a tile-lined masonry chimney (interior or outside<br />
wall) is PROHIBITED. The chimney must first be lined<br />
with either type B1 vent or an insulated single wall<br />
flexible vent lining system which has been sized according<br />
to the provided venting tables and the vent<br />
pipe manufacturer’s instructions.<br />
A fan−assisted furnace may be commonly vented into an<br />
existing lined masonry chimney if the following conditions<br />
are met:<br />
The chimney is currently serving at least one drafthood<br />
equipped appliance<br />
The vent connectors and chimney are sized according<br />
to the provided venting tables.<br />
If type B1 double-wall vent is used inside a chimney, no other<br />
appliance can be vented into the chimney. The outer wall<br />
of type B1 vent pipe must not be exposed to flue products.<br />
A type B1 vent or masonry chimney liner shall terminate<br />
above the roof surface with a listed cap or a listed roof assembly<br />
according to the terms of their respective listings<br />
and the vent manufacturer’s instructions.<br />
When inspection reveals that an existing chimney is not<br />
safe for the intended purpose, it shall be rebuilt to conform<br />
to nationally recognized standards, lined or relined with<br />
suitable materials, or replaced with a gas vent or chimney<br />
suitable for venting <strong>SL280DFV</strong> series units. The chimney<br />
passageway must be checked periodically to ensure that it<br />
is clear and free of obstructions.<br />
Do not install a manual damper, barometric draft regulator,<br />
or flue restrictor between the furnace and the chimney.<br />
Page 13
Never connect a Category I appliance to a chimney that is<br />
servicing a solid−fuel appliance. If a fireplace chimney flue<br />
is used to vent this appliance, the fireplace opening must<br />
be permanently sealed.<br />
A type B or listed chimney lining system that passes<br />
through an unused masonry chimney flue is not considered<br />
to be exposed to the outdoors.<br />
General Venting Requirements<br />
Vent all <strong>SL280DFV</strong> furnaces according to these instructions:<br />
1 − Vent diameter recommendations and maximum allowable<br />
piping runs are found in the provided venting<br />
tables.<br />
2 − In no case should the vent or vent connector diameter<br />
be less than the diameter specified in the provided<br />
venting tables.<br />
3 − The minimum vent capacity determined by the sizing<br />
tables must be less than the low fire input rating and the<br />
maximum vent capacity must be greater than the high<br />
fire input rating.<br />
4 − Single appliance vents − If the vertical vent or tile-lined<br />
chimney has a larger diameter or flow area than the<br />
vent connector, use the vertical vent diameter to determine<br />
the minimum vent capacity and the vent<br />
connector diameter to determine the maximum vent<br />
capacity. The flow area of the vertical vent, however,<br />
shall not exceed 7 times the flow area of the listed appliance<br />
categorized vent area, drafthood outlet area or<br />
flue collar area unless designed according to approved<br />
engineering methods.<br />
5 − Multiple appliance vents − The flow area of the largest<br />
section of vertical vent or chimney shall not exceed 7<br />
times the smallest listed appliance categorized vent<br />
area, drafthood outlet area or flue collar area unless designed<br />
according to approved engineering methods.<br />
6 − The entire length of single wall metal vent connector<br />
shall be readily accessible for inspection, cleaning,<br />
and replacement.<br />
7 − Single appliance venting configurations with zero lateral<br />
lengths (tables 5 and 6) are assumed to have no<br />
elbows in the vent system. For all other vent configurations,<br />
the vent system is assumed to have two 90° elbows.<br />
For each additional 90° elbow or equivalent (for<br />
example two 45° elbows equal one 90° elbow) beyond<br />
two, the maximum capacity listed in the venting table<br />
should be reduced by 10% (0.90 x maximum listed capacity).<br />
8 − The common venting tables (7, 8, 9, and 10) were generated<br />
using a maximum horizontal vent connector<br />
length of 1−1/2 feet (.46 m) for each inch (25 mm) of<br />
connector diameter as follows:<br />
Connector Diameter<br />
inches (mm)<br />
TABLE 4<br />
Maximum Horizontal<br />
Connector Length feet (m)<br />
3 (76) 4−1/2 (1.37)<br />
4 (102) 6 (1.83)<br />
5 (127) 7−1/2 (2.29)<br />
6 (152) 9 (2.74)<br />
7 (178) 10−1/2 (3.20)<br />
9 − If the common vertical vent is offset, the maximum<br />
common vent capacity listed in the common venting<br />
tables should be reduced by 20%, the equivalent of two<br />
90° elbows (0.80 x maximum common vent capacity).<br />
The horizontal length of the offset shall not exceed<br />
1-1/2 feet (.46 m) for each inch (25 mm) of common<br />
vent diameter.<br />
10 − The vent pipe should be as short as possible with the<br />
least number of elbows and angles required to complete<br />
the job. Route the vent connector to the vent using<br />
the shortest possible route.<br />
11 − A vent connector shall be supported without any dips<br />
or sags and shall slope a minimum of 1/4 inch (6.4 mm)<br />
per linear foot (305 mm) of connector, back toward the<br />
appliance.<br />
12 − Vent connectors shall be firmly attached to the furnace<br />
flue collar by self−drilling screws or other approved<br />
means, except vent connectors of listed type B vent<br />
material which shall be assembled according to the<br />
manufacturer’s instructions. Joints between sections<br />
of single wall connector piping shall be fastened by<br />
screws or other approved means.<br />
13 − When the vent connector used for Category I appliances<br />
must be located in or pass through a crawlspace<br />
or other areas which may be cold, that portion of<br />
the vent connector shall be constructed of listed<br />
double-wall type B vent material or material having<br />
equivalent insulation qualities.<br />
14 − All venting pipe passing through floors, walls, and ceilings<br />
must be installed with the listed clearance to combustible<br />
materials and be fire stopped according to local<br />
codes. In absence of local codes, refer to NFGC<br />
(Z223.1).<br />
15 − No portion of the venting system can extend into, or pass<br />
through any circulation air duct or plenum.<br />
16 − Vent connectors serving Category I appliances shall<br />
not be connected to any portion of mechanical draft<br />
systems operating under positive pressure such as<br />
Category III or IV venting systems.<br />
17 − If vent connectors are combined prior to entering the<br />
common vent, the maximum common vent capacity<br />
listed in the common venting tables must be reduced by<br />
10%, the equivalent of one 90° elbow (0.90 x maximum<br />
common vent capacity).<br />
Page 14
18 − The common vent diameter must always be at least as<br />
large as the largest vent connector diameter.<br />
19 − In no case, shall the vent connector be sized more than<br />
two consecutive table size diameters over the size of<br />
the draft hood outlet or flue collar outlet.<br />
20 − Do not install a manual damper, barometric draft regulator<br />
or flue restrictor between the furnace and the<br />
chimney.<br />
Height<br />
H<br />
(feet)<br />
6<br />
8<br />
10<br />
15<br />
20<br />
30<br />
21 − When connecting this appliance to an existing dedicated<br />
or common venting system, you must inspect the<br />
venting system’s general condition and look for signs<br />
of corrosion. The existing vent pipe size must conform<br />
to these instructions and the provided venting tables. If<br />
the existing venting system does not meet these requirements,<br />
it must be resized.<br />
TABLE 5<br />
Capacity of Type B Double−Wall Vents with Type B Double−Wall Connectors<br />
Serving a Single Category I Appliance<br />
Vent and Connector Diameter − D (inches)<br />
Lateral<br />
3 Inch 4 Inch 5 Inch 6 Inch<br />
L<br />
(feet)<br />
Appliance Input Rating in Thousands of Btu Per Hour<br />
MIN MAX MIN MAX MIN MAX MIN MAX<br />
0 0 78 0 152 0 251 0 375<br />
2 13 51 18 97 27 157 32 232<br />
4 21 49 30 94 39 153 50 227<br />
6 25 46 36 91 47 149 59 223<br />
0 0 84 0 165 0 276 0 415<br />
2 12 57 16 109 25 178 28 263<br />
5 23 53 32 103 42 171 53 255<br />
8 28 49 39 98 51 164 64 247<br />
0 0 88 0 175 0 295 0 447<br />
2 12 61 17 118 23 194 26 289<br />
5 23 57 32 113 41 187 52 280<br />
10 30 51 41 104 54 176 67 267<br />
0 0 94 0 191 0 327 0 502<br />
2 11 69 15 136 20 226 22 339<br />
5 22 65 30 130 39 219 49 330<br />
10 29 59 40 121 51 206 64 315<br />
15 35 53 48 112 61 195 76 301<br />
0 0 97 0 202 0 349 0 540<br />
2 10 75 14 149 18 250 20 377<br />
5 21 71 29 143 38 242 47 367<br />
10 28 64 38 133 50 229 62 351<br />
15 34 58 46 124 59 217 73 337<br />
20 48 52 55 116 69 206 84 322<br />
0 0 100 0 213 0 374 0 587<br />
2 9 81 13 166 14 283 18 432<br />
5 21 77 28 160 36 275 45 421<br />
10 27 70 37 150 48 262 59 405<br />
15 33 64 44 141 57 249 70 389<br />
20 56 58 53 132 66 237 80 374<br />
30 NR NR 73 113 88 214 104 346<br />
NOTE − Single appliance venting configurations with zero lateral lengths are assumed to have no elbows in the vent system. For all other<br />
vent configurations, the vent system is assumed to have two 90° elbows. For each additional 90° elbow or equivalent (for example two 45°<br />
elbows equal one 90° elbow) beyond two, the maximum capacity listed in the venting table should be reduced by 10 percent (0.90 x maximum<br />
listed capacity).<br />
Page 15
Height<br />
H<br />
(feet)<br />
6<br />
8<br />
10<br />
15<br />
20<br />
30<br />
TABLE 6<br />
Capacity of Type B Double−Wall Vents with Single−Wall Metal Connectors<br />
Serving a Single Category I Appliance<br />
Vent and Connector Diameter − D (inches)<br />
Lateral<br />
3 Inch 4 Inch 5 Inch 6 Inch<br />
L<br />
(feet)<br />
Appliance Input Rating in Thousands of Btu Per Hour<br />
MIN MAX MIN MAX MIN MAX MIN MAX<br />
0 38 77 59 151 85 249 126 373<br />
2 39 51 60 96 85 156 123 231<br />
4 NR NR 74 92 102 152 146 225<br />
6 NR NR 83 89 114 147 163 220<br />
0 37 83 58 164 83 273 123 412<br />
2 39 56 59 108 83 176 121 261<br />
5 NR NR 77 102 107 168 151 252<br />
8 NR NR 90 95 122 161 175 243<br />
0 37 87 57 174 82 293 120 444<br />
2 39 61 59 117 82 193 119 287<br />
5 52 56 76 111 105 185 148 277<br />
10 NR NR 97 100 132 171 188 261<br />
0 36 93 56 190 80 325 116 499<br />
2 38 69 57 136 80 225 115 337<br />
5 51 63 75 128 102 216 144 326<br />
10 NR NR 95 116 128 201 182 308<br />
15 NR NR NR NR 158 186 220 290<br />
0 35 96 54 200 78 346 114 537<br />
2 37 74 56 148 78 248 113 375<br />
5 50 68 73 140 100 239 141 363<br />
10 NR NR 93 129 125 223 177 344<br />
15 NR NR NR NR 155 208 216 325<br />
20 NR NR NR NR 186 192 254 306<br />
0 34 99 53 211 76 372 110 584<br />
2 37 80 55 164 76 281 109 429<br />
5 49 74 72 157 98 271 136 417<br />
10 NR NR 91 144 122 255 171 397<br />
15 NR NR 115 131 151 239 208 377<br />
20 NR NR NR NR 181 223 246 357<br />
30 NR NR NR NR NR NR NR NR<br />
NOTE − Single appliance venting configurations with zero lateral lengths are assumed to have no elbows in the vent system. For all other<br />
vent configurations, the vent system is assumed to have two 90° elbows. For each additional 90° elbow or equivalent (for example two 45°<br />
elbows equal one 90° elbow) beyond two, the maximum capacity listed in the venting table should be reduced by 10 percent (0.90 x maximum<br />
listed capacity).<br />
Page 16
Vent<br />
Height<br />
H<br />
(feet)<br />
6<br />
8<br />
10<br />
15<br />
20<br />
30<br />
TABLE 7<br />
Vent Connector Capacity<br />
Type B Double−Wall Vents with Type B Double−Wall Connectors<br />
Serving Two or More Category I Appliances<br />
Vent and Connector Diameter − D (inches)<br />
Connector<br />
Rise<br />
3 Inch 4 Inch 5 Inch 6 Inch<br />
R<br />
Appliance Input Rating in Thousands of Btu Per Hour<br />
(feet)<br />
MIN MAX MIN MAX MIN MAX MIN MAX<br />
1 22 37 35 66 46 106 58 164<br />
2 23 41 37 75 48 121 60 183<br />
3 24 44 38 81 49 132 62 199<br />
1 22 40 35 72 49 114 64 176<br />
2 23 44 36 80 51 128 66 195<br />
3 24 47 37 87 53 139 67 210<br />
1 22 43 34 78 49 123 65 189<br />
2 23 47 36 86 51 136 67 206<br />
3 24 50 37 92 52 146 69 220<br />
1 21 50 33 89 47 142 64 220<br />
2 22 53 35 96 49 153 66 235<br />
3 24 55 36 102 51 163 68 248<br />
1 21 54 33 99 46 157 62 246<br />
2 22 57 34 105 48 167 64 259<br />
3 23 60 35 110 50 176 66 271<br />
1 20 62 31 113 45 181 60 288<br />
2 21 64 33 118 47 190 62 299<br />
3 22 66 34 123 48 198 64 309<br />
TABLE 8<br />
Common Vent Capacity<br />
Type B Double−Wall Vents with Type B Double−Wall Connectors<br />
Serving Two or More Category I Appliances<br />
Common Vent Diameter − D (inches)<br />
Vent<br />
Height<br />
4 Inch 5 Inch 6 Inch 7 Inch<br />
H<br />
Appliance Input Rating in Thousands of Btu Per Hour<br />
(feet)<br />
FAN + FAN FAN + NAT FAN + FAN FAN + NAT FAN + FAN FAN + NAT FAN + FAN FAN + NAT<br />
6 92 81 140 116 204 161 309 248<br />
8 101 90 155 129 224 178 339 275<br />
10 110 97 169 141 243 194 367 299<br />
15 125 112 195 164 283 228 427 352<br />
20 136 123 215 183 314 255 475 394<br />
30 152 138 244 210 361 297 547 459<br />
Page 17
Height<br />
H<br />
(feet)<br />
6<br />
8<br />
10<br />
15<br />
20<br />
30<br />
Lateral<br />
L<br />
(feet)<br />
TABLE 9<br />
Vent Connector Capacity<br />
Type B Double−Wall Vents with Single−Wall Metal Connectors<br />
Serving Two or More Category I Appliances<br />
Vent and Connector Diameter − D (inches)<br />
3 Inch 4 Inch 5 Inch 6 Inch<br />
Appliance Input Rating in Thousands of Btu Per Hour<br />
MIN MAX MIN MAX MIN MAX MIN MAX<br />
1 NR NR NR NR NR NR NR NR<br />
2 NR NR NR NR NR NR 168 182<br />
3 NR NR NR NR 121 131 175 198<br />
1 NR NR NR NR NR NA NR NR<br />
2 NR NR NR NR 125 126 184 193<br />
3 NR NR NR NR 130 138 191 208<br />
1 NR NR NR NR 119 121 182 186<br />
2 NR NR 84 85 124 134 189 203<br />
3 NR NR 89 91 129 144 197 217<br />
1 NR NR 79 87 116 138 177 214<br />
2 NR NR 83 94 121 150 185 230<br />
3 NR NR 87 100 127 160 193 243<br />
1 49 56 78 97 115 152 175 238<br />
2 52 59 82 103 120 163 182 252<br />
3 55 62 87 107 125 172 190 264<br />
1 47 60 77 110 112 175 169 278<br />
2 51 62 81 115 117 185 177 290<br />
3 54 64 85 119 122 193 185 300<br />
NOTE − Single appliance venting configurations with zero lateral lengths are assumed to have no elbows in the vent system. For all other<br />
vent configurations, the vent system is assumed to have two 90° elbows. For each additional 90° elbow or equivalent (for example two 45°<br />
elbows equal one 90° elbow) beyond two, the maximum capacity listed in the venting table should be reduced by 10 percent (0.90 x maximum<br />
listed capacity).<br />
TABLE 10<br />
Common Vent Capacity<br />
Type B Double−Wall Vents with Single−Wall Metal Connectors<br />
Serving Two or More Category I Appliances<br />
Common Vent Diameter − D (inches)<br />
Vent<br />
Height<br />
4 Inch 5 Inch 6 Inch 7 Inch<br />
H<br />
Appliance Input Rating in Thousands of Btu Per Hour<br />
(feet)<br />
FAN + FAN FAN + NAT FAN + FAN FAN + NAT FAN + FAN FAN + NAT FAN + FAN FAN + NAT<br />
6 NA 78 NA 113 200 158 304 244<br />
8 NA 87 NA 126 218 173 331 269<br />
10 NA 94 163 137 237 189 357 292<br />
15 121 108 189 159 275 221 416 343<br />
20 131 118 208 177 305 247 463 383<br />
30 145 132 236 202 350 286 533 446<br />
Page 18
Removal of the <strong>Furnace</strong> from Common Vent<br />
In the event that an existing furnace is removed from a<br />
venting system commonly run with separate gas appliances,<br />
the venting system is likely to be too large to<br />
properly vent the remaining attached appliances.<br />
Conduct the following test while each appliance is operating<br />
and the other appliances (which are not operating) remain<br />
connected to the common venting system. If the<br />
venting system has been installed improperly, you must<br />
correct the system as indicated in the general venting requirements<br />
section.<br />
WARNING<br />
CARBON MONOXIDE POISONING HAZARD<br />
Failure to follow the steps outlined below for each<br />
appliance connected to the venting system being<br />
placed into operation could result in carbon monoxide<br />
poisoning or death.<br />
The following steps shall be followed for each appliance<br />
connected to the venting system being<br />
placed into operation, while all other appliances<br />
connected to the venting system are not in<br />
operation:<br />
1 − Seal any unused openings in the common venting system.<br />
2 − Inspect the venting system for proper size and horizontal<br />
pitch. Determine that there is no blockage, restriction,<br />
leakage, corrosion, or other deficiencies which could<br />
cause an unsafe condition.<br />
3 − Close all building doors and windows and all doors between<br />
the space in which the appliances remaining<br />
connected to the common venting system are located<br />
and other spaces of the building. Turn on clothes dryers<br />
and any appliances not connected to the common<br />
venting system. Turn on any exhaust fans, such as<br />
range hoods and bathroom exhausts, so they will operate<br />
at maximum speed. Do not operate a summer exhaust<br />
fan. Close fireplace dampers.<br />
4 − Follow the lighting instructions. Turn on the appliance<br />
that is being inspected. Adjust the thermostat so that<br />
the appliance operates continuously.<br />
5 − After the main burner has operated for 5 minutes, test<br />
for leaks of flue gases at the draft hood relief opening.<br />
Use the flame of a match or candle, or smoke from a<br />
cigarette, cigar, or pipe.<br />
6 − After determining that each appliance connected to the<br />
common venting system is venting properly, (step 3)<br />
return all doors, widows, exhaust fans, fireplace dampers,<br />
and any other gas−burning appliances to their previous<br />
mode of operation.<br />
7 − If a venting problem is found during any of the preceding<br />
tests, the common venting system must be modified<br />
to correct the problem.<br />
Resize the common venting system to the minimum<br />
vent pipe size determined by using the appropriate<br />
tables in Appendix G. (These are in the current standards<br />
of the National Fuel <strong>Gas</strong> Code ANSI Z223.1.<br />
<strong>Gas</strong> Piping<br />
CAUTION<br />
If a flexible gas connector is required or allowed by<br />
the authority that has jurisdiction, black iron pipe<br />
shall be installed at the gas valve and extend outside<br />
the furnace cabinet. The flexible connector can then<br />
be added between the black iron pipe and the gas<br />
supply line.<br />
<strong>Gas</strong> Supply<br />
1 − This unit is shipped standard for left or right side installation<br />
of gas piping. Connect the gas supply to the piping<br />
assembly.<br />
2 − When connecting the gas supply piping, consider factors<br />
such as length of run, number of fittings, and furnace<br />
rating to avoid excessive pressure drop. Table 11<br />
lists recommended pipe sizes for typical applications.<br />
3 − The gas piping must not run in or through air ducts,<br />
clothes chutes, gas vents or chimneys, dumb waiters,<br />
or elevator shafts.<br />
4 − The piping should be sloped 1/4 inch (6.4 mm) per 15<br />
feet (4.57 m) upward toward the meter from the furnace.<br />
The piping must be supported at proper intervals<br />
[every 8 to 10 feet (2.44 to 3.01 m)] with suitable hangers<br />
or straps. Install a drip leg inside vertical pipe runs<br />
to the unit.<br />
5 − A 1/8" N.P.T. plugged tap or pressure post is located<br />
on the gas valve to facilitate test gauge connection.<br />
See figures 26 and 27.<br />
6 − In some localities, codes may require the installation of<br />
a manual main shut-off valve and union (furnished by<br />
the installer) external to the unit. The union must be of<br />
the ground joint type.<br />
IMPORTANT<br />
Compounds used on threaded joints of gas piping<br />
must be resistant to the actions of liquified petroleum<br />
gases.<br />
Page 19
TABLE 11<br />
<strong>Gas</strong> Pipe Capacity − ft 3 /hr (m 3 /hr)<br />
Nominal<br />
Iron Pipe<br />
Size<br />
inches<br />
(mm)<br />
Internal<br />
Diameter<br />
inches<br />
(mm)<br />
10<br />
(3.048)<br />
20<br />
(6.096)<br />
30<br />
(9.144)<br />
40<br />
(12.192)<br />
Length of Pipe − feet (m)<br />
50<br />
(15.240)<br />
60<br />
(18.288)<br />
70<br />
(21.336)<br />
80<br />
(24.384)<br />
90<br />
(27.432)<br />
100<br />
(30.480)<br />
1/2<br />
(12.7)<br />
.622<br />
(17.799)<br />
175<br />
(4.96)<br />
120<br />
(3.40)<br />
97<br />
(2.75)<br />
82<br />
(2.32)<br />
73<br />
(2.07)<br />
66<br />
(1.87)<br />
61<br />
(1.73)<br />
57<br />
(1.61)<br />
53<br />
(1.50)<br />
50<br />
(1.42)<br />
3/4<br />
(19.05)<br />
.824<br />
(20.930)<br />
360<br />
(10.19)<br />
250<br />
(7.08)<br />
200<br />
(5.66)<br />
170<br />
(4.81)<br />
151<br />
(4.28)<br />
138<br />
(3.91)<br />
125<br />
(3.54)<br />
118<br />
(3.34)<br />
110<br />
(3.11)<br />
103<br />
(2.92)<br />
1<br />
(25.4)<br />
1.049<br />
(26.645)<br />
680<br />
(919.25)<br />
465<br />
(13.17)<br />
375<br />
(10.62)<br />
320<br />
(9.06)<br />
285<br />
(8.07)<br />
260<br />
(7.36)<br />
240<br />
(6.80)<br />
220<br />
(6.23)<br />
205<br />
(5.80)<br />
195<br />
(5.52)<br />
1−1/4<br />
(31.75)<br />
1.380<br />
(35.052)<br />
1400<br />
(39.64)<br />
950<br />
(26.90)<br />
770<br />
(21.80)<br />
660<br />
(18.69)<br />
580<br />
(16.42)<br />
530<br />
(15.01)<br />
490<br />
(13.87)<br />
460<br />
(13.03)<br />
430<br />
(12.18)<br />
400<br />
(11.33)<br />
1−1/2<br />
(38.1)<br />
1.610<br />
(40.894)<br />
2100<br />
(59.46)<br />
460<br />
(41.34)<br />
1180<br />
(33.41)<br />
990<br />
(28.03)<br />
900<br />
(25.48)<br />
810<br />
(22.94)<br />
750<br />
(21.24)<br />
690<br />
(19.54)<br />
650<br />
(18.41)<br />
620<br />
(17.56)<br />
2<br />
(50.8)<br />
2.067<br />
(52.502)<br />
3950<br />
(111.85)<br />
2750<br />
(77.87)<br />
2200<br />
(62.30)<br />
1900<br />
(53.80)<br />
1680<br />
(47.57)<br />
1520<br />
(43.04)<br />
1400<br />
(39.64)<br />
1300<br />
(36.81)<br />
1220<br />
(34.55)<br />
1150<br />
(32.56)<br />
2−1/2<br />
(63.5)<br />
2.469<br />
(67.713)<br />
6300<br />
(178.39)<br />
4350<br />
(123.17)<br />
3520<br />
(99.67)<br />
3000<br />
(84.95<br />
2650<br />
(75.04)<br />
2400<br />
(67.96)<br />
2250<br />
(63.71)<br />
2050<br />
(58.05)<br />
1950<br />
(55.22)<br />
1850<br />
(52.38)<br />
3<br />
(76.2)<br />
3.068<br />
(77.927)<br />
11000<br />
(311.48)<br />
7700<br />
(218.03)<br />
6250<br />
(176.98)<br />
5300<br />
(150.07)<br />
4750<br />
(134.50)<br />
4300<br />
(121.76)<br />
3900<br />
(110.43)<br />
3700<br />
(104.77)<br />
3450<br />
(97.69)<br />
3250<br />
(92.03)<br />
NOTE − Capacity given in cubic feet (m 3 ) of gas per hour and based on 0.60 specific gravity gas.<br />
MANUAL<br />
MAIN SHUT−OFF<br />
VALVE<br />
Left Side Piping<br />
(Standard)<br />
AUTOMATIC<br />
GAS VALVE<br />
(with manual<br />
shut−off valve)<br />
AUTOMATIC<br />
GAS VALVE<br />
(with manual<br />
shut−off valve)<br />
MANUAL<br />
MAIN SHUT−OFF<br />
VALVE<br />
GROUND<br />
JOINT<br />
UNION<br />
GROUND<br />
JOINT<br />
UNION<br />
DRIP LEG<br />
DRIP LEG<br />
FIELD<br />
PROVIDED<br />
AND INSTALLED<br />
NOTE − BLACK IRON PIPE ONLY TO BE ROUTED INSIDE OF CABINET<br />
Right Side Piping<br />
(Alternate)<br />
FIGURE 17<br />
Page 20
Leak Check<br />
After gas piping is completed, carefully check all piping<br />
connections (factory− and field−installed) for gas leaks. Use<br />
a leak detecting solution or other preferred means.<br />
NOTE − If emergency shutoff is necessary, shut off the main<br />
manual gas valve and disconnect the main power to the<br />
furnace. The installer should properly label these devices.<br />
CAUTION<br />
Some soaps used for leak detection are corrosive to<br />
certain metals. Carefully rinse piping thoroughly after<br />
leak test has been completed. Do not use<br />
matches, candles, flame or other sources of ignition<br />
to check for gas leaks.<br />
The furnace must be isolated from the gas supply system<br />
by closing its individual manual shut-off valve during any<br />
pressure testing of the gas supply system at pressures less<br />
than or equal to 1/2 psig (3.48 kPa, 14 inches w.c.).<br />
IMPORTANT<br />
When testing pressure of gas lines, gas valve must<br />
be disconnected and isolated. See figure 18. <strong>Gas</strong><br />
valves can be damaged if subjected to pressures<br />
greater than 1/2 psig (3.48 kPa, 14 inches w.c.).<br />
Refer to figure 24 for unit field wiring. See figures 21 and 22<br />
for icomfort Touch ® thermostat wiring in communicating<br />
applications. Table 13 shows DIP switch and on−board link<br />
settings for non−communicating thermostat applications.<br />
Typical wiring schematic is shown in figure 23.<br />
INTERIOR MAKE−UP BOX INSTALLATION<br />
(Left Side)<br />
FIGURE 19<br />
MAKE−UP<br />
BOX<br />
INTERIOR MAKE−UP BOX INSTALLATION<br />
(Right Side)<br />
MANUAL MAIN<br />
SHUT−OFF VALVE<br />
WILL NOT HOLD<br />
NORMAL TEST<br />
PRESSURE<br />
ISOLATE<br />
GAS VALVE<br />
FURNACE<br />
1/8 NPT PLUG<br />
CAP<br />
FIGURE 18<br />
MAKE−UP<br />
BOX<br />
Electrical<br />
ELECTROSTATIC DISCHARGE (ESD)<br />
Precautions and Procedures<br />
CAUTION<br />
Electrostatic discharge can affect electronic<br />
components. Take precautions to<br />
neutralize electrostatic charge by<br />
touching your hand and tools to metal<br />
prior to handling the control.<br />
The unit is equipped with a field make−up box on the left<br />
hand side of the cabinet. The make−up box may be moved<br />
to the right side of the furnace to facilitate installation. If the<br />
make−up box is moved to the right hand side, clip the wire<br />
ties that bundle the wires together. Secure the excess wire<br />
to the existing harness to protect it from damage.<br />
Cut the two wire ties to extend power wires for right side only<br />
FIGURE 20<br />
1 − The power supply wiring must meet Class I restrictions.<br />
Protected by either a fuse or circuit breaker, select<br />
circuit protection and wire size according to unit<br />
nameplate.<br />
NOTE − Unit nameplate states maximum current draw.<br />
Maximum over−current protection allowed is shown in table<br />
12.<br />
SL280DF Model<br />
TABLE 12<br />
Maximum Over−Current<br />
Protection (Amps)<br />
070V36A 15<br />
090V48B, 090V60C, 110V60C 20<br />
Page 21
2 − Holes are on both sides of the furnace cabinet to facilitate<br />
wiring.<br />
3 − Install a separate (properly sized) disconnect switch<br />
near the furnace so that power can be turned off for<br />
servicing.<br />
4 − Before connecting the thermostat or the power wiring,<br />
check to make sure the wires will be long enough for<br />
servicing at a later date. Remove the blower access<br />
panel to check the length of the wire.<br />
5 − Complete the wiring connections to the equipment.<br />
Use the provided unit wiring diagram and the field wiring<br />
diagrams shown in table 13 and figure 24. Use<br />
18−gauge wire or larger that is suitable for Class II rating<br />
for thermostat connections.<br />
6 − Electrically ground the unit according to local codes or,<br />
in the absence of local codes, according to the current<br />
National Electric Code (ANSI/NFPA No. 70). A green<br />
ground wire is provided in the field make−up box.<br />
NOTE − The <strong>SL280DFV</strong> furnace contains electronic<br />
components that are polarity sensitive. Make sure<br />
that the furnace is wired correctly and is properly<br />
grounded.<br />
7 − One line voltage ACC" 1/4" spade terminal is provided<br />
on the furnace integrated control. Any electronic air<br />
cleaner or other accessory rated up to one amp can be<br />
connected to this terminal with the neutral leg of the circuit<br />
being connected to the one of the provided neutral<br />
terminals. See figure 25 for control configuration. This<br />
terminal is energized when the indoor blower is operating.<br />
8 − An unpowered, normally open (dry) set of contacts with<br />
a 1/4" spade terminal HUM" are provided for humidifier<br />
connections and may be connected to 24V or 120V.<br />
Any humidifier rated up to one amp can be connected<br />
to these terminals. In 120V humidifier applications the<br />
neutral leg of the circuit can be connected to one of the<br />
provided neutral terminals. This terminal is energized<br />
in the heating mode.<br />
9 − Install the room thermostat according to the instructions<br />
provided with the thermostat. See table 13 for<br />
field wiring connections in varying applications. If the<br />
furnace is being matched with a heat pump, refer to the<br />
instruction packaged with the dual fuel thermostat.<br />
Thermostat Selection<br />
CAUTION<br />
Field wiring for both communicating and non−communicating<br />
applications is illustrated in diagrams,<br />
which begin on Page 23.<br />
Non−Communicating<br />
In non−communicating applications the <strong>SL280DFV</strong> is designed<br />
to operate in a SINGLE−STAGE mode or TWO−<br />
STAGE mode using a conventional thermostat.<br />
For optimal performance in non−communicating applications,<br />
<strong>Lennox</strong> recommends use of a ComfortSense ® 7000<br />
high quality electronic digital thermostat or any other with<br />
adjustable settings for 1st stage / 2nd stage on / off differentials<br />
and adjustable stage timers.<br />
<strong>Lennox</strong> recommends the following two−stage thermostat<br />
settings:<br />
First heat stage differential set to 1/2 to 1 degree F; second<br />
heat stage differential set to 1/2 or 1 degree F; second heat<br />
stage upstage timer disabled, or set to maximum (1 hr minimum).<br />
Communicating<br />
In communicating applications the icomfort Touch ® thermostat<br />
must be used. Refer to the instructions provided<br />
with the thermostat for installation, set−up and operation. In<br />
communicating system all unused thermostat wire in the<br />
wire bundle needs to be terminated inside and out. The extra<br />
wires can terminate on the ’C" terminal of the icomfort<br />
communication terminal strip. (RSBus). Using an additional<br />
wire come off "C" terminal and wire nut all the extra wires<br />
together. Termination on the outdoor control must match<br />
the indoor control.<br />
Indoor Blower Speeds<br />
Non−Communicating<br />
1 − When the thermostat is set to FAN ON," the indoor<br />
blower will run continuously at a field selectable percentage<br />
of the second−stage cooling speed when there<br />
is no cooling or heating demand. The factory default<br />
setting is 38% of cool speed.<br />
2 − When the <strong>SL280DFV</strong> is running in the heating mode,<br />
the indoor blower will run on the heating speed designated<br />
by the positions of DIP switches 11, 12 and 13.<br />
First stage heating will run at 91% heat speed.<br />
3 − When there is a cooling demand, the indoor blower will<br />
run on the cooling speed designated by the positions<br />
of DIP switches 5 and 6. First stage cooling will run at<br />
70% cool speed.<br />
Communicating<br />
NOTE − When the <strong>SL280DFV</strong> is used with icomfort<br />
Touch ® thermostat, proper indoor blower speed selections<br />
are made by the communicating thermostat.<br />
1 − When the thermostat is set to FAN ON," the indoor<br />
blower will run at setting determined during system<br />
configuration.<br />
2 − When there is a heating demand the fan will run on<br />
heating speeds for firing rate.<br />
3 − When there is a cooling demand, the fan will run on the<br />
first stage and second stage cooling speed set using<br />
the icomfort Touch® thermostat in the installer setup<br />
mode. The factory default is based upon 400 CFM a<br />
ton.<br />
Page 22
Generator Use − Voltage Requirements<br />
The following requirements must be kept in mind when<br />
specifying a generator for use with this equipment:<br />
The furnace requires 120 volts (Range: 102 volts to<br />
132 volts)<br />
The furnace operates at 60 Hz + 5% (Range: 57 Hz to<br />
63 Hz)<br />
<br />
<br />
The furnace integrated control requires both correct<br />
polarity and proper ground. Both polarity and proper<br />
grounding should be checked before attempting to operate<br />
the furnace on either permanent or temporary<br />
power<br />
Generator should have a wave form distortion of less<br />
than 5% THD (total harmonic distortion)<br />
icomfort Touch ® Thermostat with <strong>SL280DFV</strong><br />
and Non−Communicating Outdoor Unit<br />
icomfort Touch ® Thermostat<br />
icomfort−Enabled <strong>SL280DFV</strong> Indoor <strong>Furnace</strong><br />
Non−Communicating Outdoor Air Conditioner<br />
icomfort Touch ® Thermostat with <strong>SL280DFV</strong><br />
and icomfort−ENABLED Outdoor Unit<br />
icomfort Touch ® Thermostat<br />
icomfort−Enabled <strong>SL280DFV</strong> Indoor <strong>Furnace</strong><br />
icomfort−Enabled Outdoor Air Conditioner or Heat Pump<br />
OPTIONAL<br />
DISCHARGE<br />
AIR SENSOR<br />
icomfort Touch®<br />
THERMOSTAT<br />
icomfort−<br />
ENABLED<br />
<strong>SL280DFV</strong><br />
FURNACE<br />
OPTIONAL<br />
OUTDOOR<br />
AIR SENSOR<br />
OPTIONAL<br />
DISCHARGE<br />
AIR SENSOR<br />
OPTIONAL<br />
OUTDOOR<br />
AIR SENSOR<br />
icomfort Touch®<br />
THERMOSTAT<br />
icomfort−<br />
ENABLED<br />
<strong>SL280DFV</strong><br />
FURNACE<br />
icomfort− ENABLED<br />
OUTDOOR AIR CONDITIONING<br />
OR HEAT PUMP UNIT<br />
NON−COMMUNICATING<br />
OUTDOOR AIR<br />
CONDITIONING UNIT −<br />
1 OR 2 STAGE<br />
CLIP ON−BOARD LINK<br />
W915 (Y1 TO Y2) FOR<br />
TWO−STAGE OPERATION<br />
NOTE − On communicating systems, extra wires must terminate on the "C" RSBus terminal. Use an additional wire and come<br />
off "C" terminal and wire nut all the extra wires together. Termination on the outdoor control must match the indoor control.<br />
Outdoor Unit<br />
icomfort Integrated Control<br />
icomfort Touch ®<br />
FIGURE 21<br />
Page 23
Optional Accessories for use with any icomfort Touch ® System<br />
NOTE: icomfort Touch ® THERMOSTAT SENSES HUMIDITY<br />
& CONTROLS HUM CONTACTS TO CYCLE HUMIDIFIER<br />
BASED ON DEMAND. NO OTHER CONTROL OR HUMIDIS-<br />
TAT REQUIRED.<br />
OPTIONAL OUTDOOR AIR SENSOR FOR USE WITH HU-<br />
MIDIFIER (IF NOT ALREADY IN THE SYSTEM FOR OTHER<br />
FUNCTIONS. BUILT INTO ALL icomfort by <strong>Lennox</strong> OUT-<br />
DOOR UNITS).<br />
120V CONNECTIONS<br />
HUM" CONTACT IS<br />
CLOSED ANYTIME<br />
HUMIDITY DEMAND<br />
IS PRESENT<br />
icomfort ENABLED<br />
<strong>SL280DFV</strong> FURNACE<br />
Discharge Air<br />
Sensor (Required<br />
for even heat)<br />
icomfort Touch ®<br />
THERMOSTAT<br />
24V HUMIDIFIER CONNECTIONS<br />
CS 7000<br />
THERMOSTAT<br />
CONVENTIONAL<br />
NON−COMMUNI-<br />
CATING SYSTEM<br />
RSBus<br />
Maximum total<br />
length of all connections<br />
on the<br />
RSBus is limited<br />
to 1500ft.<br />
Wire gauge of<br />
RSBus wire is 18.<br />
COMMUNICATING SYSTEM<br />
*24V IN jumper not used in non−<br />
communicating configuration<br />
*24V IN<br />
JUMPER<br />
icomfort ENABLED<br />
<strong>SL280DFV</strong> FURNACE<br />
icomfort <br />
ENABLED OUTDOOR<br />
AIR CONDITIONING OR<br />
HEAT PUMP UNIT<br />
(POWER COMPANY INTERRUPTION SYSTEMS<br />
ARE WIRED SAME AS OVERFLOW SWITCH)<br />
NOTE: 24V UV LIGHT<br />
APPLICATIONS<br />
In an icomfort by <strong>Lennox</strong> system,<br />
neither furnace nor air handler transformer<br />
will have adequate VA to<br />
power 24V UV light applications. An<br />
additional transformer for UV light<br />
applications is required.<br />
HVAC<br />
EQUIPMENT<br />
icomfort Touch ®<br />
THERMOSTAT<br />
DEHUMIDIFIER<br />
CONTROL<br />
HVAC EQUIP<br />
Rf Cf GsGh W DH<br />
icomfort ENABLED<br />
<strong>SL280DFV</strong> FURNACE<br />
HEPA BYPASS FILTER X2680 HEPA INTERLOCK KIT<br />
icomfort ENABLED<br />
<strong>SL280DFV</strong> FURNACE<br />
PASS INDOOR BLOWER<br />
MOTOR COMMON WIRE<br />
THROUGH CURRENT LOOP.<br />
SEE HEPA INTERLOCK KIT<br />
FOR INSTALLATION DE-<br />
TAILS<br />
STANDARD 1 OR 2<br />
STAGE AC OR HP UNIT<br />
NON−COMMUNICATING<br />
SYSTEM WIRING<br />
icomfort ENABLED<br />
<strong>SL280DFV</strong> FURNACE<br />
LVCS VENTILATION CONTROL SYSTEM<br />
SEE LVCS VENTILATION<br />
INSTRUCTIONS FOR<br />
DAMPER & SENSOR WIRING<br />
2 STAGE FURNACE<br />
CUT<br />
R−DS<br />
W914<br />
DS<br />
R<br />
COMMUNICATING<br />
SYSTEM WIRING<br />
FIGURE 22<br />
Page 24
TABLE 13<br />
SL280 Field Wiring Applications With Conventional Thermostat<br />
Thermostat<br />
DIP Switch Settings and On−Board Links (See figure 25)<br />
DIP Switch 1<br />
Thermostat<br />
Heating<br />
Stages<br />
On Board Links Must Be Cut To Select<br />
System Options<br />
Wiring Connections<br />
1 Heat / 1 Cool<br />
NOTE − Use DIP<br />
switch 2 to set<br />
second−stage<br />
heat ON delay.<br />
OFF−7 minutes.<br />
ON−12 minutes.<br />
ON<br />
DO NOT CUT ANY<br />
ON−BOARD LINKS<br />
S1<br />
T’STAT<br />
FURNACE<br />
TERM. STRIP<br />
*<br />
OUTDOOR<br />
UNIT<br />
1 Heat / 2 Cool<br />
NOTE − Use DIP<br />
switch 2 to set<br />
second−stage<br />
heat ON delay.<br />
OFF−7 minutes.<br />
ON−12 minutes.<br />
ON<br />
CUT ON−BOARD LINK<br />
W915<br />
2 STAGE<br />
COMPR<br />
S1<br />
T’STAT<br />
FURNACE<br />
TERM. STRIP<br />
*<br />
OUTDOOR<br />
UNIT<br />
1 Heat / 2 Cool<br />
with t’stat with<br />
humidity control<br />
NOTE − Use DIP<br />
switch 2 to set<br />
second−stage<br />
heat ON delay.<br />
OFF−7 minutes.<br />
ON−12 minutes.<br />
ON<br />
CUT ON−BOARD LINK<br />
W915<br />
2 STAGE<br />
COMPR<br />
CUT ON−BOARD LINK<br />
W914<br />
DEHUM<br />
OR<br />
HARMONY<br />
S1<br />
T’STAT<br />
FURNACE<br />
TERM. STRIP<br />
OUTDOOR<br />
UNIT<br />
*<br />
o<br />
* Not required on all units.<br />
Page 25
TABLE 13<br />
SL280 Field Wiring Applications With Conventional Thermostat (Continued)<br />
Thermostat<br />
DIP Switch Settings and On−Board Links (See figure 25)<br />
DIP Switch 1<br />
Thermostat<br />
Heating<br />
Stages<br />
On Board Links Must Be Cut To Select<br />
System Options<br />
Wiring Connections<br />
2 Heat / 2 Cool OFF<br />
CUT ON−BOARD LINK<br />
W915<br />
2 STAGE<br />
COMPR<br />
S1<br />
T’STAT<br />
FURNACE<br />
TERM. STRIP<br />
OUTDOOR<br />
UNIT<br />
*<br />
2 Heat / 2 Cool<br />
with t’stat with<br />
humidity control<br />
OFF<br />
CUT ON−BOARD LINK<br />
W915<br />
2 STAGE<br />
COMPR<br />
S1<br />
T’STAT<br />
FURNACE<br />
TERM. STRIP<br />
OUTDOOR<br />
UNIT<br />
*<br />
CUT ON−BOARD LINK<br />
W914<br />
DEHUM<br />
OR<br />
HARMONY<br />
o<br />
2 Heat / 1 Cool<br />
with t’stat with<br />
humidity control<br />
OFF<br />
S1<br />
T’STAT<br />
FURNACE<br />
TERM. STRIP<br />
OUTDOOR<br />
UNIT<br />
CUT ON−BOARD LINK<br />
W914<br />
DEHUM<br />
OR<br />
HARMONY<br />
*<br />
o<br />
2 Heat / 1 Cool OFF<br />
S1<br />
T’STAT<br />
FURNACE<br />
TERM. STRIP<br />
OUTDOOR<br />
UNIT<br />
DO NOT CUT ANY<br />
ON−BOARD LINKS<br />
*<br />
* Not required on all units.<br />
Page 26
TABLE 13<br />
SL280 Field Wiring Applications With Conventional Thermostat (Continued)<br />
Thermostat<br />
Dual Fuel<br />
Single Stage<br />
Heat Pump<br />
ComfortSense<br />
7000 L7724U<br />
thermostat w/<br />
dual fuel capabilities<br />
Capable of 2<br />
stage gas heat<br />
control<br />
DIP Switch Settings and On−Board Links (figure 25)<br />
DIP Switch 1<br />
Thermostat On Board Links Must Be Cut To Select<br />
Heating<br />
System Options<br />
Stages<br />
OFF<br />
CUT ON−BOARD LINK<br />
W951<br />
HEAT<br />
PUMP<br />
L7724U<br />
T’STAT<br />
H<br />
L<br />
Y2<br />
D<br />
B<br />
Wiring Connections<br />
FURNACE<br />
TERM. STRIP<br />
Y2<br />
67M41*<br />
HEAT PUMP<br />
L<br />
Y<br />
T<br />
T<br />
outdoor<br />
sensor<br />
Dual Fuel<br />
Two Stage<br />
Heat Pump<br />
ComfortSense<br />
7000 L7724U<br />
thermostat w/<br />
dual fuel capabilities<br />
Capable of 2<br />
stage gas heat<br />
control<br />
OFF<br />
CUT ON−BOARD LINK<br />
W915<br />
2 STAGE<br />
COMPR<br />
CUT ON−BOARD LINK<br />
W951<br />
HEAT<br />
PUMP<br />
L7724U<br />
T’STAT<br />
H<br />
L<br />
Y2<br />
D<br />
B<br />
FURNACE<br />
TERM. STRIP<br />
67M41*<br />
HEAT PUMP<br />
L<br />
Y2<br />
out blue<br />
T<br />
T<br />
outdoor<br />
sensor<br />
* Connect W1 to W1 ONLY if using defrost tempering kit 67M41<br />
NOTE − Do NOT make a wire connection between the room thermostat L terminal and the L terminal of the SL280<br />
integrated control.<br />
Page 27
TABLE 13<br />
SL280 Field Wiring Applications With Conventional Thermostat (Continued)<br />
Thermostat<br />
Dual Fuel<br />
Single Stage<br />
Heat Pump<br />
ComfortSense<br />
7000 L7724U<br />
thermostat w/<br />
dual fuel capabilities<br />
Capable of 2<br />
stage gas heat<br />
control w/dehumidification<br />
control<br />
DIP Switch Settings and On−Board Links (figure 25)<br />
DIP Switch 1<br />
Thermostat On Board Links Must Be Cut To Select<br />
Heating<br />
System Options<br />
Stages<br />
OFF<br />
CUT ON−BOARD LINK<br />
W951<br />
HEAT<br />
PUMP<br />
CUT ON−BOARD LINK<br />
W914<br />
DEHUM<br />
OR<br />
HARMONY<br />
L7724U<br />
T’STAT<br />
H<br />
L<br />
Y2<br />
D<br />
B<br />
Wiring Connections<br />
FURNACE<br />
TERM. STRIP<br />
Y2<br />
67M41*<br />
HEAT PUMP<br />
L<br />
Y<br />
T<br />
T<br />
outdoor<br />
sensor<br />
Dual Fuel<br />
Two Stage<br />
Heat Pump<br />
ComfortSense<br />
7000 L7724U<br />
thermostat w/<br />
dual fuel capabilities<br />
Capable of 2<br />
stage gas heat<br />
control w/dehumidification<br />
OFF<br />
CUT ON−BOARD LINK<br />
W915<br />
2 STAGE<br />
COMPR<br />
CUT ON−BOARD LINK<br />
W951<br />
HEAT<br />
PUMP<br />
CUT ON−BOARD LINK<br />
W914<br />
DEHUM<br />
OR<br />
HARMONY<br />
L7724U<br />
T’STAT<br />
H<br />
L<br />
Y2<br />
D<br />
B<br />
FURNACE<br />
TERM. STRIP<br />
67M41*<br />
HEAT PUMP<br />
L<br />
Y2<br />
out blue<br />
T<br />
T<br />
outdoor<br />
sensor<br />
* Connect W1 to W1 ONLY if using defrost tempering kit 67M41<br />
NOTE − Do NOT make a wire connection between the room thermostat L terminal and the L terminal of the SL280<br />
integrated control.<br />
Page 28
<strong>SL280DFV</strong> Schematic Wiring Diagram<br />
FIGURE 23<br />
Page 29
TYPICAL <strong>SL280DFV</strong> FIELD WIRING DIAGRAM<br />
FIELD INSTALLED CLASS II 24V<br />
FIELD INSTALLED LINE VOLTAGE<br />
FIGURE 24<br />
Page 30
Integrated Control<br />
HUM<br />
ACC<br />
HS/ CAI<br />
LINE 1<br />
7 SEGMENT LED<br />
NEUTRAL<br />
FLAME SENSE<br />
DIAGNOSTIC<br />
PUSH BUTTON<br />
INDOOR<br />
BLOWER<br />
CONNECTOR<br />
DIP SWITCHES<br />
OUTDOOR AIR<br />
SENSOR<br />
TERMINALS<br />
12 PIN LOW<br />
VOLTAGE<br />
CONNECTOR<br />
DISCHARGE AIR<br />
SENSOR<br />
TERMINALS<br />
TB83<br />
COMMUNICATING<br />
OUTDOOR<br />
EQUIPMENT<br />
TB84<br />
COMMUNICATING<br />
INDOOR<br />
THERMOSTAT<br />
R I + I − C R I + I − C<br />
W1 W2 G Y2 Y1 C C R DH L O DS<br />
W915 Y1 TO Y2<br />
2 STAGE COMPR<br />
W951 R TO O<br />
HEAT PUMP<br />
W914 R TO DS<br />
DEHUM OR<br />
HARMONY<br />
NON−COMMUNICATINGNG<br />
24V TERMINALS<br />
RS−BUS LINK (TB82, future use)<br />
I+ = DATA HIGH CONNECTION<br />
I − = DATA LOW CONNECTION<br />
RS−BUS OUTDOOR (TB83)<br />
R = 24VAC<br />
I + = DATA HIGH CONNECTION<br />
I − = DATA LOW CONNECTION<br />
C = 24VAXC COMMON<br />
RS−BUS INDOOR (TB84)<br />
R = 24VAC<br />
I + = DATA HIGH CONNECTION<br />
I − = DATA LOW CONNECTION<br />
C = 24VAXC COMMON<br />
1/4" QUICK CONNECT TERMINALS<br />
HUM = UNPOWERED NORMALLY OPEN (DRY) CONTACTS<br />
XMFR = 120 VAC OUTPUT TO TRANSFORMER<br />
LI = 120 VAC INPUT TO CONTROL<br />
ACC = 120 VAC OUTPUT TO OPTIONAL ACCESSORY<br />
NEUTRALS = 120 VAC NEUTRAL<br />
THERMOSTAT CONNECTIONS (TB1)<br />
DS = DEHUMIDIFICATION SIGNAL<br />
W2 = HEAT DEMAND FROM 2ND STAGE T/STAT<br />
W1 = HEAT DEMAND FROM 1ST STAGE T/STAT<br />
R = CLASS 2 VOLTAGE TO THERMOSTAT<br />
G = MANUAL FAN FROM T’STAT<br />
C = THERMOSTAT SIGNAL GROUND CONNECTED TO<br />
TRANSFORMER GRD (TR) & CHASIS GROUND (GRD)<br />
Y1 = THERMOSTAT 1ST STAGE COOL SIGNAL<br />
Y2 = THERMOSTAT 2ND STAGE COOL SIGNAL<br />
O = THERMOSTAT SIGNAL TO HEAT PUMP<br />
REVERSING VALVE<br />
DH = DEHUMIDIFICATION OUTPUT COMMUNICATING<br />
THERMOSTAT ONLY<br />
L = USE ONLY WITH A COMMUNICATING THERMOSTAT<br />
AND A NON−COMMUNICATING OUTDOOR UNIT<br />
. . . . . . . . . . . . .<br />
FIGURE 25<br />
Page 31
Integrated Control DIP Switch Settings −<br />
Conventional Thermostat (non−communicating)<br />
<strong>SL280DFV</strong> units are equipped with a two−stage, variable<br />
speed integrated control. This control manages ignition<br />
timing, heating mode fan off delays and indoor blower<br />
speeds based on selections made using the control dip<br />
switches and jumpers. The control includes an internal<br />
watchguard feature which automatically resets the ignition<br />
control when it has been locked out. After one hour of continuous<br />
thermostat demand for heat, the watchguard will<br />
break and remake thermostat demand to the furnace and<br />
automatically reset the control to relight the furnace.<br />
Note: All icomfort settings are set at the icomfort Touch ®<br />
thermostat. See icomfort installation instruction. In icomfort<br />
communication system all DIP switch and clippable<br />
link settings are ignored. For conventional thermostats proceed<br />
with DIP switch and clippable link settings as outlined<br />
in the following.<br />
Heating Operation DIP Switch Settings<br />
Switch 1 −− Thermostat Selection −− This unit may be used<br />
with either a single−stage or two−stage thermostat. The<br />
thermostat selection is made using a DIP switch which<br />
must be properly positioned for the particular application.<br />
The DIP switch is factory−positioned for use with a two−<br />
stage thermostat. If a single−stage thermostat is to be used,<br />
the DIP switch must be repositioned.<br />
Select OFF" for two−stage heating operation controlled<br />
by a two−stage heating thermostat (factory setting);<br />
b − Select ON" for two−stage heating operation controlled<br />
by a single−stage heating thermostat. This setting<br />
provides a timed delay before second−stage heat<br />
is initiated.<br />
Switch 2 −− Second Stage Delay (Used with Single−<br />
Stage Thermostat Only) −− This switch is used to determine<br />
the second stage on delay when a single−stage thermostat<br />
is being used. The switch is factory−set in the OFF<br />
position, which provides a 7−minute delay before second−<br />
stage heat is initiated. If the switch is toggled to the ON<br />
position, it will provide a 12−minute delay before second−<br />
stage heat is initiated. This switch is only activated when<br />
the thermostat selector jumper is positioned for SINGLE−<br />
stage thermostat use.<br />
Switches 3 and 4 −− Blower−Off Delay −− The blower−on<br />
delay of 30 seconds is not adjustable. The blower−off delay<br />
(time that the blower operates after the heating demand<br />
has been satisfied) can be adjusted by moving switches 3<br />
and 4 on the integrated control. The unit is shipped from the<br />
factory with a blower−off delay of 90 seconds. The blower<br />
off delay affects comfort and is adjustable to satisfy individual<br />
applications. Adjust the blower off delay to achieve a<br />
supply air temperature between 90° and 110°F at the exact<br />
moment that the blower is de−energized. Longer off delay<br />
settings provide lower supply air temperatures; shorter settings<br />
provide higher supply air temperatures.Table 14 provides<br />
the blower off timings that will result from different<br />
switch settings.<br />
TABLE 14<br />
Blower Off Delay Switch Settings<br />
Blower Off Delay<br />
Switch 3 Switch 4<br />
(Seconds)<br />
60 On Off<br />
90 (Factory) Off Off<br />
120 Off On<br />
180 On On<br />
Indoor Blower Operation DIP Switch Settings<br />
Switches 5 and 6 −− Cooling Mode Blower Speed −− The<br />
unit is shipped from the factory with the dip switches positioned<br />
for high speed (4) indoor blower motor operation<br />
during the cooling mode. Table 15 provides the cooling<br />
mode blower speeds that will result from different switch<br />
settings. Switches 5 and 6 set the blower cfm for second−<br />
stage cool. The integrated control automatically ramps<br />
down to 70% of the second−stage cfm for first−stage cfm.<br />
Refer to tables for corresponding cfm values.<br />
TABLE 15<br />
Cooling Mode Blower Speeds<br />
Speed Switch 5 Switch 6<br />
Low On On<br />
Medium Low Off On<br />
Medium High On Off<br />
High (Factory) Off Off<br />
Switches 7 and 8 −− Cooling Blower Speed Adjustment<br />
−− The unit is shipped from the factory with the dip switches<br />
positioned for NORMAL (no) adjustment. The dip switches<br />
may be positioned to adjust the blower speed by +10% or<br />
−10% to better suit the application. Table 16 below provides<br />
blower speed adjustments that will result from different<br />
switch settings. Refer to tables for corresponding cfm values.<br />
TABLE 16<br />
Cooling Blower Speed Adjustment<br />
Adjustment Switch 7 Switch 8<br />
+10% (approx.) On Off<br />
Factory Default Off Off<br />
−10% (approx.) Off On<br />
Switches 9 and 10 −− Cooling Mode Blower Speed<br />
Ramping −− Blower speed ramping may be used to enhance<br />
dehumidification performance. The switches are<br />
factory set at option A which has the greatest effect on de−<br />
humidification performance. Table 17 provides the cooling<br />
mode blower speed ramping options that will result from<br />
different switch settings. The cooling mode blower speed<br />
ramping options are detailed on the next page.<br />
Page 32
NOTE − The off portion of the selected ramp profile also applies<br />
during heat pump operation in dual fuel applications.<br />
TABLE 17<br />
Cooling Mode Blower Speed Ramping<br />
Ramping Option Switch 9 Switch 10<br />
A (Factory) Off Off<br />
B Off On<br />
C On Off<br />
D On On<br />
Ramping Option A (Factory Selection)<br />
Motor runs at 50% for 30 seconds.<br />
Motor then runs at 82% for approximately 7−1/2 minutes.<br />
If demand has not been satisfied after 7−1/2 minutes,<br />
motor runs at 100% until demand is satisfied.<br />
Once demand is met, motor runs at 50% for 30 seconds<br />
then ramps down to stop.<br />
OFF<br />
<br />
<br />
OFF<br />
<br />
<br />
OFF<br />
1/2 MIN<br />
50% CFM<br />
7 1/2 MIN<br />
82% CFM<br />
COMPRESSOR DEMAND<br />
100%<br />
CFM<br />
1/2 MIN<br />
50% CFM<br />
OFF<br />
Ramping Option B<br />
Motor runs at 82% for approximately 7−1/2 minutes. If<br />
demand has not been satisfied after 7−1/2 minutes,<br />
motor runs at 100% until demand is satisfied.<br />
Once demand is met, motor ramps down to stop.<br />
7 1/2 MIN<br />
100% CFM<br />
82%CFM<br />
COMPRESSOR DEMAND<br />
Ramping Option C<br />
Motor runs at 100% until demand is satisfied.<br />
OFF<br />
Once demand is met, motor runs at 100% for 45 seconds<br />
then ramps down to stop.<br />
100% CFM 100% CFM<br />
COMPRESSOR<br />
DEMAND<br />
45 SEC.<br />
OFF<br />
Ramping Option D<br />
Motor runs at 100% until demand is satisfied.<br />
Once demand is met, motor ramps down to stop.<br />
OFF<br />
100% CFM<br />
COMPRESSOR<br />
DEMAND<br />
OFF<br />
Switches 11, 12 and 13 −− Heating Mode Blower Speed −−<br />
The switches are factory set to the OFF position which provides<br />
normal heat speed. Refer to table 18 for switches 11,<br />
12 and 13 that provided the corresponding increases or decrease<br />
to both high and low heat demand.<br />
TABLE 18<br />
Heating Mode Blower Speeds<br />
Heat Speed<br />
Switch<br />
11<br />
Switch<br />
12<br />
Switch<br />
13<br />
Increase 24% On On On<br />
Increase 18% On On Off<br />
Increase 12% On Off On<br />
Increase 6% On Off Off<br />
Factory Default Off Off Off<br />
Decrease 6% Off Off On<br />
Decrease 12% Off On Off<br />
Decrease18% Off On On<br />
Switches 14 and 15 −− Continuous Blower Speed −−<br />
Table 19 provides continuous blower speed adjustments<br />
that will result from different switch settings.<br />
TABLE 19<br />
Continuous Blower Speed<br />
Continuous<br />
Switch 14 Switch 15<br />
Blower Speed<br />
28% of High Cool Speed Off On<br />
38% of High Cool Speed<br />
(Factory)<br />
Off Off<br />
70% of High Cool Speed On Off<br />
100% of High Cool Speed On On<br />
Page 33
On−Board Links<br />
Note: In icomfort systems with a conventional outdoor<br />
unit (non−communicating), the on−board clippable links<br />
must be set to properly configure the system<br />
WARNING<br />
Carefully review all configuration information provided.<br />
Failure to properly set DIP switches, jumpers<br />
and on−board links can result in improper operation!<br />
On−Board Link W914 Dehum or Harmony (R to DS)<br />
On−board link W914, is a clippable connection between terminals<br />
R and DS on the integrated control. W914 must be<br />
cut when the furnace is installed with either the Harmony<br />
III zone control or a thermostat which features humidity<br />
control. If the link is left intact the PMW signal from the Harmony<br />
III control will be blocked and also lead to control<br />
damage. Refer to table 20 for operation sequence in applications<br />
including <strong>SL280DFV</strong>, a thermostat which features<br />
humidity control and a single−speed outdoor unit.<br />
Table 21 gives the operation sequence in applications with<br />
a two−speed outdoor unit.<br />
On−Board Link W951 Heat Pump (R to O)<br />
On−board link W951 is a clippable connection between terminals<br />
R and O on the integrated control. W951 must be cut<br />
when the furnace is installed in applications which include a<br />
heat pump unit and a thermostat which features dual fuel<br />
use. If the link is left intact, terminal O" will remain energized<br />
eliminating the HEAT MODE in the heat pump.<br />
On−Board Link W915 2 Stage Compr (Y1 to Y2)<br />
On−board link W915 is a clippable connection between terminals<br />
Y1 and Y2 on the integrated control. W915 must be<br />
cut if two−stage cooling will be used. If the Y1 to Y2 link is<br />
not cut the outdoor unit will operate in second−stage cooling<br />
only.<br />
Diagnostic LED (Figure 25)<br />
The seven−segment diagnostic LED displays operating<br />
status, target airflow, error codes and other information.<br />
The table beginning on Page 48 lists diagnostic LED<br />
codes.<br />
Diagnostic Push Button (Figure 25)<br />
The diagnostic push button is located adjacent to the<br />
seven−segment diagnostic LED. This button is used to enable<br />
the Error Code Recall E" mode and the Flame Signal<br />
F" mode. Press the button and hold it to cycle through a<br />
menu of options. Every five seconds a new menu item will<br />
be displayed. When the button is released, the displayed<br />
item will be selected. Once all items in the menu have been<br />
displayed, the menu resumes from the beginning until the<br />
button is released.<br />
Error Code Recall Mode<br />
Select "E" from the menu to access the most recent 10 error<br />
codes. Select c" from the Error Code Recall menu to clear<br />
all error codes. Button must be pressed a second time<br />
while c" is flashing to confirm command to delete codes.<br />
Press the button until a solid ≡" is displayed to exit the Error<br />
Code Recall mode.<br />
Flame Signal Mode<br />
Select "F" from the menu to access the flame signal mode.<br />
The integrated control will display the flame current on 7<br />
segment LED in in micro amps (uA).<br />
Flame signal mode is exited after the following:<br />
Power is reset<br />
Pressing and holding push button until 3 horizontal<br />
lines ≡" are displayed<br />
10 minutes of entering the flame sense mode.<br />
Page 34
BLOWER DATA<br />
SL280DF070V36A BLOWER PERFORMANCE (less filter)<br />
0 through 0.8 in. w.g. (Heating) and 0 through 1.0 in. w.g. (Cooling) External Static Pressure Range<br />
HEATING<br />
1<br />
Heating Speed<br />
DIP Switch<br />
First Stage Heating Speed - cfm<br />
Second Stage Heating Speed - cfm<br />
Settings<br />
+24% 1065 1170<br />
+18% 1010 1115<br />
+12% 960 1055<br />
+6% 910 1000<br />
Factory Default 860 945<br />
–6% 805 885<br />
–12% 755 830<br />
–18% 705 775<br />
COOLING<br />
1<br />
Cooling Speed<br />
First Stage Cooling Speed - cfm<br />
Second Stage Cooling Speed - cfm<br />
DIP Switch<br />
Settings<br />
Low Medium-Low Medium-High<br />
2<br />
High Low Medium-Low Medium-High<br />
2<br />
High<br />
+ 745 870 1025 1075 1100 1240 1425 1515<br />
Factory Default 665 780 925 985 1015 1115 1305 1380<br />
– 590 690 815 865 900 1025 1170 1250<br />
1<br />
Cooling and heating speeds are based on a combination of DIP switch settings on the furnace control. Refer to <strong>Installation</strong> Instructions for specific DIP Switch<br />
Settings.<br />
2<br />
Factory default setting.<br />
NOTES - The effect of static pressure is included in air volumes shown.<br />
First stage HEAT is approximately 91% of the same second stage HEAT.<br />
First stage COOL (two-stage air conditioning units only) is approximately 70% of the same second stage COOL speed position.<br />
Continuous Fan Only speed is selectable at 28%, 38%, 70% and 100% of the selected second stage cooling speed - minimum 500 cfm.<br />
<strong>Lennox</strong> Harmony III Zone Control Applications - Minimum blower speed is 425 cfm.<br />
SL280DF090V48B BLOWER PERFORMANCE (less filter)<br />
0 through 0.8 in. w.g. (Heating) and 0 through 1.0 in. w.g. (Cooling) External Static Pressure Range<br />
HEATING<br />
1<br />
Heating Speed<br />
DIP Switch<br />
First Stage Heating Speed - cfm<br />
Second Stage Heating Speed - cfm<br />
Settings<br />
+24% 1360 1500<br />
+18% 1285 1415<br />
+12% 1220 1350<br />
+6% 1135 1285<br />
Factory Default 1075 1200<br />
–6% 1030 1110<br />
–12% 960 1050<br />
–18% 890 975<br />
COOLING<br />
1<br />
Cooling Speed<br />
First Stage Cooling Speed - cfm<br />
Second Stage Cooling Speed - cfm<br />
DIP Switch<br />
Settings<br />
Low Medium-Low Medium-High<br />
2<br />
High Low Medium-Low Medium-High<br />
2<br />
High<br />
+ 740 905 1040 1220 1085 1330 1545 1730<br />
Factory Default 690 820 950 1110 990 1200 1400 1,595<br />
– 610 745 855 1005 895 1075 1270 1460<br />
1<br />
Cooling and heating speeds are based on a combination of DIP switch settings on the furnace control. Refer to <strong>Installation</strong> Instructions for specific DIP Switch<br />
Settings.<br />
2<br />
Factory default setting.<br />
NOTES - The effect of static pressure is included in air volumes shown.<br />
First stage HEAT is approximately 91% of the same second stage HEAT.<br />
First stage COOL (two-stage air conditioning units only) is approximately 70% of the same second stage COOL speed position.<br />
Continuous Fan Only speed is selectable at 28%, 38%, 70% and 100% of the selected second stage cooling speed - minimum 500 cfm.<br />
<strong>Lennox</strong> Harmony III Zone Control Applications - Minimum blower speed is 455 cfm.<br />
Page 35
BLOWER DATA<br />
SL280DF090V60C BLOWER PERFORMANCE (less filter)<br />
0 through 0.8 in. w.g. (Heating) and 0 through 1.0 in. w.g. (Cooling) External Static Pressure Range<br />
HEATING<br />
1<br />
Heating Speed<br />
DIP Switch<br />
First Stage Heating Speed - cfm<br />
Second Stage Heating Speed - cfm<br />
Settings<br />
+24% 1540 1695<br />
+18% 1465 1615<br />
+12% 1390 1530<br />
+6% 1320 1450<br />
Factory Default 1245 1365<br />
–6% 1170 1285<br />
–12% 1095 1205<br />
–18% 1020 1120<br />
COOLING<br />
1<br />
Cooling Speed<br />
First Stage Cooling Speed - cfm<br />
Second Stage Cooling Speed - cfm<br />
DIP Switch<br />
Settings<br />
Low Medium-Low Medium-High<br />
2<br />
High Low Medium-Low Medium-High<br />
2<br />
High<br />
+ 1125 1250 1400 1590 1585 1770 2000 2275<br />
Factory Default 1020 1135 1285 1445 1420 1610 1845 2,050<br />
– 900 1005 1155 1280 1305 1395 1645 1875<br />
1<br />
Cooling and heating speeds are based on a combination of DIP switch settings on the furnace control. Refer to <strong>Installation</strong> Instructions for specific DIP Switch<br />
Settings.<br />
2<br />
Factory default setting.<br />
NOTES - The effect of static pressure is included in air volumes shown.<br />
First stage HEAT is approximately 91% of the same second stage HEAT.<br />
First stage COOL (two-stage air conditioning units only) is approximately 70% of the same second stage COOL speed position.<br />
Continuous Fan Only speed is selectable at 28%, 38%, 70% and 100% of the selected second stage cooling speed - minimum 500 cfm.<br />
<strong>Lennox</strong> Harmony III Zone Control Applications - Minimum blower speed is 480 cfm.<br />
SL280DF110V60C BLOWER PERFORMANCE (less filter)<br />
0 through 0.8 in. w.g. (Heating) and 0 through 1.0 in. w.g. (Cooling) External Static Pressure Range<br />
HEATING<br />
1<br />
Heating Speed<br />
DIP Switch<br />
First Stage Heating Speed - cfm<br />
Second Stage Heating Speed - cfm<br />
Settings<br />
+24% 1645 1810<br />
+18% 1565 1720<br />
+12% 1485 1635<br />
+6% 1405 1545<br />
Factory Default 1325 1460<br />
–6% 1245 1370<br />
–12% 1170 1285<br />
–18% 1090 1195<br />
COOLING<br />
1<br />
Cooling Speed<br />
First Stage Cooling Speed - cfm<br />
Second Stage Cooling Speed - cfm<br />
DIP Switch<br />
Settings<br />
Low Medium-Low Medium-High<br />
2<br />
High Low Medium-Low Medium-High<br />
2<br />
High<br />
+ 1075 1225 1370 1530 1500 1755 1915 2120<br />
Factory Default 945 1120 1230 1385 1360 1585 1770 1960<br />
– 880 985 1135 1235 1225 1405 1595 1760<br />
1<br />
Cooling and heating speeds are based on a combination of DIP switch settings on the furnace control. Refer to <strong>Installation</strong> Instructions for specific DIP Switch<br />
Settings.<br />
2<br />
Factory default setting.<br />
NOTES - The effect of static pressure is included in air volumes shown.<br />
First stage HEAT is approximately 91% of the same second stage HEAT.<br />
First stage COOL (two-stage air conditioning units only) is approximately 70% of the same second stage COOL speed position.<br />
Continuous Fan Only speed is selectable at 28%, 38%, 70% and 100% of the selected second stage cooling speed - minimum 500 cfm.<br />
<strong>Lennox</strong> Harmony III Zone Control Applications - Minimum blower speed is 485 cfm.<br />
Page 36
TABLE 20<br />
<strong>SL280DFV</strong>, Non−Communicating Thermostat with Humidity Control Feature and Single−Speed Outdoor Unit<br />
OPERATING<br />
SEQUENCE<br />
System<br />
Condition<br />
Step<br />
NO CALL FOR DEHUMIDIFICATION<br />
Thermostat Demand<br />
Y1 O G W 1<br />
SYSTEM DEMAND<br />
Relative Humidity<br />
Status<br />
Normal Operation 1 On On On Acceptable<br />
BASIC MODE (only active on a Y1 thermostat demand)<br />
Normal Operation 1 On On On Acceptable<br />
Dehumidification<br />
Call<br />
2 On On On Demand<br />
D<br />
24<br />
VAC<br />
24<br />
VAC<br />
0<br />
VAC<br />
PRECISION MODE (operates independent of a Y1 thermostat demand)<br />
24<br />
Normal Operation 1 On On On Acceptable<br />
VAC<br />
Dehumidification<br />
call<br />
Dehumidification<br />
call ONLY<br />
2 On On On Demand<br />
1 On On On Demand<br />
0<br />
VAC<br />
0<br />
VAC<br />
Compressor<br />
SYSTEM RESPONSE<br />
Blower<br />
CFM<br />
(COOL)<br />
High 100%<br />
Comments<br />
Compressor and indoor<br />
blower follow thermostat<br />
demand<br />
High 100% ComfortSense ® 7000<br />
thermostat energizes Y1<br />
and de−energizes D on a<br />
High 70%* call for de−humidification<br />
High 100% Dehumidification mode<br />
begins when humidity is<br />
High 70%* greater than set point<br />
High 70%*<br />
Jumpers at indoor unit with a single stage outdoor unit<br />
With Condensing unit − Cut W914 (R to DS) on SureLight ® board<br />
With Heat Pump − Cut W914 (R to DS) & W951 (R to O) on SureLight ® board<br />
ComfortSense ® 7000<br />
thermostat will try to maintain<br />
room humidity setpoint<br />
by allowing the room<br />
space to maintain a cooler<br />
room thermostat setpoint**<br />
ComfortSense ® 7000 thermostat to use for this application − Y2081 4 heat / 2 cool<br />
*Dehumidification blower speed is 70% of COOL speed for all units .<br />
**In Precision mode, ComfortSense ® 7000 thermostat will maintain room temperature up to 2 °F (1.2°C) cooler than room<br />
setting.<br />
Page 37
TABLE 21<br />
<strong>SL280DFV</strong>, Non−Communicating Thermostat with Humidity Control Feature and Two−Speed Outdoor Unit<br />
OPERATING<br />
SEQUENCE<br />
System<br />
Condition<br />
Step<br />
Thermostat Demand<br />
Y1 Y2 O G W 1<br />
SYSTEM DEMAND<br />
W<br />
2<br />
Relative Humidity<br />
Status<br />
NO CALL FOR DEHUMIDIFICATION<br />
Normal Operation −<br />
1 On On On Acceptable<br />
Y1<br />
Normal Operation −<br />
Y2<br />
2 On On On On Acceptable<br />
ROOM THERMOSTAT CALLS FOR FIRST STAGE COOLING<br />
BASIC MODE (only active on a Y1 thermostat demand)<br />
Normal Operation 1 On On On Acceptable<br />
Dehumidification<br />
Call<br />
2 On On On On Demand<br />
PRECISION MODE (operates independent of a Y1 thermostat demand)<br />
Normal Operation 1 On On On Acceptable<br />
Dehumidification<br />
call<br />
Dehumidification<br />
call ONLY<br />
2 On On On On Demand<br />
1 On On On On Demand<br />
ROOM THERMOSTAT CALLS FOR FIRST AND SECOND STAGE COOLING<br />
BASIC MODE (only active on a Y1 thermostat demand)<br />
Normal Operation 1 On On On On Acceptable<br />
Dehumidification<br />
Call<br />
2 On On On On Demand<br />
PRECISION MODE (operates independent of a Y1 thermostat demand)<br />
Normal Operation 1 On On On Acceptable<br />
Dehumidification<br />
call<br />
2 On On On On Demand<br />
D<br />
24<br />
VAC<br />
24<br />
VAC<br />
24<br />
VAC<br />
0<br />
VAC<br />
24<br />
VAC<br />
0<br />
VAC<br />
0<br />
VAC<br />
24<br />
VAC<br />
0<br />
VAC<br />
24<br />
VAC<br />
0<br />
VAC<br />
Compressor<br />
SYSTEM RESPONSE<br />
Blower<br />
CFM<br />
(COOL)<br />
Comments<br />
Low 70%* Compressor and indoor<br />
blower follow thermostat<br />
High 100% demand<br />
Low 70%* ComfortSense ® 7000<br />
thermostat energizes Y2<br />
and de−energizes D on a<br />
High 70%** call for de−humidification<br />
Low 70%* Dehumidification mode<br />
begins when humidity is<br />
High 70%** greater than set point<br />
High 70%**<br />
ComfortSense ® 7000<br />
thermostat will try to<br />
maintain room humidity<br />
setpoint by allowing the<br />
room space to maintain<br />
a cooler room thermostat<br />
setpoint***<br />
High 100% ComfortSense ® 7000<br />
thermostat energizes Y2<br />
and de−energizes D on a<br />
High 70%** call for de−humidification<br />
Low 70%* Dehumidification mode<br />
begins when humidity is<br />
High 70%** greater than set point<br />
Dehumidification<br />
call ONLY<br />
1 On On On On Demand<br />
0<br />
VAC<br />
High 70%**<br />
Jumpers at indoor unit with a two stage outdoor unit<br />
Cut factory jumper from Y1 to Y2 or cut W915 (Y1 to Y2)<br />
With Condensing unit − Cut W914 (R to DS) on SureLight ® board<br />
With Heat Pump − Cut W914 (R to DS) & W951 (R to O) on SureLight ® control<br />
ComfortSense ® 7000<br />
thermostat will try to<br />
maintain room humidity<br />
setpoint by allowing the<br />
room space to maintain<br />
a cooler room thermostat<br />
setpoint***<br />
ComfortSense ® 7000 thermostat to use for this application − Y2081 4 heat / 2 cool<br />
*Normal operation first stage cooling blower speed is 70% COOL speed.<br />
**Dehumidification blower speed is, reduced to 70% of COOL.<br />
***In Precision mode, ComfortSense ® 7000 thermostat will maintain room temperature up to 2 °F (1.2°C) cooler than room<br />
setting.<br />
Page 38
Unit Start−Up<br />
FOR YOUR SAFETY READ BEFORE LIGHTING<br />
WARNING<br />
Do not use this furnace if any part has been underwater.<br />
Immediately call a licensed professional service<br />
technician (or equivalent) to inspect the furnace and<br />
to replace any part of the control system and any gas<br />
control which has been under water.<br />
WARNING<br />
If overheating occurs or if gas supply fails to shut off,<br />
shut off the manual gas valve to the appliance before<br />
shutting off electrical supply.<br />
<strong>Gas</strong> Valve Operation (Figures 26 and 27)<br />
1 − STOP! Read the safety information at the beginning of<br />
this section.<br />
2 − Set the thermostat to the lowest setting.<br />
3 − Turn off all electrical power to the unit.<br />
4 − This furnace is equipped with an ignition device which<br />
automatically lights the burners. Do not try to light the<br />
burners by hand.<br />
5 − Remove the access panel.<br />
6 − Move switch on gas valve to OFF. Do not force. See<br />
figure 26 or 27.<br />
7 − Wait five minutes to clear out any gas. If you then smell<br />
gas, STOP! Immediately call your gas supplier from a<br />
neighbor’s phone. Follow the gas supplier’s instructions.<br />
If you do not smell gas go to next step.<br />
INLET PRESSURE POST<br />
WHITE RODGERS GAS VALVE<br />
MANIFOLD<br />
PRESSURE TAP<br />
HIGH FIRE ADJUSTMENT<br />
SCREW<br />
(under cap)<br />
CAUTION<br />
Before attempting to perform any service or maintenance,<br />
turn the electrical power to unit OFF at disconnect<br />
switch.<br />
WARNING<br />
During blower operation, the ECM motor emits energy<br />
that may interfere with pacemaker operation. Interference<br />
is reduced by both the sheet metal cabinet<br />
and distance.<br />
BEFORE LIGHTING smell all around the appliance area for<br />
gas. Be sure to smell next to the floor because some gas is<br />
heavier than air and will settle on the floor.<br />
The gas valve on the <strong>SL280DFV</strong> unit will be equipped with<br />
either a gas control switch. Use only your hand to move the<br />
control switch. Never use tools. If the switch will not turn or if<br />
the switch will not move by hand, do not try to repair it.<br />
Force or attempted repair may result in a fire or explosion.<br />
Placing the furnace into operation:<br />
<strong>SL280DFV</strong> units are equipped with an automatic ignition<br />
system. Do not attempt to manually light burners on these<br />
furnaces. Each time the thermostat calls for heat, the<br />
burners will automatically light. The ignitor does not get<br />
hot when there is no call for heat on units with an automatic<br />
ignition system.<br />
WARNING<br />
If you do not follow these instructions exactly, a fire<br />
or explosion may result causing property damage,<br />
personal injury or death.<br />
INLET PRESSURE TAP<br />
ON SIDE<br />
GAS VALVE SHOWN IN ON POSITION<br />
FIGURE 26<br />
HONEYWELL GAS VALVE<br />
HIGH FIRE<br />
ADJUSTING SCREW<br />
(under cap)<br />
GAS VALVE SHOWN IN ON POSITION<br />
MANIFOLD<br />
PRESSURE<br />
TAP ON<br />
SIDE<br />
FIGURE 27<br />
8 − Move switch on gas valve to ON. Do not force. See figure<br />
26 or 27.<br />
9 − Replace the access panel.<br />
10 − Turn on all electrical power to to the unit.<br />
11 − Set the thermostat to desired setting.<br />
NOTE − When unit is initially started, steps 1 through 11<br />
may need to be repeated to purge air from gas line.<br />
Page 39
12− If the appliance will not operate, follow the instructions<br />
Turning Off <strong>Gas</strong> to Unit" and call your service technician<br />
or gas supplier.<br />
Turning Off <strong>Gas</strong> to Unit<br />
1 − Set the thermostat to the lowest setting.<br />
2 − Turn off all electrical power to the unit if service is to be<br />
performed.<br />
3 − Remove the upper access panel.<br />
4 − Move switch on gas valve to OF. Do not force. See figure<br />
26 or 27.<br />
5 − Replace the upper access panel.<br />
Failure To Operate<br />
If the unit fails to operate, check the following:<br />
1 − Is the thermostat calling for heat?<br />
2 − Are access panels securely in place?<br />
3 − Is the main disconnect switch closed?<br />
4 − Is there a blown fuse or tripped circuit breaker?<br />
5 − Is the filter dirty or plugged? Dirty or plugged filters will<br />
cause the limit control to shut the unit off.<br />
6 − Is gas turned on at the meter?<br />
7 − Is the manual main shut-off valve open?<br />
8 − Is the internal manual shut-off valve open?<br />
9 − Is the unit ignition system in lock out? If the unit locks out<br />
again, call the service technician to inspect the unit for<br />
blockages.<br />
10 −Is pressure switch closed? Obstructed flue will cause<br />
unit to shut off at pressure switch. Check flue and outlet<br />
for blockages.<br />
11 −Is the rollout switch tripped? If the switch is tripped call<br />
the service technician to inspect the unit.<br />
<strong>Gas</strong> Pressure Adjustment<br />
<strong>Gas</strong> Flow (Approximate)<br />
<strong>Furnace</strong> should operate at least 5 minutes before checking<br />
gas flow. Determine time in seconds for two revolutions<br />
of gas through the meter. (Two revolutions assures a<br />
more accurate time.) Divide by two and compare to time<br />
in table 22 below. If manifold pressure matches table 24<br />
and rate is incorrect, check gas orifices for proper size and<br />
restriction. Remove temporary gas meter if installed.<br />
NOTE − Shut unit off and remove manometer as soon as an<br />
accurate reading has been obtained. Take care to replace<br />
pressure tap plug.<br />
TABLE 22<br />
GAS METER CLOCKING CHART<br />
Seconds for One Revolution<br />
SL280 Natural<br />
LP<br />
Unit 1 cu ft 2 cu ft 1 cu ft 2 cu ft<br />
Dial Dial Dial DIAL<br />
−045 80 160 200 400<br />
−70 55 110 136 272<br />
−90 41 82 102 204<br />
−110 33 66 82 164<br />
−135 27 54 68 136<br />
Natural−1000 btu/cu ft LP−2500 btu/cu ft<br />
Supply Line Pressure<br />
White Rodgers <strong>Gas</strong> Valve<br />
An inlet post located on the gas valve provides access to<br />
the supply pressure. See figure 27. Back out the 3/32 hex<br />
screw one turn, connect a piece of 5/16 tubing and connect<br />
to a manometer to measure supply pressure. See table 24<br />
for supply line pressure.<br />
Honeywell <strong>Gas</strong> Valve<br />
A threaded plug on the inlet side of the gas valve provides<br />
access to the supply pressure tap. Remove the threaded<br />
plug, install a field−provided barbed fitting and connect a<br />
manometer to measure supply pressure. See table 24 for<br />
supply line pressure. Replace the threaded plug after measurements<br />
have been taken.<br />
Manifold Pressure<br />
NOTE − Pressure test adapter kit (10L34) is available from<br />
<strong>Lennox</strong> to facilitate manifold pressure measurement.<br />
1 − Connect test gauge to manifold pressure post (figure<br />
26) or tap (figure 27) on gas valve.<br />
2 − Ignite unit on high fire and let run for 5 minutes to allow<br />
for steady state conditions.<br />
3 − After allowing unit to stabilize for 5 minutes, record<br />
manifold pressure and compare to value given in table<br />
24.<br />
4 − If necessary, make adjustments. Figures 26 and 27<br />
show location of high fire adjustment screw.<br />
5 − If an adjustment is made on high fire, re−check manifold<br />
pressure on low fire. Do not adjust low fire manifold<br />
pressure. If low fire manifold pressure is more<br />
than 1/2" above or below value specified in table 24,<br />
replace valve.<br />
Proper Combustion<br />
<strong>Furnace</strong> should operate minimum 15 minutes with correct<br />
manifold pressure and gas flow rate before checking combustion.<br />
Table 23 shows acceptable combustion for ALL<br />
<strong>SL280DFV</strong> models.<br />
TABLE 23<br />
Firing Rate CO 2 % For Nat CO 2 % For L.P.<br />
High Fire 6.0 − 7.4 6.9 − 8.4<br />
Low Fire 4.8 − 6.0 5.7 − 7.0<br />
The carbon monoxide reading should not exceed 50 ppm.<br />
Page 40
High Altitude<br />
The manifold pressure, gas orifice and pressure switch<br />
may require adjustment or replacement to ensure proper<br />
operation at higher altitudes. Tables 24 through 27 shows<br />
manifold pressure, pressures switch and gas conversion<br />
kits at all altitudes.<br />
IMPORTANT<br />
For safety, shut unit off and remove manometer as<br />
soon as an accurate reading has been obtained.<br />
Take care to replace pressure tap plug.<br />
TABLE 24<br />
Manifold Pressure Settings<br />
Unit<br />
Input<br />
070<br />
090<br />
110<br />
<strong>Gas</strong><br />
Orifice Size<br />
0 − 7500 ft.<br />
Manifold<br />
Orifice Size Pressure in.wg.<br />
7501 − 0−4500 ft.<br />
10,000 ft. 1<br />
Low<br />
Fire<br />
High<br />
Fire<br />
Manifold<br />
Pressure in.wg.<br />
4501−7500 ft.<br />
Low<br />
Fire<br />
High<br />
Fire<br />
Supply Line<br />
Manifold<br />
7501 − 10,000 ft. 2 in. w.g.<br />
Pressure in.wg. Pressure<br />
Natural .063 .055 1.7 3.5 1.6 3.4 1.7 3.5 4.5 13.0<br />
LP/propane 3 .039 .037 4.9 10.0 4.9 10.0 4.9 10.0 11.0 13.0<br />
Natural .063 .055 1.7 3.5 1.5 3.0 1.7 3.5 4.5 13.0<br />
LP/propane 3 .039 .037 4.9 10.0 4.9 10.0 4.9 10.0 11.0 13.0<br />
Natural .063 .055 1.7 3.5 1.5 3.2 1.7 3.5 4.5 13.0<br />
LP/propane 3 .039 .037 4.9 10.0 4.9 10.0 4.9 10.0 11.0 13.0<br />
Low<br />
Fire<br />
High<br />
Fire<br />
Min<br />
Max<br />
1 This is the only permissible derate for these units.<br />
2 Natural gas high altitude orifice kit required.<br />
3 A natural to L.P. propane gas changeover kit is necessary to convert this unit. Refer to the changeover kit installation instruction for the conversion<br />
procedure.<br />
NOTE − Units may be installed at altitudes up to 4500 ft. above sea level without modifications.<br />
Unit<br />
Input<br />
Unit<br />
Input<br />
TABLE 25<br />
High Altitude Pressure Switch Kits<br />
High Altitude<br />
Pressure Switch Kit<br />
0 − 4500 ft. 4501 − 7500 ft. 7501 − 10,000 ft.<br />
070 No Change No Change 73W36<br />
090 No Change 69W56 73W36<br />
110 No Change 69W56 73W35<br />
TABLE 26<br />
Honeywell <strong>Gas</strong> Valve Conversion Kits<br />
High Altitude<br />
Natural <strong>Gas</strong><br />
Orifice Kit<br />
7501 −<br />
10,000 ft.<br />
Natural <strong>Gas</strong> to<br />
LP/ Propane Kit<br />
0 − 7500 ft.<br />
7501 −<br />
10,000 ft.<br />
LP/Propane<br />
to<br />
Natural <strong>Gas</strong><br />
Kit<br />
0 − 7500 ft.<br />
070 73W37 51W02 73W38 69W79<br />
090 73W37 51W02 73W38 69W79<br />
110 73W37 51W02 73W38 69W79<br />
Unit<br />
Input<br />
TABLE 27<br />
White Rodgers <strong>Gas</strong> Valve Conversion Kits<br />
High Altitude<br />
Natural <strong>Gas</strong><br />
Orifice Kit<br />
7501 −<br />
10,000 ft.<br />
Natural <strong>Gas</strong> to<br />
LP/ Propane Kit<br />
0 − 7500 ft.<br />
7501 −<br />
10,000 ft.<br />
LP/Propane<br />
to<br />
Natural <strong>Gas</strong><br />
Kit<br />
0 − 7500 ft.<br />
070 77W05 77W07 77W11 77W09<br />
090 77W05 77W07 77W11 77W09<br />
110 77W05 77W07 77W11 77W09<br />
Page 41
Other Unit Adjustments<br />
Primary and Secondary Limits<br />
The primary limit is located on the heating compartment<br />
vestibule panel. The secondary limits (if equipped) are located<br />
in the blower compartment, attached to the back side<br />
of the blower. These limits are factory set and require no<br />
adjustment.<br />
Flame Rollout Switch<br />
This manually reset switch is located on the burner box. If<br />
tripped, check for adequate combustion air before resetting.<br />
Pressure Switches<br />
The pressure switch assembly (includes two switches) is<br />
located in the heating compartment adjacent to the combustion<br />
air inducer. These switches check for proper combustion<br />
air inducer operation before allowing ignition trial.<br />
The switches are factory−set and require no adjustment.<br />
Temperature Rise<br />
Place the unit into operation with a second−stage heating demand.<br />
After supply and return air temperatures have stabilized,<br />
check the temperature rise. If necessary, adjust the<br />
heating blower speed to maintain the temperature rise within<br />
the range shown on the unit nameplate. Increase the blower<br />
speed to decrease the temperature rise. Decrease the blower<br />
speed to increase the temperature rise. Failure to properly<br />
adjust the temperature rise may cause erratic limit operation<br />
and may result in premature heat exchanger failure.<br />
Thermostat Heat Anticipation<br />
Set the heat anticipator setting (if adjustable) according to<br />
the amp draw listed on the wiring diagram that is attached<br />
to the unit.<br />
Heating Sequence of Operation<br />
Electronic Ignition<br />
The two−stage, variable speed integrated control used in<br />
<strong>SL280DFV</strong> units has an added feature of an internal Watchguard<br />
control. The feature serves as an automatic reset device<br />
for ignition control lockout caused by ignition failure.<br />
This type of lockout is usually due to low gas line pressure.<br />
After one hour of continuous thermostat demand for heat,<br />
the Watchguard will break and remake thermostat demand<br />
to the furnace and automatically reset the control to begin<br />
the ignition sequence.<br />
NOTE − The integrated control thermostat selection DIP switch<br />
is factory−set in the TWO−STAGE" position.<br />
Applications Using a Two−Stage Thermostat<br />
See figure 28 for ignition control sequence<br />
A − Heating Sequence −− Integrated Control Thermostat<br />
Selection DIP Switch 1 OFF in Two−Stage" Position<br />
(Factory Setting)<br />
1 − On a call for heat, thermostat first−stage contacts close<br />
sending a signal to the integrated control. The integrated<br />
control runs a self-diagnostic program and<br />
checks high temperature limit switches for normally<br />
closed contacts and pressure switches for normally<br />
open contacts. The combustion air inducer is energized<br />
at low speed.<br />
2 − Once the control receives a signal that the low pressure<br />
switch has closed, the combustion air inducer begins<br />
a 15−second pre−purge in low speed.<br />
NOTE − If the low fire pressure switch does not close<br />
the combustion air inducer will switch to high fire. After<br />
a 15 second pre−purge the high fire pressure switch<br />
will close and the unit will begin operation on high fire.<br />
After 10 to 20 seconds of high fire operation the unit<br />
will switch to low fire..<br />
3 − After the pre−purge is complete, a 20−second initial ignitor<br />
warm−up period begins. The combustion air inducer<br />
continues to operate at low speed.<br />
4 − After the 20−second warm−up period has ended, the gas<br />
valve is energized on low fire (first stage) and ignition occurs.<br />
At the same time, the control module sends a signal<br />
to begin an indoor blower 30−second ON−delay.<br />
When the delay ends, the indoor blower motor is energized<br />
on the low fire heating speed, the HUM contacts<br />
close energizing the humidifier and 120V ACC terminal<br />
is energized. The furnace will continue this operation<br />
as long as the thermostat has a first−stage heating<br />
demand.<br />
5 − If second−stage heat is required, the thermostat second−stage<br />
heat contacts close and send a signal to the<br />
integrated control. The integrated control initiates a<br />
30−second second−stage recognition delay.<br />
6 − At the end of the recognition delay, the integrated control<br />
energizes the combustion air inducer at high<br />
speed. The control also checks the high fire (second<br />
stage) pressure switch to make sure it is closed. The<br />
high fire (second stage) gas valve is energized and the<br />
indoor blower motor is energized for operation at the<br />
high fire heating speed.<br />
7 − When the demand for high fire (second stage) heat is<br />
satisfied, the combustion air inducer is switched to the<br />
low−fire heating speed and the high−fire (second<br />
stage) gas valve is de−energized. The low−fire (first<br />
stage) gas valve continues operation. The indoor<br />
blower motor is switched to the low−fire heating speed.<br />
8 − When the thermostat demand for low−fire (first stage)<br />
heat is satisfied, the gas valve is de−energized and the<br />
field−selected indoor blower off delay begins. The<br />
combustion air inducer begins a 5−second post−purge<br />
period.<br />
9 − When the combustion air post−purge period is complete,<br />
the inducer, the HUM contacts as well as the<br />
120V ACC terminals are de−energized. The indoor<br />
blower is de−energized at the end of the off delay.<br />
Page 42
Applications Using A Single−Stage Thermostat<br />
See figure 29 for ignition control sequence<br />
B − Heating Sequence −− Control Thermostat Selection<br />
DIP Switch 1 ON in Single−Stage" Position<br />
NOTE − In these applications, two−stage heat will be initiated<br />
by the integrated control if heating demand has not<br />
been satisfied after the field adjustable period (7 or 12 minutes).<br />
1 − On a call for heat, thermostat first−stage contacts close<br />
sending a signal to the integrated control. The integrated<br />
control runs a self-diagnostic program and<br />
checks high temperature limit switches for normally<br />
closed contacts and pressure switches for normally<br />
open contacts. The combustion air inducer is energized<br />
at low speed.<br />
2 − Once the control receives a signal that the low pressure<br />
switch has closed, the combustion air inducer begins<br />
a 15−second pre−purge in low speed.<br />
NOTE − If the low fire pressure switch does not close<br />
the combustion air inducer will switch to high fire. After<br />
a 15 second pre−purge the high fire pressure switch<br />
will close and the unit will begin operation on high fire.<br />
After 10 to 20 seconds of high fire operation the unit<br />
will switch to low fire.<br />
3 − After the pre−purge is complete, a 20−second initial ignitor<br />
warm−up period begins. The combustion air inducer<br />
continues to operate at low speed.<br />
4 − After the 20−second warm−up period has ended, the gas<br />
valve is energized on low fire (first stage) and ignition occurs.<br />
At the same time, the control module sends a signal<br />
to begin an indoor blower 30−second ON−delay.<br />
When the delay ends, the indoor blower motor is energized<br />
on the low fire heating speed and the HUM contacts<br />
are energized. The integrated control also initiates<br />
a second−stage on delay (factory−set at 7<br />
minutes; adjustable to 12 minutes).<br />
5 − If the heating demand continues beyond the second−<br />
stage on delay, the integrated control energizes the<br />
combustion air inducer at high speed. The control also<br />
checks the high fire (second stage) pressure switch to<br />
make sure it is closed. The high fire (second stage)<br />
gas valve is energized and the indoor blower motor is<br />
energized for operation at the high fire heating speed.<br />
6 − When the thermostat heating demand is satisfied, the<br />
combustion air inducer begins a 5−second low speed<br />
post−purge. The field−selected indoor blower off delay<br />
begins. The indoor blower operates at the low−fire<br />
heating speed.<br />
7 − When the combustion air post−purge period is complete,<br />
the inducer, the HUM contacts as well as the<br />
120V ACC terminals are de−energized. The indoor<br />
blower is de−energized at the end of the off delay.<br />
1<br />
ON<br />
OFF<br />
ÉÉ<br />
ÉÉ<br />
1 stg heat demand<br />
low speed CAI<br />
ignitor<br />
low fire gas valve<br />
indoor blower low heat<br />
HEATING OPERATION WITH TWO−STAGE THERMOSTAT<br />
15<br />
35 39<br />
80<br />
30* second<br />
Pre−Purge<br />
Trial For blower<br />
Ignitor Warm−up Ignition on" delay<br />
5 SEC<br />
Post<br />
Purge<br />
blower<br />
off"<br />
delay<br />
2 stg heat demand<br />
high speed CAI<br />
high fire gas valve<br />
indoor blower high heat<br />
30 seconds RECOGNITION PERIOD<br />
* Conventional thermostat 30 seconds, icomfort Touch ® thermostat set for 30 adjustable 15 to 45 seconds.<br />
FIGURE 28<br />
ON<br />
OFF ÉÉ<br />
heat demand<br />
low speed CAI<br />
ignitor<br />
low fire gas valve<br />
indoor blower low heat<br />
1<br />
Pre−Purge<br />
HEATING OPERATION WITH SINGLE STAGE THERMOSTAT<br />
15<br />
Ignitor Warm−up<br />
35<br />
39<br />
Trial For<br />
Ignition<br />
30* second<br />
blower<br />
on" delay<br />
7 or 12 minutes after heating demand begins, furnace switches to high fire (depends on setting)<br />
high speed CAI<br />
high fire gas valve<br />
indoor blower high heat<br />
80<br />
5 SEC<br />
Post<br />
Purge<br />
blower<br />
off"<br />
delay<br />
* Conventional thermostat 30 seconds, icomfort Touch ® thermostat set for 30 adjustable 15 to 45 seconds.<br />
FIGURE 29<br />
Page 43
Service<br />
WARNING<br />
ELECTRICAL SHOCK, FIRE,<br />
OR EXPLOSION HAZARD.<br />
Failure to follow safety warnings exactly could result<br />
in dangerous operation, serious injury, death or<br />
property damage.<br />
Improper servicing could result in dangerous operation,<br />
serious injury, death, or property damage.<br />
Before servicing, disconnect all electrical power to<br />
furnace.<br />
When servicing controls, label all wires prior to disconnecting.<br />
Take care to reconnect wires correctly.<br />
Verify proper operation after servicing.<br />
At the beginning of each heating season, a licensed professional<br />
technician (or equivalent) should check the system<br />
as follows:<br />
Blower<br />
Check the blower wheel for debris and clean if necessary.<br />
The blower motors are prelubricated for extended bearing<br />
life. No further lubrication is needed.<br />
WARNING<br />
The blower access panel must be securely in place<br />
when the blower and burners are operating. <strong>Gas</strong><br />
fumes, which could contain carbon monoxide, can<br />
be drawn into living space resulting in personal injury<br />
or death.<br />
Filters<br />
All <strong>SL280DFV</strong> filters are installed external to the unit. Filters<br />
should be inspected monthly. Clean or replace the filters<br />
when necessary to ensure that the furnace operates<br />
properly. Replacement filters must be rated for high velocity<br />
airflow. Table 3 lists recommended filter sizes.<br />
Flue And Chimney<br />
1 − Check flue pipe, chimney and all connections for tightness<br />
and to make sure there is no blockage.<br />
2 − Check unit for proper draft.<br />
Electrical<br />
1 − Check all wiring for loose connections.<br />
2 − Check for the correct voltage at the furnace (furnace<br />
operating). Correct voltage is 120VAC + 10%.<br />
3 − Check amp−draw on the blower motor with inner blower<br />
access panel in place.<br />
Unit Nameplate__________Actual__________<br />
Cleaning the Heat Exchanger and Burners<br />
NOTE − Use papers or protective covering in front of the furnace<br />
during cleaning.<br />
1 − Turn off both electrical and gas power supplies to furnace.<br />
2 − Remove flue pipe, top cap, flue chase and internal flue<br />
pipe assembly from the unit.<br />
3 − Label the wires from gas valve, rollout switches, primary<br />
limit switch and make−up box then disconnect them.<br />
4 − Remove the screws that secure the combustion air inducer/pressure<br />
switch assembly to the collector box.<br />
Carefully remove the combustion air inducer to avoid<br />
damaging blower gasket. If gasket is damaged, it must<br />
be replaced to prevent leakage.<br />
5 − Remove the collector box located behind the combustion<br />
air inducer. Be careful with the collector box gasket.<br />
If the gasket is damaged, it must be replaced to<br />
prevent leakage.<br />
6 − Disconnect gas supply piping. Remove the screw securing<br />
the burner box cover and remove cover. Remove<br />
the four screws securing the burner manifold assembly<br />
to the vestibule panel and remove the<br />
assembly from the unit.<br />
7 − Remove screws securing burner box and remove<br />
burner box.<br />
8 − Remove screws from both sides, top and bottom of<br />
vestibule panel.<br />
9 − Remove heat exchanger. It may be necessary to<br />
spread cabinet side to allow more room. If so, remove<br />
five screws from the left side or right side of cabinet.<br />
See figure 31.<br />
10− Back wash using steam. Begin from the burner opening<br />
on each clam. Steam must not exceed 275°F.<br />
11− To clean burners, run a vacuum cleaner with a soft brush<br />
attachment over the face of burners. Visually inspect inside<br />
the burners and crossovers for any blockage<br />
caused by foreign matter. Remove any blockage. Figure<br />
30 shows burner detail.<br />
Page 44
<strong>SL280DFV</strong> BURNER, COMBUSTION AIR INDUCER ASSEMBLY &<br />
HEAT EXCHANGER REMOVAL<br />
gasket<br />
flue chase<br />
internal flue pipe<br />
combustion air inducer<br />
rollout switch ignitor<br />
burner box assembly<br />
orifice plate<br />
gasket<br />
collector box<br />
sensor<br />
gasket<br />
pressure switch<br />
heat exchanger<br />
burners<br />
manifold and gas valve<br />
retention rings<br />
burner box cover plate<br />
cross over<br />
FIGURE 30<br />
Page 45
12− To clean the combustion air inducer visually inspect and<br />
using a wire brush clean where necessary. Use compressed<br />
air to clean off debris and any rust.<br />
13− Reinstall heat exchanger in vestibule. (Replace the<br />
five screws in the cabinet from step 10 if removed).<br />
14− Reinstall collector box, combustion air assembly, internal<br />
flue pipe and flue chase. Seal with high temperature<br />
RTV. Reinstall all screws to the collector box and<br />
combustion air inducer. Failure to replace all screws<br />
may cause leaks. Inspect gaskets for any damage and<br />
replace if necessary.<br />
15− Reinstall burner box, manifold assembly and burner box<br />
cover.<br />
16− Reconnect all wires.<br />
17− Reconnect top cap and vent pipe to combustion air inducer<br />
outlet.<br />
18− Reconnect gas supply piping.<br />
19− Turn on power and gas supply to unit.<br />
20− Set thermostat and check for proper operation.<br />
20− Check all piping connections, factory and field, for gas<br />
leaks. Use a leak detecting solution or other preferred<br />
means.<br />
22− Repeat steps 21 and 23 until no leaks are detected.<br />
23− Replace access panel.<br />
Remove five screws if necessary<br />
(either side of cabinet)<br />
4<br />
5<br />
3<br />
CAUTION<br />
Some soaps used for leak detection are corrosive to<br />
certain metals. Carefully rinse piping thoroughly after<br />
leak test has been completed. Do not use<br />
matches, candles, flame or other sources of ignition<br />
to check for gas leaks.<br />
21− If a leak is detected, shut gas and electricity off and<br />
repair leak.<br />
FIGURE 31<br />
2<br />
1<br />
Page 46
Planned Service<br />
The following items should be checked during an annual inspection. Power to the unit must be shut off for the service technician’s<br />
safety.<br />
Fresh air grilles and louvers (on the unit and in the room<br />
where the furnace is installed) − Must be open and unobstructed<br />
to provide combustion air.<br />
Burners − Must be inspected for rust, dirt, or signs of water.<br />
Vent pipe − Must be inspected for signs of water, damaged<br />
or sagging pipe, or disconnected joints.<br />
Unit appearance − Must be inspected for rust, dirt, signs<br />
of water, burnt or damaged wires, or components.<br />
Blower access door − Must be properly in place and provide<br />
a seal between the return air and the room where the<br />
furnace is installed.<br />
Return air duct − Must be properly attached and provide<br />
an air seal to the unit.<br />
Operating performance − Unit must be observed during<br />
operation to monitor proper performance of the unit and the<br />
vent system.<br />
Combustion gases − Flue products must be analyzed and<br />
compared to the unit specifications.<br />
Problems detected during the inspection may make it necessary<br />
to temporarily shut down the furnace until the items<br />
can be repaired or replaced.<br />
Instruct the homeowners to pay attention to their<br />
furnace. Situations can arise between annual furnace inspections<br />
that may result in unsafe operation. For instance,<br />
items innocently stored next to the furnace may obstruct<br />
the combustion air supply. This could cause incomplete<br />
combustion and the production of carbon monoxide gas.<br />
Repair Parts List<br />
The following repair parts are available through independent <strong>Lennox</strong> dealers. When ordering parts, include the complete<br />
furnace model number listed on the CSA International nameplate −− Example: SL280DF070V36A.<br />
All service must be performed by a licensed professional installer (or equivalent), service agency, or gas supplier.<br />
Cabinet Parts<br />
Upper access panel<br />
Blower panel<br />
Top cap<br />
Control Panel Parts<br />
Transformer<br />
Two−stage, variable speed integrated control<br />
Door interlock switch<br />
Circuit breaker<br />
Blower Parts<br />
Blower wheel<br />
Blower housing<br />
Motor<br />
Motor electronics<br />
Power choke (1 hp only)<br />
Motor mounting frame<br />
Blower housing cutoff plate<br />
Heating Parts<br />
Flame Sensor<br />
Heat exchanger assembly<br />
<strong>Gas</strong> manifold<br />
Two−speed combustion air inducer<br />
Two−stage gas valve<br />
Main burner cluster<br />
Main burner orifices<br />
Pressure switch<br />
Ignitor<br />
Primary limit control<br />
Flame rollout switch<br />
Secondary limit<br />
Page 47
Integrated Control Diagnostic Modes<br />
Display<br />
No change (idle)*<br />
Solid E"<br />
Solid D"<br />
Solid F"<br />
Solid P" (variable speed only)<br />
Action (when button released)<br />
Remain in idle mode<br />
Enter diagnostic recall mode<br />
Discharge Air Installed<br />
Enter flame signal mode<br />
Program unit capacity/size (Unit Code)**<br />
* No change implies the display will continue to show whatever is currently being displayed for normal operation (blinking<br />
decimal, active error code, heat state, etc..)<br />
** After the P" is selected (by releasing the push button) the integrated control will start flashing the P" on display for 90<br />
seconds. If push button is pressed again and held during that time, the control will start to display characters corresponding<br />
to different variable speed furnace models for 3 seconds each. While the wanted character−model is displayed push button<br />
has to be released. Selected option will flash display for 10 seconds and during that time push button has to be pressed<br />
and held for 5 seconds. Once control accepts new setting it will store data in non−volatile memory and reset itself. If 10 seconds<br />
expires or push button is held less than 5 seconds, control will exit filed test mode and go in idle without programming<br />
the unit size.<br />
Integrated Control Diagnostic Codes<br />
Press the diagnostic push button and hold it to cycle through a menu of options. Every five seconds a new menu item will be<br />
displayed. Release the button when the desired mode is displayed.<br />
When a solid "P" is displayed, the furnace capacity / size is programmed.<br />
When the solid E" is displayed, the control enters the Diagnostic Recall (Alarm History). Diagnostic Recall mode menu<br />
options: No change (displaying error history) remains in Diagnostic Recall mode; solid = " exits Diagnostic Recall mode;<br />
and solid c" clears the error history. Must press button while flashing c" is displayed to clear error codes.<br />
When the solid F" is displayed, the control enters the Flame Signal Mode. The Flame Signal Mode is exited: with power<br />
cycle/reset, by pressing and holding the push button until 3 horizontal line are displayed = , after 10 minutes of entering<br />
flame signal mode.<br />
Code Diagnostic Codes/Status of Equipment Action Required to Clear and Recover<br />
. Idle mode (Decimal blinks at 1 Hertz −− 0.5 second ON, 0.5 second OFF).<br />
A Cubic feet per minute (cfm) setting for indoor blower (1 second ON, 0.5<br />
second OFF) / cfm setting for current mode displayed.<br />
C Cooling stage (1 second ON, 0.5 second OFF) / 1 or 2 displayed / Pause<br />
/ cfm setting displayed / Pause / Repeat codes).<br />
d Dehumidification mode (1 second ON) / 1 second OFF) / cfm setting displayed<br />
/ Pause / Repeat Codes).<br />
h Heat pump stage (1 second ON, 0.5 second OFF) / % of input rate displayed<br />
/ Pause / cfm setting / Pause / Repeat codes.<br />
H <strong>Gas</strong> Heat Stage (1 second ON, 0.5 second OFF) / 1 or 2 displayed /<br />
Pause / cfm<br />
setting displayed / Pause / Repeat codes. Blinking during ignition.<br />
dF Defrost mode.<br />
U Discharge Air Temperature<br />
Page 48
Integrated Control Diagnostic Codes (continued)<br />
Code Diagnostic Codes/Status of Equipment Action Required to Clear and Recover<br />
E 105<br />
Device communication problem − No other devices on RS BUS (Communication<br />
system).<br />
Equipment is unable to communicate. Indicates<br />
numerous message errors. In most cases errors are<br />
related to electrical noise. Make sure high voltage<br />
power is separated from RSBus. Check for mis−<br />
wired and/or loose connections between the stat,<br />
indoor unit and outdoor unit. Check for a high voltage<br />
source of noise close to the system. Fault<br />
clears after communication is restored.<br />
E 110 Low line voltage. Line Voltage Low (Voltage lower than nameplate<br />
rating). Check power line voltage and correct. Alarm<br />
clears 5 seconds after fault recovered.<br />
E 111 Line voltage polarity reversed. Reverse line power voltage wiring. System resumes<br />
normal operation 5 seconds after fault recovered.<br />
E 112 Ground not detected System shuts down. Provide proper earth ground.<br />
System resumes normal operation 5 seconds after<br />
fault recovered.<br />
E 113 High line voltage. Line Voltage High (Voltage higher than nameplate<br />
rating). Provide power voltage within proper range.<br />
System resumes normal operation 5 seconds after<br />
fault recovered.<br />
E 114 Line voltage frequency out−of−range. No 60 Hertz Power. Check voltage and line power<br />
frequency. Correct voltage and frequency problems.<br />
System resumes normal operation 5 seconds after<br />
fault recovered.<br />
E 115 Low 24V − Control will restart if the error recovers. 24−Volt Power Low (Range is 18 to 30 volts). Check<br />
and correct voltage. Check for additional power−robbing<br />
equipment connected to system. May require<br />
installation of larger VA transformer to be installed in<br />
furnace / air handler. Clears after fault recovered.<br />
E 116 High 24V. 24 Volt Power High (Range is 18 to 30 volts). Check<br />
and correct voltage. Check for proper line voltage<br />
(120V, 240V, etc.) to equipment. Clears when control<br />
senses proper voltage.<br />
E 117 Poor ground detected (Warning only) Provide proper grounding for unit. Check for proper<br />
earth ground to the system. Warning only will clear<br />
30 seconds after fault recovered.<br />
E 120 Unresponsive device. Communication only. Usually caused by delay in outdoor unit responding<br />
to indoor unit poling. Recycle power. Check all wiring<br />
connections. Cleared after unresponsive device<br />
responds to any inquiry.<br />
E 124<br />
E 125<br />
Active communicating thermostat signal missing for more than 3 minutes.<br />
Control failed self−check, internal error, failed hardware. Will restart if<br />
error<br />
recovers. Integrated control not communicating. Covers hardware errors<br />
(flame sense circuit faults, pin shorts, etc.).<br />
Equipment lost communication with the thermostat.<br />
Check four wiring connections, ohm wires and cycle<br />
power at the thermostat. Alert stops all services and<br />
waits for heartbeat message from thermostat (subnet<br />
controller). Cleared after valid thermostat (subnet<br />
controller) message is received.<br />
Hardware problem on the control. Cycle power on<br />
control. Replace if problem prevents service and is<br />
persistent. Critical alert. Cleared 300 seconds after<br />
fault recovered.<br />
E 126 Control internal communication problem. Hardware problem on the control. Cycle power on<br />
control. Replace if problem prevents service and is<br />
persistent. Cleared 300 seconds after fault recovered.<br />
Page 49
Integrated Control Diagnostic Codes (continued)<br />
E 131<br />
E 180<br />
Corrupted control parameters (Verify configuration of system). Communicating<br />
only.<br />
Outdoor air temperature sensor failure. Only shown if shorted or out−of−<br />
range.<br />
Reconfigure the system. Replace control if heating<br />
or cooling is not available. Only applicable in the<br />
communicating mode, not in startup. Exit from Commissioning<br />
and Execute ’Set Factory Default mode’.<br />
Control will still operate on default parameter settings.<br />
Compare outdoor sensor resistance to temperature/<br />
resistance charts in unit installation instructions.<br />
Replace sensor pack if necessary. At beginning of<br />
(any) configuration, furnace or air handler control<br />
will sense outdoor air and discharge air temperature<br />
sensor(s). If detected (reading in range), appropriate<br />
feature will be set as ’installed’ and that could<br />
be seen in ’About’ screen. In normal operation after<br />
control recognizes sensors, alarm will be sent if<br />
valid temperature reading is lost. To get rid of setting<br />
and alarm, redo configuration and make sure<br />
that temperature sensor is marked as ’not installed’<br />
in Indoor Unit ’About’ screen. When Indoor unit control<br />
is replaced, thermostat will ’tell’ new control if<br />
temperature sensor is in system or not. Clears 30<br />
seconds after fault recovered.<br />
E 200 Hard lockout − Rollout circuit open or previously open. Correct cause of rollout trip, or replace flame rollout<br />
switch. Test furnace operation. Cleared after fault<br />
recovered.<br />
E 201<br />
E 202<br />
E 203<br />
Indoor blower communication failure − Unable to communicate with blower<br />
motor.<br />
Indoor blower motor mis−match − Indoor motor horsepower does not<br />
match unit capacity. See Page 55.<br />
Appliance capacity / size is NOT programmed. Invalid unit codes refer to<br />
configuration flow chart. See Page 55.<br />
Indoor blower communication failure (including power<br />
outage). Lost communication with indoor blower<br />
motor. Possible causes: motor not powered, loose<br />
wiring. Problem may be on control or motor side.<br />
Cleared after fault recovered.<br />
Incorrect appliance capacity code selected. Check<br />
for proper configuring under: Unit Size Codes for<br />
<strong>Furnace</strong>/Air Handler on configuration guide or in<br />
installation instructions. Cleared after the correct<br />
match is detected following a reset. (Remove thermostat<br />
from system while applying power and reprogramming.)<br />
No appliance capacity code selected. Check for<br />
proper configuring under: Unit Size Codes for <strong>Furnace</strong><br />
on configuration guide or in installation instructions.<br />
Critical Alert. Cleared after valid unit code is<br />
read following a reset. (Remove thermostat from<br />
system while applying power and reprogramming.)<br />
E 204 <strong>Gas</strong> valve mis−wired. Check gas valve operation and wiring. Clears when<br />
repaired.<br />
E 205 <strong>Gas</strong> valve control relay contact shorted. Check wiring on control and gas valve. If wiring is<br />
correct, replace control.<br />
E 206 <strong>Gas</strong> valve second−stage relay failure <strong>Furnace</strong> will operate on 1 st stage for remainder of<br />
the heating demand. Will clear after fault recovered.<br />
If unable to operate 2nd stage, replace control.<br />
E 207 Hot surface ignitor sensed open − Refer to troubleshooting. See Page 56. Measure resistance of hot surface ignitor. Replace if<br />
open or not within specified range found in IOM.<br />
Resumes normal operation after fault is cleared.<br />
Page 50
Integrated Control Diagnostic Codes (continued)<br />
Code Diagnostic Codes/Status of Equipment Action Required to Clear and Recover<br />
E 223 Low pressure switch failed open. Check pressure (inches w.c.) of low pressure switch<br />
closing on heat call. Measure operating pressure<br />
(inches w.c.). Inspect vent and combustion air inducer<br />
for correct operation and restriction. Resumes<br />
normal operation after fault is cleared<br />
E 224<br />
E 225<br />
E 226<br />
E 227<br />
Low pressure switch failed closed − Refer to troubleshooting. See<br />
Page 56.<br />
High pressure switch failed open − Refer to troubleshooting. See<br />
Page 56.<br />
High pressure switch failed closed − Refer to troubleshooting. See<br />
Page 56.<br />
Low pressure switch open during trial for ignition or run mode. Refer to<br />
troubleshooting. See Page 56.<br />
Check operation of low pressure switch to see if it is<br />
stuck closed on heat call longer than 150 seconds.<br />
Measure operating pressure (inches w.c.). Inspect<br />
vent and combustion air inducer for correct operation<br />
and restriction. Resumes normal operation after<br />
fault is cleared.<br />
Check pressure (inches w.c.) of high pressure<br />
switch closing on heat call. Measure operating pressure<br />
(inches w.c.). Inspect vent and combustion air<br />
inducer for correct operation and restriction. Resumes<br />
normal operation after fault is cleared.<br />
Check operation of high pressure switch closing on<br />
heat call. Measure operating pressure (inches w.c.).<br />
Inspect vent and combustion air inducer for correct<br />
operation and restriction. Resumes normal operation<br />
after fault is cleared.<br />
Check pressure (inches w.c.) of low pressure switch<br />
closing on heat call. Measure operating pressure<br />
(inches w.c.). Inspect vent and combustion air inducer<br />
for correct operation and restriction. Resumes<br />
normal operation after fault is cleared.<br />
E 228 Combustion air inducer calibration failure Unable to perform pressure switch calibration.<br />
Check vent system and pressure switch wiring connections.<br />
Resumes normal operation after fault is<br />
cleared.<br />
E 229 Ignition on high fire IFC switched to high fire ignition because low fire<br />
pressure switch did not close in allowed time. No<br />
action is needed.<br />
E 240 Low flame current − Run mode − Refer to troubleshooting. See Page 56. Check micro−amperes of flame sensor using control<br />
diagnostics or field−installed mode. Clean or replace<br />
sensor. Measure voltage of neutral to ground to ensure<br />
good unit ground. Alert clears after current<br />
heat call has been completed.<br />
E 241 Flame sensed out of sequence − Flame still present. Shut off gas. Check for gas valve leak. Replace, if<br />
necessary. Alert clears when fault is recovered.<br />
E 250 Limit switch circuit open − Refer to troubleshooting. Check for proper firing rate on furnace. Ensure<br />
there is no blockage in heater. Check for proper air<br />
flow. If limit not closed within 3 minutes, unit will go<br />
into 1−hour soft lockout. Resumes normal operation<br />
after fault is cleared.<br />
E 252 Discharge air temperature too high (gas heat only). Check temperature rise, air flow and input rate.<br />
Cleared when heat call is finished.<br />
E 270<br />
E 271<br />
Soft lockout − Exceeded maximum number of retries. No flame current<br />
sensed.<br />
Soft lockout − Exceeded maximum number of retries. Last retry failed due<br />
to the pressure switch opening.<br />
Check for proper gas flow. Ensure that ignitor is<br />
lighting burner. Check flame sensor current. Clears<br />
when heat call finishes successfully.<br />
Check pressure (inches w.c.) of low pressure switch<br />
closing on heat call. Measure operating pressure<br />
(inches w.c.). Inspect vent and combustion air inducer<br />
for correct operation and restriction. Clears<br />
when heat call finishes successfully.<br />
Page 51
Integrated Control Diagnostic Codes (continued)<br />
E 272<br />
E 273<br />
E 274<br />
Soft lockout − Exceeded maximum number of recycles. Last recycle due<br />
to the pressure switch opening.<br />
Soft lockout − Exceeded maximum number of recycles. Last recycle due<br />
to flame failure.<br />
Soft lockout − Exceeded maximum number of recycles. Last recycle<br />
failed due to the limit circuit opening or limit remained open longer than<br />
3 minutes.<br />
Check operation of low pressure switch to see if it is<br />
stuck closed on heat call. Check pressure (inches<br />
w.c.) of high pressure switch closing on heat call.<br />
Measure operating pressure (inches w.c.). Inspect<br />
vent and combustion air inducer for correct operation<br />
and restriction. Clears when heat call finishes<br />
successfully.<br />
Check micro−amperes of flame sensor using control<br />
diagnostics or field−installed mode. Clean or replace<br />
sensor. Measure voltage of neutral to ground to ensure<br />
good unit ground. Clears when heat call finishes<br />
successfully.<br />
Shut down system. 1−hour soft lockout. Check firing<br />
rate and air flow. Check for blockage. Clears when<br />
heat call finishes successfully.<br />
E 275 Soft lockout − Flame sensed out of sequence. Flame signal is gone. Shut off gas. Check for gas valve leak. 1−hour soft<br />
lockout. Clears when flame has been proven stable.<br />
E 276 Watchguard calibration failure. Unable to perform pressure switch calibration.<br />
Check vent system and pressure switch wiring connections.<br />
1−hour soft lockout. Clears when calibration<br />
has finished successfully.<br />
E 290 Ignitor circuit fault − Failed ignitor or triggering circuitry. Measure resistance of hot surface ignitor. Replace if<br />
open or not within specifications. 1−hour soft lockout.<br />
Clears when flame has been proven stable.<br />
E 291 Heat air flow restricted below the minimum. Check for dirty filter and air flow restriction. Check<br />
blower performance. 1−hour soft lockout. Cleared<br />
when heat call finishes successfully.<br />
E 292<br />
Indoor blower motor unable to start due to obstructed wheel, seized<br />
bearings.<br />
Indoor blower motor unable to start (seized bearing,<br />
stuck wheel, etc.). Replace motor or wheel if<br />
assembly does not operate or meet performance<br />
standards. 1−hour soft lockout. Clears after circulator<br />
successfully starts.<br />
E 294 Combustion air inducer over current. Check combustion blower bearings, wiring and<br />
amps. Replace if does not operate or does not meet<br />
performance standards. Clears after inducer current<br />
is sensed to be in−range after the ignition following<br />
the soft lockout or reset.<br />
E 295 Indoor blower motor temperature is too high. Indoor blower motor over temperature (motor<br />
tripped on internal protector). Check motor bearings<br />
and amps. Replace if necessary. Cleared after<br />
blower demand is satisfied.<br />
E 310 Discharge error temperature sensor failure. Only shown if shorted or<br />
out of range.<br />
Compare outdoor sensor resistance to temperature/<br />
resistance charts in installation instructions. Replace<br />
sensor if necessary. Cleared in Communicating<br />
mode: 30 seconds after fault recovered. In Non−<br />
Communicating mode: Cleared after the current<br />
heat call is completed.<br />
E 311 Heat rate reduced to match indoor blower air flow. Warning Only. <strong>Furnace</strong> blower in cutback mode due<br />
to restricted airflow. Reduce firing rate every 60<br />
seconds to match available CFM. Check filter and<br />
duct system. To clear, replace filter if needed or repair/add<br />
duct. 2−stage controls will reduce firing rate<br />
to 1 st stage. Clears when heat call finishes successfully.<br />
Page 52
Integrated Control Diagnostic Codes (continued)<br />
Code Diagnostic Codes/Status of Equipment Action Required to Clear and Recover<br />
E 312<br />
Restricted air flow in cooling or continuous fan mode is lower than cfm<br />
setting.<br />
Warning Only. Restricted airflow − Indoor blower is<br />
running at a reduced CFM (Cutback Mode − The<br />
variable speed motor has pre−set speed and torque<br />
limiters to protect the motor from damage caused<br />
by operating outside of design parameters (0 to 0.8"<br />
W.C.. total external static pressure). Check filter and<br />
duct system. To clear, replace filter if needed or repair/add<br />
duct. Cleared after the current service demand<br />
is satisfied.<br />
E 313 Indoor or outdoor unit capacity mismatch. Communication only. Incorrect indoor/outdoor capacity code selected.<br />
Check for proper configuring in installation instructions.<br />
Alarm is just a warning. The system will operate,<br />
but might not meet efficiency and capacity parameters.<br />
Alarm will clear when commissioning is<br />
exited. Cleared after commissioning is complete.<br />
E 331 Global network connection − Communication link problem. For Future Use.<br />
E 334 Relay Y1" stuck on interated control. Replace integrated control.<br />
E 347 No 24 Volt output on Y1 of "integrated control" with non communicating<br />
outdoor unit.<br />
E 348<br />
No 24 Volt output on Y2 of "integrated control" with non?communicating<br />
outdoor unit.<br />
E 349 No 24 Volts between R & O on "integrated control" with non communicating<br />
outdoor unit (Dual fuel module required for heat pump application).<br />
Operation stopped. Y1 relay / Stage 1 failed. (Pilot<br />
relay contacts did not close or the relay coil did not<br />
energize; no input back to IFC chip). Critical Alert.<br />
Cleared after reset and Y1 input sensed.<br />
Y2 relay / Stage 2 failed. (Pilot relay contacts did<br />
not close or the relay coil did not energize; no input<br />
back to IFC chip). Critical Alert. Cleared after reset<br />
and Y1 input sensed.<br />
Configuration link R to O needs to be restored. Replace<br />
link or hard−wire. Applicable in non communicating<br />
mode. Critical Alert.<br />
E 370 Interlock switch sensed open for 2 minutes. Control sees the loss of 24VAC for 2 minutes .Terminate<br />
all services and wait for interlock switch to<br />
close. The alarm will clear when 24VAC is continuously<br />
sensed on DS terminal for a minimum of 10<br />
seconds or on a power reset.<br />
E 400 LSOM − Compressor internal overload tripped. Thermostat demand Y1 is present; but, compressor<br />
is not running. Check power to outdoor unit. Clears<br />
the error after current is sensed in both RUN and<br />
START sensors for at least 2 seconds, or after service<br />
is removed, or after power reset.<br />
E 401 LSOM Compressor long run cycle or low system pressure. Compressor ran more than 18 hours to satisfy a<br />
single thermostat demand. Critical Alert. Clears the<br />
error after 30 consecutive normal run cycles or<br />
power reset. Also monitors low pressure switch<br />
trips.<br />
E 402 LSOM − Outdoor unit system pressure trip. Discharge or suction pressure out−of−limits, or compressor<br />
overloaded. Clears the error after 4 consecutive<br />
normal compressor run cycles.<br />
E 403<br />
E 404<br />
LSOM − Compressor short−cycling. .(Running less than 4 minutes). Outdoor<br />
unit pressure trip<br />
LSOM − Compressor rotor locked. Compressor short−cycling. (Running<br />
less than 4 minutes).<br />
Compressor runs less than 3 minutes to satisfy a<br />
thermostat demand. Clears the error after 4 consecutive<br />
normal run cycles or power reset.<br />
Compressor rotor locked up due to run capacitor<br />
short, bearings are seized, excessive liquid refrigerant,<br />
etc. Clears the error after 4 consecutive normal<br />
run cycles or after power reset.<br />
E 405 LSOM − Compressor open circuit. Compressor circuit open (due to power disconnection,<br />
open fuse, etc.) Clears the error after 1 normal<br />
compressor run cycle.<br />
Page 53
Integrated Control Diagnostic Codes (continued)<br />
E 406 LSOM − Compressor open start circuit. Required amount of current is not passing through<br />
Start current transformer. Clears the error after current<br />
is sensed in START sensor, or after power reset.<br />
E 407 LSOM − Compressor open run circuit. Required amount of current is not passing through<br />
Run current transformer. Clears the error after current<br />
is sensed in RUN sensor, or 1 normal compressor<br />
run cycle, or after power reset.<br />
E 408 LSOM − Compressor contactor is welded. Compressor runs continuously. Clears the error<br />
after 1 normal compressor run cycle or after power<br />
reset.<br />
E 409 LSOM − Compressor low voltage. Secondary voltage is below 18VAC. After 10 minutes,<br />
operation is discontinued. Clears the code<br />
after voltage is higher than 20 VAC for 2 seconds or<br />
after power reset.<br />
Page 54
Program Unit Capacity/Size Mode<br />
Power−Up − Number displayed represents by integrated control unit size code (furnace model<br />
and capacity). If three horizontal bars are displayed followed by continuous E203, furnace<br />
control does not recognize unit size code. Configure per the following:<br />
−<br />
Yes<br />
<strong>Furnace</strong> control in IDLE mode<br />
No heating, cooling or indoor fan<br />
operation)<br />
No<br />
To enter Program Unit<br />
Capacity/Size: push<br />
and hold button next to<br />
_<br />
7−segment LED display<br />
until solid P" symbol<br />
appears. Release<br />
button.<br />
IMPORTANT: Field replacement controls may<br />
need to be manually configured to validate<br />
furnace unit size code.<br />
Solid P starts<br />
blinking on<br />
7−Segment LED<br />
P<br />
UNIT SIZE<br />
CODE<br />
A<br />
b<br />
C<br />
d<br />
Turn room thermostat to OFF<br />
FURNACE MODEL<br />
SL280DF070V36A<br />
SL280DF090V48B<br />
SL280DF090V60C<br />
SL280DF110V60C<br />
Push and hold button. Integrated control will<br />
display unit size code number for each<br />
furnace model for three seconds.<br />
When the correct unit size code is displayed, release<br />
button. Selected code will flash for 10−second period.<br />
During that period, press and hold push button for 5<br />
seconds. Integrated control will store code in<br />
memory and will automatically exit Program Unit<br />
Capacity/Size Mode and reset. (If second period<br />
expires or push button is held less than five seconds,<br />
control will automatically exit Program<br />
Capacity/Size Mode and go into IDLE mode without<br />
storing unit size code. If this happens, programming<br />
function must be repeated).<br />
Verify that the selected unit size code is correct<br />
and stored in non−volatile memory by cycling<br />
the 24 volt power to the furnace control. (At 24<br />
volt power−up of the furnace control, the<br />
7−segment LED will display a unit size code. If<br />
three horizontal bars display, board does not<br />
recognize unit size code. Programming<br />
function must be repeated)<br />
−<br />
FINISHED<br />
Page 55
Troubleshooting: Heating Sequence of Operation<br />
CALL FOR FIRST−STAGE HEAT<br />
1<br />
CALL FOR<br />
1ST STAGE HEAT<br />
(LOW FIRE)<br />
HIGH<br />
LIMIT SWITCH<br />
CLOSED?<br />
YES<br />
NO<br />
INDOOR BLOWER OFF AFTER<br />
HEAT FAN OFF DELAY<br />
(LOW HEAT SPEED)<br />
ERROR<br />
CODE<br />
FLASHES<br />
INDOOR<br />
BLOWER<br />
ON(LOW HEAT<br />
SPEED)<br />
YES<br />
LIMIT<br />
SWITCH<br />
CLOSED WITHIN 3<br />
MINUTES?<br />
NO<br />
NO<br />
INDOOR<br />
BLOWER OFF<br />
AFTER HEAT FAN<br />
OFF DELAY (LOW<br />
HEAT SPEED)<br />
WATCHGUARD −<br />
ERROR CODE<br />
FLASHES 1<br />
NO<br />
ROLLOUT<br />
CIRCUITS<br />
CLOSED?<br />
YES<br />
LOW<br />
PRESSURE<br />
SWITCH<br />
OPEN?<br />
YES<br />
NO<br />
NO<br />
DE−ENERGIZE<br />
GAS VALVE<br />
ERROR CODE<br />
FLASHES (AFTER<br />
5 SECONDS)<br />
LOW PRESSURE<br />
SWITCH OPENS<br />
INDUCER ON<br />
(HIGH SPEED)<br />
INDOOR BLOWER<br />
ON (LOW HEAT<br />
SPEED)<br />
ERROR<br />
CODE<br />
FLASHES<br />
NO<br />
ROLLOUT<br />
CIRCUIT<br />
CLOSES<br />
(MANUAL<br />
RE−SET)<br />
INDUCER OFF<br />
AFTER POST<br />
PURGE<br />
INDOOR BLOWER<br />
OFF AFTER HEAT<br />
OFF DELAY<br />
YES<br />
CALL<br />
FOR HEAT<br />
ENDS?<br />
YES<br />
INDUCER ON<br />
LOW SPEED<br />
PRE−PURGE<br />
(15 SECONDS)<br />
H.S.I. ON<br />
(20 SECONDS)<br />
1ST STAGE GAS<br />
VALVE ENERGIZED<br />
IGNITION TRIAL<br />
BEGINS (H.S.I. ON)<br />
LOW<br />
PRESSURE SWITCH<br />
CLOSED WITHIN 120<br />
SECONDS?<br />
YES<br />
3<br />
NO<br />
HEAT FAN ON DELAY<br />
TIMER STARTED<br />
HIGH<br />
PRESSURE<br />
SWITCH<br />
OPEN<br />
BEFORE<br />
INDUCER WAS<br />
TURNED ON?<br />
YES<br />
INTERPURGE<br />
(15 SECONDS)<br />
NO<br />
INDUCER TO<br />
HIGH SPEED−<br />
ERROR CODE<br />
FLASHES<br />
HARD LOCKOUT −<br />
ERROR CODE<br />
FLASHES 2<br />
LOW & HIGH<br />
PRESSURE SWITCH<br />
CLOSED WITHIN 30<br />
SECONDS?<br />
NO<br />
YES<br />
NO<br />
YES<br />
INDUCER OFF−<br />
WAIT<br />
5 MINUTES<br />
ERROR CODE<br />
FLASHES<br />
INDOOR<br />
BLOWER<br />
ON?<br />
YES<br />
INDOOR<br />
BLOWER<br />
OFF AFTER<br />
HEAT FAN<br />
OFF DELAY<br />
1<br />
NO<br />
FLAME<br />
SENSED WITHIN<br />
4 SECONDS?<br />
NO<br />
GAS VALVE<br />
DE−ENERGIZED<br />
H.S.I. OFF<br />
5TH<br />
UNSUCCESSFUL<br />
TRIAL?<br />
YES<br />
POSTPURGE<br />
(5 SECONDS)<br />
INDUCER<br />
OFF<br />
WATCHGUARD −<br />
ERROR CODE<br />
FLASHES<br />
1<br />
YES<br />
H.S.I. OFF<br />
1<br />
WATCHGUARD LOCKOUT AUTOMATICALLY RESETS AFTER ONE HOUR<br />
INDOOR<br />
BLOWER ON 45 SEC.<br />
(LOW HEAT SPEED)<br />
2<br />
2 HARD LOCKOUT REQUIRES THERMOSTAT RESET OR CYCLING OF POWER TO RESET THE LOCKOUT.<br />
3 IN CASE HIGH SPEED INDUCER IS RUNNING AT THE TIME THE GAS VALVE GETS ENERGIZED,<br />
2ND STAGE GAS VALVE IS ENERGIZED INSTEAD OF 1ST STAGE. 20 SECONDS AFTER FLAME<br />
IS SENSED, INDUCER SWITCHES TO LOW SPEED, AND GAS VALVE SWITCHES TO 1ST STAGE.<br />
CALL FOR HEAT SATISFIED<br />
Page 56
Troubleshooting: Heating Sequence of Operation (Continued)<br />
CALL FOR SECOND−STAGE HEAT<br />
2<br />
CALL FOR 2ND STAGE HEAT<br />
(HIGH FIRE)<br />
1<br />
2 STAGE THERMOSTAT<br />
SINGLE STAGE<br />
THERMOSTAT<br />
2<br />
RECOGNITION DELAY<br />
(30 SECONDS)<br />
ONLY FOR 1ST EXPIRED?<br />
REQUEST FOR<br />
2ND STAGE HEAT<br />
YES<br />
YES<br />
2ND STAGE<br />
ON DELAY<br />
EXPIRED?<br />
INDUCER SWITCHED<br />
TO HIGH SPEED<br />
HIGH<br />
PRESSURE SWITCH<br />
CLOSED WITHIN 10<br />
SECONDS?<br />
NO<br />
INDUCER SWITCHED<br />
TO LOW SPEED<br />
5 MINUTE DELAY<br />
(ERROR CODE FLASHES)<br />
3<br />
YES<br />
2ND STAGE GAS VALVE<br />
ENERGIZED<br />
INDOOR BLOWER ENERGIZED<br />
ON HIGH HEAT SPEED<br />
3<br />
CALL FOR HEAT SATISFIED<br />
1<br />
2<br />
SYSTEM WILL ALWAYS LIGHT ON LOW FIIRE, EVEN IF 2ND STAGE HEAT IS IN PLACE.<br />
WHEN USED WITH A SINGLE STAGE THERMOSTAT, SET SW1 TO THE ON POSITION IN DIP SWITCH S4.<br />
3<br />
IF THE HIGH FIRE PRESSURE SWITCH DOES NOT CLOSE WITHIN 5 ATTEMPTS, THE SYSTEM WILL OPERATE AT<br />
LOW FIRE FOR THE REMAINDER OF THE CALL FOR HEAT REQUEST.<br />
Page 57
Troubleshooting: Heating Sequence of Operation (Continued)<br />
CALL FOR HEAT SATISFIED<br />
FIRST−STAGE HEAT<br />
SECOND−STAGE HEAT<br />
2 3<br />
RUN MODE:<br />
1ST OR 2ND STAGE CALL FOR HEAT.<br />
ALL INPUTS MONITORED (LIMIT, PRESSURE,<br />
CALL FOR HEAT/COOL, FLAME LEVEL)<br />
2ND STAGE HEAT<br />
NO<br />
2ND STAGE<br />
CALL FOR HEAT<br />
SATISFIED?<br />
YES<br />
DE−ENERGIZE 2ND STAGE<br />
GAS VALVE<br />
INDUCER SPEED SWITCHED<br />
TO LOW SPEED<br />
INDOOR BLOWER SWITCHED<br />
TO LOW HEAT SPEED<br />
1ST STAGE HEAT<br />
NO<br />
1ST STAGE<br />
CALL FOR HEAT<br />
SATISFIED?<br />
YES<br />
GAS VALVE<br />
DE−ENERGIZED<br />
INDUCER OFF AFTER<br />
5 SECOND POST PURGE<br />
INDOOR BLOWER OFF<br />
AFTER FIELD SELECTABLE<br />
OFF DELAY<br />
1<br />
Page 58
Troubleshooting: Cooling Sequence of Operation (Continued)<br />
CALL FOR COOLING<br />
1<br />
1ST STAGE COOLING<br />
REQUEST RECEIVED<br />
1<br />
WAIT FOR COMPRESSOR TIMED<br />
OFF DELAY TO EXPIRE<br />
ENERGIZE 1ST STAGE<br />
COOLING CONTACTOR<br />
(COMPRESSOR & FAN)<br />
INDOOR BLOWER 2<br />
SECOND ON DELAY<br />
ENERGIZE INDOOR BLOWER<br />
(LOW COOLING MODE)<br />
2<br />
2ND STAGE<br />
COOLING<br />
REQUEST?<br />
MAINTAIN INDOOR<br />
BLOWER<br />
(LOW COOLING MODE)<br />
1<br />
NO<br />
YES<br />
YES<br />
1ST STAGE<br />
COOLING REQUEST<br />
STILL ACTIVE?<br />
YES<br />
ENERGIZE 2ND STAGE<br />
COOLING CONTACTOR<br />
(COMPRESSOR & FAN)<br />
YES<br />
ENERGIZE INDOOR BLOWER<br />
(HIGH COOLING MODE)<br />
2<br />
NO<br />
2ND STAGE<br />
COOLING REQUEST<br />
STILL ACTIVE?<br />
YES<br />
MAINTAIN INDOOR BLOWER<br />
(HIGH COOLING MODE)<br />
NO<br />
DE−ENERGIZE 2ND<br />
STAGE COOLING<br />
CONTACTOR<br />
(COMPRESSOR & FAN)<br />
1ST STAGE<br />
COOLING REQUEST<br />
STILL ACTIVE?<br />
YES<br />
ENERGIZE AND MAINTAIN<br />
INDOOR BLOWER AT<br />
(LOW COOLING MODE)<br />
NO<br />
DE−ENERGIZE 1ST<br />
STAGE COOLING<br />
CONTACTOR<br />
(COMPRESSOR & FAN)<br />
1<br />
CONTROL WILL NOT RESPOND TO A 2ND STAGE COOLING REQUEST UNLESS A 1ST STAGE<br />
COOLING REQUEST IS ACTIVE.<br />
DE−ENERGIZE INDOOR<br />
BLOWER<br />
2<br />
2<br />
INDOOR BLOWER LOW COOLING MODE AND HIGH COOLING MODE HAVE SPECIFIC ON, OFF<br />
AND SPEED RAMPING PROFILES. THE SPECIFIC PROFILE IS SELECTED USING THE<br />
DIP SWITCHES ON THE CONROL.<br />
1<br />
Page 59
Troubleshooting: Continuous Fan Sequence of Operation<br />
CALL FOR FAN<br />
1<br />
CALL FOR FAN<br />
INDOOR BLOWER ON<br />
CONTINUOUS FAN<br />
SPEED<br />
CALL FOR FAN<br />
REMOVED?<br />
NO<br />
MAINTAIN INDOOR<br />
BLOWER AT<br />
CONTINUOUS FAN<br />
YES<br />
REQUEST<br />
FOR COOLING<br />
RECEIVED?<br />
YES<br />
MAINTAIN INDOOR<br />
BLOWER AT<br />
CONTINUOUS FAN<br />
4<br />
GO TO CALL FOR COOLING<br />
NO<br />
REQUEST<br />
FOR HEAT<br />
RECEIVED?<br />
YES<br />
INDOOR BLOWER OFF<br />
1<br />
GO TO CALL FOR 1ST STAGE HEAT<br />
NO<br />
DE−ENERGIZE INDOOR<br />
BLOWER<br />
1<br />
Page 60


