
Create successful ePaper yourself
Turn your PDF publications into a flip-book with our unique Google optimized e-Paper software.
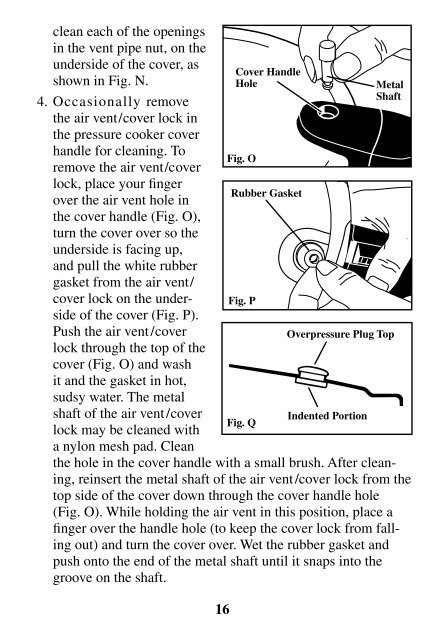
clean each of the openings<br />
in the vent pipe nut, on the<br />
underside of the cover, as<br />
shown in Fig. N.<br />
4. Occasionally remove<br />
the air vent/cover lock in<br />
the pressure cooker cover<br />
handle for cleaning. To<br />
remove the air vent/cover<br />
lock, place your finger<br />
over the air vent hole in<br />
the cover handle (Fig. O),<br />
turn the cover over so the<br />
underside is facing up,<br />
and pull the white rubber<br />
gasket from the air vent/<br />
cover lock on the underside<br />
of the cover (Fig. P).<br />
Push the air vent/cover<br />
lock through the top of the<br />
cover (Fig. O) and wash<br />
it and the gasket in hot,<br />
sudsy water. The metal<br />
shaft of the air vent/cover<br />
lock may be cleaned with<br />
a nylon mesh pad. Clean<br />
Cover Handle<br />
Hole<br />
Fig. O<br />
Rubber Gasket<br />
Fig. P<br />
Fig. Q<br />
Overpressure Plug Top<br />
Indented Portion<br />
Metal<br />
Shaft<br />
the hole in the cover handle with a small brush. After cleaning,<br />
reinsert the metal shaft of the air vent/cover lock from the<br />
top side of the cover down through the cover handle hole<br />
(Fig. O). While holding the air vent in this position, place a<br />
finger over the handle hole (to keep the cover lock from falling<br />
out) and turn the cover over. Wet the rubber gasket and<br />
push onto the end of the metal shaft until it snaps into the<br />
groove on the shaft.<br />
5. The overpressure plug can also be removed for cleaning.<br />
Simply push on the top of the overpressure plug until it pops<br />
out the underside of the cover. After cleaning, reinsert it by<br />
pushing the domed side of the plug into the opening from<br />
the underside of the cover, until the bottom edge is fully and<br />
evenly seated against the underside of the cover (Fig. Q).<br />
When the overpressure plug is properly installed, the word<br />
(TOP) will be visible on the overpressure plug when viewing<br />
the outside of the cover.<br />
6. To bring out its luster, the outside surface of your pressure<br />
cooker can be cleaned occasionally with a silver polish or any<br />
other fine, non-abrasive polish.<br />
Care and Maintenance<br />
1. When not in use, store your pressure cooker in a dry place<br />
with the cover inverted on the body. If the cover is locked on,<br />
unpleasant odors may form inside the unit and the sealing ring<br />
could be damaged.<br />
2. As is the case of all cookware, avoid chopping or cutting food<br />
inside the cooker with a knife or other sharp utensil.<br />
3. If the body or cover handles or the cooker legs become loose,<br />
tighten them with a screwdriver. CAUTION: Overtightening<br />
can result in stripping of screws or cracking of handles and<br />
legs.<br />
4. The sealing ring, overpressure plug, and rubber gasket of the<br />
air vent/cover lock may become nicked, cracked, or torn with<br />
normal use. Exposure to high heat, such as a hot burner or<br />
oven top, will cause these parts to dry out and deteriorate.<br />
Replace these parts immediately should any of these things<br />
happen. Generally, it is a good idea to replace them every two<br />
years.<br />
16 17