You also want an ePaper? Increase the reach of your titles
YUMPU automatically turns print PDFs into web optimized ePapers that Google loves.
as manufacturing residue evaporates. This is normal during<br />
initial use.<br />
Cooking pressure is reached when the pressure regulator begins<br />
a rocking motion. Cooking time starts at this point.<br />
NOTE: The air vent/cover lock may move up and down a few<br />
times when cooking first begins as it automatically exhausts<br />
air from the<br />
pressure cooker.<br />
Steam will be<br />
noticeable. This<br />
is normal. When<br />
pressure begins to<br />
build, it slides up,<br />
locking the cover<br />
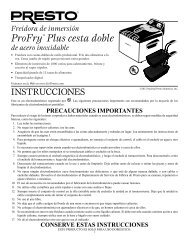
on. Once the<br />
Air Vent/Cover<br />
Lock in UP Position.<br />
Pressure in Unit.<br />
Air Vent/Cover Lock<br />
in DOWN Position.<br />
No Pressure in Unit.<br />
Fig. K<br />
cooker has sealed, the air vent/cover lock will remain in the up<br />
position until pressure is released (Fig. K).<br />
9. Allow pressure regulator to rock vigorously for 1 to 2 minutes<br />
and then slowly turn the heat control down, stopping just at<br />
the point where the pilot light goes out. As cooking proceeds,<br />
the heat control will cycle on and off periodically to provide<br />
the heat needed to maintain the proper cooking pressure. The<br />
pilot light will go on and off and the pressure regulator will<br />
rock occasionally, indicating that pressure is being maintained.<br />
Note: If the pressure regulator does not rock every 2 to 3 minutes,<br />
it is likely that the heat control temperature has been set<br />
too low. Turn the heat control up slightly until the pilot light<br />
comes on.<br />
Important: To prevent excessive liquid loss, do not allow<br />
pressure regulator to rock vigorously for more than 3 to 4<br />
minutes. If the pressure regulator is allowed to continuously<br />
rock vigorously, excess steam will escape. Therefore, too<br />
much liquid will evaporate and food may scorch. In addition,<br />
if the cooker boils dry, the cooker will overheat causing it to<br />
discolor. Do not leave pressure cooker unattended.<br />
10. Cook for the length of time indicated in the recipe or timetable.<br />
11. When cooking time is complete, turn heat control to OFF.<br />
Unplug heat control from wall outlet and then from cooker.<br />
12. Reduce pressure according to the recipe or timetable instructions.<br />
If the instructions say “Let the pressure drop of its own<br />
accord,” set the pressure cooker aside to cool until pressure<br />
is completely reduced. If the instructions state, “Cool cooker<br />
at once,” with the heat control<br />
removed, cool the pressure cooker<br />
under a running water faucet<br />
(Fig. L) or pour cold water over<br />
it until pressure is completely<br />
reduced. Pressure is completely<br />
reduced when the air vent/cover<br />
lock has dropped.<br />
If the air vent/cover lock remains<br />
Fig. L<br />
in its raised position, there is still pressure inside the pressure<br />
cooker. Continue to cool until the air vent/cover lock drops.<br />
13. After pressure has been completely reduced, remove the<br />
pressure regulator by grasping the black plastic cap. Always<br />
remove the pressure regulator before opening the cover.<br />
14. To open the cover, turn it counterclockwise until the on the<br />
cover aligns with the mark on the body handle. Then, lift<br />
the cover toward you to keep any steam away from you. If<br />
the cover turns hard, there still may be some pressure in the<br />
unit. Do not force the cover off. Continue to cool the pressure<br />
cooker until steam no longer is escaping from the vent pipe<br />
and the air vent/cover lock has dropped.<br />
15. Food is ready to serve.<br />
10 11