Pizzazz pizza Oven - Presto
Pizzazz pizza Oven - Presto
Pizzazz pizza Oven - Presto

You also want an ePaper? Increase the reach of your titles
YUMPU automatically turns print PDFs into web optimized ePapers that Google loves.
How To Use<br />
Before using for the first time, become familiar with the <strong>Pizzazz</strong> <strong>pizza</strong> oven (see Fig. A on page 8). Wash the baking pan in warm,<br />
soapy water; rinse and dry thoroughly.<br />
1. Set <strong>pizza</strong> oven on a flat, dry countertop away from countertop edge.<br />
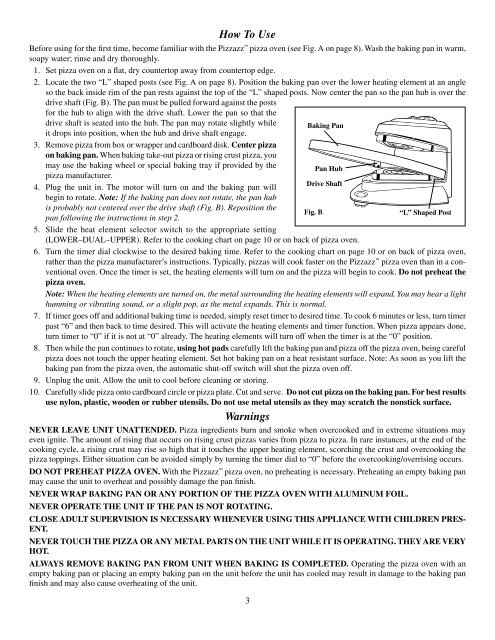
2. Locate the two “L” shaped posts (see Fig. A on page 8). Position the baking pan over the lower heating element at an angle<br />
so the back inside rim of the pan rests against the top of the “L” shaped posts. Now center the pan so the pan hub is over the<br />
drive shaft (Fig. B). The pan must be pulled forward against the posts<br />
for the hub to align with the drive shaft. Lower the pan so that the<br />
drive shaft is seated into the hub. The pan may rotate slightly while<br />
it drops into position, when the hub and drive shaft engage.<br />
3. Remove <strong>pizza</strong> from box or wrapper and cardboard disk. Center <strong>pizza</strong><br />
on baking pan. When baking take-out <strong>pizza</strong> or rising crust <strong>pizza</strong>, you<br />
may use the baking wheel or special baking tray if provided by the<br />
<strong>pizza</strong> manufacturer.<br />
4. Plug the unit in. The motor will turn on and the baking pan will<br />
begin to rotate. Note: If the baking pan does not rotate, the pan hub<br />
is probably not centered over the drive shaft (Fig. B). Reposition the<br />
pan following the instructions in step 2.<br />
5. Slide the heat element selector switch to the appropriate setting<br />
3<br />
Baking Pan<br />
Drive Shaft<br />
Fig. B<br />
Pan Hub<br />
“L” Shaped Post<br />
(LOWER–DUAL–UPPER). Refer to the cooking chart on page 10 or on back of <strong>pizza</strong> oven.<br />
6. Turn the timer dial clockwise to the desired baking time. Refer to the cooking chart on page 10 or on back of <strong>pizza</strong> oven,<br />
rather than the <strong>pizza</strong> manufacturer’s instructions. Typically, <strong>pizza</strong>s will cook faster on the <strong>Pizzazz</strong> <strong>pizza</strong> oven than in a conventional<br />
oven. Once the timer is set, the heating elements will turn on and the <strong>pizza</strong> will begin to cook. Do not preheat the<br />
<strong>pizza</strong> oven.<br />
Note: When the heating elements are turned on, the metal surrounding the heating elements will expand. You may hear a light<br />
humming or vibrating sound, or a slight pop, as the metal expands. This is normal.<br />
7. If timer goes off and additional baking time is needed, simply reset timer to desired time. To cook 6 minutes or less, turn timer<br />
past “6” and then back to time desired. This will activate the heating elements and timer function. When <strong>pizza</strong> appears done,<br />
turn timer to “0” if it is not at “0” already. The heating elements will turn off when the timer is at the “0” position.<br />
8. Then while the pan continues to rotate, using hot pads carefully lift the baking pan and <strong>pizza</strong> off the <strong>pizza</strong> oven, being careful<br />
<strong>pizza</strong> does not touch the upper heating element. Set hot baking pan on a heat resistant surface. Note: As soon as you lift the<br />
baking pan from the <strong>pizza</strong> oven, the automatic shut-off switch will shut the <strong>pizza</strong> oven off.<br />
9. Unplug the unit. Allow the unit to cool before cleaning or storing.<br />
10. Carefully slide <strong>pizza</strong> onto cardboard circle or <strong>pizza</strong> plate. Cut and serve. Do not cut <strong>pizza</strong> on the baking pan. For best results<br />
use nylon, plastic, wooden or rubber utensils. Do not use metal utensils as they may scratch the nonstick surface.<br />
Warnings<br />
Never leave unit unattended. Pizza ingredients burn and smoke when overcooked and in extreme situations may<br />
even ignite. The amount of rising that occurs on rising crust <strong>pizza</strong>s varies from <strong>pizza</strong> to <strong>pizza</strong>. In rare instances, at the end of the<br />
cooking cycle, a rising crust may rise so high that it touches the upper heating element, scorching the crust and overcooking the<br />
<strong>pizza</strong> toppings. Either situation can be avoided simply by turning the timer dial to “0” before the overcooking/overrising occurs.<br />
Do not preheat Pizza <strong>Oven</strong>. With the <strong>Pizzazz</strong> <strong>pizza</strong> oven, no preheating is necessary. Preheating an empty baking pan<br />
may cause the unit to overheat and possibly damage the pan finish.<br />
Never wrap baking pan or any portion of the <strong>pizza</strong> oven with aluminum foil.<br />
Never operate the unit if the pan is not rotating.<br />
Close adult supervision is necessary whenever using this appliance with children present.<br />
Never touch the <strong>pizza</strong> or any metal parts on the unit while it is operating. They are very<br />
hot.<br />
Always remove baking pan from unit when baking is completed. Operating the <strong>pizza</strong> oven with an<br />
empty baking pan or placing an empty baking pan on the unit before the unit has cooled may result in damage to the baking pan<br />
finish and may also cause overheating of the unit.