ZonePRO Install Guide-English - dbx
ZonePRO Install Guide-English - dbx
ZonePRO Install Guide-English - dbx

Create successful ePaper yourself
Turn your PDF publications into a flip-book with our unique Google optimized e-Paper software.
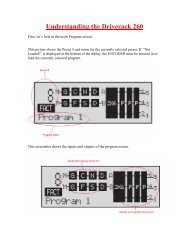
Section 6<br />
Networking<br />
<strong>ZonePRO</strong> TM<br />
6.6 Adding the <strong>ZonePRO</strong> to an existing Local Area Network<br />
Assumptions:<br />
• Using Microsoft Windows XP, Vista, or 7.<br />
• Computer has a working Ethernet network adapter.<br />
• You have a static IP address that is compatible with your existing network.<br />
• There is an existing LAN where the computer that will be running the <strong>ZonePRO</strong><br />
Designer software is able to attach to the LAN, obtain an IP address, and see other<br />
devices on this network.<br />
1. Connect the <strong>ZonePRO</strong> device to the network using a standard straight-through Ethernet<br />
cable.<br />
The cable provided with the <strong>ZonePRO</strong> is a crossover cable and will not work for this<br />
application.<br />
2. Apply power to the <strong>ZonePRO</strong> device and wait for it to boot.<br />
3. Launch the <strong>ZonePRO</strong> Designer application. If it is currently running, make sure that<br />
you are not online by selecting “Go Offline” from the Network menu. If it is already<br />
grayed-out, <strong>ZonePRO</strong> Designer is currently offline.<br />
4. Select “Properties” from the Network menu. Make sure that “Use Ethernet” is selected.<br />
Click “Next”.<br />
5. Click “Next” again to enter the Address Tool. It may take up to one minute for your new<br />
<strong>ZonePRO</strong> to show up in the device window.<br />
6. Select the <strong>ZonePRO</strong> from the table and click “Change Address” to set the IP address<br />
of your <strong>ZonePRO</strong> device. Contact your network administrator for IP address, subnet<br />
mask, and default gateway settings that are appropriate for your network. If connecting<br />
multiple <strong>ZonePRO</strong> devices, ensure that there are no addressing conflicts. If you see more<br />
than one <strong>ZonePRO</strong> device, you may need to resolve network conflicts. Each <strong>ZonePRO</strong><br />
device must have a distinct IP address and Node address. When this is done and all<br />
network conflicts are resolved, close the Networking Wizard and the <strong>ZonePRO</strong> Designer<br />
application.<br />
7. Launch the <strong>ZonePRO</strong> Designer application and select “Go Online” from the Network menu.<br />
The <strong>ZonePRO</strong> icon(s) should appear in the main <strong>ZonePRO</strong> Designer window. This indicates<br />
that you are online and the <strong>ZonePRO</strong> Designer software has discovered the <strong>ZonePRO</strong><br />
device(s).<br />
30