ZonePRO Install Guide-English - dbx
ZonePRO Install Guide-English - dbx
ZonePRO Install Guide-English - dbx

Create successful ePaper yourself
Turn your PDF publications into a flip-book with our unique Google optimized e-Paper software.
<strong>ZonePRO</strong> TM<br />
Networking<br />
Section 6<br />
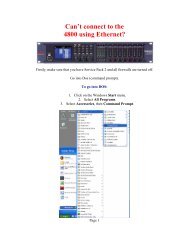
6.4 Connecting via direct-connect Ethernet<br />
Assumptions:<br />
• Using Microsoft Windows XP, Vista, or 7.<br />
• Computer has a working Ethernet network adapter.<br />
• You have administrative rights on the PC so that network settings can be changed if<br />
necessary.<br />
1. Connect the included Ethernet crossover cable to both the <strong>ZonePRO</strong> and the PC.<br />
A standard straight-through Ethernet cable will not work in this direct connect<br />
situation with a 1260 or 1261 because common straight-through cables are designed to<br />
hook a device to a hub or switch. See section “8.8 Wiring Diagrams” for a wiring diagram<br />
of the Ethernet crossover cable.<br />
2. Apply power to the <strong>ZonePRO</strong> and wait for it to boot.<br />
3. Windows networking, in its default configuration, will automatically configure its IP<br />
setting to something in the Auto-IP range (169.254.xxx.yyy with a subnet mask of<br />
255.255.0.0 and no gateway). The process of windows assigning an Auto-IP address normally<br />
takes 1-2 minutes.<br />
4. Optional (You only need to do these steps if the <strong>ZonePRO</strong> device does not show up<br />
in step 7.) Verify that you have the correct IP settings on your computer by running<br />
ipconfig.<br />
a. This is done by clicking on “Run”... from the Window’s Start Menu.<br />
b. Enter cmd and click “OK”. This will bring up a command window (DOS box).<br />
c. At the prompt, enter ipconfig and press enter.<br />
d. Now on your screen you will see your current IP settings. You should notice<br />
that the IP Address for the adapter will either be 169.254.x.y where x and y are<br />
numbers between 0 and 255, or 0.0.0.0. If it is 0.0.0.0, wait for about a minute<br />
and enter the ipconfig command again (Windows is still trying to obtain an IP<br />
address). It takes Windows about 1-2 minutes to set an Auto-IP address. If you<br />
have some other address, you are either not hooked directly to the <strong>ZonePRO</strong> with<br />
the crossover Ethernet cable, or your computer is configured with a static IP<br />
address.<br />
Only perform these next steps if your computer is configured with a static IP address<br />
(i.e. your IP address is not 169.254.x.y or 0.0.0.0). Otherwise skip to step 5.<br />
a. From the control panel, open the network connections window.<br />
b. Right click on the Local Area Network (LAN) connection that is wired to the<br />
<strong>ZonePRO</strong> and select “Properties”.<br />
c. Highlight “Internet Protocol (TCP/IP)” and then press the properties button.<br />
d. If “Use the following IP address” is selected, write down all the information on<br />
this page. The following steps will overwrite these settings, so you will need to<br />
keep this information to restore your network settings.<br />
e. Select the “Obtain an IP address automatically” radio button.<br />
f. Click on the Alternate Configuration tab and make sure that “Automatic private IP<br />
27