ZonePRO Install Guide-English - dbx
ZonePRO Install Guide-English - dbx
ZonePRO Install Guide-English - dbx

You also want an ePaper? Increase the reach of your titles
YUMPU automatically turns print PDFs into web optimized ePapers that Google loves.
SELECT<br />
A<br />
B<br />
C<br />
D<br />
A<br />
B<br />
C<br />
D<br />
SELECT<br />
A<br />
B<br />
C<br />
D<br />
A<br />
B<br />
C<br />
D<br />
<strong>ZonePRO</strong> TM<br />
Zone Controllers<br />
Section 4<br />
4.4 ZC DIP Switches & Programming<br />
When configuring the ZCs, there are two steps which need to be completed before the ZCs will<br />
function:<br />
• Step 1: Assign the ZC IDs and perform the ZC Configuration programming<br />
• Step 2: Associate the ZCs<br />
The programming of the ZCs is performed using the<br />
Configuration Wizard in <strong>ZonePRO</strong> Designer.<br />
Step 1: Assign the ZC IDs and perform the ZC Configuration programming<br />
The ID# assignments on each Zone Controller, set using the DIP switches on the side of each,<br />
must correspond with the appropriate ZC Input port on the back of the <strong>ZonePRO</strong> device and<br />
with the program loaded into the <strong>ZonePRO</strong>.<br />
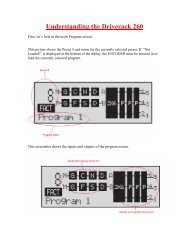
Top ZC Input Port (1-6)<br />
The top ZC Input port on the back of the <strong>ZonePRO</strong><br />
device corresponds with ID#s 1-6. Therefore, to<br />
select ID#2 for example, simply flip the 2 DIP<br />
switch into the on position and connect the ZC to<br />
the top ZC Input port on the <strong>ZonePRO</strong>. You must<br />
then program this ZC, on the corresponding ZC<br />
Panel Configuration page in <strong>ZonePRO</strong> Designer’s<br />
Configuration Wizard, as ZC Input 2 (ID#2).<br />
<strong>ZonePRO</strong> Designer<br />
Software Programming<br />
ID#2<br />
DIP<br />
Switches<br />
ZCs<br />
ZC-3<br />
ID’s 1-6<br />
(Top ZC Input Port)<br />
ZC INPUT<br />
ZC INPUT<br />
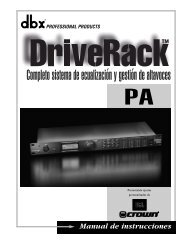
Bottom ZC Input Port (7-12)<br />
The bottom ZC Input port on the back of the<br />
<strong>ZonePRO</strong> device corresponds with ID#s 7-12. The<br />
physical DIP switch settings simply start over or<br />
repeat when connecting to the bottom ZC Input<br />
port on the <strong>ZonePRO</strong>. For example, to create ID#s<br />
7-12, add 6 to the ID# selected on the ZC’s DIP<br />
switch. For example, to get an ID# of 10, connect<br />
to the bottom ZC Input port and set the ID# to<br />
4 (4+6=10). You must then program this ZC, on<br />
the corresponding ZC Panel Configuration page in<br />
<strong>ZonePRO</strong> Designer’s Configuration Wizard, as ZC<br />
Input 10 (ID#10).<br />
ZC INPUT<br />
ZC INPUT<br />
ID’s 7-12<br />
(Bottom ZC Input Port)<br />
ZCs<br />
ZC-3<br />
DIP<br />
Switches<br />
ID#10<br />
<strong>ZonePRO</strong> Designer<br />
Software Programming<br />
19