ZonePRO Install Guide-English - dbx
ZonePRO Install Guide-English - dbx ZonePRO Install Guide-English - dbx
Section 2 ZonePRO Designer GUI ZonePRO TM Section 2 - ZonePRO Designer GUI 2.1 ZonePRO Designer Overview The ZonePRO Designer Graphic User Interface (GUI) is the included software application which is used for programming the ZonePRO products. The GUI provides network tools for configuring your control network as well as multiple “Wizard” functions for configuring the system routing and in-wall dbx Zone Controllers. The GUI also allows you to adjust DSP effect parameters and even create automatic system changes (referred to as “Scene Changes”). Understanding the ZonePRO Designer GUI is essential for getting the most out of the ZonePRO processors. After installing the ZonePRO Designer GUI, please see the software application’s help section for detailed information and assistance with the ZonePRO Designer GUI. Training videos are also available at www.dbxpro.com. 2.2 GUI System Requirements 1 GHz or faster processor Windows 2000/XP/Vista (32 bit)/7 (32 bit) 256 MB RAM (512 MB Recommended) Recommended screen resolution: 1024 x 768 pixels or higher 4
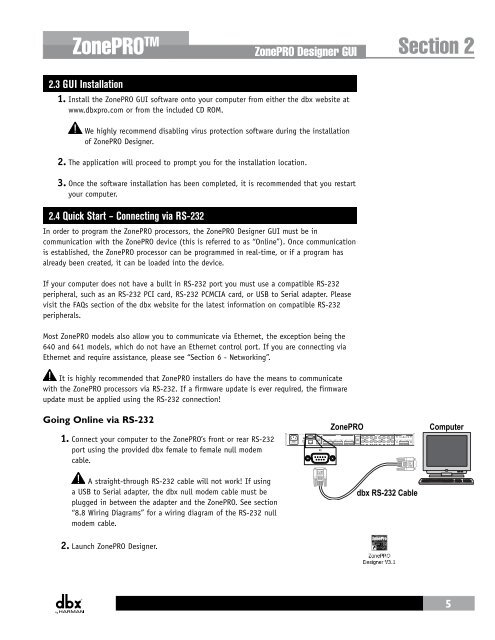
ZonePRO TM ZonePRO Designer GUI Section 2 2.3 GUI Installation 1. Install the ZonePRO GUI software onto your computer from either the dbx website at www.dbxpro.com or from the included CD ROM. We highly recommend disabling virus protection software during the installation of ZonePRO Designer. 2. The application will proceed to prompt you for the installation location. 3. Once the software installation has been completed, it is recommended that you restart your computer. 2.4 Quick Start – Connecting via RS-232 In order to program the ZonePRO processors, the ZonePRO Designer GUI must be in communication with the ZonePRO device (this is referred to as “Online”). Once communication is established, the ZonePRO processor can be programmed in real-time, or if a program has already been created, it can be loaded into the device. If your computer does not have a built in RS-232 port you must use a compatible RS-232 peripheral, such as an RS-232 PCI card, RS-232 PCMCIA card, or USB to Serial adapter. Please visit the FAQs section of the dbx website for the latest information on compatible RS-232 peripherals. Most ZonePRO models also allow you to communicate via Ethernet, the exception being the 640 and 641 models, which do not have an Ethernet control port. If you are connecting via Ethernet and require assistance, please see “Section 6 - Networking”. It is highly recommended that ZonePRO installers do have the means to communicate with the ZonePRO processors via RS-232. If a firmware update is ever required, the firmware update must be applied using the RS-232 connection! Going Online via RS-232 1. Connect your computer to the ZonePRO’s front or rear RS-232 port using the provided dbx female to female null modem cable. PC ZonePRO Computer A straight-through RS-232 cable will not work! If using a USB to Serial adapter, the dbx null modem cable must be plugged in between the adapter and the ZonePRO. See section “8.8 Wiring Diagrams” for a wiring diagram of the RS-232 null modem cable. dbx RS-232 Cable 2. Launch ZonePRO Designer. 5
- Page 1 and 2: ZonePROTM Digital Zone Processors 6
- Page 3: IMPORTANT SAFETY INSTRUCTIONS DECLA
- Page 7 and 8: ZonePRO TM Section 1 - Introduction
- Page 9: ZonePRO TM Introduction Section 1 1
- Page 13 and 14: ZonePRO TM ZonePRO Designer GUI Sec
- Page 15 and 16: ZonePRO TM Gettibg Started Section
- Page 17 and 18: ZonePRO TM Gettibg Started Section
- Page 19 and 20: ZonePRO TM Zone Controllers Section
- Page 21 and 22: ZonePRO TM Zone Controllers Section
- Page 23 and 24: ZonePRO TM Cable Specification: EIA
- Page 25 and 26: SELECT A B C D A B C D SELECT A B C
- Page 27 and 28: ZonePRO TM Zone Controllers Section
- Page 29 and 30: ZonePRO TM Link I/O Section 5 CAUTI
- Page 31 and 32: ZonePRO TM Section 6 - Networking N
- Page 33 and 34: ZonePRO TM Networking Section 6 6.4
- Page 35 and 36: ZonePRO TM Networking Section 6 a.
- Page 37 and 38: ZonePRO TM Networking Section 6 6.7
- Page 39 and 40: ZonePRO TM Networking Section 6 6.1
- Page 41 and 42: ZonePRO TM Application Guide Sectio
- Page 43 and 44: ZonePRO TM Application Guide Sectio
- Page 45 and 46: ZonePRO TM Application Guide Sectio
- Page 47 and 48: ZonePRO TM Appendix Section 8 8.2 Z
- Page 49 and 50: ZonePRO TM Appendix Section 8 8.4 Z
- Page 51 and 52: ZonePRO TM Appendix Section 8 The r
- Page 53 and 54: ZonePRO TM 640m/641m Appendix Secti
- Page 55 and 56: ZonePRO TM 1260m/1261m Appendix Sec
- Page 57 and 58: ZonePRO TM Appendix Section 8 8.8 W
- Page 59 and 60: ZonePRO TM Appendix Section 8 This
<strong>ZonePRO</strong> TM<br />
<strong>ZonePRO</strong> Designer GUI Section 2<br />
2.3 GUI <strong>Install</strong>ation<br />
1. <strong>Install</strong> the <strong>ZonePRO</strong> GUI software onto your computer from either the <strong>dbx</strong> website at<br />
www.<strong>dbx</strong>pro.com or from the included CD ROM.<br />
We highly recommend disabling virus protection software during the installation<br />
of <strong>ZonePRO</strong> Designer.<br />
2. The application will proceed to prompt you for the installation location.<br />
3. Once the software installation has been completed, it is recommended that you restart<br />
your computer.<br />
2.4 Quick Start – Connecting via RS-232<br />
In order to program the <strong>ZonePRO</strong> processors, the <strong>ZonePRO</strong> Designer GUI must be in<br />
communication with the <strong>ZonePRO</strong> device (this is referred to as “Online”). Once communication<br />
is established, the <strong>ZonePRO</strong> processor can be programmed in real-time, or if a program has<br />
already been created, it can be loaded into the device.<br />
If your computer does not have a built in RS-232 port you must use a compatible RS-232<br />
peripheral, such as an RS-232 PCI card, RS-232 PCMCIA card, or USB to Serial adapter. Please<br />
visit the FAQs section of the <strong>dbx</strong> website for the latest information on compatible RS-232<br />
peripherals.<br />
Most <strong>ZonePRO</strong> models also allow you to communicate via Ethernet, the exception being the<br />
640 and 641 models, which do not have an Ethernet control port. If you are connecting via<br />
Ethernet and require assistance, please see “Section 6 - Networking”.<br />
It is highly recommended that <strong>ZonePRO</strong> installers do have the means to communicate<br />
with the <strong>ZonePRO</strong> processors via RS-232. If a firmware update is ever required, the firmware<br />
update must be applied using the RS-232 connection!<br />
Going Online via RS-232<br />
1. Connect your computer to the <strong>ZonePRO</strong>’s front or rear RS-232<br />
port using the provided <strong>dbx</strong> female to female null modem<br />
cable.<br />
PC<br />
<strong>ZonePRO</strong><br />
Computer<br />
A straight-through RS-232 cable will not work! If using<br />
a USB to Serial adapter, the <strong>dbx</strong> null modem cable must be<br />
plugged in between the adapter and the <strong>ZonePRO</strong>. See section<br />
“8.8 Wiring Diagrams” for a wiring diagram of the RS-232 null<br />
modem cable.<br />
<strong>dbx</strong> RS-232 Cable<br />
2. Launch <strong>ZonePRO</strong> Designer.<br />
5


