Understanding the Driverack PA - dbx
Understanding the Driverack PA - dbx
Understanding the Driverack PA - dbx

You also want an ePaper? Increase the reach of your titles
YUMPU automatically turns print PDFs into web optimized ePapers that Google loves.
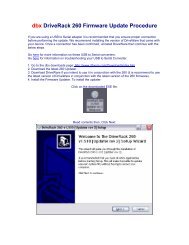
<strong>Understanding</strong> <strong>the</strong> <strong>Driverack</strong> 260<br />
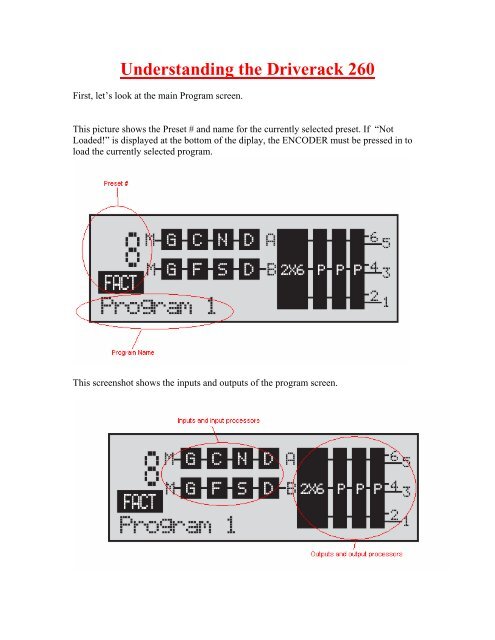
First, let’s look at <strong>the</strong> main Program screen.<br />
This picture shows <strong>the</strong> Preset # and name for <strong>the</strong> currently selected preset. If “Not<br />
Loaded!” is displayed at <strong>the</strong> bottom of <strong>the</strong> diplay, <strong>the</strong> ENCODER must be pressed in to<br />
load <strong>the</strong> currently selected program.<br />
This screenshot shows <strong>the</strong> inputs and outputs of <strong>the</strong> program screen.
Here is a breakdown of <strong>the</strong> components in <strong>the</strong> <strong>Driverack</strong> 260.<br />
If at anytime you want to come back to this main program screen just press <strong>the</strong><br />
PROGRAM button. Think of it as a kind of “Panic” button.<br />
The below screenshot is a typo in <strong>the</strong> manual. This is actually a screenshot from <strong>the</strong><br />
<strong>Driverack</strong> <strong>PA</strong> and will never be displayed in <strong>the</strong> <strong>Driverack</strong> 260.
Configuration Mode<br />
The <strong>Driverack</strong> 260 has a CONFIGURATION mode that enables you to go in and<br />
change <strong>the</strong> internal routing of <strong>the</strong> signal, link/unlink processors and select different<br />
processing blocks. This gives you much more control and many more configuration<br />
options over <strong>the</strong> <strong>Driverack</strong> <strong>PA</strong>.<br />
In order to perform <strong>the</strong> below procedures, it is recommended that you familiarize<br />
yourself with <strong>the</strong> navigation of <strong>the</strong> <strong>Driverack</strong> 260. Please see <strong>the</strong> owners manual for more<br />
information on navigation.<br />
When setting up your system <strong>the</strong> procedure order is as follows:<br />
1. Set <strong>the</strong> x-over points, slopes, driver alignment delays and post x-over PEQs<br />
(optimizes your speakers, but doesn't take <strong>the</strong> room into account). These are usually<br />
available from <strong>the</strong> speaker manufacturer. If your speakers were selected in <strong>the</strong> WIZARD<br />
<strong>the</strong>se settings will be set for you automatically (do not go back into <strong>the</strong> x-over and change<br />
<strong>the</strong>se settings if you are unsure of what you are doing). If you use passive (full range)<br />
speaker cabinets you shouldn’t have to worry about any PEQ settings, but you may want<br />
to set a high pass and possibly a low pass filter if needed (look at <strong>the</strong> frequency response<br />
of <strong>the</strong> speakers).<br />
2. Set <strong>the</strong> gain structure (optimizes your signal to noise ratio and helps prevent<br />
clipping). This includes setting <strong>the</strong> gain of each device (in this case <strong>the</strong> <strong>Driverack</strong> and<br />
amps) and <strong>the</strong> output limiters. If you selected your amps in <strong>the</strong> WIZARD, <strong>the</strong> x-over<br />
(output) gains and limiters will automatically be set. Do not go back into <strong>the</strong> X-over or<br />
Limiter and change <strong>the</strong> settings if you are unsure of what you are doing.<br />
3. EQ <strong>the</strong> system (tune your system to <strong>the</strong> room). Use <strong>the</strong> Auto EQ function to tune <strong>the</strong><br />
system to <strong>the</strong> room. Some fine tuning will likely be needed. Fine tune gain structure to<br />
take <strong>the</strong> EQ gain into account.<br />
4. Ring out <strong>the</strong> system using <strong>the</strong> AFS (feedback suppression) to eliminate feedback.<br />
5. Add extras to desired taste. This includes <strong>the</strong> Subharmonic Synth, compression, etc.<br />
1. X-OVER & PEQs<br />
If you selected your speakers in <strong>the</strong> Setup Wizard, <strong>the</strong> <strong>Driverack</strong> will<br />
automatically set your x-over parameters, driver alignment delays and PEQs. If your<br />
speakers are not in <strong>the</strong> Wizard, you should select “Custom”. You will need to obtain <strong>the</strong><br />
recommended x-over settings (and o<strong>the</strong>r speaker tuning info, if available) from <strong>the</strong><br />
speaker manufacturer. There are some tuning programs available for download. Please<br />
check <strong>the</strong> <strong>dbx</strong>pro website to see if your tunings are available for download. You will have<br />
to use <strong>the</strong> provided Driveware software to load <strong>the</strong>se programs into <strong>the</strong> 260. If you use<br />
passive (full range) speaker cabinets you shouldn’t have to worry about any PEQ settings.<br />
If <strong>the</strong> subs are not lined up with <strong>the</strong> mains, driver alignment delay may be needed.
2. GAIN STRUCTURE & LIMITER<br />
By properly setting <strong>the</strong> gain structure, your signal to noise ratio will be optimized<br />
(your system will be as quiet as possible) and you can minimize <strong>the</strong> possibility of<br />
clipping any components in your system. Make sure that your amplifiers are properly<br />
rated for your speakers before proceeding. If you are unsure, contact <strong>the</strong> speaker<br />
manufacturer. If you selected your amps in <strong>the</strong> Wizard this has already been set for you.<br />
If not, please proceed. Make sure to select “Custom” for your amps when you run <strong>the</strong><br />
SETUP WIZARD. Make sure that all <strong>the</strong> dynamics processors (limiters and compressors)<br />
and <strong>the</strong> graphic EQ are off before proceeding. Unplug your speakers from your amps.<br />
Most solid state amplifiers will not be damaged when operated without a load connected.<br />
If you are unsure, contact <strong>the</strong> amplifier manufacturer. Keep in mind that <strong>the</strong> amp may<br />
clip slightly sooner when <strong>the</strong> load is connected, so make sure to leave a “cushion” of<br />
headroom. If possible you can use a dummy load to get a more accurate reading. Make<br />
sure that your output limiters are off before proceeding. Run pink noise through your<br />
mixer (from a cd or generator). Set your CD (pink noise source) channel to unity gain.<br />
Bring up <strong>the</strong> master faders on <strong>the</strong> mixer until you barely clip <strong>the</strong> mixer. If you can’t clip<br />
it, bring up <strong>the</strong> channel fader. If you still can’t clip <strong>the</strong> master section, try raising <strong>the</strong> gain<br />
or trim pot slightly. Now adjust your mixer to just under <strong>the</strong> clip point. Now adjust <strong>the</strong><br />
inputs of <strong>the</strong> next device (for <strong>the</strong> sake of this document, this will be <strong>the</strong> 260) until you are<br />
just below <strong>the</strong> clip point. If your amplifiers have a voltage sensitivity switch, set <strong>the</strong>m to<br />
around 1.4 Volts. Now, select one of your amps to start with and set <strong>the</strong> attenuator so that<br />
it just clips, <strong>the</strong>n back it off so that <strong>the</strong> clip indicator just goes out. Now lower it slightly<br />
to provide a little extra room to compensate for <strong>the</strong>re being no load connected. Mark this<br />
setting with a piece of tape or something that will not permanently mark <strong>the</strong> amp. Now<br />
turn <strong>the</strong> amp attenuator up until <strong>the</strong> clip indicator just lights again. Go into <strong>the</strong> Limiter,<br />
for <strong>the</strong> outputs that you are currently working with, and turn it on. Set <strong>the</strong> Overeasy<br />
setting to “off”. Set <strong>the</strong> limiter Threshold so that you no longer clip <strong>the</strong> inputs of <strong>the</strong> amp.<br />
Now set <strong>the</strong> attenuator back to <strong>the</strong> mark that you made earlier. Repeat this process for all<br />
o<strong>the</strong>r amp channels in <strong>the</strong> system. Turn your mixer down and your amps off. Reconnect<br />
your speakers, turn your amps back on and try running some music through your<br />
speakers. You should not be continually hitting <strong>the</strong> limiter when you are running your<br />
system at performance level, which should be unity gain (0 VU on your mixer). If you<br />
do, go back and redo <strong>the</strong> gain structure process. The limiters should only be triggered by<br />
<strong>the</strong> peaks. You will want to <strong>the</strong>n adjust <strong>the</strong> attenuators to achieve as flat of a frequency<br />
response as possible before you run <strong>the</strong> Auto EQ. Make sure that you turn down<br />
attenuators (you don't want to set <strong>the</strong> attenuators past <strong>the</strong> mark that you made earlier). So<br />
for example: If you don't have enough low end, turn down your mid and or high amps. If<br />
you are using powered speakers you will need to know what <strong>the</strong> maximum input of <strong>the</strong><br />
powered speaker is. The maximum output of <strong>the</strong> <strong>Driverack</strong> <strong>PA</strong> is 20 dBu (about 7.75<br />
Volts).You would have to find out how much attenuation is needed on <strong>the</strong> amp/speaker<br />
so that an input of about 7.75 Volts (20 dBu) would be just under <strong>the</strong> clip point of <strong>the</strong><br />
amp.
3. GRAPHIC EQ<br />
If you have <strong>the</strong> optional RTA microphone, you can use it to tune <strong>the</strong> system to <strong>the</strong><br />
venue. If you have set <strong>the</strong> gain structure properly, when your system is at unity gain<br />
throughout, you will also be at <strong>the</strong> desired performance level. So, this means when you<br />
run <strong>the</strong> AutoEQ, you should reach <strong>the</strong> desired performance level when <strong>the</strong> <strong>Driverack</strong><br />
260s output levels are around 0 to +5 dBu (<strong>the</strong>y may be slightly below this due to x-over<br />
and speaker tuning settings). Just make sure that <strong>the</strong> outputs aren’t really high before<br />
running <strong>the</strong> AutoEQ function. You need to leave some headroom available for <strong>the</strong> EQ to<br />
make it’s adjustments.<br />
Microphone placement can be a big issue. If running both sides at once, place <strong>the</strong><br />
mic out approximately <strong>the</strong> same distance as <strong>the</strong> speakers are apart. Place it so <strong>the</strong> distance<br />
between <strong>the</strong> mic and ei<strong>the</strong>r speaker is <strong>the</strong> same. You don’t want <strong>the</strong>re to be a time delay<br />
(one speaker being fur<strong>the</strong>r from <strong>the</strong> mic than <strong>the</strong> o<strong>the</strong>r). You could also try placing <strong>the</strong><br />
reference mic directly on <strong>the</strong> floor. This can have a big effect on frequencies near 250Hz.<br />
You may want to try running <strong>the</strong> pink noise out of only one side, so that you are not<br />
trying to compensate for <strong>the</strong> comb filtering effects of <strong>the</strong> two speakers combined.<br />
There are a few different response curves in <strong>the</strong> Auto EQ. Usually, response 0<br />
(flat) is a good place to start, but may require some fine tuning. If you plan on running<br />
your system at loud levels, you will want <strong>the</strong> response to be more flat. If you are running<br />
<strong>the</strong> system at lower levels, you may want to use one of <strong>the</strong> o<strong>the</strong>r response curves that<br />
contain a low and high boost. You may want to set <strong>the</strong> lower frequencies (from about 100<br />
Hz down) closer to flat after <strong>the</strong> Auto EQ completes. This is usually a better choice<br />
because EQing <strong>the</strong>se lower frequencies are going to affect o<strong>the</strong>r listening positions in <strong>the</strong><br />
room anyway. Unfortunately, you cannot make every listening position in <strong>the</strong> venue have<br />
<strong>the</strong> same low frequency response. Since you cannot EQ non minimum phase problems,<br />
any bands that are boosted or cut more than 6 dB should be brought back closer to 0 dB.<br />
You may want to fine tune <strong>the</strong> higher frequencies by ear. There is a natural high<br />
frequency roll-off that occurs as <strong>the</strong> distance from <strong>the</strong> source (speaker) increases. If you<br />
boost <strong>the</strong> high frequency bands too much, you run <strong>the</strong> risk of distorting your high<br />
frequency drivers (running out of headroom) and/or deafening <strong>the</strong> people in <strong>the</strong> front<br />
row. You may want to experiment with <strong>the</strong> o<strong>the</strong>r response curves to see what sounds best<br />
with your style of music and at different system levels. However, typically you want your<br />
speaker system to not introduce its own color on <strong>the</strong> sound, so a response setting of “0” is<br />
usually a better choice for live sound. You will need to experiment to find what works<br />
best for your application.<br />
A precision setting of “LOW” will finish <strong>the</strong> fastest, but will not be as accurate as<br />
a “HIGH” setting. Sometimes a setting of “MEDIUM” or “HIGH” may take a long time<br />
or never finish because <strong>the</strong> acoustic environment may be too complex or ambient noise<br />
may be impeding <strong>the</strong> process. The “LOW” setting should be acceptable for most<br />
applications and will get you up and running <strong>the</strong> fastest. The LOW setting also has<br />
convergence criterion that allows more bands to be off. Use this settings if <strong>the</strong> Auto EQ<br />
does not finish or you want a first cut of <strong>the</strong> EQ. You can always "freshen up" <strong>the</strong> eq<br />
settings with a subsequent Auto EQ procedure - it will pick up where it left off.<br />
There can be many circumstances where <strong>the</strong> AutoEQ will not work. AutoEQ can<br />
only fix <strong>the</strong> problems that EQ can fix - if <strong>the</strong>re are speaker placement, gain structure,<br />
xover, speaker presets, time alignment issues etc, AutoEQ will not be able to tune <strong>the</strong>
system. If AutoEQ is not consistently converging, look at <strong>the</strong> rest of <strong>the</strong> system - <strong>the</strong>re<br />
may be issues with <strong>the</strong> setup that Auto EQ can not address. AutoEQ does best when it<br />
only has to compensate for room resonance. Tuning your speakers is best done with <strong>the</strong><br />
x-over/PEQ/alignment delay. If <strong>the</strong> display reads "not done", take a look at <strong>the</strong> EQ<br />
settings after you have run <strong>the</strong> Auto EQ. It will tell you which frequency region you are<br />
having problems with. If it's around <strong>the</strong> x-over point, <strong>the</strong>n you have most likely<br />
improperly set <strong>the</strong> x-over settings. If <strong>the</strong> problems are in <strong>the</strong> lower frequencies, it could<br />
be caused from room modes or lack of low frequency response in your system. If it is <strong>the</strong><br />
high frequencies it could be that <strong>the</strong> mic is placed too far away and trying to boost <strong>the</strong><br />
extreme high frequencies (<strong>the</strong> <strong>Driverack</strong> <strong>PA</strong> cannot take a systems natural high frequency<br />
roll-off into account).<br />
If you do not have <strong>the</strong> optional RTA microphone, you will have to go into <strong>the</strong><br />
GEQ and fine tune <strong>the</strong> system manually by ear using a music CD that reproduces all<br />
frequencies that your system is capable of reproducing. You will most likely need to fine<br />
tune <strong>the</strong> gain structure to compensate for any EQ adjustments. Keep in mind that you do<br />
not want to alter <strong>the</strong> overall balance between <strong>the</strong> low, mid and high drivers.
4. AFS FEEDBACK SUPRESSOR<br />
Run <strong>the</strong> AFS Wizard to ring out <strong>the</strong> system and achieve more gain before<br />
feedback. There are two modes or types of filters in <strong>the</strong> AFS. These filter types are<br />
FIXED and LIVE. Keep in mind that it is very important for <strong>the</strong> systems gain structure to<br />
be properly set for <strong>the</strong> AFS to function properly.<br />
The FIXED filters are used as permanent notch filters and <strong>the</strong> LIVE filters will be lifted if<br />
one of <strong>the</strong> below conditions are met:<br />
1. Expiration of a period of time that is pre determined by <strong>the</strong> user (LIVE filter lift<br />
setting).<br />
2. All filters are used and begin to round robin (lifts <strong>the</strong> first LIVE filter set to use it at<br />
ano<strong>the</strong>r frequency location). Chances are if this problem persists and begins to loop, <strong>the</strong>n<br />
you need to turn down <strong>the</strong> gain at your mixer.<br />
3. The unit is power cycled.<br />
You will want to do a quick sound check on <strong>the</strong> microphones first. Get <strong>the</strong>m as<br />
close to <strong>the</strong> desired performance level as possible before feedback occurs. Make sure to<br />
use proper gain structure techniques for adjusting <strong>the</strong> individual mixer channels. You can<br />
start with 6 FIXED and 6 LIVE filters. Select <strong>the</strong> desired notch filter size. The selections<br />
range from SPEECH, which have <strong>the</strong> broadest Q factor to MUSIC HIGH, which have <strong>the</strong><br />
narrowest Q factor. Speech will be <strong>the</strong> most audible and may not use as many filters to<br />
eliminate <strong>the</strong> feedback. Music High is <strong>the</strong> most inaudible, but may use <strong>the</strong> filters up<br />
faster. You will have to find a happy medium when selecting <strong>the</strong> width of <strong>the</strong> filters. Now<br />
with no signal going to <strong>the</strong> mics, but with <strong>the</strong> mics active, slowly bring up <strong>the</strong> master<br />
fader(s) on your mixer until you reach <strong>the</strong> desired performance level (probably around<br />
0dB on your mixer’s master fader, assuming your gain structure is set properly). You<br />
may want to push <strong>the</strong> master fader(s) slightly above 0 VU so that you are not right on <strong>the</strong><br />
verge of feedback when set to unity gain. If you run out of FIXED filters, go back and<br />
allocate more filters as FIXED and repeat <strong>the</strong> process. If you still can’t eliminate <strong>the</strong><br />
feedback and don’t have many more FIXED filters to set, try setting <strong>the</strong> filters to a<br />
broader Q (such as Music Low). If you don’t use all of <strong>the</strong> FIXED filters, you can go<br />
back and designate more of <strong>the</strong> filters for LIVE and repeat <strong>the</strong> process. Once you are<br />
done <strong>the</strong> unit will automatically enter LIVE mode.