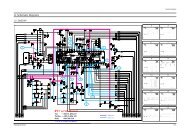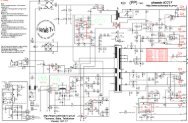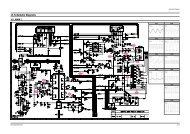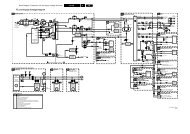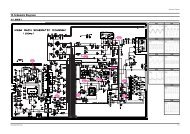
10. Schematic Diagrams
10. Schematic Diagrams
10. Schematic Diagrams

You also want an ePaper? Increase the reach of your titles
YUMPU automatically turns print PDFs into web optimized ePapers that Google loves.
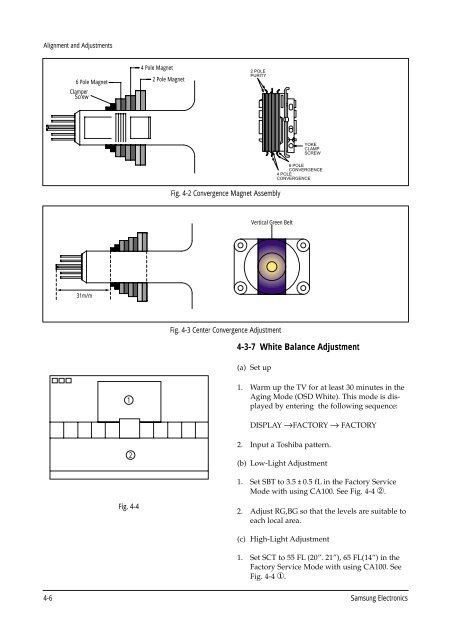
Alignment and Adjustments<br />
6 Pole Magnet<br />
Clamper<br />
Screw<br />
4 Pole Magnet<br />
2 Pole Magnet<br />
2 POLE<br />
PURITY<br />
ADJUST THE ANGLE<br />
(VERTICAL LINES)<br />
YOKE<br />
CLAMP<br />
SCREW<br />
Fig. 4-2 Convergence Magnet Assembly<br />
6 POLE<br />
CONVERGENCE<br />
4 POLE<br />
CONVERGENCE<br />
Vertical Green Belt<br />
31m/m<br />
Fig. 4-3 Center Convergence Adjustment<br />
4-3-7 White Balance Adjustment<br />
(a) Set up<br />
1<br />
1. Warm up the TV for at least 30 minutes in the<br />
Aging Mode (OSD White). This mode is displayed<br />
by entering the following sequence:<br />
DISPLAY →FACTORY → FACTORY<br />
2<br />
2. Input a Toshiba pattern.<br />
(b) Low-Light Adjustment<br />
1. Set SBT to 3.5 ± 0.5 fL in the Factory Service<br />
Mode with using CA100. See Fig. 4-4 ➁.<br />
Fig. 4-4<br />
2. Adjust RG,BG so that the levels are suitable to<br />
each local area.<br />
(c) High-Light Adjustment<br />
1. Set SCT to 55 FL (20”. 21”), 65 FL(14”) in the<br />
Factory Service Mode with using CA100. See<br />
Fig. 4-4 1.<br />
4-6 Samsung Electronics