
Create successful ePaper yourself
Turn your PDF publications into a flip-book with our unique Google optimized e-Paper software.
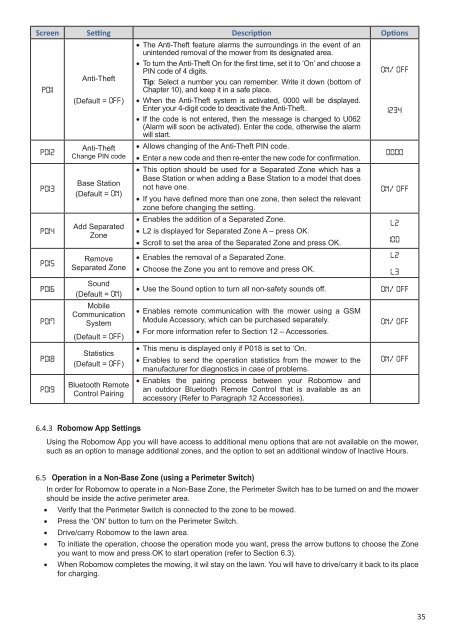
Screen Setting Description Options<br />
P011<br />
P012<br />
P013<br />
P014<br />
P015<br />
P016<br />
P017<br />
P018<br />
P019<br />
Anti-Theft<br />
(Default = OFF)<br />
Anti-Theft<br />
Change PIN code<br />
Base Station<br />
(Default = ON)<br />
Add Separated<br />
Zone<br />
Remove<br />
Separated Zone<br />
Sound<br />
(Default = ON)<br />
Mobile<br />
Communication<br />
System<br />
(Default = OFF)<br />
Statistics<br />
(Default = OFF)<br />
Bluetooth Remote<br />
Control Pairing<br />
• The Anti-Theft feature alarms the surroundings in the event of an<br />
unintended removal of the <strong>mower</strong> from its designated area.<br />
• To turn the Anti-Theft On for the first time, set it to ‘On’ and choose a<br />
PIN code of 4 digits.<br />
Tip: Select a number you can remember. Write it down (bottom of<br />
Chapter 10), and keep it in a safe place.<br />
• When the Anti-Theft system is activated, 0000 will be displayed.<br />
Enter your 4-digit code to deactivate the Anti-Theft.<br />
• If the code is not entered, then the message is changed to U062<br />
(Alarm will soon be activated). Enter the code, otherwise the alarm<br />
will start.<br />
• Allows changing of the Anti-Theft PIN code.<br />
• Enter a new code and then re-enter the new code for confirmation.<br />
• This option should be used for a Separated Zone which has a<br />
Base Station or when adding a Base Station to a model that does<br />
not have one.<br />
• If you have defined more than one zone, then select the relevant<br />
zone before changing the setting.<br />
• Enables the addition of a Separated Zone.<br />
• L2 is displayed for Separated Zone A – press OK.<br />
• Scroll to set the area of the Separated Zone and press OK.<br />
• Enables the removal of a Separated Zone.<br />
• Choose the Zone you ant to remove and press OK.<br />
• Use the Sound option to turn all non-safety sounds off.<br />
• Enables remote communication with the <strong>mower</strong> using a GSM<br />
Module Accessory, which can be purchased separately.<br />
• For more information refer to Section 12 – Accessories.<br />
• This menu is displayed only if P018 is set to ‘On.<br />
• Enables to send the operation statistics from the <strong>mower</strong> to the<br />
manufacturer for diagnostics in case of problems.<br />
• Enables the pairing process between your Robomow and<br />
an outdoor Bluetooth Remote Control that is available as an<br />
accessory (Refer to Paragraph 12 Accessories).<br />
On/ OFF<br />
1234<br />
0000<br />
On/ OFF<br />
L2<br />
100<br />
L2<br />
L3<br />
On/ OFF<br />
On/ OFF<br />
On/ OFF<br />
6.4.3 Robomow App Settings<br />
Using the Robomow App you will have access to additional menu options that are not available on the <strong>mower</strong>,<br />
such as an option to manage additional zones, and the option to set an additional window of Inactive Hours.<br />
6.5 Operation in a Non-Base Zone (using a Perimeter Switch)<br />
In order for Robomow to operate in a Non-Base Zone, the Perimeter Switch has to be turned on and the <strong>mower</strong><br />
should be inside the active perimeter area.<br />
• Verify that the Perimeter Switch is connected to the zone to be mowed.<br />
• Press the ‘ON’ button to turn on the Perimeter Switch.<br />
• Drive/carry Robomow to the lawn area.<br />
• To initiate the operation, choose the operation mode you want, press the arrow buttons to choose the Zone<br />
you want to mow and press OK to start operation (refer to Section 6.3).<br />
• When Robomow completes the mowing, it wil stay on the lawn. You will have to drive/carry it back to its place<br />
for charging.<br />
35