RTHD 125-450 Ton Installation - Operation - Maintenance
RTHD 125-450 Ton Installation - Operation - Maintenance
RTHD 125-450 Ton Installation - Operation - Maintenance

You also want an ePaper? Increase the reach of your titles
YUMPU automatically turns print PDFs into web optimized ePapers that Google loves.
<strong>Installation</strong><br />
<strong>Operation</strong><br />
<strong>Maintenance</strong><br />
Series R<br />
Helical Rotary Liquid Chillers<br />
Models <strong>RTHD</strong><br />
175-<strong>450</strong> ton units (60 Hz)<br />
<strong>125</strong>-<strong>450</strong> ton units (50 Hz)<br />
June 2004<br />
<strong>RTHD</strong>-SVX01B-EN<br />
© American Standard Inc. 2004
NOTICE: Warnings and Cautions appear at appropriate sections throughout<br />
this literature. Read these carefully.<br />
WARNING: Indicates a potentially hazardous situation which, if not<br />
avoided, could result in death or serious injury.<br />
CAUTION: Indicates a potentially hazardous situation which, if not<br />
avoided, may result in minor or moderate injury. It may also be used to<br />
alert against unsafe practices.<br />
CAUTION: Indicates a situation that may result in equipment or propertydamage<br />
only accidents.<br />
Important<br />
Environmental Concerns!<br />
Scientific research has shown that certain man-made chemicals<br />
can affect the earth’s naturally occurring stratospheric ozone layer<br />
when released to the atmosphere. In particular, several of the<br />
identified chemicals that may affect the ozone layer are<br />
refrigerants that contain Chlorine, Fluorine and Carbon (CFCs) and<br />
those containing Hydrogen, Chlorine, Fluorine and Carbon<br />
(HCFCs). Not all refrigerants containing these compounds have<br />
the same potential impact to the environment. Trane advocates<br />
the responsible handling of all refrigerants—including industry<br />
replacements for CFCs such as and HCFCs and HFCs.<br />
Responsible Refrigerant Practices!<br />
Trane believes that responsible refrigerant practices are important<br />
to the environment, our customers, and the air conditioning<br />
industry. All technicians who handle refrigerants must be<br />
certified. The Federal Clean Air Act (Section 608) sets forth the<br />
requirements for handling, reclaiming, recovering and recycling of<br />
certain refrigerants and the equipment that is used in these<br />
service procedures. In addition, some states or municipalities<br />
may have additional requirements that must also be adhered to<br />
for responsible management of refrigerants. Know the applicable<br />
laws and follow them.<br />
WARNING<br />
Contains Refrigerant!<br />
System contains oil and refrigerant under high pressure. Recover<br />
refrigerant to relieve pressure before opening the system. See<br />
unit nameplate for refrigerant type. Do not use non-approved<br />
refrigerants, refrigerant substitutes, or refrigerant additives.<br />
Failure to follow proper procedures or the use of non-approved<br />
refrigerants, refrigerant substitutes, or refrigerant additives could<br />
result in death or serious injury or equipment damage.<br />
2 <strong>RTHD</strong>-SVX01B-EN
Contents<br />
General Information . . . . . . . . . . . . . . . . . . . . . . . . . . . . . . . . . . . . . . . 9<br />
Literature Change History . . . . . . . . . . . . . . . . . . . . . . . . . . . . . . . . . . . . . . 9<br />
Unit Identification - Nameplates . . . . . . . . . . . . . . . . . . . . . . . . . . . . . . . . . 9<br />
Unit Inspection . . . . . . . . . . . . . . . . . . . . . . . . . . . . . . . . . . . . . . . . . . . . . 10<br />
Inspection Checklist . . . . . . . . . . . . . . . . . . . . . . . . . . . . . . . . . . . . . . . . . 10<br />
Loose Parts Inventory . . . . . . . . . . . . . . . . . . . . . . . . . . . . . . . . . . . . . . . . 10<br />
Unit Description . . . . . . . . . . . . . . . . . . . . . . . . . . . . . . . . . . . . . . . . . . . . . 10<br />
Model Number Coding System . . . . . . . . . . . . . . . . . . . . . . . . . . . . . . . . . 10<br />
<strong>Installation</strong> Overview . . . . . . . . . . . . . . . . . . . . . . . . . . . . . . . . . . . . . . . . . 19<br />
<strong>Installation</strong> Mechanical . . . . . . . . . . . . . . . . . . . . . . . . . . . . . . . . . . . . . 25<br />
Storage . . . . . . . . . . . . . . . . . . . . . . . . . . . . . . . . . . . . . . . . . . . . . . . . . . . 25<br />
Location Requirements . . . . . . . . . . . . . . . . . . . . . . . . . . . . . . . . . . . . . . . 25<br />
Moving and Rigging . . . . . . . . . . . . . . . . . . . . . . . . . . . . . . . . . . . . . . . . . . 27<br />
Lifting Procedure . . . . . . . . . . . . . . . . . . . . . . . . . . . . . . . . . . . . . . . . . . . . 31<br />
Isolation Pads . . . . . . . . . . . . . . . . . . . . . . . . . . . . . . . . . . . . . . . . . . . . . . 34<br />
Unit Leveling . . . . . . . . . . . . . . . . . . . . . . . . . . . . . . . . . . . . . . . . . . . . . . . 36<br />
Water Piping . . . . . . . . . . . . . . . . . . . . . . . . . . . . . . . . . . . . . . . . . . . . . . . 37<br />
Water Pressure Drop Data . . . . . . . . . . . . . . . . . . . . . . . . . . . . . . . . . . . . 45<br />
Condenser Water Regulating Valve . . . . . . . . . . . . . . . . . . . . . . . . . . . . . . 55<br />
Water Treatment . . . . . . . . . . . . . . . . . . . . . . . . . . . . . . . . . . . . . . . . . . . . 56<br />
Water Pressure Gauges and Thermometers . . . . . . . . . . . . . . . . . . . . . . . 57<br />
Water Pressure Relief Valves . . . . . . . . . . . . . . . . . . . . . . . . . . . . . . . . . . 57<br />
Flow Sensing Devices . . . . . . . . . . . . . . . . . . . . . . . . . . . . . . . . . . . . . . . . 57<br />
Refrigerant Pressure Relief Valve Venting . . . . . . . . . . . . . . . . . . . . . . . . 58<br />
Thermal Insulation . . . . . . . . . . . . . . . . . . . . . . . . . . . . . . . . . . . . . . . . . . . 60<br />
<strong>Installation</strong> Electrical . . . . . . . . . . . . . . . . . . . . . . . . . . . . . . . . . . . . . . 63<br />
General Recommendations . . . . . . . . . . . . . . . . . . . . . . . . . . . . . . . . . . . . 63<br />
Power Supply Wiring . . . . . . . . . . . . . . . . . . . . . . . . . . . . . . . . . . . . . . . . . 63<br />
Compressor Motor Phase Sequencing . . . . . . . . . . . . . . . . . . . . . . . . . . . 65<br />
Correcting Improper Electrical Phase Sequence . . . . . . . . . . . . . . . . . . . . 66<br />
Application Of Solid-State Starters . . . . . . . . . . . . . . . . . . . . . . . . . . . . . . . . . . 69<br />
Precautions When Using Solid-State Starters . . . . . . . . . . . . . . . . . . . . . . . . . . 72<br />
Module Connections for Interconnecting Wiring . . . . . . . . . . . . . . . . . . . 75<br />
Interconnecting Wiring (Field Wiring Required) . . . . . . . . . . . . . . . . . . . . . 75<br />
Operating Principles Mechanical . . . . . . . . . . . . . . . . . . . . . . . . . . . . . 83<br />
General . . . . . . . . . . . . . . . . . . . . . . . . . . . . . . . . . . . . . . . . . . . . . . . . . . . 83<br />
Refrigeration (Cooling) Cycle . . . . . . . . . . . . . . . . . . . . . . . . . . . . . . . . . . . 83<br />
Compressor Description . . . . . . . . . . . . . . . . . . . . . . . . . . . . . . . . . . . . . . 86<br />
Oil Management System . . . . . . . . . . . . . . . . . . . . . . . . . . . . . . . . . . . . . 88<br />
Oil Cooler . . . . . . . . . . . . . . . . . . . . . . . . . . . . . . . . . . . . . . . . . . . . . . . . . . 90<br />
Operator Interface Controls . . . . . . . . . . . . . . . . . . . . . . . . . . . . . . . . . 91<br />
CH530 Communications Overview . . . . . . . . . . . . . . . . . . . . . . . . . . . . . . 91<br />
Controls Interface . . . . . . . . . . . . . . . . . . . . . . . . . . . . . . . . . . . . . . . . . . . 91<br />
DynaView Interface . . . . . . . . . . . . . . . . . . . . . . . . . . . . . . . . . . . . . . . . . . 92<br />
Display Screens . . . . . . . . . . . . . . . . . . . . . . . . . . . . . . . . . . . . . . . . . . . . . 93<br />
Keypad/Display Lockout Feature . . . . . . . . . . . . . . . . . . . . . . . . . . . . . . . . 94<br />
Main Screen . . . . . . . . . . . . . . . . . . . . . . . . . . . . . . . . . . . . . . . . . . . . . . . 95<br />
Reports Screen . . . . . . . . . . . . . . . . . . . . . . . . . . . . . . . . . . . . . . . . . . . . . 100<br />
<strong>RTHD</strong>-SVX01B-EN 3
Contents<br />
Settings Screen . . . . . . . . . . . . . . . . . . . . . . . . . . . . . . . . . . . . . . . . . . . . . 102<br />
Diagnostic Screen . . . . . . . . . . . . . . . . . . . . . . . . . . . . . . . . . . . . . . . . . . . 104<br />
TechView . . . . . . . . . . . . . . . . . . . . . . . . . . . . . . . . . . . . . . . . . . . . . . . 105<br />
Minimum PC requirements to install and operate TechView . . . . . . . . . . 106<br />
Unit View . . . . . . . . . . . . . . . . . . . . . . . . . . . . . . . . . . . . . . . . . . . . . . . . . . 107<br />
Status View . . . . . . . . . . . . . . . . . . . . . . . . . . . . . . . . . . . . . . . . . . . . . . . . 108<br />
Setpoint View . . . . . . . . . . . . . . . . . . . . . . . . . . . . . . . . . . . . . . . . . . . . . . 111<br />
Manual Override View . . . . . . . . . . . . . . . . . . . . . . . . . . . . . . . . . . . . . . . . 115<br />
Diagnostics View . . . . . . . . . . . . . . . . . . . . . . . . . . . . . . . . . . . . . . . . . . . . 117<br />
Software View . . . . . . . . . . . . . . . . . . . . . . . . . . . . . . . . . . . . . . . . . . . . . . 121<br />
Binding View . . . . . . . . . . . . . . . . . . . . . . . . . . . . . . . . . . . . . . . . . . . . . . . 122<br />
Software Download . . . . . . . . . . . . . . . . . . . . . . . . . . . . . . . . . . . . . . . . . . 123<br />
Unit Start-up . . . . . . . . . . . . . . . . . . . . . . . . . . . . . . . . . . . . . . . . . . . . <strong>125</strong><br />
Power Up . . . . . . . . . . . . . . . . . . . . . . . . . . . . . . . . . . . . . . . . . . . . . . . . . <strong>125</strong><br />
Power Up to Starting . . . . . . . . . . . . . . . . . . . . . . . . . . . . . . . . . . . . . . . . . <strong>125</strong><br />
Stopped to Starting: . . . . . . . . . . . . . . . . . . . . . . . . . . . . . . . . . . . . . . . . . 127<br />
Seasonal Unit Start-Up Procedure . . . . . . . . . . . . . . . . . . . . . . . . . . . . . . . 129<br />
Unit Shutdown . . . . . . . . . . . . . . . . . . . . . . . . . . . . . . . . . . . . . . . . . . 133<br />
Normal Shutdown to Stopped . . . . . . . . . . . . . . . . . . . . . . . . . . . . . . . . . . 133<br />
Seasonal Unit Shutdown . . . . . . . . . . . . . . . . . . . . . . . . . . . . . . . . . . . . . . 134<br />
Periodic <strong>Maintenance</strong> . . . . . . . . . . . . . . . . . . . . . . . . . . . . . . . . . . . . . 135<br />
Overview . . . . . . . . . . . . . . . . . . . . . . . . . . . . . . . . . . . . . . . . . . . . . . . . . . 135<br />
Weekly <strong>Maintenance</strong> and Checks . . . . . . . . . . . . . . . . . . . . . . . . . . . . . . . 135<br />
Monthly <strong>Maintenance</strong> and Checks . . . . . . . . . . . . . . . . . . . . . . . . . . . . . . 135<br />
Annual <strong>Maintenance</strong> . . . . . . . . . . . . . . . . . . . . . . . . . . . . . . . . . . . . . . . . . 136<br />
Scheduling Other <strong>Maintenance</strong> . . . . . . . . . . . . . . . . . . . . . . . . . . . . . . . . . 137<br />
<strong>Maintenance</strong> Procedures . . . . . . . . . . . . . . . . . . . . . . . . . . . . . . . . . . 141<br />
Cleaning the Condenser . . . . . . . . . . . . . . . . . . . . . . . . . . . . . . . . . . . . . . 141<br />
Cleaning the Evaporator . . . . . . . . . . . . . . . . . . . . . . . . . . . . . . . . . . . . . . 142<br />
Compressor Oil . . . . . . . . . . . . . . . . . . . . . . . . . . . . . . . . . . . . . . . . . . . . . 142<br />
Oil Sump Level Check . . . . . . . . . . . . . . . . . . . . . . . . . . . . . . . . . . . . . . . . 142<br />
Removing Compressor Oil . . . . . . . . . . . . . . . . . . . . . . . . . . . . . . . . . . . . 144<br />
Oil Charging Procedure . . . . . . . . . . . . . . . . . . . . . . . . . . . . . . . . . . . . . . . 144<br />
Replacing the Main Oil Filter (Hot Filter) . . . . . . . . . . . . . . . . . . . . . . . . . . 145<br />
Replacing the Gas Pump Oil Filter . . . . . . . . . . . . . . . . . . . . . . . . . . . . . . . 146<br />
Refrigerant Charge . . . . . . . . . . . . . . . . . . . . . . . . . . . . . . . . . . . . . . . . . . 146<br />
Refrigerant Charging . . . . . . . . . . . . . . . . . . . . . . . . . . . . . . . . . . . . . . . . . 147<br />
Diagnostics . . . . . . . . . . . . . . . . . . . . . . . . . . . . . . . . . . . . . . . . . . . . . 151<br />
Wiring Schematics . . . . . . . . . . . . . . . . . . . . . . . . . . . . . . . . . . . . . . . 165<br />
Unit Electrical Data . . . . . . . . . . . . . . . . . . . . . . . . . . . . . . . . . . . . . . . . . . 165<br />
4 <strong>RTHD</strong>-SVX01B-EN
List of Tables<br />
General Information. . . . . . . . . . . . . . . . . . . . . . . . . . . . . . . . . . . . . . . . 9<br />
Model Number . . . . . . . . . . . . . . . . . . . . . . . . . . . . . . . . . . . . . . . . . . . . . 11<br />
Compressor Model Number . . . . . . . . . . . . . . . . . . . . . . . . . . . . . . . . . . 16<br />
<strong>Installation</strong> Responsibility Chart for <strong>RTHD</strong> Units . . . . . . . . . . . . . . . . . . . 19<br />
General Data . . . . . . . . . . . . . . . . . . . . . . . . . . . . . . . . . . . . . . . . . . . . . . 21<br />
General Data . . . . . . . . . . . . . . . . . . . . . . . . . . . . . . . . . . . . . . . . . . . . . . 22<br />
General Data . . . . . . . . . . . . . . . . . . . . . . . . . . . . . . . . . . . . . . . . . . . . . . 23<br />
General Data . . . . . . . . . . . . . . . . . . . . . . . . . . . . . . . . . . . . . . . . . . . . . . 24<br />
<strong>Installation</strong> Mechanical . . . . . . . . . . . . . . . . . . . . . . . . . . . . . . . . . . . . . 25<br />
Unit Weights (lb (kg)) . . . . . . . . . . . . . . . . . . . . . . . . . . . . . . . . . . . . . . . . 28<br />
Center of Gravity (in (mm)). . . . . . . . . . . . . . . . . . . . . . . . . . . . . . . . . . . . 30<br />
Weights and Rigging . . . . . . . . . . . . . . . . . . . . . . . . . . . . . . . . . . . . . . . . 32<br />
Evaporator and Condenser Data . . . . . . . . . . . . . . . . . . . . . . . . . . . . . . . 44<br />
Pressure Relief Valve Data. . . . . . . . . . . . . . . . . . . . . . . . . . . . . . . . . . . . 59<br />
Recommended Insulation Types . . . . . . . . . . . . . . . . . . . . . . . . . . . . . . . 61<br />
<strong>Installation</strong> Electrical . . . . . . . . . . . . . . . . . . . . . . . . . . . . . . . . . . . . . . . 63<br />
Wire Selection Chart for Starter Panels . . . . . . . . . . . . . . . . . . . . . . . . . . 64<br />
Lug Sizes . . . . . . . . . . . . . . . . . . . . . . . . . . . . . . . . . . . . . . . . . . . . . . . . . 68<br />
Dip and Rotary Switch Settings . . . . . . . . . . . . . . . . . . . . . . . . . . . . . . . . 70<br />
Chiller Events/Status Descriptions . . . . . . . . . . . . . . . . . . . . . . . . . . . . . . 79<br />
Programable Relays . . . . . . . . . . . . . . . . . . . . . . . . . . . . . . . . . . . . . . . . . 80<br />
Operating Principles Mechanical . . . . . . . . . . . . . . . . . . . . . . . . . . . . . 83<br />
Operator Interface Controls . . . . . . . . . . . . . . . . . . . . . . . . . . . . . . . . . 91<br />
Main Screen Items. . . . . . . . . . . . . . . . . . . . . . . . . . . . . . . . . . . . . . . . . . 95<br />
Operating Modes . . . . . . . . . . . . . . . . . . . . . . . . . . . . . . . . . . . . . . . . . . . 96<br />
Report Screen Items . . . . . . . . . . . . . . . . . . . . . . . . . . . . . . . . . . . . . . . 100<br />
Settings Screen Items . . . . . . . . . . . . . . . . . . . . . . . . . . . . . . . . . . . . . . 102<br />
TechView . . . . . . . . . . . . . . . . . . . . . . . . . . . . . . . . . . . . . . . . . . . . . . . 105<br />
Status View Items . . . . . . . . . . . . . . . . . . . . . . . . . . . . . . . . . . . . . . . . . 109<br />
Configuration View Items. . . . . . . . . . . . . . . . . . . . . . . . . . . . . . . . . . . . 119<br />
Unit Start-up. . . . . . . . . . . . . . . . . . . . . . . . . . . . . . . . . . . . . . . . . . . . . <strong>125</strong><br />
Limit Conditions . . . . . . . . . . . . . . . . . . . . . . . . . . . . . . . . . . . . . . . . . . . 129<br />
Unit Shutdown. . . . . . . . . . . . . . . . . . . . . . . . . . . . . . . . . . . . . . . . . . . 133<br />
Periodic <strong>Maintenance</strong> . . . . . . . . . . . . . . . . . . . . . . . . . . . . . . . . . . . . . 135<br />
Operating Conditions at Full Load . . . . . . . . . . . . . . . . . . . . . . . . . . . . . 136<br />
Operating Conditions at Minimum Load . . . . . . . . . . . . . . . . . . . . . . . . 136<br />
<strong>Maintenance</strong> Procedures. . . . . . . . . . . . . . . . . . . . . . . . . . . . . . . . . . . 141<br />
POE Oil Properties . . . . . . . . . . . . . . . . . . . . . . . . . . . . . . . . . . . . . . . . . 142<br />
Low Refrigerant Temperature, Ethylene Glycol, and Freeze Protection Settings<br />
. . . . . . . . . . . . . . . . . . . . . . . . . . . . . . . . . . . . . . . . . . . . . . . . . . . . 148<br />
Diagnostics . . . . . . . . . . . . . . . . . . . . . . . . . . . . . . . . . . . . . . . . . . . . . . 151<br />
Diagnostic List . . . . . . . . . . . . . . . . . . . . . . . . . . . . . . . . . . . . . . . . . . . 151<br />
Wiring Schematics . . . . . . . . . . . . . . . . . . . . . . . . . . . . . . . . . . . . . . . . 165<br />
<strong>RTHD</strong>-SVX01B-EN 5
List of Tables<br />
6 <strong>RTHD</strong>-SVX01B-EN
List of Figures<br />
General Information. . . . . . . . . . . . . . . . . . . . . . . . . . . . . . . . . . . . . . . . 9<br />
Typical Unit Nameplate . . . . . . . . . . . . . . . . . . . . . . . . . . . . . . . . . . . . . . 9<br />
Component Location for Typical <strong>RTHD</strong> Unit . . . . . . . . . . . . . . . . . . . . . . 17<br />
Component Location for Typical <strong>RTHD</strong> Unit (Back View) . . . . . . . . . . . . 18<br />
<strong>Installation</strong> Mechanical . . . . . . . . . . . . . . . . . . . . . . . . . . . . . . . . . . . . . 25<br />
Recommended Operating and Service Clearances . . . . . . . . . . . . . . . . . 26<br />
Unit Weights and Dimensions for Rigging . . . . . . . . . . . . . . . . . . . . . . . . 28<br />
Lifting the Unit . . . . . . . . . . . . . . . . . . . . . . . . . . . . . . . . . . . . . . . . . . . . . 33<br />
Isolator Pad Placement . . . . . . . . . . . . . . . . . . . . . . . . . . . . . . . . . . . . . . 35<br />
Oil Separator with Shipping Bracket and Compressor Shipping Spacer . 36<br />
Condenser and Evaporator Water Connections -BBB . . . . . . . . . . . . . . . 38<br />
Condenser and Evaporator Water Connections -BCD . . . . . . . . . . . . . . . 39<br />
Condenser and Evaporator Water Connections - CEF . . . . . . . . . . . . . . . 40<br />
Condenser and Evaporator Water Connections - CDE/DDE/EDE . . . . . . 41<br />
Condenser and Evaporator Water Connections - DFF/EFF/CFF. . . . . . . . 42<br />
Condenser and Evaporator Water Connections - DGG/EGG . . . . . . . . . . 43<br />
Typical Thermometer, Valving, and Manifold Pressure Gauge Set-up . . . 57<br />
Relief Valve Location . . . . . . . . . . . . . . . . . . . . . . . . . . . . . . . . . . . . . . . . 59<br />
Typical <strong>RTHD</strong> Insulation Requirements . . . . . . . . . . . . . . . . . . . . . . . . . . 61<br />
<strong>Installation</strong> Electrical . . . . . . . . . . . . . . . . . . . . . . . . . . . . . . . . . . . . . . . 63<br />
Electrical <strong>Installation</strong>. . . . . . . . . . . . . . . . . . . . . . . . . . . . . . . . . . . . . . . . . 65<br />
Control Interface module (CIM) . . . . . . . . . . . . . . . . . . . . . . . . . . . . . . . . 71<br />
Solid State Starter Connections . . . . . . . . . . . . . . . . . . . . . . . . . . . . . . . . 72<br />
Y-D Starter Panel Power Wire Routing . . . . . . . . . . . . . . . . . . . . . . . . . . 74<br />
Solid State Starter Panel Power Wire Routing. . . . . . . . . . . . . . . . . . . . . . . 75<br />
Operating Principles Mechanical . . . . . . . . . . . . . . . . . . . . . . . . . . . . . 83<br />
Pressure /Enthalpy Curve . . . . . . . . . . . . . . . . . . . . . . . . . . . . . . . . . . . . . 84<br />
Refrigerant Flow Diagram . . . . . . . . . . . . . . . . . . . . . . . . . . . . . . . . . . . . 85<br />
Compressor Description . . . . . . . . . . . . . . . . . . . . . . . . . . . . . . . . . . . . . 86<br />
Oil Flow Diagram . . . . . . . . . . . . . . . . . . . . . . . . . . . . . . . . . . . . . . . . . . . 88<br />
Gas Pump. . . . . . . . . . . . . . . . . . . . . . . . . . . . . . . . . . . . . . . . . . . . . . . . . 90<br />
Operator Interface Controls . . . . . . . . . . . . . . . . . . . . . . . . . . . . . . . . . 91<br />
DynaView . . . . . . . . . . . . . . . . . . . . . . . . . . . . . . . . . . . . . . . . . . . . . . . . . 92<br />
TechView . . . . . . . . . . . . . . . . . . . . . . . . . . . . . . . . . . . . . . . . . . . . . . . 105<br />
Unit Start-up. . . . . . . . . . . . . . . . . . . . . . . . . . . . . . . . . . . . . . . . . . . . . <strong>125</strong><br />
Power Up . . . . . . . . . . . . . . . . . . . . . . . . . . . . . . . . . . . . . . . . . . . . . . . . <strong>125</strong><br />
Power Up to Starting . . . . . . . . . . . . . . . . . . . . . . . . . . . . . . . . . . . . . . . 126<br />
Stoped to Starting . . . . . . . . . . . . . . . . . . . . . . . . . . . . . . . . . . . . . . . . . 128<br />
Unit Shutdown. . . . . . . . . . . . . . . . . . . . . . . . . . . . . . . . . . . . . . . . . . . 133<br />
Normal Shutdown . . . . . . . . . . . . . . . . . . . . . . . . . . . . . . . . . . . . . . . . . 133<br />
Periodic <strong>Maintenance</strong> . . . . . . . . . . . . . . . . . . . . . . . . . . . . . . . . . . . . . 135<br />
<strong>Maintenance</strong> Procedures. . . . . . . . . . . . . . . . . . . . . . . . . . . . . . . . . . . 141<br />
Determining Oil Level in Sump . . . . . . . . . . . . . . . . . . . . . . . . . . . . . . . 143<br />
Oil Filter Replacement Chart (E,D, C and B Frame Compressors) . . . . . 146<br />
Diagnostics . . . . . . . . . . . . . . . . . . . . . . . . . . . . . . . . . . . . . . . . . . . . . . 151<br />
<strong>RTHD</strong>-SVX01B-EN 7
List of Figures<br />
Wiring Schematics . . . . . . . . . . . . . . . . . . . . . . . . . . . . . . . . . . . . . . . . 165<br />
8 <strong>RTHD</strong>-SVX01B-EN
General Information<br />
Literature Change History<br />
<strong>RTHD</strong>-SVX01B-EN New Evap/Cond configuration C2F2F3 and change to<br />
minimum flow rates. (June 2004)<br />
<strong>RTHD</strong>-SVX01A-EN New manual describes installation, operation, and<br />
maintenance of <strong>RTHD</strong> units. (May 2003)<br />
Unit Identification - Nameplates<br />
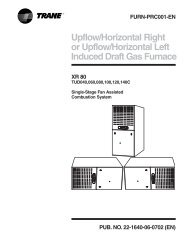
When the unit arrives, compare all nameplate data with ordering, submittal,<br />
and shipping information. A typical unit nameplate is shown in Figure 1.<br />
Figure 1<br />
Typical Unit Nameplate<br />
Unit Nameplates<br />
The <strong>RTHD</strong> “unit” nameplate is applied to the exterior surface of the starter/<br />
control panel. The “compressor” nameplate is applied to the compressor.<br />
The starter/control panel nameplate is located inside the panel.<br />
The unit nameplate provides the following information:<br />
• Unit model<br />
• Unit Serial Number<br />
• Unit device number.<br />
– Identifies unit electrical requirements<br />
– Lists correct operating charges of HFC-134a and refrigerant oil<br />
– Lists unit test pressures and maximum working pressures.<br />
The starter/control panel nameplate provides the following information:<br />
• Panel model number<br />
• Rated load amps<br />
• Voltage<br />
• Electrical characteristics - starter type, wiring<br />
• Options included.<br />
The compressor nameplate provides the following information:<br />
• Compressor model descriptor<br />
• Compressor serial number<br />
<strong>RTHD</strong>-SVX01B-EN 9
General Information<br />
• Compressor device number<br />
• Motor serial number<br />
• Compressor electrical characteristics<br />
• Refrigerant.<br />
Unit Inspection<br />
When the unit is delivered, verify that it is the correct unit and that it is properly<br />
equipped.<br />
Inspect all exterior components for visible damage. Report any apparent damage<br />
or material shortage to the carrier and make a “unit damage” notation on<br />
the carrier’s delivery receipt. Specify the extent and type of damage found<br />
and notify the appropriate Trane Sales Office.<br />
Do not proceed with installation of a damaged unit without sales office<br />
approval.<br />
Inspection Checklist<br />
To protect against loss due to damage incurred in transit, complete the following<br />
checklist upon receipt of the unit.<br />
• Inspect the individual pieces of the shipment before accepting the unit.<br />
Check for obvious damage to the unit or packing material.<br />
• Inspect the unit for concealed damage as soon as possible after delivery<br />
and before it is stored. Concealed damage must be reported within 10<br />
days after receipt.<br />
• If concealed damage is discovered, stop unpacking the shipment. Do not<br />
remove damaged material from the receiving location. Take photos of the<br />
damage, if possible. The owner must provide reasonable evidence that<br />
the damage did not occur after delivery.<br />
• Notify the Trane sales representative and arrange for repair. Do not repair<br />
the unit, however, until damage is inspected by the transportation representative.<br />
Loose Parts Inventory<br />
Check all items against the shipping list. Water vessel drain plugs, isolation<br />
pads, rigging and electrical diagrams, service literature and the starter/control<br />
panel wire pullbox (required on some starters) are shipped unassembled in<br />
the starter control panel.<br />
Unit Description<br />
The <strong>RTHD</strong> units are single compressor, helical-rotary type, water-cooled liquid<br />
chillers designed for installation indoors. Each unit is a completely assembled,<br />
hermetic package that is factory-piped, wired, leak-tested, dehydrated,<br />
charged (optional), and tested for proper control operation before shipment.<br />
Figure 2 and Figure 3 show a typical <strong>RTHD</strong> unit and its components. Water<br />
inlet and outlet openings are covered before shipment. The oil tank is factory<br />
charged with the proper amount of refrigeration oil. The unit can be factory<br />
charged with refrigerant.<br />
Model Number Coding System<br />
The model numbers for the unit and the compressor are composed of numbers<br />
and letters that represent features of the equipment. Shown in the three<br />
tables following are samples of typical unit, compressor, and panel model<br />
numbers, followed by the coding system for each.<br />
10 <strong>RTHD</strong>-SVX01B-EN
General Information<br />
Each position, or group of positions, in the model number is used to represent<br />
a feature. For example, in the first table, position 08 of the unit model<br />
number, Unit Voltage, contains the letter “F”. An F in this position means that<br />
the unit voltage is 460/60/3.<br />
Unit Model Number<br />
Table 1<br />
Model Number<br />
Name Code M/N Digit M/N Code Description<br />
MODL 1-4 Basic product line<br />
<strong>RTHD</strong> <strong>RTHD</strong> Water-Cooled Series R - Dev Sequence D<br />
DCTL 5 Manufacturing Plant<br />
WCBU U Water Chiller Business Unit, Pueblo CO USA<br />
EPL E Epinal Business Unit, Charmes FR<br />
CHIN C China Business Unit<br />
COMP 6-7 Compressor<br />
B1 B1 B1 compressor<br />
B2 B2 B2 compressor<br />
C1 C1 C1 compressor<br />
C2 C2 C2 compressor<br />
D1 D1 D1 compressor<br />
D2 D2 D2 compressor<br />
D3 D3 D3 compressor (50 Hz only)<br />
E3 E3 E3 compressor (50 Hz only)<br />
VOLT 8 Unit power supply<br />
200A A 200V/60Hz/3Ph power<br />
230A C 230V/60Hz/3Ph power<br />
380A D 380V/60Hz/3Ph power<br />
380B R 380V/50Hz/3Ph power<br />
400B T 400V/50Hz/3Ph power<br />
415B U 415V/50Hz/3Ph power<br />
460A F 460V/60Hz/3Ph power<br />
575A H 575V/60Hz/3Ph power<br />
SPEC 9 Design Specials<br />
NONE X None<br />
ELSE C Specials denoted elsewhere<br />
NOT S Specials not denoted elsewhere<br />
DSEQ 10-11 Design sequence<br />
A0 A0 Factory/ABU assigned, start with A0<br />
AGLT 12 Agency listing<br />
NONE X No agency listing<br />
CUL U C/UL listing<br />
CCC 3 CCC- Chinese Compulsory Code<br />
<strong>RTHD</strong>-SVX01B-EN 11
General Information<br />
Table 1<br />
Model Number<br />
Name Code M/N Digit M/N Code Description<br />
CODE 13 Pressure vessel code<br />
ASME A ASME pressure vessel code<br />
CAN C Canadian code<br />
SQLO L Chinese code<br />
SPL S Special<br />
EVAP 14-15 Evaporator<br />
B1 B1 B1 evaporator<br />
B2 B2 B2 evaporator<br />
C1 C1 C1 evaporator<br />
C2 C2 C2 evaporator<br />
D1 D1 D1 evaporator<br />
D2 D2 D2 evaporator<br />
D3 D3 D3 evaporator<br />
D4 D4 D4 evaporator<br />
D5 D5 D5 evaporator<br />
D6 D6 D5 evaporator<br />
E1 E1 E1 evaporator<br />
F1 F1 F1 evaporator<br />
F2 F2 F2 evaporator<br />
G1 G1 G1 evaporator<br />
G2 G2 G2 evaporator<br />
G3 G3 G3 evaporator<br />
EVTM 16 Evap Tube type<br />
STD A Standard<br />
EVWP 17 Evaporator passes<br />
2 2 2 Pass evaporator<br />
3 3 3 Pass evaporator<br />
4 4 4 Pass evaporator<br />
EVWC 18 Evaporator water connection<br />
LH L Left hand evaporator connection<br />
RH R Right hand evaporator connection<br />
EVCT 19 Evaporator connection type<br />
STD A Standard grooved pipe<br />
SPEC S Special<br />
EVPR 20 Evaporator water side pressure<br />
LOW L 150 PSI / 10.5 Bar evaporator water pressure<br />
HIGH H 300 PSI / 21 Bar evaporator water pressure<br />
12 <strong>RTHD</strong>-SVX01B-EN
General Information<br />
Table 1<br />
Model Number<br />
Name Code M/N Digit M/N Code Description<br />
COND 21-22 Condenser<br />
B1 B1 B1 condenser<br />
B2 B2 B2 condenser<br />
D1 D1 D1 condenser<br />
D2 D2 D2 condenser<br />
E1 E1 E1 condenser<br />
E2 E2 E2 condenser<br />
E3 E3 E3 condenser<br />
E4 E4 E4 condenser<br />
E5 E5 E5 condenser<br />
F1 F1 F1 condenser<br />
F2 F2 F2 condenser<br />
F3 F3 F3 condenser<br />
G1 G1 G1 condenser<br />
G2 G2 G2 condenser<br />
G3 G3 G3 condenser<br />
CDTM 23 Condenser tube type<br />
CUFN A Enhanced fin - copper<br />
SMBR B Smooth bore - copper<br />
SBCN C Smooth bore - 90/10 Cu/Ni<br />
CDWP 24 Condenser passes<br />
2 2 2 Pass<br />
CDWC 25 Condenser water connection<br />
LH L Left hand condenser connection<br />
RH R Right hand condenser connection<br />
CDCT 26 Condenser connection type<br />
STD A Standard grooved pipe<br />
MAR C Marine<br />
SPEC S Special<br />
CDPR 27 Condenser water side pressure<br />
150 L 150 PSI / 10.5 Bar condenser water pressure<br />
300 H 300 PSI / 21 Bar condenser water pressure<br />
CDLW 28 Condenser Leaving Water Temp<br />
STD A Standard (
General Information<br />
Table 1<br />
Model Number<br />
Name Code M/N Digit M/N Code Description<br />
OILC 30 Oil Cooler<br />
NONE X without oil cooler<br />
OIL C with oil cooler<br />
INSL 31 Thermal Insulation<br />
NONE X No insulation<br />
INSC Q Factory insulation cold parts<br />
SNDA 32 Sound Attenuator<br />
NONE X No insulation<br />
INSL A Standard attenuator<br />
LANG 33 Control, Label, and Literature Language<br />
ENG E English<br />
SFTY 34 Safety Devices<br />
STD X Standard<br />
CHRG 35 Shipping Charge<br />
FACT A Full Factory Charge<br />
N2 B Nitrogen<br />
PCKG 36 Shipping Package<br />
DOM A Domestic<br />
DMSW B Domestic + Shrink Wrap<br />
SKID C Skid<br />
SKSW D Skid + Shrink Wrap<br />
SPEC J Special<br />
FLOW 37 Flow Switch<br />
NONE X Without<br />
EVNM A Evap NEMA-1<br />
ECNM B Evap & Cond NEMA-1<br />
EVVP C Evap Vapor<br />
ECVP D Evap & Cond Vapor<br />
TEST 38 Factory Performance Test<br />
NONE X Without<br />
WIT C Witness test<br />
REP D Performance test w/report<br />
SPEC S Special<br />
SRTY 39 Starter type<br />
YDEL Y Wye-delta closed transition starter<br />
SSST A Solid State starter<br />
MRLA MRLA 40-42 *** Design RLA (for starter)<br />
*** Selection RLA<br />
14 <strong>RTHD</strong>-SVX01B-EN
General Information<br />
Table 1<br />
Model Number<br />
Name Code M/N Digit M/N Code Description<br />
PCON 43 Power line connection type<br />
TERM A Terminal block connection for incoming line(s)<br />
DISC B Mech disconnect switch<br />
CB D Circuit breaker<br />
CBHI F High interrupt circuit breaker<br />
GFCB H Ground fault circuit breaker<br />
GFHI J Ground fault high interrupt circuit breaker<br />
ENC 44 Enclosure type<br />
NEMA A NEMA 1<br />
WVUO 45 Under/over voltage protection<br />
NIST X No under/over voltage protection<br />
INST U Under/over voltage protection<br />
OPIN 46 Unit operator interface<br />
DVA A Dyna-View operator interface-Pueblo<br />
DVD D Dyna-View/Spanish<br />
DVG G Dyna-View/Trad.Chinese<br />
DVH H Dyna-View/Simp.Chinese<br />
DVJ J Dyna-View/Japanese<br />
DVK K Dyna-View/Portugese(Brazil)<br />
DVL L Dyna-View/Korean<br />
DVM M Dyna-View/Thai<br />
COMM 47 Remote Interfaces (digital comm)<br />
NIST X No remote digital comm<br />
TRM4 4 Tracer Comm 4 Interface<br />
TRM5 5 Tracer Comm 5 LCI-C (LonTalk )<br />
SETP 48 External Chilled Water & Current Limit Setpoint<br />
NIST X None<br />
INST 4 4-20 ma input<br />
INSA 2 2-10 Vdc input<br />
BSLD 49 External Base Loading<br />
NIST X None<br />
INST 4 4-20 ma input<br />
INSA 2 2-10 Vdc input<br />
ICEB 50 Icemaking<br />
NIST X None<br />
INST A Icemaking with relay<br />
INSA B Icemaking without relay<br />
<strong>RTHD</strong>-SVX01B-EN 15
General Information<br />
Table 1<br />
Model Number<br />
Name Code M/N Digit M/N Code Description<br />
STAT 51 Programmable Relays<br />
NIST X None<br />
INST R Programmable Relay<br />
OATS 52 Chilled water reset -outdoor air temp<br />
NIST X No Sensor (return water CHW reset standard)<br />
INST T Chilled water reset - outdoor air temp<br />
RPOT 53 Reg. Valve & RLA<br />
NIST X None<br />
WREG V Condenser reg. Valve out & % RLA out<br />
HPC P Condenser Pressure (%HPC) & % RLA out<br />
DELP D Chiller Delta P & %RLA out<br />
RMTP 54 Refrigerant Monitor Input<br />
NIST X None<br />
INST A 100 ppm / 4-20 ma<br />
INSA B 1000 ppm / 4-20 ma<br />
INSB C 100 ppm / 2-10 Vdc<br />
INSC D 1000 ppm / 2-10 Vdc<br />
Compressor Model Number (located on compressor nameplate):<br />
Table 2 Compressor Model Number<br />
Selection Category M/N Digit M/N Code Description of Selection<br />
Compressor Series 1-4 CHHC Semi-Hermetic Heli-Rotor Compressor<br />
Design Control 5 1 Pueblo<br />
Compressor Frame 6 B B Frame<br />
C<br />
C Frame<br />
D<br />
D Frame<br />
E<br />
E Frame<br />
Compressor Capacity 7 1 Smaller capacity (minor)<br />
2 Larger capacity (major)<br />
3 Special 50 Hz capacity<br />
Motor 8 A 200V/60Hz/3<br />
C<br />
230V/60Hz/3<br />
D<br />
380V/60Hz/3<br />
F<br />
460V/60Hz/3 or 400V/50Hz/3<br />
H<br />
575V/60Hz/3<br />
Specials 9 O No Specials<br />
C<br />
Specials Denoted Elsewhere<br />
S<br />
Uncategorized Special not denoted elsewhere<br />
Design Sequence 10-11 AO 1st Design (Factory Input)<br />
16 <strong>RTHD</strong>-SVX01B-EN
General Information<br />
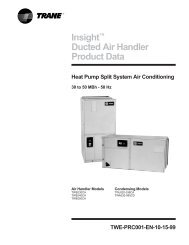
DynaView or EasyView Interface<br />
Starter/Control<br />
Panel<br />
Oil Separator<br />
Relief Valves<br />
Evaporator<br />
Oil Sump<br />
Condenser<br />
Water Outlet<br />
Liquid Level<br />
Sensor<br />
Gas Pump<br />
Evaporator<br />
Water Outlet<br />
Condenser<br />
Water Inlet<br />
Figure 2<br />
Component Location for Typical <strong>RTHD</strong> Unit<br />
<strong>RTHD</strong>-SVX01B-EN 17
General Information<br />
Oil Separators<br />
Compressor<br />
Oil Filter (Cold)<br />
Hot Oil Filter is<br />
hidden from view.<br />
Discharge Line<br />
Relief Valves<br />
Unit Nameplate<br />
(On side of starter/control panel)<br />
EXVs<br />
Evaporator<br />
Water Inlet<br />
Condenser<br />
Service Valves<br />
(With Refrigerant Isolation<br />
Valve Option Only)<br />
Oil Sump<br />
(The oil distribution system is located between<br />
the condenser and the evaporator.)<br />
Figure 3<br />
Component Location for Typical <strong>RTHD</strong> Unit (Back View)<br />
18 <strong>RTHD</strong>-SVX01B-EN
General Information<br />
<strong>Installation</strong> Overview<br />
For convenience, Table 3 summarizes responsibilities that are typically associated<br />
with the <strong>RTHD</strong> chiller installation process.<br />
Table 3<br />
<strong>Installation</strong> Responsibility Chart for <strong>RTHD</strong> Units<br />
Trane-supplied,<br />
Trane-installed<br />
Trane-supplied,<br />
Field-installed<br />
Field-supplied,<br />
Field-installed<br />
Requirement<br />
Rigging<br />
Safety chains<br />
Clevis connectors - Lifting beam<br />
Isolation Isolation pads Isolation pads<br />
Electrical Circuit breakers or non-fused Circuit breaker or non-fused Circuit breakers or fusible disconnects<br />
disconnects (optional)<br />
disconnect handle<br />
(optional)<br />
Unit-mounted starter<br />
Temperature sensor (optional<br />
outdoor air)<br />
Flow switches (may be fieldsupplied)<br />
Condenser water regulating valve<br />
controller (optional: may be fieldsupplied)<br />
Terminal lugs<br />
Ground connection(s)<br />
Jumper bars<br />
BAS wiring (optional)<br />
IPC wiring<br />
Control voltage wiring<br />
High condenser pressure<br />
interlock wiring<br />
Chilled water pump contactor and<br />
wiring<br />
Condenser water pump contactor<br />
and wiring<br />
Optional relays and wiring<br />
Water piping<br />
Flow switches (may be fieldsupplied)<br />
Thermometers<br />
Condenser water regulating valve Water flow pressure gauges<br />
controller (optional: may be fieldsupplied)<br />
Isolation and balancing valves<br />
water piping<br />
Vents and drain valves<br />
Pressure relief valves (for water<br />
boxes as required)<br />
Pressure Relief Relief valves Vent line and flexible connector<br />
Insulation Insulation (optional) Insulation<br />
<strong>RTHD</strong>-SVX01B-EN 19
General Information<br />
Refer to the <strong>Installation</strong> Mechanical and <strong>Installation</strong> Electrical sections of this<br />
manual for detailed installation instructions.<br />
• Locate and maintain the loose parts, e.g. isolators, temperature sensors,<br />
flow sensors or other factory-ordered, field-installed options, for installation,<br />
as required. Loose parts are located in the starter/control panel.<br />
• Install the unit on a foundation with flat support surfaces, level within<br />
1/4” (6.35 mm) and of sufficient strength to support concentrated loading.<br />
Place the manufacturer-supplied isolation pad assemblies under the<br />
unit.<br />
• Install the unit per the instructions outlined in the Mechanical <strong>Installation</strong><br />
section.<br />
• Complete all water piping and electrical connections.<br />
NOTE: Field piping must be arranged and supported to avoid stress on the<br />
equipment. It is strongly recommended that the piping contractor provide at<br />
least 3 feet (914 mm) of clearance between the pre-installation piping and the<br />
planned location of the unit. This will allow for proper fit-up upon arrival of the<br />
unit at the installation site. All necessary piping adjustments can be made at<br />
that time. Refer to the current engineering bulletin for further details on installation.<br />
• Where specified, supply and install valves in the water piping upstream<br />
and downstream of the evaporator and condenser water boxes, to isolate<br />
the shells for maintenance and to balance/trim the system.<br />
• Supply and install condenser water control valve(s) per Trane Engineering<br />
Bulletin -Water Cooled Series R ® Condenser Water Contol.<br />
• Supply and install flow switches or equivalent devices in both the chilled<br />
water and condenser water piping. Interlock each switch with the proper<br />
pump starter and CH530, to ensure that the unit can only operate when<br />
water flow is established.<br />
• Supply and install taps for thermometers and pressure gauges in the<br />
water piping, adjacent to the inlet and outlet connections of both the<br />
evaporator and the condenser.<br />
• Supply and install drain valves on each water box.<br />
• Supply and install vent cocks on each water box.<br />
• Where specified, supply and install strainers ahead of all pumps and automatic<br />
modulating valves.<br />
• Supply and install refrigerant pressure relief piping from the pressure<br />
relief to the atmosphere.<br />
• If necessary, supply enough HCFC-134 refrigerant and dry nitrogen (75<br />
psig) for pressure testing.<br />
• Start the unit under supervision of a qualified service technician.<br />
• Where specified, supply and insulate the evaporator and any other portion<br />
of the unit, as required, to prevent sweating under normal operating<br />
conditions.<br />
• For unit-mounted starters, cutouts are provided at the top of the panel for<br />
line-side wiring.<br />
• Supply and install the wire terminal lugs to the starter.<br />
• Supply and install field wiring to the line-side lugs of the starter.<br />
20 <strong>RTHD</strong>-SVX01B-EN
General Information<br />
Table 4<br />
General Data<br />
Unit Designator (corresponds to digits 6, 7, 14, 15, 21, 22 of unit model number)<br />
D1D1E1 D1F1F2 D1G2G2 D2D2E2 D2F2F3 D2G3G3<br />
General<br />
Refrigerant Type HFC-134a HFC-134a HFC-134a HFC-134a HFC-134a HFC-134a<br />
Refrigerant Charge (lb (kg)) 475 (216) 625 (284) 700 (318) 475 (216) 625 (284) 700 (318)<br />
Oil Charge (gal (l)) 6 (23) 10 (38) 11 (42) 6 (23) 10 (38) 11 (42)<br />
Operating Weight (lb (kg)) 15385 (6978) 17537 (7955) 21065 (9555) 15570 (7063) 18220 (8265) 21641 (9816)<br />
Shipping Weight (lb (kg)) 14443 (6551) 16187 (7342) 19107 (8667) 14562 (6605) 16820 (7630) 19508 (8849)<br />
Overall Dimensions<br />
Length (in (mm))* 126 (3189) 144 (3669) 146 (3712) 126 (3189) 144 (3669) 146 (3712)<br />
Width (in (mm))* 68 (1717) 68 (1716) 70 (1771) 68(1717) 68 (1716) 70 (1771)<br />
Height (in (mm))* 76 (1717) 76 (1716) 80 (2033) 76 (1937) 76 (1936) 80 (2033)<br />
Evaporator<br />
Water Storage (gal (l)) 69 (261) 102 (386) 144 (545) 74 (280) 107 (405) 159 (602)<br />
Minimum Flow (gpm (l/s))<br />
Water<br />
Minimum Flow (gpm (l/s))<br />
Brine<br />
415 (26) for<br />
2-pass<br />
275 (17) for<br />
3-pass<br />
498 (31) for<br />
2-pass<br />
330 (21) for<br />
3-pass<br />
Maximum Flow (gpm (l/s)) 1812 (114)<br />
for 2-pass<br />
1206 (76)<br />
for 3-pass<br />
563 (36) for<br />
2-pass<br />
376 (24) for<br />
3-pass<br />
676 (43) for<br />
2-pass<br />
454 (29) for<br />
3-pass<br />
2478 (156)<br />
for 2-pass<br />
1655 (104)<br />
for 3-pass<br />
550 (35) for<br />
3-pass<br />
411 (26) for<br />
4-pass<br />
660 (42) for<br />
3-pass<br />
492 (31) for<br />
4-pass<br />
2413 (152)<br />
for 3-pass<br />
1807 (114)<br />
for 4-pass<br />
<strong>450</strong> (28) for<br />
2-pass<br />
300 (20) for<br />
3-pass<br />
541 (34) for<br />
2-pass<br />
357 (23) for<br />
3-pass<br />
1980 (<strong>125</strong>)<br />
for 2-pass<br />
1320 (83)<br />
for 3-pass<br />
604 (38) for<br />
2-pass<br />
404 (25) for<br />
3-pass<br />
725 (46) for<br />
2-pass<br />
487 (31) for<br />
3-pass<br />
2667 (168)<br />
for 2-pass<br />
1780 (112)<br />
for 3-pass<br />
622 (39) for<br />
3-pass<br />
466 (29) for<br />
4-pass<br />
747 (47) for<br />
3-pass<br />
557 (35) for<br />
4-pass<br />
2732 (172)<br />
for 3-pass<br />
2050 (129)<br />
for 4-pass<br />
Condenser<br />
(all are 2-pass)<br />
Water Storage (gal (l)) 44 (166) 57 (216) 91 (344) 47 (178) 61 (231) 97 (367)<br />
Minimum Flow (gpm (l/s)) 291 (18) 355 (22) 535 (34) 316 (20) 385 (24) 589 (37)<br />
Water<br />
Minimum Flow (gpm (l/s)) 350 (22) 430 (27) 650 (41) 380 (24) 460 (29) 710 (45)<br />
Brine<br />
Maximum Flow (gpm (l/s)) 1280 (81) 1560 (98) 2360 (149) 1390 (88) 1700 (107) 2600 (164)<br />
All weights ±3%, include standard 150 psig water boxes.<br />
Operating weights include refrigerant, oil, and water charges.<br />
If oil cooler is installed, add 1/4 gal (1 liter) to the oil charge value given for B family units; add 1.0 gal (4 liters) for all other units.<br />
Overall dimensions are based on 3-pass evap/2 pass cond and LH/RH water connections. Refer to submittals for exact job configurations<br />
<strong>RTHD</strong>-SVX01B-EN 21
General Information<br />
Table 5<br />
General Data<br />
Unit Designator (corresponds to digits 6, 7, 14, 15, 21, 22 of unit model number)<br />
D3D2E2 D3F2F3 D3G3G3 E3D2E2 E3F2F3 E3G3G3<br />
General<br />
Refrigerant Type HFC-134a HFC-134a HFC-134a HFC-134a HFC-134a HFC-134a<br />
Refrigerant Charge (lb (kg)) 475 (216) 625 (284) 700 (318) 475 (216) 625 (284) 700 (318)<br />
Oil Charge (gal (l)) 6 (23) 10 (38) 11 (42) 6 (23) 10 (38) 11 (42)<br />
Operating Weight (lb (kg)) 15570 (7063) 18220 (8265) 21641 (9816) 15728 (7134) 18356 (8326) 21786 (9882)<br />
Shipping Weight (lb (kg)) 14562 (6605) 16820 (7630) 19508 (8849) 14720 (6677) 16956 (7695) 19653 (8915)<br />
Overall Dimensions<br />
Length (in (mm)) 126 (3189) 144 (3669) 146 (3712) 126 (3189) 144 (3669) 146 (3712)<br />
Width (in (mm)) 68 (1717) 68 (1716) 70 (1771) 68 (1717) 67 (7716) 70 (1771)<br />
Height (in (mm)) 76 (1937) 76 (1936) 80 (2033) 76 (1937) 76 (1936) 80 (2033)<br />
Evaporator<br />
Water Storage (gal (l)) 74 (280) 107 (405) 159 (602) 74 (280) 107 (405) 159 (602)<br />
Minimum Flow (gpm (l/s))<br />
Water<br />
Minimum Flow (gpm (l/s))<br />
Brine<br />
405 (28) for<br />
2-pass<br />
300 (19) for<br />
3-pass<br />
541 (34) for<br />
2-pass<br />
357 (23) for<br />
3-pass<br />
Maximum Flow (gpm (l/s)) 1980 (<strong>125</strong>)<br />
for 2-pass<br />
1320 (83)<br />
for 3-pass<br />
604 (38) for<br />
2-pass<br />
404 (25) for<br />
3-pass<br />
725 (46) for<br />
2-pass<br />
487 (31) for<br />
3-pass<br />
2667 (168)<br />
for 2-pass<br />
1780 (112)<br />
for 3-pass<br />
622 (39) for<br />
3-pass<br />
466 (29) for<br />
4-pass<br />
747 (47) for<br />
3-pass<br />
557 (35) for<br />
4-pass<br />
2732 (172)<br />
for 3-pass<br />
2050 (129)<br />
for 4-pass<br />
405 (28) for<br />
2-pass<br />
300 (19) for<br />
3-pass<br />
541 (34) for<br />
2-pass<br />
357 (23) for<br />
3-pass<br />
1980 (<strong>125</strong>)<br />
for 2-pass<br />
1320 (83)<br />
for 3-pass<br />
604 (38) for<br />
2-pass<br />
404 (25) for<br />
3-pass<br />
725 (46) for<br />
2-pass<br />
487 (31) for<br />
3-pass<br />
2667 (168)<br />
for 2-pass<br />
1780 (112)<br />
for 3-pass<br />
622 (39) for<br />
3-pass<br />
466 (29) for<br />
4-pass<br />
747 (47) for<br />
3-pass<br />
557 (35) for<br />
4-pass<br />
2732 (172)<br />
for 3-pass<br />
2050 (129)<br />
for 4-pass<br />
Condenser<br />
(all are 2-pass)<br />
Water Storage (gal (l)) 47 (178) 61 (231) 97 (367) 47 (178) 61 (231) 97 (367)<br />
Minimum Flow (gpm (l/s)) 316 (20) 355 (22) 589 (37) 316 (20) 355 (22) 589 (37)<br />
Water<br />
Minimum Flow (gpm (l/s)) 380 (24) 460 (29) 710 (45) 380 (24) 460 (29) 710 (45)<br />
Brine<br />
Maximum Flow (gpm (l/s)) 1390 (88) 1700 (107) 2600 (164) 1390 (88) 1700 (107) 2600 (164)<br />
All weights ±3%, include standard 150 psig water boxes.<br />
Operating weights include refrigerant, oil, and water charges.<br />
If oil cooler is installed, add 1/4 gal (1 liter) to the oil charge value given for B family units; add 1.0 gal (4 liters) for all other units.<br />
Overall dimensions are based on 3-pass evap/2 pass cond and LH/RH water connections. Refer to submittals for exact job configurations<br />
22 <strong>RTHD</strong>-SVX01B-EN
General Information<br />
Table 6<br />
General Data<br />
Unit Designator (corresponds to digits 6, 7, 14, 15, 21, 22 of unit model number)<br />
C1D6E5 C1D5E4 C1E1F1 C2D4E4 C2D3E3<br />
General<br />
Refrigerant Type HFC-134a HFC-134a HFC-134a HFC-134a HFC-134a<br />
Refrigerant Charge (lb (kg)) 490 (222) 490 (222) 525 (238) 490 (222) 490 (222)<br />
Oil Charge (gal (l)) 6 (23) 6 (23) 10 (38) 6 (23) 6 (23)<br />
Operating Weight (lb (kg)) 13397 (6077) 13673 (6202) 15818 (7175) 13672 (6202) 15044 (6824)<br />
Shipping Weight (lb (kg)) 12780 (5797) 12973 (5885) 14718 (6675) 12972 (5884) 14002 (6351)<br />
Overall Dimensions<br />
Length (in (mm))* 126 (3194) 126 (3194) 144 (3650) 126 (3194) 126 (3194)<br />
Width (in (mm))* 68 (1717) 68 (1717) 68 (1715) 68 (1717) 68 (1717)<br />
Height (in (mm))* 76 (1937) 76 (1937) 76 (1937) 76 (1937) 76 (1937)<br />
Evaporator<br />
Water Storage (gal (l)) 45 (170) 52 (197) 82 (311) 52 (197) 78 (295)<br />
Minimum Flow (gpm (l/s))<br />
Water<br />
Minimum Flow (gpm (l/s))<br />
Brine<br />
Maximum Flow (gpm (l/s))<br />
293 (18) for<br />
2-pass<br />
196 (12) for<br />
3-pass<br />
352 (22) for<br />
2-pass<br />
233 (15) for<br />
3-pass<br />
1287 (81) for<br />
2-pass<br />
860 (54) for<br />
3-pass<br />
351 (21) for<br />
2-pass<br />
234 (15) or<br />
3-pass<br />
422 (27) for<br />
2-pass<br />
281 (18) or<br />
3-pass<br />
1542 (97)or<br />
2-pass<br />
1028 (65) or<br />
3-pass<br />
<strong>450</strong> (28) for<br />
2-pass<br />
300 (19) for<br />
3-pass<br />
487 (31) for<br />
2-pass<br />
357 (23) for<br />
3-pass<br />
1980 (<strong>125</strong>) for<br />
2-pass<br />
1320 (83) for<br />
3-pass<br />
351 (21) for<br />
2-pass<br />
234 (15) or<br />
3-pass<br />
422 (27) for<br />
2-pass<br />
281 (18) or<br />
3-pass<br />
1542 (97)or<br />
2-pass<br />
1028 (65) or<br />
3-pass<br />
465 (31) for<br />
2-pass<br />
324 (20) for<br />
3-pass<br />
584 (37) for<br />
2-pass<br />
389 (25) for<br />
3-pass<br />
2131 (134) for<br />
2-pass<br />
1417 (89) for<br />
3-pass<br />
Condenser<br />
(all are 2-pass)<br />
Water Storage (gal (l)) 29 (110) 32 (121) 60 (226) 32 (121) 47 (178)<br />
Minimum Flow (gpm (l/s)) 206 (13) 245 (15) 375 (24) 245 (15) 325 (21)<br />
Water<br />
Minimum Flow (gpm (l/s)) 250 (16) 295 (19) <strong>450</strong> (28) 295 (19) 390 (25)<br />
Brine<br />
Maximum Flow (gpm (l/s)) 910 (57) 1080 (68) 1650 (104) 1080 (68) 1420 (90)<br />
All weights ±3%, include standard 150 psig water boxes.<br />
Operating weights include refrigerant, oil, and water charges.<br />
If oil cooler is installed, add 1/4 gal (1 liter) to the oil charge value given for B family units; add 1.0 gal (4 liters) for all other units.<br />
Overall dimensions are based on 3-pass evap/2 pass cond and LH/RH water connections. Refer to submittals for exact job configurations<br />
<strong>RTHD</strong>-SVX01B-EN 23
General Information<br />
Table 7<br />
General Data<br />
Unit Designator (corresponds to digits 6, 7, 14, 15, 21, 22 of unit model number)<br />
C2F2F3 B1B1B1 B1C1D1 B2B2B2 B2C2D2<br />
General<br />
Refrigerant Type HFC-134a HFC-134a HFC-134a HFC-134a HFC-134a<br />
Refrigerant Charge (lb (kg)) 700 (318) 410 (186) 490 ((222) 410 (186) 490 ((222)<br />
Oil Charge (gal (l)) 11 (42) 4.5 (17.0) 4.5 (17.0) 4.5 (17.0) 4.5 (17.0)<br />
Operating Weight (lb (kg)) 17560 (7965) 9867 (4476) 10554 (4787) 10019 (4544) 10653 (4832)<br />
Shipping Weight (lb (kg)) 16168 (7334) 9292 (4215) 9837 (4462) 9402 (4265) 9953 (4515)<br />
Overall Dimensions<br />
Length (in (mm))* 144 (3658) 124 (3160) 143 (3624) 124 (3160) 143 (3624)<br />
Width (in (mm))* 68 (1727) 64 (1634) 64 (1634) 64 (1634) 64 (1634)<br />
Height (in (mm))* 76 (1930) 73 (1849) 73 (1849) 73 (1849) 72 (1849)<br />
Evaporator<br />
Water Storage (gal (l)) 107 (405) 41 (155) 55 (208) 45 (170) 58 (220)<br />
Minimum Flow (gpm (l/s))<br />
Water<br />
Minimum Flow (gpm (l/s))<br />
Brine<br />
604 (38) for<br />
2-pass<br />
404 (25) for<br />
3-pass<br />
725 (46) for<br />
2-pass<br />
487 (31) for<br />
3-pass<br />
Maximum Flow (gpm (l/s)) 2667 (168)<br />
for 2-pass<br />
1780 (112)<br />
for 3-pass<br />
253 (16) for<br />
2-pass<br />
168 (11) for<br />
3-pass<br />
303 (19) for<br />
2-pass<br />
200 (13) for<br />
3-pass<br />
1104 (70) for<br />
2-pass<br />
736 (46) for<br />
3-pass<br />
320 (18) for<br />
2-pass<br />
213 (12) for<br />
3-pass<br />
346 (22) for<br />
2-pass<br />
254 (16) for<br />
3-pass<br />
1412 (89) for<br />
2-pass<br />
941 (59) for<br />
3-pass<br />
288 (22) for<br />
2-pass<br />
192 (15) for<br />
3-pass<br />
346 (22) for<br />
2-pass<br />
233 (15) for<br />
3-pass<br />
1266 (80) for<br />
2-pass<br />
844 (53) for<br />
3-pass<br />
347 (22) for<br />
2-pass<br />
232 (15) for<br />
3-pass<br />
375 (24) for<br />
2-pass<br />
276 (17) for<br />
3-pass<br />
1531 (97) for<br />
2-pass<br />
1022 (65) for<br />
3-pass<br />
Condenser<br />
(all are 2-pass)<br />
Water Storage (gal (l)) 61 (231) 28 (106) 31 (117) 29 (110) 34 (129)<br />
Minimum Flow (gpm (l/s)) 355 (22) 193 (12) 193 (12) 212 (13) 212 (13)<br />
Water<br />
Minimum Flow (gpm (l/s)) 460 (29) 230 (15) 230 (15) 255 (16) 255 (16)<br />
Brine<br />
Maximum Flow (gpm (l/s)) 1700 (107) 850 (54) 850 (54) 935 (59) 935 (59)<br />
All weights ±3%, include standard 150 psig water boxes.<br />
Operating weights include refrigerant, oil, and water charges.<br />
If oil cooler is installed, add 1/4 gal (1 liter) to the oil charge value given for B family units; add 1.0 gal (4 liters) for all other units.<br />
Overall dimensions are based on 3-pass evap/2 pass cond and LH/RH water connections. Refer to submittals for exact job configurations<br />
24 <strong>RTHD</strong>-SVX01B-EN
<strong>Installation</strong> Mechanical<br />
Storage<br />
If the chiller is to be stored more than one month prior to installation, observe<br />
the following precautions:<br />
• Do not remove the protective coverings from the electrical panel.<br />
• Store the chiller in a dry, vibration-free, secure area.<br />
• At least every three months, attach a gauge and manually check the pressure<br />
in the refrigerant circuit. If the refrigerant pressure is below 71 psig<br />
at 70 o F (or 46 psig at 50 o F), call a qualified service organization and the<br />
appropriate Trane sales office.<br />
NOTE: Pressure will be approximately 20 psig if shipped with the optional<br />
nitrogen charge.<br />
Location Requirements<br />
Noise Considerations<br />
• Refer to Trane Engineering Bulletin -Series R ® Chiller Sound Ratings and<br />
<strong>Installation</strong> Guide.<br />
for sound consideration applications.<br />
• Locate the unit away from sound-sensitive areas.<br />
• Install the isolation pads under the unit. Refer to “Unit Isolation.”<br />
• Install rubber vibration isolators in all water piping.<br />
• Use flexible electrical conduit for final connection to the CH530.<br />
• Seal all wall penetrations.<br />
NOTE:<br />
Consult an acoustical engineer for critical applications.<br />
Foundation<br />
Provide rigid, non-warping mounting pads or a concrete foundation of sufficient<br />
strength and mass to support the chiller operating weight (including<br />
completed piping and full operating charges of refrigerant, oil and water).<br />
Refer to Table 8 for unit operating weights.<br />
Once in place, level the chiller within 1/4” (6.35 mm) over its length and<br />
width.<br />
The Trane Company is not responsible for equipment problems resulting from<br />
an improperly designed or constructed foundation.<br />
Vibration Eliminators<br />
• Provide rubber boot type isolators for all water piping at the unit.<br />
• Provide flexible conduit for electrical connections to the unit.<br />
• Isolate all pipe hangers and be sure they are not supported by main structure<br />
beams that could introduce vibration into occupied spaces.<br />
• Make sure that the piping does not put additional stress on the unit.<br />
NOTE: Do not use metal braided type eliminators on the water piping.<br />
Metal braided eliminators are not effective at the frequencies at which the<br />
unit will operate.<br />
<strong>RTHD</strong>-SVX01B-EN 25
<strong>Installation</strong> Mechanical<br />
Clearances<br />
Provide enough space around the unit to allow the installation and maintenance<br />
personnel unrestricted access to all service points. Refer to submittal<br />
drawings for the unit dimensions.<br />
Allow adequate clearance for condenser and compressor servicing. A minimum<br />
of three feet is recommended for compressor service and to provide<br />
sufficient clearance for the opening of control panel doors. Refer to Figure 4<br />
for minimum clearances required for condenser tube service. In all cases,<br />
local codes will take precedence over these recommendations.<br />
NOTE: Required vertical clearance above the unit is 36” (914.4 mm). There<br />
should be no piping or conduit located over the compressor motor.<br />
If the room configuration requires a variance to the clearance dimensions,<br />
contact your Trane sales office representative.<br />
3'-0" (914 mm)<br />
Service Clearance<br />
3'-0" (914 mm)<br />
Service Clearance<br />
(Opposite Tube Removal)<br />
36.5" (927 mm)<br />
Radius<br />
105~ Swing<br />
26.4" (671 mm)<br />
Radius<br />
3'-0" (914 mm)<br />
Service Clearance<br />
3'-0" (914 mm)<br />
Service Clearance<br />
Tube Removal<br />
Clearance<br />
(Either End)<br />
E DE, DDE, CDE, BBB:<br />
108" (2743 mm)<br />
E FF, DFF, CEF, BCD:<br />
126" (3200 mm)<br />
E GG, DGG, CGG:<br />
130" (3302 mm)<br />
Figure 4<br />
Recommended Operating and Service Clearances<br />
26 <strong>RTHD</strong>-SVX01B-EN
<strong>Installation</strong> Mechanical<br />
NOTE: Maximum clearances are given. Depending on the unit configuration,<br />
some units may require less clearance than others in the same<br />
category.<br />
Ventilation<br />
The unit produces heat even though the compressor is cooled by the refrigerant.<br />
Make provisions to remove heat generated by unit operation from the<br />
equipment room. Ventilation must be adequate to maintain an ambient temperature<br />
lower than 122 o F (50 o C).<br />
Vent the evaporator, condenser and compressor pressure relief valves in<br />
accordance with all local and national codes. Refer to Table 12.<br />
Make provisions in the equipment room to keep the chiller from being<br />
exposed to freezing temperatures (32 o F/0 o C).<br />
Water Drainage<br />
Locate the unit near a large capacity drain for water vessel drain-down during<br />
shutdown or repair. Condensers and evaporators are provided with drain connections.<br />
Refer to “Water Piping.” All local and national codes apply.<br />
Access Restrictions<br />
Door clearances for the <strong>RTHD</strong> units are given in Figure 5. Refer to the unit<br />
submittals for specific “per unit” dimensional information.<br />
Moving and Rigging<br />
The Model <strong>RTHD</strong> chiller should be moved by lifting at designated lift points<br />
only. Refer to Figure 6 and Table 8 for typical unit lifting and operating<br />
weights. Refer to the rigging diagram that ships with each unit for specific<br />
“per unit” weight data.<br />
WARNING<br />
Heavy Equipment!<br />
Always use lifting equipment with a capacity exceeding unit<br />
lifting weight by an adequate safety factor. (+10%). Follow the<br />
procedures and diagrams in this manual and in the submittal.<br />
Failure to do so can result in death or serious injury.<br />
<strong>RTHD</strong>-SVX01B-EN 27
<strong>Installation</strong> Mechanical<br />
C<br />
B<br />
D<br />
A<br />
X<br />
= C.G.<br />
Z<br />
Y<br />
Figure 5<br />
Unit Weights and Dimensions for Rigging<br />
Table 8<br />
Unit Weights (lb (kg))<br />
Location (points)<br />
Unit Designator * A B C D<br />
E3G3G3 5339<br />
4455<br />
4374<br />
5486<br />
(2422)<br />
(2021) (1984) (2488)<br />
E3F2F3 4781<br />
(2169)<br />
E3D2E2 3796<br />
(1722)<br />
D3G3G3 5320<br />
(2413)<br />
3582<br />
(1625)<br />
2834<br />
(1285)<br />
4451<br />
(2019)<br />
3750<br />
(1701)<br />
3300<br />
(1497)<br />
4327<br />
(1963)<br />
*Unit Designator (corresponds to digits 6, 7, 14, 15, 21, 22 of unit model number)<br />
4851<br />
(2200)<br />
4789<br />
(2172)<br />
5140<br />
(2331)<br />
28 <strong>RTHD</strong>-SVX01B-EN
<strong>Installation</strong> Mechanical<br />
Table 8<br />
Unit Weights (lb (kg))<br />
Unit Designator *<br />
D3F2F3 4737<br />
(2149)<br />
D3D2E2 3754<br />
(1703)<br />
D2G3G3 5320<br />
(2413)<br />
D2F2F3 4737<br />
(2149)<br />
D2D2E2 3754<br />
(1703)<br />
D1G2G2 5216<br />
(2366)<br />
D1F1F2 4526<br />
(2053)<br />
D1D1E1 3728<br />
(1691)<br />
C2F2F3 4649<br />
2109<br />
C2D3E3 3612<br />
(1638)<br />
C2D4E4 3374<br />
(1530)<br />
C1E1F1 4205<br />
(1907)<br />
C1D5E4 2275<br />
(1032)<br />
C1D6E5 3330<br />
(1510)<br />
B2C2D2 3162<br />
(1510)<br />
B2B2B2 2522<br />
(1144)<br />
B1C1D1 3136<br />
(1422)<br />
B1B1B1 2495<br />
(1132)<br />
Location (points)<br />
A B C D<br />
3563<br />
(1616)<br />
2818<br />
(1278)<br />
4451<br />
(2019)<br />
3563<br />
(1616)<br />
2818<br />
(1278)<br />
4344<br />
(1970)<br />
3452<br />
(1566)<br />
2758<br />
(<strong>125</strong>1)<br />
3496<br />
1586<br />
2738<br />
(1242)<br />
2479<br />
(1124)<br />
3046<br />
(1382)<br />
2479<br />
(1124)<br />
2430<br />
(1102)<br />
2297<br />
(1042)<br />
1996<br />
(905)<br />
2264<br />
(1027)<br />
1969<br />
(893)<br />
4797<br />
(2176)<br />
3269<br />
(1483)<br />
4327<br />
(1963)<br />
4797<br />
(2176)<br />
3269<br />
(1483)<br />
4231<br />
(1919)<br />
3615<br />
(1640)<br />
3236<br />
(1468)<br />
4707<br />
2135<br />
3148<br />
(1428)<br />
2876<br />
(1305)<br />
3196<br />
(1<strong>450</strong>)<br />
2876<br />
(1305)<br />
2825<br />
(1281)<br />
1767<br />
(802)<br />
1926<br />
(874)<br />
1739<br />
(789)<br />
1901<br />
(862)<br />
*Unit Designator (corresponds to digits 6, 7, 14, 15, 21, 22 of unit model number)<br />
4797<br />
(2176)<br />
4720<br />
(2141)<br />
5140<br />
(2331)<br />
4797<br />
(2176)<br />
4720<br />
(2141)<br />
5316<br />
(2411)<br />
4594<br />
(2084)<br />
4694<br />
(2129)<br />
4707<br />
2135<br />
<strong>450</strong>3<br />
(2043)<br />
4243<br />
(1925)<br />
4271<br />
(1937)<br />
4243<br />
(1925)<br />
4195<br />
(1903)<br />
2726<br />
(1237)<br />
2958<br />
(1342)<br />
2698<br />
(1224)<br />
2928<br />
(1328)<br />
<strong>RTHD</strong>-SVX01B-EN 29
<strong>Installation</strong> Mechanical<br />
Table 9<br />
Center of Gravity (in (mm))<br />
Unit Configuration* X Y Z<br />
E3G3G3 30.8 63.81 37.62<br />
(782.32) (1621) (956)<br />
E3F2F3 27.64 63.46 38.33<br />
(702.056 (1612) (974)<br />
E3D2E2 25.9 60.05 40.5<br />
(658) (1525) (1029)<br />
D3G3G3 30.85 63.48 37.44<br />
(784) (1612) (951)<br />
D3F2F3 27.7 63.4 38.14<br />
(704) (1610) (969)<br />
D3D2E2 25.97 59.95 40.31<br />
(660) (1523) (1024)<br />
D2G3G3 30.85 63.48 37.44<br />
(784) (1612) (951)<br />
D2F2F3 27.7 63.4 38.14<br />
(704) (1610) (969)<br />
D2D2E2 25.97 59.95 40.31<br />
(660) (1523) (1024)<br />
D1G2G2 30.77 63.55 37.72<br />
(782) (1614) (958)<br />
D1F1F2 27.92 63.47 38.7<br />
(709) (1612) (9833)<br />
D1D1E1 25.91 60 40.47<br />
(658) (1524) (1028)<br />
C2F2F3 27.92 63.47 38.7<br />
(709) (1612) (9833)<br />
C2D3E3 26.13 59.74 40.08<br />
(664) (1517) (1018)<br />
C2D4E4 26.13 59.74 40.08<br />
(664) (1517) (1018)<br />
C1E1F1 26.36 63.49 40.95<br />
(670) (1613) (1040)<br />
C1D5E4 26.13 59.74 40.08<br />
(664) (1517) (1018)<br />
C1D6E5 26.13 59.74 40.08<br />
(664) (1517) (1018)<br />
B2C2D2 22.4 58.29 33.51<br />
(569) (1481) (851)<br />
B2B2B2 22.88 58.11 35.43<br />
(581) (1476) (900)<br />
B1C1D1 22.32 58.23 33.65<br />
(567) (1479) (855)<br />
B1B1B1 22.84 58.13 35.59<br />
(580) (1477) (904)<br />
Designator corresponds to digits 6, 7, 14, 15, 21, 22 of model number<br />
30 <strong>RTHD</strong>-SVX01B-EN
<strong>Installation</strong> Mechanical<br />
Lifting Procedure<br />
CAUTION<br />
Equipment Damage!<br />
Never use a forklift to move the unit. The skid is not designed to<br />
support the unit at any one point and using a forklift to move the<br />
equipment may cause unit damage. Always position the lifting<br />
beam so that cables do not contact the unit. Failure to do so may<br />
result in unit damage.<br />
NOTE: If absolutely necessary, the chiller can be pushed or pulled across a<br />
smooth surface if it is bolted to wood shipping mounts.<br />
WARNING<br />
Shipping Mounts!<br />
Do not use the threaded holes in the compressor to lift or assist in<br />
lifting the unit. They are not intended for that purpose and could<br />
create a dangerous situation. Do not remove the wood mounts<br />
until the unit is in its final location. Removal of wood shipping<br />
mounts prior to unit final locating could result in death or serious<br />
injury or equipment damage.<br />
1. When the unit is at its final location, remove the shipping bolts that<br />
secure the unit to the wood base mounts.<br />
2. Rig the unit properly and lift from above or jack the unit (alternate moving<br />
method). Use the points shown on the rigging diagram that ships with<br />
the unit as shown in Figure 6. Remove the base mounts.<br />
3. Install clevis connectors in lifting holes provided on the unit. Attach lifting<br />
chains or cables to clevis connectors as shown in Figure 6. Each cable<br />
alone must be strong enough to lift the chiller.<br />
<strong>RTHD</strong>-SVX01B-EN 31
<strong>Installation</strong> Mechanical<br />
Table 10<br />
Rigging<br />
Unit<br />
Dimension (mm (in))<br />
Configuration* A B C D E F<br />
E3G3G3 3658 3353 1621 20 661 610<br />
(144.02) (132.01) (63.82) (0.79) (26.02) (24.02)<br />
E3F2F3 3658 3353 1612 29 615 610<br />
(144.02) (132.01) (63.46) (1.14) (24.21) (24.02)<br />
E3D2E2 3048 2743 1525 116 612 610<br />
(120.00) (107.99) (60.04) (4.57) (24.09) (24.02)<br />
D3G3G3 3658 3353 1612 99 654 610<br />
(144.02) (132.01) (63.46) (3.90) (25.75) (24.02)<br />
D3F2F3 3658 3353 1610 101 617 610<br />
(144.02) (132.01) (63.39) (3.98) (24.29) (24.02)<br />
D3D2E2 3048 2743 1523 188 614 610<br />
(120.00) (107.99) (59.96) (7.40) (24.17) (24.02)<br />
D2G3G3 3658 3353 1612 99 654 610<br />
(144.02) (132.01) (63.46) (3.90) (25.75) (24.02)<br />
D2F2F3 3658 3353 1610 101 617 610<br />
(144.02) (132.01) (63.39) (3.98) (24.29) (24.02)<br />
D2D2E2 3048 2743 1523 188 614 610<br />
(120.00) (107.99) (59.96) (7.40) (24.17) (24.02)<br />
D1G2G2 3658 3353 1614 97 661 610<br />
(144.02) (132.01) (63.54) (3.82) (26.02) (24.02)<br />
D1F1F2 3658 3353 1612 99 622 610<br />
(144.02) (132.01) (63.46) (3.90) (24.49) (24.02)<br />
D1D1E1 3048 2743 1524 187 612 610<br />
(120.00) (107.99) 60.00) (7.36) (24.09) (24.02)<br />
C2F2F3 3658 3353 1610 101 617 610<br />
(144.02) (132.01) 63.39) (3.98) (24.29) (24.02)<br />
C2D3E3 3048 2743 1517 225 618 610<br />
(120.00) (107.99) (59.72) (8.86) (24.33) (24.02)<br />
C2D4E4 3048 2743 1523 219 584 610<br />
(120.00) (107.99) (59.96) (8.62) (22.99) (24.02)<br />
C1E1F1 3658 3353 1613 129 624 610<br />
(144.02) (132.01) (63.50) (5.08) (24.57) (24.02)<br />
C1D5E4 3048 2743 1523 219 584 610<br />
(120.00) (107.99) (59.96) (8.62) (22.99) (24.02)<br />
C1D6E5 3048 2743 1524 218 582 610<br />
(120.00) (107.99) (60.00) (8.58) (22.91) (24.02)<br />
B2C2D2 3658 3353 1481 93 523 610<br />
(144.02) (132.01) (58.31) (3.66) (20.59) (24.02)<br />
*Designator corresponds to digits 6, 7, 14, 15, 21, 22 of model number<br />
32 <strong>RTHD</strong>-SVX01B-EN
<strong>Installation</strong> Mechanical<br />
Table 10<br />
Rigging<br />
Unit<br />
Dimension (mm (in))<br />
Configuration* A B C D E F<br />
B2B2B2 3048 2743 1476 98 535 610<br />
(120.00) (107.99) (58.11) (3.86) (21.06) (24.02)<br />
B1C1D1 3658 3353 1479 95 521 610<br />
(144.02) (132.01) (58.23) (3.74) (20.51) (24.02)<br />
B1B1B1 3048 2743 1447 97 534 610<br />
(120.00) (107.99) (56.97) (3.82) (21.02) (24.02)<br />
*Designator corresponds to digits 6, 7, 14, 15, 21, 22 of model number<br />
NOTES:<br />
1. LIFTING CABLES (CHAINS) WILL NOT BE THE SAME LENGTH.<br />
ADJUST TO KEEP UNIT LEVEL WHILE LIFTING.<br />
2. ATTACH ANTI-ROLLING CABLE (CHAIN) AS SHOWN WITHOUT TENSION.<br />
NOT AS A LIFTING CABLE, BUT TO PREVENT UNIT FROM ROLLING.<br />
3. DO NOT FORK LIFT UNIT.<br />
4. WEIGHTS ARE TYPICAL FOR UNITS WITH R-134a CHARGE.<br />
5. IF UNIT IS DISASSEMBLED, SEE SERVICE BULLETIN<br />
FOR LIFTING AND RIGGIN G OF C OMPONENTS.<br />
A<br />
WARNING: DO NOT USE CABLES (CHAINS) OR SLINGS EXCEPT AS SHOWN.<br />
OTHER LIFTING ARRANGEMENTS MAY CAUSE EQUIPMENT DAMAGE OR<br />
E<br />
SERIOUS PERSONAL INJURY.<br />
D<br />
B<br />
C<br />
ANTI-ROLLING<br />
CABLE<br />
ANTI-ROLLING CABLE<br />
ANTI-ROLLING CABLE<br />
EYELET OR M16 INTERNAL THREAD<br />
F (MIN)<br />
LIFTING HOLES<br />
n44 ,5 MM TYP<br />
STARTER<br />
CONTROLS<br />
COND EVAP EVAP CON D<br />
UN IT MODEL NUMBER LOCATION<br />
Figure 6<br />
Lifting the Unit<br />
4. Attach cables to lifting beam. Total lifting weight, lifting weight distribution<br />
and required lifting beam dimensions are shown in the rigging diagram<br />
shipped with each unit and in Figure 6. The lifting beam crossbar must be<br />
positioned so the lifting cables do not contact unit piping or electrical<br />
panel enclosure.<br />
<strong>RTHD</strong>-SVX01B-EN 33
<strong>Installation</strong> Mechanical<br />
WARNING<br />
Anti- rotation Strap!<br />
Connect an anti-rotation strap between the lifting beam and<br />
compressor before lifting unit. Failure to do so may result in death<br />
or serious injury should a lifting cable fail.<br />
5. Connect an anti-rotation strap or cable loosely between the lifting beam<br />
and the threaded coupling or eyelet provided at the top of the compressor.<br />
Use an eyebolt or clevis to secure the strap at the coupling or eyelet.<br />
NOTE: The anti-rotation strap is not a lifting chain, but a safety device to<br />
ensure that the unit cannot tilt during lifting.<br />
Alternate Moving Method<br />
6. If it is not possible to rig from above as shown in the figures, the unit may<br />
also be moved by jacking each end high enough to move an equipment<br />
dolly under each tube sheet support. Once securely mounted on the dollies,<br />
the unit may be rolled into position.<br />
Isolation Pads<br />
The elastomeric pads shipped (as standard) are adequate for most installations.<br />
For additional details on isolation practices, refer to<br />
Trane Engineering Bulletin -Series R ® Chiller Sound Ratings and <strong>Installation</strong><br />
Guide., or consult an acoustical engineer for sound-sensitive installations.<br />
7. During final positioning of the unit, place the isolation pads under the<br />
evaporator and condenser tube sheet supports as shown in Figure 7.<br />
Level the unit as described in the next main paragraph.<br />
NOTE: Durometer values for isolator pads are a measure of resilience. See<br />
Figure 7.<br />
34 <strong>RTHD</strong>-SVX01B-EN
<strong>Installation</strong> Mechanical<br />
Note: Level unit to 1/4” (6.35 mm) across<br />
width and length<br />
Typical Elastomeric<br />
Isolation Pad<br />
B<br />
A (hidden leg)<br />
Durometer: 50 +/-5<br />
C<br />
D<br />
Pads extend the full<br />
width of legs<br />
Durometer: 40 +/-5 Durometer: 55 +/-10<br />
0.31 0.31 0.31<br />
Figure 7<br />
Isolator Pad Placement<br />
<strong>RTHD</strong>-SVX01B-EN 35
<strong>Installation</strong> Mechanical<br />
8. The unit is shipped with four spacers (only three on B family) on the compressor<br />
mount that protect the compressor isolation pads during shipping<br />
and in handling. Remove these spacers (Figure 8) before the unit is operated.<br />
9. Remove the shipping brackets from the bottom sides of the oil separator(s)<br />
(see Figure 8).<br />
NOTE: Once shipping bracket(s) is removed, the oil separator is only<br />
supported by the discharge line.<br />
Compressor<br />
Housing<br />
Oil Separator<br />
M20 bolt<br />
Shipping Bracket<br />
Remove 4 Shipping<br />
Spacers (only 3 on B<br />
family)<br />
Figure 8<br />
Oil Separator with Shipping Bracket and Compressor Shipping Spacer<br />
Unit Leveling<br />
NOTE: The electrical panel side of the unit is designated as the “front” of<br />
the unit.<br />
1. Check unit level end-to-end by placing a level on the top surface of the<br />
evaporator shell.<br />
2. If there is insufficient surface available on the top of the evaporator shell,<br />
attach a magnetic level to the bottom of the shell to level the unit. The<br />
unit should be level to within 1/4” (6.35 mm) over its length.<br />
3. Place the level on the evaporator shell tube sheet support to check sideto-side<br />
(front-to-back) level. Adjust to within 1/4” (6.35 mm) of level frontto-back.<br />
NOTE: The evaporator MUST be level for optimum heat transfer and unit<br />
performance.<br />
4. Use full-length shims to level the unit.<br />
36 <strong>RTHD</strong>-SVX01B-EN
<strong>Installation</strong> Mechanical<br />
Water Piping<br />
Piping Connections<br />
CAUTION<br />
Equipment Damage!<br />
To prevent equipment damage, bypass the unit if using an acidic<br />
flushing agent.<br />
Make water piping connections to the evaporator and condenser. Isolate and<br />
support piping to prevent stress on the unit. Construct piping according to<br />
local and national codes. Insulate and flush piping before connecting to unit.<br />
Use grooved pipe connectors for all water piping connections. Evaporator and<br />
condenser water inlet and outlet sizes and locations are shown by the unit<br />
submittals and in Figure 9 through Figure 14. The designation in the tables<br />
corresponds to the compressor frame code followed by the evaporator shell<br />
code followed by the condenser shell code as given in the unit model number,<br />
digits 6, 7, 14, 15, 21 and 22. Table 11 gives additional water connection<br />
information.<br />
Reversing Water Boxes<br />
All water boxes may be reversed end-for-end. Do not rotate water boxes.<br />
Remove the sensors from the wells before removing the water box. Complete<br />
the water box switch and replace the sensors. See Figure 9 through Figure<br />
14 for correct orientation of the water inlet and outlet.<br />
If the water boxes are reversed, be sure to properly rewire the water temperature<br />
sensors in the control panel.<br />
NOTE: Be certain to replace water boxes right-side-up to maintain proper<br />
baffle orientation. Use new o-rings.<br />
<strong>RTHD</strong>-SVX01B-EN 37
<strong>Installation</strong> Mechanical<br />
23.50[597mm]<br />
13.50 [343 mm]<br />
11.50[292mm]<br />
8.00 [203 mm] for 150psi<br />
8.50 [216 mm] for 300psi<br />
0.08 [2 mm]<br />
70.30 [1786 mm]<br />
OUT<br />
IN<br />
IN<br />
COND EVAP<br />
9.50 [241 mm]<br />
13.35 [339 mm]<br />
64.34 [1634 mm]<br />
97.51 [2477 mm]<br />
CONDENSER<br />
OIL SUMP<br />
8.38 [213 mm]<br />
13.84 [351 mm]<br />
4.97 [126 mm] for 150 ps i<br />
5.47 [139 mm] for 300 ps i<br />
EVAPORATOR<br />
10.23[260mm]<br />
IN<br />
EVAPORATOR<br />
107.66 [2734 mm]<br />
Standard 3 Pass<br />
6.87 [174 mm]<br />
2 Pass Evap Connection Configuration<br />
(left or right hand) Depending on Water Inlet<br />
72.80 [1849 mm]<br />
28.59 [726mm]<br />
OUT<br />
8.38 [213 mm]<br />
27.34 [694mm]<br />
15.09 [383 mm]<br />
8.94 [227 mm]<br />
Figure 9<br />
Condenser and Evaporator Water Connections -BBB<br />
38 <strong>RTHD</strong>-SVX01B-EN
<strong>Installation</strong> Mechanical<br />
23.50 [597 mm]<br />
13.50 [343mm]<br />
11.50[292mm]<br />
8.00 [203 mm] for 150 psi<br />
8.50 [216 mm] for 300 psi<br />
8.38 [213 mm]<br />
70.80 [1798 mm]<br />
OUT<br />
IN<br />
IN<br />
COND EVAP<br />
13.84[351mm]<br />
IN<br />
9.50 [241 mm]<br />
13.35[339mm]<br />
64.34 [1634 mm]<br />
118.00 [2997 mm]<br />
4.97 [126 mm] for 150 psi<br />
5.47 [139 mm] for 300 psi<br />
CONDENSER<br />
OIL SUMP<br />
EVAPORAT OR<br />
7.91 [201mm] 0.01[0 mm]<br />
EVAPORAT OR<br />
<strong>125</strong>.91 [3198 mm]<br />
Standard 3 Pass<br />
7.87 [174 mm]<br />
2 Pass Evap Connection Configuration<br />
(left or right hand) Depending on Water Inlet<br />
72.80 [1849 mm]<br />
28.59[726 mm]<br />
OUT<br />
8.38 [213 mm]<br />
27.34 [694 mm]<br />
15.09 [383 mm]<br />
8.94 [227 mm]<br />
Figure 10<br />
Condenser and Evaporator Water Connections -BCD<br />
<strong>RTHD</strong>-SVX01B-EN 39
<strong>Installation</strong> Mechanical<br />
73.44 [1865 mm]<br />
25.88 [657 mm]<br />
9.06 [230 mm]<br />
OUT<br />
IN IN<br />
COND EVAP<br />
14.13 [359 mm]<br />
12.49[317mm]<br />
67.54 [1715 mm]<br />
14.88 [378 mm] IN<br />
5.29 [134 mm]<br />
14.50 [368 mm]<br />
8.00 [203 mm] for 150 psi<br />
8.50 [216 mm] for 300 psi<br />
118.00 [2997 mm]<br />
6.00 [153 mm] for 150 psi<br />
6.50 [165 mm] for 300 psi<br />
CONDENSER<br />
OIL SUMP<br />
EVAPORATOR<br />
4.84 [123 mm] 3.07 [78 mm]<br />
76.24 [1937 mm]<br />
30.13 [765 mm]<br />
OUT<br />
EVAPORATOR<br />
<strong>125</strong>.91 [3198 mm]<br />
Standard 3 Pass<br />
9.06 [230 mm]<br />
29.63 [753 mm]<br />
15.38 [391 mm]<br />
7.67 [195 mm]<br />
9.42 [239 mm]<br />
2 Pass Evap Connection Configuration<br />
(left or right hand) Depending on Water Inlet<br />
Figure 11<br />
Condenser and Evaporator Water Connections - CEF<br />
40 <strong>RTHD</strong>-SVX01B-EN
<strong>Installation</strong> Mechanical<br />
8.84 [225 mm]<br />
25.88 [657 mm]<br />
73.44 [1865 mm]<br />
OUT<br />
IN IN<br />
14.88[378mm]<br />
COND EVAP<br />
14.13 [359 mm]<br />
5.29 [134 mm]<br />
12.49[317mm]<br />
14.50 [368 mm]<br />
67.58 [1717 mm]<br />
8.00 [203 mm] for 150 psi<br />
8.50 [216 mm] for 300 psi<br />
97.50 [2477 mm]<br />
6.00 [153 mm] for 150 psi<br />
6.50 [166 mm] for 300 psi<br />
CONDENSER<br />
OIL SUMP<br />
EVAPORATOR<br />
2.56 [65 mm] 7.59 [193 mm]<br />
IN<br />
EVAPORATOR<br />
107.66 [2734 mm]<br />
Standard 3 Pass<br />
7.67 [195 mm]<br />
2 Pass Evap Connection Configuration<br />
(left or right hand) Depending on Water Inlet<br />
76.27 [1937 mm]<br />
30.13 [765 mm]<br />
OUT<br />
9.06 [230 mm]<br />
29.63 [753 mm]<br />
15.38 [391 mm]<br />
9.50 [241 mm]<br />
Figure 12<br />
Condenser and Evaporator Water Connections - CDE/DDE/EDE<br />
<strong>RTHD</strong>-SVX01B-EN 41
<strong>Installation</strong> Mechanical<br />
9.16 [233 mm]<br />
25.88[657mm]<br />
73.52 [1867 mm]<br />
OUT<br />
IN<br />
IN<br />
COND EVAP<br />
IN<br />
14.13[359mm]<br />
3.59 [91 mm]<br />
12.49[317mm]<br />
16.20[411mm]<br />
67.54 [1716 mm]<br />
11.43 [290 mm]<br />
8.00 [203 mm] for 150 psi<br />
8.50 [216 mm] for 300 psi<br />
118.00 [2997 mm]<br />
6.15 [156 mm] for 150 psi<br />
6.65 [169 mm] for 300 psi<br />
CONDENSER<br />
OIL SUMP<br />
EVAPORATOR<br />
4.87 [124 mm] 3.04 [77 mm]<br />
EVAPORATOR<br />
<strong>125</strong>.91 [3198 mm]<br />
Standard 3 Pass<br />
8.71 [221 mm]<br />
2 Pass Evap Connection Configuration<br />
(left or right hand) Depending on Water Inlet<br />
76.23 [1936 mm]<br />
9.38 [238 mm]<br />
OU T<br />
28.43[722mm]<br />
27.30 [693 mm]<br />
12.55 [319 mm]<br />
10.88 [276 mm]<br />
Figure 13<br />
Condenser and Evaporator Water Connections - DFF/EFF/CFF<br />
42 <strong>RTHD</strong>-SVX01B-EN
<strong>Installation</strong> Mechanical<br />
29.02[737mm]<br />
14.73 [374mm]<br />
14.70 [373 mm]<br />
9.88 [251 mm] for 300 psi<br />
9.13 [232 mm] for 150 psi<br />
3.22 [82 mm]<br />
OUT<br />
IN<br />
77.29 [1963 mm]<br />
10.88 [276 mm]<br />
OUT<br />
OUT<br />
22.50 [571mm]<br />
33.89 [861 mm]<br />
IN<br />
COND EVAP<br />
IN<br />
1.18 [30 mm]<br />
11.39 [289 mm]<br />
18.63 [473mm]<br />
69.72 [1771 mm]<br />
129.80 [3297 mm] 7.62 [194 mm] for 300 ps i<br />
7.25 [184 mm] for 150 ps i<br />
CONDENSER<br />
OIL SUMP<br />
EVAPORATOR<br />
0.67 [17 mm]<br />
32.64<br />
[829 mm]<br />
EVAPORATOR<br />
<strong>125</strong>.91 [3198 mm]<br />
Standard 4 Pass<br />
12.29 [312<br />
mm]<br />
2 Pass Evap Connection Configuration<br />
(left or right hand) Depending on Water Inlet<br />
80.02 [2033 mm]<br />
9.35 [238 mm]<br />
12.64<br />
[321 mm]<br />
12.38 [314 mm]<br />
Figure 14<br />
Condenser and Evaporator Water Connections - DGG/EGG<br />
<strong>RTHD</strong>-SVX01B-EN 43
<strong>Installation</strong> Mechanical<br />
Table 11<br />
Evaporator and Condenser Data<br />
Compress<br />
or Frame<br />
Code<br />
(Digit 6,7<br />
of Model<br />
No.)<br />
Evap Shell<br />
Code (Digits<br />
14, 15 of<br />
Model No.)<br />
Evap.<br />
Shell<br />
Diameter<br />
(in)<br />
Nominal Connector<br />
size (NPS)*<br />
2-<br />
Pass<br />
3-<br />
Pass<br />
4-<br />
Pass<br />
Cond Shell<br />
Code<br />
(Digits 21,22 of<br />
Model No.)<br />
Cond.<br />
Shell<br />
Diameter<br />
(in)<br />
Nom.<br />
Conn.<br />
Size<br />
(NPS)*<br />
2-Pass<br />
E3 D2 26.5 8 8 - E2 22.0 8<br />
F2 29.0 8 8 - E2 22.0 8<br />
G3 33.5 - 10 8 G3 25.75 8<br />
D3 D2 26.5 8 8 - E2 22.0 8<br />
F2 29.0 10 8 - F3 22.0 8<br />
G3 33.5 - 10 8 G3 25.75 8<br />
D2 D2 26.5 8 8 - E2 22.0 8<br />
F2 29.0 10 8 - F3 22.0 8<br />
G3 33.5 - 10 8 G3 25.75 8<br />
D1 D1 26.5 8 8 - E1 22.0 8<br />
F1 29.0 10 8 - F2 22.0 8<br />
G2 33.5 - 10 8 G2 25.75 8<br />
C2 D3 26.5 8 8 - E3 22.0 8<br />
D4 26.5 8 8 E4 22.0 8<br />
F2 29.0 10 8 - F3 22.0 8<br />
C1 D6 26.5 8 8 - E5 22.0 8<br />
D5 26.5 8 8 - E4 22.0 8<br />
E1 33.5 8 8 - F1 22.0 8<br />
B2 C2 23.0 - 6 - D2 18.75 6<br />
B2 23.0 - 6 - B2 18.75 6<br />
B1 C1 23.0 - 6 - D1 18.75 6<br />
B1 23.0 - 6 - B1 18.75 6<br />
Metric Conversion is:<br />
6 NPS = 150 mm nominal<br />
8 NPS = 200 mm nominal<br />
10 NPS = 250 mm nominal<br />
44 <strong>RTHD</strong>-SVX01B-EN
<strong>Installation</strong> Mechanical<br />
Water Pressure Drop Data<br />
Evaporator Pressure Drop<br />
G Frame - 3 Pass<br />
Delt-P (Ft H2O)<br />
50<br />
45<br />
40<br />
35<br />
30<br />
25<br />
20<br />
15<br />
10<br />
5<br />
0<br />
G2<br />
G1<br />
G3<br />
0 500 1000 1500 2000 2500 3000<br />
Flow (GPM)<br />
Evaporator Pressure Drop<br />
G Frame - 4 Pass<br />
70<br />
Delt-P (Ft H2O)<br />
60<br />
50<br />
40<br />
30<br />
20<br />
G1<br />
G2<br />
G3<br />
10<br />
0<br />
0 500 1000 1500 2000<br />
Flow (GPM)<br />
<strong>RTHD</strong>-SVX01B-EN 45
<strong>Installation</strong> Mechanical<br />
Evaporator Pressure Drop<br />
F Frame - 2 Pass<br />
35<br />
30<br />
F1<br />
F2<br />
Delt-P (Ft H2O)<br />
25<br />
20<br />
15<br />
10<br />
5<br />
0<br />
0 500 1000 1500 2000 2500 3000<br />
Flow (GPM)<br />
Evaporator Pressure Drop<br />
F Frame - 3 Pass<br />
Delt-P (Ft H2O)<br />
50<br />
45<br />
40<br />
35<br />
30<br />
25<br />
20<br />
15<br />
10<br />
5<br />
0<br />
F1<br />
F2<br />
0 500 1000 1500 2000<br />
Flow (GPM)<br />
46 <strong>RTHD</strong>-SVX01B-EN
<strong>Installation</strong> Mechanical<br />
Evaporator Pressure Drop<br />
E Frame - 2 Pass<br />
40<br />
35<br />
Delt-P (Ft H2O)<br />
30<br />
25<br />
20<br />
15<br />
10<br />
5<br />
0<br />
E1<br />
0 500 1000 1500 2000<br />
Flow (GPM)<br />
Evaporator Pressure Drop<br />
E Frame - 3 Pass<br />
Delt-P (Ft H2O)<br />
50<br />
45<br />
40<br />
35<br />
30<br />
25<br />
20<br />
15<br />
10<br />
5<br />
0<br />
0 200 400 600 800 1000 1200 1400<br />
Flow (GPM)<br />
E1<br />
<strong>RTHD</strong>-SVX01B-EN 47
<strong>Installation</strong> Mechanical<br />
Evaporator Pressure Drop<br />
D Frame - 2 Pass<br />
40<br />
35<br />
D1<br />
D2<br />
Delt-P (Ft H2O)<br />
30<br />
25<br />
20<br />
15<br />
10<br />
D6<br />
D4 & D5<br />
D3<br />
5<br />
0<br />
0 500 1000 1500 2000 2500<br />
Flow (GPM)<br />
Evaporator Pressure Drop<br />
D Frame - 3 Pass<br />
Delt-P (Ft H2O)<br />
45<br />
40<br />
35<br />
30<br />
25<br />
20<br />
15<br />
10<br />
5<br />
0<br />
D1<br />
D2<br />
D4 & D5<br />
D6<br />
D3<br />
0 200 400 600 800 1000 1200 1400<br />
Flow (GPM)<br />
48 <strong>RTHD</strong>-SVX01B-EN
<strong>Installation</strong> Mechanical<br />
Evaporator Pressure Drop<br />
C Frame - 2 Pass<br />
Delt-P (Ft H2O)<br />
35<br />
30<br />
25<br />
20<br />
15<br />
10<br />
5<br />
C1<br />
C2<br />
0<br />
0 500 1000 1500<br />
Flow (GPM)<br />
Evaporator Pressure Drop<br />
C Frame - 3 Pass<br />
Delt-P (Ft H2O)<br />
50<br />
45<br />
40<br />
35<br />
30<br />
25<br />
20<br />
15<br />
10<br />
5<br />
0<br />
C1<br />
C2<br />
0 200 400 600 800 1000<br />
Flow (GPM)<br />
<strong>RTHD</strong>-SVX01B-EN 49
<strong>Installation</strong> Mechanical<br />
Evaporator Pressure Drop<br />
B Frame - 3 Pass<br />
Delt-P (Ft H2O)<br />
45<br />
40<br />
35<br />
30<br />
25<br />
20<br />
15<br />
10<br />
5<br />
0<br />
B1<br />
B2<br />
0 200 400 600 800 1000<br />
Flow (GPM)<br />
Evaporator Pressure Drop<br />
B Frame - 2 Pass<br />
Delt-P (Ft H2O)<br />
30<br />
25<br />
20<br />
15<br />
10<br />
B1<br />
B2<br />
5<br />
0<br />
0 200 400 600 800 1000 1200 1400<br />
Flow (GPM)<br />
50 <strong>RTHD</strong>-SVX01B-EN
<strong>Installation</strong> Mechanical<br />
Condenser Pressure Drop<br />
G Frame - 2 Pass<br />
60<br />
Delt-P (Ft H2O)<br />
50<br />
40<br />
30<br />
20<br />
G1<br />
G2<br />
G3<br />
10<br />
0<br />
0 500 1000 1500 2000 2500 3000<br />
Flow (GPM)<br />
Condenser Pressure Drop<br />
F Frame - 2 Pass<br />
Delt-P (Ft H2O)<br />
45<br />
40<br />
35<br />
30<br />
25<br />
20<br />
15<br />
10<br />
5<br />
0<br />
F2<br />
F1 & F3<br />
0 500 1000 1500 2000<br />
Flow (GPM)<br />
<strong>RTHD</strong>-SVX01B-EN 51
<strong>Installation</strong> Mechanical<br />
Condenser Pressure Drop<br />
E Frame - 2 Pass<br />
40<br />
Delt-P (Ft H2O)<br />
35<br />
30<br />
25<br />
20<br />
15<br />
10<br />
E5<br />
E4<br />
E1<br />
E2<br />
E3<br />
5<br />
0<br />
0 500 1000 1500<br />
Flow (GPM)<br />
Condenser Pressure Drop<br />
D Frame - 2 Pass<br />
Delt-P (Ft H2O)<br />
45<br />
40<br />
35<br />
30<br />
25<br />
20<br />
15<br />
10<br />
5<br />
0<br />
D1<br />
D2<br />
0 200 400 600 800 1000<br />
Flow (GPM)<br />
52 <strong>RTHD</strong>-SVX01B-EN
<strong>Installation</strong> Mechanical<br />
Condenser Pressure Drop<br />
B Frame - 2 Pass<br />
40<br />
Delt-P (Ft H2O)<br />
35<br />
30<br />
25<br />
20<br />
15<br />
10<br />
B1<br />
B2<br />
5<br />
0<br />
0 200 400 600 800 1000<br />
Flow (GPM)<br />
Making Grooved Pipe Connections<br />
CAUTION<br />
Equipment Damage!<br />
To prevent damage to water piping, do not overtighten<br />
connections. To prevent equipment damage, bypass the unit if<br />
using an acidic flushing agent.<br />
NOTE:<br />
unit.<br />
Make sure that all piping is flushed and cleaned prior to starting the<br />
Vents and Drains<br />
Install pipe plugs in evaporator and condenser water box drain and vent connections<br />
before filling the water systems.<br />
To drain water, remove vent and drain plugs, install a NPT connector in the<br />
drain connection with a shutoff valve and connect a hose to it.<br />
Evaporator Piping Components<br />
NOTE: Make sure all piping components are between the shutoff valves, so<br />
that isolation can be accomplished on both the condenser and the evaporator.<br />
<strong>RTHD</strong>-SVX01B-EN 53
<strong>Installation</strong> Mechanical<br />
“Piping components” include all devices and controls used to provide proper<br />
water system operation and unit operating safety. These components and<br />
their general locations are given below.<br />
Entering Chilled Water Piping<br />
• Air vents (to bleed air from system)<br />
• Water pressure gauges with shutoff valves<br />
• Pipe unions<br />
• Vibration eliminators (rubber boots)<br />
• Shutoff (isolation) valves<br />
• Thermometers<br />
• Cleanout tees<br />
• Pipe strainer<br />
• Flow switch<br />
Leaving Chilled Water Piping<br />
• Air vents (to bleed air from system)<br />
• Water pressure gauges with shutoff valves<br />
• Pipe unions<br />
• Vibration eliminators (rubber boots)<br />
• Shutoff (isolation) valves<br />
• Thermometers<br />
• Cleanout tees<br />
• Balancing valve<br />
• Pressure relief valve<br />
CAUTION<br />
Evaporator Damage!<br />
To prevent evaporator damage, do not exceed 150 psig (10.3 bar)<br />
evaporator water pressure for standard water boxes. Maximum<br />
pressure for high pressure water boxes is 300 psig (20.7 bar).<br />
Refer to digit 14 of the Model No. To prevent tube damage, install<br />
a strainer in the evaporator water inlet piping. To prevent tube<br />
corrosion, ensure that the initial water fill has a balanced pH.<br />
Condenser Piping Components<br />
“Piping components” include all devices and controls used to provide proper<br />
water system operation and unit operating safety. These components and<br />
their general locations are given below.<br />
Entering condenser water piping.<br />
• Air vents (to bleed air from system)<br />
• Water pressure gauges with shutoff valves<br />
54 <strong>RTHD</strong>-SVX01B-EN
<strong>Installation</strong> Mechanical<br />
• Pipe unions<br />
• Vibration eliminators (rubber boots)<br />
• Shutoff (isolation) valves. One per each pass<br />
• Thermometers<br />
• Cleanout tees<br />
• Pipe strainer<br />
• Flow switch<br />
Leaving condenser water piping.<br />
• Air vents (to bleed air from system)<br />
• Water pressure gauges with shutoff valves<br />
• Pipe unions<br />
• Vibration eliminators (rubber boots)<br />
• Shutoff (isolation) valve - one per each pass<br />
• Thermometers<br />
• Cleanout tees<br />
• Balancing valve<br />
• Pressure relief valve.<br />
CAUTION<br />
Condenser Damage!<br />
To prevent condenser damage, do not exceed 150 psig (10.3 bar)<br />
water pressure for standard water boxes. Maximum pressure for<br />
high pressure water boxes is 300 psig (20.7 bar). Refer to digit 18<br />
of the Model No. To prevent tube damage, install a strainer in<br />
condenser water inlet piping. To prevent tube corrosion, ensure<br />
that the initial water fill has a balanced pH.<br />
Condenser Water Regulating Valve<br />
The Condenser Head Pressure Control Option provides for a 0-10VDC (maximum<br />
range - a smaller range is adjustable) output interface to the customer's<br />
condenser water flow device. The condenser water flow device is typically a<br />
large butterfly type (6" or 8") automatic valve for 200 to 400 <strong>Ton</strong> chillers.<br />
The following guidelines must be met in order to ensure adequate oil circulation<br />
throughout the system.<br />
• The <strong>RTHD</strong> must maintain a 23 psid system pressure differential at all load<br />
conditions in order to ensure adequate oil circulation.<br />
• The entering condenser water temperature must be above 55°F (12.8°C)<br />
or between 45°F (7.2°C) and 55°F (12.8°C) with a 1°F temperature rise per<br />
minute to 55°F (12.8°C).<br />
<strong>RTHD</strong>-SVX01B-EN 55
<strong>Installation</strong> Mechanical<br />
• Condenser leaving water temperature must be 17°F degrees higher than<br />
evaporator leaving water temperature within 2 minutes of startup. A 25°F<br />
diferential must be maintained thereafter.<br />
If the above guidelines cannot be met, then some form of tower water control<br />
must be used.<br />
Condenser Water Regulating Valve Adjustment<br />
A separate TechView Settings Menu tab entitled "Condenser Head Pressure<br />
Control - Setup" that is only visible if the configuration is selected, contain the<br />
following settings and manual overrides for user adjustments and commissioning<br />
all under one tab:<br />
• "Off State" Output Command (0-10 Vdc 0.1 volt increments, Default 2.0<br />
Vdc)<br />
• Output Voltage @ Desired Minimum Flow (Adj: 0 to 10.0 in 0.1 volt increments,<br />
Default 2.0 Vdc)<br />
• Desired Minimum Flow (Adj: 0- 100% of full flow in 1% intervals, Default<br />
20%)<br />
• Output Voltage @ Desired Maximum Flow (Adj: 0 to 10.0 in .1 volt increments<br />
(or finer), Default 10 Vdc)<br />
• Actuator Stroke Time (Min to Max Range Time) (Adj: 1 to 1000 seconds,<br />
in 1 second increments, Default 30s)<br />
• Damping Coefficient (adj: 0.1 to 1.8 , in .1 increments, Default .5)<br />
• Head Pressure Control Override (enumeration of: disabled (auto), "off"<br />
state, minimum, maximum (100%),) default :disabled (auto). When this<br />
setting is in "disabled (auto)"<br />
• Condenser Water Pump Prerun Time ( )<br />
Water Treatment<br />
CAUTION<br />
Proper Water Treatment!<br />
The use of untreated or improperly treated water in a <strong>RTHD</strong> may<br />
result in scaling, erosion, corrosion, algae or slime. It is<br />
recommended that the services of a qualified water treatment<br />
specialist be engaged to determine what water treatment, if any,<br />
is required. The Trane Company assumes no responsibility for<br />
equipment failures which result from untreated or improperly<br />
treated water, or saline or brackish water.<br />
Using untreated or improperly treated water in these units may result in inefficient<br />
operation and possible tube damage. Consult a qualified water treatment<br />
specialist to determine whether treatment is needed.<br />
56 <strong>RTHD</strong>-SVX01B-EN
<strong>Installation</strong> Mechanical<br />
Water Pressure Gauges and Thermometers<br />
Install field-supplied thermometers and pressure gauges (with manifolds,<br />
whenever practical) as shown in Figure 15. Locate pressure gauges or taps in<br />
a straight run of pipe; avoid placement near elbows, etc. Be sure to install the<br />
gauges at the same elevation on each shell if the shells have opposite-end<br />
water connections.<br />
To read manifolded water pressure gauges, open one valve and close the<br />
other (depending upon the reading desired). This eliminates errors resulting<br />
from differently calibrated gauges installed at unmatched elevations.<br />
Flow Switch<br />
Cond Water<br />
Reg. Valve (Opt.)<br />
Evap<br />
Water<br />
Flow<br />
Shutoff<br />
Valves<br />
Isolation<br />
Valves<br />
Pressure Differential<br />
Gauge<br />
Manifold<br />
Flow Switch<br />
Thermometers<br />
Relief<br />
Valve<br />
Relief<br />
Valve<br />
Refer to Trane Engineering Bulletin -Series R ® Chiller Sound Ratings and<br />
<strong>Installation</strong> Guide for sound-sensitive applications.<br />
Shutoff<br />
Valves<br />
Manifold<br />
Isolation<br />
Valves<br />
Thermometers<br />
Pressure Differential<br />
Gauge<br />
Cond<br />
Water<br />
Flow<br />
Figure 15<br />
Typical Thermometer, Valving, and Manifold Pressure Gauge Set-up<br />
Water Pressure Relief Valves<br />
CAUTION<br />
Shell Damage!<br />
Install a pressure relief valve in both evaporator and condenser<br />
water systems. Failure to do so may result in shell damage.<br />
Install a water pressure relief valve in one of the condenser and one of the<br />
evaporator water box drain connections or on the shell side of any shutoff<br />
valve. Water vessels with close-coupled shutoff valves have a high potential<br />
for hydrostatic pressure buildup on a water temperature increase. Refer to<br />
applicable codes for relief valve installation guidelines.<br />
Flow Sensing Devices<br />
The installer must provide flow switches or differential pressure switches<br />
with pump interlocks to sense system water flow. Flow switch locations are<br />
schematically shown in Figure 15.<br />
To provide chiller protection, install and wire flow switches in series with the<br />
water pump interlocks, for both chilled water and condenser water circuits<br />
(refer to the <strong>Installation</strong> Electrical section). Specific connections and schematic<br />
wiring diagrams are shipped with the unit.<br />
<strong>RTHD</strong>-SVX01B-EN 57
<strong>Installation</strong> Mechanical<br />
Flow switches must stop or prevent compressor operation if either system<br />
water flow drops off below the required minimum shown on the pressure<br />
drop curves. Follow the manufacturer’s recommendations for selection and<br />
installation procedures. General guidelines for flow switch installation are outlined<br />
below.<br />
• Mount the switch upright, with a minimum of 5 pipe diameters straight,<br />
horizontal run on each side.<br />
• Do not install close to elbows, orifices or valves.<br />
NOTE:<br />
flow.<br />
The arrow on the switch must point in the direction of the water<br />
• To prevent switch fluttering, remove all air from the water system<br />
NOTE: The CH530 provides a 6-second time delay on the flow switch input<br />
before shutting down the unit on a loss-of-flow diagnostic. Contact a qualified<br />
service organization if nuisance machine shutdowns persist.<br />
• Adjust the switch to open when water flow falls below nominal. Refer to<br />
the General Data table in Section 1 for minimum flow recommendations<br />
for specific water pass arrangements. Flow switch contacts are closed on<br />
proof of water flow.<br />
Refrigerant Pressure Relief Valve Venting<br />
WARNING<br />
Hazardous Gases!<br />
Consult local regulations for any special relief line requirements.<br />
Refrigerant vented into a confined equipment room could<br />
displace available oxygen to breathe, causing possible<br />
asphyxiation or other serious health risks. Failure to follow these<br />
recommendations could result in death or serious injury.<br />
NOTE: Vent pipe size must conform to the ANSI/ASHRAE Standard 15 for<br />
vent pipe sizing. All federal, state, and local codes take precedence over any<br />
suggestions stated in this manual.<br />
All relief valve venting is the responsibility of the installing contractor.<br />
All <strong>RTHD</strong> units use evaporator, compressor, and condenser pressure relief<br />
valves (Figure 16) that must be vented to the outside of the building.<br />
Relief valve connection sizes and locations are shown in the unit submittals.<br />
Refer to local codes for relief valve vent line sizing information.<br />
Caution<br />
Equipment Damage!<br />
Do not exceed vent piping code specifications. Failure to comply<br />
with specifications may result in capacity reduction, unit damage<br />
and/or relief valve damage.<br />
58 <strong>RTHD</strong>-SVX01B-EN
<strong>Installation</strong> Mechanical<br />
Relief valve discharge setpoints and capacities rates are given in Table 12.<br />
Once the relief valve has opened, it will reclose when pressure is reduced to<br />
a safe level.<br />
NOTE: Once opened, relief valves may have tendency to leak and must be<br />
replaced.<br />
Discharge Pipes<br />
*<br />
*<br />
Evaporator Shell<br />
* Valve is hidden by pipe<br />
Condenser Shell<br />
Figure 16<br />
Relief Valve Location<br />
Table 12<br />
Pressure relief valve discharge capacities will vary with shell diameter and<br />
length and also compressor displacement. Discharge venting capacity should<br />
be calculated as required by ASHRAE Standard 15-94. Do not adjust relief<br />
valve setting in the field.<br />
Pressure Relief Valve Data<br />
Valve Location<br />
Discharge<br />
Setpoint<br />
(psi)<br />
Number<br />
of Valves<br />
Rated Capacity<br />
per Relief Valve<br />
(lba/min.)<br />
Field Connection<br />
Pipe Size (in NPT)<br />
Factory<br />
Shell Side<br />
Connection(in)<br />
Evap - B1 200 1 48.0 1 1-5/16 -12<br />
Evap - B2 200 1 48.0 1 1-5/16 -12<br />
Evap -B3 200 1 48.0 1 1-5/16 -12<br />
Evap -C1 200 1 48.0 1 1-5/16 -12<br />
Evap - C2 200 1 48.0 1 1-5/16 -12<br />
Evap - D1 200 1 48.0 1 1-5/16 -12<br />
Evap - D2 200 1 48.0 1 1-5/16 -12<br />
Evap - D3 200 1 48.0 1 1-5/16 -12<br />
Evap - D4 200 1 48.0 1 1-5/16 -12<br />
Evap - D5 200 1 48.0 1 1-5/16 -12<br />
Evap - D6 200 1 48.0 1 1-5/16 -12<br />
Evap - E1 200 1 48.0 1 1-5/16 -12<br />
Evap - F1 200 1 48.0 1 1-5/16 -12<br />
Evap - F2 200 1 48.0 1 1-5/16 -12<br />
Evap - G1 200 1 78.8 1-1/4 1-5/8 - 12<br />
Evap - G2 200 1 78.8 1-1/4 1-5/8 - 12<br />
<strong>RTHD</strong>-SVX01B-EN 59
<strong>Installation</strong> Mechanical<br />
Table 12<br />
Pressure Relief Valve Data<br />
Discharge<br />
Rated Capacity<br />
Factory<br />
Setpoint Number per Relief Valve Field Connection Shell Side<br />
Valve Location (psi) of Valves (lba/min.) Pipe Size (in NPT) Connection(in)<br />
Evap - G3 200 1 78.8 1-1/4 1-5/8 - 12<br />
Cond - B1 200 2 48.0 1 1-5/16 -12<br />
Cond - B2 200 2 48.0 1 1-5/16 -12<br />
Cond - D1 200 2 48.0 1 1-5/16 -12<br />
Cond - D2 200 2 48.0 1 1-5/16 -12<br />
Cond - E1 200 2 48.0 1 1-5/16 -12<br />
Cond - E2 200 2 48.0 1 1-5/16 -12<br />
Cond - E3 200 2 48.0 1 1-5/16 -12<br />
Cond - E4 200 2 48.0 1 1-5/16 -12<br />
Cond - E5 200 2 48.0 1 1-5/16 -12<br />
Cond - F1 200 2 48.0 1 1-5/16 -12<br />
Cond - F2 200 2 48.0 1 1-5/16 -12<br />
Cond - F3 200 2 48.0 1 1-5/16 -12<br />
Cond - G1 200 2 48.0 1 1-5/16 -12<br />
Cond - G2 200 2 48.0 1 1-5/16 -12<br />
Cond - G3 200 2 48.0 1 1-5/16 -12<br />
Comp - B1/B2* 200 2 78.8 1-1/4 1-5/8 - 12<br />
Comp - C1/C2* 200 3 78.8 1-1/4 1-5/8 - 12<br />
Comp - D1/D2/D3* 200 3 78.8 1-1/4 1-5/8 - 12<br />
Comp -E3* 200 3 78.8 1-1/4 1-5/8 - 12<br />
* Only used with isolation valve option<br />
Thermal Insulation<br />
All <strong>RTHD</strong> units are available with optional factory installed thermal insulation.<br />
If the unit is not factory insulated, install insulation over the areas shaded in<br />
Figure 17. Refer to Table 13 for types and quantities of insulation required.<br />
NOTE: Liquid line filter, refrigerant charging valves, water temperature<br />
sensors, drain and vent connections when insulated must remain accessible<br />
for service.<br />
NOTE: Use only water-base latex paint on factory-applied insulation. Failure<br />
to do so may result in insulation shrinkage.<br />
NOTE: Units in environments with higher humidity or very low leaving water<br />
temperature may require thicker insulation<br />
60 <strong>RTHD</strong>-SVX01B-EN
<strong>Installation</strong> Mechanical<br />
.<br />
Figure 17<br />
Typical <strong>RTHD</strong> Insulation Requirements<br />
Table 13<br />
Recommended Insulation Types<br />
Location Type Sq. Feet<br />
Evaporator 3/4” wall 90<br />
Compressor 3/4” wall 25<br />
All components and piping on low side of system (gas<br />
pump, return oil line, filter from pump)<br />
3/4” wall 160<br />
<strong>RTHD</strong>-SVX01B-EN 61
<strong>Installation</strong> Mechanical<br />
62 <strong>RTHD</strong>-SVX01B-EN
<strong>Installation</strong> Electrical<br />
General Recommendations<br />
For proper electrical component operation, do not locate the unit in areas<br />
exposed to dust, dirt, corrosive fumes, or excessive humidity. If any of these<br />
conditions exist, corrective action must be taken.<br />
WARNING<br />
Hazardous Voltage!<br />
Disconnect all electric power, including remote disconnects<br />
before servicing. Follow proper lockout/tagout procedures to<br />
ensure the power can not be inadvertently energized. Failure to<br />
disconnect power before servicing could result in death or serious<br />
injury.<br />
All wiring must comply with local and National Electric Codes. Minimum circuit<br />
ampacities and other unit electrical data is on the unit nameplate. See the<br />
unit order specifications for actual electrical data. Specific electrical schematics<br />
and connection diagrams are shipped with the unit.<br />
Typical wiring diagrams are in the back of this manual.<br />
CAUTION<br />
Use Copper Conductors Only!<br />
Unit terminals are not designed to accept other types of<br />
conductors. Failure to use copper conductors may result in<br />
equipment damage.<br />
Do not allow conduit to interfere with other components, structural members<br />
or equipment. All conduit must be long enough to allow compressor and<br />
starter removal.<br />
NOTE: To prevent control malfunctions, do not run low voltage wiring (
<strong>Installation</strong> Electrical<br />
Electrical Panel Power Supply<br />
Power supply wiring instructions for the starter/control panel are:<br />
1. Run line voltage wiring in conduit to access opening(s) on starter/control<br />
panel or pull-box. See CTV-EB-93 for wire sizing and selection information<br />
and refer to Table 14 that show typical electrical connection sizes and<br />
locations. Always refer to submittal information for your actual unit specifications.<br />
Table 14<br />
Wire Selection Chart for Starter Panels<br />
Min.<br />
Wire<br />
Size<br />
Copper<br />
75 0 C<br />
Supply Leads for All Starters (0 - 2000 Volts)<br />
1 Conduit<br />
3 Wire<br />
1 Conduit<br />
6 Wire<br />
1 Conduit<br />
9 Wire<br />
2<br />
Conduits<br />
6 Wire<br />
2<br />
Conduits<br />
12 Wire<br />
3<br />
Conduits<br />
9 Wire<br />
4<br />
Conduits<br />
12 Wire<br />
8 40 * * * * * *<br />
6 52 * * * * * *<br />
4 68 * * * * * *<br />
3 60 * * * * * *<br />
2 92 * * * * * *<br />
1 104 * * * * * *<br />
0 120 192 252 360 384 360 480<br />
00 140 224 294 420 448 420 560<br />
000 160 256 336 480 512 480 640<br />
0000 184 294 386 552 589 552 736<br />
250 204 326 428 612 653 612 816<br />
300 228 356 479 684 730 684 912<br />
350 248 397 521 744 794 744 992<br />
400 268 429 563 804 858 804 1072<br />
500 304 486 638 912 973 912 1216<br />
Conductors to the starter and motor connected in parallel (electrically joined at both ends to form a single conductor)<br />
must be sized 0 (1/0) or larger per NEC 310-4. Each phase must be equally represented in each conduit.<br />
64 <strong>RTHD</strong>-SVX01B-EN
<strong>Installation</strong> Electrical<br />
Figure 18<br />
Electrical <strong>Installation</strong><br />
WARNING<br />
Live Electrical Components!<br />
During installation, testing, servicing and troubleshooting of this<br />
product, it may be necessary to work with live electrical<br />
components. Have a qualified licensed electrician or other<br />
individual who has been properly trained in handling live<br />
electrical components perform these tasks. Failure to follow all<br />
electrical safety precautions when exposed to live electrical<br />
components could result in death or serious injury.<br />
Compressor Motor Phase Sequencing<br />
Always verify that proper rotation of the Series R compressor is established<br />
before the machine is started. Proper motor rotation requires confirmation of<br />
the electrical phase sequence of the power supply. The motor is internally<br />
connected for clockwise rotation with incoming power supply phased A, B, C.<br />
To confirm the correct phase sequence (ABC), use a Model 45 Associated<br />
Research Phase indicator or equivalent.<br />
Basically, voltages generated in each phase of a polyphase alternator or circuit<br />
are called phase voltages. In a three-phase circuit, three sine wave voltages<br />
are generated, differing in phase by 120 electrical degrees. The order in which<br />
the three voltages of a three-phase system succeed one another is called<br />
<strong>RTHD</strong>-SVX01B-EN 65
<strong>Installation</strong> Electrical<br />
phase sequence or phase rotation. This is determined by the direction of rotation<br />
of the alternator. When rotation is clockwise, phase sequence is usually<br />
called “ABC,” when counterclockwise, “CBA.”<br />
This direction may be reversed outside the alternator by interchanging any<br />
two of the line wires. It is this possible interchange of wiring that makes a<br />
phase sequence indicator necessary if the operator is to quickly determine<br />
the phase rotation of the motor.<br />
Correcting Improper Electrical Phase Sequence<br />
Proper compressor motor electrical phasing can be quickly determined and<br />
corrected before starting the unit. If using an Associated Research Model 45<br />
Phase Sequence Indicator, follow this procedure:<br />
1. Press the STOP button to insure the unit will not attempt to start the<br />
compressor.<br />
2. Open the electrical disconnect or circuit protection switch that provides<br />
line power to the line power terminal block in the control panel (or to the<br />
unit-mounted disconnect).<br />
3. Connect the phase sequence indicator leads to the line power terminal<br />
block (or the unit mounted disconnect) as follows:<br />
Phase Seq. Lead<br />
Black (Phase A)<br />
Red (Phase B)<br />
Yellow (Phase C)<br />
1TB1 Terminal<br />
L1<br />
L2<br />
L3<br />
4. Turn power on by closing the unit supply power disconnect switch.<br />
5. Read the phase sequence on the indicator. The “ABC” indicator on the<br />
face of the phase indicator will glow if phase is “ABC”.<br />
WARNING<br />
Hazardous Voltage!<br />
Disconnect all electric power, including remote disconnects<br />
before servicing. Follow proper lockout/tagout procedures to<br />
ensure the power can not be inadvertently energized. Failure to<br />
disconnect power before servicing could result in death or serious<br />
injury.<br />
6. If the “CBA” indicator glows instead, open the unit main power disconnect<br />
and switch two line leads on the line power terminal block (or the<br />
unit mounted disconnect). Reclose the main power disconnect and<br />
recheck phasing.<br />
7. Reopen the unit disconnect and disconnect the phase indicator.<br />
Terminal Lugs<br />
Proper starter/control panel line-side lug sizes are specified on the starter<br />
submittals. These lug sizes must be compatible with conductor sizes specified<br />
by the electrical engineer or contractor. Appropriate lug sizes are provided.<br />
66 <strong>RTHD</strong>-SVX01B-EN
<strong>Installation</strong> Electrical<br />
Circuit Breakers and Non-Fused Disconnect Switches (factory installed<br />
Option)<br />
Units that are ordered with factory installed Circuit Breakers or Non-Fused<br />
Disconnect Switches ship with the handle in the control panel. The handle<br />
must be installed prior to starting the unit.<br />
The operating mechanism is already pre installed on the Disconnect/ Circuit<br />
Breaker frame.<br />
The hole locations and shafts lengths have already been cut. And the shaft<br />
already installed.<br />
WARNING<br />
Hazardous Voltage!<br />
Disconnect all electric power, including remote disconnects<br />
before servicing. Follow proper lockout/tagout procedures to<br />
ensure the power can not be inadvertently energized. Failure to<br />
disconnect power before servicing could result in death or serious<br />
injury.<br />
1. Carefully remove the inner portion of the gasket/template keeping the<br />
outer ring and place it between the handle assembly and the door.<br />
Loosely drive the four ¼-20 x 0.5 screws through the door and gasket<br />
mounting holes from the inside of the enclosure door cover and into the<br />
handle assembly. Tighten evenly. ( for International applications the hardware<br />
is similar to the M6x1x12mm screw if original hardware is misplaced)<br />
Figure 19. Handle on Door<br />
2. With power isolated from the circuit breaker, test function of installed<br />
handle mechanism in the following manner.<br />
a Close enclosure door. Switch handle mechanism to ON.<br />
b Check the handle mechanism switches the circuit breaker to the ON position<br />
and the enclosure door can not be opened.<br />
<strong>RTHD</strong>-SVX01B-EN 67
<strong>Installation</strong> Electrical<br />
c<br />
d<br />
e<br />
f<br />
g<br />
h<br />
i<br />
j<br />
k<br />
Switch the handle mechanism to OFF position.<br />
Check that handle mechanism switches circuit breaker to the OFF position<br />
and that the enclosure door cannot be opened.<br />
Turn Handle to the OPEN position and insure the door opens.<br />
Close enclosure door. Switch handle mechanism/circuit breaker to ON.<br />
Turn interlock defeater counter clockwise with a flat-blade screwdriver.<br />
Open enclosure door.<br />
Press the Push to Trip button in the circuit breaker trip unit with a small<br />
flat-blade screwdriver to trip circuit breaker.<br />
Align handle assembly with shaft and close enclosure door.<br />
Switch handle mechanism to OPEN COVER (RESET) position. Check to<br />
insure breaker resets.<br />
Table 15<br />
RLA<br />
Lug Sizes<br />
Circuit Breaker<br />
Non-fused<br />
Disconnect Switch<br />
1-185 (2) 2/0 - 250 MCM or (1)2/0 - 500 (1) #4 - 350 MCM<br />
186-296 (2) 2/0 - 250 MCM or 2/0 - 500<br />
297-444 (2) 3/0 - 350 MCM<br />
445-592 (2) 1 - 500 MCM<br />
593-888 (4) 4/0 - 500 MCM<br />
RLA<br />
Main Lugs Only<br />
1-623 (2) #4-500 MCM<br />
624-888 (4) #4/0-500 MCM<br />
Fused Disconnect Switches<br />
Size fused disconnects in accordance with NEC Article 440-22(a).<br />
Rated Load Amperage (RLA)<br />
The compressor motor RLA for a particular chiller is determined by the field<br />
selection program and indicated on the compressor nameplate.<br />
Minimum Circuit Ampacity (MCA)<br />
The MCA is equal to 1.25 x the compressor RLA (on nameplate).<br />
Maximum Fuse/Circuit Breaker Size<br />
The maximum fuse/circuit breaker size is equal to 2.25 x the compressor RLA<br />
in accordance with UL 1995, para. 36.15.See also NEC 440-22.<br />
The recommended dual element (RDE) fuse size is equal to 1.75 x RLA in<br />
accordance with NEC Table 430-152.<br />
For recommended field connection lug sizes (<strong>RTHD</strong> starters) see Table 15.<br />
68 <strong>RTHD</strong>-SVX01B-EN
<strong>Installation</strong> Electrical<br />
Application Of Solid-State Starters<br />
The Intelligent Technologies (IT) Inside the Delta Soft Starter is an electronic,<br />
self-contained, panel- or enclosure-mounted motor soft-starting device. It is<br />
intended to provide 3-phase delta-connected induction motors with a smooth<br />
start both mechanically and electrically. The IT line of soft starters utilizes six<br />
SCRs in 3 anti-parallel; one pair in series with each phase winding of the<br />
Delta-connected motor. Controlling the SCRs' conduction period controls the<br />
voltage applied to the motor. This in turn controls the torque developed by the<br />
motor. After the motor reaches speed, contacts inside the starter are closed<br />
to bypass the SCRs.<br />
The Intelligent Technologies (IT) Soft Starter is designed to fulfill the industrial<br />
service requirements for applications such as Chillers and Compressors<br />
where Wye-Delta starters are historically applied.<br />
The Intelligent Technologies (IT) Soft Starter meets all relevant specifications<br />
set forth by NEMA ICS 1, ICS 2 and ICS 5, UL 508, IEC 60947-4-2, CE, and<br />
CSA. This user manual covers useful information that is necessary to know in<br />
order to set-up, operate, troubleshoot and maintain the IT Soft Starter.<br />
Settings and Interface<br />
To program and operate the IT starter, a “Control Interface Module” (CIM) is<br />
used. The CIM is mounted on the front face of the IT starter. The CIM contains<br />
the dip switches and rotary controls used to select the settings of the IT<br />
starter. Also on the CIM are LEDs that provide status concerning unit operation<br />
and faults.<br />
Note that any change to a dip switch will cause all LEDs to flash momentarily.<br />
Any adjustment to a rotary control will cause the LEDs to light, and they will<br />
stay lit until the adjustment has been completed.<br />
WARNING<br />
Hazardous Voltage!<br />
Disconnect all electric power, including remote disconnects<br />
before servicing. Follow proper lockout/tagout procedures to<br />
ensure the power can not be inadvertently energized. Failure to<br />
disconnect power before servicing could result in death or serious<br />
injury.<br />
The IT Starter does not have to be powered in order to make adjustments on<br />
the CIM. Once the unit is energized, the CIM will load its parameters into the<br />
IT starter. To verify the CIM is operational press the “fault reset” button that<br />
is just below the CIM. All LEDs will momentarily flash if the CIM is powered<br />
and communicating.<br />
Dip and Rotary Switch Settings<br />
Refer to the following table for the recommended settings on the CIM. If a<br />
switch is labeled “non-settable”, this means that feature is internally set at a<br />
fixed value for the Trane application, and it can not be changed using the<br />
switches. Moving the switch will have no effect.<br />
<strong>RTHD</strong>-SVX01B-EN 69
<strong>Installation</strong> Electrical<br />
Table 16<br />
Dip and Rotary Switch Settings<br />
CIM Dip or Rotary Switch Settable/Non-Settable Default/Masked Setting<br />
Overload Settable Disable<br />
Jam Settable Disable<br />
Stall Settable Disable<br />
Phase loss Settable Disable<br />
Phase reversal Settable Disable<br />
Manual reset Settable Automatic reset<br />
S.F. (special function) Settable Disable<br />
Ramp start and Current limit Settable Ramp<br />
T 1 (kick start) Non-settable 0% torque<br />
t k (kick start time) Non-settable 0 seconds<br />
T 2 (advance or limit) Settable 15%<br />
t s (soft-stop time) Non-settable 0 seconds<br />
t r (ramp) Settable 7 seconds - CDE Compressors<br />
3 seconds - B Compressors<br />
FLA Non-settable Max range (D)<br />
Overload Trip Class Non-settable Class 30<br />
70 <strong>RTHD</strong>-SVX01B-EN
<strong>Installation</strong> Electrical<br />
S.S. TRIP<br />
OVERLOAD - ON<br />
JAM ON<br />
STALL ON<br />
PH. LOSS ON<br />
PH. REV. ON<br />
MANUAL RESET<br />
RAMP START<br />
EMA71<br />
DISABLE<br />
DISABLE<br />
DISABLE<br />
DISABLE<br />
DISABLE<br />
AUTO RESET<br />
CURRENT LIMIT<br />
T1<br />
TORQUE (T2)<br />
BYPASS<br />
T1<br />
t k t r t s<br />
START<br />
TORQUE (%)<br />
45 45<br />
25 65 25 65 OVLD <br />
TRIP TRIP<br />
5 T1 85 5 T2 85 CLASS<br />
1 20<br />
15<br />
30<br />
40 B C<br />
0.5 1.5 10 60 15 45<br />
5 120<br />
0 2<br />
t k<br />
0DGH LQ 86$<br />
0.5 180<br />
t r<br />
BYPASS<br />
t k t r t s<br />
A D<br />
FLA<br />
TIME (Sec.)<br />
0 t s<br />
60<br />
Figure 20<br />
Control Interface module (CIM)<br />
The LEDs that are present next to the dip switches are not used to show the<br />
status of the dip switches because the features represented are not used in<br />
the Trane application. However, the LEDs are used when reading fault codes<br />
that may be present in the starter. Refer to the troubleshooting section of this<br />
manual.<br />
Rotary Switch Settings<br />
The lower portion of the CIM module contains several rotary switches that<br />
must be set to provide proper operation of the IT starter.<br />
The “T 1 ” rotary switch is the kick start torque setting. Because kick start is<br />
not used in the Trane application it can remain set to 0% torque. Non-settable.<br />
The “t k ” rotary switch is the kick start time setting. Because kick start is not<br />
used in the Trane application it can remain set to 0 seconds. Non-settable.<br />
The “T 2 ” rotary switch is the initial torque setting for ramp starting, or it is the<br />
torque and current limit setting if the Current Limit method of starting is<br />
selected. Refer to the “Starting Options” section of this manual for the recommended<br />
settings.<br />
The “t r ” rotary switch is the time setting for the ramp and current limit starting<br />
methods. Refer to the “Starting Options” section of this manual for the<br />
recommended settings.<br />
The “t s ” rotary switch is the time setting for the “soft-stop” feature of the IT<br />
starter. Because soft stop is not used in the Trane application it can remain<br />
set at 0 seconds. Non-settable.<br />
<strong>RTHD</strong>-SVX01B-EN 71
<strong>Installation</strong> Electrical<br />
Precautions When Using Solid-State Starters<br />
When using solid-state starters, there are two precautions servicing personnel<br />
need to be aware of.<br />
WARNING<br />
Live Electrical Components!<br />
STARTER AND MOTOR TERMINALS REMAIN “HOT” AT HIGH<br />
VOLTAGE EVEN WHEN MOTOR AND STARTER ARE “OFF.”<br />
Be Certain To Disconnect All Power To The Unit Before Performing<br />
Any Work In The Starter Panel. Follow proper lockout/<br />
tagout procedures to ensure the power can not be inadvertently<br />
energized. Failure to disconnect power before servicing could<br />
result in death or serious injury.<br />
The “In the Phase” starter does not remove voltage from any of the six motor<br />
leads when it is off. Three of the six motor leads remain directly connected to<br />
line voltage with respect to ground. The remaining three terminals are pulled<br />
up to the line voltage through the motor impedance of each phase. See Figure<br />
21.<br />
Line<br />
T6<br />
Bypass<br />
Contactor<br />
L1<br />
Shunt Trip Circuit<br />
Breaker\Disconnect<br />
Phase<br />
T3<br />
Triac "In<br />
the Phase"<br />
T1<br />
L3<br />
T5<br />
T2<br />
T4<br />
L2<br />
Figure 21<br />
Solid State Starter Connections<br />
NOTE: Note that even a Solid State Starter with its triacs “in the line”<br />
represent a similar hazard. Should a person contact any of the motor<br />
terminals, even with the motor off, the triac “off-state” leakage and finite<br />
snubber impedance would be enough to cause a severe, even fatal, electrical<br />
shock. In the case of the “in the phase” starter, the currents available could<br />
be quite high, as little or no impedence would be in series with the voltage<br />
source.<br />
72 <strong>RTHD</strong>-SVX01B-EN
<strong>Installation</strong> Electrical<br />
Figure 22 Caution label on starters panels equipped with solid-state starters<br />
WARNING<br />
Electrical Shock!<br />
Contacting any of the motor terminals, even with the motor off<br />
can cause a severe, potentially fatal, shock. Follow proper<br />
lockout/tagout procedures to ensure the power can not be<br />
inadvertently energized. Failure to disconnect power before<br />
servicing could result in death or serious injury.<br />
NOTE: IMPORTANT! WHEN EVACUATING THE CHILLER’S REFRIG-<br />
ERANT SYSTEM, ALWAYS HAVE THE MAIN POWER DISCONNECT/<br />
CIRCUIT BREAKER OPENED.<br />
Even when the compressor is not running, voltage is present at the<br />
compressor motor terminals, providing the potential for current to flow<br />
through a low impedance path.<br />
When removing refrigerant for the chiller both the condenser and chilled<br />
water pump must be operating to avoid freeze up.<br />
As the chiller is evacuated below atmospheric pressure, the dielectric<br />
strength (resistance to arcing) of the gaseous atmosphere is significantly<br />
reduced. Because the SCRs are connected “inside the delta,” three of the<br />
motor terminals are connected directly to the line voltage. An “arc over” can<br />
occur between motor terminals under conditions seen in the evacuation process.<br />
If this occurs the circuit breaker (or other external protective devices)<br />
will trip in response to high fault currents, and motor damage may also occur.<br />
This can be avoided through being certain that the chiller is fully disconnected<br />
from all power sources before beginning pumpdown or evacuation<br />
procedures, as well as guaranteeing that the disconnect cannot be<br />
accidentally closed while the chiller is in a vacuum.<br />
<strong>RTHD</strong>-SVX01B-EN 73
<strong>Installation</strong> Electrical<br />
* ' * % * " ) # )<br />
$ )<br />
= E<br />
2 M A H<br />
% )<br />
' )<br />
)<br />
6 <br />
6<br />
6 !<br />
6 $<br />
6 "<br />
6 #<br />
& )<br />
)<br />
)<br />
"<br />
& + + +<br />
!<br />
* ) * ) * )<br />
+ 6 I<br />
* ) * ) * )<br />
' %<br />
+ * + * + *<br />
& <br />
* ) ) * ) *<br />
&<br />
! <br />
! <br />
) ) )<br />
! * * *<br />
<br />
<br />
! <br />
6 + JH I<br />
Figure 23<br />
Y-D Starter Panel Power Wire Routing<br />
74 <strong>RTHD</strong>-SVX01B-EN
<strong>Installation</strong> Electrical<br />
/<br />
6 <br />
% +<br />
6 $<br />
' +<br />
+ 6 I<br />
= E<br />
2 M A H<br />
!<br />
. / . / . /<br />
/<br />
! /<br />
6<br />
6 "<br />
6 ! 6 #<br />
+<br />
+ ' + % +<br />
6 ! 6 6 <br />
5 E@<br />
5 J= JA <br />
5 J= HJA H<br />
JA 5 5 5 <br />
E I J= A @ E <br />
F = A K F I E@ A <br />
@ M <br />
! <br />
! <br />
. . . <br />
<br />
<br />
! <br />
6 + JH I<br />
Figure 24<br />
Solid State Starter Panel Power Wire Routing<br />
Module Connections for Interconnecting Wiring<br />
All connectors can be unplugged or the wires can be removed from the<br />
screw assembly. If an entire plug is removed, make sure the plug and the<br />
associated jack are marked for proper location identification during reinstallation.<br />
CAUTION<br />
Equipment Damage!<br />
Plugs and jacks must be clearly marked before disconnecting,<br />
because specific plugs will fit into other jacks. Possible damage to<br />
equipment may occur if the plugs are reversed with the jacks.<br />
Interconnecting Wiring (Field Wiring Required)<br />
NOTE: Important: Do not turn chiller on or off using the chilled water pump<br />
interlocks.<br />
<strong>RTHD</strong>-SVX01B-EN 75
<strong>Installation</strong> Electrical<br />
When making field connections, refer to the appropriate field layout, wiring,<br />
schematics and controls diagrams that ship with the unit. The diagrams in this<br />
manual are typical only and may not match the unit.<br />
Whenever a contact closure (binary output) is referenced, the electrical rating<br />
is:<br />
At 120 VAC<br />
At 240 VAC<br />
7.2 amp resistive<br />
2.88 amp pilot duty<br />
1/3 hp, 7.2 FLA, 43.2 LRA<br />
5.0 amp resistive<br />
2.0 amp pilot duty<br />
1/3 hp, 3.6 FLA, 21.6 LRA<br />
Whenever a dry contact input (binary input) is referenced, the electrical rating<br />
is 24VDC, 12 mA.<br />
Whenever a control voltage contact input (binary input) is referenced, the<br />
electrical rating is 120 VAC, 5mA.<br />
NOTE: Asterisked connections require the user to provide an external<br />
source of power. The 115V control power transformer is not sized for<br />
additional load.<br />
Chilled Water Pump Control<br />
CH530 has a evaporator water pump output relay that closes when the chiller<br />
is given a signal to go into the Auto mode of operation from any source. The<br />
contact is opened to turn off the pump in the event of most machine level<br />
diagnostics to prevent the build up of pump heat. To protect against the<br />
build-up of pump heat for those diagnostics that do not stop and/or start the<br />
pump and to protect against the condition of a bad flow switch, the pump<br />
shall always be stopped when the evaporator pressure is seen to be close to<br />
the Low Side Evaporator Pressure relief valve setting.<br />
Chilled Water Flow Interlock<br />
CH530 has an input that will accept a contact closure from a proof-of-flow<br />
device such as a flow switch. The flow switch is to be wired in series with<br />
the chilled water pump starter's auxiliary contacts. When this input does not<br />
prove flow within 20 minutes relative to transition from Stop to Auto modes<br />
of the chiller, or if the flow is lost while the chiller is in the Auto mode of operation,<br />
the chiller will be inhibited from running by a non-latching diagnostic.The<br />
flow switch input shall be filtered to allow for momentary openings<br />
and closings of the switch due to turbulent water flow. This is accomplished<br />
with a 6 seconds filtering time. The sensing voltage for the condenser water<br />
flow switch is 115/240 VAC<br />
IMPORTANT! DO NOT cycle the chiller through starting and stopping the<br />
chilled water pump. This could cause the compressor to shut down fully<br />
loaded. Use the external stop/start input to cycle the chiller.<br />
Condenser Water Pump Control<br />
CH530 provides a contact closure output to start and stop the condenser<br />
water pump. If condenser pumps are arranged in a bank with a common<br />
header, the output can be used to control an isolation valve and/or signal<br />
another device that an additional pump is required.<br />
76 <strong>RTHD</strong>-SVX01B-EN
<strong>Installation</strong> Electrical<br />
Condenser Water Pump Prestart time has been added to help with cold condenser<br />
water problems. In very cold outdoor ambients, the cooling towers<br />
sump cold water would reach the chiller some time after the low system differential<br />
pressure protection had run through its ignore time, and result in an<br />
immediate shutdown and latching diagnostic. By simply starting the pump<br />
earlier, and allowing mixing of the warmer indoor loop with the cooling<br />
tower's sump, this problem can be avoided.<br />
Condenser Water Flow Interlock<br />
The CH530 shall accept an isolated contact closure input from a customer<br />
installed proof-of-flow device such as a flow switch and customer provided<br />
pump starter auxiliary contact for interlocking with condenser water flow.<br />
The input shall be filtered to allow momentary openings and closings of the<br />
switch due to turbulent water flow, etc. This shall be accomplished with a 6<br />
seconds filtering time. The sensing voltage for the condenser water flow<br />
switch is 115/240 VAC.<br />
On a call for cooling after the restart inhibit timer has timed out, the CH530<br />
shall energize the condenser water pump relay and then check the condenser<br />
water flow switch and pump starter interlock input for flow confirmation.<br />
Startup of the compressor will not be allowed until flow has proven.<br />
If flow is not initially established within 1200 seconds (20 minutes) of the condenser<br />
pump relay energizing, an automatically resetting diagnostic "Condenser<br />
Water Flow Overdue" shall be generated which terminates the<br />
prestart mode and de-energizes the condenser water pump relay This diagnostic<br />
is automatically reset if flow is established at any later time.<br />
Note: This diagnostic would never automatically reset if CH530 was in control<br />
of the condenser pump through its condenser pump relay since it is commanded<br />
off at the time of the diagnostic. It could however reset and allow<br />
normal chiller operation if the pump was controlled from some external<br />
source.<br />
Chilled Water Reset (CWR)<br />
The MP will reset the chilled water temperature setpoint based on either<br />
return water temperature, or outdoor air temperature. The Return Reset<br />
option is standard, Outdoor Reset is optional.<br />
The following is selectable:<br />
• RESET TYPE Setpoint.<br />
This can be set to: NO CWR, OUTDOOR AIR TEMPERATURE RESET,<br />
RETURN WATER TEMPERATURE RESET, or CONSTANT RETURN<br />
WATER TEMPERATURE RESET. The MP shall not permit more than one<br />
type of reset to be selected.<br />
• RESET RATIO Setpoints.<br />
For outdoor air temp. reset, both positive and negative reset ratios will be<br />
allowed.<br />
• START RESET Setpoints.<br />
• MAXIMUM RESET Setpoints.<br />
The maximum resets shall be with respect to the chilled water setpoint.<br />
When the chiller is running, if any type of CWR is enabled, the MP will step<br />
the CWS toward the desired CWS' (based on the below equations and setup<br />
parameters) at a rate of 1 degree F every 5 minutes until the Active CWS<br />
equals the desired CWS'. When the chiller is not running the CWS will be<br />
<strong>RTHD</strong>-SVX01B-EN 77
<strong>Installation</strong> Electrical<br />
fully reset immediately (within one minute). The chiller will then start at the<br />
Differential to Start value above a fully reset CWS or CWS' for Outdoor,<br />
Return, and Constant Return Reset.<br />
Equations for calculating CWR<br />
Equation used to get Degrees of Reset:<br />
Outdoor Air:<br />
Degrees of Reset = Reset Ratio * (Start Reset - TOD)<br />
Return Reset:<br />
Degrees of Reset = Reset Ratio * (Start Reset - (TWE - TWL))<br />
Constant Return:<br />
Degrees of Reset = 100% * (Design Delta Temp - (TWE - TWL))<br />
To obtain Active CWS from Degrees of Reset:<br />
Active CWS = Degrees of Reset + Previous CWS<br />
Note: Previous CWS can either be Front Panel, BAS, or External<br />
Reset Ratio calculation:<br />
The Reset Ratio on the User Interface is displayed as a percentage. To use it<br />
in the above equation it must be converted to its decimal form.<br />
Reset Ratio percent / 100 = Reset Ratio decimal<br />
Example of converting Reset Ratio:<br />
If the Reset Ratio displayed on the User Interface is 50%<br />
then use (50/100) = .5 in the equation<br />
TOD = Outdoor Air Temp<br />
TWE = Evap Entering Water Temp<br />
TWL = Evap Leaving Water Temp<br />
Programmable Relays (Alarm and Status) - Optional<br />
CH530 provides a flexible alarm or chiller status indication to a remote location<br />
through a hard wired interface to a dry contact closure. Four relays are<br />
available for this function, and they are provided (generally with a Quad Relay<br />
Output LLID) as part of the Alarm Relay Output Option.<br />
The events/states that can be assigned to the programmable relays are listed<br />
in the following table.<br />
78 <strong>RTHD</strong>-SVX01B-EN
<strong>Installation</strong> Electrical<br />
Table 17<br />
Chiller Events/Status Descriptions<br />
Event/State<br />
Alarm - Latching<br />
Alarm - Auto Reset<br />
Alarm<br />
Warning<br />
Chiller Limit Mode<br />
Compressor<br />
Running<br />
Chiller Head<br />
Pressure Relief<br />
Request Relay<br />
Description<br />
This output is true whenever there is any active diagnostic that requires a manual reset to<br />
clear, that effects the Chiller, the Circuit, or any of the Compressors on a circuit. This<br />
classification does not include informational diagnostics.<br />
This output is true whenever there is any active diagnostic that could automatically clear, that<br />
effects the Chiller, the Circuit, or any of the Compressors on a circuit. This classification does<br />
not include informational diagnostics. If all of the auto resetting diagnostics were to clear,<br />
this output would return to a false condition.<br />
This output is true whenever there is any diagnostic effecting any component, whether<br />
latching or automatically clearing. This classification does not include informational<br />
diagnostics.<br />
This output is true whenever there is any informational diagnostic effecting any component,<br />
whether latching or automatically clearing.<br />
This output is true whenever the chiller has been running in one of the Unloading types of<br />
limit modes (Condenser, Evaporator, Current Limit or Phase Imbalance Limit) continuously<br />
for the last 20 minutes. A given limit or overlapping of different limits must be in effect<br />
continuously for 20 minutes prior to the output becoming true. It will become false, if no<br />
Unload limits are present for 1 minute. The filter prevents short duration or transient<br />
repetitive limits from indicating. The chiller is considered to be in a limit mode for the<br />
purposes of front panel display and annunciation, only if it is fully inhibiting loading by virtue<br />
of being in either the "hold" or "forced unload" regions of the limit control, excluding the<br />
"limited loading region". (In previous designs, the "limit load" region of the limit control was<br />
included in the criteria for the limit mode call out on the front panel and annunciation<br />
outputs)<br />
The output is true whenever any compressors are started or running on the chiller and false<br />
when no compressors are either starting or running on the chiller.<br />
This status may or may not reflect the true status of the compressor in Service Pumpdown if<br />
such a mode exists for a particular chiller.<br />
This relay output is energized anytime the chiller is running in one of the following modes;<br />
Ice Making Mode or Condenser Pressure Limit Control Mode continuously for the duration<br />
specified by the Chiller Head Relief Relay Filter Time. The Chiller Head Relief Relay Filter<br />
Time is a service setpoint. The relay output is de-energized anytime the chiller exits all above<br />
modes continuously for the duration specified by the same Chiller Head Relief Relay Filter<br />
Time.<br />
<strong>RTHD</strong>-SVX01B-EN 79
<strong>Installation</strong> Electrical<br />
The CH530 Service Tool (TechView) is used to install and assign any of the<br />
above listed events or status to each of the four relays provided with this<br />
option.<br />
The default assignments for the four available relays are listed below.<br />
Table 18<br />
Programable Relays<br />
LLID Name<br />
Operating Status<br />
Programmable<br />
Relays<br />
LLID Software<br />
Relay Designation Output Name Default<br />
Relay 0 Status Relay 4, J2-1,2,3 Head Pressure Relief Request<br />
Relay 1 Status Relay 3, J2-4,5,6 Chiller Limit Mode Relay<br />
Relay 2 Status Relay 2, J2-7,8,9 Chiller Alarm Relay (latching or<br />
nonlatching)<br />
Relay 3 Status Relay 1, J2-10,11,12 Compressor Running Relay<br />
Emergency Stop<br />
The CH530 provides auxiliary control for a customer specified/installed latching<br />
trip out. When this customer-furnished remote contact is provided, the<br />
chiller will run normally when the contact is closed. When the contact opens,<br />
the unit will trip off on a manually resettable diagnostic. This condition<br />
requires manual reset at the chiller switch on the front of the control panel.<br />
External Auto/Stop<br />
If the unit requires the external Auto/Stop function, the installer must provide<br />
leads from the remote contacts to the proper terminals of the LLID on the<br />
control panel.<br />
The chiller will run normally when the contacts are closed. When the contact<br />
opens, the compressor(s), if operating, will go to the RUN:UNLOAD operating<br />
mode and cycle off. Unit operation will be inhibited. Re-closure of the contacts<br />
will permit the unit to automatically return to normal operation.<br />
NOTE: A “panic” stop (similar to “emergency” stop) can be manually<br />
commanded by pressing the STOP button twice in a row, the chiller will<br />
immediately shut down, but without creating a latching diagnostic.<br />
Soft Loading<br />
Soft loading will prevent the chiller from going to full capacity during the pulldown<br />
period.<br />
The CH530 control system has two soft loading algorithms running all of the<br />
time. They are capacity control soft loading and current limit soft loading.<br />
These algorithms introduce the use of a Filtered Chilled Water Setpoint and a<br />
Filtered Current Limit Setpoint. After the compressor has been started, the<br />
starting point of the filtered chilled water setpoint is initialized to the value of<br />
the Evap Leaving Water Temperature. The filtered current limit setpoint is initialized<br />
to the value of the Current Limit Softload Starting Percent. These filtered<br />
setpoints allow for a stable pull-down that is user adjustable in duration.<br />
They also eliminate sudden transients due to setpoint changes during normal<br />
chiller operation.<br />
Three settings are used to describe the behavior of soft loading. The setup<br />
for softloading can be done using TechView.<br />
• Capacity Control Softload Time: This setting controls the time constant of<br />
the Filtered Chilled Water Setpoint. It is settable between 0 and 120 min.<br />
80 <strong>RTHD</strong>-SVX01B-EN
<strong>Installation</strong> Electrical<br />
• Current Limit Control Softload Time: This Setting controls the time constant<br />
of the Filtered Current Limit Setpoint. It is settable between 0 and<br />
120 minutes.<br />
• Current Limit Softload Starting Percent: This setting controls the starting<br />
point of the Filtered Current Limit Setpoint. It is adjustable from 20 (40<br />
for <strong>RTHD</strong>) to 100 percent RLA.<br />
External Base Loading - Optional<br />
Primarily for process control requirements, base loading provides for immediate<br />
start and loading of a chiller up to an externally or remotely adjustable current<br />
limit setpoint without regard to differential to start or stop, or to leaving<br />
water temperature control. This allows the flexibility to prestart or preload a<br />
chiller in anticipation of a large load application. It also allows you to keep a<br />
chiller on line between processes when leaving water temperature control<br />
would normally cycle the unit.<br />
When the base loading option is installed through TechView it will be controllable<br />
through DynaView/TechView, External Hardware Interface or Tracer (if<br />
Tracer is installed). Order for precedence for all setpoints, DynaView/Tech-<br />
View then External then Tracer from lowest to highest priority. If one of the<br />
higher priority setpoints drops out due to a bad sensor or communication loss<br />
then base loading shall go to the next lowest priority of command and setpoint.<br />
The command settings and control setpoints associated with base<br />
loading are explained below.<br />
Base Loading Control setpoint<br />
This setpoint has three possible sources, an External Analog Input, Dyna-<br />
View/TechView or Tracer.<br />
• DynaView/TechView Base Loading Control Setpoint<br />
The range is 40 - 100 % Compressor Load (Max %RLA). The default is<br />
50%.<br />
• Tracer Base Loading Control Setpoint<br />
The range is 40 - 100 % Compressor Load (Max %RLA). The default is<br />
50%.<br />
• External Base Loading Setpoint<br />
This is an Analog Input that sets the base loading setpoint. This signal can<br />
be controlled by either a 2-10Vdc or 4-20ma Signal based on configuration<br />
information. The equations show the relationship between input and percent<br />
compressor load:<br />
If the input is configured as a 4 - 20 mA:<br />
% Load = 3.75 * (mA Input) + 25<br />
If the input is configured as a 2 - 10 Vdc:<br />
% Load = 7.5 * (Vdc Input) + 25<br />
Summit Interface - Optional<br />
CH530 provides an optional interface between the chiller and a Trane Summit<br />
BAS. A Communications interface LLID shall be used to provide "gateway"<br />
functionality between the Chiller and Summit.<br />
<strong>RTHD</strong>-SVX01B-EN 81
<strong>Installation</strong> Electrical<br />
LonTalk Communication Interface - Optional<br />
CH530 provides an optional LonTalk Communication Interface (LCI-C)<br />
between the chiller and a Building Automation System (BAS). An LCI-C LLID<br />
shall be used to provide "gateway" functionality between the LonTalk protocol<br />
and the Chiller.<br />
Ice Making Contact - Optional<br />
CH530 accepts a contact closure input to initiate Ice Building. When in the<br />
ice building mode, the compressor will be fully loaded (not given a low setpoint)<br />
and will continue to operate until the ice contacts open or the return<br />
water temperature reaches the Ice Termination Setpoint. If terminated on<br />
return setpoint, CH530 will not allow the chiller to restart until the ice making<br />
contact is opened.<br />
Ice Machine Control - Optional<br />
CH530 provides an output contact closure that can be used as a signal to the<br />
system that ice building is in operation. This relay will be closed when ice<br />
building is in progress and open when ice building has been terminated by<br />
either CH530 or the remote interlock. It is used to signal the system changes<br />
required to convert to and from ice making.<br />
External Chilled Water Setpoint - Optional<br />
Ch530 will accept either a 2-10 VDC or a 4-20 mA input (J9-4, J9-5) signal, to<br />
adjust the chilled water setpoint from a remote location.<br />
External Current Limit Setpoint - Optional<br />
CH530 will accept either a 2-10VDC or a 4-20mA input (J7-11, J7-12) signal to<br />
adjust the current limit setpoint from a remote location.<br />
Percent Condenser Pressure Output - Optional<br />
CH530 provides a 2-10 VDC analog output to indicate percent High Pressure<br />
Cutout (HPC) condenser pressure.<br />
Percent HPC = (Condenser Pressure/High Pressure Cutout Setpoint)*100<br />
Compressor Percent RLA Output - Optional<br />
CH530 provides a 0-10 Vdc analog output to indicate % RLA of compressor<br />
starter average phase current. 2 to 10 Vdc corresponds to 0 to 120% RLA.<br />
82 <strong>RTHD</strong>-SVX01B-EN
Operating Principles Mechanical<br />
This section contains an overview of the operation and maintenance of Series<br />
R chillers equipped with microcomputer-based control systems. It describes<br />
the overall operating principles of the <strong>RTHD</strong> water chiller..<br />
Following the section is information regarding specific operating instructions,<br />
detailed descriptions of the unit controls and options (Operator Interface -<br />
Control Systems), and maintenance procedures that must be performed regularly<br />
to keep the unit in top condition (Periodic <strong>Maintenance</strong> and <strong>Maintenance</strong><br />
Procedures). Diagnostic information (Diagnostics) is provided to allow<br />
the operator to identify system malfunctions.<br />
NOTE: To ensure proper diagnosis and repair, contact a qualified service<br />
organization if a problem should occur.<br />
General<br />
The Model <strong>RTHD</strong> units are single-compressor water-cooled liquid chillers.<br />
These units are equipped with unit-mounted starter/control panels.<br />
The basic components of an <strong>RTHD</strong> unit are:<br />
• Unit-mounted panel containing starter and TracerCH530 controller and<br />
Input/Output LLIDS<br />
• Helical-rotary compressor<br />
• Evaporator<br />
• Electronic expansion valve<br />
• Water-cooled condenser with integral subcooler<br />
• Oil supply system<br />
• Oil cooler (application dependent)<br />
• Related interconnecting piping.<br />
Refrigeration (Cooling) Cycle<br />
The refrigeration cycle of the Series R chiller is conceptually similar to that of<br />
other Trane chiller products. It makes use of a shell-and-tube evaporator<br />
design with refrigerant evaporating on the shell side and water flowing inside<br />
tubes having enhanced surfaces.<br />
The compressor is a twin-rotor helical rotary type. It uses a suction gascooled<br />
motor that operates at lower motor temperatures under continuous<br />
full and part load operating conditions. An oil management system provides<br />
an almost oil-free refrigerant to the shells to maximize heat transfer performance,<br />
while providing lubrication and rotor sealing to the compressor. The<br />
lubrication system ensures long compressor life and contributes to quiet<br />
operation.<br />
Condensing is accomplished in a shell-and-tube heat exchanger where refrigerant<br />
is condensed on the shell side and water flows internally in the tubes.<br />
Refrigerant is metered through the flow system using an electronic expansion<br />
valve, that maximizes chiller efficiency at part load.<br />
A unit-mounted starter and control panel is provided on every chiller. Microprocessor-based<br />
unit control modules (Tracer CH530) provide for accurate<br />
chilled water control as well as monitoring, protection and adaptive limit functions.<br />
The “adaptive” nature of the controls intelligently prevents the chiller<br />
from operating outside of its limits, or compensates for unusual operating<br />
conditions, while keeping the chiller running rather than simply tripping due to<br />
a safety concern. When problems do occur, diagnostic messages assist the<br />
operator in troubleshooting.<br />
<strong>RTHD</strong>-SVX01B-EN 83
Operating Principles Mechanical<br />
Cycle Description<br />
The refrigeration cycle for the <strong>RTHD</strong> chiller can be described using the pressure-enthalpy<br />
diagram shown in Figure 25. Key State Points are indicated on<br />
the figure and are referenced in the discussion following. A schematic of the<br />
system showing the refrigerant flow loop as well as the lubricant flow loop is<br />
shown in Figure 28.<br />
Liquid<br />
4<br />
3<br />
2<br />
Pressure<br />
5<br />
1<br />
Gas<br />
Enthalpy<br />
Figure 25<br />
Pressure /Enthalpy Curve<br />
Evaporation of refrigerant occurs in the evaporator. A metered amount of<br />
refrigerant liquid enters a distribution system in the evaporator shell and is<br />
then distributed to the tubes in the evaporator tube bundle. The refrigerant<br />
vaporizes as it cools the water flowing through the evaporator tubes. Refrigerant<br />
vapor leaves the evaporator as saturated vapor (State Pt. 1).<br />
The refrigerant vapor generated in the evaporator flows to the suction end of<br />
the compressor where it enters the motor compartment of the suction-gascooled<br />
motor. The refrigerant flows across the motor, providing the necessary<br />
cooling, then enters the compression chamber. Refrigerant is compressed<br />
in the compressor to discharge pressure conditions. Simultaneously,<br />
lubricant is injected into the compressor for two purposes: (1) to lubricate the<br />
rolling element bearings, and (2) to seal the very small clearances between<br />
the compressor’s twin rotors. Immediately following the compression process<br />
the lubricant and refrigerant are effectively divided using an oil separator.<br />
The oil-free refrigerant vapor enters the condenser at State Pt. 2. The lubrication<br />
and oil management issues are discussed in more detail in the compressor<br />
description and oil management sections that follow.<br />
Baffles within the condenser shell distribute the compressed refrigerant<br />
vapor evenly across the condenser tube bundle. Cooling tower water, circulating<br />
through the condenser tubes, absorbs heat from this refrigerant and condenses<br />
it.<br />
84 <strong>RTHD</strong>-SVX01B-EN
Operating Principles Mechanical<br />
As the refrigerant leaves the bottom of the condenser (State Pt. 3), it enters<br />
an integral subcooler where it is subcooled before traveling to the electronic<br />
expansion valve (State Pt. 4). The pressure drop created by the expansion<br />
process vaporizes a portion of the liquid refrigerant. The resulting mixture of<br />
liquid and gaseous refrigerant then enters the Evaporator Distribution system<br />
(State Pt. 5). The flash gas from the expansion process is internally routed to<br />
compressor suction, and while the liquid refrigerant is distributed over the<br />
tube bundle in the evaporator.<br />
The <strong>RTHD</strong> chiller maximizes the evaporator heat transfer performance while<br />
minimizing refrigerant charge requirements. This is accomplished by metering<br />
the liquid refrigerant flow to the evaporator’s distribution system using the<br />
electronic expansion valve. A relatively low liquid level is maintained in the<br />
evaporator shell, which contains a bit of surplus refrigerant liquid and accumulated<br />
lubricant. A liquid level measurement device monitors this level and provides<br />
feedback information to the CH530 unit controller, which commands<br />
the electronic expansion valve to reposition when necessary. If the level<br />
rises, the expansion valve is closed slightly, and if the level is dropping, the<br />
valve is opened slightly such that a steady level is maintained.<br />
dual discharge lines only on C, D & E frame compressors<br />
compressor<br />
dual discharge lines<br />
only on C, D & E frame<br />
compressors<br />
s<br />
e<br />
p<br />
a<br />
r<br />
a<br />
t<br />
o<br />
r<br />
s<br />
e<br />
p<br />
a<br />
r<br />
a<br />
t<br />
o<br />
r<br />
EXV<br />
evaporator<br />
condenser<br />
gas pump<br />
Figure 26<br />
Refrigerant Flow Diagram<br />
<strong>RTHD</strong>-SVX01B-EN 85
Operating Principles Mechanical<br />
Compressor Description<br />
Male Rotor<br />
Female Rotor<br />
Bearings<br />
Suction<br />
Unload<br />
Solenoid<br />
Load<br />
Solenoid<br />
Motor<br />
Housing<br />
Piston<br />
Housing<br />
Bearing<br />
Housing<br />
Rotor<br />
Housing<br />
Discharge<br />
Check Valve<br />
Motor Stator<br />
Slide Valve<br />
Oil Reclaim<br />
Port<br />
Unloader<br />
Piston<br />
Discharge<br />
Plenum<br />
Bearing<br />
Lubricant<br />
Port<br />
Rotor<br />
Injection<br />
Port<br />
Primary<br />
Mounting<br />
Holes<br />
Discharge<br />
Check Valve<br />
Figure 27<br />
Compressor Description<br />
86 <strong>RTHD</strong>-SVX01B-EN
Operating Principles Mechanical<br />
The compressor used by the Series R chiller consists of three distinct sections:<br />
the motor, the rotors and the bearing housing. Refer to Figure 27.<br />
Compressor Motor<br />
A two-pole, hermetic, squirrel-cage induction motor directly drives the compressor<br />
rotors. The motor is cooled by suction vapor drawn from the evaporator<br />
and entering the end of the motor housing (Figure 27) .<br />
Compressor Rotors<br />
Each Series R chiller uses a semi-hermetic, direct-drive helical rotary type<br />
compressor. Excluding the bearings, each compressor has only 3 moving<br />
parts: 2 rotors - “male” and “female” - provide compression, and a slide valve<br />
that controls capacity. See Figure 27. The male rotor is attached to, and driven<br />
by the motor, and the female rotor is, in turn, driven by the male rotor. Separately<br />
housed bearing sets are provided at each end of both rotors on the<br />
<strong>RTHD</strong> units. The slide valve is located below (and moves along) the rotors.<br />
The helical rotary compressor is a positive displacement device. Refrigerant<br />
from the evaporator is drawn into the suction opening at the end of the motor<br />
section. The gas is drawn across the motor, cooling it, and then into the rotor<br />
section. It is then compressed and released directly into the discharge plenum.<br />
There is no physical contact between the rotors and compressor housing. Oil<br />
is injected into the bottom of the compressor rotor section, coating both<br />
rotors and the compressor housing interior. Although this oil does provide<br />
rotor lubrication, its primary purpose is to seal the clearance spaces between<br />
the rotors and compressor housing. A positive seal between these internal<br />
parts enhances compressor efficiency by limiting leakage between the high<br />
pressure and low pressure cavities.<br />
Capacity control is accomplished by means of a slide valve assembly located<br />
in the rotor/bearing housing sections of the compressor. Positioned along the<br />
bottom of the rotors, the slide valve is driven by a piston/cylinder along an axis<br />
that parallels those of the rotors (Figure 27).<br />
Compressor load condition is dictated by the coverage of the rotors by the<br />
slide valve. When the slide valve fully covers the rotors, the compressor is<br />
fully loaded. Unloading occurs as the slide valve moves away from the suction<br />
end of the rotors. Slide valve unloading lowers refrigeration capacity by<br />
reducing the compression surface of the rotors.<br />
Slide Valve Movement<br />
Movement of the slide valve piston (Figure 27) determines slide valve position<br />
which, in turn, regulates compressor capacity. Compressed vapor flowing<br />
in to and out of the cylinder governs piston movement, and is controlled by<br />
the load and unload solenoid valves.<br />
The solenoid valves (both normally closed) receive “load” and “unload” signals<br />
from the CH530, based on system cooling requirements. To load the<br />
compressor, the CH530 opens the load solenoid valve. The pressurized vapor<br />
flow then enters the cylinder and, with the help of the lower suction pressure<br />
acting on the face of the unloader valve, moves the slide valve over the rotors<br />
toward the suction end of the compressor.<br />
The compressor is unloaded when the unload solenoid valve is open. Vapor<br />
“trapped” within the cylinder is drawn out into the lower-pressure suction<br />
area of the compressor. As the pressurized vapor leaves the cylinder, the slide<br />
valve slowly moves away from the rotors toward the discharge end of the<br />
rotors.<br />
When both solenoid valves are closed, the present level of compressor loading<br />
is maintained.<br />
<strong>RTHD</strong>-SVX01B-EN 87
Operating Principles Mechanical<br />
On compressor shutdown, the unload solenoid valve is energized. Springs<br />
assist in moving the slide valve to the fully-unloaded position, so the unit<br />
always starts fully unloaded.<br />
Oil Management System<br />
Oil Separator<br />
The oil separator consists of a vertical cylinder surrounding an exit passageway.<br />
Once oil is injected into the compressor rotors, it mixes with compressed<br />
refrigerant vapor and is discharged directly into the oil separator. As<br />
the refrigerant-and-oil mixture is discharged into the oil separator, the oil is<br />
forced outward by centrifugal force, collects on the walls of the cylinder and<br />
drains to the bottom of the oil separator cylinder. The accumulated oil then<br />
drains out of the cylinder and collects in the oil sump located near the top and<br />
in-between the evaporator and condenser shells.<br />
Oil that collects in the oil tank sump is at condensing pressure during compressor<br />
operation; therefore, oil is constantly moving to lower pressure areas.<br />
Master Oil Line<br />
Solenoid<br />
Oil Filter<br />
Oil Return Filter<br />
<strong>RTHD</strong> Oil System<br />
Manual<br />
Service<br />
Valve<br />
Oil Pressure<br />
Transducer<br />
To Bearings<br />
Injection to<br />
Rotors<br />
restrictor<br />
Compressor<br />
Discharge<br />
Temperature<br />
Sensor<br />
Compressor<br />
Condenser<br />
Pressure<br />
Transducer<br />
Evaporator<br />
Pressure<br />
Transducer Pe<br />
Optional Oil<br />
Cooler<br />
Manual<br />
Service<br />
Valve<br />
Optical Oil<br />
Detector<br />
Evaporator<br />
Vent to<br />
Condenser<br />
Oil Sump<br />
Vent Line<br />
Oil Separators<br />
Oil Heaters<br />
Liquid/Vapor<br />
Refrigerant Mixture<br />
EXV<br />
Condenser<br />
Fill Solenoid<br />
Valve<br />
Oil/Refrigerant<br />
Mixture<br />
Oil Recovery<br />
Oil Return<br />
Gas Pump<br />
Drain Solenoid<br />
Valve<br />
To Condenser<br />
Pressure<br />
Primary Oil System<br />
Refrigerant & Oil<br />
Mixture-Oil Recovery<br />
System<br />
Other<br />
Figure 28<br />
Oil Flow Diagram<br />
88 <strong>RTHD</strong>-SVX01B-EN
Operating Principles Mechanical<br />
Oil Flow Protection<br />
Oil flowing through the lubrication circuit flows from the oil sump to the compressor<br />
(see Figure 28). As the oil leaves the sump, it passes through a service<br />
valve, an oil cooler (if used), oil filter, master solenoid valve, and another<br />
service valve. Oil flow then splits into two distinct paths, each performing a<br />
separate function: (1) bearing lubrication and cooling, and (2) compressor oil<br />
injection.<br />
Oil flow and quality is proven through a combination of a number of sensors,<br />
most notably a pressure transducer and the optical oil level sensor.<br />
If for any reason oil flow is obstructed because of a plugged oil filter, closed<br />
service valve, faulty master solenoid, or other source, the oil pressure transducer<br />
will read an excessively high pressure drop in the oil system (relative to<br />
the total system pressure) and shut down the chiller.<br />
Likewise, the optical oil level sensor can detect the lack of oil in the primary<br />
oil system (which could result from improper oil charging after servicing, or oil<br />
logging in other parts of the system). The sensor will prevent the compressor<br />
from starting or running unless an adequate volume of oil is present. The<br />
combination of these two devices, as well as diagnostics associated with<br />
extended low system differential pressure and low superheat conditions, can<br />
protect the compressor from damage due to severe conditions, component<br />
failures, or improper operation.<br />
If the compressor stops for any reason, the master solenoid valve closes; this<br />
isolates the oil charge in the sump during “off” periods. With the oil efficiently<br />
contained in the sump, oil is immediately available to the compressor at startup.<br />
Such flows would otherwise purge oil from the lines and the oil sump,<br />
which is an undesirable effect.<br />
To ensure the required system differential pressure is adequate to move oil to<br />
the compressor, the CH530 attempts to both control a minimum system differential<br />
pressure as well as monitor it. Based on readings from pressure<br />
transducers in both the evaporator and condenser , the EXV is modulated to<br />
maintain evaporator pressure at a minimum of 25 psid below the condenser<br />
pressure. Once the minimum is met, the EXV will return to normal liquid<br />
level control (see the paragraph on "Cycle Description". If the differential is<br />
significantly lower than required, the unit will trip and initiate a appropriate<br />
diagnostics and would enforce a compressor "cool down" period.<br />
To ensure proper lubrication and minimize refrigerant condensation in the oil<br />
sump, heaters are mounted on the bottom of the oil sump. An auxilliary contact<br />
of the compressor starter, energizes these heaters during the compressor<br />
off cycle to maintain a proper elevation of the oil temperature. The heater<br />
element is continuously energized while the compressor is off and does not<br />
cycle on temperature.<br />
Oil Filter<br />
All Series R chillers are equipped with replaceable-element oil filters. Each<br />
removes any impurities that could foul the compressor internal oil supply galleries.<br />
This also prevents excessive wear of compressor rotor and bearing<br />
surfaces and promotes long bearing life. Refer to the Section 9 for recommended<br />
filter element replacement intervals.<br />
Compressor Bearing Oil Supply<br />
Oil is injected into the rotor housing where it is routed to the bearing groups<br />
located in the motor and bearing housing sections. Each bearing housing is<br />
vented to compressor suction so oil leaving the bearings returns through the<br />
compressor rotors to the oil separator.<br />
<strong>RTHD</strong>-SVX01B-EN 89
Operating Principles Mechanical<br />
Compressor Rotor Oil Supply<br />
Oil flowing through this circuit enters the bottom of the compressor rotor<br />
housing. From there it is injected along the rotors to seal clearance spaces<br />
around the rotors and lubricate the contact line between the male and female<br />
rotors.<br />
Lubricant Recovery<br />
Despite the high efficiency of the oil separators, a small percentage of oil will<br />
get past them, move through the condenser, and eventually end up in the<br />
evaporator. This oil must be recovered and returned to the oil sump. The function<br />
of active oil return is accomplished by a pressure-actuated pump referred<br />
to as the “gas pump.”<br />
The gas pump, mounted just beneath the evaporator, is a cylinder with four<br />
ports controlled by two solenoids. The pump serves to return accumulating<br />
oil in the evaporator to the compressor at regular time intervals. As the refrigerant-oil<br />
mixture enters the gas pump from the bottom of the evaporator, a fill<br />
solenoid opens to allow refrigerant vapor to be vented into the top of the<br />
evaporator, and is then closed. A second solenoid then opens to allow refrigerant<br />
at condenser pressure to enter the gas pump. Simultaneously, a check<br />
valve prevents reverse flow back into the evaporator. A liquid refrigerant and<br />
oil mixture is displaced from the gas pump cylinder and is directed through a<br />
filter to the compressor. The oil then combines with oil injected into the compressor<br />
and returns to the oil sump via the oil separators.<br />
Oil Cooler<br />
The oil cooler is a brazed plate heat exchanger located near the oil filter. It is<br />
designed to transfer approximately one ton of heat from the oil to the suction<br />
side of the system. Subcooled liquid is the cooling source.<br />
The oil cooler is required on units running at high condensing or low suction<br />
temperatures. The high discharge temperatures in these applications<br />
increase oil temperatures above the recommended limits for adequate lubrication<br />
and reduce the viscosity of the oil.<br />
90 <strong>RTHD</strong>-SVX01B-EN
Operator Interface Controls<br />
CH530 Communications Overview<br />
The Trane CH530 control system that runs the chiller consists of several elements:<br />
• The main processor collects data, status, and diagnostic information and<br />
communicates commands to the starter module and the LLID (for Low<br />
Level Intelligent Device) bus. The main processor has an integral display<br />
(DynaView).<br />
• Higher level modules (e.g. starter) exist only as necessary to support system<br />
level control and communications. The starter module provides control<br />
of the starter when starting, running, and stopping the chiller motor.<br />
It also processes its own diagnostics and provides motor and compressor<br />
protection.<br />
• Low level intelligent device (LLID) bus. The main processor communicates<br />
to each input and output device (e.g. temperature and pressure<br />
sensors, low voltage binary inputs, analog input/output) all connected to a<br />
four-wire bus, rather than the conventional control architecture of signal<br />
wires for each device.<br />
• The communication interface to a building automation system (BAS).<br />
• A service tool to provide all service/maintenance capabilities.<br />
Main processor and service tool (TechView) software is downloadable from<br />
www.Trane.com. The process is discussed later in this section under Tech-<br />
View Interface.<br />
DynaView provides bus management. It has the task of restarting the link, or<br />
filling in for what it sees as “missing” devices when normal communications<br />
has been degraded. Use of TechView may be required.<br />
The CH530 uses the IPC3 protocol based on RS485 signal technology and<br />
communicating at 19.2 Kbaud to allow 3 rounds of data per second on a 64-<br />
device network. A typical four-compressor RTAC will have around 50 devices.<br />
Most diagnostics are handled by the DynaView. If a temperature or pressure<br />
is reported out of range by a LLID, the DynaView processes this information<br />
and calls out the diagnostic. The individual LLIDs are not responsible for any<br />
diagnostic functions. The only exception to this is the Starter module.<br />
NOTE: It is imperative that the CH530 Service Tool (TechView) be used to<br />
facilitate the replacement of any LLID or reconfigure any chiller component.<br />
TechView is discussed later in this section.<br />
Controls Interface<br />
DynaView<br />
Each chiller is equipped with the DynaView interface. DynaView has the capability<br />
to display additional information to the advanced operator including the<br />
ability to adjust settings. Multiple screens are available and text is presented<br />
in multiple languages as factory-ordered or can be easily downloaded online.<br />
TechView<br />
TechView can be connected to the DynaView module and provides further<br />
data, adjustment capabilities, diagnostics information, downloadable software,<br />
and downloadable languages.<br />
<strong>RTHD</strong>-SVX01B-EN 91
Operator Interface Controls<br />
DynaView Interface<br />
The display on DynaView is a 1/4 VGA display with a resistive touch screen<br />
and an LED backlight. The display area is approximately 4 inches wide by 3<br />
inches high (102mm x 60mm).<br />
Figure 30<br />
DynaView<br />
Key Functions<br />
In this touch screen application, key functions are determined completely by<br />
software and change depending upon the subject matter currently being displayed.<br />
The basic touch screen functions are outlined below.<br />
CAUTION<br />
Equipment Damage!<br />
Putting excessive pressure on the touch screen could cause<br />
damage. It takes less that 15 lbs of force to break the screen.<br />
Radio Buttons<br />
Radio buttons show one menu choice among two or more alternatives, all visible.<br />
(the AUTO button in Figure 30.) The radio button model mimics the buttons<br />
used on old-fashioned radios to select stations. When one is pressed,<br />
the one that was previously pressed “pops out” and the new station is<br />
selected. In the DynaView, model the possible selections are each associated<br />
with a button. The selected button is darkened, presented in reverse video to<br />
indicate it is the selected choice. The full range of possible choices as well as<br />
the current choice is always in view.<br />
Spin Value Buttons<br />
Spin values are used to allow a variable setpoint to be changed, such as leaving<br />
water setpoint. The value increases or decreases by touching the increment<br />
(+) or decrement (-) arrows.<br />
92 <strong>RTHD</strong>-SVX01B-EN
Operator Interface Controls<br />
Action Buttons<br />
Action buttons appear temporarily and provide the user with a choice such as<br />
Enter or Cancel.<br />
File Folder Tabs<br />
File folder tabs are used to select a screen of data. Just like tabs in a file<br />
folder, these serve to title the folder/screen selected, as well as provide navigation<br />
to other screens. In DynaView, the tabs are in one row across the top<br />
of the display. The folder tabs are separated from the rest of the display by a<br />
horizontal line. Vertical lines separate the tabs from each other. The folder that<br />
is selected has no horizontal line under its tab, thereby making it look like a<br />
part of the current folder (as would an open folder in a file cabinet). The user<br />
selects a screen of information by touching the appropriate tab.<br />
Display Screens<br />
Basic Screen Format<br />
The basic screen format appears as:<br />
Main Reports Settings<br />
File Folder<br />
Tabs<br />
Page Scroll<br />
(up)<br />
Line Scroll<br />
(up/down)<br />
Page Scroll<br />
(down)<br />
Fixed Display<br />
Contrast control (lighter)<br />
Contrast control (darker)<br />
The file folder tabs across the top of the screen are used to select the various<br />
display screens.<br />
The main body of the screen is used for description text, data, setpoints, or<br />
keys (touch sensitive areas). The Chiller Mode is displayed here.<br />
The double up arrows cause a page-by-page scroll either up or down. The single<br />
arrow causes a line by line scroll to occur. At the end of the page, the<br />
appropriate scroll bar will disappear.<br />
A double arrow pointing to the right indicates more information is available<br />
about the specific item on that same line. Pressing it will bring you to a subscreen<br />
that will present the information or allow changes to settings.<br />
The bottom of the screen (Fixed Display) is present in all screens and contains<br />
the following functions. The left circular area is used to reduce the contrast/viewing<br />
angle of the display. The right circular area is used to increase<br />
the contrast/viewing angle of the display. The contrast may require re-adjustment<br />
at ambient temperatures significantly different from those present at<br />
last adjustment.<br />
<strong>RTHD</strong>-SVX01B-EN 93
Operator Interface Controls<br />
The other functions are critical to machine operation. The AUTO and STOP<br />
keys are used to enable or disable the chiller. The key selected is in black<br />
(reverse video). The chiller will stop when the STOP key is touched and after<br />
completing the Run Unload mode.<br />
Touching the AUTO key will enable the chiller for active cooling if no diagnostic<br />
is present. (A separate action must be taken to clear active diagnostics.)<br />
The AUTO and STOP keys, take precedence over the Enter and Cancel keys.<br />
(While a setting is being changed, AUTO and STOP keys are recognized even<br />
if Enter or Cancel has not been pressed.)<br />
The ALARMS button appears only when an alarm is present, and blinks (by<br />
alternating between normal and reverse video) to draw attention to a diagnostic<br />
condition. Pressing the ALARMS button takes you to the corresponding<br />
tab for additional information.<br />
Keypad/Display Lockout Feature<br />
DISPLAY AND TOUCH SCREEN ARE LOCKED<br />
ENTER PASSWORD TO UNLOCK<br />
1<br />
3<br />
7<br />
Enter<br />
2<br />
5<br />
8<br />
0<br />
3<br />
6<br />
9<br />
Cancel<br />
NOTE: The DynaView display and Touch Screen Lock screen is shown<br />
below. This screen is used if the Display and touch screen and lock feature is<br />
enabled. Thirty minutes after the last keystroke, this screen is displayed and<br />
the Display and Touch Screen is locked out until the sequence “159<br />
” is pressed.<br />
Until the proper password is entered, there will be no access to the Dyna-<br />
View screens including all reports, setpoints, and Auto/Stop/Alarms/Interlocks.<br />
The password “159” can not be changed from either DynaView or TechView.<br />
94 <strong>RTHD</strong>-SVX01B-EN
Operator Interface Controls<br />
Main Screen<br />
The Main screen is a summary of the chiller’s activity.The Main screen is the<br />
default screen. After an idle time of 30 minutes the CH530 will display the<br />
Main screen with the first data fields.<br />
The remaining items (listed in the following table) are viewed by selecting the<br />
up/down arrow icons.<br />
Figure 31. Main Screen<br />
Table 19<br />
Main Screen Items<br />
Description Resolution Units<br />
Chiller Mode (>> submodes)<br />
Text<br />
Evap Ent/Lvg Water Temp X.X F / C<br />
Cond Ent/Lvg Water Temp X.X F / C<br />
Active Chilled Water Setpoint (>>source) X.X F / C<br />
Average Line Current X % RLA<br />
Active Current Limit Setpoint (>>source) X % RLA<br />
Active Base Loading Setpoint (>>source) X %<br />
Active Ice Termination Setpoint (>>source) X.X F / C<br />
Outdoor Air Temperature X.X F / C<br />
Software Type RTH Text<br />
Software Version X.XX Text<br />
<strong>RTHD</strong>-SVX01B-EN 95
Operator Interface Controls<br />
Chiller Operating Modes<br />
The machine-operating mode indicates the operational status of the chiller. A<br />
sub-screen with additional mode summary information is provided by selection<br />
of an additional information icon (>>). The operating mode line will<br />
remain stationary while the remaining status items scroll with the up/down<br />
arrow keys. The following is a list of all Top Level and Sub-modes.<br />
Table 20<br />
Operating Modes<br />
Chiller Modes<br />
MP Resetting 1<br />
Description<br />
Stopped 1<br />
The chiller is not running and cannot run without intervention.<br />
Further information is provided by the sub-mode:<br />
Local Stop 2<br />
Chiller is stopped by DynaView Stop button command- cannot be<br />
remotely overridden.<br />
Panic Stop 2<br />
Chiller is stopped by the DynaView Panic Stop (by pressing Stop<br />
button twice in succession) - previous shutdown was manually<br />
commanded to shutdown immediately without a run-unload or<br />
pumpdown cycle - cannot be remotely overridden.<br />
Diagnostic Shutdown - Manual Reset 2 The chiller is stopped by a diagnostic that requires manual intervention<br />
to reset.<br />
Other sub-modes are possible in conjunction with at least one of the above modes - See items below for their<br />
descriptions:<br />
Diagnostic Shutdown - Auto Reset 2<br />
Start Inhibited by External Source 2<br />
Start Inhibited by BAS 2<br />
Waiting for BAS Communications 2<br />
Ice Building to Normal Transition 2<br />
Ice Building is Complete 2<br />
Waiting for Oil Level 2<br />
Run Inhibit 1<br />
Diagnostic Shutdown - Auto Reset 2<br />
Start Inhibited by External Source 2<br />
Start Inhibited by BAS 2<br />
1 - Top Level Mode<br />
2 - Sub Level Mode<br />
The chiller is currently being inhibited from starting (and running*),<br />
but may be allowed to start if the inhibiting or diagnostic condition<br />
is cleared. Further information is provided by the sub-mode:<br />
The entire chiller is stopped by a diagnostic that may automatically<br />
clear.<br />
The chiller is inhibited from starting (and running) by the "external<br />
stop" hardwired input.<br />
The chiller is inhibited from starting (and running) by command<br />
from a Building Automation System via the digital communication<br />
link (com 4 or com 5).<br />
96 <strong>RTHD</strong>-SVX01B-EN
Operator Interface Controls<br />
Table 20<br />
Operating Modes<br />
Chiller Modes<br />
Waiting for BAS Communications 2<br />
Power Up Delay Inhibit 2<br />
min:sec<br />
Ice Building to Normal Transition 2<br />
Ice Building is Complete 2<br />
Low Diff Rfgt Pres Cool-Down Time 2<br />
mn:sec<br />
Auto 1<br />
Waiting For Evap Water Flow 2<br />
Waiting for Need to Cool 2<br />
Waiting to Start 1<br />
Waiting For Cond Water Flow 2<br />
Waiting for Oil Level 2<br />
Cond Water Pump PreRun Time 2<br />
min:sec<br />
1 - Top Level Mode<br />
2 - Sub Level Mode<br />
Description<br />
This is a transient mode - 15-min. max, and is only possible if the<br />
chiller is in the Auto - Remote command mode. After a power up<br />
reset, it is necessary to wait for valid communication from a<br />
Building Automation System (Tracer) to know whether to run or<br />
stay inhibited. Either valid communication will be received from<br />
the Building Automation System (e.g. Tracer), or a communication<br />
diagnostic ultimately will result. In the latter case the chiller will<br />
revert to Local control.<br />
The compressor is currently being inhibited from starting as part of<br />
the power up start delay (or staggered start) feature. This feature is<br />
intended to prevent multiple chillers from all starting simultaneously<br />
if power is restored to all chillers simultaneously.<br />
The chiller is inhibited from running for a brief period of time if it is<br />
commanded from active ice building mode into normal cooling<br />
mode via the ice building hardwired input or Tracer. This allows<br />
time for the external system load to "switchover" from an ice bank<br />
to the chilled water loop, and provides for a controlled pull down of<br />
the loop's warmer temperature. This mode is not seen if the ice<br />
making is automatically terminated on return brine temperature per<br />
the mode below.<br />
The chiller is inhibited from running as the Ice Building process has<br />
been normally terminated on the return brine temperature. The<br />
chiller will not start unless the ice building command (hardwired<br />
input or Building Automation System command) is removed or<br />
cycled.(contact opened)<br />
See oil flow protection spec<br />
The chiller is not currently running but can be expected to start at<br />
any moment given that the proper conditions and interlocks are<br />
satisfied. Further information is provided by the sub-mode:<br />
The chiller will wait up to 4 minutes in this mode for evaporator<br />
water flow to be established per the flow switch hardwired input.<br />
The chiller will wait indefinitely in this mode, for an evaporator<br />
leaving water temperature higher than the Chilled Water Setpoint<br />
plus the Differential to Start.<br />
The chiller is not currently running and there is a call for cooling but<br />
start is delayed by certain interlocks or proofs. Further information<br />
is provided by the sub-mode:<br />
The chiller will wait up to 4 minutes in this mode for condenser<br />
water flow to be established per the flow switch hardwired input.<br />
The chiller will wait up to 2 minutes in this mode for oil level to<br />
appear in the oil tank.<br />
The chiller will wait up to 30 minutes (user adjustable) in this mode<br />
to allow the condenser water loop to equalize in temperature<br />
<strong>RTHD</strong>-SVX01B-EN 97
Operator Interface Controls<br />
Table 20<br />
Operating Modes<br />
Chiller Modes<br />
Compressor Restart Inhibit Time 2<br />
min:sec<br />
Waiting For EXV Preposition 2<br />
Running 1<br />
Unit is Building Ice 2<br />
Establishing Min Capacity - High Disch<br />
Temp 2<br />
Base Loaded 2<br />
Capacity Control Softloading 2<br />
Current Control Softloading 2<br />
EXV Controlling Differential Pressure 2<br />
Running - Limited 1<br />
Capacity Limited by High Cond Press 2<br />
Capacity Limited by Low Evap Rfgt<br />
Temp 2<br />
1 - Top Level Mode<br />
2 - Sub Level Mode<br />
Description<br />
The compressor is currently unable to start due to its restart inhibit<br />
timer. A given compressor is not allowed to start until 5 minutes<br />
(adj) has expired since its last start.<br />
The Chiller will wait for the time it takes the EXV to get to its<br />
commanded pre-position prior to starting the compressor. This is<br />
typically a relatively short delay and no countdown timer is<br />
necessary (less than 15 seconds).<br />
The chiller, circuit, and compressor are currently running. Further<br />
information is provided by the sub-mode:<br />
The chiller is running in the Ice Building Mode, and either at or<br />
moving towards full capacity available. Ice mode is terminated<br />
either with the removal of the ice mode command or with the return<br />
brine temperature falling below the Ice Termination Setpoint.<br />
The compressor is running and is being forced loaded, without<br />
regard to the leaving water temperature control, to prevent tripping<br />
on high compressor discharge temperature.<br />
Chiller is running in "Base Load" operation where the capacity of the<br />
chiller is controlled to maintain a given current per an adjustable set<br />
point. The chiller is forced to run without regard to the chilled water<br />
temperatures and the differential to start and stop.<br />
The chiller is running, but loading is influenced by a gradual<br />
'pulldown" filter on the chilled water temperature setpoint The<br />
settling time of this filter is user adjustable as part of the softload<br />
control feature.<br />
The chiller is running, but loading is influenced by a gradual filter<br />
on the current limit setpoint The starting current and the settling<br />
time of this filter is user adjustable as part of the softload control<br />
feature.<br />
Liquid level control of the Electronic Expansion Valve has temporarily<br />
been suspended. The EXV is being modulated to control for a<br />
minimum differential pressure. This control implies low liquid<br />
levels and higher approach temperatures, but is necessary to<br />
provide minimum oil flow for the compressor until the condenser<br />
water loop can warm up to approx 50F.<br />
The chiller, circuit, and compressor are currently running, but the<br />
operation of the chiller/compressor is being actively limited by the<br />
controls. Further information is provided by the sub-mode.<br />
The circuit is experiencing condenser pressures at or near the<br />
condenser limit setting. The compressor will be unloaded to<br />
prevent exceeding the limits.<br />
The circuit is experiencing saturated evaporator temperatures at or<br />
near the Low Refrigerant Temperature Cutout setting. The<br />
compressors will be unloaded to prevent tripping.<br />
98 <strong>RTHD</strong>-SVX01B-EN
Operator Interface Controls<br />
Table 20<br />
Operating Modes<br />
Chiller Modes<br />
Description<br />
Capacity Limited by Low Liquid Level 2 The circuit is experiencing low refrigerant liquid levels and the EXV<br />
is at or near full open. The compressor will be unloaded to prevent<br />
tripping.<br />
Capacity Limited by High Current 2 The compressor is running and its capacity is being limited by high<br />
currents. The current limit setting is 120% RLA (to avoid<br />
overcurrent trips).<br />
Capacity Limited by Phase Unbalance 2 The compressor is running and its capacity is being limited by<br />
excessive phase current unbalance.<br />
Note: Other normal running modes (see above) may also appear under this top level mode.<br />
Shutting Down 1<br />
The chiller is still running but shutdown is imminent. The chiller is<br />
going through a compressor run-unload. sequence. Shutdown is<br />
necessary due to one (or more) of the following sub-modes:<br />
Local Stop 2<br />
Chiller is in the process of being stopped by DynaView Stop button<br />
command.<br />
Panic Stop 2<br />
Chiller is in the process of being stopped by DynaView Panic Stop<br />
command.<br />
Diagnostic Shutdown - Manual Reset 2 Chiller is in the process of being stopped by a Latching Diagnostic<br />
shutdown - Manual Reset is required to clear.<br />
Diagnostic Shutdown - Auto Reset 2 Chiller is in the process of being stopped by a Diagnostic shutdown<br />
- Automatic clearing of the diagnostic is possible if condition clears.<br />
Compressor Unloading 2 min:sec The compressor is in its "run - unload" state in which it is being<br />
continuously unloaded for 40 sec prior to shutdown.<br />
Start Inhibited by External Source 2 Chiller is in the process of being stopped by the External Stop<br />
hardwired input.<br />
Start Inhibited by BAS 2<br />
The Chiller is in the process of shutdown due to a command from<br />
the Building Automation System (e.g. Tracer).<br />
Ice Building to Normal Transition 2 Chiller is in the process of being stopped by the transition from ice<br />
to normal cooling mode with the removal of the ice making<br />
command via the hardwired input or Building Automation System<br />
(e.g. Tracer).<br />
Ice Building is Complete 2<br />
Chiller is in the process of being stopped as the Ice Building process<br />
is being normally terminated on the return brine temperature.<br />
Evap Pump Off Delay 2 min:sec<br />
Service Override 1<br />
The Chiller is in a Service Override mode<br />
Service Pumpdown 2<br />
The chiller, circuit, and compressor is running via a manual<br />
command to perform a Service Pumpdown. Both evap and<br />
condenser water pumps are commanded to run. The EXV is held<br />
wide open, but the manual liquid line service valve should be<br />
closed.<br />
1 - Top Level Mode<br />
2 - Sub Level Mode<br />
<strong>RTHD</strong>-SVX01B-EN 99
Operator Interface Controls<br />
Reports Screen<br />
The Reports tab allows a user to select from a list of reports headings. Each<br />
report will generate a list of status items as defined in the tables that follow.<br />
Figure 32. Reports Screen<br />
Chiller Log<br />
Table 21<br />
Report Screen Items<br />
Description Resolution Units<br />
Evaporator<br />
Evap Entering Water Temp ± XXX.X F / C<br />
Evap Leaving Water Temp ± XXX.X F / C<br />
Evap Sat Rfgt Temp ± XXX.X F / C<br />
Evap Rfgt Pressure XXX.X psi / kPa<br />
Evap Approach ± XXX.X F / C<br />
Evap Water Flow Switch Status (Flow, No Flow) Text<br />
Expansion Valve Position XXX.X Percent<br />
Expansion Valve Position Steps XXXX Steps<br />
Evaporator Liquid Level X.X in / mm<br />
Condenser<br />
Cond Entering Water Temp ± XXX.X F / C<br />
Cond Leaving Water Temp ± XXX.X F / C<br />
Cond Sat Rfgt Temp ± XXX.X F / C<br />
Cond Rfgt Pressure XXX.X psi / kPa<br />
Cond Approach Temp ± XXX.X F / C<br />
Cond Water Flow Switch Status (Flow, No Flow) Text<br />
Cond Head Pressure Ctrl Command XXX %<br />
100 <strong>RTHD</strong>-SVX01B-EN
Operator Interface Controls<br />
Table 21<br />
Report Screen Items<br />
Description Resolution Units<br />
Outdoor Air Temperature ± XXX.X F / C<br />
Compressor<br />
Compressor Starts XXXX Integer<br />
Compressor Running Time XXXX:XX hr:min<br />
System Rfgt Diff Pressure XXX.X psi / kPa<br />
Oil Pressure XXX.X psi / kPa<br />
Compressor Rfgt Discharge Temp ± XXX.X F / C<br />
Discharge Superheat ± XXX.X F / C<br />
% RLA L1 L2 L3 XXX.X Percent RLA<br />
Amps L1 L2 L3 XXXX Amps<br />
Volts AB BC CA XXXX Volts<br />
ASHRAE Chiller Log<br />
Current Time/Date XX:XX mmm dd, yyyy Date / Time<br />
Operating Mode:<br />
Text<br />
Amps L1 L2 L3 XXXX Amps<br />
Volts AB BC CA XXXX Volts<br />
Active Chilled Water Setpoint XXX.X F / C<br />
Active Current Limit Setpoint XXX.X F / C<br />
Refrigerant Monitor XXX.X Ppm<br />
Compressor Starts XXXX Integer<br />
Compressor Running Time XX:XX Hours:Minute<br />
Compressor Rfgt Discharge Temp XXX.X F / C<br />
Evap Entering Water Temp XXX.X F / C<br />
Evap Leaving Water Temp XXX.X F / C<br />
Evap Sat Refrigerant Temp XXX.X F / C<br />
Evap Rfgt Pressure XXX.X psi / kPa<br />
Evap Approach Temp: XXX.X F / C<br />
Evap Water Flow Switch Status<br />
Text<br />
Cond Entering Water Temp XXX.X F / C<br />
Cond Leaving Water Temp XXX.X F / C<br />
Cond Sat Rfgt Temp XXX.X F / C<br />
Cond Rfgt Pressure XXX.X psi / kPa<br />
Condenser Approach Temp XXX.X F / C<br />
Cond Water Flow Switch Status<br />
Text<br />
<strong>RTHD</strong>-SVX01B-EN 101
Operator Interface Controls<br />
Settings Screen<br />
The Settings screen provides the user the ability to adjust settings. The layout<br />
provides a list of sub-menus, organized by typical subsystem.<br />
Figure 33. Settings Screen<br />
Table 22<br />
Settings Screen Items<br />
Description Resolution or (Text), Default Units<br />
Chiller<br />
Front Panel Chilled Water Setpt ± XXX.X (3)<br />
Front Panel Current Limit Setpt XXX (4) Percent RLA<br />
Front Panel Base Load Cmd On/Auto Text<br />
Front Panel Base Load Setpt XXX Percent<br />
Front Panel Ice Build Cmd On/Auto Text<br />
Front Panel Ice Termn Setpt XXX.X F / C<br />
Ice to Normal Cool Timer Setpt (0-10), 5 min Minutes<br />
Differential to Start XXX.X F / C<br />
Differential to Stop XXX.X F / C<br />
Setpoint Source<br />
(BAS/Ext/FP, Ext/ Front Panel, Front Panel),<br />
BAS/Ext/FP<br />
Text<br />
Features<br />
Chilled Water Reset (Constant, Outdoor, Return, Disable), Disable Text<br />
Return Reset Ratio XXX Percent<br />
Return Start Reset XXX.X F / C<br />
Return Maximum Reset XXX.X F / C<br />
102 <strong>RTHD</strong>-SVX01B-EN
Operator Interface Controls<br />
Table 22<br />
Settings Screen Items<br />
Description Resolution or (Text), Default Units<br />
Outdoor Reset Ratio XXX Percent<br />
Outdoor Start Reset XXX.X F / C<br />
Outdoor Maximum Reset XXX.X F / C<br />
Ext Chilled Water Setpoint (Enable, Disable), Disable Text<br />
Ext Current Limit Setpoint (Enable, Disable), Disable Text<br />
Ice Building (Enable, Disable), Disable Text<br />
Ext Base Loading Setpoint (Enable, Disable), Disable Text<br />
Mode Overrides<br />
Evap Water Pump (Auto, On), Auto Text<br />
Cond Water Pump (Auto, On), Auto (8) Text<br />
Expansion Valve Control (Auto, Manual) Auto Text<br />
Slide Valve Control (Auto, Manual) Auto Text<br />
Service Pumpdown Status: (Avail, Not Avail, Pumpdown) Text<br />
Display Settings<br />
Date Format<br />
("mmm dd, yyy", "dd-mmm-yyyy"),<br />
Text<br />
"mmm dd, yyy<br />
Date<br />
Text<br />
Time Format (12-hour, 24-hour), 12-hour Text<br />
Time of Day<br />
Text<br />
Keypad/Display Lockout (Enable, Disable), Disable (5) Text<br />
Display Units (SI, English) English Text<br />
Pressure Units (Absolute, Gauge), Absolute Text<br />
Language Selection Downloaded fron TechView Text<br />
<strong>RTHD</strong>-SVX01B-EN 103
Operator Interface Controls<br />
Diagnostic Screen<br />
Figure 34. Diagnostics Screen<br />
The diagnostic screen is accessible by depressing the Alarms enunciator. A<br />
verbal description will be provided.<br />
A scrollable list of the last (up to 10) active diagnostics is presented. Performing<br />
a “Reset Diags” will reset all active diagnostics regardless of type,<br />
machine or circuit. The scrollable list will be sorted by time of occurrence.<br />
If a informational warning is present, the "Alarms" key will be present but not<br />
flashing. If a diagnostic shutdown (normal or immediate)has occurred, the<br />
"Alarm" key will display that is flashing. If no diagnostics exist, the "Alarm" key<br />
will not be present.<br />
The "Operating Mode At Last Diagnostic" text above the most recent diagnostic<br />
will display a sub-screen listing the operating mode and submodes at the<br />
time of the last diagnostic.<br />
104 <strong>RTHD</strong>-SVX01B-EN
TechView<br />
TechView is the PC (laptop) based tool used for servicing Tracer CH530<br />
Chillers. Technicians that make any chiller control modification or service any<br />
diagnostic with Tracer CH530 must use a laptop running the software<br />
application “TechView.” TechView is a Trane application developed to minimize<br />
chiller downtime and aid the technicians' understanding of the chiller<br />
operation and service requirements.<br />
NOTE: Important: Performing any Tracer CH530 service functions should be<br />
done only by a properly trained service technician. Please contact your local<br />
Trane service agency for assistance with any service requirements.<br />
TechView software is available via Trane.com.<br />
(http://www.trane.com/commercial/software/tracerch530/)<br />
This download site provides a user the TechView installation software and<br />
CH530 main processor software that must be loaded onto their PC in order to<br />
service a CH530 main processor. The TechView service tool is used to load<br />
software into the Tracer CH530 main processor.<br />
<strong>RTHD</strong>-SVX01B-EN 105
TechView<br />
Minimum PC requirements to install and operate TechView<br />
• Pentium II or higher processor<br />
• 128Mb RAM<br />
• 1024 x 768 resolution of display<br />
• 56K modem<br />
• 9-pin RS-232 serial connection<br />
• Operating system - Windows 2000<br />
• Microsoft Office (MS Word, MS Access, MS Excel)<br />
• Parallel Port (25-pin) or USB Port<br />
NOTE: TechView was designed for the preceding listed laptop configuration.<br />
Any variation will have unknown results. Therefore, support for TechView is<br />
limited to only those operating systems that meet the specific configuration<br />
listed here. Only computers with a Pentium II class processor or better are<br />
supported; Intel Celeron, AMD, or Cyrix processors have not been tested.<br />
TechView is also used to perform any CH530 service or maintenance<br />
function. Servicing a CH530 main processor includes:<br />
• Updating main processor software<br />
• Monitoring chiller operation<br />
• Viewing and resetting chiller diagnostics<br />
• Low Level Intelligent Device (LLID) replacement and binding<br />
• Main processor replacement and configuration modifications<br />
• Setpoint modifications<br />
• Service overrides<br />
106 <strong>RTHD</strong>-SVX01B-EN
TechView<br />
Unit View<br />
Unit view is a summary for the system organized by chiller subsystem. This<br />
provides an overall view of chiller operating parameters and gives you an "at-aglance"<br />
assessment of chiller operation.<br />
Upon successful Local Connect Tech View will display UNIT VIEW.<br />
<strong>RTHD</strong> Unit View is shown below<br />
Figure 35<br />
Unit View<br />
<strong>RTHD</strong>-SVX01B-EN 107
TechView<br />
Status View<br />
Status View displays, in real time, all non-setpoint data organized by<br />
subsystem tabs. As data changes on the chiller it is automatically updated in<br />
Status View<br />
Figure 36. Status View<br />
108 <strong>RTHD</strong>-SVX01B-EN
TechView<br />
Table 23<br />
Status View Items<br />
Tab Text Units<br />
Chiller Active Chilled Water Setpoint / Source Temperature<br />
Active Current Limit Setpoint / Source Percent RLA<br />
Active Base Loading Setpoint / Source Percent<br />
Active Ice Termination Setpoint / Source Temperature<br />
Evaporator Entering Water Temperature Temperature<br />
Evaporator Leaving Water Temperature Temperature<br />
Chilled Water Pump Relay<br />
(on/off)<br />
Evaporator Water Flow Switch Status (Flow/NoFlow)<br />
Condenser Entering Water Temperature Temperature<br />
Condenser Leaving Water Temperature Temperature<br />
Condenser Water Pump Relay<br />
(on/off)<br />
Condenser Water Flow Switch Status (Flow/NoFlow)<br />
Outdoor Air Temperature<br />
Temperature<br />
Refrigerant Monitor<br />
Ppm<br />
Circuit<br />
Evaporator Saturated Refrigerant<br />
Temperature<br />
Temperature<br />
Evaporator Refrigerant Pressure<br />
Pressure<br />
Evaporator Approach Temperature<br />
Diff.<br />
Temperature<br />
Evaporator Liquid Level<br />
Level<br />
Condenser Saturated Refrigerant<br />
Temperature<br />
Temperature<br />
Condenser Refrigerant Pressure<br />
Pressure<br />
Condenser Approach Temperature<br />
Diff.<br />
Temperature<br />
Discharge Superheat<br />
Diff.<br />
Temperature<br />
Expansion Valve Position<br />
Percent<br />
Expansion Valve Position Steps<br />
Steps<br />
HPC Switch Status<br />
(Closed/<br />
Tripped)<br />
<strong>RTHD</strong>-SVX01B-EN 109
TechView<br />
Table 23<br />
Status View Items<br />
Tab Text Units<br />
Compressor Compressor Running Status (On/Off)<br />
Compressor Starts<br />
Integer<br />
Compressor Run Time<br />
Hrs:mins<br />
Compressor Refrigerant Discharge Temp Temperature<br />
Oil Return Gas Fill Solenoid Valve Status (Open/Closed)<br />
Oil Return Gas Drain Solenoid Valve Status (Open/Closed)<br />
Oil Loss Level Sensor<br />
(Dry/Wet)<br />
Oil Pressure<br />
Pressure<br />
Oil Pressure Ratio Pressure Ratio-<br />
Psid/Psid or<br />
Kpa/Kpa<br />
System Refrigerant Differential Pressure Diff Pressure<br />
Restart Inhibit Time Remaining<br />
Min:sec<br />
Line Current L1, L2, L3<br />
Percent RLA<br />
Line Current L1, L2, L3<br />
amps<br />
Phase Voltage AB BC CA<br />
volts<br />
Average Line Current<br />
Percent RLA<br />
Average Line Current<br />
amps<br />
Maximum Line Current<br />
Percent RLA<br />
Average Phase Voltage<br />
volts<br />
Condenser Flow Commanded<br />
Percent<br />
Head Pressure<br />
(optional)<br />
Output Voltage Commanded<br />
Voltage<br />
Modes Chiller Top Level Mode Text<br />
Chiller Sub Modes<br />
Text<br />
Chiller Mode at Time of Last Diagnostic Text<br />
Chiller Sub Modes at Time of Last<br />
Diagnostic<br />
Text<br />
110 <strong>RTHD</strong>-SVX01B-EN
TechView<br />
Setpoint View<br />
Setpoint view displays the active setpoints and allows you to make changes.<br />
Figure 37<br />
Setpoint View<br />
Setpoint List<br />
The center of the window displays the scrollable list of setpoint panels.<br />
Setpoint Enumeration Panel<br />
A setpoint numeric panel contains a label with the setpoint description and a<br />
pull-down list showing the active value and the other selections. The Default<br />
button returns the setpoint to the product's factory setting. The text field is<br />
updated when the change is complete.<br />
<strong>RTHD</strong>-SVX01B-EN 111
TechView<br />
Setpoint Numeric Panel<br />
A setpoint numeric panel contains a label with the setpoint description, a<br />
Default button, a text field with a unit label, and a slider.<br />
The Default button changes the setpoint to the product's factory setting. The<br />
text field and slider are updated when the change is complete.<br />
You can change a setpoint with the text field or with the slider. When you click<br />
on the entry field, the change setpoint dialog displays to coordinate the<br />
setpoint change.<br />
You can change the display units for a setpoint by clicking on the unit label<br />
next to the entry field. Only units that have different English and SI values can<br />
be modified.<br />
Change Setpoint<br />
The change setpoint window allows you to enter a new value for the setpoint<br />
into a text field. If the entered value is outside the given range, the<br />
background turns red.<br />
112 <strong>RTHD</strong>-SVX01B-EN
TechView<br />
Table 24<br />
Setpoint View Items<br />
Tab Setpoint (Min, Max), Default Units<br />
Chiller Front Panel Chilled Water Setpoint (-17.78, 18.33), 6.67 °C Temperature<br />
Front Panel Current Limit Setpoint (40, 100), 100 %RLA Percent RLA<br />
Front Panel Ice Building Command On/auto Enum<br />
Front Panel Ice Termination Setpoint (-6.67, 0.0), -2.78 °C Temperature<br />
Ice To Normal Cooling Timer (0-10), 5 min Minutes<br />
Front Panel Base Loading Command On/auto Enum<br />
Front Panel Base Loading Setpoint (40-100),50 Percent<br />
Differential to Start Setpoint (0.55, 5.55), 2.78 °C Diff Temperature<br />
Differential to Stop Setpoint (0.55, 5.55), 2.78 °C Diff Temperature<br />
Setpoint Source<br />
(BAS/Ext/FP, Ext Front<br />
Panel, Front Panel),<br />
BAS/Ext/FP<br />
Enum<br />
Power Up Start Delay (0, 600), 0 sec Seconds<br />
Evaporator Water Pump Off Delay (0, 30), 1 min Minutes<br />
Condenser Pump Prestart Time (0, 30), 0 min Minutes<br />
Evaporator Design Delta Temperature (2.22, 16.7), 5.56 °C Diff Temperature<br />
Evaporator Leaving Water Temperature<br />
Cutout<br />
(-18.33, 2.22), 2.22 °C<br />
"Warning: Adequate<br />
Antifreeze Required<br />
TechView<br />
Table 24<br />
Setpoint View Items<br />
Tab Setpoint (Min, Max), Default Units<br />
Feature<br />
Settings<br />
Condenser<br />
Head Pressure<br />
(optional)<br />
Chilled Water Reset<br />
(Constant, Outdoor,<br />
Return, Disable),<br />
Disable<br />
Enum<br />
Return Reset Ratio (10, 120), 50 % Percent<br />
Return Start Reset (2.22, 16.67), 5.56 °C Diff Temperature<br />
Return Max Reset (0.0, 11.11), 2.78 °C Diff Temperature<br />
Outdoor Reset Ratio (-80, 80), 10 % Percent<br />
Outdoor Start Reset (10, 54.44), 32.22 °C Temperature<br />
Outdoor Max Reset (0.0, 11.11), 2.78 °C Diff Temperature<br />
External Chilled Water Setpoint<br />
(Enable, Disable),<br />
Disable<br />
Enum<br />
External Current Limit Setpoint<br />
Ice Building Feature<br />
External Base Loading Setpoint Enable<br />
(Enable, Disable),<br />
Disable<br />
(Enable, Disable),<br />
Disable<br />
(Enable, Disable),<br />
Disable<br />
Enum<br />
Enum<br />
Enum<br />
Capacity Control Softloading Time (0, 7200), 900 sec Seconds<br />
Current Limit Control Softloading Time (0, 7200), 600 sec Seconds<br />
Current Limit Softload Start Point (40, 100), 40 %RLA Percent RLA<br />
Phase Unbalance Limit Protection<br />
(Enable, Disable),<br />
Enable<br />
Enum<br />
Over/Under Voltage Protection<br />
(Enable, Disable),<br />
Disable<br />
Enum<br />
"Off State" Output Command (0.0-10.0), 2.0 Volts Voltage<br />
Output Voltage at Desired Minimum Flow (0.0 - 10.0) 2.0 Volts Voltage<br />
Desired Minimum Flow (0-100), 20 % Percent<br />
Output Voltage at Desired Maximum Flow (0.0 - 10.0), 2.0 Volts Voltage<br />
Actuator Stroke Time (0.0 - 300) 30 Sec Seconds<br />
Damping Coefficient (0.1 - 1.8) 0.5 None<br />
Min, Max and Default values are shown in SI units<br />
114 <strong>RTHD</strong>-SVX01B-EN
Figure 38. Manual Override View<br />
TechView<br />
Manual Override View<br />
Manual Override View is a combined presentation of setpoint (override) and<br />
status values. Each manual override item has an "Auto / On" (or Off) for binary<br />
control values or an "Auto/Manual" and an analog target value. Additionally,<br />
each item has a monitor value that the user will track the effect of an override.<br />
The panel contents are described as follows:<br />
Description<br />
Override<br />
Enable<br />
Target<br />
Present<br />
Setting<br />
Monitor<br />
Value(s)<br />
<strong>RTHD</strong>-SVX01B-EN 115
TechView<br />
Table 25<br />
Manuel Override View<br />
Description Radio 1 Radio 2 Monitor Value(s): Attribute ID<br />
Expansion Valve<br />
Control<br />
(%)<br />
Evaporator Pump<br />
Control<br />
Condenser Pump<br />
Control<br />
Slide Valve Control<br />
(Slide Valve Control<br />
Duty Cycle)<br />
Pumpdown Command<br />
and<br />
Pumpdown Status<br />
Auto<br />
Manual<br />
Expansion Valve Control Target<br />
EXV Position (%)<br />
EXV Position (steps)<br />
Evaporator Liquid Level (inches)<br />
Auto On Evap Water Flow Switch Status:<br />
Chilled Water Pump Relay:<br />
Evap Pump Override Time Remaining:<br />
Auto On Cond Water Flow Switch Status:<br />
Condenser Water Pump Relay:<br />
Cond Pump Override Time Remaining<br />
Auto<br />
Start<br />
Available<br />
Not Available<br />
In Progress<br />
Inhibited<br />
Manual<br />
Rate*<br />
integers<br />
-100 to +100<br />
Abort<br />
Evaporator Leaving Water Temperature<br />
Average Line Current (%RLA)<br />
Note:<br />
positive integers 1 to 100 imply<br />
loading at that duty cycle(5 sec<br />
period)<br />
negative integers -1 to -100 imply<br />
unloading at that absolute value<br />
duty cycle<br />
0 implies hold<br />
Evaporator Refrigerant Pressure<br />
Restart Inhibit Timer Clear (Button) Time Remaining<br />
Head Pressure Control<br />
Override<br />
0= Auto<br />
1= Off<br />
2= Minimum<br />
3=Maximum<br />
"Off State" Output Command<br />
Output Voltage at Desired<br />
Minimum Flow<br />
Desired Minimum Flow<br />
Output Voltage at Desired<br />
Maximum Flow<br />
Actuator Stroke Time<br />
Damping Coefficient<br />
Condenser Water Pump<br />
Prestart Time<br />
Leaving Condenser Water Temperature<br />
Leaving Condenser Water Temperature<br />
Condenser Water Pump Flow Status<br />
Output Voltage Commanded<br />
Flow Commanded<br />
Time to Get to Commanded Position<br />
116 <strong>RTHD</strong>-SVX01B-EN
Figure 39. Diagnostics View<br />
TechView<br />
Diagnostics View<br />
This window lists the active and inactive (history) diagnostics. There can be<br />
up to 60 diagnostics, both active and historic. For example, if there were 5<br />
active diagnostics, the possible number of historic diagnostics would be 55.<br />
You can also reset active diagnostics here, (i.e., transfer active diagnostics to<br />
history and allow the chiller to regenerate any active diagnostics).<br />
Resetting the active diagnostics may cause the chiller to resume operation.<br />
The Active and History diagnostics have separate tabs. A button to reset the<br />
active diagnostics displays when either tab is selected<br />
.<br />
<strong>RTHD</strong>-SVX01B-EN 117
TechView<br />
Configuration View<br />
Configuration view displays the active configuration and allows you to make<br />
changes.<br />
Figure 40<br />
Configuration View<br />
Configuration View allows you to define the chiller's components, ratings, and<br />
configuration settings. These are all values that determine the required<br />
installed devices, and how the chiller application is run in the main processor.<br />
For example, a user may set an option to be installed with Configuration View,<br />
which will require devices to be bound using Binding View. And when the<br />
main processor runs the chiller application, the appropriate steps are taken to<br />
monitor required inputs and control necessary outputs.<br />
Any changes made in the Configuration View, on any of the tabs, will modify<br />
the chiller configuration when you click on the Load Configuration button<br />
(located at the base of the window). The Load Configuration button uploads<br />
the new configuration settings into the main processor.<br />
Note: Selecting the Undo All button will undo any configuration setting<br />
changes made during the present TechView connection and since the last<br />
time the Load Configuration button was selected<br />
118 <strong>RTHD</strong>-SVX01B-EN
TechView<br />
Table 26<br />
Configuration View Items<br />
Tab Description Setting Notes<br />
Unit Unit Type (MODL)<br />
<strong>RTHD</strong><br />
Type<br />
Control Sequence 1<br />
CH530 Chiller Design Sequence** A0, B0, C0, D0, etc. See Nameplate<br />
Electronic Expansion Valve - Actuators SNGL (single), DUAL (dual) If COMP=B* then SNGL<br />
Evaporator Size B1, B2, C1, C2, D1, D2, D3, D4, D5,<br />
E1, F1, F2, G1, G2, G3<br />
Condenser High Pressure Cutout 35 to 3<strong>450</strong> 1240<br />
Unit Line Voltage 180 to 600 See Nameplate<br />
Motor NP Hertz 50 or 60 If VOLT= R, T, or U then 50<br />
Line Voltage Sensing<br />
not installed, installed<br />
Starter Rated Load Amps 34 to 999 See Nameplate<br />
Current Transformer (CT) Meter Scale 50, 75, 100, 150, 200, 275, 400, RLA CT Meter Scale<br />
500, 700, 1000<br />
33.4-50 50<br />
50-75 75<br />
67-100 100<br />
100-150 150<br />
134-200 200<br />
184-275 275<br />
267-400 400<br />
334-500 500<br />
467-700 700<br />
667-1000 1000<br />
Starter Type<br />
wye-delta, solid state<br />
Contactor Integrity Test<br />
enable, disable<br />
Momentary Power Loss Protection enable, disable Must have line voltage<br />
sensing option to enable.<br />
Compressor Frame Size<br />
B1, B2, C1, C2, D1, D2, D3, E3<br />
Phase Reversal Protection<br />
enable, disable<br />
Current Imbalance Trip Point 15 to 90 30<br />
Current Imbalance Grace Period 30 to 255 90<br />
Maximum Acceleration Time 3 to 10 Comp Max Accel<br />
Time<br />
B1 3<br />
B2 3<br />
C1 5<br />
C2 5<br />
D1 6<br />
D2 6<br />
D3 6<br />
E3 6<br />
Acceleration Timeout Action<br />
shutdown, transition<br />
<strong>RTHD</strong>-SVX01B-EN 119
TechView<br />
Table 26<br />
Configuration View Items<br />
Tab Description Setting Notes<br />
Options Outdoor Air Temperature not installed, installed<br />
Ice Building Option<br />
not installed, installed w/hdwr,<br />
installed w/o hdwr<br />
External Chilled Water Setpoint not installed, 2-10 Volts, 4-20 mA<br />
External Current Limit Setpoint not installed, 2-10 Volts, 4-20 mA<br />
Base Loading<br />
not installed, 2-10 Volts, 4-20 mA<br />
Motor Current Analog Output (%RLA) not installed, installed<br />
Refrigerant Monitor Type not installed, 4-20 mA, 100 ppm, 4-<br />
20 mA, 1000 ppm, 2-10 V, 100<br />
ppm, 2-10 V, 1000 ppm<br />
Operating Status Programmable<br />
Relays<br />
not installed, installed<br />
Options<br />
Setup<br />
Refrigerant Pressure Output Type<br />
(Condenser Pressure, Differential<br />
Pressure, or Condenser Water<br />
Regulating Valve Analog Output) the<br />
latter is also known as Head Pressure<br />
Control<br />
Tracer Interface<br />
External Chilled Water Setpoint<br />
Minimum Temperature<br />
External Chilled Water Setpoint<br />
Maximum Temperature<br />
External Current Limit Setpoint<br />
Minimum % RLA<br />
External Current Limit Setpoint<br />
Maximum % RLA<br />
Programmable Status Relay 1 (J2 -<br />
10,11,12)<br />
Programmable Status Relay 2 (J2 -<br />
7,8,9)<br />
Programmable Status Relay 3 (J2 -<br />
4,5,6)<br />
Programmable Status Relay 4 (J2 -<br />
1,2,3)<br />
Differential Pressure Output Minimum<br />
Pressure<br />
Differential Pressure Output Maximum<br />
Pressure<br />
NIST (not installed), HPC<br />
(condenser pressure in %HPC),<br />
DELP (differential pressure),<br />
WREG (condenser water<br />
regulating control output)<br />
comm4, LCI-C<br />
-17.8 to 9.9 -17.8<br />
10.0 to 18.4 18.4<br />
40 to 69 40<br />
70 to 100 100<br />
NONE, - Latching Alarm, Non-latching Alarm, Alarm (Alarm -<br />
Latching or Non-latching Shutdown), Chiller Limit Mode,<br />
Compressor Running), Warning, Head Pressure Relief Request,<br />
Tracer Controlled Relay<br />
0 to 3<strong>450</strong> 0<br />
0 to 3<strong>450</strong> 1103<br />
COMM4 Address 32 to 100 65<br />
120 <strong>RTHD</strong>-SVX01B-EN
TechView<br />
Software View<br />
Software view allows you to verify the version of chiller software (MP)<br />
currently running on the DynaView and download a new version of chiller<br />
software to the DynaView.<br />
You can also select up to two available languages to load into the DynaView.<br />
Loading an alternate language file allows the DynaView to display its text in<br />
the selected alternate language.<br />
Figure 41. Software View<br />
<strong>RTHD</strong>-SVX01B-EN 121
TechView<br />
Binding View<br />
Binding View allows you to assess the status of the network and all the<br />
devices connected as a whole, or the status of individual devices by using<br />
status icons and function buttons.<br />
Binding View is essentially a table depicting what devices and options are<br />
actually discovered on the network bus (and their communication status)<br />
versus what is required to support the configuration defined by the feature<br />
codes and categories. Binding View allows you to add, remove, modify, verify,<br />
and reassign devices and options in order to match the configuration<br />
requirements.<br />
Whenever a device is installed, it must be correctly configured to<br />
communicate and to function as intended. This process is called binding.<br />
Some features of Binding View are intended to serve a second purpose; that<br />
is diagnosing problems with communication among the devices.<br />
Figure 42. Binding View<br />
122 <strong>RTHD</strong>-SVX01B-EN
TechView<br />
Replacing or Adding Devices<br />
If a device is communicating but incorrectly configured, it might not be<br />
necessary to replace it. If the problem with the device is related to<br />
communication, attempt to rebind it, and if the device becomes correctly<br />
configured, it will then communicate properly.<br />
If a device that needs to be replaced is still communicating, it should be<br />
unbound. Otherwise, it will be necessary to rebuild the network image for<br />
Binding View to discover that it has been removed. An unbound device stops<br />
communicating and allows a new device to be bound in its place.<br />
It is good practice to turn the power off while detaching and attaching devices<br />
to the network. Be sure to keep power on the service tool computer. After<br />
power is restored to the network, the reconnect function in Binding View<br />
restores communication with the network. If the service tool computer is<br />
turned off, you must restart TechView and Binding View.<br />
If a device is not communicating, the binding function displays a window to<br />
request manual selection of the device to be bound. Previously-selected<br />
devices are deselected when the function starts. When manual selection is<br />
confirmed, exactly one device must be selected; if it is the correct type, it is<br />
bound. If the desired device cannot be selected or if multiple devices are<br />
accidentally selected, you can close the manual selection window by clicking<br />
on No and repeat the bind function.<br />
Software Download<br />
Instructions for First Time TechView Users<br />
This information can also be found at http://www.trane.com/commercial/<br />
software/tracerch530/.<br />
1. Create a folder called “CH530” on your C:\ drive. You will select and use<br />
this folder in subsequent steps so that downloaded files are easy to<br />
locate.<br />
2. Download the Java Runtime installation utility file onto your PC in the<br />
CH530 folder (please note that this does not install Java Runtime, it only<br />
downloads the installation utility).<br />
– Click on the latest version of Java Runtime shown in the TechView<br />
Download table.<br />
– Select “Save this program to disk” while downloading the files (do not<br />
select “Run this program from its current location”).<br />
3. Download the TechView installation utility file onto your PC in the CH530<br />
folder (please note that this does not install TechView, it only downloads<br />
the installation utility).<br />
– Click on the latest version of TechView shown in the TechView<br />
Download table.<br />
– Select “Save this program to disk” while downloading the files (do not<br />
select “Run this program from its current location”).<br />
4. Remember where you downloaded the files (the “CH530” folder). You<br />
will need to locate them to finish the installation process.<br />
5. Proceed to “Main Processor Software Download” page and read the<br />
instructions to download the latest version of main processor installation<br />
files.<br />
Note: you will first select the chiller type to obtain the available file versions.<br />
<strong>RTHD</strong>-SVX01B-EN 123
TechView<br />
6. Select the product family. A table with the download link will appear for<br />
that product family.<br />
7. Download the main processor software onto your PC in the CH530 folder<br />
(please note that this does not install the main processor, it only downloads<br />
the installation utility).<br />
– To do this, click on the latest version of the main processor.<br />
– Select “Save this program to disk” while downloading the files (do not<br />
select “Run this program from its current location”).<br />
8. Remember where you downloaded the files (the “CH530” folder). You<br />
will need to locate them to finish the installation process.<br />
9. To complete the installation process, locate the installation utilities you<br />
downloaded into the CH530 folder. If necessary, use your PC’s file manager<br />
to locate the downloaded files.<br />
10. Install the applications in the following order by double-clicking on the<br />
install program and following the installation prompts:<br />
– Java Runtime Environment (JRE_VXXX.exe)<br />
Note: During the Java Runtime Environment installation, you may be<br />
prompted to “select the default Java Runtime for the system browsers...”.<br />
Do not select any system browsers at this step. There should be no<br />
default browsers selected for proper operation.<br />
– TechView (6200-0347-VXXX.exe)<br />
– The main processor (6200-XXXX-XX-XX.exe).<br />
– The main processor program will self extract to the proper folder within<br />
the TechView program directory, provided the TechView program is<br />
properly installed on the C:\ drive.<br />
11. Connect your PC to the CH530 main processor using a standard 9-pin<br />
male/9-pin female RS-232 cable.<br />
12. Run the TechView software by selecting the TechView icon placed on<br />
your desktop during the installation process. The “Help...About” menu<br />
can be viewed to confirm proper installation of latest versions.<br />
124 <strong>RTHD</strong>-SVX01B-EN
Unit Start-up<br />
Power Up<br />
The Power up chart shows the respective DynaView screens during a power<br />
up of the main processor. This process takes from 30 to 50 seconds depending<br />
on the number of installed Options. On all power ups, the software<br />
model will always transition through the 'Stopped' Software state independent<br />
of the last mode. If the last mode before power down was 'Auto', the<br />
transition from 'Stopped' to 'Starting' occurs, but it is not apparent to the<br />
user.<br />
Figure 35<br />
Power Up<br />
Power Up to Starting<br />
The Power up to starting diagram shows the timing from a power up event to<br />
energizing the compressor. The shortest allowable time would be under the<br />
following conditions:<br />
1. No motor restart inhibit<br />
2. Evaporator and Condenser Water flowing<br />
3. Power up Start Delay setpoint set to 0 minutes<br />
4. Adjustable Stop to Start Timer set to 5 seconds<br />
5. Need to cool<br />
The above conditions would allow for a minimum power up to starting compressor<br />
time of 95 seconds.<br />
<strong>RTHD</strong>-SVX01B-EN <strong>125</strong>
Unit Start-up<br />
Figure 36<br />
Power Up to Starting<br />
126 <strong>RTHD</strong>-SVX01B-EN
Unit Start-up<br />
Stopped to Starting:<br />
The stopped to starting diagram shows the timing from a stopped mode to<br />
energizing the compressor. The shortest allowable time would be under the<br />
following conditions:<br />
1. No motor restart inhibit<br />
2. Evaporator and Condenser Water flowing<br />
3. Power up Start Delay Timer has expired<br />
4. Adjustable Stop to Start Timer has expired<br />
5. Need to cool<br />
The above conditions would allow the compressor to start in 60 seconds<br />
<strong>RTHD</strong>-SVX01B-EN 127
Unit Start-up<br />
Figure 37<br />
Stopped to Starting<br />
128 <strong>RTHD</strong>-SVX01B-EN
Unit Start-up<br />
Limit Conditions<br />
CH530 will automatically limit certain operating parameters during startup<br />
and run modes to maintain optimum chiller performance and prevent nuisance<br />
diagnostic trips. These limit conditions are noted in Table 27.<br />
Table 27<br />
Limit Conditions<br />
Running - Limited<br />
Capacity Limited by High<br />
Cond Press<br />
Capacity Limited by Low<br />
Evap Rfgt Temp<br />
Capacity Limited by Low<br />
Liquid Level<br />
Capacity Limited by High<br />
Current<br />
Capacity Limited by Phase<br />
Unbalance<br />
The chiller, circuit, and compressor are currently running, but the operation of the<br />
chiller/compressor is being actively limited by the controls. Further information is<br />
provided by the sub-mode.<br />
The circuit is experiencing condenser pressures at or near the condenser limit setting. The<br />
compressor will be unloaded to prevent exceeding the limits.<br />
The circuit is experiencing saturated evaporator temperatures at or near the Low Refrigerant<br />
Temperature Cutout setting. The compressors will be unloaded to prevent tripping.<br />
The circuit is experiencing low refrigerant liquid levels and the EXV is at or near full open. The<br />
compressor will be unloaded to prevent tripping.<br />
The compressor is running and its capacity is being limited by high currents. The current limit<br />
setting is 120% RLA (to avoid overcurrent trips).<br />
The compressor is running and its capacity is being limited by excessive phase current<br />
unbalance.<br />
Seasonal Unit Start-Up Procedure<br />
1. Close all valves and re-install the drain plugs in the evaporator and condenser<br />
heads.<br />
2. Service the auxiliary equipment according to the start-up/maintenance<br />
instructions provided by the respective equipment manufacturers.<br />
3. Vent and fill the cooling tower, if used, as well as the condenser and piping.<br />
At this point, all air must be removed from the system (including each<br />
pass). Close the vents in the evaporator chilled water circuits.<br />
4. Open all the valves in the evaporator chilled water circuits.<br />
5. If the evaporator was previously drained, vent and fill the evaporator and<br />
chilled water circuit. When all air is removed from the system (including<br />
each pass), install the vent plugs in the evaporator water boxes.<br />
CAUTION<br />
Equipment Damage!<br />
Ensure that the oil sump heaters have been operating for a<br />
minimum of 24 hours before starting. Failure to do so may result<br />
in equipment damage.<br />
6. Check the adjustment and operation of each safety and operating control.<br />
7. Close all disconnect switches.<br />
8. Refer to the sequence for daily unit startup for the remainder of the seasonal<br />
startup.<br />
<strong>RTHD</strong>-SVX01B-EN 129
Unit Start-up<br />
Series R Start-up Test Log<br />
Job Name<br />
Job Location<br />
Model # Serial # start date:<br />
Sales Order # ship date: Job elevation (ft. above sea level)<br />
STARTER DATA:<br />
START-UP ONLY<br />
Manufacturer<br />
Chiller appearance at arrival:<br />
Type: (solid state, wye-delta) Compressor shipping bolts removed? Y N<br />
Vendor ID #/Model #:<br />
Oil separator shipping bolts removed? Y N<br />
Volts Amps Hz Machine Gauge Pressure: psig/ kPag<br />
COMPRESSOR DATA: Machine CH530 Pressure: psig/ kPag<br />
Model #:<br />
Complete if pressure test is required<br />
Serial #: Vacuum after leak test= mm<br />
NAMEPLATE DATA: Standing vacuum test = mm rise in hrs<br />
RLA KW Volts UNIT CHARGES<br />
50 60 Hz<br />
DESIGN DATA: Unit refrigerant charge: lbs/ Kg<br />
RLA KW Volts Unit Oil Charge: gal/ L<br />
CURRENT TRANSFORMER<br />
SUMMARY OF UNIT OPTIONS INSTALLED<br />
Part Number (“X” code and 2-digit extension) Y N Tracer Communications Interface<br />
Primary CT’s Y N Options Module<br />
X - Y N Outdoor Air Sensor<br />
X - Y N Ice Making Control<br />
X - Y N Other<br />
DESIGN CONDITIONS<br />
Evap Desig ________GPM L/S _________ PSID kPad Ent. Water F/C__________ Leaving Water F/C_________<br />
Evap Actual ________GPM L/S _________ PSID kPad Ent. Water F/C__________ Leaving Water F/C_________<br />
Cond Design ________GPM L/S _________ PSID kPad Ent. Water F/C__________ Leaving Water F/C_________<br />
Cond Actual ________GPM L/S _________ PSID kPad Ent. Water F/C__________ Leaving Water F/C_________<br />
Owner Witness Signature: _________________________________________________<br />
130 <strong>RTHD</strong>-SVX01B-EN
Unit Start-up<br />
<strong>Installation</strong> Checklist for Model <strong>RTHD</strong> Series R<br />
To:______________________________________________________ Trane Service Company<br />
S.O. No.:_________________________________________________Serial No: ___________________________<br />
Job/Project Name:____________________________________________________________________________<br />
RECEIVING<br />
Verify that the unit nameplate data corresponds to the ordering information.<br />
Inspect the unit for shipping damage and any shortages of materials. Report any damage or shortage to the<br />
carrier.<br />
UNIT LOCATION AND MOUNTING<br />
Inspect the location desired for installation and verify adequate service access clearances.<br />
Provide drainage for evaporator and condenser water.<br />
Remove and discard all shipping materials (cartons, etc.)<br />
Install optional spring or neoprene isolators, if required. Refer to IOM for details.<br />
Level unit and secure it to the mounting surface.<br />
UNIT PIPING<br />
Caution: If using an acidic commercial flushing solution, construct a temporary bypass around the unit to prevent<br />
damage to the internal components of the condenser and evaporator. To avoid possible equipment damage,<br />
do not use untreated or improperly treated system water.<br />
Flush all unit water piping before making final connections to unit.<br />
Connect water piping to the evaporator and condenser.<br />
Install pressure gauges and shutoff valves on the water inlet and outlet to the evap. and cond.<br />
Install water strainers in the entering chilled water and condenser water lines.<br />
Install balancing valves (discretionary) and flow switches in the leaving chilled and condenser water lines.<br />
Install drains with shutoff valves or drain plugs on the evaporator and condenser.<br />
Vent the chilled water and condenser water systems at the high points of the system piping.<br />
Pipe relief valves outdoors in accordance to ASHRAE 15, the IOM and local code.<br />
ELECTRICAL WIRING<br />
WARNING: To prevent injury or death, disconnect electrical power source before completing wiring<br />
connections on the unit.<br />
Check for tight connections for the unit power supply wiring with the fused disconnect to the terminal block (or<br />
unit-mounted disconnect) in the power section of the control panel.<br />
Check for tight 115 volt control wiring connections to the chilled water pump and condenser water pump<br />
Check Interlock Wiring, including chilled water pump control, chilled water flow interlock, condenser water<br />
pump, condenser water flow interlock, external auto stop. For further details refer to the IOM or the unit<br />
wiring.<br />
Caution: Information on Interconnecting Wiring: Chilled Water Pump Interlock and External Auto/Stop must be adhered<br />
to or equipment damage may occur.<br />
If remote Alarm contacts, Limit Warning Contact, Outdoor Air Temperature Sensor, Emergency Stop, Head<br />
Relief Request Contact, Ice Making, External Chilled Water Setpoint, External Current Limit Setpoint, Percent<br />
Condenser Pressure output are used refer to the IOM and the unit wiring for further details.<br />
Control power wiring isolated in control panel/starter panel enclosure.<br />
Is chilled water pump control by UCP2, CH530 or Others (circle one)<br />
<strong>RTHD</strong>-SVX01B-EN 131
Unit Start-up<br />
<strong>Installation</strong> Checklist for Model <strong>RTHD</strong> Series R<br />
PRE-START CHECK-OUT<br />
Inspect all wiring connections. Connections should be clean and tight.<br />
Energize crankcase heaters. Heaters need to be energized 24 hours before start-up.<br />
Confirm that all service and isolation valves are open. Refer to <strong>RTHD</strong>-SVB01A-EN for <strong>RTHD</strong> units, RTHC-<br />
SB-1B for RTHC units and RTHB-IOM-1 for the RTHB units.<br />
Remove the four (3 on B Frame Compressors) compressor shipping stops (snubbers) from under the<br />
compressor. (<strong>RTHD</strong> and RTHC only)<br />
Remove shipping bolts from under the two oil separators (<strong>RTHD</strong> and RTHC only)<br />
Confirm phase-sequencing “A-B-C”. Refer to the IOM for further details.<br />
Check all water temperature sensors for proper installation and use of heat transfer paste.<br />
Fill the chilled water circuit. Type of glycol ___________________ Percent of glycol _______________ by<br />
weight<br />
Caution: To prevent equipment damage, do not use untreated or improperly treated water in the system.<br />
Fill the condensing water circuit.<br />
Close the fused disconnect switch to supply power to the chilled water pump and condenser water pump<br />
starter.<br />
Start the water pumps. With water pumps running, inspect all piping connections for leakage. Make any<br />
necessary repairs.<br />
With water pumps running, adjust water flows and check water pressure drops through the evaporator and<br />
condenser.<br />
Adjust the flow switches for proper operation.<br />
Return pumps to the automatic mode.<br />
Disable machine start circuit until start-up mechanic arrives (use either the external stop or emergency stop<br />
circuit)<br />
132 <strong>RTHD</strong>-SVX01B-EN
Unit Shutdown<br />
Normal Shutdown to Stopped<br />
The Normal Shutdown diagram shows the Transition from Running through a<br />
Normal (friendly) Shutdown. The Dashed lines on the top attempt to show<br />
the final mode if you enter the stop via various inputs.<br />
Figure 38<br />
Normal Shutdown<br />
<strong>RTHD</strong>-SVX01B-EN 133
Unit Shutdown<br />
Seasonal Unit Shutdown<br />
1. Perform the normal unit stop sequence using the key.<br />
NOTE: Do not open the starter disconnect switch. This must remain closed<br />
to provide control power from the control power transformer to the oil sump<br />
heater.<br />
2. Verify that the chilled water and condenser water pumps are cycled off. If<br />
desired, open the disconnect switches to the pumps.<br />
3. Drain the condenser piping and cooling tower, if desired.<br />
4. Remove the drain and vent plugs from the condenser headers to drain<br />
the condenser.<br />
5. Verify that the Crank Case heater is working.<br />
6. Once the unit is secured, perform the maintenance identified in the following<br />
sections.<br />
134 <strong>RTHD</strong>-SVX01B-EN
Periodic <strong>Maintenance</strong><br />
Overview<br />
This section describes preventative maintenance procedures and intervals for<br />
the Series R unit. Use a periodic maintenance program to ensure optimal performance<br />
and efficiency of the Series R units.<br />
An important aspect of the chiller maintenance program is the regular completion<br />
of the “Series R Operating Log”; an example of this log is provided in<br />
this manual. When filled out properly the completed logs can be reviewed to<br />
identify any developing trends in the chiller's operating conditions.<br />
For example, if the machine operator notices a gradual increase in condensing<br />
pressure during a month's time, he can systematically check for and then correct,<br />
the possible cause(s) of this condition (e.g., fouled condenser tubes,<br />
non-condensables in the system).<br />
Weekly <strong>Maintenance</strong> and Checks<br />
After the unit has operated for approximately 30 minutes and the system has<br />
stabilized, check the operating conditions and complete the procedures<br />
below:<br />
• Log the chiller.<br />
• Check evaporator and condenser pressures with gauges and compare to<br />
the reading on the Clear Language Display. Pressure readings should fall<br />
within the following ranges specified in the Operating Conditions.<br />
NOTE: Optimum condenser pressure is dependent on condenser water<br />
temperature, and should equal the saturation pressure of the refrigerant at a<br />
temperature 2 to 5°F above that of leaving condenser water at full load.<br />
Monthly <strong>Maintenance</strong> and Checks<br />
• Review operating log.<br />
• Clean all water strainers in both the chilled and condensing water piping<br />
systems.<br />
• Measure the oil filter pressure drop. Replace oil filter if required. Refer to<br />
“Service Procedures”.<br />
• Measure and log the subcooling and superheat.<br />
• If operating conditions indicate a refrigerant shortage, leak check the unitan<br />
confirm using soap bubbles.<br />
• Repair all leaks.<br />
• Trim refrigerant charge until the unit operates in the conditions listed in<br />
the note below.<br />
NOTE: ARI conditions are: condenser water: 85 o F and 3 GPM per ton and<br />
evaporator water: 54-44 o F.<br />
<strong>RTHD</strong>-SVX01B-EN 135
Periodic <strong>Maintenance</strong><br />
Table 28<br />
Operating Conditions at Full Load<br />
Description<br />
Evaporator pressure<br />
Condensing pressure<br />
Discharge superheat<br />
Subcooling<br />
EXV percent open<br />
Condition<br />
40-55 psig<br />
85-120 psig<br />
17 o F<br />
5-10 o F<br />
40-50% open in Auto mode<br />
All conditions stated above are based on the unit running fully loaded,<br />
running at ARI conditions.<br />
• If full load conditions can not be met. Refer to note below to trim the<br />
refrigerant charge<br />
NOTE: Conditions at minimum must be: entering condenser water: 85°F<br />
and entering evaporator water: 55°F<br />
Table 29<br />
Operating Conditions at Minimum Load<br />
Description<br />
Evaporator approach<br />
Condensing approach<br />
Subcooling<br />
EXV percent open<br />
Condition<br />
*less than 7 o F (non-glycol<br />
applications)<br />
*less than 7 o F<br />
2-3 o F<br />
10-20 % open<br />
* ≅1.0 o F for new unit.<br />
Annual <strong>Maintenance</strong><br />
Shut down the chiller once each year to check the following:<br />
WARNING<br />
Hazardous Voltage!<br />
Disconnect all electric power, including remote disconnects<br />
before servicing. Follow proper lockout/tagout procedures to<br />
ensure the power can not be inadvertently energized. Failure to<br />
disconnect power before servicing could result in death or serious<br />
injury.<br />
136 <strong>RTHD</strong>-SVX01B-EN
Periodic <strong>Maintenance</strong><br />
• Perform all weekly and monthly maintenance procedures.<br />
• Check the refrigerant charge and oil level. Refer to “<strong>Maintenance</strong> Procedures”.<br />
Routine oil changing is not necessary on a hermetic system.<br />
• Have a qualified laboratory perform an oil analysis to determine system<br />
moisture content and acid level.<br />
NOTE: IMPORTANT: Due to the hygroscopic properties of the POE oil, all oil<br />
must be stored in metal containers. The oil will absorb water if stored in a<br />
plastic container<br />
• Check the pressure drop across the oil filter. Refer to “<strong>Maintenance</strong> Procedures”.<br />
• Contact a qualified service organization to leak check the chiller, to<br />
inspect safety controls, and inspect electrical components for deficiencies.<br />
• Inspect all piping components for leakage and/or damage. Clean out any<br />
inline strainers.<br />
• Clean and repaint any areas that show signs of corrosion.<br />
• Test vent piping of all relief valves for presence of refrigerant to detect<br />
improperly sealed relief valves. Replace any leaking relief valve.<br />
• Inspect the condenser tubes for fouling; clean if necessary. Refer to<br />
“<strong>Maintenance</strong> Procedures”.<br />
• Check to make sure that the crank case heater is working.<br />
Scheduling Other <strong>Maintenance</strong><br />
• Use a nondestructive tube test to inspect the condenser and evaporator<br />
tubes at 3-year intervals.<br />
NOTE: It may be desirable to perform tube tests on these components at<br />
more frequent intervals, depending upon chiller application. This is especially<br />
true of critical process equipment.<br />
• Depending on chiller duty, contact a qualified service organization to<br />
determine when to conduct a complete examination of the unit to determine<br />
the condition of the compressor and internal components.<br />
Operating Log<br />
A sample of several operating logs and checklists have been included.<br />
<strong>RTHD</strong>-SVX01B-EN 137
Periodic <strong>Maintenance</strong><br />
Chiller Log<br />
Run Time<br />
Main Tab 15 min 30 min 1 hr<br />
Chiller Mode<br />
Evap Ent/Lvg Water Temp<br />
Cond Ent/Lvg Water Temp<br />
Active Chilled Water Setpoint (F)<br />
Average Line Current (%RLA)<br />
Active Current Limit Setpoint (%RLA)<br />
Software Type<br />
Software Version<br />
Reports Tab<br />
Evaporator<br />
Evap Entering Water Temperature (F)<br />
Evap Leaving Water Temperature (F)<br />
Evap Sat Rfgt Temp (F)<br />
Evap Rfgt Pressure (psia)<br />
Evap Approach Temp (F)<br />
Evap Water Flow Switch Status<br />
Expansion Valve Position (%)<br />
Expansion Valve Position Steps<br />
Evap Rfgt Liquid Level (in)<br />
Condenser<br />
Cond Entering Water Temperature (F)<br />
Cond Leaving Water Temperature (F)<br />
Cond Sat Rfgt Temp (F)<br />
Cond Rfgt Pressure (psia)<br />
Cond Approach Temp (F)<br />
Cond Water Flow Switch Status<br />
Cond Head Pressure Ctrl Command (%)<br />
Compressor<br />
Compressor Starts<br />
Compressor Run Time<br />
System Rfgt Diff Pressure (psid)<br />
Oil Pressure (psia)<br />
Compressor rfgt Discharge Temp (F)<br />
Discharge Superheat (F)<br />
% RLA L1 L2 L3 (%)<br />
Amps L1 L2 L3 (Amps)<br />
Volts AB BC CA<br />
138 <strong>RTHD</strong>-SVX01B-EN
Periodic <strong>Maintenance</strong><br />
Settings<br />
Settings Tab<br />
Chiller<br />
Front Panel Chilled Water Setpt (F)<br />
Front Panel Current Limit Setpt (RLA)<br />
Differential to Start (F)<br />
Differential to Stop (F)<br />
Setpoint Source<br />
Feature Settings<br />
Chilled Water Reset<br />
Return Reset Ratio<br />
Return Start Reset<br />
Return Maximum Reset<br />
Outdoor Reset Ratio<br />
Outdoor Start Reset<br />
Outdoor Maximum Reset<br />
Mode Overrides<br />
Evap Water Pump<br />
Cond Water Pump<br />
Expansion Valve Control<br />
Slide Valve Control<br />
Service Pumpdown<br />
Display Settings<br />
Date Format<br />
Date<br />
Time Format<br />
Time of Day<br />
Keypad/Display Lockout<br />
Display Units<br />
Pressure Units<br />
Language Selection<br />
<strong>RTHD</strong>-SVX01B-EN 139
Periodic <strong>Maintenance</strong><br />
140 <strong>RTHD</strong>-SVX01B-EN
<strong>Maintenance</strong> Procedures<br />
Cleaning the Condenser<br />
CAUTION<br />
Proper Water Treatment!<br />
The use of untreated or improperly treated water in a <strong>RTHD</strong> may<br />
result in scaling, erosion, corrosion, algae or slime. It is<br />
recommended that the services of a qualified water treatment<br />
specialist be engaged to determine what water treatment, if any,<br />
is required. The Trane Company assumes no responsibility for<br />
equipment failures which result from untreated or improperly<br />
treated water, saline or brackish water.<br />
Condenser tube fouling is suspect when the “approach” temperature (i.e.,<br />
the difference between the refrigerant condensing temperature and the leaving<br />
condenser water temperature) is higher than predicted.<br />
Standard water applications will operate with less than a 10 o F approach. If the<br />
approach exceeds 10 o F cleaning the condenser tubes is recommended.<br />
NOTE:<br />
Glycol in the water system typically doubles the standard approach.<br />
If the annual condenser tube inspection indicates that the tubes are fouled, 2<br />
cleaning methods can be used to rid the tubes of contaminants.The methods<br />
are:<br />
Mechanical Cleaning Procedure<br />
Mechanical tube cleaning this method is used to remove sludge and loose<br />
material from smooth-bore condenser tubes.<br />
1. Remove the retaining bolts from the water boxes at each end of the condenser.<br />
Use a hoist to lift the water boxes.<br />
2. Work a round nylon or brass bristled brush (attached to a rod) in and out<br />
of each of the condenser water tubes to loosen the sludge.<br />
3. Thoroughly flush the condenser water tubes with clean water.<br />
(To clean internally enhanced tubes, use a bi-directional brush or consult a<br />
qualified service organization for recommendations.)<br />
Chemical Cleaning Procedure<br />
• Scale deposits are best removed by chemical means. Consult a qualified<br />
water treatment specialist (i.e., one that knows the local water supply<br />
chemical/mineral content) for a recommended cleaning solution suitable<br />
for the job. (A standard condenser water circuit is composed solely of<br />
copper, cast iron and steel.) Improper chemical cleaning can damage<br />
tube walls.<br />
All of the materials used in the external circulation system, the quantity of the<br />
solution, the duration of the cleaning period, and any required safety precautions<br />
should be approved by the company furnishing the materials or performing<br />
the cleaning.<br />
NOTE: Chemical tube cleaning should always be followed by mechanical<br />
tube cleaning.<br />
<strong>RTHD</strong>-SVX01B-EN 141
<strong>Maintenance</strong> Procedures<br />
Cleaning the Evaporator<br />
Since the evaporator is typically part of a closed circuit, it does not accumulate<br />
appreciable amounts of scale or sludge. However, if cleaning is deemed<br />
necessary, use the same cleaning methods described for the condenser<br />
tubes.<br />
Compressor Oil<br />
CAUTION<br />
Equipment Damage!<br />
To prevent oil sump heater burnout, open the unit main power<br />
disconnect switch before removing oil from the compressor.<br />
Trane Polyolester Oil is the approved oil for the <strong>RTHD</strong> units. Polyolester oil is<br />
extremely hygroscopic meaning it readily attracts moisture. The oil can not be<br />
stored in plastic containers due to the hygroscopic properties. As with mineral<br />
oil, if water is in the system it will react with the oil to form acids. Use<br />
Table 30 to determine the acceptability of the oil.<br />
Table 30<br />
POE Oil Properties<br />
Description<br />
Moisture content<br />
Acid Level<br />
Acceptable Levels<br />
less than 300 ppm<br />
less than 0.5 TAN (mg KOH/g)<br />
Mineral oil used in the RTHA and RTHB units had different acceptable levels (<<br />
50 ppm of moisture and < 0.05 mg KOH/g)<br />
NOTE: Note: Use an oil transfer pump to change the oil regardless of chiller<br />
pressure.<br />
Oil Sump Level Check<br />
The oil level in the oil sump can be measured to give an indication of the system<br />
oil charge. Follow the procedures below to measure the level.<br />
1. Run the unit fully loaded for approximately 20 minutes.<br />
NOTE: Note: Operating the unit at minimum load tends to lower oil sump<br />
levels to as low as 2”, well below the normal 4.5” to 6.0” levels. This is<br />
because the evaporator tends to hold more oil at minimum load conditions.<br />
Before adding any oil, obtain an oil level reading near a full load operating<br />
condition.<br />
2. Cycle the compressor off line.<br />
142 <strong>RTHD</strong>-SVX01B-EN
<strong>Maintenance</strong> Procedures<br />
CAUTION<br />
Oil Loss!<br />
Never operate the compressor with the sightglass service valves<br />
opened. Severe oil loss will occur. Close the valves after checking<br />
the oil level. The sump is above the condenser and it is possible<br />
to drain the oil.<br />
Sightglass<br />
3/8" or 1/2" Hose<br />
Figure 39<br />
Determining Oil Level in Sump<br />
3. Attach a 3/8” or 1/2” hose with a sightglass in the middle to the oil sump<br />
drain valve and the condenser service valve at the top of the condenser.<br />
Using high pressure rated clear hose with appropriate fittings can help<br />
speed up the process.<br />
4. After the unit is off line for 10 minutes, move the sightglass along the side<br />
of the oil sump.<br />
5. The level should be between 2” and 5” from the bottom of the oil sump.<br />
If the level appears to be above 8”, the oil sump is completely full. Most<br />
likely more oil resides in the rest of the system and some oil needs to be<br />
removed until the level falls between 2” and 5” in the oil sump.<br />
6. If the level is below 2”, there is not enough oil in the sump. This can occur<br />
from not enough oil in the system or more likely, oil migration to the evaporator.<br />
Oil migration can occur from a low refrigerant charge, gas pump<br />
malfunction, etc.<br />
<strong>RTHD</strong>-SVX01B-EN 143
<strong>Maintenance</strong> Procedures<br />
NOTE: If the oil is logged in the evaporator confirm the operation of the gas<br />
pump. If the gas pump is not functioning properly all oil will be logged in the<br />
evaporator.<br />
7. After the level is determined, close the service valves and remove the<br />
hose/sightglass assembly.<br />
Removing Compressor Oil<br />
The oil in the compressor oil sump is under a constant positive pressure at<br />
ambient temperature. To remove oil, open the service valve located on the<br />
bottom of the oil sump and drain the oil into a suitable container using the<br />
procedure outlined below:<br />
CAUTION<br />
POE Oil!<br />
Due to the hygroscopic properties of the POE oil, all oil must be<br />
stored in metal containers. The oil will absorb water if stored in a<br />
plastic container.<br />
Oil should not be removed until the refrigerant is isolated or removed.<br />
8. Connect a line to the oil sump drain valve.<br />
9. Open the valve and allow the desired amount of oil to flow into the container<br />
and close the charging valve.<br />
10. Measure the exact amount of oil removed from the unit.<br />
Oil Charging Procedure<br />
It is critical to fill the oil lines feeding the compressor when charging a system<br />
with oil. The diagnostic “Loss of oil at the compressor stopped” will be generated<br />
if the oil lines are not full on start-up.<br />
To properly charge the system with oil, follow the steps below:<br />
1. Locate the 1/4” schrader valve between the ball valve and oil filter (or the<br />
ball valve and oil cooler, if so equipped).<br />
2. Loosely connect oil pump to schrader valve called out in step 1.<br />
3. Operate oil charging pump until oil appears at the charging valve connection;<br />
then tighten the connection.<br />
NOTE: Note: To keep air from entering the oil, the charging valve connection<br />
must be air- tight.<br />
4. Close the ball valve just upstream of the schrader valve connected to the<br />
oil pump. This will allow the oil to travel through the oil lines to the compressor<br />
first rather than directly to the oil sump.<br />
5. Energize the master oil solenoid.<br />
6. This will allow the oil to travel from the schrader to the compressor. It<br />
takes approximately 2 gallons of oil to fill the lines.<br />
7. After charging the first 2 gallons, de-energize the master solenoid.<br />
8. Open the ball valve just upstream of the schrader connected to the oil<br />
pump. This will allow the remainder of the charge to flow to the oil sump.<br />
144 <strong>RTHD</strong>-SVX01B-EN
<strong>Maintenance</strong> Procedures<br />
9. Monitor the “Oil Loss Level Sensor Status in TechView under the Status<br />
view. This display shows whether the optical sensor is seeing oil (wet) or<br />
if it is not (dry).<br />
NOTE: The remainder of the oil charge can be charged into the 1/4” service<br />
valve located at the bottom of the sump if a larger connection is preferred.<br />
Replacing the Main Oil Filter (Hot Filter)<br />
The filter element should be changed if the oil flow is sufficiently obstructed.<br />
Two things can happen: first, the chiller may shut down on a “Low Oil Flow”<br />
diagnostic, or secondly, the compressor may shut down on a “Loss of Oil at<br />
Compressor (Running) diagnostic. If either of these diagnostics occurs, it is<br />
possible the oil filter needs replacement. The oil filter is not usually the cause<br />
of a Loss of oil at Compressor diagnostic.<br />
Specifically, the filter must be changed if the pressure drop between the two<br />
service valves in the lubrication circuit exceeds the maximum level as given in<br />
Figure 40. This chart shows the relationship between the pressure drop measured<br />
in the lubrication circuit as compared with operating pressure differential<br />
of the chiller (as measured by pressures in the condenser and evaporator).<br />
Normal pressure drops between the service valves of the lubrication circuit<br />
are shown by the lower curve. The upper curve represents the maximum<br />
allowable pressure drop and indicates when the oil filter must be changed.<br />
Pressure drops that lie between the lower and upper curves are considered<br />
acceptable.<br />
For a chiller equipped with an oil cooler, add 5 psid to the values shown in Figure<br />
40. For example, if the system pressure differential was 80 psid, then the<br />
clean filter pressure drop would be approximately 15 psid (up from 10 psid).<br />
For a chiller with an oil cooler and operating with a dirty oil filter, the maximum<br />
allowable pressure drop would be 28 psid (up from 23 psid).<br />
Under normal operating conditions the element should be replaced after the<br />
first year of operation and then as needed thereafter.<br />
Refer to Table 4 - Table 7 and Unit nameplate for Oil charge information.<br />
1. Isolate the oil filter by closing the two ball valves located before and after<br />
the filter.<br />
2. Relieve the pressure from the hydraulic line through the 1/4” schrader<br />
valve located between the ball valve and the oil filter (or the ball valve and<br />
oil cooler, if so equipped).<br />
3. Use a strap wrench to break loose the nut that secures the oil filter element<br />
to the filter manifold.<br />
4. Turn the nut clockwise until the filter element detaches from the manifold.<br />
5. Remove the filter element and measure the exact amount of oil contained<br />
in the filter bowl and element.<br />
6. Place the cartridge in the nut after filling the bowl with the proper amount<br />
of refrigerant oil (see Step 5). Turn the new nut assembly counterclockwise<br />
and tighten securely.<br />
7. Connect manifold gauge set at oil charging valve and evacuate the filter to<br />
500 microns.<br />
8. Charge the oil line back with the amount of oil removed. Open the isolation<br />
valves to the oil supply system.<br />
<strong>RTHD</strong>-SVX01B-EN 145
<strong>Maintenance</strong> Procedures<br />
Replacing the Gas Pump Oil Filter<br />
The filter element in the gas pump circuit may need to be changed if the gas<br />
pump is unable to return the oil to the compressor.<br />
An evaporator logged with oil will have a high liquid level when referring to<br />
the liquid level sensor, low suction pressures, and higher than normal<br />
approach on the evaporator.<br />
Refer to Figure 40 to determine if the pressure drop across the filter is above<br />
the normal range at full load conditions. Once the oil is logged in the evaporator,<br />
it may be necessary to manually move the oil from the evaporator to the<br />
oil sump to avoid losses in the main oil lines.<br />
Oil Filter Replacement Chart<br />
50<br />
D- and E-Frame Normal Press Drop C-Frame Normal Press Drop<br />
Max Pressure Drop<br />
B-Frame Normal Press Drop<br />
45<br />
Oil Filter Press Drop (psid)<br />
40<br />
35<br />
30<br />
25<br />
20<br />
15<br />
10<br />
5<br />
0<br />
20 40 60 80 100 120 140 160<br />
Condensing Press - Suction Press (psid)<br />
Figure 40<br />
Oil Filter Replacement Chart (E,D, C and B Frame Compressors)<br />
Refrigerant Charge<br />
If a low refrigerant charge is suspected, first determine the cause of lost<br />
refrigerant. Once the problem is repaired follow the procedures below for<br />
evacuating and charging the unit.<br />
Evacuation and Dehydration<br />
1. Disconnect ALL power before/during evacuation.<br />
2. Connect the vacuum pump to the 5/8” flare connection on the bottom of<br />
the evaporator and/or condenser.<br />
3. To remove all of the moisture from the system and to insure a leak free<br />
unit, pull the system down below 500 microns.<br />
4. After the unit is evacuated, perform a standing rise test for at least an<br />
hour. The pressure should not rise more than 150 microns. If the pressures<br />
rises more than 150 microns, either a leak is present or moisture is<br />
still in the system.<br />
146 <strong>RTHD</strong>-SVX01B-EN
<strong>Maintenance</strong> Procedures<br />
NOTE: If oil is in the system, this test is more difficult. The oil is aromatic<br />
and will give off vapors that will raise the pressure of the system.<br />
Refrigerant Charging<br />
Once the system is deemed leak and moisture free, use the 5/8” flare connections<br />
at the bottom of the evaporator and condenser to add refrigerant<br />
charge.<br />
Refer to Table 4 - Table 7 and Unit nameplate for Refrigerant charge information.<br />
Freeze Protection<br />
For unit operation in a low temperature environment, adequate protection<br />
measures must be taken against freezing. Adjusted settings and recommended<br />
ethylene glycol solution strengths are contained in Table 31 as follows:<br />
<strong>RTHD</strong>-SVX01B-EN 147
Table 31 Low Refrigerant Temperature, Ethylene Glycol, and Freeze Protection Settings<br />
.<br />
DDE, EDE, CBC* DFF, EFF, CDE, BCD, BBB, CFF* DGG, EGG, CEF*<br />
Chilled<br />
Water<br />
Setpt<br />
(°F)<br />
Leaving<br />
Wtr Temp<br />
Cutout<br />
(°F)<br />
Low Rfgt<br />
Temp<br />
Cutout<br />
(°F)<br />
Rec %<br />
Ethylene<br />
Glycol<br />
Solution<br />
Freeze<br />
Point (°F)<br />
Low Rfgt<br />
Temp<br />
Cutout (°F)<br />
Rec %<br />
Ethylene<br />
Glycol<br />
Solution<br />
Freeze<br />
Point (°F)<br />
Low Rfgt<br />
Temp<br />
Cutout<br />
(°F)<br />
Rec %<br />
Ethylene<br />
Glycol<br />
Solution<br />
Freeze<br />
Point (°F)<br />
40 34 28.6 0 32.0 28.6 0 32.0 28.6 0 32.0<br />
39 33 27.2 2 30.6 27.6 1 31.3 27.9 0 32.0<br />
38 32 25.7 4 29.1 26.5 3 30.1 27.2 2 31.1<br />
37 31 24.2 6 27.6 25.4 5 28.9 26.5 3 30.2<br />
36 30 22.7 8 26.1 24.2 6 27.7 25.7 4 29.3<br />
35 29 21.1 11 24.5 23.0 8 26.4 24.9 6 28.3<br />
34 28 20.2 12 23.6 22.1 10 25.5 24.0 7 27.4<br />
33 27 19.2 13 22.6 21.1 11 24.5 23.0 8 26.4<br />
32 26 18.1 15 21.5 20.1 12 23.5 22.0 10 25.4<br />
31 25 17.0 16 20.4 18.8 14 22.2 20.6 12 24.0<br />
30 24 15.9 17 19.3 17.6 15 21.0 19.3 13 22.7<br />
29 23 14.8 18 18.2 16.6 16 20.0 18.4 14 21.8<br />
28 22 13.6 20 17.0 15.5 17 18.9 17.4 15 20.8<br />
27 21 12.4 21 15.8 14.4 18 17.8 16.4 16 19.8<br />
26 20 11.2 22 14.6 13.3 20 16.7 15.4 17 18.8<br />
25 19 9.9 23 13.3 12.1 21 15.5 14.3 19 17.7<br />
24 18 8.6 24 12.0 10.9 22 14.3 13.2 20 16.6<br />
23 17 7.3 25 10.7 9.7 23 13.1 12.1 21 15.5<br />
22 16 5.9 26 9.3 8.4 24 11.8 10.9 22 14.3<br />
21 15 4.5 27 7.9 7.1 25 10.5 9.7 23 13.1<br />
148 <strong>RTHD</strong>-SVX01B-EN
Table 31 Low Refrigerant Temperature, Ethylene Glycol, and Freeze Protection Settings<br />
DDE, EDE, CBC* DFF, EFF, CDE, BCD, BBB, CFF* DGG, EGG, CEF*<br />
Chilled<br />
Water<br />
Setpt<br />
(°F)<br />
Leaving<br />
Wtr Temp<br />
Cutout<br />
(°F)<br />
Low Rfgt<br />
Temp<br />
Cutout<br />
(°F)<br />
Rec %<br />
Ethylene<br />
Glycol<br />
Solution<br />
Freeze<br />
Point (°F)<br />
Low Rfgt<br />
Temp<br />
Cutout (°F)<br />
Rec %<br />
Ethylene<br />
Glycol<br />
Solution<br />
Freeze<br />
Point (°F)<br />
Low Rfgt<br />
Temp<br />
Cutout<br />
(°F)<br />
Rec %<br />
Ethylene<br />
Glycol<br />
Solution<br />
Freeze<br />
Point (°F)<br />
20 14 3.1 28 6.5 5.8 26 9.2 8.5 24 11.9<br />
19 13 1.6 30 5.0 4.4 27 7.8 7.3 25 10.7<br />
18 12 0.1 31 3.5 3.1 29 6.5 6.0 27 9.4<br />
17 11 -1.4 32 2.0 1.6 30 5.0 4.7 28 8.1<br />
16 10 -2.9 33 0.5 0.2 31 3.6 3.3 29 6.7<br />
15 9 -4.5 33 -1.1 -1.3 32 2.1 2.0 30 5.4<br />
14 8 N/A 34 -2.8 -2.8 33 0.6 0.6 31 4.0<br />
13 7 N/A 35 -4.4 -4.3 34 -0.9 -0.8 32 2.6<br />
12 6 N/A 36 -6.1 N/A 34 -2.5 -2.3 33 1.1<br />
11 5 N/A 37 -7.8 N/A 35 -4.1 -3.8 34 -0.4<br />
10 4 N/A 38 -9.6 N/A 36 -5.7 -5.3 34 -1.9<br />
Notes: * Refer to unit Model No. digits 6, 14, 21<br />
N/A means chiller is not to be applied at leaving evaporator water temperatures, which result in the LRTC setting below those shown in the table.<br />
NOTE: When setting up an ice-making system, the ice termination setpoint is the entering water. Subtract 6°F<br />
from the setpoint to use Table 31 (Chilled Water Setpoint (ice-making only) = (Ice Termination Setpoint - 6°F).<br />
<strong>RTHD</strong>-SVX01B-EN 149
<strong>Maintenance</strong> Procedures<br />
150 <strong>RTHD</strong>-SVX01B-EN
Diagnostics<br />
The following diagnostic Table contains all the diagnostics possible. Not all<br />
data is available unless TechView is installed.<br />
Hex Code: 3 digit hexadecimal code used on all past products to uniquely<br />
identify diagnostics. Refer to the database \\SRV-et-data\ucp3\servicetool\databases\servicetool.mdb<br />
Diagnostic Name and Source: Name of diagnostic and its source. Note<br />
that this is the exact text used in the User Interface and/or Service Tool displays.<br />
Severity: Defines the severity of the above effect. Immediate means immediate<br />
shutdown of the effected portion, Normal means normal or friendly<br />
shutdown of the effected portion, Special Mode means a special mode of<br />
operation (limp along) is invoked, but without shutdown, and Info means an<br />
Informational Note or Warning is generated.<br />
Persistence: Defines whether or not the diagnostic and its effects are to be<br />
manually reset (Latched), or can be either manually or automatically reset<br />
(Nonlatched).<br />
Criteria: Quantitatively defines the criteria used in generating the diagnostic<br />
and, if nonlatching, the criteria for auto reset. If more explanation is necessary<br />
a hot link to the Functional Specification is used.<br />
Reset Level: Defines the lowest level of manual diagnostic reset command<br />
which can clear the diagnostic. The manual diagnostic reset levels in order of<br />
priority are: Local and Remote. A diagnostic that has a reset level of Local,<br />
can only be reset by a local diagnostic reset command, but not by the lower<br />
priority remote Reset command whereas a diagnostic listed as Remote reset<br />
can be reset by either.<br />
Table 32<br />
Diagnostic List<br />
Hex<br />
Code<br />
3D8<br />
3D6<br />
Diagnostic<br />
Name and<br />
Source Severity Persistence Criteria<br />
At Speed Input<br />
Opened<br />
At Speed Input<br />
Shorted<br />
398 BAS Communication<br />
Lost<br />
390 BAS Failed to<br />
Establish<br />
Communication<br />
Immediate Latch The "At Speed" input was found to be opened with<br />
the compressor motor running after successfully<br />
obtaining an at speed and bypassed condition. This<br />
is active for solid state starters only<br />
Immediate Latch The "At Speed" input is shorted before the<br />
compressor was started. This is active for only solid<br />
state starters.<br />
Special<br />
Special<br />
The BAS was setup as "installed" at the MP and the<br />
Comm 3 llid lost communications with the BAS for<br />
15 contiguous minutes after it had been established.<br />
Refer to Section on Setpoint Arbitration to determine<br />
how setpoints and operating modes may be effected<br />
by the comm loss. The chiller follows the value of<br />
the Tracer Default Run Command which can be<br />
previously written by Tracer and stored nonvolatilely<br />
by the MP (either use local or shutdown).<br />
The BAS was setup as "installed" and the BAS did<br />
not communicate with the MP within 15 minutes<br />
after power-up. Refer to Section on Setpoint<br />
Arbitration to determine how setpoints and<br />
operating modes may be effected. Note: The<br />
original requirement for this was 2 minutes, but was<br />
implemented at 15 minutes for RTAC.<br />
Reset<br />
Level<br />
Local<br />
Local<br />
Remote<br />
Remote<br />
<strong>RTHD</strong>-SVX01B-EN 151
Diagnostics<br />
Table 32<br />
Diagnostic List<br />
Hex<br />
Code<br />
2E6 Check Clock Info Latch The real time clock had detected loss of its oscillator<br />
at some time in the past. Check / replace battery?<br />
This diagnostic can be effectively cleared only by<br />
writing a new value to the chiller's time clock using<br />
the TechView or DynaView's "set chiller time"<br />
functions.<br />
8A<br />
5F8<br />
5EF<br />
6B6<br />
6B6<br />
6B6<br />
6B6<br />
6B6<br />
5F2<br />
6B6<br />
5F9<br />
Diagnostic<br />
Name and<br />
Source Severity Persistence Criteria<br />
Chilled Water<br />
Flow (Entering<br />
Water Temp)<br />
Comm Loss:<br />
Chilled Water<br />
Pump Starter<br />
Comm Loss:<br />
Chilled Water<br />
Flow Switch<br />
Comm Loss:<br />
Compressor %<br />
RLA Output<br />
Comm Loss:<br />
Compressor<br />
Discharge<br />
Temperature<br />
Comm Loss:<br />
Cond Head Press<br />
Cntrl Output<br />
Comm Loss:<br />
Condenser<br />
Entering Water<br />
Temperature<br />
Comm Loss:<br />
Condenser<br />
Leaving Water<br />
Temperature<br />
Comm Loss:<br />
Condenser Rfgt<br />
Pressure<br />
Comm Loss:<br />
Condenser Rfgt<br />
Pressure Output<br />
Comm Loss:<br />
Condenser Water<br />
Pump Starter<br />
Info NonLatch The entering evaporator water temp fell below the<br />
leaving evaporator water temp. by more than 2°F for<br />
100 °F-sec. For falling film evaporators this<br />
diagnostic cannot reliably indicate loss of flow, but<br />
can warn of improper flow direction through the<br />
evaporator, misbound temperature sensors, or other<br />
system problems<br />
Info Latch Continual loss of communication between the MP<br />
and the Functional ID has occurred for a 30 second<br />
period.<br />
Immediate Latch Continual loss of communication between the MP<br />
and the Functional ID has occurred for a 30 second<br />
period.<br />
Info Latch Continual loss of communication between the MP<br />
and the Functional ID has occurred for a 30 second<br />
period.<br />
Immediate Latch Continual loss of communication between the MP<br />
and the Functional ID has occurred for a 30 second<br />
period.<br />
Info Latch Continual loss of communication between the MP<br />
and the Functional ID has occurred for a 30 second<br />
period.<br />
Info and<br />
Special<br />
Action<br />
Latch<br />
Continual loss of communication between the MP<br />
and the Functional ID has occurred for a 30 second<br />
period. If chiller running, and condenser water<br />
regulating valve option installed, force valve to 100%<br />
flow.<br />
Info Latch Continual loss of communication between the MP<br />
and the Functional ID has occurred for a 30 second<br />
period.<br />
Normal Latch Continual loss of communication between the MP<br />
and the Functional ID has occurred for a 30 second<br />
period.<br />
Info Latch Continual loss of communication between the MP<br />
and the Functional ID has occurred for a 30 second<br />
period.<br />
Info Latch Continual loss of communication between the MP<br />
and the Functional ID has occurred for a 30 second<br />
period.<br />
Reset<br />
Level<br />
Remote<br />
Remote<br />
Remote<br />
Remote<br />
Remote<br />
Remote<br />
Remote<br />
Remote<br />
Remote<br />
Remote<br />
Remote<br />
Remote<br />
152 <strong>RTHD</strong>-SVX01B-EN
Diagnostics<br />
Table 32<br />
Diagnostic List<br />
Hex<br />
Code<br />
694 Comm Loss:<br />
Electronic<br />
Expansion Valve,<br />
Actuator 1<br />
695 Comm Loss:<br />
Electronic<br />
Expansion Valve,<br />
Actuator 2<br />
5DE<br />
5E4<br />
5E3<br />
Comm Loss:<br />
Emergency Stop<br />
Comm Loss:<br />
Evaporator<br />
Entering Water<br />
Temperature<br />
Comm Loss:<br />
Evaporator<br />
Leaving Water<br />
Temperature<br />
688 Comm Loss:<br />
Evaporator Rfgt<br />
Liquid Level<br />
5F0<br />
5E1<br />
5DD<br />
6B6<br />
6B6<br />
5E9<br />
Diagnostic<br />
Name and<br />
Source Severity Persistence Criteria<br />
Comm Loss:<br />
Evaporator Rfgt<br />
Pressure<br />
Comm Loss: Ext<br />
Ice Building<br />
Control Input<br />
Comm Loss:<br />
External Auto/<br />
Stop<br />
Comm Loss:<br />
External Base<br />
Load Enable<br />
Comm Loss:<br />
External Base<br />
Load Setpoint<br />
Input<br />
Comm Loss:<br />
External Chilled<br />
Water Setpoint<br />
Normal Latch Continual loss of communication between the MP<br />
and the Functional ID has occurred for a 30 second<br />
period.<br />
Normal Latch Continual loss of communication between the MP<br />
and the Functional ID has occurred for a 30 second<br />
period.<br />
Normal Latch Continual loss of communication between the MP<br />
and the Functional ID has occurred for a 30 second<br />
period.<br />
Info and<br />
Special<br />
Action<br />
Latch<br />
Continual loss of communication between the MP<br />
and the Functional ID has occurred for a 30 second<br />
period. Chiller shall remove any Return or Constant<br />
Return Chilled Water Reset, if it was in effect. Apply<br />
slew rates per Chilled Water Reset spec.<br />
Normal Latch Continual loss of communication between the MP<br />
and the Functional ID has occurred for a 30 second<br />
period.<br />
Normal Latch Continual loss of communication between the MP<br />
and the Functional ID has occurred for a 30 second<br />
period.<br />
Normal Latch Continual loss of communication between the MP<br />
and the Functional ID has occurred for a 30 second<br />
period.<br />
Normal Latch Continual loss of communication between the MP<br />
and the Functional ID has occurred for a 30 second<br />
period. Chiller shall revert to normal (non-ice<br />
building) mode regardless of last state.<br />
Normal Latch Continual loss of communication between the MP<br />
and the Functional ID has occurred for a 30 second<br />
period.<br />
Info and<br />
Special<br />
Action<br />
Info and<br />
Special<br />
Action<br />
Info and<br />
Special<br />
Action<br />
Latch<br />
Latch<br />
NonLatch<br />
Continual loss of communication between the MP<br />
and the Functional ID has occurred for a 30 second<br />
period. The external base load input is removed<br />
from the arbitration to enable Base Loading.<br />
Continual loss of communication between the MP<br />
and the Functional ID has occurred for a 30 second<br />
period. The external base load setpoint input is<br />
removed from the arbitration to establish the Base<br />
LoadingSetpoint.<br />
Continual loss of communication between the MP<br />
and the Functional ID has occurred for a 30 second<br />
period. Chiller shall discontinue use of the External<br />
Chilled Water Setpoint source and revert to the next<br />
higher priority for setpoint arbitration<br />
Reset<br />
Level<br />
Remote<br />
Remote<br />
Remote<br />
Remote<br />
Remote<br />
Remote<br />
Remote<br />
Remote<br />
Remote<br />
Remote<br />
Remote<br />
Remote<br />
<strong>RTHD</strong>-SVX01B-EN 153
Diagnostics<br />
Table 32<br />
Hex<br />
Code<br />
5EA<br />
5EB<br />
5FA<br />
69D<br />
6B6<br />
6B6<br />
5F4<br />
6B6<br />
6B6<br />
6A0<br />
5E2<br />
6B6<br />
5D2<br />
5D1<br />
Diagnostic List<br />
Diagnostic<br />
Name and<br />
Source Severity Persistence Criteria<br />
Comm Loss:<br />
External Current<br />
Limit Setpoint<br />
Comm Loss: High<br />
Pressure Cutout<br />
Switch<br />
Comm Loss: Ice-<br />
Making Status<br />
Comm Loss:<br />
Local BAS<br />
Interface<br />
Comm Loss:<br />
Master Oil Line<br />
Solenoid Valve<br />
Comm Loss: Oil<br />
Loss Level Input<br />
Comm Loss: Oil<br />
Pressure<br />
Comm Loss: Oil<br />
Return Gas Pump<br />
Drain<br />
Comm Loss: Oil<br />
Return Gas Pump<br />
Fill<br />
Comm Loss: Op<br />
Status Programmable<br />
Relays<br />
Comm Loss:<br />
Outdoor Air<br />
Temperature<br />
Comm Loss:<br />
Refrigerant<br />
Monitor Input<br />
Comm Loss:<br />
Slide Valve Load<br />
Comm Loss:<br />
Slide Valve<br />
Unload<br />
Info and<br />
Special<br />
Action<br />
NonLatch<br />
Continual loss of communication between the MP<br />
and the Functional ID has occurred for a 30 second<br />
period. Chiller shall discontinue use of the External<br />
Current limit setpoint and revert to the next higher<br />
priority for Current Limit setpoint arbitration<br />
Normal Latch Continual loss of communication between the MP<br />
and the Functional ID has occurred for a 30 second<br />
period.<br />
Normal Latch Continual loss of communication between the MP<br />
and the Functional ID has occurred for a 30 second<br />
period. Chiller shall revert to normal (non-ice<br />
building) mode regardless of last state.<br />
Info and<br />
Special<br />
Action<br />
Non Latch<br />
Continual loss of communication between the MP<br />
and the Functional ID has occurred for a 30 second<br />
period. Use the last values sent from BAS<br />
Normal Latch Continual loss of communication between the MP<br />
and the Functional ID has occurred for a 30 second<br />
period.<br />
Normal Latch Continual loss of communication between the MP<br />
and the Functional ID has occurred for a 30 second<br />
period.<br />
Normal Latch Continual loss of communication between the MP<br />
and the Functional ID has occurred for a 30 second<br />
period.<br />
Normal Latch Continual loss of communication between the MP<br />
and the Functional ID has occurred for a 30 second<br />
period.<br />
Normal Latch Continual loss of communication between the MP<br />
and the Functional ID has occurred for a 30 second<br />
period.<br />
Info Latch Continual loss of communication between the MP<br />
and the Functional ID has occurred for a 30 second<br />
period.<br />
Info and<br />
Special<br />
Action<br />
Latch<br />
Continual loss of communication between the MP<br />
and the Functional ID has occurred for a 30 second<br />
period. Note that if this diagnostic occurs, Chiller<br />
shall remove any OA Chilled Water Reset, if it was in<br />
effect and if Tracer OA was unavailable. Apply slew<br />
rates per Chilled Water Reset spec<br />
Info Latch Continual loss of communication between the MP<br />
and the Functional ID has occurred for a 30 second<br />
period.<br />
Normal Latch Continual loss of communication between the MP<br />
and the Functional ID has occurred for a 30 second<br />
period.<br />
Normal Latch Continual loss of communication between the MP<br />
and the Functional ID has occurred for a 30 second<br />
period.<br />
Reset<br />
Level<br />
Remote<br />
Remote<br />
Remote<br />
Remote<br />
Remote<br />
Remote<br />
Remote<br />
Remote<br />
Remote<br />
Remote<br />
Remote<br />
Remote<br />
Remote<br />
Remote<br />
154 <strong>RTHD</strong>-SVX01B-EN
Diagnostics<br />
Table 32<br />
Diagnostic List<br />
Hex<br />
Code<br />
6B6<br />
Comm Loss:<br />
Solid State<br />
Starter Fault Input<br />
690 Comm Loss:<br />
Starter<br />
1F5<br />
EE<br />
1FA<br />
Compressor Did<br />
Not Accelerate<br />
Fully<br />
Compressor Did<br />
Not Accelerate:<br />
Shutdown<br />
Compressor Did<br />
Not Accelerate:<br />
Transition<br />
284 Compressor<br />
Discharge<br />
Temperature<br />
Sensor<br />
9A<br />
9B<br />
5B8<br />
F7<br />
Diagnostic<br />
Name and<br />
Source Severity Persistence Criteria<br />
Condenser<br />
Entering Water<br />
Temperature<br />
Sensor<br />
Condenser<br />
Leaving Water<br />
Temperature<br />
Sensor<br />
Condenser<br />
Refrigerant<br />
Pressure Transducer<br />
Condenser Water<br />
Flow Lost<br />
Info Latch Continual loss of communication between the MP<br />
and the Functional ID has occurred for a 30 second<br />
period.<br />
Immediate Latch Continual loss of communication between the MP<br />
and the Functional ID has occurred for a 30 second<br />
period.<br />
Immediate Latch The starter module did not receive an "Up to Speed"<br />
or "End of Ramp" signal from the SSS within 2.5<br />
seconds after commanding a bypass, or after the<br />
maximum acceleration time had expired, whichever<br />
is longer. This diagnostic only applies to SSS.<br />
Immediate Latch The compressor did not come up to speed (get to<br />
Diagnostics<br />
Table 32<br />
Diagnostic List<br />
Hex<br />
Code<br />
DC<br />
EC or EC<br />
Condenser Water<br />
Flow Overdue<br />
Current Overload<br />
TripMotor Current<br />
Overload<br />
Normal NonLatch Condenser water flow was not proven within 20<br />
minutes of the condenser pump relay being<br />
energized. The Cond Pump shall be commanded off.<br />
Diagnostic is reset with return of flow (although only<br />
possible with external control of pump)<br />
Immediate Latch Compressor current exceeded overload time vs. trip<br />
characteristic. For A/C products Must trip = 140%<br />
RLA, Must hold=<strong>125</strong>%, nominal trip 132.5% in 30<br />
seconds<br />
FD Emergency Stop Immediate Latch a. EMERGENCY STOP input is open. An external<br />
interlock has tripped. Time to trip from input<br />
opening to unit stop shall be 0.1 to 1.0 seconds.<br />
8E<br />
AB<br />
27D<br />
5BA<br />
ED<br />
Evaporator<br />
Entering Water<br />
Temperature<br />
Sensor<br />
Evaporator<br />
Leaving Water<br />
Temperature<br />
Sensor<br />
Evaporator Liquid<br />
Level Sensor<br />
Evaporator Refrigerant<br />
Pressure<br />
Transducer<br />
Evaporator Water<br />
Flow Lost<br />
384 Evaporator Water<br />
Flow Overdue<br />
5C4<br />
Diagnostic<br />
Name and<br />
Source Severity Persistence Criteria<br />
Excessive Loss of<br />
Comm<br />
Info Latch Bad Sensor or LLID Normal operation unless CHW<br />
Reset is enabled. If CHW Reset is enabled and<br />
either Return or Constant Return Chilled Water<br />
Reset is selected, its effect will be removed but slew<br />
rates on the change will be limited per the Chilled<br />
Water Reset spec.<br />
Remote<br />
Local<br />
Local<br />
Remote<br />
Normal Latch Bad Sensor or LLID Remote<br />
Normal Latch Bad Sensor or LLID Remote<br />
Normal Latch Bad Sensor or LLID Remote<br />
Immediate NonLatch The chilled water flow proof input was open for more<br />
than 6-10 contiguous seconds after flow had been<br />
proven. The pump command status will not be<br />
effected. 6-10 seconds of contiguous flow shall<br />
clear this diagnostic. Even though the pump may be<br />
commanded to run in the STOP modes (pump off<br />
delay time), this diagnostic shall not be called out in<br />
the STOP modes.<br />
Normal NonLatch Evaporator water flow was not proven within 20<br />
minutes of the Chilled water pump relay being<br />
energized. The Evap pump command status will not<br />
be effected.<br />
Immediate Latch Loss of comm with 20% or more of the llids<br />
configured for the system has been detected. This<br />
diagnostic will suppress the callout of all subsequent<br />
comm loss diagnostics. Check power supply(s) and<br />
power disconnects - troubleshoot LLIDS buss using<br />
TechView<br />
Reset<br />
Level<br />
Remote<br />
Remote<br />
Remote<br />
156 <strong>RTHD</strong>-SVX01B-EN
Diagnostics<br />
Table 32<br />
Diagnostic List<br />
Hex<br />
Code<br />
4C4<br />
External Base<br />
Loading Setpoint<br />
87 External Chilled<br />
Water Setpoint<br />
89 External Current<br />
Limit Setpoint<br />
1C2<br />
1C6<br />
Diagnostic<br />
Name and<br />
Source Severity Persistence Criteria<br />
High Compressor<br />
Discharge<br />
Temperature<br />
High Differential<br />
Refrigerant<br />
Pressure<br />
Info and<br />
Special<br />
Action<br />
NonLatch<br />
a. Not "Enabled": no diagnostics. b. "Enabled ": Out-<br />
Of-Range Low or Hi or bad LLID, set diagnostic,<br />
default BLS to next level of priority (e.g. Front Panel<br />
SetPoint. This Info diagnostic will automatically<br />
reset if the input returns to the normal range.<br />
Info NonLatch a. Function Not "Enabled": no diagnostics. b.<br />
"Enabled ": Out-Of-Range Low or Hi or bad LLID, set<br />
diagnostic, default CWS to next level of priority (e.g.<br />
Front Panel SetPoint). This Info diagnostic will<br />
automatically reset if the input returns to the normal<br />
range.<br />
Info NonLatch a. Not "Enabled": no diagnostics. b. "Enabled ": Out-<br />
Of-Range Low or Hi or bad LLID, set diagnostic,<br />
default CLS to next level of priority (e.g. Front Panel<br />
SetPoint. This Info diagnostic will automatically<br />
reset if the input returns to the normal range.<br />
Immediate Latch The compressor discharge temperature exceeded<br />
190°F. This diagnostic will be suppressed if it occurs<br />
during the compressor run-unload period or after the<br />
compressor has stopped, but a run unload will be<br />
terminated early as a result. Note: As part of the<br />
Compressor High Temperature Limit Mode (aka<br />
Minimum Capacity Limit), the compressor shall be<br />
forced loaded as the filtered discharge temperature<br />
nears this trip-point.<br />
Normal Latch a. The system differential pressure was above 160<br />
Psid- trip immediately (normal shutdown) B The diff<br />
pressure was above 152 Psid - trip in 1 hour<br />
Reset<br />
Level<br />
Remote<br />
Remote<br />
Remote<br />
Remote<br />
Remote<br />
584 High Evaporator<br />
Liquid Level<br />
6B8<br />
F5<br />
High Evaporator<br />
Refrigerant<br />
Pressure<br />
High Pressure<br />
Cutout<br />
Normal Latch The liquid level sensor is seen to be at or near its<br />
high end of range for 80 contiguous minutes while<br />
the compressor is running. (The diagnostic timer<br />
will hold, but not clear when the circuit is off).<br />
Design: 80% or more of bit count corresponding to<br />
+21.2 mm or more liquid level for 80 minutes)<br />
Immediate<br />
and Special<br />
Action<br />
NonLatch<br />
The evaporator refrigerant pressure has risen above<br />
190 psig. The evaporator water pump relay will be<br />
de-energized to stop the pump regardless of why<br />
the pump is running. The diagnostic will auto reset<br />
and the pump will return to normal control when the<br />
evaporator pressures falls below 185 psig. This<br />
diagnostic must shutdown the chiller if it is running.<br />
Immediate Latch A high pressure cutout was detected; C.O. on rise @<br />
180 psig, reset @ 135 psig (+/-5 psi on switching<br />
tolerance) Note: Pressure relief valve is 200 Psig +-<br />
2% trip at 315 ± 5 psi. Note: Other diagnostics that<br />
may occur as an expected consequence of the HPC<br />
trip will be suppressed from annunciation. These<br />
include Phase Loss, Power Loss, and Transition<br />
Complete Input Open.<br />
Remote<br />
Local<br />
Local<br />
<strong>RTHD</strong>-SVX01B-EN 157
Diagnostics<br />
Table 32<br />
Diagnostic List<br />
Hex<br />
Code<br />
1C6<br />
59C<br />
59D<br />
C5<br />
C6<br />
1AE<br />
18E<br />
High Refrigerant<br />
Pressure Ratio<br />
Loss of Oil at<br />
Compressor<br />
(Running)<br />
Loss of Oil at<br />
Compressor<br />
(Stopped)<br />
Low Chilled<br />
Water Temp: Unit<br />
Off<br />
Low Chilled<br />
Water Temp: Unit<br />
On<br />
Low Differential<br />
Refrigerant<br />
Pressure<br />
Low Discharge<br />
Superheat<br />
583 Low Evaporator<br />
Liquid Level<br />
B5<br />
Diagnostic<br />
Name and<br />
Source Severity Persistence Criteria<br />
Low Evaporator<br />
Refrigerant<br />
Pressure<br />
Immediate Latch The system pressure ratio exceeded 5.61 for 1<br />
contiguous minute. This pressure ratio is a fundamental<br />
limitation of the compressor. The pressure<br />
ratio is defined as Pcond (abs)/Pevap(abs).<br />
Immediate Latch In running modes , Oil Loss Level Sensor detects<br />
lack of oil in the oil tank feeding the compressor<br />
(distinguishing a liquid flow from a vapor flow)<br />
Immediate<br />
and Special<br />
Action<br />
Info and<br />
Special<br />
Action<br />
Immediate<br />
and Special<br />
Action<br />
Latch<br />
NonLatch<br />
NonLatch<br />
Oil Loss Level Sensor detects a lack of oil in the oil<br />
tank feeding the compressor for 90 seconds after<br />
EXV preposition is completed. Note: Compressor<br />
start is delayed while waiting for oil to be detected.<br />
The leaving chilled water temp. fell below the leaving<br />
water temp cutout setting for 30 degree F seconds<br />
while the Chiller is in the Stop mode, or in Auto<br />
mode with no compressors running. Energize Evap<br />
Water pump Relay until diagnostic auto resets, then<br />
return to normal evap pump control. Automatic<br />
reset occurs when the temp rises 2°F (1.1°C) above<br />
the cutout setting for 30 minutes.<br />
The chilled water temp. fell below the cutout<br />
setpoint for 30 degree F Seconds while the<br />
compressor was running. Automatic reset occurs<br />
when the temperature rises 2 °F (1.1°C) above the<br />
cutout setting for 2 minutes. This diagnostic shall not<br />
de-energize the Evaporator Water Pump Output.<br />
Immediate Latch The system differential pressure was either below<br />
15 Psid for more than 164 Psid-sec, or below 23.0<br />
Psid for 3000 Psid-sec. The latter integral's value is<br />
not cleared for any reason including diagnostic trip,<br />
manual reset, or power up reset (ie. Integral is saved<br />
nonvolatily on power down). The integral will decay<br />
while circuit is running at a max rate of -10 PSID, and<br />
while stopped at a rate of -0.4 PSID. This same<br />
integral is associated with the operating mode<br />
"Compressor Cool Down". Also see diagnostic below<br />
Normal Latch While Running Normally, the Discharge Superheat<br />
was less than 12 degrees F +- 1F for more than<br />
6500 degree F seconds.. At startup the UCM shall<br />
ignore the Discharge Superheat for 5.<br />
Info NonLatch The liquid level sensor is seen to be at or near its low<br />
end of range for 80 contiguous minutes while the<br />
compressor is running. Design: 20% or less of bit<br />
count corresponding to -21.2 mm or less liquid level<br />
for 80 minutes)<br />
Immediate Latch The Evaporator Refrigerant Pressure dropped below<br />
10 psia just prior to compressor start. The pressure<br />
fell below 10 psia while running but before the 1<br />
minute ignore time had expired or fell below 16 Psia<br />
after the 1 minute ignore time had expired.<br />
Reset<br />
Level<br />
Remote<br />
Local<br />
Local<br />
Remote<br />
Remote<br />
Remote<br />
Remote<br />
Remote<br />
Local<br />
158 <strong>RTHD</strong>-SVX01B-EN
Diagnostics<br />
Table 32<br />
Diagnostic List<br />
Hex<br />
Code<br />
FB<br />
6B3<br />
Low Evaporator<br />
Refrigerant<br />
Temperature<br />
Low Evaporator<br />
Temp: Unit Off<br />
Immediate Latch a. The inferred Saturated Evap Refrigerant Temperature<br />
(calculated from suction pressure transducer(s))<br />
dropped below the Low Refrigerant<br />
Temperature Cutout Setpoint for <strong>450</strong>°F-sec (10°F-sec<br />
max rate) while the circuit was running after the<br />
ignore period had expired. The integral is held at<br />
zero for the 1 minute ignore time following the<br />
circuit startup and the integral will be limited to<br />
never trip in less than 45 seconds, i.e. the error term<br />
shall be clamped to 10°F. The minimum LRTC<br />
setpoint is -5°F (18.7 Psia) the point at which oil<br />
separates from the refrigerant. b. During the<br />
timeout of the trip integral, the unload solenoid(s) of<br />
the running compressors on the circuit, shall be<br />
energized continuously and the load solenoid shall<br />
be off. Normal load/unload operation will be<br />
resumed if the trip integral is reset by return to<br />
temps above the cutout setpoint.<br />
Info and<br />
Special<br />
Action<br />
NonLatch<br />
The evap sat temp fell below the water temp cutout<br />
setting while the respective evap liquid level was<br />
greater than -21.2mm for 30 degree F seconds while<br />
Chiller is in the Stop mode, or in Auto mode with no<br />
compressors running. Energize Evap Water pump<br />
Relay until diagnostic auto resets, then return to<br />
normal evap pump control. Automatic reset occurs<br />
when either the evap temp rises 2°F (1.1°C) above<br />
the cutout setting or the liquid level falls below -<br />
21.2mm for 30 minutes<br />
198 Low Oil Flow Immediate Latch The oil pressure was out of the acceptable pressure<br />
range for 15 seconds, while the Delta Pressure was<br />
greater than 23.8 Psid.: Acceptable range is 0.50 ><br />
(PC-Po) / (PC-PE) for the first 2.5 minutes of<br />
operation, and 0.40 > (PC-Po) / (PC-PE) thereafter,<br />
E2<br />
Diagnostic<br />
Name and<br />
Source Severity Persistence Criteria<br />
Momentary<br />
Power Loss<br />
Immediate Nonlatch Momentary Power Loss option disabled: No effect.<br />
Momentary Power Loss option enabled: A loss of<br />
power on three line cycles or more was detected.<br />
Diagnostic is reset in 30 seconds. See Momentary<br />
Power Loss Protection specification for additional<br />
information.<br />
Reset<br />
Level<br />
Remote<br />
Remote<br />
Local<br />
Remote<br />
1AD<br />
MP Application<br />
Memory CRC<br />
Error<br />
Immediate Latch App software inside the MP failed its own checksum<br />
test. Possible causes: application software in the<br />
MP is not complete - software download to the MP<br />
was not completed successfully - or MP hardware<br />
problem. Note: User should attempt to reprogram<br />
the MP if this diagnostic occurs.<br />
Remote<br />
6A1<br />
MP: Could not<br />
Store Starts and<br />
Hours<br />
Info Latch MP has determined there was an error with the<br />
previous power down store. Starts and Hours may<br />
have been lost for the last 24 hours.<br />
Remote<br />
<strong>RTHD</strong>-SVX01B-EN 159
Diagnostics<br />
Table 32<br />
Diagnostic List<br />
Hex<br />
Code<br />
5FF<br />
6A2<br />
69C<br />
D9<br />
MP: Invalid<br />
Configuration<br />
MP: Non-Volatile<br />
Block Test Error<br />
MP: Non-Volatile<br />
Memory<br />
Reformat<br />
MP: Reset Has<br />
Occurred<br />
297 No Differential<br />
Refrigerant<br />
Pressure<br />
1E1<br />
5BE<br />
A1<br />
Diagnostic<br />
Name and<br />
Source Severity Persistence Criteria<br />
Oil Flow<br />
Protection Fault<br />
Oil Pressure<br />
Transducer<br />
Outdoor Air<br />
Temperature<br />
Sensor<br />
Immediate Latch MP has an invalid configuration based on the current<br />
software installed<br />
Info Latch MP has determined there was an error with a block<br />
in the Non-Volatile memory. Check settings.<br />
Info Latch MP has determined there was an error in a sector of<br />
the Non-Volatile memory and it was reformatted.<br />
Check settings.<br />
Info NonLatch The main processor has successfully come out of a<br />
reset and built its application. A reset may have<br />
been due to a power up, installing new software or<br />
configuration. This diagnostic is immediately and<br />
automatically cleared and thus can only be seen in<br />
the Historic Diagnostic List in TechView<br />
Immediate Latch The system differential pressure was below 7.7 Psid.<br />
The occurrence of this diagnostic will saturate the<br />
above "Low Diff Rfgt Press" Integral and invoke the<br />
same "Compressor Cool Down" op mode.<br />
Immediate Latch The Oil Pressure Transducer for this Chiller is reading<br />
a pressure either above its Condenser Pressure by<br />
15 Psia or more, or below its Evaporator Pressure 10<br />
Psia or more for 30 seconds continuously.<br />
Remote<br />
Remote<br />
Remote<br />
Remote<br />
Remote<br />
Local<br />
Normal Latch Bad Sensor or LLID Remote<br />
Info and<br />
Special<br />
Action<br />
Latch<br />
Bad Sensor or LLID. This diagnostic will only occur if<br />
OA sensor is configured.OA Chilled water reset will<br />
be suspended if selected and Tracer OA unavailable.<br />
D7 Over Voltage Normal NonLatch a. Average of all monitored Line voltages above +<br />
10% of nominal. [Must hold = + 10 % of nominal.<br />
Must trip = + 15 % of nominal. Reset differential =<br />
min. of 2% and max. of 4%. Time to trip =<br />
minimum of 1 min. and maximum of 5 min.) Design:<br />
Nom. trip: 60 seconds at greater than 112.5%, + or -<br />
2.5%, Auto Reset at 109% or less.<br />
E4 Phase Loss Immediate Latch a) No current was sensed on one or two of the<br />
current transformer inputs while running or starting<br />
(See Nonlatching Power Loss Diagnostic for all three<br />
phases lost while running). Must hold = 20% RLA.<br />
Must trip = 5% RLA. Time to trip shall be longer<br />
than guaranteed reset on Starter Module at a<br />
minimum, 3 seconds maximum. Actual design<br />
trippoint is 10%. The actual design trip time is 2.64<br />
seconds. b) If Phase reversal protection is enabled<br />
and current is not sensed on one or more current<br />
xformer inputs. Logic will detect and trip in a<br />
maximum of 0.3 second from compressor start.<br />
E5 or E5 Phase Reversal Immediate Latch A phase reversal was detected on the incoming<br />
current. On a compressor startup the phase reversal<br />
logic must detect and trip in a maximum of 0.3<br />
second from compressor start.<br />
Reset<br />
Level<br />
Remote<br />
Remote<br />
Local<br />
Local<br />
160 <strong>RTHD</strong>-SVX01B-EN
Diagnostics<br />
Table 32<br />
Diagnostic List<br />
Hex<br />
Code<br />
E3<br />
Phase UnbalanceSevere<br />
Current<br />
Imbalance<br />
Normal Latch A 30% Phase cCurrent Unbalance imbalance has<br />
been detected on one phase relative to the average<br />
of all 3 phases for 90 continuous seconds.<br />
1A0 Power Loss Immediate NonLatch The compressor had previously established currents<br />
while running and then all three phases of current<br />
were lost. Design: Less than 10% RLA, trip in 2.64<br />
seconds. This diagnostic will preclude the Phase<br />
Loss Diagnostic and the Transition Complete Input<br />
Opened Diagnostic from being called out. To<br />
prevent this diagnostic from occurring with the<br />
intended disconnect of main power, the minimum<br />
time to trip must be greater than the guaranteed<br />
reset time of the Starter module. Note: This<br />
diagnostic prevents nuisance latching diagnostics<br />
due to a momentary power loss - It does not protect<br />
motor/compressor from uncontrolled power reapplication.<br />
See Momentary Power Loss Diagnostic for<br />
this protection. This diagnostic will auto reset in 10<br />
seconds from its occurrence, and is not active during<br />
the start mode before the transition complete input<br />
is proven. This prevents the chiller from cycling due<br />
to some internal starter problem, as the starter<br />
would latch out on either a "Starter Fault Type 3" or a<br />
"Starter Did Not Transition" latching diagnostic.<br />
However true power loss occurring during a start<br />
would result in a misdiagnosis and the chiller would<br />
not automatically recover.<br />
2F2<br />
28C<br />
Refrigerant<br />
Monitor Sensor<br />
Restart Inhibit<br />
Warning<br />
189 Solid State<br />
Starter Fault<br />
188 Starter Dry Run<br />
Test<br />
5CD<br />
CA<br />
Diagnostic<br />
Name and<br />
Source Severity Persistence Criteria<br />
Starter Comm<br />
Loss with MP<br />
Starter Contactor<br />
Interrupt Failure<br />
Info NonLatch Open or Shorted input and the Rfgt Monitor is setup<br />
as installed<br />
Info NonLatch The Restart Inhibit was invoked on a compressor.<br />
This indicates excessive chiller cycling which should<br />
be corrected.<br />
Local<br />
Remote<br />
Remote<br />
Remote<br />
Immediate Latch The Solid State Starter Fault Relay is open Local<br />
Immediate Latch Starter has had a loss of communication with the<br />
MP for a 15 second period.<br />
Immediate Latch While in the Starter Dry Run Mode either 50 % Line<br />
Voltage was sensed at the Potential Transformers or<br />
10 % RLA Current was sensed at the Current Transformers.<br />
Immediateand<br />
Special<br />
ModeActio<br />
n<br />
Latch Detected compressor currents greater than 10%<br />
RLA on any or all phases when the compressor was<br />
commanded off. Detection time shall be 5 seconds<br />
minimum and 10 seconds maximum. On detection<br />
and until the controller is manually reset: generate<br />
diagnostic, energize the appropriate alarm relay,<br />
continue to energize the Evap and Cond Pump<br />
Outputs, continue to command the affected<br />
compressor off, fully unload the effected<br />
compressor. For as long as current continues,<br />
perform liquid level and oil return gas pump control<br />
Reset<br />
Level<br />
Local<br />
Local<br />
Local<br />
<strong>RTHD</strong>-SVX01B-EN 161
Diagnostics<br />
Table 32<br />
Hex<br />
Code<br />
F0<br />
6A3<br />
1E9<br />
1ED<br />
1F1<br />
5C5<br />
5C9<br />
3D7<br />
3D5<br />
Diagnostic List<br />
Diagnostic<br />
Name and<br />
Source Severity Persistence Criteria<br />
Starter Did Not<br />
Transition<br />
Starter Failed to<br />
Arm/Start<br />
Starter Fault Type<br />
I<br />
Starter Fault Type<br />
II<br />
Starter Fault Type<br />
III<br />
Starter Module<br />
Memory Error<br />
Type 1<br />
Starter Module<br />
Memory Error<br />
Type 2 -<br />
Transition<br />
Complete Input<br />
Opened<br />
Transition<br />
Complete Input<br />
Shorted<br />
Immediate Latch The Starter Module did not receive a transition<br />
complete signal in the designated time from its<br />
command to transition. The must hold time from<br />
the Starter Module transition command is 1 second.<br />
The Must trip time from the transition command is 6<br />
seconds. Actual design is 2.5 seconds. This<br />
diagnostic is active only for Y-Delta, Auto-Transformer,<br />
Primary Reactor, and X-Line Starters.<br />
Info Latch Starter failed to arm or start within the allotted time<br />
(15 seconds).<br />
Immediate Latch This is a specific starter test where 1M(1K1) is<br />
closed first and a check is made to ensure that there<br />
are no currents detected by the CT's. If currents are<br />
detected when only 1M is closed first at start, then<br />
one of the other contactors is shorted.<br />
Immediate Latch a. This is a specific starter test where the Shorting<br />
Contactor (1K3) is individually energized and a check<br />
is made to ensure that there are no currents<br />
detected by the CT's. If current is detected when<br />
only S is energized at Start, then 1M is shorted. b.<br />
This test in a. above applies to all forms of starters<br />
(Note: It is understood that many starters do not<br />
connect to the Shorting Contactor.).<br />
Immediate Latch As part of the normal start sequence to apply power<br />
to the compressor, the Shorting Contactor (1K3) and<br />
then the Main Contactor (1K1) were energized. 1.6<br />
seconds later there were no currents detected by<br />
the CT's for the last 1.2 seconds on all three phases.<br />
The test above applies to all forms of starters except<br />
Adaptive Frequency Drives.<br />
Info Latch Checksum on RAM copy of the Starter LLID configuration<br />
failed. Configuration recalled from EEPROM.<br />
Immediate Latch Checksum on EEPROM copy of the Starter LLID<br />
configuration failed. Factor default values used.<br />
Immediate Latch The Transition Complete input is open with the<br />
compressor motor running after a successful<br />
completion of transition. This is active only for all<br />
electromechanical starters<br />
Immediate Latch The Transition Complete input is shorted before the<br />
compressor was started. This is active for all<br />
electromechanical starters.<br />
Reset<br />
Level<br />
Local<br />
Remote<br />
Local<br />
Local<br />
Local<br />
Local<br />
Local<br />
Local<br />
Local<br />
162 <strong>RTHD</strong>-SVX01B-EN
Diagnostics<br />
Table 32<br />
Diagnostic List<br />
Hex<br />
Code<br />
Diagnostic<br />
Name and<br />
Source Severity Persistence Criteria<br />
D8 Under Voltage Normal NonLatch a. Average of all monitored Line voltages below -<br />
10% of nominal or the Under/Overvoltage transformer(s)<br />
are not connected. [Must hold = - 10 % of<br />
nominal. Must trip = - 15 % of nominal. Reset differential<br />
= min. of 2% and max. of 4%. Time to trip =<br />
min. of 1 min. and max. of 5 min.) Design: Nom.<br />
trip: 60 seconds at less than 87.5%, + or - 2.8% at<br />
200V or + or - 1.8% at 575V, Auto Reset at 90% or<br />
greater.<br />
Reset<br />
Level<br />
Remote<br />
<strong>RTHD</strong>-SVX01B-EN 163
Diagnostics<br />
164 <strong>RTHD</strong>-SVX01B-EN
Wiring Schematics<br />
Typical field connection diagrams, electrical schematics and connections diagrams<br />
for the <strong>RTHD</strong> units are shown in this section.<br />
NOTE: The drawings in this section are provided for reference only. These<br />
diagrams may not reflect the actual wiring of your unit. For specific electrical<br />
connection and schematic information, always refer to the wiring diagrams<br />
that were shipped with the unit.<br />
Unit Electrical Data<br />
To determine the specific electrical characteristics of a particular chiller, refer<br />
to the nameplates mounted on the units.<br />
Drawing Description IOM Page<br />
2309-4870 Field Wiring 166<br />
2309-4869 Field Layout 168<br />
2309-7552 Schematic, page 1 - WYE-DELTA Starter Size 3,4,5 170<br />
2309-7556 Schematic, page 1 - WYE-DELTA Starter Size 6 172<br />
2309-7560 Schematic, page 1 - SOLID STATE Starter 174<br />
2309-7553 Schematic, page 2 - WYE-DELTA Starter Size 3,4,5 176<br />
2309-7557 Schematic, page 2 - WYE-DELTA Starter Size 6 178<br />
2309-7561 Schematic, page 2 - SOLID STATE Starter 180<br />
2309-7554 Schematic, page 3 - WYE-DELTA Starter Size 3,4,5 182<br />
2309-7558 Schematic, page 3 - WYE-DELTA Starter Size 6 184<br />
2309-7562 Schematic, page 3 - SOLID STATE Starter 186<br />
2309-7555 Schematic, page 4 - WYE-DELTA Starter Size 3,4,5 188<br />
2309-7559 Schematic, page 4 - WYE-DELTA Starter Size 6 190<br />
2309-7563 Schematic, page 4 - SOLID STATE Starter 192<br />
2309-7564 Component Location 194<br />
2309-7565 Component Location - Solid State Starter 196<br />
<strong>RTHD</strong>-SVX01B-EN 165
166
167
168
169
A DIVISION OF AMERICAN STANDARD INC.<br />
ALL RIGHTS RESERVED<br />
C<br />
170
171
A DIVISION OF AMERICAN STANDARD INC.<br />
ALL RIGHTS RESERVED<br />
C<br />
172
173
A DIVISION OF AMERICAN STANDARD INC.<br />
ALL RIGHTS RESERVED<br />
C<br />
174
175
A DIVISION OF AMERICAN STANDARD INC.<br />
ALL RIGHTS RESERVED<br />
C<br />
176
177
A DIVISION OF AMERICAN STANDARD INC.<br />
ALL RIGHTS RESERVED<br />
C<br />
178
179
A DIVISION OF AMERICAN STANDARD INC.<br />
ALL RIGHTS RESERVED<br />
C<br />
180
181
A DIVISION OF AMERICAN STANDARD INC.<br />
ALL RIGHTS RESERVED<br />
C<br />
182
183
A DIVISION OF AMERICAN STANDARD INC.<br />
ALL RIGHTS RESERVED<br />
C<br />
184
185
A DIVISION OF AMERICAN STANDARD INC.<br />
ALL RIGHTS RESERVED<br />
C<br />
186
187
A DIVISION OF AMERICAN STANDARD INC.<br />
ALL RIGHTS RESERVED<br />
C<br />
188
189
A DIVISION OF AMERICAN STANDARD INC.<br />
ALL RIGHTS RESERVED<br />
C<br />
190
191
A DIVISION OF AMERICAN STANDARD INC.<br />
ALL RIGHTS RESERVED<br />
C<br />
192
193
194
C<br />
A DIVISION OF AMERICAN STANDARD INC.<br />
ALL RIGHTS RESERVED<br />
195
196
C<br />
A DIVISION OF AMERICAN STANDARD INC.<br />
ALL RIGHTS RESERVED<br />
197
Trane<br />
A business of American Standard Companies<br />
www.trane.com<br />
Literature Order Number<br />
File Number<br />
Supersedes<br />
Stocking Location<br />
<strong>RTHD</strong>-SVX01B-EN<br />
SV-RF-<strong>RTHD</strong>-SVX01B-EN-0604<br />
<strong>RTHD</strong>-SVX01A-EN<br />
Inland<br />
For more information contact your local district<br />
office or e-mail us at comfort@trane.com<br />
Trane has a policy of continuous product data and product improvement and reserves<br />
the right to change design and specifications without notice. Only qualified technicians<br />
should perform the installation and servicing of equipment referred to in this bulletin.