DRIVER'S MANUAL SB220GS - Training Registration System
DRIVER'S MANUAL SB220GS - Training Registration System
DRIVER'S MANUAL SB220GS - Training Registration System

You also want an ePaper? Increase the reach of your titles
YUMPU automatically turns print PDFs into web optimized ePapers that Google loves.
mph<br />
v min 25 km /h<br />
v max125 km/h<br />
125 km/h<br />
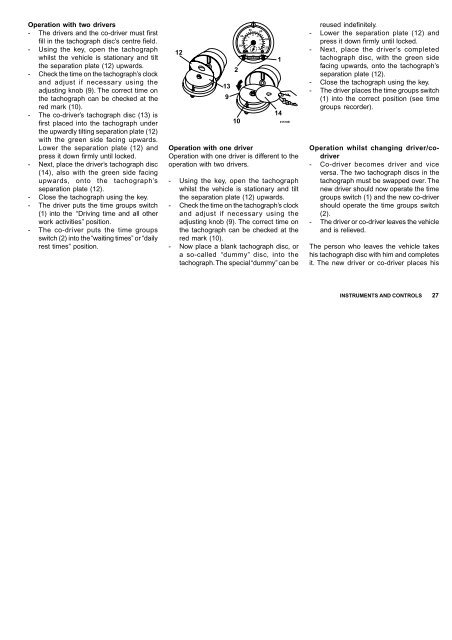
Operation with two drivers<br />
- The drivers and the co-driver must first<br />
fill in the tachograph disc’s centre field.<br />
- Using the key, open the tachograph<br />
whilst the vehicle is stationary and tilt<br />
the separation plate (12) upwards.<br />
- Check the time on the tachograph’s clock<br />
and adjust if necessary using the<br />
adjusting knob (9). The correct time on<br />
the tachograph can be checked at the<br />
red mark (10).<br />
- The co-driver’s tachograph disc (13) is<br />
first placed into the tachograph under<br />
the upwardly tilting separation plate (12)<br />
with the green side facing upwards.<br />
Lower the separation plate (12) and<br />
press it down firmly until locked.<br />
- Next, place the driver’s tachograph disc<br />
(14), also with the green side facing<br />
upwards, onto the tachograph’s<br />
separation plate (12).<br />
- Close the tachograph using the key.<br />
- The driver puts the time groups switch<br />
(1) into the “Driving time and all other<br />
work activities” position.<br />
- The co-driver puts the time groups<br />
switch (2) into the “waiting times” or “daily<br />
rest times” position.<br />
12<br />
13<br />
9<br />
Operation with one driver<br />
Operation with one driver is different to the<br />
operation with two drivers.<br />
- Using the key, open the tachograph<br />
whilst the vehicle is stationary and tilt<br />
the separation plate (12) upwards.<br />
- Check the time on the tachograph’s clock<br />
and adjust if necessary using the<br />
adjusting knob (9). The correct time on<br />
the tachograph can be checked at the<br />
red mark (10).<br />
- Now place a blank tachograph disc, or<br />
a so-called “dummy” disc, into the<br />
tachograph. The special “dummy” can be<br />
2<br />
10<br />
40<br />
20<br />
20<br />
10<br />
30<br />
60<br />
40<br />
2 km 1<br />
0 0 001 6 5<br />
80<br />
50<br />
60<br />
70<br />
80<br />
100<br />
120<br />
1<br />
14<br />
01510B<br />
reused indefinitely.<br />
- Lower the separation plate (12) and<br />
press it down firmly until locked.<br />
- Next, place the driver’s completed<br />
tachograph disc, with the green side<br />
facing upwards, onto the tachograph’s<br />
separation plate (12).<br />
- Close the tachograph using the key.<br />
- The driver places the time groups switch<br />
(1) into the correct position (see time<br />
groups recorder).<br />
Operation whilst changing driver/codriver<br />
- Co-driver becomes driver and vice<br />
versa. The two tachograph discs in the<br />
tachograph must be swapped over. The<br />
new driver should now operate the time<br />
groups switch (1) and the new co-driver<br />
should operate the time groups switch<br />
(2).<br />
- The driver or co-driver leaves the vehicle<br />
and is relieved.<br />
The person who leaves the vehicle takes<br />
his tachograph disc with him and completes<br />
it. The new driver or co-driver places his<br />
INSTRUMENTS AND CONTROLS<br />
27