Instructions for M100 GameSpy Digital Camera - Trail Camera
Instructions for M100 GameSpy Digital Camera - Trail Camera
Instructions for M100 GameSpy Digital Camera - Trail Camera

Create successful ePaper yourself
Turn your PDF publications into a flip-book with our unique Google optimized e-Paper software.
<strong>Instructions</strong> <strong>for</strong> <strong>M100</strong><br />
<strong>GameSpy</strong> <strong>Digital</strong> <strong>Camera</strong><br />
THANK YOU <strong>for</strong> your purchase of the <strong>M100</strong> <strong>GameSpy</strong> <strong>Digital</strong> <strong>Camera</strong>. Please<br />
read this booklet be<strong>for</strong>e using the unit. If you should have any questions about this<br />
product or any other Moultrie product, please contact us using the in<strong>for</strong>mation on<br />
the back of this booklet. Please register your camera at www.moultriefeeders.com<br />
to activate your warranty.<br />
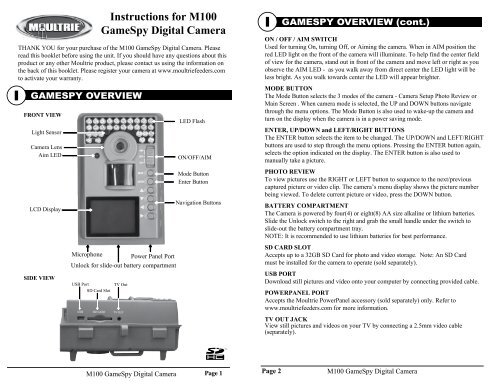
FRONT VIEW<br />
Light Sensor<br />
<strong>Camera</strong> Lens<br />
Aim LED<br />
LED Flash<br />
ON/OFF/AIM<br />
ON / OFF / AIM SWITCH<br />
Used <strong>for</strong> turning On, turning Off, or Aiming the camera. When in AIM position the<br />
red LED light on the front of the camera will illuminate. To help find the center field<br />
of view <strong>for</strong> the camera, stand out in front of the camera and move left or right as you<br />
observe the AIM LED - as you walk away from direct center the LED light will be<br />
less bright. As you walk towards center the LED will appear brighter.<br />
MODE BUTTON<br />
The Mode Button selects the 3 modes of the camera - <strong>Camera</strong> Setup Photo Review or<br />
Main Screen . When camera mode is selected, the UP and DOWN buttons navigate<br />
through the menu options. The Mode Button is also used to wake-up the camera and<br />
turn on the display when the camera is in a power saving mode.<br />
ENTER, UP/DOWN and LEFT/RIGHT BUTTONS<br />
The ENTER button selects the item to be changed. The UP/DOWN and LEFT/RIGHT<br />
buttons are used to step through the menu options. Pressing the ENTER button again,<br />
selects the option indicated on the display. The ENTER button is also used to<br />
manually take a picture.<br />
LCD Display<br />
SIDE VIEW<br />
Microphone Power Panel Port<br />
Unlock <strong>for</strong> slide-out battery compartment<br />
USB Port<br />
SD Card Slot<br />
TV Out<br />
Mode Button<br />
Enter Button<br />
Navigation Buttons<br />
PHOTO REVIEW<br />
To view pictures use the RIGHT or LEFT button to sequence to the next/previous<br />
captured picture or video clip. The camera’s menu display shows the picture number<br />
being viewed. To delete current picture or video, press the DOWN button.<br />
BATTERY COMPARTMENT<br />
The <strong>Camera</strong> is powered by four(4) or eight(8) AA size alkaline or lithium batteries.<br />
Slide the Unlock switch to the right and grab the small handle under the switch to<br />
slide-out the battery compartment tray.<br />
NOTE: It is recommended to use lithium batteries <strong>for</strong> best per<strong>for</strong>mance.<br />
SD CARD SLOT<br />
Accepts up to a 32GB SD Card <strong>for</strong> photo and video storage. Note: An SD Card<br />
must be installed <strong>for</strong> the camera to operate (sold separately).<br />
USB PORT<br />
Download still pictures and video onto your computer by connecting provided cable.<br />
POWERPANEL PORT<br />
Accepts the Moultrie PowerPanel accessory (sold separately) only. Refer to<br />
www.moultriefeeders.com <strong>for</strong> more in<strong>for</strong>mation.<br />
TV OUT JACK<br />
View still pictures and videos on your TV by connecting a 2.5mm video cable<br />
(separately).<br />
<strong>M100</strong> <strong>GameSpy</strong> <strong>Digital</strong> <strong>Camera</strong><br />
Page 2<br />
<strong>M100</strong> <strong>GameSpy</strong> <strong>Digital</strong> <strong>Camera</strong>
CAPTURE MODES<br />
Slide the UNLOCK switch on the bottom of <strong>Camera</strong> and use the knob to pull<br />
the slide-out Battery Tray. Install four(4) or eight(8) AA size alkaline or<br />
lithium batteries with polarities as indicated in the Battery Tray. Re-install<br />
the Battery Tray.<br />
Thread the provided Mounting Strap through the Eyelets on the back of the<br />
camera and secure to a tree or pole approximately 36" from the ground as<br />
shown.<br />
Turn <strong>Camera</strong> on by sliding ON/OFF/AIM switch to<br />
the ON position.<br />
Eyelet<br />
Press the MODE button one time to get to the<br />
<strong>Camera</strong> Setup Menu. Set Time and Date by pressing<br />
ENTER, using UP/DOWN to adjust selected field,<br />
LEFT/RIGHT to move to the next field and ENTER<br />
when done.<br />
Press MODE button until MENU SELECTION<br />
screen is displayed. Use the UP/DOWN buttons<br />
until the MAIN SCREEN option is highlighted<br />
yellow. Press ENTER.<br />
Your <strong>Camera</strong> will now automatically take pictures<br />
whenever an animal is detected in range -based on<br />
the default settings below.<br />
Mounting<br />
Strap<br />
The <strong>GameSpy</strong> offers four capture modes as described below. The default capture<br />
mode is <strong>Trail</strong> Cam.<br />
TRAIL CAM MODE<br />
Still photos are taken when an animal is detected. The number of photos taken<br />
when an animal is detected is configurable in Settings. Photos are stored in<br />
the in the DCIM/100_MDGC folder on the SD card.<br />
PLOT CAM MODE<br />
The camera takes photos at a specified interval during the day and combines<br />
them together to create a Plot Video (*.MLT file) which can be viewed on the<br />
supplied Moultrie Plot Stalker software. The camera takes a Plot Video twice<br />
a day; once in the morning and once in the evening. The morning Plot Video<br />
begins 30 min be<strong>for</strong>e sunrise. The evening Plot Video ends 30 min after<br />
sunset. See chart below as a reference. The length of each Plot Video is<br />
determined by the Plot Duration setting in the camera menu. The camera will<br />
detect the correct sunrise and sunset times automatically and adjust itself<br />
accordingly. The Plot Videos are stored in :/PLOT folder on the SD card.<br />
IMPORTANT: It will take the camera 24hrs to properly adjust to the correct<br />
sunrise and sunset times. As a default the camera will start the morning Plot<br />
Video at 5:30am and end the evening video at 6:30pm. To reset the sunrise<br />
and sunset times back to the default times, use the Default Settings option in<br />
the menu.<br />
{<br />
{<br />
Capture Mode<br />
TRAIL CAM (Still)<br />
Photo Quality<br />
HIGH<br />
Photo Delay after each photo is taken 1 MIN<br />
Multi Shot Count<br />
1-SHOT<br />
<strong>Digital</strong> Zoom<br />
NO ZOOM<br />
Video Resolution<br />
HIGH<br />
Video Length<br />
5 SEC<br />
Video Audio<br />
ON<br />
<strong>Camera</strong> Name<br />
MYCAMERA<br />
Temperature<br />
Fahrenheit<br />
Info Strip printed on photos<br />
ON<br />
Plot Frequency<br />
15 SECONDS<br />
Plot Duration<br />
3 HOUR<br />
Default Setting<br />
NO<br />
Delete All?<br />
NO<br />
<strong>M100</strong> <strong>GameSpy</strong> <strong>Digital</strong> <strong>Camera</strong> Page 3<br />
4<br />
Page 4<br />
Morning Plot Video<br />
Evening Plot Video<br />
HYBRID CAM MODE<br />
<strong>Camera</strong> operates in Plot Cam mode during the day and <strong>Trail</strong> Cam Mode during<br />
the night. Thirty minutes after dusk the camera will enter the <strong>Trail</strong> Cam mode<br />
and take night photos when the PIR sensor is triggered.<br />
VIDEO MODE<br />
<strong>Camera</strong> records a video when an animal is detected by the motion sensor.<br />
During daylight hours the camera will record a video 5, 15 or 30 seconds in<br />
length. During night the camera will record a video with a maximum length<br />
of 10 seconds. The video length is configurable in SETTINGS.<br />
<strong>M100</strong> <strong>GameSpy</strong> <strong>Digital</strong> <strong>Camera</strong>
Setup Menu - The UP/DOWN buttons are used to navigate through the available<br />
setting choices. UP/DOWN moves to the next menu item, and ENTER selects<br />
the item to be changed. Additional menu choices are available by hitting the<br />
UP/DOWN button when either the first/last option is highlighted.<br />
Date/Time - Set Date /Time -on the SETUP DATE/TIME<br />
screen, use the UP/DOWN buttons to modify the month.<br />
Press LEFT/RIGHT buttons to move to the next field. Press<br />
the ENTER button again to save your selections. The Time<br />
and Date is retained between battery changes. Time is not<br />
automatically adjusted <strong>for</strong> daylight savings.<br />
Capture Mode - (default <strong>Trail</strong> Cam) Press the UP/DOWN<br />
buttons to highlight the desired mode. Press the ENTER<br />
button to save the mode and return to the <strong>Camera</strong> Setup<br />
Menu. There are four capture mode settings –TRAIL<br />
CAM, PLOT CAM, HYBRID CAM or VIDEO. Refer to<br />
the CAPTURE MODE section of this manual <strong>for</strong> details.<br />
Photo Quality - (default High) -The higher the quality of<br />
the photo/image the more memory it consumes. However,<br />
higher quality images have higher resolution which results<br />
in clearer images -especially when zooming in. There are<br />
four photo/image quality settings -ENHANCED, HIGH,<br />
MEDIUM, and LOW. Press the UP/DOWN buttons to<br />
highlight the desired setting. Press the ENTER button to<br />
save the setting and return to the <strong>Camera</strong> Setup Menu.<br />
Refer to SPECIFICATIONS section of this document <strong>for</strong><br />
details on number of images stored based on Photo Quality.<br />
Photo Delay - (default 1 minute) -The photo delay<br />
determines the number of minutes between pictures when<br />
an animal is detected and remains in range. To change the<br />
delay time, press the UP/DOWN buttons to highlight the<br />
desired setting. Press the ENTER button to save the setting<br />
and return to the <strong>Camera</strong> Setup Menu. Additional menu<br />
choices are available by hitting the UP/DOWN button<br />
when the first/last option is highlighted. Photo Delays can<br />
be set to 15 and 30 seconds, 1, 5, 10, 30 and 60 minutes.<br />
Multi-Shot - (default 1-Shot) - When the Game Spy<br />
<strong>Camera</strong> is configured <strong>for</strong> STILL in the Capture Mode<br />
screen, the camera can take 1, 2, or 3 pictures each time an<br />
animal is detected. There is an approximate 5 second delay<br />
between pictures based on battery strength. To change the<br />
number of pictures taken, press the UP/DOWN buttons to<br />
highlight the desired setting. Press the ENTER button to<br />
save the setting and return to the <strong>Camera</strong> Setup Menu.<br />
<strong>Digital</strong> Zoom - (default No Zoom) - This function will<br />
allow the user to select between 3 levels of digital zoom.<br />
The camera will default to no zoom setting. Press the<br />
UP/DOWN buttons to highlight the desired setting. Press<br />
the ENTER button to save the setting and return to the<br />
<strong>Camera</strong> Setup Menu.<br />
Video Resolution - (default High) - Video resolution can<br />
be set to LOW or HIGH. The higher the quality of the<br />
video, the more memory it consumes. However, higher<br />
quality videos have higher resolution.<br />
Low: 352 x 192 @ 24fps<br />
High: 720 x 400 @ 24fps<br />
Press the UP/DOWN buttons to highlight the desired<br />
setting. Press the ENTER button to save the setting and<br />
return to the <strong>Camera</strong> Setup Menu.<br />
Video Length - (default 5 seconds) - When the Game Spy<br />
<strong>Camera</strong> is configured <strong>for</strong> VIDEO in the Capture Mode<br />
screen, the camera will record video <strong>for</strong> a designated<br />
amount of time each time an animal is detected. To change<br />
the amount of time recorded, press the UP/DOWN buttons<br />
to highlight the desired setting. Press the ENTER button to<br />
save the setting and return to the <strong>Camera</strong> Setup Menu.<br />
The maximum video length <strong>for</strong> a nighttime IR video is<br />
10 seconds.<br />
Video Audio - (default On) - This option allows the user to<br />
turn the audio during video recording ON or OFF. When<br />
selected and the Game Spy <strong>Camera</strong> is configured <strong>for</strong><br />
VIDEO in the Capture Mode screen; the camera will record<br />
audio along with the video each time an animal is detected.<br />
Press the LEFT/RIGHT buttons to highlight the desired<br />
setting. Press the ENTER button to save the setting and<br />
return to the <strong>Camera</strong> Setup Menu.<br />
<strong>M100</strong> <strong>GameSpy</strong> <strong>Digital</strong> <strong>Camera</strong> Page 5<br />
Page 6<br />
<strong>M100</strong> <strong>GameSpy</strong> <strong>Digital</strong> <strong>Camera</strong>
<strong>Camera</strong> Name - (default MYCAMERA) The <strong>Camera</strong><br />
Name is imprinted on the photos and provides a point of<br />
reference when multiple cameras are used. To change the<br />
<strong>Camera</strong> Name, use the LEFT/RIGHT buttons to highlight<br />
the character to be modified. Press the UP/DOWN button<br />
to select the desired character (A to Z, 0 to 9, dash or<br />
space). Press LEFT/RIGHT to move to the next character.<br />
Press the ENTER button to save the new camera name and<br />
return to the <strong>Camera</strong> Setup Menu.<br />
Temperature - (default Fahrenheit) - The temperature is<br />
imprinted on each photo and can be in degrees Fahrenheit<br />
or Celsius. To change the temperature units, press the<br />
UP/DOWN buttons to highlight the desired setting. Press<br />
the ENTER button to save the setting and return to the<br />
<strong>Camera</strong> Setup Menu.<br />
IR Test- (default On) When IR Test is ON, the red AIM<br />
LED light on the front of the camera will illuminate. To<br />
help find the center field of view <strong>for</strong> the camera, stand out<br />
in front of the camera and move left or right as you observe<br />
the AIM LED - as you walk away from direct center the<br />
LED light will be less bright. As you walk towards center<br />
the LED will appear brighter.<br />
Info Strip - (default On) -When the Info Strip is turned<br />
ON, the in<strong>for</strong>mation strip, as described in the Advanced<br />
Setup section of this manual, is imprinted on the photos.<br />
The Barometer, Temperature, Moon phase, Date, Time,<br />
<strong>Camera</strong> Name, & Moultrie logo are imprinted on the<br />
bottom of each picture. When the Info Strip is turned OFF,<br />
the photo contains no in<strong>for</strong>mation strip. To change the Info<br />
Strip setting, press the LEFT/RIGHT buttons to highlight<br />
the desired setting. Press the ENTER button to save the<br />
setting and return to the <strong>Camera</strong> Setup Menu.<br />
Plot Frequency - (default 15 seconds) - Used to set the<br />
time frequency between each photo in plot mode. To<br />
change the plot frequency, press the UP/DOWN buttons to<br />
highlight the desired setting. Press the ENTER button to<br />
save the setting and return to the <strong>Camera</strong> Setup Menu.<br />
Plot frequency can be set to 5, 10, 15, 30, or 60 seconds.<br />
NOTE: Increasing the Plot Frequency will decrease the<br />
battery life of the camera. It is recommended to use lithium<br />
batteries <strong>for</strong> taking plot videos.<br />
Plot Duration - (default 3 hours) – Plot Duration is used to<br />
limit the time periods that the camera will be active. To<br />
change the plot duration, press the UP/DOWN buttons to<br />
highlight the desired setting. Press the ENTER button to<br />
save the setting and return to the <strong>Camera</strong> Setup Menu.<br />
Plot duration can be set to All Day, 1, 2, 3, or 4 hours.<br />
• All Day – Plot cam takes photos all day<br />
• 1 Hour – Plot cam takes photos <strong>for</strong> 1 hour twice a day.<br />
• 2 Hour – Plot cam takes photos <strong>for</strong> 2 hours twice a day.<br />
• 3 Hour – Plot cam takes photos <strong>for</strong> 3 hours twice a day.<br />
• 4 Hour – Plot cam takes photos <strong>for</strong> 4 hours twice a day.<br />
NOTE: Increasing the Plot Duration will decrease the battery<br />
life of the camera. It is recommended to use lithium batteries<br />
<strong>for</strong> taking plot videos.<br />
Battery Calc - This feature provides an estimated battery<br />
life of the camera. The battery life is expressed as “###<br />
Days”. Pressing the MODE button will return to the<br />
<strong>Camera</strong> Setup menu.<br />
NOTE: The number of days shown is based on using 8 AA<br />
alkaline batteries with 5 day and 5 night photos per day.<br />
Actual battery life will vary depending on type of battery,<br />
weather conditions and camera usage. It is recommended to<br />
use lithium batteries <strong>for</strong> best per<strong>for</strong>mance.<br />
Default Settings - (default No) -To restore all the settings<br />
back to the factory default, press the LEFT/RIGHT buttons<br />
to highlight the YES setting. Press the ENTER button to<br />
restore the default settings and return to the <strong>Camera</strong> Setup<br />
Menu.<br />
Delete All Photos - (default No) - To remove all content<br />
on the SD card, press the LEFT/RIGHT buttons to<br />
highlight the YES setting. Press the ENTER button to<br />
erase photos and return to the <strong>Camera</strong> Setup Menu.<br />
<strong>M100</strong> <strong>GameSpy</strong> <strong>Digital</strong> <strong>Camera</strong> Page 7<br />
Page 8<br />
<strong>M100</strong> <strong>GameSpy</strong> <strong>Digital</strong> <strong>Camera</strong>
VI<br />
ADVANCED INFORMATION<br />
Security Code - (default "00000") - This feature prevents<br />
unauthorized use of the camera should it become lost or<br />
stolen by requiring a 5 digit security code to be entered to<br />
unlock the camera. The security code is 5 digits, each digit<br />
being a number 0-9. The default code is "00000". Once the<br />
code is changed from the default code, the camera will<br />
prompt you to enter the correct code whenever:<br />
• The camera is turned on<br />
• The camera is woken up from sleep mode<br />
• The camera is connected to USB<br />
If the security code is the default number, then you do not need to<br />
enter the code.<br />
VIEWING PICTURES ON COMPUTER VIA USB<br />
1. Plug provided USB cable into the USB port on your Windows 7/Vista/XP<br />
computer.<br />
2. Plug other end of USB cable into the camera's USB port.<br />
3. To access JPG pictures and AVI movie files, navigate to "My Computer" and<br />
double click the "Moultrie CAM" drive. Picture files will be stored In the<br />
DCIM/100_MDGC directory; video files are located in the DCIM directory.<br />
4. To exit USB mode, follow Windows’ instructions <strong>for</strong> properly disconnecting<br />
a removable drive and then unplug<br />
VIEWING PICTURES - TV OUT<br />
1. To enter TV Out Mode, turn on the camera and place in the SETUP mode.<br />
2. Plug RCA jack on provided TV Adapter Cable into a VIDEO IN port on a<br />
TV or VCR.<br />
3. Plug other end of TV Adapter Cable into the TV Out Jack. Pictures are now<br />
presented on the TV.<br />
4. To view pictures use the RIGHT or LEFT button to sequence to the<br />
next/previous captured picture or video clip. The camera’s menu display shows<br />
the picture number being viewed.<br />
5. To delete current picture or video, press the DOWN button.<br />
6. To exit TV mode, unplug the TV Adapter Cable from the TV Out Jack and<br />
TV or VCR.<br />
MFH-<strong>M100</strong><br />
<strong>M100</strong> <strong>GameSpy</strong> <strong>Digital</strong> <strong>Camera</strong> Page 9<br />
Page 10<br />
<strong>M100</strong> <strong>GameSpy</strong> <strong>Digital</strong> <strong>Camera</strong>
VI<br />
ADVANCED INFORMATION (cont.)<br />
INFORMATION ON PICTURE<br />
The info strip below will appear at the bottom of the photo/video:<br />
27.88 inHg ↑ 75 o F 01/01/11 12:00 AM MYCAMERA<br />
Barometer-Trend Temp. Moon Date Time <strong>Camera</strong> Name<br />
Barometric<br />
The barometric pressure is displayed on the info strip with units in Hg.<br />
Barometric Trend<br />
The barometric trend is calculated and shown as “↑”, “↓”, or “-“.<br />
Moon Phase<br />
The icons <strong>for</strong> the moon phase are as follows:<br />
Photo Quality<br />
LOW<br />
1480 X 832 (1.3MP)<br />
MEDIUM<br />
1848 x 1040 (3.2 MP)<br />
HIGH<br />
2616 x 1472 (4.0 MP)<br />
ENHANCED<br />
3248 x 1824 (6.0 MP)<br />
Video Quality<br />
HIGH<br />
720 x 400 @ 24fps<br />
LOW<br />
352 x 192 @ 24fps<br />
Approximate photos stored 1GB SD card<br />
LOW 3779<br />
MEDIUM 1784<br />
HIGH 890<br />
ENHANCED 578<br />
Approximate video time stored 1GB SD card<br />
HIGH<br />
20min<br />
LOW<br />
60min<br />
Optional SD Memory Card<br />
32 GB Max<br />
Optical Field of View<br />
55 degrees<br />
Batteries<br />
Alkaline AA-cells<br />
Approximate Detection Range<br />
45 +/-5 feet<br />
<strong>M100</strong> <strong>GameSpy</strong> <strong>Digital</strong> <strong>Camera</strong> Page 11<br />
Page 12<br />
<strong>M100</strong> <strong>GameSpy</strong> <strong>Digital</strong> <strong>Camera</strong>
A<br />
PLOTSTALKER SOFTWARE INTRO<br />
B<br />
PLOTSTALKER ACTIVITY SEARCH<br />
INTRODUCTION<br />
In time-lapse photography a series<br />
of still photos are taken at regular<br />
time intervals. The PlotStalker<br />
Software allows you to load the<br />
time lapse file that was captured<br />
from your Moultrie Game <strong>Camera</strong><br />
and scroll backward and <strong>for</strong>ward<br />
through your photos, single step,<br />
search <strong>for</strong> activity in a designated<br />
area, and save the files.<br />
SYSTEM REQUIREMENTS<br />
> Computer: Intel® Pentium® 4 or AMD Athlon® 64 processor or above; 1GB<br />
RAM minimum; 100 MB hard disk space minimum.<br />
> Operating System: Microsoft® Windows® 32 bit - XP with Service Pack 2 or<br />
later; Windows Vista® Home Premium, Business, Ultimate, or Enterprise with<br />
Service Pack 1; or Windows 7<br />
SOFTWARE INSTALLATION<br />
> Insert the PlotStalker CD into your computer and follow on-screen instructions.<br />
LOADING PLOT FILES<br />
1 Using standard Microsoft utilities (ex. File Explorer – My Computer),<br />
copy the PlotFiles (extension is .MLT) from the PLOT directory on the<br />
SD card to the hard disk drive in your computer. Note the location stored<br />
on the hard disk drive.<br />
2 Open the PlotStalker software application from the Windows Start Button<br />
menu. Once in the PlotStalker software, click on the File Button<br />
3 Browse to the location in which you have saved the Plot file(s)<br />
(.MLT) in step 1 above, select the file of interest and click Open.<br />
BEGIN/END<br />
Goes to the first or last photo in the Plot File.<br />
FRAME BY FRAME SEARCH<br />
Individually step <strong>for</strong>ward or backward through each photo.<br />
REWIND/PAUSE/PLAY<br />
Play photos in sequence, pause, or play the photos in reverse order.<br />
These functions simulate a video and are useful <strong>for</strong> manually searching<br />
changes in the photos. When a sequence is being played, press<br />
fast-<strong>for</strong>ward or fast-rewind multiple times to increase speed. (1x-5x)<br />
ACTIVITY SEARCH<br />
The Search Feature will scan through your photos and automatically<br />
look <strong>for</strong> changes in regions that you identify in Setup.<br />
In search mode, the PlotStalker software scans through the .mlt photo file, stops on<br />
a photo when changes are found in your identified region, and then highlights the<br />
changes in blue. You can click anywhere in the video viewing area to remove the<br />
blue highlights.<br />
ACTIVITY SEARCH SETUP<br />
Click the Settings button to activate<br />
the Region and Sensitivity settings<br />
<strong>for</strong> the Activity Search<br />
DEFINE SEARCH REGION<br />
Provides the ability to search <strong>for</strong><br />
changes in the photo in a specific<br />
region rather than the entire photo.<br />
1<br />
2<br />
3<br />
Click on the Set Motion Search Area Button.<br />
Use the mouse to select and drag the red outline around the area you want to<br />
search <strong>for</strong> movement. This allows you to focus on a very precise area if<br />
required.<br />
Click OK button on the Settings Popup window to confirm your settings and<br />
exit the menu.<br />
SENSITIVITY<br />
1 Set to High, Medium or Low - This sets the level of pixel change the program<br />
will detect. Note; a pixel change will occur with a color, intensity, lighting or<br />
movement so this setting is critical to obtain the desired results.<br />
DEFAULT SETTINGS<br />
1 Click on Default button to return to the default values <strong>for</strong> Search Area and<br />
Sensitivity settings<br />
PlotStalker Software Page 13<br />
Page 14<br />
PlotStalker Software
C<br />
PLOTSTALKER SAVE FILE<br />
SAVING FILES OVERVIEW<br />
Use the Save File features of the PlotStalker<br />
software to create a single photo, reduce the<br />
overall size of the .mlt file, exclude unwanted<br />
photos in the front, or create a video that can<br />
be viewed using a standard media player.<br />
EXPORTING AN IMAGE/PHOTO<br />
1<br />
2<br />
3<br />
4<br />
5<br />
On the main screen, choose a starting image/<br />
photo (frame) by using the scroll bar on the<br />
bottom of the display or the frame-by-frame<br />
search feature.<br />
Press the SAVE button<br />
Select the Current Image (*.jpg) radio button<br />
Press Change... to enter the directory and<br />
filename to save the image<br />
Press Export to save the file<br />
EXPORTING MLT FILE<br />
1 Select the appropriate 50, 100, or 200 images video clip radio button.<br />
This will create a MLT <strong>for</strong>mat file from the starting frame plus the<br />
next 50, 100, or 200 frames.<br />
2 Select the Change button to select the desired location to save the export file.<br />
3 Enter the directory and filename to save the file<br />
4 Select the Export button to save the file. These files are viewable with<br />
Plot Stalker Software.<br />
EXPORTING WMV FILE<br />
1<br />
2<br />
3<br />
4<br />
Select the appropriate 50, 100, or 200 images video clip radio button. This will<br />
create a .wmv <strong>for</strong>mat file of the starting frame plus the next 50, 100, or 200 frames.<br />
Select the Change button to select the desired location to save the export file.<br />
Enter the directory and filename to save the file<br />
Select the Export button to save the file. The program will convert the images<br />
to video based on the chosen settings. The .wmv file can be viewed using a<br />
standard media player.<br />
Great <strong>for</strong> uploading to the internet or emailing.<br />
PlotStalker Software Page 15<br />
12222010R1/ MFH-DGS-M80