TD 2030 TD 2010 - Thorens
TD 2030 TD 2010 - Thorens
TD 2030 TD 2010 - Thorens

Create successful ePaper yourself
Turn your PDF publications into a flip-book with our unique Google optimized e-Paper software.
EINLEITUNG 6<br />
SICHERHEITSHINWEISE 7<br />
AUSPACKEN UND MONTAGE 8<br />
AUFSTELLUNG UND ANSCHLUSS 10<br />
INSTALLATION DES TONABNEHMERS 12<br />
EINSTELLUNG DER TONARMHÖHE 13<br />
FEINJUSTAGE DES TONABNEHMERS 14<br />
TONARM TP 250 (<strong>TD</strong> <strong>2010</strong>) 15<br />
TONARM TP 300 (<strong>TD</strong> <strong>2030</strong>) 16<br />
BETRIEB DES PLATTENSPIELERS 17<br />
WARTUNG UND PFLEGE 18<br />
TECHNISCHE DATEN 19<br />
SERVICEINFORMATIONEN 20
INTRODUCTION 22<br />
HINTS FOR SAFETY AND PRECAUTION 23<br />
UNPACKING AND ASSEMBLY 24<br />
PLACEMENT AND CONNECTIONS 26<br />
MOUNTING THE PICKUP CARTRIDGE 28<br />
ADJUSTING TONEARM HEIGHT 29<br />
ALIGNMENT OF PICKUP CARTRIDGE 30<br />
TONEARM TP 250 (<strong>TD</strong> <strong>2010</strong>) 31<br />
TONEARM TP 300 (<strong>TD</strong> <strong>2030</strong>) 32<br />
OPERATION 33<br />
MAINTENANCE AND CARE 34<br />
TECHNICAL SPECIFICATIONS 35<br />
SERVICE INFORMATION 36<br />
INTRODUCTION 38<br />
CONSIGNES DE SECURITE 39<br />
DEBALLAGE ET MONTAGE 40<br />
INSTALLATION ET RACCORDEMENT 42<br />
INSTALLATION DE LA CELLULE DE LECTURE 44<br />
REGLAGE DE LA HAUTEUR DU BRAS 45<br />
REGLAGE PRECIS DE LA CELLULE 46<br />
BRAS DE LECTURE TP 250 (<strong>TD</strong> <strong>2010</strong>) 47<br />
BRAS DE LECTURE TP 300 (<strong>TD</strong> <strong>2030</strong>) 48<br />
UTILISATION DE LA PLATINE 49<br />
MAINTENANCE ET ENTRETIEN 50<br />
CARACTERISTIQUES TECHNIQUES 51<br />
INFORMATIONS SERVICE APRES-VENTE 52
Herzlichen Glückwunsch zum Kauf Ihres<br />
neuen <strong>TD</strong> <strong>2010</strong> / <strong>2030</strong>.<br />
Wir hoffen, dass Sie mit Ihrem neuen Plattenspieler viel<br />
Freude haben werden. In Verbindung mit einem guten<br />
Tonabnehmersystem besitzt dieses Laufwerk herausragende<br />
Wiedergabequalitäten. Fertigung und Montage<br />
erfolgen komplett in Deutschland, so dass Sie sich auch<br />
noch nach Jahren auf das Gerät verlassen können.<br />
Bitte Denken Sie daran, dass dieser Plattenspieler ein Präzisionsinstrument<br />
ist, das stets mit Sorgfalt behandelt werden<br />
muss. Wir empfehlen Ihnen daher, diese Bedienungsanleitung<br />
vor der ersten Ingebrauchnahme aufmerksam<br />
durchzulesen. Sie enthält wichtige Hinweise für Aufstellung,<br />
Anschluß und Konfiguration Ihres neuen Laufwerks.<br />
Sollten Sie darüber hinaus noch Fragen haben, so können<br />
Sie sich jederzeit an Ihren <strong>Thorens</strong> Fachhändler wenden.<br />
6
BITTE VOR DER ERSTMALIGEN INBETRIEBNAHME<br />
AUFMERKSAM LESEN!<br />
VORSICHT<br />
Um einen elektrischen Schlag zu vermeiden, darf das Gehäuse des<br />
Netzteils nicht geöffnet werden. Im Geräteinneren befinden sich keine<br />
vom Benutzer zu wartenden Teile.<br />
WARNUNG<br />
UM DER GEFAHR VON FEUER UND EINES ELEKTRISCHEN SCHLA-<br />
GES VORZUBEUGEN, DARF DAS GERÄT WEDER REGEN NOCH<br />
FEUCHTIGKEIT AUSGESETZT WERDEN.<br />
ERLÄUTERUNG DER GRAFISCHEN SYMBOLE<br />
Das Blitz-Symbol mit dem nach unten weisenden<br />
Pfeil im gleichseitigen Dreieck warnt vor “gefährlicher<br />
Spannung” im Gehäuseinneren, deren Höhe für<br />
eine Gefährdung von Personen durch einen Stromschlag<br />
ausreichend ist.<br />
Das Ausrufezeichen innerhalb des gleichseitigen<br />
Dreiecks macht auf wichtige Bedienungs- und Wartungshinweise<br />
in der beiliegenden Bedienungsanleitung<br />
aufmerksam.<br />
Dieses Elektronikprodukt entspricht den gültigen Richtlinien<br />
zur Erlangung des CE-Zeichens. Alle notwendigen Prüfungen<br />
wurden mit positivem Ergebnis vorgenommen.<br />
WICHTIG: ENTSORGUNG VON ELEKTROGE-<br />
RÄTEN DURCH VERBRAUCHER IN PRIVATEN<br />
HAUSHALTEN INNERHALB DER EU<br />
Dieses Symbol auf dem Produkt oder dessen Verpackung<br />
gibt an, dass dieses Produkt nicht zusammen<br />
mit dem Restmüll entsorgt werden darf. Es obliegt<br />
daher Ihrer Verantwortung, das Gerät an einer entsprechenden<br />
Stelle für die Entsorgung oder Wiederverwertung<br />
von Elektrogeräten aller Art abzugeben<br />
(z.B. ein Werkstoffhof). Die separate Sammlung und<br />
das Recyceln Ihrer alten Elektrogeräte zum Zeitpunkt<br />
ihrer Entsorgung trägt zum Schutz der Umwelt bei<br />
und gewährleistet, dass sie auf eine Art und Weise<br />
recycelt werden, die keine Gefährdung für die Gesundheit<br />
von Mensch und Umwelt darstellt. Weitere<br />
Informationen darüber, wo Sie alte Elektrogeräte<br />
zum Recyceln abgeben können, erhalten Sie bei<br />
den örtlichen Behörden, Werkstoffhöfen oder dort,<br />
wo Sie das Gerät erworben haben.<br />
7
Nehmen Sie das Gerät und die mitgelieferten Einzelteile<br />
vorsichtig aus der Verpackung.<br />
Lieferumfang:<br />
1 x Bedienungsanleitung<br />
1 x Chassis (mit/ohne Tonarm)<br />
1 x Motor im Standgehäuse<br />
1 x <strong>Thorens</strong> Antriebsriemen<br />
1 x Plattenteller mit Filzmatte<br />
1 x Tonarmgewicht<br />
1 x Elektronikeinheit PS 800<br />
1 x Netzteil<br />
1 x Netzkabel<br />
1 x Cinchkabel<br />
1 x Adapter für 17 cm Schallplatten<br />
3 x Fußunterlage<br />
2 x Schutzhandschuh<br />
ACHTUNG: Die Oberflächen von Chassis und<br />
Plattenteller sind sehr kratzempfindlich. Verwenden<br />
Sie daher zur Montage unbedingt die beiliegenden<br />
Schutzhandschuhe.<br />
Legen Sie zunächst die Unterlagen für die Spikespitzen an<br />
den Platz, an dem das Laufwerk aufgestellt werden soll.<br />
Die Unterlagen verhindern, dass empfindliche Oberflächen<br />
durch die Spikes des Plattenspielers beschädigt werden.<br />
Stellen Sie den Plattenspieler nun auf diese Unterlagen<br />
und richten Sie ihn so aus, dass er waagrecht steht. Sie<br />
können die Höhe der Füße anpassen, indem Sie deren<br />
Spitzen drehen. Kontrollieren Sie die Höheneinstellung<br />
danach mithilfe einer Wasserwaage und korrigieren Sie<br />
gegebenfalls.<br />
Nun muss der Motor in der dafür vorgesehenen Aussparung<br />
links hinten platziert werden. Heben Sie hierfür das<br />
Chassis an und positionieren Sie den Motor unter der<br />
Aussparung. Senken Sie nun das Chassis langsam ab, so<br />
dass sich der Motor von unten in die Aussparung schiebt.<br />
Gehen Sie hierbei sehr vorsichtig vor, um die Oberfläche<br />
des Plattenspielers nicht zu verkratzen. Die Motoreinheit<br />
sollte an ihrer endgültigen Position das Chassis nicht mehr<br />
berühren.<br />
8
Setzen Sie nun den Plattenteller vorsichtig in das Lager<br />
ein. Achten Sie dabei unbedingt darauf, dass die Achsspitze<br />
nicht auf den Lagerboden aufschlägt! Drehen Sie<br />
den Teller von Hand und prüfen Sie, ob er sich ohne großen<br />
Widerstand drehen lässt. Legen Sie anschließend die<br />
Filzmatte auf. Spannen Sie den Riemen um Plattenteller<br />
und Riemenscheibe (Abb. 1).<br />
Vermeiden Sie Öl- oder Fettspuren auf Antriebsriemen,<br />
Motor-Riemenscheibe und der Lauffläche des Plattentellers.<br />
Falls notwendig, können Sie diese Teile mit<br />
einem in reinem Alkohol getränkten, nicht fasernden<br />
Tuch oder Lappen reinigen.<br />
Wurde Ihr Plattenspieler ohne Tonarm geliefert, so montieren<br />
Sie diesen nun bitte nach der Anleitung des Herstellers.<br />
Ansonsten ist der Plattenspieler nun vollständig<br />
montiert.<br />
Abbildung 1<br />
WICHTIG: Bitte bewahren Sie die Verpackung auf, falls<br />
das Gerät einmal zum Transport verpackt werden muss.<br />
Für Transportschäden durch unsachgemäße Verpackung<br />
wird keine Haftung übernommen!<br />
9
Verbinden Sie das Kabel des Motorgehäuses mit der<br />
PS 800 Einheit (Abb. 2.1).<br />
ACHTUNG: Bevor der Plattenspieler mit dem<br />
Stromnetz verbunden wird, muss der ON/OFF<br />
Schalter an der PS 800 Einheit auf „OFF“ und der<br />
Geschwinidigkeitswahlschalter auf „33“ gestellt<br />
werden (Abb. 2.2).<br />
Zum Anschluss an das Stromnetz wird die PS 800 Einheit<br />
mithilfe des Netzteils und des Netzkabels mit einer Steckdose<br />
verbunden (Abb. 2.3).<br />
Abbildung 2.1 Abbildung 2.2<br />
ACHTUNG: Trennen Sie niemals den Motorstecker<br />
während die PS 800 Einheit eingeschaltet<br />
ist, da diese hierdurch zerstört werden kann.<br />
Verbinden Sie nun das Kabel des Tonarms mit dem (Phono-)<br />
Eingang Ihres Verstärkers (Abb. 2.4). Achten Sie hierbei<br />
unbedingt auf eine korrekte Verpolung (linker-/rechter<br />
Kanal!) der Anschlüsse.<br />
Abbildung 2.3 Abbildung 2.4<br />
10
Hinweis: Für Verstärker ohne Phonoeingang wird zusätzlich<br />
ein spezieller Phonovorverstärker benötigt. Für Verstärker<br />
mit einer 5-poligen Eingangsbuchse nach DIN wird<br />
zusätzlich ein spezielles Adapterkabel benötigt. Bitte wenden<br />
Sie sich in diesen Fällen an Ihren Fachhändler.<br />
Achten Sie bei der Aufstellung Ihres neuen Plattenspielers<br />
darauf, einen Mindestabstand zu anderen elektronischen<br />
Geräten (z.B. Verstärker, Reciever oder CD-Spieler) einzuhalten,<br />
da es sonst zu magnetischen Einstrahlungen<br />
auf das Tonabnehmersystem kommen kann, welche sich<br />
durch Brummstörungen in der Wiedergabe äußern.<br />
<strong>Thorens</strong> Plattenspieler sind relativ unempfindlich gegenüber<br />
Erschütterungen. Dennoch stellen diese ein generelles<br />
Problem bei der Plattenwiedergabe mit hochwertigen Tonabnehmern<br />
dar. Wählen Sie deshalb ein möglichst stabiles<br />
Möbelstück zur Aufstellung und vermeiden Sie die Nähe<br />
zu Lautsprechern.<br />
Leider reicht dies in älteren Häusern mit Holzbalkendecken<br />
bisweilen nicht aus. In der Regel hilft hier allerdings<br />
die Aufstellung des Plattenspielers auf einer Konsole, die<br />
mit geeigneten Konsolenträgern an einer tragenden Zimmerwand<br />
befestigt wird.<br />
Magnetische Störungen kann man leicht ermitteln und<br />
beseitigen, indem man Aufstellung und Position der<br />
Geräte zueinander verändert.<br />
11
Installieren und konfigurieren Sie Ihr Tonabnehmersystem<br />
entsprechend der Montageanleitung des Herstellers und<br />
nehmen Sie alle notwendigen Einstellungen vor.<br />
Im Folgenden erhalten Sie einige Hinweise zur Installation<br />
und Konfiguration von <strong>Thorens</strong> Tonarmen, die analog<br />
auch für andere Fabrikate gelten können. Halten Sie sich<br />
jedoch im Zweifel immer an die Anleitung des jeweiligen<br />
Herstellers. Spezielle Konfigurationshinweise für die <strong>Thorens</strong><br />
Tonarme TP 250 und TP 300 finden Sie ab Seite 15.<br />
Hinweis: Sollte Ihr Plattenspieler mit montiertem Tonarm<br />
und Tonabnehmersystem geliefert worden sein, so sind<br />
alle Einstellungen bereits werkseitig vorgenommen. Einzig<br />
die Auflagekraft muss noch eingestellt werden, da das<br />
Tonarmgewicht für den Transport deinstalliert wurde.<br />
Montieren Sie den Tonabnehmer in die dafür vorgesehenen<br />
Bohrungen des Tonabnehmerkopfs. Belassen Sie<br />
dabei den Nadelschutz – wenn möglich – auf dem Tonabnehmer,<br />
um Beschädigungen der Abtastnadel zu vermeiden.<br />
An den <strong>Thorens</strong> Tonarmen können Tonabnehmersysteme<br />
mit einem standardisierten Abstand der Befestigungslöcher<br />
von 12,5 mm (1/2 ”) montiert werden.<br />
Die vier farblich gekennzeichneten Anschlußlitzen werden<br />
auf die entsprechenden Anschluß-Stifte (identische Farbe)<br />
des Tonabnehmersystems geschoben.<br />
R<br />
G<br />
L<br />
G<br />
rechter Kanal, rot (Signal)<br />
rechter Kanal, grün (Masse)<br />
linker Kanal, weiß (Signal)<br />
linker Kanal, blau (Masse)<br />
Ziehen Sie die Montageschuhe zunächst nur lose ab. Die<br />
Feinjustage des Tonabnehmers erfolgt nach dem Einstellen<br />
der Tonarmhöhe.<br />
Hinweis: Bei Grado Tonabnehmern sollten die mitgelieferten<br />
Schrauben von unten durch den Tonabnehmer<br />
geführt werden und die Mutter oben auf das Headshell<br />
geschraubt werden, da sie am Systemkörper nur schwer<br />
zu verwenden sind.<br />
12
Drehen Sie nun das Tonarmgewicht in Richtung der Tonarmbank<br />
auf den Tonarm (Abb. 3).<br />
ACHTUNG: Gehen Sie im Folgenden extrem vorsichtig<br />
vor, da jeder Fehler die Abtastnadel des<br />
Tonabnehmers zerstören kann!<br />
Entfernen Sie vorsichtig den Nadelschutz. Der Tonarm wird<br />
anschließend bei abgesenktem Lift zwischen Tonarmstütze<br />
und Plattenteller positioniert und durch Verdrehen des<br />
Gegengewichtes ausbalanciert. Hinweis: Antiskatingkraft<br />
und Auflagekraft (falls diese, wie beim TP 300, nicht durch<br />
das Gegengewicht erzeugt wird) sollten hierbei unbedingt<br />
auf 0 redurziert werden.<br />
Legen Sie nun eine alte Schallplatte auf und senken Sie<br />
die Abtastnadel vorsichtig ab. Das Tonarmrohr sollte parallel<br />
zur Plattenoberfläche stehen. Ist dies nicht der Fall,<br />
so muss die Tonarmhöhe mittels VTA justiert werden. VTA<br />
bedeutet Vertical Tracking Adjustment, dieses System<br />
ermöglicht es, den Tonarm mithilfe eines Spannmechanismus<br />
(Abb. 3) auf die Höhe des jeweiligen Tonabnehmers<br />
einzustellen.<br />
Abbildung 3<br />
Um die Einstellung vorzunehmen, müssen Sie zunächst<br />
die Spannschraube öffnen. Anschließend kann der Tonarm<br />
in die gewünschte Höhe gebracht werden. Ziehen Sie<br />
die Schraube nun vorsichtig wieder an.<br />
13
Nur bei einer genauen Justage des Tonabnehmersystems<br />
kommen die hervorragenden Klangeigenschaften dieses<br />
Laufwerks voll zur Geltung. Sollte Sie hierbei Probleme haben,<br />
so hilft Ihnen Ihr Fachhändler gerne dabei.<br />
ACHTUNG: Bei der Feinjustage des Tonabnehmers<br />
ist größte Sorgfalt geboten, damit weder<br />
Abtastnadel noch die empfindliche Feinmachanik<br />
des Tonarms beschädigt werden. Sollten Sie<br />
hierin keinerlei Erfahrung haben, so empfehlen<br />
wir Ihnen, dies einem Fachmann zu überlassen.<br />
Falsch eingestellte Tonabnehmersysteme können<br />
zu starkem Klangverlust bis hin zu Schäden<br />
an der Schallplatte führen!<br />
Kröpfungswinkel: Der Kröpfungswinkel ist der Winkel<br />
zwischen der Längsachse des Tonabnehmers und der<br />
Tonarmachse. Bei allen Drehpunktarmen (wie die Tonarme<br />
TP 250 und TP 300) liegen die optimalen Werte zwischen<br />
21° und 24°. Zur Einstellung benötigen Sie eine spezielle<br />
Schablone, welche im Fachhandel erhältlich ist.<br />
Überhang: Der Überhang ist die Strecke, welche die Tonabnehmernadel<br />
über die Plattentellermitte hinausragt. Der<br />
Überhang sollte bei den Tonarmen TP 250 und TP 300 ca.<br />
17 mm betragen. Zur Einstellung benötigen Sie eine spezielle<br />
Schablone, welche im Fachhandel erhältlich ist.<br />
Azimut: Dies ist der Winkel zwischen Nadelträger und<br />
Schallplattenrille. Er sollte 90° betragen (hiervon ausgenommen<br />
sind Systeme, deren Nadel absichtlich schief<br />
eingebaut ist). Der Azimut kann am TP 250 und TP 300<br />
nicht eingestellt werden. Sie sollten mit diesen Tonarmen<br />
daher nur Tonabnehmer verwenden, die einen korrekten<br />
Azimut besitzen.<br />
14
Einstellung des Tonarmlifts: Die Lifteinstellung dieses<br />
Tonarms wird im Werk vorgenommen und passt für nahezu<br />
alle Tonabnehmer. Sollte trotzdem eine Nachjustage<br />
nötig sein, wenden Sie sich bitte an Ihren Fachhändler.<br />
Einstellung der Antiskatingkraft: Die Antiskatingkraft<br />
wird durch den auf der Tonarmbank (2) unter dem Tonarm<br />
sitzenden Schieberegler eingestellt. Wir empfehlen, die<br />
Antiskatingkraft etwas niedriger als die Auflagekraft einzustellen.<br />
Einstellung der Auflagekraft: Informieren Sie sich zunächst<br />
darüber, welche Auflagekraft für Ihr Tonabnehmersystem<br />
empfohlen wird. Im Allgemeinen sind Auflagekräfte<br />
zwischen 10 und 25 mN gebräuchlich (dies entspricht einem<br />
Auflagegewicht von 1,0 - 2,5 g).<br />
Hinweis: Wählen Sie die Auflagekraft nicht zu niedrig, da<br />
der Tonabnehmer sonst nicht mehr richtig arbeitet.<br />
Wenn der Tonarm ausbalanciert ist (siehe Seite 13), können<br />
Sie die Auflagekraft durch Drehen des Gegengewichts<br />
(3) nach folgendem Schema einstellen:<br />
Eine halbe Umdrehung des Gewichts entspricht einer<br />
Auflagekraft von 10 mN, eine volle entspricht 20 mN.<br />
Drehen in Richtung der Tonarmbank erhöht die Auflagekraft,<br />
Drehen in entgegengesetzter Richtung verringert sie.<br />
Die grünen Punkte am Gewicht dienen zur Orientierung.<br />
Arretieren Sie unbedingt den Tonarm, bevor Sie<br />
diese Einstellung vornehmen.<br />
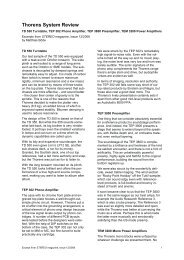
Tonarm TP 250<br />
➀<br />
➁<br />
➂<br />
Tonarmlift<br />
Tonarmbank<br />
Gegengewicht<br />
➀<br />
➁<br />
➂<br />
15
Einstellung des Tonarmlifts: Die Lifteinstellung dieses<br />
Tonarms wird im Werk vorgenommen und passt für nahezu<br />
alle Tonabnehmer. Sollte trotzdem eine Nachjustage<br />
nötig sein, wenden Sie sich bitte an Ihren Fachhändler.<br />
Einstellung der Antiskatingkraft: Die Antiskatingkraft<br />
wird durch den auf der Tonarmbank (2) unter dem Tonarm<br />
sitzenden Schieberegler eingestellt. Wir empfehlen, die<br />
Antiskatingkraft etwas niedriger als die Auflagekraft einzustellen.<br />
Einstellung der Auflagekraft: Informieren Sie sich zunächst<br />
darüber, welche Auflagekraft für Ihr Tonabnehmersystem<br />
empfohlen wird. Im Allgemeinen sind Auflagekräfte<br />
zwischen 10 und 25 mN gebräuchlich (dies entspricht einem<br />
Auflagegewicht von 1,0 - 2,5 g).<br />
Hinweis: Wählen Sie die Auflagekraft nicht zu niedrig, da<br />
der Tonabnehmer sonst nicht mehr richtig arbeitet.<br />
Die Auflagekraft wird durch eine Feder im Inneren des<br />
Tonarms erzeugt. Nachdem der Tonarm mittels des Tonarmgegengewichts<br />
(3) ausbalanciert wurde (siehe Seite<br />
13), kann diese mit Hilfe des seitlich am Tonarm sitzenden<br />
Drehreglers (4) eingestellt werden.<br />
Stellen Sie die Auflagekraft auf „0“, bevor Sie den<br />
Tonarm ausbalancieren und arretieren Sie diesen<br />
anschließend, bevor Sie die Einstellung der Auflagekraft<br />
vornehmen.<br />
16<br />
Tonarm TP 300<br />
➀<br />
➁<br />
➂<br />
➃<br />
Tonarmlift<br />
Tonarmbank<br />
Gegengewicht<br />
Drehregler für Auflagekraft<br />
➀<br />
➁<br />
➃<br />
➂
Der Motor des Plattenspielers wird über die angeschlossene<br />
PS 800 Einheit (Abb. 6) gesteuert. Der rechte Schalter<br />
dient zur Geschwindigkeitsauswahl. Folgende Geschwindigkeiten<br />
stehen zur Verfügung: 33 U/min für Langspielplatten<br />
und 45 U/min für kleine Schallplatten. Links daneben<br />
befindet sich der ON/OFF Schalter mit dem der<br />
Motor an- bzw. ausgeschaltet wird.<br />
Zum Abspielen einer Platte wird der Plattenspieler zunächst<br />
mit der entsprechenden Geschwindigkeit gestartet. Dann<br />
wird der Tonarmlift angehoben, hierzu muss der Hebel<br />
nach hinten oben bewegt werden. Nun wird der Tonabnehmer<br />
über der Einlaufrille oder über dem gewünschten<br />
Stück positioniert und anschließend mithilfe des Lifts auf<br />
die Platte abgesenkt (Hebel nach vorne unten bewegen).<br />
Abbildung 6<br />
Der Plattenspieler besitzt keine automatische Endabschaltung.<br />
Sobald die Auslaufrille erreicht ist, muss der Tonarm<br />
mittels Handlift von der Platte gehoben und der ON/OFF<br />
Schalter betätigt werden.<br />
17
Ihr Plattenspieler benötigt keinerlei ständige Wartung.<br />
Staub, der sich im Laufe der Zeit auf dem Chassis absetzt,<br />
kann mit einem weichen und feuchten Tuch entfernt werden.<br />
Hinweis: Verwenden Sie zur Reinigung am besten ein<br />
feuchtes Brillenputztuch.<br />
ACHTUNG: Verwenden Sie zur Reinigung auf keinen<br />
Fall ein Papiertuch oder sonstige raufasrige<br />
Materialien, da diese die empfindliche Acryloberfläche<br />
verkratzen können. Ein trockenes Tuch<br />
hingegen kann unerwünschte elektrostatische<br />
Aufladungen verursachen.<br />
Den <strong>Thorens</strong> Präzisionsriemen sollten Sie alle 2 Jahre ersetzen.<br />
Sollte das Gerät über längere Zeit nicht in Betrieb<br />
sein, so empfiehlt es sich, den Riemen abzunehmen, um<br />
einer vorzeitigen Alterung vorzubeugen.<br />
Bei häufigem Gebrauch sollten Sie alle 5 Jahre eine<br />
Überprüfung des Lagers vornehmen lassen und dessen<br />
Schmierung erneuern.<br />
18
Modell<br />
Antriebssystem<br />
Antrieb<br />
Geschwindigkeiten<br />
Geschw.umschaltung<br />
Plattenteller<br />
Tonarm (standard)<br />
Antiskating<br />
Automatik<br />
Endabschaltung<br />
Kabelkapazität<br />
Stromversorgung<br />
Abmessungen<br />
Gewicht<br />
<strong>TD</strong> <strong>2010</strong><br />
Riemenantrieb (außenliegend)<br />
elektronisch geregelter<br />
AC-Synchronmotor<br />
33 , 45 U/min<br />
elektronisch<br />
Aluminium 300 mm (12”), 4,5 kg<br />
<strong>Thorens</strong> TP 250<br />
magnetisch<br />
keine<br />
keine<br />
140 pF<br />
PS 800 Elektronikeinheit,<br />
landesspezifisches Netzteil<br />
420 x 340 x 160 mm (B x T x H)<br />
18,0 kg<br />
<strong>TD</strong> <strong>2030</strong><br />
Riemenantrieb (außenliegend)<br />
elektronisch geregelter<br />
AC-Synchronmotor<br />
33 , 45 U/min<br />
elektronisch<br />
Aluminium 300 mm (12”), 6,2 kg<br />
<strong>Thorens</strong> TP 300<br />
magnetisch<br />
keine<br />
keine<br />
140 pF<br />
PS 800 Elektronikeinheit,<br />
landesspezifisches Netzteil<br />
420 x 340 x 200 mm (B x T x H)<br />
22,0 kg<br />
Technische Änderungen vorbehalten. Handmade in Germany.<br />
19
Ihr Fachhändler oder Vertrieb sind jederzeit kompetente<br />
Ansprechpartner, die Ihnen bei sämtlichen Fragen rund<br />
um Ihr <strong>Thorens</strong> Produkt gerne zur Verfügung stehen.<br />
Sie können <strong>Thorens</strong> auch direkt kontaktieren:<br />
<strong>Thorens</strong> Export Company AG<br />
Im Huebel 1, CH-4304 Giebenach, Schweiz<br />
www.thorens.com, info@thorens.com<br />
Bitte kontaktieren Sie im Garantiefall immer zuerst Ihren<br />
Fachhändler oder Vertrieb!<br />
Weitere Informationen unter:<br />
<br />
20
21
Congratulations for your purchase of the<br />
new <strong>TD</strong> <strong>2010</strong> / <strong>2030</strong>.<br />
We hope that your new record player will give you lots<br />
of listening pleasure. In combination with a good pickup<br />
cartridge this turntable is to yield outstanding sound. Manufacturing<br />
and assembly of this record player has been<br />
carried out in Germany which will guarantee you its high<br />
quality and functionality being maintained for many years<br />
to come.<br />
Please keep in mind that this device is a precision instrument<br />
and therefore requires some attention and care. We<br />
strongly advise to read these instructions attentively before<br />
proceeding with the set-up as it contains all necessary<br />
information and guidance for assembly, placement,<br />
set-up and configuration of your new record player.<br />
In the event that you have any question this user manual<br />
cannot answer please do not hesitate to ask your <strong>Thorens</strong><br />
dealer for further assistance.<br />
22
PLEASE READ THIS PAGE CAREFULLY BEFORE<br />
OPERATING YOUR UNIT!<br />
CAUTION<br />
To reduce risk of electric shock, do not remove the cover (or back).<br />
No user-serviceable parts inside.<br />
This product was tested and complies with all the<br />
requirements for the CE Mark.<br />
WARNING<br />
TO PREVENT FIRE OR SHOCK HAZARD, DO NOT EXPOSE THIS<br />
APPLIANCE TO RAIN OR MOISTURE.<br />
EXPLANATION OF GRAPHICAL SYMBOLS<br />
The lightning flash with arrowhead symbol, within<br />
an equilateral triangle, is intended to alert you to<br />
the presence of uninsulated ‘dangerous voltage’<br />
within the product’s enclosure that may be of sufficient<br />
magnitude to constitute an electric shock to<br />
persons.<br />
The exclamation point within an equilateral triangle<br />
is intended to alert you to the presence of important<br />
operating and maintenance (servicing) instructions in<br />
the literature accompanying the appliance.<br />
IMPORTANT: DISPOSAL OF WASTE EQUIP-<br />
MENT BY USERS IN PRIVATE HOUSEHOLDS<br />
IN THE EUROPEAN UNION<br />
This symbol on the product or on its packaging indicates<br />
that this product must not be disposed off<br />
with your other household waste. Instead, it is your<br />
responsibility to dispose of your waste equipment by<br />
handing it over to a designated collection point for<br />
the recycling of waste electrical and electronic equipment.<br />
The separate collection and recycling of your<br />
waste equipment at the time of disposal will help to<br />
conserve natural resources and ensure that it is recycled<br />
in a manner that protects human health and<br />
the environment. For more information about where<br />
you can drop off your waste equipment for recycling,<br />
please contact your local city office, your household<br />
waste disposal service or the shop where you purchased<br />
the product.<br />
23
Carefully remove the unit and its accessories from the<br />
shipping box.<br />
Supplied items:<br />
1 x user manual<br />
1 x plinth (with/without tonearm)<br />
1 x motor in housing<br />
1 x <strong>Thorens</strong> drive belt<br />
1 x platter with felt mat<br />
1 x tonearm counterweight<br />
1 x electronic control unit PS 800<br />
1 x mains adaptor<br />
1 x power cord<br />
1 x set of RCA interconnecting leads<br />
1 x adaptor for single records<br />
3 x protective disks<br />
2 x cotton glove<br />
ATTENTION: The surface of both plinth and platter<br />
is quite sensitive to scratches. It is therefore<br />
recommended to wear the supplied gloves whilst<br />
the record player is being assembled.<br />
Proceed with placing the three protective disks where the<br />
record player is eventually going to stay. They are provided<br />
to prevent the sensitive surface of furniture from being<br />
damaged by the record player’s spiked feet.<br />
Now put the record player respectively its feet onto the<br />
disks and after the final position has been achieved make<br />
sure that the plinth is fairly level. For any fine-adjustments<br />
turn the tip of each foot up or down until the plinth is in<br />
a perfect horizontal position. This procedure is best controlled<br />
(and corrected if necessary) with the help of good<br />
spirit level.<br />
The motor housing is now to be inserted into the dedicated<br />
recess at the rear left corner. This is carried out by<br />
having the plinth lifted up and the motor positioned exactly<br />
beneath the recess. Slowly lower the plinth so that the<br />
motor housing is entering the recess. Great care should<br />
be taken while doing this in order to prevent any scratches<br />
on the plinth surface. Being in its final position the motor<br />
housing should not be touching the inside of the recess.<br />
24
Now take the platter with both hands and hold its axle<br />
perpendicular over the hole in the bearing. Slowly and very<br />
carefully insert the axle into the bearing while making sure<br />
that it must not forcefully hit the bottom of the bearing.<br />
After the platter has been put in place turn it manually to<br />
see if it runs smoothly and with ease. Add felt mat and<br />
finally loop the belt around the outer rim of the platter and<br />
the motor pulley (Fig. 1).<br />
Avoid any oil or greasy substance to get onto the belt<br />
and the transmission area of platter and motor pulley.<br />
If necessary you may clean them with a lint-free tissue<br />
soaked in an alcoholic dilution (e.g. ethanol).<br />
Unless you have acquired your record player with tonearm,<br />
you can now proceed with mounting a foreign tone<br />
arm according to the instructions supplied by its manufacturer.<br />
Otherwise your record player is now completely<br />
assembled.<br />
IMPORTANT: It is highly recommended to save the shipping<br />
box and all packing material in case the record player<br />
needs to be packed again for transportation.<br />
Fig. 1<br />
<strong>Thorens</strong> cannot be held responsible for any damage that<br />
may occur during transport on the ground that the record<br />
player has not been properly packed.<br />
25
Connect the cord coming from the motor housing to the<br />
rear panel of the electronic control unit PS 800 (Fig. 2.1).<br />
ATTENTION: Before connecting the record player<br />
to the mains power please make sure that the<br />
power switch on the PS 800 unit is set to OFF and<br />
the speed selector switch set to “33” (Fig.2.2).<br />
The PS 800 unit is connected to the mains by using the<br />
supplied mains adaptor and the power cord plugged into<br />
a wall socket (Fig. 2.3).<br />
Fig. 2.1 Fig. 2.2<br />
ATTENTION: Never disconnect the motor plug<br />
from the PS 800 unit while it is switched ON. Disregarding<br />
this advise may damage the electronic<br />
circuitry inside the PS 800.<br />
Take the RCA interconnect leads and plug them into the<br />
designated (phono) input jacks at the rear side of your amplifier<br />
or receiver. Make sure that polarity (left/right channel!)<br />
is correct.<br />
Fig. 2.3 Fig. 2.4<br />
26
Hint: if your amplifier lacks a built-in phono stage you need<br />
to acquire a special external phono-preamplifier. For amplifiers/receivers<br />
featuring a 5-pin DIN-socket at the phono<br />
input section you will need a special adaptor (RCA to DIN)<br />
which may be available from your <strong>Thorens</strong> dealer.<br />
When placing the record player to its final position make<br />
sure that it is a fair distance away from other audio devices,<br />
such as amplifier, receiver or CD player. This measure<br />
is to avoid electro-magnetic interferences which can yield<br />
a distorting effect in the sensitive pickup cartridge, which<br />
may be audible as hum during playback.<br />
Electro-magnetic interferences however can be disclosed<br />
and eliminated by simply changing the position<br />
of the record player with respect to the other devices.<br />
<strong>Thorens</strong> record players are relatively insensitive when subject<br />
to foot-fall shocks or airborne resonance. Nevertheless,<br />
a general problem remains when it comes to playing<br />
back vinyl records with a high-quality pickup cartridge. It<br />
is therefore highly recommended to choose a sturdy piece<br />
of furniture for placement and to avoid the proximity of the<br />
record player to the loudspeakers.<br />
Under certain circumstances all these precautions may not<br />
be good enough in older houses with wooden floor construction.<br />
Here, in most cases a solid shelf firmly mounted<br />
to a supporting wall can be very beneficial for the sonic<br />
properties of the record player if it is placed on such a shelf<br />
or console.<br />
27
You can now mount and adjust your pickup cartridge according<br />
to the instructions provided with the pickup or<br />
with the tonearm.<br />
In the following chapters you’ll find some comprehensive<br />
hints and advise concerning the correct mounting of <strong>Thorens</strong><br />
tonearms. They may accordingly be used for mounting<br />
foreign tonearms as well, yet if in doubt you should<br />
in any case resort to the original instructions provided by<br />
the manufacturer of the tonearm. Special hints about the<br />
configuration of the <strong>Thorens</strong> tonearms TP 250 and TP 300<br />
are to be found on page 31-32 of this manual.<br />
Hint: If you happen to have acquired this record player as a<br />
complete system, i.e. with tonearm and pickup cartridge,<br />
there are no adjustments necessary because everything<br />
has already been carried out for you in the <strong>Thorens</strong> factory.<br />
Only the tracking force needs to be adjusted.<br />
Mount the pickup cartridge to the slots in the tonearm’s<br />
headshell. While doing this basic work it is recommended<br />
to leave the stylus guard attached to the cartridge in order<br />
to avoid damaging of the delicate stylus and cantilever.<br />
<strong>Thorens</strong> tonearms will accept any pickup cartridge with<br />
the standard fixing hole distance of 12.5 mm (1/2 ”).<br />
Carefully and with the help of tweezers the four colourcoded<br />
litz wires coming from the tonearm’s headshell are<br />
attached to the respective pins (identical colours) at the<br />
rear face of the cartridge.<br />
R<br />
G<br />
L<br />
G<br />
right channel, red (signal)<br />
right channel, green (ground)<br />
left channel, white (signal)<br />
left channel, blue (ground)<br />
For the time being do not tighten the headshell screws.<br />
Fine-adjusting and fixing the cartridge is done after having<br />
determined the final tone arm height.<br />
Hint: If Grado pickup cartridges are going to be employed<br />
it is recommended to fix the cartridge with the screws<br />
“upside down”. This means that the screws are inserted<br />
from underneath through the holes of cartridge and<br />
headshell whereby the nuts are to fix the screws on top of<br />
the headshell.<br />
28
The counterweight is attached to the rear end of the tonearm<br />
by some slight pressure and a clockwise rotation towards<br />
the tonearm’s bearings (Fig. 3).<br />
ATTENTION: Great care is necessary for the following<br />
mounting and adjust-ment procedures,<br />
because the slightest mistake may damage the<br />
stylus and cantilever of your pickup cartridge.<br />
Carefully detach the stylus guard from the cartridge. Lower<br />
the lift lever and move the tonearm to a position in between<br />
tonearm rest and the outer rim of the platter. Now<br />
balance the tonearm by rotating the counterweight either<br />
clockwise or counter-clock-wise until total equilibrium has<br />
been achieved. Hint: anti-skating force as well as tracking<br />
force (unless it is generated by the counterweight like with<br />
the TP 250) must in any case be set to “0”.<br />
Put an old, worn record onto the platter and lower the<br />
tonearm by the lift lever. The tonearm tube should then be<br />
parallel to the record (to be visualised from the side). If this<br />
is not the case the so-called Vertical Tracking Angle (VTA)<br />
should be adjusted.<br />
Fig. 3<br />
A special clamp mechanism (Fig. 3) however allows to<br />
individually adjust the VTA according to the size of the<br />
mounted pickup cartridge. Adjustments are made by<br />
simply loosening the screw of the clamp mechanism and<br />
carefully sliding the entire tonearm slightly up or down. Before<br />
doing so we advise to move the tonearm back onto<br />
its rest. After the correct position for the VTA has been<br />
found the clamp screw is to be tightened again.<br />
29
Only a painstakingly aligned pickup cartridge is able to<br />
compliment the outstanding sonic capabilities and potential<br />
of this record player. If you consider the alignment too<br />
difficult to be carried out by yourself, do not hesitate to ask<br />
your <strong>Thorens</strong> dealer for a helping hand.<br />
ATTENTION: When aligning the cartridge great<br />
care is once more obligatory in order to avoid that<br />
the delicate stylus or sensitive parts of the tonearm<br />
are being damaged. If you are a newcomer<br />
without any experience it is better to leave this<br />
work to an expert who knows the specific characteristics<br />
of most cartridges. A badly aligned<br />
pickup cartridge will be well on the way to yield<br />
bad sound and to damage your records!<br />
Offset: this is the angle between the longitudinal axis of<br />
the pickup cartridge and the tonearm’s longitudinal axis.<br />
In all pivoted tonearms (like TP 250 and TP 300) the optimum<br />
angle is to be found between 21° and 24°. The special<br />
cartridge alignment gauge required for this adjustment<br />
may be available from your <strong>Thorens</strong> dealer.<br />
Overhang: this is the distance between the stylus tip and<br />
the centre of the platter spindle. For the TP 250 and TP<br />
300 the overhang should be 17 mm. The special cartridge<br />
alignment gauge required for this adjustment may be available<br />
from your <strong>Thorens</strong> dealer.<br />
Azimuth: This is the angle between cantilever and record<br />
groove. It should be exactly 90° (excluding those cartridges<br />
in which the cantilever has purposely been installed with<br />
a slight offset). Azimuth can be adjusted neither on the TP<br />
250 nor on the TP 300. It is therefore most important that<br />
a cartridge with precise azimuth is going to be mounted.<br />
30
Adjusting the tonearm lift: It has already been adjusted<br />
in the factory and can be considered suitable for nearly all<br />
pickup cartridges in the market. However in the unlikely<br />
case that the tonearm lift needs to be re-adjusted to fit a<br />
special cartridge please contact your <strong>Thorens</strong> dealer.<br />
Anti-skating force (bias): This is adjusted by shifting the<br />
button on the tonearm’s lift bench (2). It is recommended<br />
to set the anti-skating force slight below the value of the<br />
tracking force.<br />
Adjustment of tracking force: Make sure to inquire the<br />
recommended tracking force for your pickup cartridge<br />
from either the cartridge manufacturer or by consulting the<br />
mounting instructions supplied with the cartridge. Tracking<br />
force is usually adjusted between 10 and 25 mN (corresponding<br />
to 1.0 and 2.5 grams).<br />
Hint: Do not set too low a tracking force, because this may<br />
prevent the pickup car-tridge from tracking properly.<br />
After the tonearm has been correctly balanced (see page<br />
29) you can apply the tracking force by rotating the counterweight<br />
(3) according to the following scheme: a half turn<br />
of the counterweight corresponds to a tracking force of<br />
10 mN (1.0 g) whereby a full turn corresponds to a force<br />
of 20 mN (2.0 g). Turning the counter-weight towards the<br />
bearings will increase tracking force, whereas turning the<br />
weight into the opposite direction will decrease it.<br />
Make sure that the tonearm is kept in its armrest<br />
before doing these adjustments.<br />
Tonearm TP 250<br />
➀<br />
➁<br />
➂<br />
tonearm lift lever<br />
tonearm bench<br />
counterweight<br />
➀<br />
➁<br />
➂<br />
31
Adjusting the tonearm lift: It has already been adjusted<br />
in the factory and can be considered suitable for nearly all<br />
pickup cartridges in the market. However in the unlikely<br />
case that the tonearm lift needs to be re-adjusted to fit a<br />
special cartridge please contact your <strong>Thorens</strong> dealer.<br />
Anti-skating force (bias): This is adjusted by shifting the<br />
button on the tonearm’s lift bench (2). It is recommended<br />
to set the anti-skating force slight below the value of the<br />
tracking force.<br />
Adjustment of tracking force: Make sure to inquire the<br />
recommended tracking force for your pickup cartridge<br />
from either the cartridge manufacturer or by consulting the<br />
mounting instructions supplied with the cartridge. Tracking<br />
force is usually adjusted between 10 and 25 mN (corresponding<br />
to 1.0 and 2.5 grams).<br />
Hint: Do not set too low a tracking force, because this may<br />
prevent the pickup cartridge from tracking properly.<br />
Tracking force is applied by a spring inside the bearing<br />
assembly. After the tonearm has been correctly balanced<br />
(see page 29) you can adjust the tracking force by turning<br />
the dial knob (4) at the bearing assembly.<br />
Set tracking force dial to “0” before balancing the<br />
tonearm and make sure the tonearm is kept in<br />
its armrest before proceeding with these adjustments.<br />
32<br />
Tonearm TP 300<br />
➀<br />
➁<br />
➂<br />
➃<br />
tonearm lift lever<br />
tonearm bench<br />
counterweight<br />
anti-skating dial knob<br />
➀<br />
➁<br />
➃<br />
➂
The motor of the record player is electronically controlled<br />
by the connected PS 800 unit (Fig. 6). The toggle switch<br />
on the right is for selecting the speed whereby two speeds<br />
are available: 33 rpm for long playing records and 45<br />
rpm for singles. The toggle switch on the left labelled ON/<br />
OFF is to start or stop the motor.<br />
For playing a record the turntable is first started with the<br />
desired speed. Then lift the tonearm by slowly pushing<br />
the lift lever up and back. Release the tonearm from its<br />
rest and position it above the lead-in groove or above the<br />
desired piece/track to be played. Slowly bring the lift lever<br />
to the down-position whereupon the tonearm is smoothly<br />
descending.<br />
Fig. 6<br />
This record player does not feature any automatic end-ofrecord<br />
shut-off facility. Therefore, as soon as the stylus has<br />
reached the lead-out groove, the tonearm is to be lifted up<br />
manually by the lever and the motor switched off.<br />
33
Your record player requires no particular maintenance.<br />
If over the time dust has collected on the plinth you can<br />
wipe it off with a moistened cloth. Hint: A pre-moistened<br />
cleaning tissue for glasses is a very good choice for doing<br />
this.<br />
ATTENTION: Do not use paper tissue or any<br />
coarse-fibred cloth because they may leave<br />
scratches on the rather sensitive acryl surface.<br />
Also refrain from using a dry cloth for cleaning<br />
because this will in any case generate undesired<br />
static charges.<br />
The <strong>Thorens</strong> precision belt should be exchanged at least<br />
every other year. If the record player is not in use for a<br />
longer time, it is advisable to remove the belt in order to<br />
prevent a premature ageing under tension.<br />
If the record player is frequently in use it is recommended<br />
to have the bearing checked and lubrication renewed after<br />
about 5 years.<br />
34
Model<br />
Drive system<br />
Motor<br />
Speed<br />
Speed change<br />
Platter<br />
Tonearm (standard)<br />
Anti-skating<br />
Automatic functions<br />
Automatic shut-off<br />
Capacity of leads<br />
Voltage/Power supply<br />
Dimensions (WxDxH)<br />
Weight<br />
<strong>TD</strong> <strong>2010</strong><br />
belt drive (via platter rim)<br />
electronically controlled<br />
AC synchronous motor<br />
33 and 45 rpm<br />
electronically<br />
aluminium 300 mm (12”) 4.5 kg<br />
<strong>Thorens</strong> TP 250<br />
magnetic<br />
n/a<br />
n/a<br />
140 pF<br />
PS 800 electronic control unit<br />
country-specified mains adaptor<br />
420 x 340 x 160 mm<br />
18.0 kg<br />
<strong>TD</strong> <strong>2030</strong><br />
belt drive (via platter rim)<br />
electronically controlled<br />
AC synchronous motor<br />
33 and 45 rpm<br />
electronically<br />
aluminium 300 mm (12”) 6.2 kg<br />
<strong>Thorens</strong> TP 300<br />
magnetic<br />
n/a<br />
n/a<br />
140 pF<br />
PS 800 electronic control unit<br />
country-specified mains adaptor<br />
420 x 340 x 200 mm<br />
22.0 kg<br />
Technical modifications subject to change. Handmade in Germany<br />
35
Your <strong>Thorens</strong> dealer or distribution partner shall be pleased<br />
to assist you in the event that you have any further queries<br />
or need additional information concerning <strong>Thorens</strong> products.<br />
You may contact <strong>Thorens</strong> also directly:<br />
<strong>Thorens</strong> Export Company Ltd.<br />
Im Huebel 1, CH-4304 Giebenach, Switzerland<br />
www.thorens.com, info@thorens.com<br />
In case of warranty claims you are kindly requested to<br />
first contact your <strong>Thorens</strong> dealer or distributor.<br />
Further information may also be obtained from:<br />
<br />
36
37
Félicitations pour l’achat de votre nouvelle<br />
platine <strong>TD</strong> <strong>2010</strong> / <strong>2030</strong>.<br />
Nous espérons que vous aurez beaucoup de plaisir avec<br />
l’utilisation de votre nouvelle platine. Equipée d’une cellule<br />
de lecture de bonne qualité, cette platine vous offrira<br />
une excellente qualité de reproduction. La fabrication et<br />
le montage sont entièrement effectués en Allemagne, ce<br />
qui vous garantit un usage satisfaisant pour de longues<br />
années.<br />
Veuillez lire avec attention la totalité de ce mode d’emploi<br />
avant la première mise en service. Il contient d’importants<br />
conseils pour l’installation, le raccordement et la configuration<br />
de votre nouvelle platine. N’oubliez jamais que cette<br />
platine est un instrument de précision, qui doit toujours<br />
être manipulé avec précaution.<br />
Si vous aviez des questions dont les réponses ne se trouveraient<br />
pas dans ce mode d’emploi, veuillez vous adresser<br />
à votre revendeur.<br />
38
A LIRE ATTENTIVEMENT AVANT LA PREMIERE<br />
MISE EN SERVICE!<br />
ATTENTION<br />
Pour éviter tout choc électrique, le boîtier de l’alimentation ne doit pas<br />
être ouvert. A l’intérieur de l’appareil ne se trouve aucune pièce nécessitant<br />
un entretien de la part de l’utilisateur.<br />
AVERTISSEMENT<br />
POUR EVITER TOUT DANGER D‘INCENDIE ET DE CHOC ELECTRI-<br />
QUE, L‘APPAREIL NE DOIT PAS ETRE EXPOSE A LA PLUIE ET A L‘HU-<br />
MIDITE.<br />
EXPLICATION DES SYMBOLES GRAPHIQUE<br />
Le symbole éclair avec flèche vers le bas dans le<br />
triangle avertit d‘une „tension dangereuse“ à l‘intérieur<br />
de l‘appareil, dont le niveau est suffisant pour<br />
présenter un danger de choc électrique aux personnes.<br />
Le point d‘exclamation à l‘intérieur du triangle indique<br />
des instructions de commande et d‘entretien<br />
figurant dans le présent mode d‘emploi.<br />
Ce produit électronique est conforme aux directives européennes<br />
pour l‘obtention de la marque CE. Tous les essais<br />
nécessaires ont été effectués avec un résultat positif.<br />
IMPORTANT: ELIMINATION D‘APPAREILS<br />
ELECTRIQUES PAR LES UTILISATEURS PAR-<br />
TICULIERS RESIDANT DANS LA CE<br />
Ce symbole, figurant sur le produit ou sur son emballage,<br />
indique que ce produit ne doit pas être éliminé<br />
avec les ordures ménagères. Il est de votre responsabilité<br />
de remettre ce produit à une entreprise<br />
d‘élimination ou de recyclage d‘appareils électriques<br />
de tous types (par ex. une décharge spécialisée)<br />
La collecte sélective et la réutilisation de tous vos<br />
anciens appareils électroniques à l‘occasion de leur<br />
élimination, contribuent à la protection de l‘environnement<br />
et assure qu‘il soient recyclés de manière à<br />
éviter de porter atteinte à la santé humaine et à la<br />
protection de la nature. Pour obtenir de plus amples<br />
informations sur les dépôts et le recyclage des<br />
appareils électroniques usagés, adressez-vous aux<br />
autorités locales, aux déchèteries ou au distributeur<br />
qui vous a vendu l‘appareil.<br />
39
Sortez l‘appareil et les pièces livrées de l‘emballage avec<br />
précaution.<br />
Contenu:<br />
1 x Mode d‘emploi<br />
1 x Châssis (avec/sans bras de lecture)<br />
1 x Moteur dans le boîtier<br />
1 x Courroie d‘entraînement <strong>Thorens</strong><br />
1 x Plateau avec feutre<br />
1 x Poids du bras de lecture<br />
1 x Unité électronique PS 800<br />
1 x Alimentation<br />
1 x Cordon secteur<br />
1 x Câble Cinch<br />
1 x Adaptateur pour disques 17 cm<br />
3 x Embase de pied<br />
2 x Gants de protection<br />
ATTENTION: Les surfaces du châssis et du plateau<br />
sont sensibles aux rayures. Utilisez impérativement<br />
les gants de protection fournis pour le<br />
montage.<br />
Positionnez d‘abord les embases de pointes à l‘endroit<br />
où vous voulez installer le lecteur. Les embases servent à<br />
protéger les surfaces fragiles qui pourraient être endommagées<br />
par les pointes.<br />
Placez maintenant la platine sur ces embases et réglez<br />
son horizontalité. Vous pouvez régler la hauteur des pieds<br />
en faisant tourner les pointes. Contrôlez ensuite le réglage<br />
de la hauteur à l‘aide d‘un niveau à bulle et corrigez-le si<br />
nécessaire.<br />
Placez maintenant le moteur dans le logement prévu à<br />
cet effet, à l‘arrière gauche. Soulevez le châssis et placez<br />
le moteur sous son logement. Abaissez maintenant<br />
lentement le châssis afin que le moteur s‘insère dans son<br />
logement par le dessous. Procédez avec beaucoup de<br />
précaution afin de ne pas rayer la surface de la platine.<br />
L‘unité moteur ne doit pas toucher le châssis dans sa position<br />
finale.<br />
40
Placez maintenant prudemment le plateau dans son palier.<br />
Il faut absolument veiller à ce que la pointe de l‘axe ne<br />
cogne pas dans le fond du palier! Faites tourner le plateau<br />
à la main et vérifiez s‘il tourne sans offrir trop de résistance.<br />
Mettez ensuite le feutre en place. Tendez la courroie<br />
autour du plateau et sur la poulie (Fig. 1).<br />
Evitez toute trace d‘huile ou de graisse sur la courroie<br />
d‘entraînement, la poulie du moteur et la surface<br />
d‘entraînement du plateau. Si nécessaire vous pouvez<br />
nettoyer ces pièces à l‘aide d‘un tissu ou chiffon non<br />
pelucheux, imprégné d‘alcool pur.<br />
Si votre platine a été livrée sans bras de lecture, montez<br />
celui-ci conformément aux instructions du fabricant. Dans<br />
le cas contraire, la platine est maintenant entièrement<br />
montée.<br />
IMPORTANT: Veuillez conserver l‘emballage, au cas où<br />
l‘appareil devrait être remballé pour le transport. Aucune<br />
garantie de dommages de transport ne peut être acceptée<br />
pour un appareil dont l‘emballage n‘est pas conforme!<br />
Fig. 1<br />
41
Reliez le câble du moteur à l‘unité PS 800 (Fig. 2.1).<br />
ATTENTION: Avant de raccorder la platine au<br />
secteur, le commutateur ON/OFF de l‘unité PS<br />
800 doit être en position „OFF“ et le sélecteur de<br />
vitesse doit être en position „33“ (Fig. 2.2).<br />
Pour le raccordement au secteur, l‘unité PS 800 est reliée<br />
à une prise de courant à l‘aide de l‘alimentation et du cordon<br />
secteur. (Fig. 2.3).<br />
Fig. 2.1 Fig. 2.2<br />
ATTENTION: Ne débranchez jamais le connecteur<br />
du moteur quand l‘unité PS 800 est sous tension,<br />
car ceci pourrait la détériorer.<br />
Raccordez maintenant le câble du bras de lecture avec<br />
l‘entrée (phono) de votre amplificateur (Fig. 2.4). Remarque:<br />
Respectez impérativement la bonne polarité<br />
Fig. 2.3 Fig. 2.4<br />
42
Remarque: Si l‘amplificateur n‘a pas d‘entrée phono, il est<br />
nécessaire d‘utiliser en plus un préamplificateur phono<br />
spécial. Pour les amplificateurs ayant une prise d‘entrée<br />
à 5 pôles selon DIN, procurez-vous un câble d’adaptation<br />
chez votre revendeur.<br />
Lors de l‘installation de votre nouvelle platine, veillez à<br />
respecter une distance minimale par rapport aux autres<br />
appareils électroniques (par ex. amplificateur, récepteur<br />
ou lecteur de CD), car des rayonnements électromagnétiques<br />
pourraient perturber le système de lecture, ce qui<br />
se traduirait par des bourdonnements en cours de reproduction.<br />
Les platines <strong>Thorens</strong> sont relativement insensibles aux vibrations.<br />
Cependant, celles-ci posent en général un problème<br />
pour la reproduction des disques avec des lecteurs<br />
de haute qualité. Choisissez un meuble stable comme<br />
support et évitez la proximité des haut-parleurs.<br />
Mais ceci n‘est pas suffisant dans le cas d‘anciennes demeures<br />
avec poutraison de plancher en bois. En général,<br />
dans ce cas, il faut toujours placer la platine sur une console,<br />
qui est elle-même vissée au mur porteur de la pièce<br />
à l‘aide de ses propres supports de console.<br />
On peut facilement identifier et éliminer les perturbations<br />
magnétiques en modifiant la disposition de la platine<br />
par rapport aux autres appareils.<br />
43
Installez et configurez votre système de lecture conformément<br />
aux instructions de montage du fabricant et effectuez<br />
tous les réglages nécessaires.<br />
Ci-dessous, vous trouverez quelques instructions pour<br />
l‘installation et la configuration de bras de lecture de <strong>Thorens</strong>,<br />
qui peuvent également être valables pour d‘autres<br />
fabrications. En cas de doute, reportez-vous toujours aux<br />
instructions de chacun des fabricants. Vous trouverez des<br />
instructions spéciales de configuration pour les bras de<br />
lecture <strong>Thorens</strong> TP 250 et TP 300 à partir de la page 44.<br />
Remarque: Si votre platine vous a été livrée avec le bras<br />
et le système de lecture montés, tous les réglages ont<br />
été effectués en usine. Il n‘y a que la force d‘appui qui<br />
reste encore à régler, car le poids du bras de lecture est<br />
démonté pour le transport.<br />
Montez la cellule de lecture dans les trous de la tête de<br />
lecture prévus à cet effet. Si possible, laissez en place la<br />
protection de l‘aiguille sur la cellule, pour éviter tout dommage<br />
de l‘aiguille de lecture.<br />
Sur les bras de lecture <strong>Thorens</strong>, il est possible de monter<br />
des systèmes de lecture ayant un écart standard entre les<br />
trous de fixation de 12,5 mm (1/2 ”).<br />
Les quatre cosses de raccordement repérées par couleurs<br />
doivent être connectées aux picots correspondants<br />
(même couleur) du système de lecture.<br />
R<br />
G<br />
L<br />
G<br />
canal droit, rouge (signal)<br />
canal droit, vert (masse)<br />
canal gauche, blanc (signal)<br />
canal gauche, bleu (masse)<br />
Desserrez d‘abord légèrement les semelles de montage.<br />
L‘alignement définitif de la cellule de lecture se fera après<br />
réglage de la hauteur du bras.<br />
Remarque: Pour les cellules de lecture Grado montez les<br />
vis fournies par le dessous de la cellule et vissez les écrous<br />
sur le dessus de la tête de lecture, car trop difficiles à visser<br />
par le dessous.<br />
44
Tournez maintenant le contrepoids sur le bras en direction<br />
du palier de bras (Fig. 3).<br />
ATTENTION: Procédez ensuite avec une extrême<br />
précaution, car chaque erreur peut détruire<br />
l‘aiguille de lecture de la cellule !<br />
Retirez prudemment la protection de l‘aiguille. Le bras de<br />
lecture doit ensuite être positionné entre le support de bras<br />
et le plateau avec l‘élévateur en position basse et équilibré<br />
par la rotation du contrepoids. Remarque: la force antiskating<br />
et la force d’appui (dans le cas où celles-ci ne seraient<br />
pas produites par le contrepoids comme pour le TP 300)<br />
doivent impérativement être réduites à 0.<br />
Posez pour cela un vieux disque sur le plateau et abaissez<br />
prudemment l‘aiguille de lecture. Le tube du bras de lecture<br />
doit alors être parallèle à la surface du disque. Si ce<br />
n‘était pas le cas, la hauteur du bras de lecture devra être<br />
réglée à l‘aide du VTA. VTA signifie Vertical Tracking Adjustment,<br />
ce système permet de régler le bras de lecture à<br />
la hauteur de la cellule de lecture en question, à l‘aide d‘un<br />
mécanisme de bridage (Fig. 3).<br />
Fig. 3<br />
Pour procéder au réglage, il faut d‘abord desserrer les vis<br />
de serrage. Le bras de lecture peut alors être amené à<br />
la hauteur souhaitée. Resserrez ensuite prudemment les<br />
vis.<br />
45
Seul un réglage précis du système de lecture permet de<br />
mettre en valeur les excellentes caractéristiques sonores<br />
de cette platine. Si vous rencontrez des difficultés à ce<br />
sujet, faites appel à votre revendeur qui vous aidera volontiers.<br />
ATTENTION: Le réglage précis de la cellule de<br />
lecture exige le plus grand soin, afin d‘éviter tout<br />
dommage de l‘aiguille de lecture et de la mécanique<br />
de précision du bras de lecture. Si vous<br />
n‘avez aucune d‘expérience dans ce domaine,<br />
nous vous recommandons de faire appel à un<br />
spécialiste. Des systèmes de lecture mal réglés<br />
peuvent occasionner des pertes importantes de<br />
son et même endommager des disques.<br />
Angle de coude: L‘angle de coude est l‘angle entre l‘axe<br />
longitudinal de la cellule de lecture et l‘axe du bras de lecture.<br />
Pour tous les bras rotatifs (comme les bras de lecture<br />
TP 250 et TP 300) les valeurs optimales se situent entre<br />
21° et 24°. Il faut un gabarit spécial, disponible chez les<br />
revendeurs spécialisés, pour effectuer ce réglage.<br />
Longueur de porte-à-faux: Le porte-à-faux est la longueur<br />
de déplacement de l‘aiguille au-delà du centre du<br />
disque. Le porte-à-faux doit en général être de 17 mm<br />
pour les bras de lecture TP 250 et TP 300. Il faut un gabarit<br />
spécial, disponible chez les revendeurs spécialisés,<br />
pour effectuer ce réglage.<br />
Azimut: Il s‘agit de l‘angle entre le porte-aiguille et le sillon<br />
du disque. Il doit être de 90° (à l‘exception des systèmes<br />
dont les aiguilles sont montées volontairement en biais).<br />
L‘azimut ne peut pas être réglé sur le <strong>TD</strong> 250 et TP 300.<br />
N‘utilisez avec ces bras de lecture que des cellules qui ont<br />
un azimut correct.<br />
46
Réglage du lève-bras: Le réglage du lève-bras de ce<br />
bras de lecture est réalisé en usine et convient à presque<br />
tous les types de cellule. Si une correction de réglage<br />
s‘avérait malgré tout nécessaire, veuillez vous adresser à<br />
votre revendeur.<br />
Réglage de la force antiskating: La force antiskating<br />
se règle à l‘aide du réglage coulissant du palier de bras<br />
(2) situé sous le bras de lecture. Nous recommandons de<br />
régler la force antiskating légèrement inférieure à la force<br />
d‘appui.<br />
Réglage de la force d‘appui: Informez-vous d‘abord de<br />
la force d‘appui recommandée pour votre cellule de lecture.<br />
En général les forces d‘appui en usage se situent<br />
entre 10 et 25 mN (ceci correspond à un poids d‘appui<br />
de 1,0 - 2,5 g).<br />
Remarque: Ne choisissez pas une force d‘appui trop faible,<br />
car la cellule de lecture ne fonctionnerait pas correctement.<br />
Lorsque le bras de lecture est équilibré (voir page 45),<br />
vous pouvez régler la force d‘appui en tournant le contrepoids<br />
(3) selon le schéma suivant: Une demi-rotation<br />
du contrepoids correspond à une force d‘appui de 10<br />
mN, une rotation complète correspond à 20 mN. Une<br />
rotation en direction du palier de bras augmente la force<br />
d‘appui, une rotation en direction opposée la réduit. Les<br />
points verts sur le poids servent pour l‘orientation.<br />
Bloquez impérativement le bras de lecture avant<br />
d’effectuer ce réglage.<br />
Bras de lecture TP 250<br />
➀<br />
➁<br />
➂<br />
Lève-bras<br />
Palier du bras de lecture<br />
Contrepoids<br />
➀<br />
➁<br />
➂<br />
47
Réglage du lève-bras: le réglage du lève-bras de ce<br />
bras de lecture est réalisé en usine et convient à presque<br />
tous les types de cellule. Si une correction de réglage<br />
s‘avérait malgré tout nécessaire, veuillez vous adresser à<br />
votre revendeur.<br />
Réglage de la force antiskating: la force antiskating<br />
se règle à l‘aide du réglage coulissant du palier de bras<br />
(2) situé sous le bras de lecture. Nous recommandons de<br />
régler la force antiskating légèrement inférieure à la force<br />
d‘appui.<br />
Réglage de la force d‘appui: informez-vous d‘abord de<br />
la force d‘appui recommandée pour votre cellule de lecture.<br />
En général les forces d‘appui en usage se situent<br />
entre 10 et 25 mN (ceci correspond à un poids d‘appui<br />
de 1,0 - 2,5 g).<br />
Remarque: Ne choisissez pas une force d‘appui trop faible,<br />
car la cellule de lecture ne fonctionnerait pas correctement.<br />
La force d’appui est produite par un ressort situé à l’intérieur<br />
du bras. Après avoir équilibré le bras à l’aide du<br />
contrepoids du bras de lecture (3 – voir page 45) la force<br />
d’appui peut être réglée à l’aide de la molette tournante (4)<br />
située sur le côté du bras.<br />
Mettez la force d’appui à “0”, avant d’équilibrer le<br />
bras de lecture et bloquez-le ensuite avant d’effectuer<br />
le réglage de la force d’appui.<br />
48<br />
Bras de lecture TP 300<br />
➀<br />
➁<br />
➂<br />
➃<br />
Lève-bras<br />
Palier du bras de lecture<br />
Contrepoids<br />
Molette de réglage de la force d’appui<br />
➀<br />
➁<br />
➃<br />
➂
Le moteur de la platine est commandé par l‘unité PS 800<br />
raccordée (Fig. 6). Le commutateur de droite sert de sélecteur<br />
de vitesse. Les vitesses de rotation suivantes sont<br />
disponibles: 33 t/mn pour disque de longue durée et<br />
45 t/mn pour disques de petit diamètre. A la gauche du<br />
sélecteur de vitesses se trouve le commutateur ON/OFF<br />
servant à la mise en marche et à l‘arrêt du moteur.<br />
Pour la lecture d’un disque la platine doit d’abord être lancée<br />
à la vitesse de rotation adéquate. Levez ensuite le bras<br />
de lecture, le levier doit être levé vers l’arrière pour cela.<br />
Positionnez alors la cellule au-dessus du sillon d’entrée<br />
ou au-dessus du morceau recherché et ensuite abaissezla<br />
sur le disque à l’aide du levier (déplacez le levier vers<br />
l’avant et en bas).<br />
Fig. 6<br />
La platine ne possède pas d’arrêt automatique. Dès que<br />
le sillon de fin de disque est atteint, le bras de lecture doit<br />
être levé manuellement à l’aide du lève-bras et vous devez<br />
actionner le commutateur ON/OFF.<br />
49
Votre platine ne nécessite aucun entretien permanent.<br />
La poussière qui pourrait se déposer avec le temps sur le<br />
châssis, peut être enlevée avec un chiffon doux humide.<br />
Remarque: Utilisez pour le nettoyage de préférence un<br />
chiffon pour nettoyage de lunette humide.<br />
ATTENTION: N’utilisez en aucun cas pour le nettoyage<br />
un chiffon de papier ou tout autre matériau<br />
à fibres rugueuses, car celles-ci pourraient<br />
rayer la délicate surface acrylique. D’autre part,<br />
un chiffon sec peut provoquer des charges électrostatiques<br />
non souhaitées.<br />
Vous devriez remplacer la courroie de précision <strong>Thorens</strong><br />
tous les deux ans. Si l’appareil devait rester inutilisé pendant<br />
une durée prolongée, il est recommandé de démonter<br />
la courroie, pour prévenir d’une usure prématurée.<br />
En cas d’utilisation intense, vous devriez faire vérifier le<br />
palier de la platine tous les 5 ans et renouveler son graissage.<br />
50
Modèle<br />
Système d’entraînement<br />
Entraînement<br />
Vitesses de rotation<br />
Commulation vitesses<br />
Plateau<br />
Bras de lecture (standard)<br />
Antiskating<br />
Automatique<br />
Arrêt automatique<br />
Capacité câble<br />
Alimentation électrique<br />
Dimensions (L x P x H)<br />
Poids<br />
<strong>TD</strong> <strong>2010</strong><br />
entraînement par courroie (extérieure)<br />
à régulation électronique<br />
moteur synchrone AC<br />
33 , 45 t/mn<br />
électronique<br />
aluminium 300 mm (12”), 4,5 kg<br />
<strong>Thorens</strong> TP 250<br />
magnétique<br />
sans<br />
sans<br />
140 pF<br />
électro-unité PS 800,<br />
aalim. électrique spécifique pays<br />
420 x 340 x 160 mm<br />
18,0 kg<br />
<strong>TD</strong> <strong>2030</strong><br />
entraînement par courroie (extérieure)<br />
à régulation électronique<br />
moteur synchrone AC<br />
33 , 45 t/mn<br />
électronique<br />
aluminium 300 mm (12”), 6,2 kg<br />
<strong>Thorens</strong> TP 300<br />
magnétique<br />
sans<br />
sans<br />
140 pF<br />
électro-unité PS 800,<br />
alim. électrique spécifique pays<br />
420 x 340 x 200 mm<br />
22,0 kg<br />
Sous réserve de modification technique. Handmade in Germany.<br />
51
Votre distributeur et revendeur sont à tout moment des<br />
partenaires compétents, qui seront à votre entière disposition<br />
pour toutes questions concernant votre produit<br />
<strong>Thorens</strong>.<br />
Vous pouvez également prendre directement contact<br />
avec <strong>Thorens</strong> :<br />
<strong>Thorens</strong> Export Company S.A.<br />
Im Huebel 1, CH-4304 Giebenach, Suisse<br />
www.thorens.com, info@thorens.com<br />
Pour des questions de garantie, prière de toujours<br />
d’abord prendre contact avec votre distributeur ou votre<br />
revendeur!<br />
Pour plus d‘information voir:<br />
<br />
52
53
© 2006 <strong>Thorens</strong> Export Company AG<br />
Im Huebel 1, CH-4304 Giebenach<br />
E-Mail: info@thorens.com<br />
Internet: www.thorens.com
analog high fidelity<br />
Printed in Germany · UM2000S-1006-A