english - Michael W. Buder
english - Michael W. Buder
english - Michael W. Buder

Create successful ePaper yourself
Turn your PDF publications into a flip-book with our unique Google optimized e-Paper software.
SECTION 4<br />
MAINTENANCE<br />
I. MAINTENANCE - DAILY<br />
A. Exterior<br />
Everyday you should clean the outside of the oven with a<br />
soft cloth and mild detergent.<br />
WARNING<br />
Never use a water hose or pressurized steam<br />
cleaning equipment when cleaning the oven.<br />
D. Crumb Pans (Figure 4-2)<br />
Remove and clean the crumb pan at each end of the oven.<br />
Each crumb pan can be removed by sliding it out, as<br />
shown in Figure 4-2. Reinstall the crumb pans after<br />
cleaning.<br />
E. Window<br />
The window can be cleaned daily while it is in place.<br />
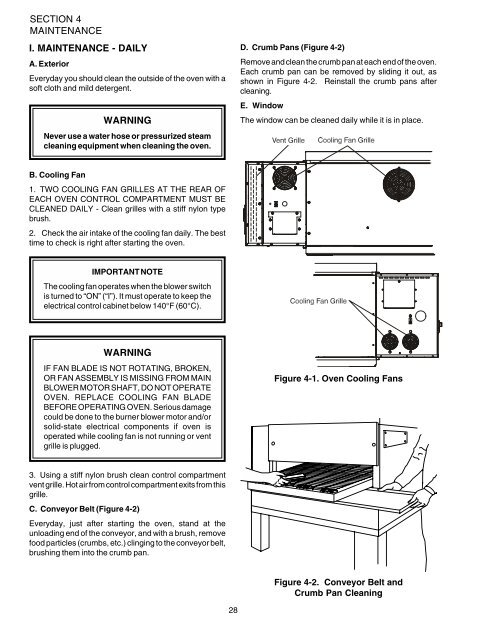
B. Cooling Fan<br />
1. TWO COOLING FAN GRILLES AT THE REAR OF<br />
EACH OVEN CONTROL COMPARTMENT MUST BE<br />
CLEANED DAILY - Clean grilles with a stiff nylon type<br />
brush.<br />
2. Check the air intake of the cooling fan daily. The best<br />
time to check is right after starting the oven.<br />
IMPORTANT NOTE<br />
The cooling fan operates when the blower switch<br />
is turned to “ON” (“I”). It must operate to keep the<br />
electrical control cabinet below 140°F (60°C).<br />
WARNING<br />
IF FAN BLADE IS NOT ROTATING, BROKEN,<br />
OR FAN ASSEMBLY IS MISSING FROM MAIN<br />
BLOWER MOTOR SHAFT, DO NOT OPERATE<br />
OVEN. REPLACE COOLING FAN BLADE<br />
BEFORE OPERATING OVEN. Serious damage<br />
could be done to the burner blower motor and/or<br />
solid-state electrical components if oven is<br />
operated while cooling fan is not running or vent<br />
grille is plugged.<br />
Figure 4-1. Oven Cooling Fans<br />
3. Using a stiff nylon brush clean control compartment<br />
vent grille. Hot air from control compartment exits from this<br />
grille.<br />
C. Conveyor Belt (Figure 4-2)<br />
Everyday, just after starting the oven, stand at the<br />
unloading end of the conveyor, and with a brush, remove<br />
food particles (crumbs, etc.) clinging to the conveyor belt,<br />
brushing them into the crumb pan.<br />
Figure 4-2. Conveyor Belt and<br />
Crumb Pan Cleaning<br />
28