english - Michael W. Buder
english - Michael W. Buder
english - Michael W. Buder

Create successful ePaper yourself
Turn your PDF publications into a flip-book with our unique Google optimized e-Paper software.
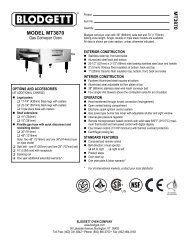
SECTION 3<br />
OPERATION<br />
II.<br />
NORMAL OPERATION - STEP-BY-STEP<br />
A. DAILY STARTUP PROCEDURE<br />
1. Check that the circuit breaker/fused disconnect is in the on<br />
position. Check that the window is closed.<br />
2. Turn the "BLOWER/<br />
HEAT" ( )( )switch<br />
to the “ON” ("I") position.<br />
3. Turn the "CONVEYOR"<br />
( ) switch to the “ON”<br />
("I") position.<br />
8. Allow the oven to preheat for 10 minutes after it has reached<br />
the set point temperature.<br />
B. DAILY SHUTDOWN PROCEDURE<br />
1. Turn the "BLOWER"/<br />
"HEAT" ( )( ) switch<br />
to the "OFF" ("O") position.<br />
Note that the blowers<br />
will remain in operation<br />
until the oven has<br />
cooled to below 200°F<br />
(93°C).<br />
4. If necessary, adjust the<br />
conveyor speed setting<br />
by pressing the or<br />
pushbuttons on the conveyor<br />
speed controller to<br />
change the displayed<br />
bake time.<br />
or<br />
2. Make certain that there<br />
are no products left on<br />
the conveyor inside the<br />
oven. Turn the "CON-<br />
VEYOR" ( ) switch to<br />
the "OFF" ("O") position.<br />
3. Open the window to allow the oven to cool faster.<br />
5. Adjust the temperature<br />
controller to a desired set<br />
temperature, if necessary.<br />
• Press the Set Point<br />
and Unlock keys at<br />
the same time. Wait<br />
for the "SET PT" light<br />
to turn on.<br />
+<br />
wait<br />
for<br />
4. After the oven has cooled and the blowers have turned off,<br />
switch the circuit breaker/fused disconnect to the off position.<br />
• Press the Up Arrow<br />
and Down Arrow<br />
Keys as necessary<br />
to adjust the setpoint.<br />
6. Wait for the oven to heat to the setpoint temperature. Higher<br />
setpoint temperatures will require a longer wait. The oven<br />
can reach a temperature of 500°F (232°C) in approximately<br />
15 minutes.<br />
7. (Optional) Press the Temperature<br />
( ) key to show<br />
the Actual Temperature<br />
in the display, and wait<br />
for the "ACTUAL TEMP"<br />
light to turn on. This allows<br />
you to monitor the<br />
oven temperature as it<br />
rises to the setpoint.<br />
or<br />
wait<br />
for<br />
IMPORTANT<br />
On gas ovens, if the "HEAT ON" light will not illuminate, OR<br />
if the oven does not heat, the gas burner may not have lit.<br />
Turn the "BLOWER/HEAT" ( )( ), and "CONVEYOR"<br />
( ) switches to the "OFF" ("O") position. Wait for AT<br />
LEAST FIVE MINUTES before restarting the oven. Then,<br />
repeat the Daily Startup procedure.<br />
CAUTION<br />
In case of power failure, turn all switches to the “OFF” ("O")<br />
position, open the oven window, and remove the product.<br />
After the power has been restored, perform the normal<br />
startup procedure. IF THE OVEN WAS SWITCHED OFF<br />
FOR LESS THAN 5 MINUTES, WAIT FOR AT LEAST FIVE<br />
MINUTES BEFORE RESTARTING THE OVEN.<br />
The burner will not operate and gas will not flow through<br />
the burner without electric power. No attempt should<br />
be made to operate the oven during a power failure.<br />
24