FAUST INS MANUAL.fh11 - Saruhan Makina ve Elektrikli Ev Aletleri
FAUST INS MANUAL.fh11 - Saruhan Makina ve Elektrikli Ev Aletleri
FAUST INS MANUAL.fh11 - Saruhan Makina ve Elektrikli Ev Aletleri

Create successful ePaper yourself
Turn your PDF publications into a flip-book with our unique Google optimized e-Paper software.
<strong>FAUST</strong><br />
Cyclonic Kuru <strong>Elektrikli</strong> Süpürge - Kullanma K›lavuzu<br />
Cyclonic Dry Vacuum Cleaner - Instruction Manual
Girifl<br />
Uzun y›llar sorunsuz çal›flmas› için tasarlanan <strong>ve</strong> üretilen Fakir Faust kuru elektrik<br />
süpürgesini sat›n ald›¤›n›z için teflekkür ederiz.<br />
Benzer ürünleri kullanmaya al›fl›k olabilirsiniz, ancak kullanma k›lavuzunu okumak<br />
için lütfen zaman ay›r›n›z. Bu k›lavuz sat›n alm›fl oldu¤unuz üründen en iyi performans›<br />
alman›z için haz›rlanm›flt›r.<br />
Gü<strong>ve</strong>nlik Önemlidir<br />
Sizin <strong>ve</strong> yak›nlar›n›z›n gü<strong>ve</strong>nli¤ini sa¤lamak için ürünü çal›flt›rmadan önce lütfen<br />
gü<strong>ve</strong>nlik uyar›lar›n› okuyunuz.Bu K›lavuzu gelecek kullan›mlar çin saklay›n›z.<br />
2
Gü<strong>ve</strong>nlik Uyar›lar›<br />
<strong>Elektrikli</strong> bir cihaz kullan›l›rken,<br />
afla¤›daki önlemler her zaman<br />
al›nmal›d›r. Yang›n, elektrik çarpmas›<br />
<strong>ve</strong> kiflisel yaralanmalar› engellemek<br />
için;<br />
• Kullanma k›lavuzunda size <strong>ve</strong>rilen<br />
bilgileri dikkatlice okuyunuz. Lütfen<br />
kullanma k›lavuzunu saklay›n›z.Cihaz›<br />
üçüncü bir kifliye <strong>ve</strong>recekseniz mutlaka<br />
k›lavuzu da birlikte <strong>ve</strong>riniz.<br />
• Ürünü kolisinden ilk ç›kard›¤›n›zda<br />
aksesuarlar›n <strong>ve</strong> aparatlar›n tam<br />
oldu¤undan emin olunuz. Kutuda eksik<br />
var ise, en yak›n Fakir Yetkili Servisi’ne<br />
baflvurunuz.<br />
• Aksesuarlar›n <strong>ve</strong> aparatlar›n koruma<br />
pofletlerini bo¤ulma riskini engellemek<br />
için çocuklardan <strong>ve</strong> bebeklerden uzak<br />
tutunuz.<br />
• E¤er cihaz›n üzerinde, kasas›nda,<br />
kablosunda, fiflinde herhangi bir<br />
problem oldu¤unu düflünüyorsan›z,<br />
cihaz› çal›flt›rmay›n›z. Size en yak›n<br />
Fakir Servisine baflvurunuz.<br />
• Ürünü ›slak zeminleri, henüz<br />
so¤umam›fl külleri, sivri metal ya da<br />
cam parçalar›, yan›c› maddeleri,<br />
üzerinizdeki giysileri süpürmek için<br />
kullanmay›n›z. Cihaz sa¤l›¤a zararl›<br />
maddelerin süpürülmesinde<br />
kullan›lmamal›d›r.<br />
• E¤er cihaz ar›zalanm›fl ise yetkili Fakir<br />
Servisi taraf›ndan tamir edilmelidir. Asla<br />
kendiniz tamir etmeyiniz.<br />
• Cihaz› plastik, çimento, tafl tozu <strong>ve</strong> un<br />
kapl› yüzeyleri süpürmek için<br />
kullanmay›n›z.<br />
• Cihaz elektrik gücüyle çal›flt›¤›ndan<br />
elektrik floku tehlikesi vard›r, bu nedenle<br />
fifle kesinlikle ›slak ellerle dokunmay›n›z.<br />
• Fifli prizden çekmek istedi¤inizde<br />
mutlaka fiflten tutarak çekiniz. Elektrik<br />
kordonundan tutarak çekmeye<br />
çal›flmay›n›z. Kabloya zarar <strong>ve</strong>rebilir.<br />
• Elektrik kablosunun zedelenmemesine,<br />
›s› kayna¤› ya da sivri uçlarla temas<br />
etmemesine özen gösteriniz.<br />
• Makine çal›fl›r haldeyken aç›k<br />
k›s›mlar›na herhangi bir objenin<br />
s›k›flmamas›na özen gösterin. Hava<br />
deliklerinin kapanmas› makinenin fazla<br />
›s›nmas›na yol açar.<br />
• Aç›k havada kullanmay›n›z. Makineniz<br />
kir ya da ya¤murdan olumsuz<br />
etkilenebilir.<br />
• Makinenizi kesinlikle suya dald›rmay›n›z<br />
<strong>ve</strong> ya¤mur ya da rutubetten koruyunuz.<br />
• Makinenizi mutlaka cihaz›n üzerinde<br />
yazan voltaj aral›¤›nda kullan›n›z.<br />
• Makinenizi asla fifle tak›l› iken<br />
gözetiminiz d›fl›nda b›rakmay›n›z.<br />
Gözetiminiz d›fl›nda çocuklar›n cihazla<br />
oynamas›na izin <strong>ve</strong>rmeyiniz.<br />
• Aksesuarlar› takarken, ç›kart›rken ya<br />
da cihaz› temizlerken <strong>ve</strong> bak›m<br />
yaparken, fiflin prizde olmad›¤›ndan<br />
emin olunuz.<br />
• Çal›flt›rmadan önce filtrelerin yerlerinde<br />
oldu¤undan, elektrik süpürgesinin aç›k<br />
k›s›mlar›na herhangi bir objenin<br />
s›k›flmam›fl oldu¤undan emin olun.<br />
Filtreler bozulmam›fl <strong>ve</strong> kuru olmal›d›r.<br />
Aksi taktirde silindir elektrik süpürgesine<br />
zarar <strong>ve</strong>rebilir.<br />
• Cihaz›n elektrik kablosu <strong>ve</strong>ya fiflinde<br />
bir ar›za ya da hasar var ise, cihaz›<br />
kullanmay›n›z <strong>ve</strong> en yak›n Fakir Yetkili<br />
Servisi’ne baflvurunuz.<br />
BU KULLANMA KILAVUZUNU<br />
‹LER‹DEK‹ KULLANIMLAR ‹Ç‹N<br />
SAKLAYINIZ.<br />
3
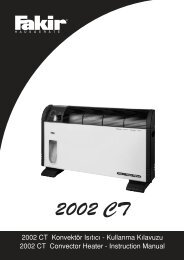
Ürün Bilgileri 1) Tutma Sap›<br />
8<br />
2) Aksesuar A¤z›<br />
3) ‹kinci Hava Kontrolörü<br />
1<br />
4) Birleflik Aparat<br />
13<br />
7 5) Kenar Köfle Aparat›<br />
6) Vakum Hortumu<br />
7) Kablo Çekim Dü¤mesi<br />
2<br />
8) Toz Haznesi Sap› Ve Açma Dü¤mesi<br />
9) Teleskopik Boru<br />
10) Teleskopik Boru Kilidi<br />
11) Yer Aparat›<br />
6<br />
12) Hal› Ve Özel Zemin Dü¤mesi<br />
3<br />
13) Toz Haznesi<br />
14) Parke F›rças› (Opsiyonel)<br />
15) Turbo F›rça (Opsiyonel)<br />
11<br />
12<br />
10<br />
9<br />
Teknik Bilgi<br />
Ürün : Cyclonic Elektrik Süpürgesi (toz<br />
torbas›z)<br />
Model : Faust<br />
Voltaj : 220 V - 240 V~50/60 Hz<br />
Güç : 1400 W nom. - 1600 W max.<br />
Toz haznesi : 1.5 litre, y›kanabilir<br />
Filtreler :Motor koruma filtresi, hijyenik<br />
ç›k›fl filtresi<br />
Kablo uzunlu¤u : yaklafl›k 8.0 m<br />
A¤›rl›k : yaklafl›k 6.0 kg<br />
5.Kullanma Talimatlar›<br />
Vakum borusunun tak›lmas›<br />
4<br />
5<br />
4<br />
14<br />
15<br />
1. fiekil 2/1’de belirtildi¤i gibi vakum<br />
hortumunu vakum ç›k›fl›na yerlefltiriniz<br />
<strong>ve</strong> adaptörü stop göstergesine kadar<br />
çevirerek kilitleyiniz.<br />
2. Tutma sap›n›(flekil 3/1) teleskopik vakum<br />
borusunun(flekil 3/2) içine do¤ru itiniz.<br />
3. Vakum borusunun(flekil 3/4 ) di¤er<br />
ucuna f›rçay› yerlefltiriniz.<br />
4. Vakum borusunun boyunu ayarlay›n›z,<br />
bunu yapmak için borunun üzerindeki<br />
anahtar›(flekil 4/1) ileri do¤ru itiniz.
Ard›ndan vakum borusunu istenilen<br />
uzunlu¤a (flekil 4/b) gelinceye kadar<br />
çekiniz.Kilitlemek için vakum borusunu<br />
serbest duruma getiriniz.Bir klik sesi<br />
duyacaks›n›z.<br />
fiekil 2/1<br />
1<br />
2<br />
• Mobilya f›rças› (flekil 6/3) : birleflik<br />
aparat› da bu amaçla kullanabildi¤ini<br />
gibi koltuklar› temizlemekte<br />
kullan›labilir.Temiz yumuflak, çizilmez<br />
yüzeylerde (döfleme mobilyalara)<br />
kullan›n›z.<br />
• Turbo f›rça(flekil 7):Bu f›rçan›n<br />
dönebilen bir bafll›¤› vard›r <strong>ve</strong> bu<br />
yüzden hal›n›n derinlemesine<br />
temizli¤inde kullan›l›r. F›rças› hal›n›n<br />
k›llar›n›n canl› durmas›n› sa¤lar.<br />
Not: Turbo f›rça kullan›l›rken gücü<br />
yüksek oldu¤undan yüksek bir ses<br />
ç›kar. Bu normal durumdur.<br />
• Parke f›rças› (flekil 8) : uzun k›llarla<br />
donat›lm›flt›r <strong>ve</strong> özellikle hassas<br />
yüzeylerin (parke <strong>ve</strong> laminant gibi)<br />
temizli¤inde kullan›l›r.<br />
Aksesuarlar›n tak›lmas›:<br />
Yer aparat›n›n yan›nda di¤er<br />
aksesuarlar› da kullanarak elektrik<br />
süpürgenizin kullan›m alan›n›<br />
geniflletebilirsiniz.<br />
Kenar köfle aparat› <strong>ve</strong> birleflik aparat<br />
teslimatta aksesuar olarak<br />
da¤›t›lmaktad›r.Aksesuar a¤z›na<br />
tak›labilirler.<br />
• Kenar köfle aparat› (flekil 5/2) :<br />
ulafl›lmas› zor yerler için kullan›l›r.<br />
• Birleflik f›rça : mobilya f›rças› gibi<br />
kullan›labilir. Koltuklar›n <strong>ve</strong> hassas<br />
zeminleri (masa üstü, dolap)olan<br />
objeleri temizlemekte kullan›labilir.<br />
5
F›rçan›n monte edilmesi<br />
1. Öncelikle makineyi kapat›n›z <strong>ve</strong> fifli<br />
prizden çekiniz.<br />
2. Aparat› yerinden ç›kar›n›z. (flekil 9/1)<br />
3. ‹htiyaca göre tutma sap›n›n ya da<br />
teleskopik borunun ucuna (flekil 9)<br />
istedi¤iniz f›rça ya da aparat› tak›n›z.<br />
D‹KKAT:<br />
Elektrik süpürgesini f›rça olmadan<br />
kullan›rsan›z, eflyalar›n süpürülmesinde<br />
daha büyük kaza riskleri oluflur.<br />
4. Gösterildi¤i gibi,f›rçan›n aksesuar<br />
girifline istenilenden daha uzun<br />
olmayacak flekilde monte edildi¤inden<br />
emin olunuz.<br />
•Birleflik f›rçay› aksesuar girifline do¤ru<br />
itiniz.(flekil 10/a)<br />
•Kenar köfle aparat›n› aksesuar girifline<br />
do¤ru itiniz <strong>ve</strong> tutturunuz,yerine<br />
oturdu¤una dair klik sesi gelecektir.<br />
5. Di¤er f›rçalar› gü<strong>ve</strong>nli <strong>ve</strong> çocuklar›n<br />
ulaflamayaca¤› bir yerde muhafaza<br />
ediniz.<br />
Kullan›m<br />
UYARI:<br />
Elektrik süpürgesinin <strong>ve</strong> güç kablosunu<br />
her kullan›m öncesi kontrol ediniz.<br />
Hasarl› ürün asla kullan›lmamal›d›r.<br />
D‹KKAT:<br />
Tüm filtrelerin do¤ru yerinde<br />
oldu¤undan <strong>ve</strong> aç›kl›klar›n<br />
kapanmad›¤›ndan emin oldu¤unuzda<br />
elektrik süpürgesini kullan›n›z.Filtreler<br />
bozulmam›fl <strong>ve</strong> kuru<br />
olmal›d›r.Uyumsuzluk elektrik<br />
süpürgenize zarar <strong>ve</strong>rebilir.<br />
1. ‹stedi¤iniz f›rça ya da aparat› tak›n›z.<br />
2. Kabloyu, fifli tutarak, sar› uyar› çizgisi<br />
ç›kana dek çekebilirsiniz.<br />
Uyar›:E¤er k›rm›z› uyar› çizgisi ç›kar<br />
ise kablo geri say›m dü¤mesini (flekil<br />
11/1) kullanarak kabloyu tekrar sar›<br />
çizgiye kadar geri sar›n›z.Kablonun<br />
k›rm›z› çizgisinin ç›kmas› elektrik<br />
çarpma tehlikesi oluflturaca¤›ndan<br />
zararl›d›r.<br />
3. Elektrik süpürgesini açma/kapama<br />
dü¤mesine basarak aç›n›z (flekil 11/2).<br />
2<br />
1<br />
fiekil 11<br />
4. Döflemenin cinsine göre hal›/sert yüzey<br />
anahtar›n› (flekil 12) ayarlay›n›z.<br />
6
• Sert Yüzey (flekil 12/A):Laminat<br />
yüzeyler, fayanslar, PVC yüzeyler vb.<br />
• Hal› (flekil 12/B) :Uzun <strong>ve</strong> k›sa tüy<br />
hal›lar, yol hal›lar› vb.<br />
5. Süpürmek için,elektrik süpürgesini<br />
arkan›zda olacak flekilde<br />
çekiniz.Döfleme üreticisinin tavsiyelerini<br />
dikkate al›n›z.<br />
NOT:<br />
Perde, vb’in s›k›flmas› halinde ikinci<br />
hava kontrolü (flekil 13/1) sayesinde<br />
vakum gücünü hemen düflürebilirsiniz.<br />
Makinenin kapat›lmas› <strong>ve</strong> kablonun<br />
toplanmas›:<br />
1. Açma kapama dü¤mesini kullanarak<br />
elektrik süpürgesini kapat›n›z (flekil<br />
14/2) <strong>ve</strong> fifli prizden çekiniz.<br />
2. Fifli elinizde s›k›ca tutunuz<br />
Uyar›:Kablo makinenin içine sar›l›rken<br />
sizi yan›lt›p etrafa zarar <strong>ve</strong>rebilir. Bu<br />
nedenle kablo sar›l›rken fifli elinizde<br />
s›k›ca tutunuz.<br />
3. Makinenin üzerindeki fifl toplama<br />
dü¤mesine (flekil 14/1) basarak<br />
kabloyu sar›n. Kablo sar›l›rken fifli<br />
tuttu¤unuz elinizle de kabloya rehberlik<br />
edin. 2<br />
1<br />
fiekil 14<br />
NOT:<br />
Elektrik süpürgesi fazla ›s›nmaya karfl›<br />
korumal›d›r. Fazla ›s›nd›¤›nda<br />
kendili¤inden duracakt›r. ( çok ›s›nmas›<br />
ya da toz torbas›n›n dolu olmas›<br />
durumunda ) Bu durumda makineyi<br />
kapat›n›z <strong>ve</strong> fifli prizden çekiniz.<br />
Is›nmaya yol açan etkeni ortadan<br />
kald›r›n›z <strong>ve</strong> çal›flt›rmadan önce 45<br />
dakika so¤umas› için bekleyiniz.<br />
Saklama s›ras›nda ya da çal›flma<br />
aras›nda yer aparat›n› sabitlemek için<br />
asma kancas›n› kullan›n›z.Yer<br />
aparat›n›n üzerindeki kancay› park<br />
kancas›na asarak sabit durmas›n›<br />
sa¤lay›n›z.(flekil 15)<br />
fiekil 15<br />
7
UYARI:<br />
Çal›flma alan›n› terk edecekseniz,<br />
makineyi kapat›n›z.<br />
D‹KKAT:<br />
Makineyi do¤rudan ›s› kaynaklar›n›n<br />
önüne koymay›n›z. Is› kaynaklar› <strong>ve</strong><br />
direk günefl ›fl›¤›na maruz kalmas›<br />
makinenize zarar <strong>ve</strong>rebilir.<br />
Makinenizi uzun süre<br />
kullanmayacaksan›z filtrenin <strong>ve</strong><br />
gerekiyorsa toz torbas›n›n temizli¤ini<br />
yaparak çocuklar›n ulaflamayacaklar›<br />
bir yere kald›r›n›z.<br />
Toz Haznesinin Boflalt›lmas›<br />
D‹KKAT:Toz haznesini boflaltmadan<br />
önce,cihaz› kapat›n›z.Bu flekilde tozlar›n<br />
cihaz›n›z› bozmas›n› önleyebilirsiniz.<br />
Toz haznesini en geç “max” göstergesi<br />
(flekil 16/1) yand›¤›nda ya da çekme<br />
gücü azald›¤›nda temizleyiniz.<br />
3. Tozu çöpe boflaltmak için hazneyi çöpe<br />
yak›n tutunuz.<br />
4. Açma dü¤mesine (flekil 18/1)<br />
bas›n›z.Ünite (18/2) aç›l›r <strong>ve</strong> çöpler çöp<br />
kutusuna geçer.<br />
5. Kalan toz için hazneyi sarsarak<br />
boflalt›n›z.<br />
6. Tozu boflaltt›ktan sonra üniteyi kapat›n›z.<br />
7. Hazneyi elektrik süpürgesine<br />
yerlefltiriniz. Geçme a¤z›ndaki<br />
dü¤meye (flekil 19) do¤ru duyulabilir<br />
bir ses gelene kadar bast›r›n›z.<br />
1. Toz haznesini dü¤mesine basarak<br />
serbest b›rak›n›z.(flekil 17/a)<br />
2. Haznesini elektrik süpürgesinden<br />
ç›kar›n›z.(flekil 17/b)<br />
NOT:<br />
Hazneyi kolay yerlefltirmek için<br />
dü¤meye bas›l› flekilde tutabilirsiniz.<br />
Yerine yerlefltirmek için sert bast›rman›z<br />
gerekebilir.<br />
8. Haznenin tam olarak yerleflti¤inden<br />
emin olunuz.<br />
8
Filtreler<br />
Elektrik süpürgesinde bulunan filtreler<br />
flunlard›r:<br />
• Ay›rma ünitesinin temizleme ekran›(flekil<br />
21/1) : Toz haznesindeki havay›<br />
temizler.( 2 ayda bir temizlenir.)<br />
NOT:<br />
E¤er filtre çok kirliyse, dufl bafll›¤›n›n<br />
alt›na tutarak suyla temizleyiniz(flekil<br />
22). Temizlendikten sonra kurumaya<br />
b›rak›n›z. Filtreyi ancak tamamen<br />
kuruduktan sonra yerine yerlefltiriniz.<br />
• Koruyucu motor filtresi (flekil 20/1): Toz<br />
partiküllerinin motora ulaflmas›n›<br />
engeller. ( 2 ayda bir temizlenir.)<br />
2<br />
• Hijyenik filtre(flekil 20/2): Havadaki toz<br />
partiküllerini temizler. ( 6 ayda bir<br />
de¤ifltirilir.)<br />
• Filtreler bir süre sonra bloke olabilir <strong>ve</strong><br />
bu yüzden vakum gücü düflürülebilir.<br />
• Filtrelerinizin zarar görmesi halinde<br />
hemen de¤ifltiriniz.<br />
Filtrelerin Temizlenmesi<br />
• Makineyi kapat›n›z.<br />
• Toz haznesini kald›r›n›z <strong>ve</strong> temizleyiniz.<br />
• Ay›rma ünitesini saat yönünün tersine<br />
çevirerek ç›kar›n›z.(flekil 21)<br />
• Çöpe hafifçe sallayarak boflalt›n›z.Daha<br />
sonra usulca kilitleyiniz.<br />
• Ay›rma ünitesini kuruduktan sonra<br />
yeniden toz torbas›n›n üzerine<br />
yerlefltiriniz. Yerlefltirdi¤inizde<br />
gösterildi¤i gibi (flekil 23/1) iflaretlerin<br />
birbirine bakmas›na özen gösteriniz.<br />
Ay›rma ünitesini saat yönünde çevirerek<br />
kilitli pozisyona gelmesini sa¤lay›n›z<br />
(flekil 23/2).<br />
• Burada koruyucu motor filtresini<br />
temizleyebilirsiniz.Aksi takdirde toz<br />
haznesini sesli klik sesi gelinceye kadar<br />
yerlefltiriniz.<br />
9
Motor Koruma Filtresinin<br />
Temizlenmesi<br />
1. Cihaz› kapat›n›z.<br />
2. Toz haznesini ç›kart›n›z.<br />
3. Filtreyi kapa¤›ndan tutarak gevfletiniz<br />
(flekil 24/1) <strong>ve</strong> yerinden ç›kar›n›z.<br />
NOT:<br />
Filtre çok kirliyse dufl bafll›¤›n›n alt›na<br />
tutarak suyla y›kayabilirsiniz (flekil 27)<br />
Bu ifllem için kesinlikle f›rça<br />
kullanmay›n›z.<br />
4. Motor filtreyi tutma sap› ile birlikte tutarak<br />
ç›kar›n›z.(flekil 25)<br />
5. Motor koruma filtresini tutaca¤› ile birlikte<br />
çöp kutusunun üzerine geldikten sonra<br />
ikiye ay›r›n›z <strong>ve</strong> sallayarak temizleyiniz.<br />
Derin temizleme için çöp kutusunun<br />
üzerinde silkeleyiniz.(flekil 26)<br />
Daha sonra filtreyi korumaya<br />
b›rak›n›z.(oda s›cakl›¤›nda yaklafl›k 15<br />
saat).Tamamen kurudu¤unda tekrar<br />
kullan›n›z.Kir ç›kmad›ysa,yeni bir motor<br />
koruma filtresi yerlefltiriniz.<br />
6. Kuru motor koruma filtresini yerine<br />
yerlefltiriniz.<br />
7. Motor koruma filtresini yuvas›na<br />
yerlefltiriniz.<br />
8. Filtre kapa¤›n› asarak yerine tam olarak<br />
oturtunuz.Daha sonra yerine<br />
oturdu¤una dair klik sesi duyacaks›n›z.<br />
D‹KKAT:<br />
Motor koruma filtresi bulafl›k<br />
makinesinde y›kanmaya uygun de¤ildir.<br />
NOT:<br />
Toz haznesinin yerine yerleflmesi için<br />
filtre kapa¤› tam olarak<br />
yerleflmelidir.E¤er kapak tam olarak<br />
yerleflmezse bast›rmak yeterli<br />
olmayacakt›r.(flekil 28/a)<br />
9. Toz haznesini elektrik süpürgesine<br />
10
yerlefltiriniz.Yerleflti¤ine dair klik sesi<br />
gelinceye dek toz haznesine bast›r›n›z.<br />
10.Toz haznesinin tamamen yerleflti¤inden<br />
emin olunuz.<br />
NOT:<br />
Biraz kuv<strong>ve</strong>tli itmek gerekebilir.Toz<br />
haznesini yerlefltirirken ifllemi<br />
kolaylaflt›rmak için boflaltma dü¤mesini<br />
bas›l› tutunuz.<br />
Hijyenik Filtrenin(Hepa Filtre)<br />
Temizlenmesi<br />
1. Cihaz› açma/kapama dü¤mesine<br />
basarak kapat›n›z.<br />
2. Gizli tutma sap›n›n üzerindeki kapa¤›<br />
kald›r›n›z <strong>ve</strong> ç›kar›n›z.<br />
3. Hijyenik filtreyi ç›kar›n›z(flekil 29).<br />
fiekil 29<br />
H.E.P.A.<br />
Filtre<br />
NOT:<br />
Hijyenik filtre y›kanmaya uygun de¤ildir.<br />
Az kirlenmifl ise çöpe boflaltarak<br />
temizleyebilirsiniz. Bunun yan›nda s›k<br />
s›k de¤ifltirmenizi tavsiye ederiz.<br />
4. Hijyenik filtreyi temizleyiniz ya da çok<br />
kirliyse yeni bir tane ile de¤ifltiriniz.<br />
5. Temiz/yeni hijyenik filtreyi yerine<br />
yerlefltiriniz.<br />
6. Daha sonra filtre kapa¤›n› asarak yerine<br />
yerlefltiriniz.Yerleflti¤ine dair sesli <strong>ve</strong><br />
duyulur bir klik sesine kadar bast›rarak<br />
kapa¤› kilitleyiniz<br />
NOT:<br />
Yerine yerlefltirmek biraz zor olabilir.<br />
bast›rarak yerlefltiriniz. Yerine tam<br />
oturdu¤undan emin olunuz. Aksi<br />
takdirde filtre kolayl›kla yerinden<br />
ç›kabilir.<br />
fiekil 30<br />
H.E.P.A.<br />
Filtre<br />
Muhtemel Sorunlar›n Giderilmesi<br />
Ürünü Fakir Yetkili Servisine<br />
göndermeden önce, sorunlar›<br />
çözebilmek için, afla¤›daki tabloyu<br />
kullanabilirsiniz.<br />
UYARI<br />
Sorunu çözmeye bafllamadan<br />
önce,cihaz› kapat›n›z <strong>ve</strong> ana fiflini<br />
çekiniz.Kesinlikle hatal› ürünü<br />
kullanmay›n›z.<br />
11
SORUN<br />
Makine çal›flmad›¤›nda<br />
Makine tozlar› çekmedi¤inde<br />
Makine çal›flma esnas›nda<br />
fazla ses yap›yorsa<br />
MUHTEMEL NEDEN<br />
Fifli tak›lmam›flt›r ya da makine<br />
çal›flt›r›lmam›flt›r.<br />
Soketten geçen ak›m<br />
bulunmamaktad›r.<br />
Kablo zarar görmüfltür.<br />
Toz haznesi doludur ya da<br />
bloke olmufltur.<br />
Seçilen f›rça yüzeye uygun<br />
de¤ildir.<br />
Filtre kirlenmifltir.<br />
Hortum, vakum borusu ya da<br />
aparat t›kanm›flt›r.<br />
Çekilen objeler hava yolunu<br />
t›k›yor olabilir.<br />
ÇÖZÜM<br />
Fifli tak›n›z ya da makineyi<br />
çal›flt›r›n›z.<br />
Elektrik süpürgesini ak›m<br />
geçti¤inden emin oldu¤unuz<br />
baflka bir sokete ba¤lay›n›z.<br />
Fakir Yetkili Servisinden<br />
kabloyu de¤ifltiriniz.<br />
Toz haznesini boflalt›n›z/<br />
temizleyiniz.<br />
F›rçan›z› yüzeye uygun olan<br />
ile de¤ifltiriniz.<br />
‹lgili filtreyi temizleyiniz.<br />
T›kanmay› gideriniz. Gerekirse<br />
bunun için uzun bir tahta<br />
kullanabilirsiniz.<br />
Objeleri yerinden alarak<br />
t›kanmay› gideriniz. Gerekirse<br />
bunun için uzun bir tahta<br />
kullanabilirsiniz.<br />
Temizleme<br />
Uyar›:Elektrik süpürgesini<br />
temizlemeden önce,cihaz› kapat›n›z <strong>ve</strong><br />
ana fiflini çekiniz<br />
Gövdenin Temizlenmesi:Temizlemek<br />
için yaln›zca hafif nemli yumuflak bir<br />
bez kullan›n›z.<br />
Dikkat:<br />
Gövdeye zarar <strong>ve</strong>rebilecek herhangi<br />
bir temizleme arac›,alkol gibi temizleme<br />
maddesi kullanmay›n›z.<br />
Filtrelerin Temizlenmesi<br />
Filtreleri temizlemek için “Filtreler”<br />
bölümüne bakabilirsiniz.<br />
At›klar›n At›lmas›<br />
Ürün için kullan›lan filtreler çevreyle<br />
uyumlu maddelerden yap›lm›flt›r <strong>ve</strong> e<strong>ve</strong><br />
ait çöplerle at›labilir.<br />
Çal›flamaz durumdaki ürünlerinizin<br />
garanti süresi geçmifl ise, elektrik ile<br />
ba¤lant›s›n› kesiniz. Cihaz›n imha<br />
edilmesi çevresel hükümlere göre<br />
ülkenizde uygulanabilir.<strong>Elektrikli</strong> alet<br />
at›klar› ev çöpünde imha edilemez,<br />
imha için ulusal kanunun belirledi¤i<br />
kurallar› uygulay›n›z.<br />
12
Introduction<br />
Thank you for purchasing Fakir Faust dry vacuum cleaner which has been designed<br />
and manufactured to gi<strong>ve</strong> you many years of trouble-free service.<br />
You may already be familiar with using a similar product, but do please take time<br />
to read these instructions - they ha<strong>ve</strong> been written to ensure you get the <strong>ve</strong>ry best<br />
from your purchase.<br />
Safety is Important<br />
To ensure your safety and the safety of others, please ensure you read the Safety<br />
Instructions before you operate this product. Keep this information in a safe place<br />
for future reference.<br />
13
2- Important Safeguards<br />
When using an electric appliance, basic<br />
precautions should always be followed,<br />
including the following:<br />
To reduce the risk of fire, electric shock,<br />
or injury:<br />
• Read this operating manual through<br />
completely before working with the<br />
appliance. Keep the operating manual<br />
safe. If you pass the appliance on to a<br />
third party, gi<strong>ve</strong> them the operating<br />
manual as well.<br />
• Ensure that, the apparatus and the<br />
accessories of the vacuum cleaner are<br />
complete when you first open the<br />
giftbox. If there are defecti<strong>ve</strong> parts,<br />
apply to an authorized Fakir Service.<br />
• Keep the packaging away from babies<br />
and children in order to avoid the risk<br />
of suffocation.<br />
• If there is any damage on the vacuum<br />
cleaner or power cord or the plug, do<br />
not use the vacuum cleaner. Apply to<br />
an authorized Fakir Service.<br />
• Don’t use the vacuum cleaner to suck<br />
up inflammables and glass or metal<br />
splinters or the clothes. This appliance<br />
is not suitable to be used to pick up<br />
substances constituting a health<br />
hazard.<br />
• If the appliance has breakdown, it may<br />
only be repaired by the maintenance<br />
center. Ne<strong>ve</strong>r dismantle it by yourself<br />
blindly.<br />
• Don’t suck up surface co<strong>ve</strong>red with<br />
plastic, cement, stone dust or flour.<br />
• The appliance is operated with<br />
electrical power which means there is<br />
in principle a risk of electric shock so<br />
that do not touch the plug with wet<br />
hands.<br />
14<br />
• If you want to pull the plug out of the<br />
socket then always pull directly on the<br />
plug. Ne<strong>ve</strong>r pull on the cable as this<br />
could damage it.<br />
• Make sure that the power cable is not<br />
bent, caught or run o<strong>ve</strong>r, and that it<br />
does not come into contact with heat<br />
sources or sharp edges.<br />
• Do not push objects into the openings<br />
of the appliance while it is running. The<br />
appliance could o<strong>ve</strong>rheat.<br />
• Do not use in the open-air. There is a<br />
risk of the appliance being destroyed<br />
by rain and dirt.<br />
• Ne<strong>ve</strong>r immerse the appliance in water<br />
or other fluids and keep it away from<br />
rain and moisture.<br />
• Only use an extension cable that is<br />
designed for the power requirement of<br />
the appliance.<br />
• Ne<strong>ve</strong>r lea<strong>ve</strong> the appliance unattended,<br />
and use it with the greatest of care if<br />
children or persons who cannot assess<br />
the risks are nearby.<br />
• Unplug the unit, during connecting<br />
accessories, cleaning, repairing or<br />
servicing the unit.<br />
• Only use the vacuum cleaner if all filters<br />
are correctly in place and once you<br />
ha<strong>ve</strong> ensured that no openings are<br />
blocked The filters must be intact and<br />
dry. Non-compliance can damage the<br />
cylinder vacuum cleaner.<br />
• If the power cord or the plug of the<br />
appliance is broken or damaged, do<br />
not use the appliance. Apply to nearest<br />
authorized Fakir Service.<br />
KEEP THIS <strong>MANUAL</strong> FOR FUTURE<br />
REFERENCES.
Product Specification<br />
13<br />
2<br />
6<br />
3<br />
8<br />
1<br />
7<br />
1) Handle<br />
2) Accessories mount<br />
3) Secondary air controller<br />
4) 1 combi-nozzle<br />
5) Crevice nozzle<br />
6) Suction hose<br />
7) Cable retract button<br />
8) Dust container handle with release<br />
button<br />
9) Telescopic tube<br />
10) Telescopic tube lock<br />
11) Floor nozzle<br />
12) "Carpet/hard floor" switch<br />
13) Dust container<br />
14) Parquet brush (optional)<br />
15) Turbo brush (optional)<br />
11<br />
12<br />
10<br />
9<br />
Technical Specifications<br />
Type of appliance : Cyclonic vacuum<br />
cleaner (bagless)<br />
Model : Faust<br />
Voltage : 220 V - 240 V ~ 50/60 Hz<br />
Output : 1400 W nom. - 1600 W max.<br />
Dust container : 1.5 litre, washable<br />
Filters : Protecti<strong>ve</strong> motor filter, hygienic<br />
exhaust filter<br />
Mains cable length : approx. 8.0 m<br />
Weight : approx. 6.0 kg<br />
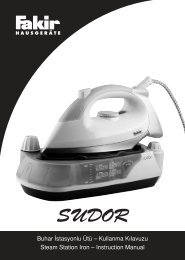
Operating Instructions<br />
4<br />
5<br />
14<br />
15<br />
Mounting suction hose<br />
1. Plug the suction hose adapter (Fig. 2/1)<br />
into the suction hose recei<strong>ve</strong>r (Fig. 2/2)<br />
and lock the adapter by turning it<br />
clockwise to the stop point.<br />
2. Push the handle (Fig. 3/1) into the upper<br />
end of the telescopic tube (Fig. 3/2).<br />
3. Push the floor nozzle (Fig. 3/3) onto the<br />
lower end of the telescopic tube(Fig.<br />
3/4)<br />
4. Adjust the length of the telescopic tube.<br />
To do this, press the telescopic tube<br />
15
lock (Fig. 4/1) forwards (Fig. 4/a). Then<br />
pull the telescopic tube by the handle<br />
to the desired length (Fig. 4/b). To lock<br />
it, release the telescopic tube lock while<br />
you pull. You will hear an audible click.<br />
1<br />
2<br />
ha<strong>ve</strong> sensiti<strong>ve</strong> surfaces (e. g.<br />
cupboards, tables).<br />
• Upholstery nozzle (Fig. 6/3) By simply<br />
pushing off the brush attachment (Fig.<br />
6/2) you can make an upholstery brush<br />
(Fig. 6/3) from the 2-in-1 combi-nozzle.<br />
Use this to clean soft, scratchresistant<br />
surfaces (e. g. upholstered furniture).<br />
Also available as an option are the<br />
following:<br />
• Turbo brush (Fig. 7) This has a rotating<br />
brush head and is therefore best suited<br />
for deep-cleaning carpets. Brushing<br />
also causes the carpet pile to straighten<br />
up.<br />
NOTE: When using the turbo brush, a<br />
loud noise can occur as a result of the<br />
high speed of the brush. This is normal.<br />
• Parquet brush (Fig. 8) This is<br />
equipped with long bristles and is used<br />
for vacuuming particularly sensiti<strong>ve</strong><br />
surfaces (e. g. parquet, laminate<br />
flooring).<br />
Mounting the accessories<br />
Alongside the floor nozzle just installed,<br />
you can expand the range of functions<br />
of your cylinder vacuum cleaner with<br />
other nozzles.<br />
The crevice nozzle and the 2-in-1<br />
combi-nozzle are included as<br />
accessories in the scope of deli<strong>ve</strong>ry.<br />
They can be secured to the accessories<br />
mount (Fig. 5/1)<br />
• Crevice nozzle (Fig. 5/2) : Use this to<br />
vacuum dust from hard to reach places.<br />
• 2-in-1 combi-nozzle (Fig. 5/3) to be<br />
used as: Furniture brush (Fig. 6/1) Use<br />
this to vacuum dust off objects that<br />
16<br />
Mounting the nozzle<br />
1. Switch the appliance off and pull the<br />
plug out of the socket.<br />
2. Remo<strong>ve</strong> the nozzle from the telescopic<br />
tube (Fig. 9/1).
3. When required, push the desired nozzle<br />
onto the lower end of the telescopic<br />
tube or the handle (Fig. 9).<br />
ATTENTION:<br />
Only use the cylinder vacuum cleaner<br />
if all filters are correctly in place and<br />
once you ha<strong>ve</strong> ensured that no<br />
openings are blocked The filters must<br />
be intact and dry. Non-compliance can<br />
damage the cylinder vacuum cleaner.<br />
ATTENTION:<br />
If you use the cylinder vacuum cleaner<br />
without an attached nozzle, there is a<br />
greater risk of accidently vacuuming<br />
up objects.<br />
4. As illustrated, secure the nozzles no<br />
longer required onto the accessories<br />
mount, as far as this is possible.<br />
•Push the 2-in-1 combi-nozzle into the<br />
accessories mount (Fig. 10/a).<br />
•Push the crevice nozzle onto the<br />
accessories mount and attach it so it<br />
clicks audibly and noticeably into<br />
place(Fig. 10/b).<br />
5. Keep the other nozzles safe and<br />
inaccessible to children(Fig 10/b).<br />
1. Push on the desired nozzle<br />
2. Remo<strong>ve</strong> the cable, by holding the plug,<br />
until the yellow mark is reached.<br />
Warning: If the red mark is visible, use<br />
the cable retract button (Fig. 11/1) to<br />
draw in the cable again up to the yellow<br />
mark. Otherwise the cable can break<br />
off. There is a risk of electric shock.<br />
3. Switch on the cylinder vacuum cleaner<br />
using the on/off switch (Fig. 11/2).<br />
2<br />
1<br />
Fig. 11<br />
4. Adjust the carpet/hard floor switch (Fig.<br />
12) depending on the type of flooring:<br />
• Hard floor (Fig. 12/A) Laminate<br />
flooring, tiles, PVC flooring, etc.<br />
• Carpet (Fig. 12/B) Long and short pile<br />
carpets, runners, etc.<br />
Operating the Unit<br />
WARNING:<br />
Check the cylinder vacuum cleaner<br />
and the power cable before each use.<br />
A damaged appliance must ne<strong>ve</strong>r be<br />
used.<br />
17
5. To vacuum, pull the cylinder vacuum<br />
cleaner behind you like a sledge.<br />
Obser<strong>ve</strong> the recommendations of the<br />
flooring manufacturer.<br />
NOTE:<br />
You can quickly reduce the suction<br />
power with the secondary air controller<br />
(Fig. 13/1), e. g. to release curtains that<br />
ha<strong>ve</strong> been sucked in.<br />
firmly.<br />
Warning: The power cable can whip<br />
around when being pulled in, it can<br />
also trip you or somebody else up or<br />
knock down objects.<br />
3. Press the cable retract button (Fig.<br />
14/2) to pull in the power cable. Guide<br />
the last part with the plug by hand.<br />
2<br />
Fig. 14<br />
1<br />
For storage or during work breaks, you<br />
can use the parking hook mount to<br />
hook the parking hook onto the floor<br />
nozzle (Fig. 15).<br />
NOTE:<br />
The cylinder vacuum cleaner has an<br />
o<strong>ve</strong>rheating protection device. It will<br />
switch off automatically if o<strong>ve</strong>rheated<br />
(e. g. due to blocked nozzles or o<strong>ve</strong>rfull<br />
dust container). If this happens,<br />
then turn off the appliance and remo<strong>ve</strong><br />
the plug. Remo<strong>ve</strong> the cause of<br />
o<strong>ve</strong>rheating. Wait approx. 45 min. You<br />
can use the cylinder vacuum cleaner<br />
again once it has cooled down.<br />
Switching off the unit and retracting<br />
the power cable<br />
1. Switch off the cylinder vacuum cleaner<br />
using the on/off switch (Fig. 14/1) and<br />
pull the plug out of the socket.<br />
2.Take the plug in your hand and hold it<br />
Fig. 15<br />
WARNING:<br />
If you lea<strong>ve</strong> your work area, switch off<br />
the appliance.<br />
ATTENTION:<br />
Ne<strong>ve</strong>r position the appliance directly<br />
against heat sources (e. g. heating,<br />
o<strong>ve</strong>n). Avoid direct sunlight. Heat can<br />
damage the appliance.<br />
If you want to store the appliance for a<br />
longer period of time, empty the dust<br />
18
container and clean it as well as the<br />
filters. Store the appliance in a cool,<br />
dry room, inaccessible to children.<br />
Emptying the dust container<br />
ATTENTION: Before you empty the<br />
dust container, switch off the appliance.<br />
This is how you will pre<strong>ve</strong>nt dust from<br />
destroying the appliance.<br />
Empty the dust container at the latest<br />
when the sucked in quantity of dirt in<br />
the dust container has reached the<br />
"MAX" mark (Fig. 16/1) or the suction<br />
power has dropped.<br />
5. Carefully knock the remaining dust<br />
loose.<br />
6. Close the base.<br />
7. Place the dust container onto the<br />
cylinder vacuum cleaner. Press the<br />
dust container firmly into its mounting<br />
bracket (Fig. 19) until it audibly clicks<br />
into place.<br />
1. Release the dust container by pressing<br />
down the release button as shown (Fig.<br />
17/a).<br />
2. Lift the dust container forwards out of<br />
the cylinder vacuum cleaner (Fig. 17/b).<br />
3. When emptying the dust container,<br />
hold it low o<strong>ve</strong>r a dustbin.<br />
4. Press the open button (Fig. 18/1). The<br />
base (Fig. 18/2) opens and the dust<br />
runs into the dustbin.<br />
NOTE:<br />
It may be necessary to push a bit<br />
harder. To make it easier, you can hold<br />
the release button pressed when<br />
inserting the dust container.<br />
8. Check whether the dust container is<br />
securely seated.<br />
Filters<br />
The cylinder vacuum cleaner has the<br />
following filters:<br />
• Filter screen of separation unit (Fig.<br />
21/1) Thoroughly pre-cleans the air in<br />
the dust container.<br />
Clean: e<strong>ve</strong>ry 2 months<br />
19
• Protecti<strong>ve</strong> motor filter (Fig. 20/1) is used<br />
to filter out the fine dust particles.<br />
Clean: e<strong>ve</strong>ry 2 months<br />
• Hygienic exhaust filter (Fig. 20/2) Filters<br />
out the fine particles from the blownout<br />
air.<br />
Replace: e<strong>ve</strong>ry 6 months<br />
• For a rough clean, hold the filter screen<br />
o<strong>ve</strong>r a dustbin. Then knock it gently.<br />
NOTE:<br />
If the filter screen is extremely dirty,<br />
rinse it thoroughly with a shower head<br />
(Fig. 22)<br />
2<br />
• The filters can become blocked after<br />
some time and can thereby reduce the<br />
suction power. It is therefore important<br />
that the abo<strong>ve</strong>mentioned intervals are<br />
adhered to.<br />
• If you determine that a filter is damaged<br />
then replace it immediately.<br />
Cleaning the Filters<br />
• Switch the appliance off<br />
• Remo<strong>ve</strong> and empty the dust container,<br />
• Turn the separation unit anticlockwise<br />
off the dust container (Fig. 21).<br />
Then lea<strong>ve</strong> it to dry completely. Only<br />
re-insert it once it is completely dry.<br />
• Place the separation unit back on the<br />
dust container so that the markings are<br />
positioned abo<strong>ve</strong> each other, as shown<br />
(Fig. 23/1). Connect both parts by<br />
turning clockwise until the markings<br />
are flush (Fig. 23/2).<br />
Take this opportunity to clean the<br />
protecti<strong>ve</strong> motor filter.Otherwise, insert<br />
20
the dust container back into its<br />
mounting bracket until it audibly clicks<br />
into place.<br />
Cleaning the protecti<strong>ve</strong> motor filter<br />
1. Switch the appliance off<br />
2. Remo<strong>ve</strong> the dust container<br />
3. Release the filter co<strong>ve</strong>r (Fig. 24/1) and<br />
remo<strong>ve</strong> it.<br />
ATTENTION:<br />
The protecti<strong>ve</strong> motor filter is not suitable<br />
for the dishwasher.<br />
NOTE:<br />
If the protecti<strong>ve</strong> motor filter is <strong>ve</strong>ry dirty,<br />
rinse it thoroughly with a shower head<br />
(Fig. 27). Do not use any brushes for<br />
this.<br />
4. Remo<strong>ve</strong> the protecti<strong>ve</strong> motor filter<br />
together with the holder at the lip<br />
provided for this purpose below right<br />
(Fig. 25).<br />
5. Hold the protecti<strong>ve</strong> motor filter together<br />
with the holder o<strong>ve</strong>r a dustbin. Only<br />
then should you separate both parts<br />
from each other. For a rough clean,<br />
gently knock both parts o<strong>ve</strong>r a dustbin<br />
(Fig. 26).<br />
Then lea<strong>ve</strong> the filter to dry (approx. 15<br />
hours at room temperature). Only use<br />
it again when it is completely dry. If the<br />
dirt cannot be remo<strong>ve</strong>d, insert a new<br />
protecti<strong>ve</strong> motor filter<br />
6. Insert the dry protecti<strong>ve</strong> motor filter<br />
back into its holder.<br />
7. Place protecti<strong>ve</strong> motor filter into its<br />
receptacle.<br />
8. Replace the filter co<strong>ve</strong>r by hooking it<br />
precisely from abo<strong>ve</strong> first (Fig. 28/a).<br />
Then engage the lock by pressing it<br />
(Fig. 28/b) until it audibly clicks into<br />
place.<br />
21
NOTE:<br />
The filter co<strong>ve</strong>r must be inserted<br />
correctly for the dust container to fit<br />
into its mounting bracket. Pressing<br />
firmly will not help if the co<strong>ve</strong>r has not<br />
been positioned precisely (Fig. 28/a)<br />
9. Place the dust container onto the<br />
cylinder vacuum cleaner. Press the<br />
dust container firmly into its mounting<br />
bracket until it audibly clicks into place.<br />
10. Check whether the dust container is<br />
securely seated.<br />
NOTE:<br />
It may be necessary to push a bit<br />
harder. To make it easier, you can hold<br />
the release button pressed when<br />
inserting the dust container.<br />
Replacing the hygienic exhaust filter<br />
1. Switch the appliance off with on/off<br />
switch.<br />
2. Release the exhaust filter co<strong>ve</strong>r on the<br />
recessed handle provided for this<br />
purpose and remo<strong>ve</strong> it.<br />
3. Remo<strong>ve</strong> the hygienic exhaust filter (Fig.<br />
29)<br />
Fig. 29<br />
H.E.P.A.<br />
Filter<br />
NOTE:<br />
The hygienic exhaust filter is not<br />
washable. If it is only slightly dirty, it<br />
can also suffice to knock the exhaust<br />
filter o<strong>ve</strong>r a dustbin. Howe<strong>ve</strong>r, we<br />
recommend you replace the filter<br />
regularly.<br />
4. Clean the hygienic exhaust filter or if<br />
it is <strong>ve</strong>ry dirty replace it with a new one<br />
22<br />
5. Place the clean/new hygienic exhaust<br />
filter back into its receptacle.<br />
6. Then insert the exhaust filter co<strong>ve</strong>r by<br />
hooking it in from abo<strong>ve</strong> first. Lock the<br />
co<strong>ve</strong>r by pressing firmly until it audibly<br />
and noticeably clicks into place.<br />
NOTE:<br />
It may be necessary to push a bit<br />
harder. Make sure when doing this that<br />
the co<strong>ve</strong>r clicks fully into place behind<br />
both projections provided for this<br />
purpose (Fig. 30). Otherwise the co<strong>ve</strong>r<br />
and possibly e<strong>ve</strong>n the exhaust filter will<br />
fall out easily.<br />
Fig. 30<br />
H.E.P.A.<br />
Filtre<br />
Cleaning:<br />
Warning: Before you clean the<br />
appliance, switch off the appliance and<br />
remo<strong>ve</strong> the mains plug.<br />
Cleaning the housing<br />
Only clean the housing with a slightly<br />
damp cloth.<br />
Attention:<br />
Do not use any cleaning agent,<br />
scouring agent or alcohol as these can<br />
damage the housing.<br />
Cleaning the filters<br />
To clean the filters, see "Filters" chapter.<br />
Waste disposal<br />
The filters used for the appliance are<br />
made from environmentally compatible<br />
materials and can be
7.Correcting malfunctions<br />
Before sending the appliance to<br />
authorized Fakir services , use the<br />
following table to check whether you<br />
can correct the malfunctions yourself.<br />
WARNING:<br />
Before starting to troubleshoot, switch<br />
the appliance off and pull out the mains<br />
plug. Ne<strong>ve</strong>r use a defecti<strong>ve</strong><br />
appliance.<br />
MALFUNCTION<br />
POSSIBLE CAUSE<br />
SOLUTION<br />
Appliance does not work<br />
Appliance does not suck up<br />
any dirt<br />
Plug is not plugged in or the<br />
appliance is not switched on.<br />
Socket does not carry any<br />
current.<br />
Power cable is damaged.<br />
Plug in the plug or switch the<br />
appliance on<br />
Test the cylinder vacuum<br />
cleaner at another socket which<br />
you are sure carries curreent<br />
Ha<strong>ve</strong> the cable replaced by<br />
authorized Fakir services<br />
Dust container is full or blocked. Empty/clean dust container.<br />
Selected brush/nozzle are<br />
incorrect for the type of flooring.<br />
Filter is dirty.<br />
Nozzle, telescopic tube or<br />
suction hose are blocked.<br />
Adjust your brush/nozzle<br />
selection to the type of flooring.<br />
Clean the corresponding filter.<br />
Remo<strong>ve</strong> the blockage. If<br />
necessary, use along wooden<br />
rod for this (e.g.a broom handle).<br />
Appliance is making unusually<br />
loud noises while running<br />
Sucked-in particles are<br />
blocking the air-way.<br />
Remo<strong>ve</strong> the particles. If<br />
necessary, use a long wooden<br />
rod for this (e. g. a broom<br />
handle).<br />
23
disposed of with the domestic waste.<br />
When the service life of the appliance<br />
has expired, in particular if malfunctions<br />
occur, make the finished appliance<br />
unusable by removing the mains plug<br />
from the socket and disconnecting the<br />
power cable. Dispose of the appliance<br />
according to the environmental<br />
provisions applicable in your country.<br />
Electrical waste must not be disposed<br />
of with domestic waste. Contact your<br />
municipal authority or your dealer for<br />
any advice regarding recycling.<br />
24