kullanma kılavuzu için tıklayınız.
kullanma kılavuzu için tıklayınız.
kullanma kılavuzu için tıklayınız.

You also want an ePaper? Increase the reach of your titles
YUMPU automatically turns print PDFs into web optimized ePapers that Google loves.
Mergo<br />
Electronic Steam Iron – Instruction Manual<br />
Elektronik Buharl› Ütü – Kullanma Kılavuzu
Girifl<br />
Uzun y›llar sorunsuz çal›flmas› için<br />
tasarlanan ve üretilen Fakir Mergo Buharl›<br />
Ütüyü sat›n alm›fl oldu¤unuz için teflekkür<br />
ederiz.<br />
Benzer ürünleri <strong>kullanma</strong>ya al›fl›k<br />
olabilirsiniz, ancak <strong>kullanma</strong> k›lavuzunu<br />
okumak için lütfen zaman ay›r›n›z. Bu k›lavuz<br />
sat›n alm›fl oldu¤unuz üründen en iyi<br />
performans› alman›z için haz›rlanm›flt›r.<br />
Güvenlik Önemlidir<br />
Kendi güvenli¤iniz ve di¤erlerinin güvenli¤i<br />
için ürünü çal›flt›rmadan önce <strong>kullanma</strong><br />
k›lavuzunu okuyunuz. Bu k›lavuzu ilerideki<br />
kullan›mlar için güvenli bir yerde saklay›n›z.<br />
Güvenlik uyar›lar›<br />
Elektrikli bir cihaz kullan›rken afla¤›daki<br />
basit güvenlik önlemleri her zaman<br />
al›nmal›d›r:<br />
1. Kullanma k›lavuzunu dikkatli bir flekilde<br />
okuyunuz ve daha sonraki kullan›mlar için<br />
saklay›n›z.<br />
2. Elektrik çarpma riskinden korunmak için<br />
cihaz› kesinlikle su veya baflka bir s›v›ya<br />
dald›rmay›n›z.<br />
3. Cihaz› yaln›zca kendi kullan›m amac›na<br />
uygun olarak kullan›n›z.<br />
4. Ütünün s›cakl›k ayar derecesi cihaz fifle<br />
tak›lmadan önce veya fiflten çekilmeden<br />
önce her zaman minimuma indirilmelidir.<br />
Cihaz›n kablosunu elektrik prizinden<br />
ç›karmak için çekmeyiniz, kabloyu s›k›ca<br />
kavray›p çekiniz.<br />
5. Cihaz›n kablosunun s›cak yüzeylere<br />
de¤mesine izin vermeyiniz. Cihaz tamamen<br />
so¤uduktan sonra dik duracak flekilde<br />
saklay›n›z.<br />
6. Kablo cihaz›n arka taraf›nda bulunan ve<br />
kolayl›k sa¤layan istif yerine<br />
sar›labilmektedir.<br />
7. Cihaz›n s›cak yüzeyine dokunmay›n›z.<br />
Yüksek derece, kullan›m s›ras›nda yan›klara<br />
sebep olabilmektedir. Her zaman ütü tutma<br />
sap›n› kullan›n›z, özellikle dikey ütüleme<br />
yaparken di¤er kiflileri(özellikle çocuklar›)<br />
s›cak su, buhar veya ütü yüzeyinin<br />
2<br />
muhtemel zararlar›na karfl› uyar›n›z.<br />
8. Cihaz› <strong>kullanma</strong>d›¤›n›z zamanlarda fiflini<br />
mutlaka elektrik prizinden çekiniz.<br />
9. E¤er kablo zarar gördüyse, tehlikelerden<br />
kaç›nmak için, Fakir yetkili servisine<br />
baflvurunuz.<br />
10. Cihaz›n kablosunu muhtemel zararlardan<br />
koruyabilmek için belli süre aral›klar›nda<br />
kontrol ediniz.<br />
11. Cihaz› çocuklar›n ulaflamayacaklar› yerlerde<br />
sakl› tutunuz.<br />
12. Ütünüzün kablosunu kesinlikle çocuklar›n›z›n<br />
ulaflabilece¤i yüksek yerlerden sarkacak<br />
biçimde b›rakmay›n›z.<br />
13. Cihaz›n fiflini afla¤›daki gibi durumlarda her<br />
zaman çekik tutunuz:<br />
• Su doldurmadan veya suyu boflaltmadan<br />
önce,<br />
• Temizlemeden veya ütünün bak›m›ndan<br />
önce,<br />
• Kullan›mdan sonra derhal.<br />
14. K›yafetlerinizi asla üzerinizdeyken<br />
ütülemeyiniz.<br />
15. Cihaz› çocuklar›n yan›nda kullan›l›rken hiçbir<br />
zaman bofl b›rakmay›n›z. Ütüyü asla ütü<br />
masas›n›n üstünde veya herhangi bir yerde<br />
ba¤lant› halinde b›rakmay›n›z.<br />
16. Cihaz› asla aç›k havada veya banyoda<br />
<strong>kullanma</strong>y›n›z.<br />
17. Cihaz›n üzerinde yazan voltaj ile flebeke<br />
voltaj›n›n uyumlu oldu¤undan emin olunuz.<br />
18. Kullanmadan önce elektrik kablosunu tam<br />
olarak aç›n›z ve düzlefltiriniz.<br />
19. Cihaz› sert ve düz bir zemine yerlefltiriniz.<br />
20. Ütüleme ifllemini sert ve düz bir zemin<br />
üzerinde yap›n›z.<br />
21. Cihaz prize tak›l› oldu¤unda kesinlikle<br />
gözetimsiz b›rakmay›n›z.<br />
22. Cihaza ütüleme esnas›nda ya da<br />
ütülemeden hemen sonra dokunmay›n›z.<br />
23. Cihaz tam olarak so¤umadan, kablosunu<br />
ütünün etraf›n› sarmay›n›z.<br />
24. Cihaz üzerinde kullan›c›n›n yapabilece¤i<br />
herhangi bir bak›m yoktur. Bu yüzden<br />
cihaz›n herhangi bir parças›n› sökmeye<br />
çal›flmay›n›z. Herhangi bir ar›za durumunda<br />
tamir için Fakir Yetkili Servisi’ne gönderiniz.
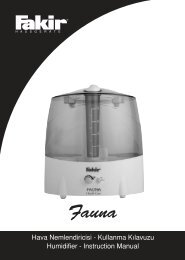
ÜRÜN ÖZELL‹KLER‹
KULLANIM ÖNCES‹<br />
Ütüyü <strong>kullanma</strong>dan önce lütfen k›lavuzu<br />
dikkatle okuyunuz.<br />
• Ütü taban›nda bulunan herhangi bir etiketi<br />
ya da koruyucu folyoyu <strong>kullanma</strong>dan önce<br />
ç›kart›n›z.<br />
• ‹lk kullan›mda ütü taban›n› ve su tank›n›<br />
tamamen temizlemek için eski bir kumafl<br />
parças› kullanabilirsiniz.<br />
• Ütüyü ilk kullanaca¤›n›z zaman tabandan<br />
beyaz tanecikler ç›kabilir. Bu normaldir;<br />
tanecikler zarars›zd›r ve k›sa bir sure süre<br />
sonra ç›kmayacakt›r.<br />
KULLANIM:<br />
S›cakl›k Ayar›:<br />
• Öncelikle kumafllar› üzerinde yaz›l› olan<br />
ütüleme talimatlar›na uygun olarak ay›r›n›z.<br />
Cihaz ilk olarak düflük s›cakl›ktan bafllayarak<br />
yüksek s›cakl›¤a kadar artt›r›l›r. Bütün<br />
s›cakl›k göstergeleri ve bir çok çamafl›r<br />
ütüleme talimat› iflaretene sahiptir.<br />
• Cihaz› dik bir flekilde tutarak derece ayar›n›<br />
minimuma getiriniz. Cihaz›n fiflini elektrik<br />
prizine tak›n›z.<br />
• S›cakl›k ayar›n› istenilen s›cakl›k seviyesine<br />
göre, s›cakl›k göstergesine uygun olarak<br />
ayarlay›nız.<br />
• S›cakl›k gösterge ›fl›¤› ütünün ›s›nmakta<br />
oldu¤unu göstermek için yanacakt›r. Ifl›¤›n<br />
sönmesi ütünün istenilen s›cakl›¤a eriflti¤i<br />
ve kullan›ma haz›r oldu¤unu gösterir. Ifl›k,<br />
termostat istenilen s›cakl›¤› korudukça yan›p<br />
sönecektir.<br />
ÖNEML‹: Buharl› ütüler herhangi bir afl›r›<br />
›s›nma sonucu ütüyü koruyabilmek için bir<br />
termal güvenlik fitiline sahiptirler. Ancak ütü<br />
bir elektrik prizine ba¤l› olarak asla<br />
gözetimsiz bir flekilde b›rak›lmamal›d›r.<br />
Gerekli tedbir her zaman özellikle de<br />
çocuklar evdeyken al›nmal›d›r.<br />
KURU ÜTÜLEME:<br />
Buhar ayar› pozisyonunu kuruya getiriniz,<br />
bu da buhar ak›fl›n› durdurur, ancak tankta<br />
su bulunmal›d›r. S›cakl›k ayar›n› kumafl›n<br />
özelli¤ine uygun olacak biçimde ayarlay›n›z.<br />
S›cakl›k istenilen dereceye geldi¤inde<br />
ütüleme ifllemine bafllan›labilir. Kuru ütüleme<br />
yaparken sprey <strong>kullanma</strong>k istedi¤inizde su<br />
tank›n›n içinde yeteri kadar su bulunmas›na<br />
özen gösteriniz. E¤er kuru ütüleme 20<br />
dakikadan uzun sürecek ise, su tank›<br />
meydana gelebilecek herhangi bir afl›r›<br />
›s›nmay› önlemek amac›yla bofl<br />
b›rak›lmal›d›r.<br />
SUYUN DOLDURULMASI:<br />
• ‹lk olarak ütüyü suyla doldurmadan önce<br />
ütünün prizinden çekik olmas›na özen<br />
gösteriniz.<br />
• Buhar ayar›n› kuru pozisyonuna getiriniz.<br />
74
• Su girifl kapa¤›n› aç›p, ütüyü flekilde<br />
gösterildi¤i gibi tutup, su doldurma<br />
ölçe¤inden yararlanarak yavaflça suyla<br />
doldurunuz.<br />
NOT: Musluk suyu kullan›labilmektedir.<br />
• Su girifl kapa¤›n› s›k›ca kapat›n›z.<br />
• Ütü yapt›¤›n›z müddetçe su tank›n›n içinde<br />
yeterli miktarda su olmas›na özen gösteriniz.<br />
D‹KKAT: Suyun tortu veya alkali içermesi<br />
buhar deli¤ine, ütünün iç iflleyiflinin kireçle<br />
kaplanmas›na sebep olur. Özel olarak<br />
tasarlanm›fl buhar haznesi ve anti<br />
dereceleme supab›, temizlik için sökülebilir<br />
nitelikte olup buharl› ütünüzü kireçlenmelere<br />
karfl› korur. Bu nedenle ütünüze musluk<br />
suyu koyabilirsiniz. Ancak ütünüz kireç<br />
önleyici filtre ile donat›lmam›flsa musluk<br />
suyu yerine saf su konulmas› önerilir.<br />
Buharl› ütünüzün uzun ömürlü olmas›n›<br />
garanti alt›na almak için:<br />
• Kesinlikle kimyasal kireç temizleyici su<br />
<strong>kullanma</strong>y›n›z.<br />
• Suyun sertlik derecesi ne kadar çoksa,<br />
ütünüzün kendi kendini temizleme<br />
fonksiyonunuda bu s›kl›kta kullan›lmal›d›r.<br />
K‹RECE KARfiI KORUMA:<br />
Kireç önleyici filtre buharl› ütüleme boyunca<br />
ortaya ç›kan kirecin oluflumunu düflürmek<br />
için tasarlanm›flt›r ve bu da ütünüzün yaflam<br />
ömrünü uzatacakt›r. Ancak kireç önleyici<br />
filtre hiçbir zaman tamamen kirecin do¤al<br />
oluflum sürecini durdurmaz.<br />
SU DAMLATMA ÖZELL‹⁄‹:<br />
Geleneksel buharl› ütülerde e¤er derece<br />
çok düflükte seçilmiflse, su ütü altl›¤›ndan<br />
akabilmektedir. Bu da lekelere sebep<br />
5<br />
olmaktad›r. Ancak ütünüz damlama önleyici<br />
sisteme sahipse, ütünüz çok so¤uk olsa<br />
bile suyun ütü altl›¤›ndan ak›fl› önlenir.<br />
Damlama önleyici sistem kullan›ld›¤› sürece<br />
s›cakl›k artt›¤›nda ve düfltü¤ünde yüksek<br />
bir klik sesi duyulur. Bu kesinlikle normal<br />
olup sistemin do¤ru bir flekilde iflledi¤ini<br />
göstermektedir.<br />
BUHARLI ÜTÜLEME:<br />
Derece göstergesindeki seçeneklerde ve<br />
ütüleme talimatında (derece ayar› k›sm›na<br />
bak›n›z) gösterildi¤i gibi buharl› ütü yaln›zca<br />
yüksek ütü derecelerinde •• veya •••<br />
ayarlar›nda yap›labilmektedir.<br />
Damla önleyici sistem çok düflük bir derece<br />
seçilmifl olmas›na ra¤men otomatik olarak<br />
ütünün akmas›n› önler.<br />
• Fifli prize tak›n ve ütüyü çal›flt›r›n›z.<br />
• Derece göstergesini buhar k›sm›nda<br />
bulunan pozisyona getiriniz ve ›s›nma sinyali<br />
›fl›¤› sönene kadar bekleyiniz.<br />
• Buhar ayar›n› istenilen olan ayara getiriniz.<br />
Bu ifllemlerden sonra buharl› ütüye<br />
bafllayabilirsiniz.<br />
fiOK BUHAR:<br />
Buhar dalgas›, ekstra buhar özellili¤i<br />
sayesinde buharl› ve kuru ütüleme yaparken<br />
oluflan inatç› k›r›fl›kl›klar› kald›rmak için<br />
idealdir.<br />
• Derece ayar›n› buhar k›sm›nda bulunan en<br />
yüksek dereceye getiriniz ve s›cakl›k sinyal<br />
›fl›¤› sönene kadar bekleyiniz.<br />
• Ütüyü kumafl›n yüzeyine denk gelecek<br />
flekilde biraz kald›r›n›z, buhar dalgas› tufluna<br />
tamamen bas›n ve ütü s›ras›nda gevfletin.<br />
Buhar›n yo¤unlu¤u kumafl›n içine kadar<br />
ifller. En iyi buhar kalitesi için buhar dalgas›<br />
tufluna basmadan önce en az 4 saniye<br />
aral›k b›rak›n›z.
NOT: Buhar dalgas› özelli¤i buhar ayar› en<br />
yüksek seviyedeyken kullan›labilir. En güçlü<br />
buhar dalgas› özelli¤ini görmek için buhar<br />
ayar›n› kuru pozisyonuna getiriniz.<br />
D‹KEY ÜTÜLEME:<br />
Dikey buhar sistemi ütüyü dik bir flekilde<br />
de kullanabilmenizi sa¤lar. Bu da özellikle<br />
as›l› duran k›yafetlerdeki, perdelerdeki ve<br />
duvarda as›l› duran dekorasyonlardaki<br />
k›r›fl›kl›klar›n ütülenmesinde kullan›fll›d›r.<br />
OTOMAT‹K KAPANMA ÖZELL‹⁄‹:<br />
Otomatik kapanma özelli¤i ütünün 10 dakika<br />
boyunca dik flekilde durmas› ve ayn›<br />
zamanda 30 saniye boyunca yatay flekilde<br />
altl›k üstünde durmas› sonucu devreye girip<br />
ütüyü otomatik kapat›r. Bu gibi durumlarda<br />
ütünün gücü otomatik olarak durur ve<br />
otomatik kapanma sinyal ›fl›¤› su tank›n›n<br />
içinde uyar› niteli¤indeki bir sesle beraber<br />
yanar.<br />
Biraz yap›lan bir ütü hareketi gücü s›f›ra<br />
geri getirir.<br />
Ütüyü dikey ütüleme yapılacak kumaflın<br />
önünde dik bir flekilde tutunuz ve buhar<br />
dalgas› tufluna bas›n›z.<br />
UYARI: K›yafetlerinizi üzerinizdeyken asla<br />
ütülemeyiniz.<br />
SPREY ÖZELL‹⁄‹:<br />
Sprey özelli¤i zor kumafllar›, kuru bölgeleri,<br />
yün kumaflları ve k›r›fl›kl›klar› ›slatmak için<br />
kullan›lmaktad›r.<br />
Ütünün bafl›ndan sudan oluflan iyi bir sprey<br />
elde etmek için ütü yapt›¤›n›z s›rada sprey<br />
tufluna tam olarak bas›n›z.<br />
Sprey özelli¤i ayr›ca hassas, düflük<br />
derecede ütülenmesi gereken ve buhar<br />
özelli¤i ile ütülenemeyen kumafllar için de<br />
kullan›labilmektedir.<br />
KULLANIMDAN SONRA:<br />
• Buhar ayar göstergesini kuruya getiriniz.<br />
• Fifli prizden çekiniz.<br />
• Su girifl kapa¤›n› aç›nız.<br />
• Ütüyü ters çeviriniz ve ütünün içindeki suyu<br />
boflaltmak için sallay›n›z daha sonra ütüyü<br />
dik bir flekilde b›rakarak so¤umaya b›rak›n›z.<br />
• Ütü so¤uduktan sonra ütü kablosu ütü<br />
altl›¤›n›n yan›nda bulunan ve kolayl›k<br />
sa¤layan ve yer kazand›ran k›sma sar›labilir.<br />
• Ütüyü her zaman ayakl›¤›n›n üstünde<br />
duracak flekilde(su tank›ndan suyu<br />
boflalt›lm›fl olarak) saklay›n›z, ütü yüzeyini<br />
ütü masas›na veya herhangi bir yüzeye<br />
de¤ecek flekilde b›rakmay›n›z. E¤er ütü<br />
67
herhangi bir yüzey veya ütü masas›n›n<br />
üstünde ütü yüzeyi masaya gelecek flekilde<br />
b›rak›l›rsa, en küçük bir nem bile ütü<br />
yüzeyinde paslanmaya ve kireçlenmeye<br />
sebep olur.<br />
su deliklerden akacak ve kireç ve tortular<br />
su sayesinde d›flar› ak›tacakt›r.<br />
BAKIM:<br />
Kendi - kendini temizleme<br />
E¤er ütünüzden en iyi sonuçlar› almak<br />
istiyorsan›z, ütünüzün düzenli olarak (ayda<br />
bir veya iki kez) kendi kendini temizleme<br />
özelli¤ini <strong>kullanma</strong>lısınız.<br />
• Buhar ayar› göstergesini kuru pozisyonuna<br />
ayarlay›nız.<br />
• Ütünüzün su tank›n› ölçek yard›m›yla<br />
maksimum su seviyesine kadar getiriniz.<br />
• Ütünüzü altl›¤›n›n üstünde duracak flekilde<br />
yerlefltiriniz.<br />
• Derece göstergesini keten k›sm›na getiriniz.<br />
• Cihaz› prize tak›n›z.<br />
• Ütüyü ›s›nmas› için s›cakl›k sinyal ›fl›¤› bir<br />
kez sönüp sonra tekrar yanana kadar<br />
bekletiniz.<br />
• Fifli prizden çekiniz.<br />
• Ütüyü yatay bir flekilde tutun.<br />
• Buhar ayar göstergesini “clean” (kireç<br />
temizleme) pozisyonuna getiriniz ve<br />
ayn› zamanda buhar dalga dü¤mesine<br />
devaml› olarak bas›n›z. Buhar ve kaynayan<br />
7<br />
• Bu durum ortaya ç›karken ütüyü ileriye ve<br />
geriye do¤ru oynat›n›z. Buhar›n ve suyun<br />
deliklerden akmas›na damlama önleyici<br />
sistemin buhar› kesmesi için devreye<br />
girmesine kadar izin veriniz.<br />
• Fifli prize takın›z.<br />
• Derece göstergesini keten ayar›na getiriniz,<br />
ütü tekrar ısınan akadar bekleyiniz, buhar<br />
haznesinin içinde kalan su buharlaflacakt›r.<br />
• Cihaz›n fiflini prizden çekiniz ve ütü yüzeyinin<br />
so¤umas› için bekleyiniz, so¤uduktan sonra<br />
ise yumuflak nemli bir bezle temizleyiniz.<br />
Temizlik ve bak›m:<br />
• Cihaz› fiflten çekerek, ba¤lant›s›n› kesiniz.<br />
• Kumafllar ütü yüzeyinin üstünde tortu<br />
oluflmas›na sebep olabilir, bu tortu sirkeli<br />
su içinde iyice ›slat›lm›fl sert bir bezle<br />
temizlenerek ç›kart›labilir. Bu ifllemden sonra<br />
nemli bir bezle kurulama yapınız.<br />
• Ütü yüzeyini temizlemek için törpü veya<br />
z›mpara türü aletler <strong>kullanma</strong>y›n›z. Ütü<br />
yüzeyini yumuflak tutunuz ve metal objelerin<br />
sert bir flekilde ütü yüzeyine de¤mesinden<br />
kaç›n›n›z. Ütü yüzeyini çizmeyiniz ya da<br />
zarar vermeyiniz.<br />
• Ütü gövdesini nemli bir bezle silip, kuru bir<br />
bezle de kurulay›nız.<br />
• Ütü yüzeyine zarar verebilecek afl›nd›r›c›<br />
maddeler ya da sert temizlik malzemeleri<br />
<strong>kullanma</strong>y›n›z.<br />
• Ütüyü asla suya ya da herhangi bir s›v›ya<br />
dald›rmay›n›z.<br />
• Su tank›n›n içine asla sirke veya herhangi<br />
bir kireç temizleyici madde koymay›n›z.<br />
• Buhar deliklerini temizlemek için- basitçe<br />
nemli bir bez yard›m›yla oluflmufl pamuk
art›klar›n› silin veya buhar deliklerinin içinden<br />
kolalay›n›z.<br />
• Ütü k›m›ldamayacak bir yüzeyde kullan›lmal›<br />
ve dinlendirilmelidir.<br />
• Ütü sabit bir flekilde dururken, ütünün<br />
durdu¤u yüzeyin sa¤lam oldu¤una özen<br />
gösteriniz.<br />
• Ütü yere düflürüldüyse veya herhangi<br />
görünen bir zarar varsa veya ak›t›yorsa,<br />
ütüyü <strong>kullanma</strong>y›n›z.<br />
• Cihazı çocuklar yada akıl, ruh ve fiziksel<br />
yetenekleri cihazı <strong>kullanma</strong>k için yeterli<br />
olmayan kifliler <strong>kullanma</strong>malıdır. Çocukların<br />
cihaz ile oynamadı¤ından emin olunuz.<br />
8
Introduction<br />
Thank you for purchasing Mergo Steam<br />
Iron, which has been designed and<br />
manufactured to give you many years of<br />
trouble-free service.<br />
You may already be familiar with using a<br />
similar product, but do please take time to<br />
read these instructions - they have been<br />
written to ensure you get the very best from<br />
your purchase.<br />
Safety is important<br />
For yours and others safety please read<br />
the instructions before using the appliance.<br />
Please keep this instruction in a safe place<br />
for the further use.<br />
Important Safeguards<br />
When use electrical appliances, basic safety<br />
precautions should always be followed,<br />
including the following<br />
1. Read carefully and save all the instructions<br />
provided with the appliance.<br />
2. To protect against a risk of electric shock,<br />
do not immerse the iron in water or other<br />
liquids.<br />
3. Use iron only for its intended use.<br />
4. The iron should always be turned to<br />
minimum before plugging or unplugging<br />
from outlet. Never pull cord to disconnect<br />
from electrical outlet; instead, grasp plug<br />
and pull to disconnect.<br />
5. Do not allow cord to touch hot surfaces.<br />
Allow the iron cool completely then<br />
store in the upright position on its heel.<br />
6. The cord can be wrapped around the<br />
stowage facility at the rear of the iron.<br />
7. Do not touch hot surfaces. High<br />
temperatures are generated during use<br />
which could cause burns. Always use the<br />
handle and warn others (especially children)<br />
of the possible dangers of burns from steam,<br />
hot water or the soleplate, especially when<br />
ironing vertically.<br />
8. Always disconnect iron from electrical outlet<br />
when not in use.<br />
9. If the supply cord is damaged, it must be<br />
replaced by authorized Fakir services in<br />
order to avoid a hazard.<br />
10. Check the cord periodically for possible<br />
damaged.<br />
11. Store the unit out of reach of children.<br />
12. Do not allow the power cord to hang down<br />
over edges where it can be reached by<br />
children.<br />
13. Unplug the appliance from the mains<br />
supply:<br />
• before filling with water or emptying it,<br />
• before cleaning and maintenance,<br />
• Immediately after use.<br />
14. Never iron or dampen cloths while wearing<br />
them.<br />
15. Close supervision is necessary for any<br />
appliance being used near children. Do<br />
not leave iron unattended while connected<br />
or on an ironing board.<br />
16. Do not use the appliance outdoors or in<br />
bathrooms.<br />
17. Check the mains voltage stated on the rating<br />
plate corresponds to the local electricity<br />
supply.<br />
18. Unwind and straighten the power cord and<br />
supply cord before use.<br />
19. Place the appliance on a firm and steady<br />
surface.<br />
20. When placing the iron on its stand, ensure<br />
that the surface on which the stand is placed<br />
is stable.<br />
21. Keep electrical appliances out of reach from<br />
Children or infirm persons. Do not let them<br />
use the appliances without supervision.<br />
22. Do not touch the iron rest during or just after<br />
ironing. It is hot!<br />
23. Do not roll the power cord around the iron<br />
for storage until it has cooled down<br />
completely.<br />
24. If the power cord or supply cord is damaged,<br />
the manufacturer or its service agent or<br />
similarly qualified person must replace it in<br />
order to avoid a hazard.<br />
10
KNOW YOUR STEAM IRON
Before using for the first time<br />
Please read these instructions carefully<br />
before using the iron.<br />
*Remove any sticker or protective cover<br />
from the soleplate before using the iron.<br />
*Use for the first time on an old piece of<br />
fabric to ensure the soleplate and water<br />
tank are completely clean.<br />
* When first used some vapour may be<br />
emitted, after a short while,however, this<br />
will cease.<br />
SETTING THE TEMPERATURE<br />
First sort items to be ironed, according to<br />
the International Textile Care Labeling Code.<br />
Iron fabrics requiring the coolest<br />
temperatures first. Work gradually to be<br />
higher temperatures. Both the temperature<br />
dial and most items of laundry have<br />
markings corresponding with this code<br />
Usage:<br />
Temperature Setting<br />
First sort items to be ironed, according to<br />
the International Textile Care Labeling Code.<br />
Iron fabrics requiring the coolest<br />
temperatures first. Work gradually to be<br />
higher temperatures. Both the temperature<br />
dial and most items of laundry have<br />
markings corresponding with this code.<br />
• Stand the iron on its heel and turn the<br />
temperature dial to minimum. Plug the cord<br />
into an electrical outlet.<br />
• Select the temperature setting required by<br />
rotating the temperature dial so that the<br />
desired setting is aligned with the heating<br />
indicator light / dial indicator.<br />
• The heating indicator light will glow showing<br />
that the iron is heating up. When it goes<br />
out, the iron has reached the selected<br />
temperature and is ready for use. The light<br />
will glow and go out as the thermostat<br />
maintains the selected temperature.<br />
IMPORTANT: The steam irons incorporate<br />
a thermal safety fuse to protect the steam<br />
iron from over-heating. However, the iron<br />
should not be left unattended while it is<br />
connected to an electrical outlet. Special<br />
care should always be taken when there<br />
are children in the home.<br />
Dry-ironing<br />
Figure 1<br />
Turn the steam selector to position dry, this<br />
shuts off the steam flow, should there be<br />
any water in the tank. Select the temperature<br />
setting most suitable for the fabric to be<br />
ironed. Once the temperature has been<br />
reached, ironing may commence. Ensure<br />
that there is sufficient water in the water<br />
12
tank if you wish to use the spray facility<br />
occasionally while dry-ironing. If dry-ironing<br />
for longer than 20 minutes, the water tank<br />
should be emptied to prevent over heating<br />
of any water present.<br />
Filling with water<br />
Figure 2<br />
• First ensure that the iron is disconnected<br />
from the electricity supply before filling with<br />
water.<br />
• Set the Steam Selector to position dry.<br />
• Open the water filling inlet cover, with the<br />
iron held on an angle as shown in figure 2,<br />
use the water filling beaker supplied to pour<br />
water slowly into the filling hole.<br />
NOTE: Tap water can be used (see below:”<br />
A Special Note on Water").<br />
• Push firmly to close the water filling inlet<br />
cover.<br />
• During the ironing process, always ensure<br />
there is sufficient water in the water tank.<br />
A SPECIAL NOTE ON WATER:<br />
Water containing sediments and alkalis will<br />
cause the steam holes and internal workings<br />
of the iron to fur. The specially designed<br />
steam chamber and the anti-scaling valve,<br />
which is removable for cleaning, gives your<br />
steam iron protection against furring. You<br />
can use tap water in your iron, unless it is<br />
particularly hard and your iron is not fitted<br />
with an anti-calc filter, in which case the<br />
use of distilled or dematerialized water is<br />
advised.<br />
To guarantee the maximum life-time of your<br />
steam iron:<br />
• Do not use chemically descaled water.<br />
13<br />
• The harder the water the more the iron<br />
should be self-cleaned (see section<br />
"Maintenance").<br />
Anti-Calc Filter<br />
The built-in anti-calc filter is designed to<br />
reduce the build-up of lime scale which<br />
occurs during steam ironing, this will prolong<br />
the working life of your iron. However,<br />
please note that the anti-calc filter will not<br />
completely stop the natural process of lime<br />
scale build-up.<br />
Anti-Drip System<br />
With conventional steam irons, water may<br />
leak from the soleplate if a too low<br />
temperature has been selected. This will<br />
then cause stains. However, your iron is<br />
fitted with an anti-drip system which is<br />
designed to prevent water escaping from<br />
the soleplate when the iron is too cold.<br />
During use the anti-drip system may emit<br />
a loud "click", particularly during heat-up<br />
or whilst cooling down. This is perfectly<br />
normal and indicates that the system is<br />
functioning correctly<br />
Steam-Ironing<br />
Figure 3<br />
As per the indications on the temperature<br />
dial and the table A (see section "Setting<br />
the temperature") that steam-ironing is only<br />
possible at higher ironing temperatures,<br />
indicated with •• or •••<br />
The anti-drip system will automatically stop<br />
the iron from steaming if the selected<br />
temperature is too low.<br />
• Plug into the mains supply and switch on.
• Set the temperature dial at the required<br />
position within the steam area (or) and wait<br />
until the heating indicator light has gone<br />
out<br />
• Set the steam selector to the required setting<br />
Figure 3. You can then begin steam ironing.<br />
Surge of steam<br />
Hold the iron vertically, in front of the item<br />
to be steamed and press the Surge of<br />
Steam button<br />
WARNING! Never iron clothes on the body!<br />
Spraying<br />
Figure 6<br />
Figure 4<br />
The Surge of Steam provides an extra burst<br />
of steam which is ideal for removal of<br />
stubborn creases and wrinkles during<br />
STEAM or DRY ironing.<br />
• Turn the temperature setting to the hottest<br />
setting within the steam area (••• or linen)<br />
and wait until the heating indicator light<br />
goes out.<br />
• Lift the iron slightly above the surface of<br />
the fabric, Figure 4. Press the Surge of<br />
Steam button down firmly and then release<br />
it during ironing (Figure 4). An intense<br />
"burst" of steam penetrates deep into the<br />
fabric. For optimum steam quality, leave an<br />
interval of at least four seconds between<br />
pressing the Surge of Steam button.<br />
NOTE: The Surge of Steam can be used<br />
when the Steam Selector is in maximum<br />
setting. For a stronger surge of steam set<br />
the Steam Selector on the dry position.<br />
Spray may be used to dampen difficult<br />
fabrics, dry areas, wool items and accidental<br />
creases. Press the spray button firmly to<br />
produce a fine spray of water ahead of the<br />
iron, and continue ironing (Figure 6). Spray<br />
may also be used with delicate (synthetic)<br />
fabrics which are ironed at a low<br />
temperature and thus cannot be steamironed.<br />
Electronic safety Auto-OFF Indicator<br />
The steam iron has an Electronic Safety<br />
Auto-Off indicator wich will turn the iron off<br />
should the iron remain motionless either in<br />
the upright position for approximately 10<br />
minutes or flat on the soleplate for<br />
approximately 30 seconds (Figure 7)<br />
Figure 7<br />
Vertical ironing<br />
Figure 5<br />
The unique Vertical Steam System allows<br />
you to use the iron for vertical ironing. This<br />
is especially useful for getting wrinkles out<br />
of hanging clothes, curtains, wall hangings,<br />
etc.<br />
In such instances the power to the iron will<br />
automatically be switched off and the auto-<br />
Off indicator light inside the water tank will<br />
flash whilst a warning beep will sound<br />
(Figure 8)<br />
Slight movement of the iron will reset the<br />
power (Figure 9)<br />
14
Figure 8<br />
After Use<br />
• Set the steam selector knob to “dry”.<br />
• Disconnect from the mains supply.<br />
• Open the water filling inlet cover.<br />
• Invert iron and shake the iron to empty the<br />
water tank, and then stand the iron in a<br />
upright position to allow to cool (Figure 10)<br />
• In order to save space, the power cord may<br />
be easily wound around the cord stowage<br />
facility after the iron has been cooled (Figure<br />
11)<br />
• Always store the iron (with water empted<br />
from water tank) on its heel rest, not on the<br />
soleplate. Even the smallest amount of<br />
moisture will cause corrosion and staining<br />
of the soleplate if the iron is stored with the<br />
soleplate facing downwards.<br />
Maintenance<br />
Self-cleaning<br />
Your iron will give the best ironing results<br />
and last longer if you apply "self-cleaning"<br />
regularly (once or twice a month) to remove<br />
any scale or fluff.<br />
15<br />
Figure 9<br />
Figure 10 Figure 11<br />
Figure 12 Figure 13<br />
• Set the steam selector knob to "dry" position.<br />
• Fill the water tank up to "max" water level<br />
with off should the iron remain motionless<br />
either water filling beaker supplied.<br />
• Place the iron on its heel.<br />
• Set the temperature dial to "linen".<br />
• Plug into the mains supply and switch on<br />
at the socket.<br />
• Allow the iron to heat up until the heating<br />
indicator light first goes out and then comes<br />
on again.<br />
• Remove the plug from the wall socket.<br />
• Hold the iron horizontally over the sink.<br />
• Set the steam selector knob at position<br />
"clean" (= descaling) (Figure 12) and at the<br />
same time press the Surge of steam button<br />
continuously. Steam and boiling water will<br />
emit from the holes and wash away the<br />
impurities and scale (Figure 13).<br />
• Move the iron forwards and backwards<br />
while this happens. Go on letting steam<br />
and water escape until the anti-drip system<br />
cut off the steam.<br />
• Insert the plug into the wall socket.<br />
• Set the temperature dial to position "linen",<br />
let the iron heat up again, the remainder of<br />
the water inside the steam chamber will<br />
now vaporize.<br />
• Unplug from power supply and allow<br />
soleplate to cool and wipe it clean with a<br />
soft damp cloth.<br />
Care and Cleaning<br />
• Disconnect from the mains supply by<br />
removing the plug.<br />
• Certain fabric finish residues may build up<br />
on the soleplate; these may be removed<br />
by cleaning with a rough cloth soaked in a<br />
vinegar water solution. Dry with a cloth.<br />
• Do not use abrasives or scouring pads to<br />
clean the soleplate. Keep the soleplate<br />
smooth: avoid hard contact with metal<br />
objects. Do not scratch or damage the<br />
surface of the soleplate.<br />
• Wipe the outside housing with a damp cloth<br />
and polish with a dry one. Do not use<br />
abrasives or harsh cleaners as they may<br />
damage the surface of the iron.<br />
• Never immerse the iron in water or any
liquids.<br />
• Do not put vinegar or other descaling agents<br />
into the water tank.<br />
• To clean steam holes - simply use a damp<br />
cloth to wipe away any build up of lint or<br />
starch from inside steam holes.<br />
• The iron must be used and rested on a<br />
stable surface.<br />
• When placing the iron on its stand, ensure<br />
that the surface on which the stand is placed<br />
is stable.<br />
• The iron should not be used if it has been<br />
dropped, if there are visible signs of<br />
damage or if it is leaking.<br />
• The appliance should not intend for use by<br />
children or other persons without assistance<br />
or supervision if their physical, sensory or<br />
mental capabilities prevent them from using<br />
it safety. Children should be supervised to<br />
ensure that they do not play with the<br />
appliance.<br />
16