Favor ins_manual.fh11
Favor ins_manual.fh11
Favor ins_manual.fh11

Create successful ePaper yourself
Turn your PDF publications into a flip-book with our unique Google optimized e-Paper software.
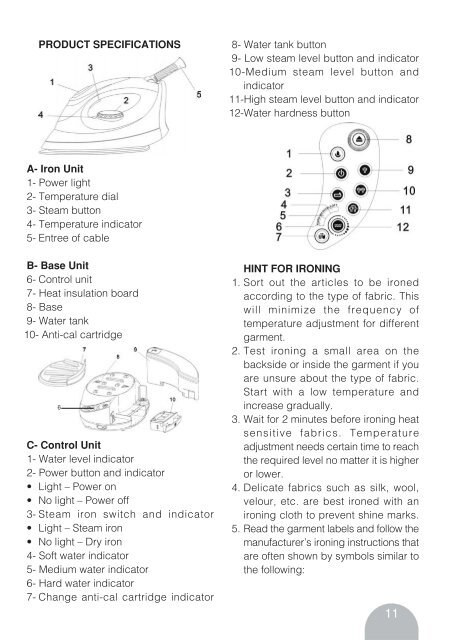
PRODUCT SPECIFICATIONS<br />
8- Water tank button<br />
9- Low steam level button and indicator<br />
10-Medium steam level button and<br />
indicator<br />
11-High steam level button and indicator<br />
12-Water hardness button<br />
A- Iron Unit<br />
1- Power light<br />
2- Temperature dial<br />
3- Steam button<br />
4- Temperature indicator<br />
5- Entree of cable<br />
B- Base Unit<br />
6- Control unit<br />
7- Heat <strong>ins</strong>ulation board<br />
8- Base<br />
9- Water tank<br />
10- Anti-cal cartridge<br />
6<br />
C- Control Unit<br />
1- Water level indicator<br />
2- Power button and indicator<br />
• Light – Power on<br />
• No light – Power off<br />
3- Steam iron switch and indicator<br />
• Light – Steam iron<br />
• No light – Dry iron<br />
4- Soft water indicator<br />
5- Medium water indicator<br />
6- Hard water indicator<br />
7- Change anti-cal cartridge indicator<br />
HINT FOR IRONING<br />
1. Sort out the articles to be ironed<br />
according to the type of fabric. This<br />
will minimize the frequency of<br />
temperature adjustment for different<br />
garment.<br />
2. Test ironing a small area on the<br />
backside or <strong>ins</strong>ide the garment if you<br />
are unsure about the type of fabric.<br />
Start with a low temperature and<br />
increase gradually.<br />
3. Wait for 2 minutes before ironing heat<br />
sensitive fabrics. Temperature<br />
adjustment needs certain time to reach<br />
the required level no matter it is higher<br />
or lower.<br />
4. Delicate fabrics such as silk, wool,<br />
velour, etc. are best ironed with an<br />
ironing cloth to prevent shine marks.<br />
5. Read the garment labels and follow the<br />
manufacturer’s ironing <strong>ins</strong>tructions that<br />
are often shown by symbols similar to<br />
the following:<br />
11