kullanma kılavuzu için tıklayınız. - Saruhan Makina ve Elektrikli Ev ...
kullanma kılavuzu için tıklayınız. - Saruhan Makina ve Elektrikli Ev ...
kullanma kılavuzu için tıklayınız. - Saruhan Makina ve Elektrikli Ev ...

You also want an ePaper? Increase the reach of your titles
YUMPU automatically turns print PDFs into web optimized ePapers that Google loves.
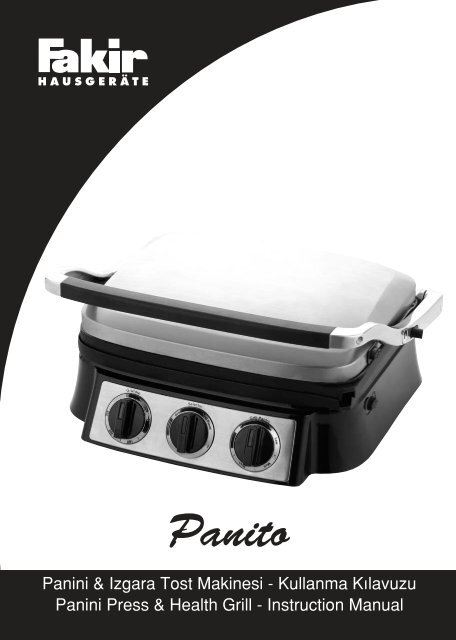
Panito<br />
Panini & Izgara Tost Makinesi - Kullanma K›lavuzu<br />
Panini Press & Health Grill - Instruction Manual
Girifl:<br />
Uzun y›llar sorunsuz çal›flmas› için<br />
tasarlanan <strong>ve</strong> üretilen Fakir Panito Panini &<br />
Izgara Tost Makinesini sat›n alm›fl<br />
oldu¤unuz için teflekkür ederiz.<br />
Benzer ürünleri <strong>kullanma</strong>ya al›fl›k<br />
olabilirsiniz, ancak <strong>kullanma</strong> k›lavuzunu<br />
okumak için lütfen zaman ay›r›n›z. Bu k›lavuz<br />
sat›n alm›fl oldu¤unuz üründen en iyi<br />
performans› alman›z için haz›rlanm›flt›r.<br />
Gü<strong>ve</strong>nlik Önemlidir<br />
Kendi gü<strong>ve</strong>nli¤iniz <strong>ve</strong> di¤erlerinin gü<strong>ve</strong>nli¤i<br />
için ürünü çal›flt›rmadan önce <strong>kullanma</strong><br />
k›lavuzunu okuyunuz. Bu k›lavuzu ilerideki<br />
kullan›mlar için gü<strong>ve</strong>nli bir yerde saklay›n›z.<br />
E¤er cihaz› birisine <strong>ve</strong>riyorsan›z, <strong>kullanma</strong><br />
k›lavuzunu da <strong>ve</strong>riniz. Bütün paketleri<br />
sökünüz, fakat cihaz›n›z›n çal›flt›¤›ndan emin<br />
olana kadar da paketleri saklay›n›z.<br />
Gü<strong>ve</strong>nlik uyar›lar›:<br />
Bir elektrikli cihaz kullan›rken afla¤›daki<br />
basit gü<strong>ve</strong>nlik önlemleri her zaman<br />
al›nmal›d›r:<br />
• Bütün <strong>kullanma</strong> k›lavuzunu dikkatlice<br />
okuyunuz.<br />
• S›cak yüzeylere sak›n dokunmay›n›z, üst<br />
plakay› kald›rmak için panini yapma<br />
makinas›n›n kolunu kullan›n›z.<br />
• Yang›n, elektrik çarpmas› <strong>ve</strong> di¤er kiflilere<br />
herhangi bir zarar›n gelmesini önlemek için,<br />
kesinlikle cihaz›n kablosunu <strong>ve</strong> fiflini suya<br />
<strong>ve</strong>ya herhangi bir s›v›ya temas ettirmeyiniz.<br />
• Cihaz çocuklar›n yanında kullan›ld›¤›<br />
zamanlarda, yak›n gözetim gereklidir.<br />
• Cihaz kullan›lmad›¤›nda <strong>ve</strong>ya<br />
temizlenmeden önce cihaz›n fiflini prizden<br />
mutlaka çekiniz.<br />
• Cihaz› temizlemeden önce <strong>ve</strong>ya parçalar›n›<br />
tak›p sökmeden önce cihaz›n so¤umas› için<br />
bekleyiniz.<br />
• Düzenli olarak cihaz›n›z›n kablosunu, fiflini<br />
<strong>ve</strong> cihaz›n kendisini herhangi bir hasar<br />
olmad›¤›na dair kontrol ediniz. Cihaz›n›zda<br />
herhangi bir hasar görülmesi durumunda,<br />
derhal cihaz kullan›m›n› durdurup, en yak›n<br />
yetkili bir Fakir servisine baflvurunuz.<br />
• Üretici taraf›ndan tedarik edilmeyen ya da<br />
önerilmeyen aparatlar›n kullan›lmas› yang›n,<br />
elektrik çarpmas› <strong>ve</strong>ya kiflilerin yaralanmas›<br />
riskine sebep olabilmektedir.<br />
• Cihaz› d›fl mekânlarda <strong>kullanma</strong>y›n›z.<br />
• Cihaz›n kablosunun masa <strong>ve</strong> ya tezgâh<br />
köflesinden sallanacak flekilde<br />
b›rak›lmas›na, s›cak yüzeylere temas<br />
etmesine <strong>ve</strong>ya dü¤ümlenmesine müsaade<br />
etmeyiniz.<br />
• Bu cihaz› kesinlikle temas edebilece¤i gazl›<br />
<strong>ve</strong>ya elektrikli ›s›t›c› üstünde ya da yak›n›nda<br />
<strong>kullanma</strong>y›n›z.<br />
• Cihaz›n kullan›m› bittikten sonra, lütfen fiflini<br />
prizden çekiniz.<br />
• Cihaz› lütfen kendi kullan›m alan› d›fl›ndaki<br />
durumlarda <strong>kullanma</strong>y›n›z.<br />
• S›cak ya¤ <strong>ve</strong>ya di¤er s›cak s›v›lar› içeren<br />
cihazlar›n hareket ettirilmesi s›ras›nda son<br />
derece dikkat edilmelidir.<br />
• Cihaz› kapatmak için, önce h›z ayar›n› Off<br />
(kapal›) konuma getiriniz, ard›ndan cihaz›n<br />
fiflini prizden çekiniz.<br />
• Yang›n <strong>ve</strong> elektrik çarpmas› riskini düflürmek<br />
için, tamir ifllemleri yaln›zca yetkili bir Fakir<br />
servisi taraf›ndan yap›lmal›d›r.<br />
D‹KKAT: Kullanma k›lavuzunuzda yaz›l›<br />
olan gü<strong>ve</strong>nlik kurallar›n› <strong>ve</strong> <strong>kullanma</strong><br />
talimatlar›n› dikkatlice okuyunuz.<br />
Bu <strong>kullanma</strong> k›lavuzunu ilerideki<br />
kullan›mlar için saklay›n›z.<br />
Ürün Bilgileri:<br />
Güç: 1500W<br />
Koruma S›n›f›: II<br />
3
Ürün Parçalar›n›n Tan›t›m›:<br />
5<br />
8<br />
3b<br />
2<br />
1<br />
3<br />
7<br />
4c<br />
4a<br />
4b<br />
6<br />
1. Taban <strong>ve</strong> kapak: Paslanmaz çelik olan<br />
sa¤lam yap›s›yla ayarlanabilen kapak.<br />
2. Panini stilli tutma sap›: Dayan›kl› metal tutma<br />
sap›, kapa¤›n yiyeceklerin kal›nl›¤›na göre<br />
uyum sa¤lamas›na yard›mc› olur.<br />
3. De¤iflebilen piflme plakalar›: Kolay<br />
temizlenebilen yap›flmaz <strong>ve</strong> bulafl›k<br />
makinas›nda y›kanabilen plakalar.<br />
a. Izgara plakalar›: Et, hamburger, tavuk <strong>ve</strong><br />
sebze piflirmek için idealdir.<br />
b. Griddle plakalar›: Kusursuz krepler,<br />
yumurtalar <strong>ve</strong> midye-istiridye haz›rlamak<br />
için idealdir.<br />
4. Kontroller: Sinyal ›fl›¤› yand›¤›nda kullan›ma<br />
haz›r konuma gelir.<br />
a. Ayar: Izgara, panini <strong>ve</strong>ya griddle ayar›<br />
seçilir.<br />
b. Izgara/Panini: Derece ayar›n› s›caktan<br />
(warm), kızartma (sear) pozisyonuna kadar<br />
ayarlayabilirsiniz.<br />
c. Griddle: Derece ayar›n› 95°C ‘den 220°C’ye<br />
kadar ayarlayabilirsiniz.<br />
5. Damlama kâseleri: Ya¤› toplay›p, bulafl›k<br />
makinas›nda y›kanabilme özelli¤ine<br />
sahiptirler.<br />
6. Temizleme spatulas›: Kullan›m sonras› ›zgara<br />
<strong>ve</strong> griddle plakalar›n›n temizli¤inde kullan›l›r.<br />
7. Plaka gevfletme dü¤mesi: Dü¤meye<br />
basarak, plakalar› gevfletip yerinden<br />
sökebilirsiniz.<br />
8. Destek gevfletme kolu: Kapa¤›n düz bir<br />
flekilde piflirebilmesi için arkaya<br />
yaslanmas›n› sa¤lar.<br />
4
Kullan›m:<br />
Kullan›m Öncesi:<br />
Bütün paketleme materyalleri <strong>ve</strong> promosyon<br />
etiketleri cihazdan sökünüz. Paketleme<br />
materyallerini atmadan önce, cihaz›n›z›n<br />
bütün aparatlar› içerdi¤inden emin olunuz.<br />
‹leriki bir zamanda da <strong>kullanma</strong>k için cihaz›n<br />
kutusu <strong>ve</strong> paketleme materyallerini<br />
saklamak isteyebilirsiniz.<br />
NOT: Damlama kaplar› sol polyfoam ekinin<br />
d›fl k›sm›nda bulunmaktad›r.<br />
Tost makinenizi <strong>kullanma</strong>dan önce <strong>ve</strong> ilk<br />
kullan›mda, taban›, kapa¤› <strong>ve</strong> kontrolleri<br />
nemli bir bezle üstündeki tozlar› kald›rmak<br />
için siliniz. Plakalar›, damlama kaplar›n› <strong>ve</strong><br />
temizleme spatulas›n› temizleyiniz. Izgara<br />
<strong>ve</strong> griddle plakalar›, damlama kaplar› <strong>ve</strong><br />
temizleme spatulas› bulafl›k makinas›nda<br />
y›kanabilme özelli¤ine sahiptir. Plakalar›n<br />
söküm ifllemi için “montaj” bölümüne<br />
bak›n›z.<br />
Griddle<br />
Griddle plakaları, size 4 ayr› piflirme<br />
seçenekleri sa¤layan bir mutfak cihaz›d›r.<br />
Basit bir flekilde piflirme plakalar›n›<br />
de¤ifltiriniz <strong>ve</strong> ›zgara, panini, aç›k ›zgara<br />
<strong>ve</strong>ya griddle olarak <strong>kullanma</strong>n›z› sa¤lar.<br />
Izgara: Izgara hamburger, kemiksiz et <strong>ve</strong><br />
ince kesilmifl et <strong>ve</strong> sebzelerin piflirilmesinde<br />
idealdir.<br />
Izgara fonksiyonu k›sa sürede bir yiyecek<br />
piflirmek istedi¤iniz zaman <strong>ve</strong>ya sa¤l›kl› bir<br />
yöntemle piflirilmifl sa¤l›kl› bir ›zgara yeme¤i<br />
piflirmek için idealdir. Yiyece¤i her iki<br />
taraf›ndan da piflirdi¤inizden ›zgara<br />
yiyece¤inizi h›zl› bir flekilde piflirir. Izgara<br />
plakalar›n üstündeki ribler plakan›n<br />
köflesinde bulunan ya¤ olu¤uyla kombine<br />
edilmifl olup, ya¤›n etten akmas›n› <strong>ve</strong><br />
plakalardaki suyu çekmesini sa¤lar.<br />
Cihaz› ›zgara olarak <strong>kullanma</strong>k istedi¤inizde<br />
›zgara plakalar›n› <strong>kullanma</strong>n›z<br />
önerilmektedir. Yiyece¤in üstündeki kapa¤›,<br />
istenilen piflirme derecesine ulafl›ncaya<br />
kadar düzenli olarak dinlendirin. Izgaran›z<br />
eflsiz bir tutma sap› ile beraber tasarlanm›fl<br />
olup, yiyece¤in kal›nl›¤›na uygun olarak<br />
kapa¤›n kapanmas›n› sa¤lar. Bu da ince<br />
kesilmifl patatesten kal›n dilimlenmifl ete<br />
kadar kolayca ›zgara yapman›z› sa¤lar.<br />
Bir yiyecekten daha fazla ›zgara yap›lmas›<br />
durumunda, yiyeceklerin kal›nl›¤›n›n<br />
yo¤unlu¤u kapa¤›n rahatça kapanabilmesi<br />
aç›s›ndan önemlidir.<br />
Panini Pres:<br />
Cihazı panini press olarak <strong>kullanma</strong>k<br />
istedi¤inizde sandviçleri, ekmekleri <strong>ve</strong> tost<br />
ekmeklerini ›zgara yapmak için<br />
kullanabilirsiniz. Panini ›zgaralanm›fl<br />
sandviçler için kullan›lan bir ‹talyan terimidir.<br />
Panini sebze, et <strong>ve</strong> peynir gibi malzemelerin<br />
iki parça ekme¤in aras›na konulmas›yla<br />
yap›l›r. Ard›ndan sandviç ekme¤i tost<br />
yapmak ya da sandviçi ›s›tmak iki pres<br />
aras›nda s›k›flt›r›l›r. Lezzetli bir panini<br />
yapabilmeniz için taze piflmifl ekmek<br />
<strong>kullanma</strong>n›z› tavsiye ederiz. Panini yapmak<br />
için kullan›lan popüler ekmekler ise flöyledir;<br />
focaccia, michetta, ciabatta.<br />
Tost makinenizi panini pres olarak <strong>kullanma</strong>k<br />
istedi¤inizde, ›zgara plakalar›n› <strong>kullanma</strong>n›z<br />
önerilir. Izgara plakalar› önermemizin sebebi<br />
ise, geleneksel stilli Panini sandviç<br />
ekme¤inin üstünde ›zgara izine sahip<br />
olmas›d›r. Ancak sandviç tipine göre, griddle<br />
plakalar›n› da <strong>kullanma</strong>k isteyebilirsiniz.<br />
Griddle panini pres ile ayn› görevi yapar<br />
bu da contact gril ile de ayn› görevi yapt›¤›<br />
anlam›na gelir. Griddle benzeri olmayan<br />
bir tutma sap› <strong>ve</strong> destek ile beraber<br />
tasarlanm›flt›r bu da sandviçin kal›nl›¤›na<br />
göre kapa¤›n ayarlanmas›n› sa¤lar. Tutma<br />
sap›na uygulanacak hafif bir bask›,<br />
5
sandviçinizi kendi zevkinize uygun olarak<br />
s›k›flt›r›p <strong>ve</strong> ›s›tman›z› sa¤lar. Birden fazla<br />
panini piflirece¤iniz zaman her sandviçin<br />
kal›nl›¤›n›n birbirine uyumu önemlidir, bu<br />
da kapa¤›n eflit bir biçimde sandviçleri<br />
kapatmas› aç›s›ndan önemlidir.<br />
Aç›k ›zgara:<br />
Sebze, bal›k, hamburger, et, tavuk <strong>ve</strong>ya<br />
hindi etini (tavuk <strong>ve</strong>ya hindi etini kemikli<br />
piflirmeniz tavsiye edilmez) piflirmek için<br />
cihazı aç›k ›zgara olarak kullanabilirsiniz.<br />
Aç›k ›zgarada piflirmek cihazı <strong>kullanma</strong>n›n<br />
en esnek yöntemidir. Aç›k pozisyonda<br />
›zgara yapmak için 2 kat daha fazla alana<br />
sahip olurusunuz. Farkl› plakalarda farkl›<br />
türden yiyecekleri piflirebilme seçene¤ine<br />
sahip olursunuz. Izgaray› aç›k pozisyonda<br />
<strong>kullanma</strong>n›z ayn› zamanda farkl›<br />
kesimlerdeki etlerin farkl› kal›nl›klarda<br />
olmas›na ra¤men kendi iste¤inize <strong>ve</strong> damak<br />
zevkinize uygun bir biçimde piflirmenizi<br />
sa¤lar. Aç›k ›zgara pozisyonu sebebiyle 2<br />
kat› daha fazla yüzeyde yiyeceklerinizi<br />
piflirmenizi sa¤lar.<br />
v.b.) piflirmek için kullanabilirsiniz. Griddle<br />
fonksiyonunu <strong>kullanma</strong>k iki kiflilik ya da<br />
büyük bir aileye kahvalt› haz›rlamak için<br />
idealdir. Genifl yüzey ayn› zamanda birçok<br />
de¤iflik yiyece¤i <strong>ve</strong>ya büyük miktarda<br />
yiyecekleri bir arada piflirmenizi sa¤lar.<br />
Cihaz›n Griddle fonksiyonunu kulland›¤›n›z<br />
zaman, kapa¤› aç›n›z, bu durumda cihaz<br />
iki kat daha fazla piflirme yüzeyine sahip<br />
olacakt›r. Bu pozisyonda yiyeceklerin<br />
piflebilmeleri için yiyecekler çevrilmelidirler.<br />
Bu piflirme fonksiyonu kullan›ld›¤› s›rada,<br />
griddle plakalar› kullan›lmal›d›r.<br />
Montaj :<br />
Cihaz›n›z› temiz düz bir yüzeye yerlefltiriniz.<br />
Panini & Izgara Tost Makinesi üç flekilde<br />
yerlefltirilebilir:<br />
• Kapal› pozisyonu: Üst plaka/kapak alt plaka<br />
ya da kapa¤›n üstüne oturtulur. Izgara ya<br />
da Panini pres fonksiyonlar›n› kullanaca¤›n›z<br />
zaman kapal› konum pozisyonu bafllama<br />
<strong>ve</strong> ›s›tma pozisyonudur.<br />
Yiyecekler ›zgarada piflirildi¤i zaman,<br />
piflebilmeleri için çevrilmelidirler. Cihaz<br />
aç›k ›zgara olarak kullan›ld›¤› zaman ›zgara<br />
plakalar› kullan›lmal›d›r.<br />
Griddle Fonksiyonu:<br />
Griddle plakalarını krep, yumurta, Frans›z<br />
tostu <strong>ve</strong> kahvalt› etleri (sucuk, salam, sosis<br />
6
• Aç›k pozisyon: 105°C pozisyonda üst <strong>ve</strong><br />
alt plaka/kapaklar aç›k konuma gelir. Panini<br />
& ızgara tost makinenizi ›zgara ya da panini<br />
pres olarak <strong>kullanma</strong>dan önce kapa¤›<br />
afla¤›daki flekildeki pozisyondaki gibi aç›n<br />
<strong>ve</strong> basit bir flekilde tutma sap›n›, kilitlenme<br />
pozisyonuna geldi¤ini hissedinceye kadar<br />
yukar› kald›r›n.<br />
Cihazı bu pozisyona getirmek için destek<br />
gevfletme ayar›n› sa¤ elinizle tutunuz. Tutma<br />
sap›n› sol elinizle tutunuz, sa¤ elinizi<br />
kullanarak ayar› kendinize do¤ru kayd›r›n›z.<br />
Kapak düz bir flekilde yay›lana kadar tutma<br />
sap›n› geriye do¤ru bast›r›n›z. Cihaz siz<br />
tutma sap› <strong>ve</strong> kapa¤› yukar› kald›r›p kapal›<br />
pozisyonuna getirinceye kadar bu<br />
pozisyonda kalacakt›r.<br />
Siz tutma sap›n› piflirmek için afla¤›ya<br />
indirene kadar kapak dikey bir pozisyonda<br />
kalacakt›r. Bu ifllem tamamland›ktan sonra,<br />
kapak kendili¤inden afla¤›ya inecektir<br />
böylece kapak sizin haz›rlad›¤›n›z yiyece¤in<br />
üstüne düz bir flekilde yaslanacakt›r. Bu<br />
yöntem sizin yiyece¤iniz her iki taraftan da<br />
hem üstten hem de alttan piflirmenize<br />
yard›mc› olur. Piflirdikten sonra panini &<br />
ızgara tost makinenizi açmak için tutma<br />
sap›n› yukar› kald›rd›¤›n›zda, kapak düz bir<br />
pozisyonda alt plakaya paralel bir flekilde<br />
duracakt›r. Kapa¤› dik bir pozisyonda geri<br />
kilitlemek için, cihazı içinde yiyecek olmadan<br />
kilitlemeniz gerekmektedir.<br />
• Düz pozisyon: Üst plaka/kapak alt<br />
plaka/kapak ile ayn› düzeydedir. Üst <strong>ve</strong> alt<br />
plakalar genifl bir piflirme yüzeyi yaratmak<br />
için s›ralan›rlar. Afla¤›daki flekilde panini<br />
ızgara & tost makinesini aç›k pozisyonda<br />
nas›l kullan›ld›¤›n› görebilirisiniz.<br />
Destek<br />
Gevfletme<br />
Ayar›<br />
E¤er cihazı hali haz›rda aç›k pozisyonda<br />
ise <strong>ve</strong> siz düz pozisyona getirmek<br />
istiyorsan›z, tutma sap›n› biraz kendinize<br />
do¤ru çekin <strong>ve</strong> ard›ndan destek gevfletme<br />
ayar›n› yukar›ya do¤ru kald›r›n. Destek<br />
gevfletme ayar tuflunu yukar› kald›rmadan<br />
önce tutma sap›n› ileriye do¤ru biraz<br />
çekmek destekteki bas›nc› alarak sizin cihazı<br />
daha rahat bir flekilde ayarlaman›z› sa¤lar.<br />
Piflirme plakalar›n›n yerlefltirilmesi<br />
Kontrol tufllar› direk sizin önünüzde olacak<br />
flekilde panini & ızgara tost makinenizi düz<br />
pozisyona ayarlay›n›z. Bu s›rada bir plakay›<br />
yerlefltiriniz. Her iki plaka da cihazın üst <strong>ve</strong><br />
alt k›sm›na yerleflebilmeleri için<br />
tasarlanm›flt›r. Alt (lower) <strong>ve</strong> üst (upper)<br />
kelimeleri her iki plakan›n da üstünde sizin<br />
kolayl›kla plakalar› nereye oturtaca¤›n›z›<br />
anlayabilmeniz için kabart›lm›flt›r. Alt plakay›<br />
7
piflirme elementinin yüzü afla¤› konuma<br />
gelecek flekilde elinize al›n›z. E¤er cihazı<br />
yüzü afla¤›da kalacak flekilde yerlefltiri<br />
yorsan›z, damlama a¤z› plakan›n ön sa¤ el<br />
köflesine yerlefltirilmelidir.<br />
Üst Plaka<br />
Gevfletme<br />
Tuflu<br />
Alt Plaka<br />
Gevfletme<br />
Tuflu<br />
Plakan›n arkas›n› e¤iniz <strong>ve</strong> plakalar›n arka<br />
k›sm›ndaki metal desteklerle s›ralay›n›z.<br />
Plakay› desteklerin alt›na do¤ru kayd›r›n›z<br />
<strong>ve</strong> plakan›n ön bitifline do¤ru afla¤›ya itiniz.<br />
Yerine oturacakt›r. Cihazı kendi etraf›nda<br />
döndürün <strong>ve</strong> efli olan ›zgara <strong>ve</strong> griddle<br />
plakas›n› üst k›sma do¤ru ayn› ilk plakada<br />
yapt›¤›n›z gibi yerlefltiriniz.<br />
Panini & ızgara tost makinenizi ›zgara ya<br />
da panini press olarak <strong>kullanma</strong>k<br />
istedi¤inizde, sadece bir adet damlama<br />
kab› yeterli olacakt›r. Piflirme esnas›nda ya¤<br />
ak›tma a¤z›n›n alt›na kab› direk olarak<br />
yerlefltiriniz. Piflirmeden sonra ya¤ gü<strong>ve</strong>nli<br />
bir flekilde yok olacakt›r. Damlama kaplar›<br />
bulafl›k makinas›nda y›kanabilmektedirler.<br />
Cihazı aç›k ›zgara <strong>ve</strong>ya griddle olarak<br />
kulland›¤›n›zda, her iki damlama kab› da<br />
kullan›lmal›d›r. Damlama kaplar› ya¤ ak›tma<br />
a¤z›na direk olarak yerlefltirilmelidir.<br />
Panini & ızgara tost makinesini bir seferde<br />
tam olarak yerlefltirildi¤inde, pifli prize<br />
takabilirsiniz. Fifli prize takt›ktan sonra<br />
piflirmeye bafllayabilirsiniz.<br />
Piflirme plakalar›n›n ç›kart›lmas›<br />
Cihazı afla¤ıdaki flekildeki gibi düz<br />
pozisyona ayarlay›nız. Tufllar› gevfleterek<br />
plakay› cihaz›n parças›na yerlefltiriniz. Tufla<br />
tam olarak bas›n›z <strong>ve</strong> plaka biraz tabandan<br />
f›rlayacakt›r.<br />
Plakay› iki elinizle kavray›n›z, metal<br />
desteklerin alt›ndan d›flar›ya do¤ru<br />
kayd›r›n›z, tabandan d›flar›ya do¤ru yukar›<br />
kald›r›n›z. Di¤er piflirme plakas›n› da ayn›<br />
flekilde ç›kartmak için ayn› ifllemi<br />
tekrarlay›n›z.<br />
Damlama kaplar›n›n yerlefltirilmesi<br />
8<br />
Kullan›m:<br />
Panini & ızgara tost makinenizin montaj›n›<br />
tam olarak yapt›ktan sonra cihaz›n›z<br />
piflirmeye haz›r konuma gelecektir. Ayar<br />
tuflunu solda bulunan griddle ya da sa¤da<br />
bulunan ›zgara/panini pozisyonuna getiriniz.<br />
Ayar sol ya da sa¤daki seçeneklerden<br />
herhangi birine gelmesi durumunda, k›rm›z›<br />
gösterge ›fl›¤› yanacakt›r. E¤er cihazı ›zgara,<br />
panini ya da düz ›zgara fleklinde<br />
kullanacaksan›z, ›zgara/panini kontrolünü<br />
piflirmek için istenilen dereceye getiriniz.<br />
Derece ayar› s›cak (95°C) ‘den kızartmaya<br />
(220°C)’ye kadar ayarlanabilmektedir.<br />
E¤er cihazınızı griddle plakaları ile olarak<br />
kullanacaksan›z, griddle kontrolünü istenilen<br />
dereceye ayarlay›n›z. Dereceyi 95°C’den<br />
220°C’ye kadar yaralayabilirsiniz.
E¤er cihazınızı düz ›zgara ya da griddle<br />
olarak kullanacaksan›z, fakat bütün yüzeye<br />
de ihtiyac›n›z yoksa alt plakay› kullan›n›z.<br />
Ayarlanm›fl dereceye ba¤l› olarak, s›cakl›¤›n<br />
istenilen dereceye ulaflmas› 10 dakikadan<br />
fazla sürebilir. Termostat kullan›lacak olan<br />
dereceye geldi¤inde, seçilmifl kontrolün<br />
içindeki yeflil, cihazın kullan›ma haz›r<br />
oldu¤unu göstermek için yanacakt›r.<br />
Kullan›m esnas›nda termostat dereceyi<br />
ayarlad›¤›ndan dolay›, yeflil ›fl›k düzenli<br />
olarak yanacakt›r.<br />
Derece kontrolü piflirme yüzeyinin<br />
derecesinin ayarlanmas› için<br />
kullan›lmaktad›r. E¤er farkl› tipte yemekleri<br />
ayn› piflirme yüzeyinde piflirmek isterseniz,<br />
kontrol ayar›n› piflirme esnas›nda her zaman<br />
ayarlayabilirisiniz.<br />
Piflirme esnas›nda Panini & ızgara tost<br />
makinenizi tutuyorsan›z, ekstra dikkat<br />
etmelisiniz. Cihazı açmak için her zaman<br />
tutma sap›n›n siyah plastik k›sm›n› kullan›n›z.<br />
Bu siyah plastik k›s›m piflirme esnas›nda<br />
her zaman so¤uk kalacakt›r. Tutma sap›n›n<br />
kollar› alüminyum oldu¤undan piflirme<br />
esnas›nda ›s›nacakt›r. Sak›n piflirme<br />
esnas›nda ya da piflirmeden hemen sonra<br />
alüminyum tutma sap›na dokunmay›n›z.<br />
Panini & ızgara tost makinesinin gövdesi<br />
piflirme esnas›nda ›s›nacakt›r. Kapak<br />
paslanmaz çelik özelli¤ine sahip<br />
oldu¤undan, piflirme esnas›nda afl›r›<br />
derecede ›s›nacakt›r, bu sebeple piflirme<br />
esnas›nda ya da piflirmeden hemen sonra<br />
sak›n kapa¤a dokunmay›n›z. E¤er kapa¤›<br />
ayarlaman›z gerekiyorsa, yan›klar›<br />
engellemeniz için f›r›n eldi<strong>ve</strong>ni <strong>kullanma</strong>n›z›<br />
tavsiye ederiz.<br />
Cihazın alt yüzeyi plastikten yap›lm›flt›r <strong>ve</strong><br />
piflirme esnas›nda çok ›s›naca¤›ndan sizi<br />
yakabilir. Piflirme esnas›nda cihazın yerini<br />
de¤ifltirmek istiyorsan›z, cihaz› sadece<br />
taban›ndan tuttu¤unuzdan emin olunuz.<br />
Kapa¤a kesinlikle dokunmay›n›z.<br />
Panini & ızgara tost makinesini tutmadan<br />
önce, en az 30 dakika so¤umas›n›<br />
bekleyiniz.<br />
NOT: Panini & ızgara tost makinenizi ilk<br />
kez kulland›¤›n›zda, cihaz hafif bir kokuya<br />
sahip olup, kokabilir. Bu durum normal olup,<br />
yap›flmaz yüzeyleri olan cihazlar için al›fl›ld›k<br />
bir durumdur.<br />
Panini & ızgara tost makinesi siyah bir<br />
temizleme <strong>ve</strong> parçalama spatulas› ile<br />
beraber gelecektir. Bu spatula yiyecekleriniz<br />
pifltikten <strong>ve</strong> cihaz›n›z tam olarak(en az 30<br />
dakika) so¤uduktan sonra ›zgaray› <strong>ve</strong><br />
plakalar› temizlemek için kullan›lmaktad›r.<br />
Plastik spatulan›n s›cak yüzeyler üzerinde<br />
uzun süreli kullan›m› plasti¤in erimesine<br />
sebep olacakt›r.<br />
Bak›m:<br />
• Asla bak›m için metal aletleri <strong>kullanma</strong>y›n›z,<br />
bu tip aletler yap›flmaz plakalar› çizecektir.<br />
Metal aletler yerine, tahta ya da ›s›ya<br />
dayan›kl› plastik aletler kullan›n›z.<br />
• Asla plastik aletleri s›cak ›zgara plakalar›na<br />
temas edecek flekilde b›rakmay›n›z. Bu<br />
plastik aletlere temizleme spatulas› da<br />
dâhildir.<br />
• Piflirmeden sonra, yiyeceklerden ç›km›fl<br />
olan ya¤ direk olarak damlama kaplar›na<br />
akacaktır, yeni bir piflirme ifllemine<br />
bafllamadan önce k⤛t havlu ile plakalar›n<br />
üstünü temizleyiniz.<br />
• Cihazı temizlemeden önce, cihaz›n<br />
so¤umas› için an az 30 dakika bekleyiniz.<br />
Temizlik <strong>ve</strong> Bak›m:<br />
UYARI: Cihaz›n›z› temizlemeden önce,<br />
tamamen so¤udu¤undan emin olunuz.<br />
Yiyeceklerinizi piflirdikten sonra, ayar<br />
kontrolünü OFF (kapal›) konuma getirip,<br />
cihaz›n fiflini prizden çekiniz. Cihaz›<br />
tutmadan önce, so¤umas› için en az 30<br />
9
dakika bekleyiniz. Piflirme plakalar›n›n<br />
üstünde kalan herhangi bir yiyecek<br />
kal›nt›lar›n› plastik temizle spatulas› ile<br />
temizleyebilirsiniz. Plastik temizleme<br />
spatulas› bulafl›k makinas›nda ya da elde<br />
y›kanabilmektedir. Damlama kaplar›ndan<br />
ya¤› temizleyiniz. Damlama kaplar› elde ya<br />
da bulafl›k makinas›nda y›kanabilmektedir.<br />
Plaka gevfletme tufluna plakalar› gevfletmek<br />
için bas›n›z. Plakalar› tutmadan önce,<br />
tamamen so¤umufl olduklar›ndan<br />
(so¤umas› için en az 30dakika bekleyiniz)<br />
emin olunuz. Piflirme plakalar› bulafl›k<br />
makinas›nda y›kanabilmektedir.<br />
10
Introduction<br />
Thank you for purchasing Fakir Panito Panini<br />
Press & Helath Grill, which has been<br />
designed and manufactured to gi<strong>ve</strong> you<br />
many years of trouble-free service.<br />
You may already be familiar with using a<br />
similar product, but do please take time to<br />
read these instructions - they ha<strong>ve</strong> been<br />
written to ensure you get the <strong>ve</strong>ry best from<br />
your purchase.<br />
Safety is important<br />
For yours and others safety please read<br />
the instructions before using the appliance.<br />
Please keep this instruction in a safe place<br />
for the further use. If you pass the grilling<br />
machine on, pass on the instructions too.<br />
Remo<strong>ve</strong> all packaging, but keep it until you<br />
are satisfied that the grilling machine is<br />
working. You may find a plastic label on<br />
the grilling machine listing its features peel<br />
this off.<br />
Important Safeguards<br />
When use electrical appliances, basic safety<br />
precautions should always be followed,<br />
including the following:<br />
• Read all instructions.<br />
• Do not touch hot surfaces; use handles or<br />
knobs.<br />
• To protect against fire, electric shock, and<br />
injury to persons, do not immerse cord or<br />
plug in water or other liquids.<br />
• Close supervision is necessary when any<br />
appliance is used by or near children.<br />
• Unplug from outlet when not in use and<br />
before cleaning. Allow to cool before putting<br />
on or taking off parts, and before cleaning<br />
appliance.<br />
• Do not operate any appliance with a<br />
damaged cord or plug, or after the<br />
appliance has malfunctioned or has been<br />
damaged in any manner. Return the<br />
appliance to the nearest Fakir Service for<br />
examination, repair or adjustment.<br />
• The use of accessory attachments not<br />
recommended by Fakir may result in fire,<br />
electrical shock, or risk of injury to persons.<br />
• Do not use outdoors.<br />
• Do not let power cord hang o<strong>ve</strong>r edge of<br />
table or counter, or touch hot surfaces.<br />
• Do not place on or near hot gas or electric<br />
burner, or in a heated o<strong>ve</strong>n.<br />
• Unplug the unit when finished using.<br />
• Do not use appliance for other than intended<br />
use.<br />
• Extreme caution must be exercised when<br />
moving an appliance containing hot oil or<br />
other hot liquids.<br />
• To disconnect, turn control to OFF setting,<br />
then remo<strong>ve</strong> plug from wall outlet.<br />
• To reduce the risk of fire or electric shock,<br />
only an authorized Fakir Service should do<br />
repairs.<br />
NOTE: Please read all instructions and<br />
safety guards carefully.<br />
Please keep this instruction manual for<br />
further usage.<br />
Specifications:<br />
Power consumption: 1500W<br />
Protection class: II<br />
12
Parts of description:<br />
5<br />
8<br />
3b<br />
2<br />
1<br />
7<br />
4c<br />
4a<br />
4b<br />
6<br />
1. Base and Co<strong>ve</strong>r: Solid construction with<br />
stainless steel self-adjusting co<strong>ve</strong>r.<br />
2. Panini-Style Handle: Sturdy cast metal<br />
handle adjusts co<strong>ve</strong>r to accommodate<br />
thickness of food.<br />
3. Removable Cooking Plates: Nonstick and<br />
dishwasher safe for easy cleanup.<br />
a. Grill Plates: Perfect for grilling steak,<br />
burgers, chicken and <strong>ve</strong>getables.<br />
b. Griddle Plates: Prepare flawless pancakes,<br />
eggs, bacon and seared scallops.<br />
4. Controls: Indicator lights signal “power on”<br />
and “ready to cook”.<br />
a. Selector: Choose the Grill/Panini or Griddle<br />
function.<br />
b. Grill/Panini: Adjust temperature from “warm”<br />
to “sear”.<br />
c. Griddle: Adjust temperature from 95 to 220<br />
degrees.<br />
5. Drip Cups: Collect grease and are<br />
dishwasher safe.<br />
6. Cleaning/Scraping Tool: Helps clean grill<br />
or griddle plates after cooking.<br />
7. Plate Release Buttons: Push in to release<br />
and remo<strong>ve</strong> cooking plates.<br />
8. Hinge Release Le<strong>ve</strong>r: Allows the co<strong>ve</strong>r to<br />
lay back for cooking in the flat position.<br />
13
Usage:<br />
Before first use:<br />
Remo<strong>ve</strong> all packaging materials and any<br />
promotional labels or stickers from your<br />
grill. Be sure all parts (listed under Parts<br />
and Features) of your new appliance ha<strong>ve</strong><br />
been included before discarding any<br />
packaging materials. You may want to keep<br />
the box and packing materials for use at a<br />
later date.<br />
NOTE: Drips cups are located on outside<br />
of left polyfoam insert.<br />
Before using your Panini press & health grill<br />
for the first time, remo<strong>ve</strong> any dust by wiping<br />
the base, co<strong>ve</strong>r and controls with a damp<br />
cloth. Thoroughly clean cooking plates, drip<br />
trays and scraping tool. The grill and griddle<br />
plates, drip trays and cleaning tool are<br />
dishwasher safe. Refer to Assembly<br />
Instructions for plate removal.<br />
Panini Press & Health Grill:<br />
The panini press & health grill is the ultimate<br />
kitchen appliance, offering you four separate<br />
cooking options.<br />
Simply change the cooking plates and<br />
adjust the hinge to use as a Contact Grill,<br />
Panini Press, Open Grill or Griddle.<br />
Contact Grill: Use the appliance as a<br />
Contact Grill to cook burgers, boneless<br />
pieces of meat and thin cuts of meat and<br />
<strong>ve</strong>getables. The Contact Grill function works<br />
best when you want to cook something in<br />
a short amount of time or when you are<br />
looking for a healthy method of grilling.<br />
When cooked on the Contact Grill, food will<br />
cook quickly because you are grilling both<br />
sides of the food item at the same time.<br />
The ribs on the grill plates combined with<br />
the grease spout at the corner of the plate<br />
14<br />
allow the grease to drip from the meat and<br />
drain off the plates.<br />
When the panini press & health grill is used<br />
as a Contact Grill the grill plates are<br />
recommended. Rest the co<strong>ve</strong>r e<strong>ve</strong>nly on<br />
top of the food until it has reached the<br />
desired cooked temperature. The panini<br />
press & health grill was designed with a<br />
unique handle and hinge that allows the<br />
co<strong>ve</strong>r to adjust to the thickness of the food.<br />
You can easily grill anything from a thinlysliced<br />
potato to a thick sirloin steak with<br />
e<strong>ve</strong>n results. When cooking more than one<br />
food item in the Contact Grill, it is important<br />
that the thickness of food items is consistent<br />
so the co<strong>ve</strong>r will close e<strong>ve</strong>nly on the food.<br />
Panini Press:<br />
Use the appliance as a Panini Press to grill<br />
sandwiches, breads and quesadillas. The<br />
word “Panini” is an Italian term for grilled<br />
sandwich. Panini can include any<br />
combination of ingredients such as<br />
<strong>ve</strong>getables, meat and cheese layered<br />
between two pieces of fresh baked bread.<br />
The sandwich is then pressed between two<br />
grill or griddle plates to toast the bread and<br />
warm the sandwich. Experiment to make a<br />
variety of savory or sweet sandwiches for<br />
any meal. We recommend using fresh<br />
baked bread to produce the best tasting<br />
Panini. Popular breads used for Panini are<br />
focaccia (flat bread frequently baked with<br />
rosemary, salt and onion on top), michetta<br />
(a small round roll with a crisp crust),<br />
ciabatta rectangular bread with a slightly<br />
domed crust) and thick slices of classic<br />
Italian bread.<br />
When the panini press & health grill is used<br />
as a Panini Press, the grill plates are<br />
recommended. We recommend the grill<br />
plates because a traditional-style Panini<br />
sandwich will ha<strong>ve</strong> grill marks on the bread.<br />
Howe<strong>ve</strong>r, depending upon the type of<br />
sandwich you are preparing, you may wish
to use the griddle plates. The appliance<br />
functions as a Panini Press in the same<br />
manner that it functions as a Contact Grill.<br />
The panini press & health grill was designed<br />
with a unique handle and hinge that allows<br />
the co<strong>ve</strong>r to adjust to the thickness of the<br />
sandwich you are preparing, and to rest<br />
there e<strong>ve</strong>nly. Light pressure can be applied<br />
to the handle to press and heat the<br />
sandwich to your liking.<br />
When cooking more than one Panini, it is<br />
important that the thickness of each<br />
sandwich is consistent so the co<strong>ve</strong>r will<br />
close e<strong>ve</strong>nly on the Panini.<br />
Open Grill:<br />
Use the panini press & health grill as an<br />
Open Grill to cook burgers, steak, poultry<br />
(we do not recommend cooking bone-in<br />
chicken, since it does not cook e<strong>ve</strong>nly on<br />
an open grill), fish and <strong>ve</strong>getables.<br />
Cooking on the Open Grill is the most<br />
<strong>ve</strong>rsatile method of using the panini press<br />
& health grill. In the open position, you ha<strong>ve</strong><br />
double the surface area (200 sq. inches)<br />
for grilling. You ha<strong>ve</strong> the option of cooking<br />
different types of foods on separate plates<br />
without combining their flavors, or cooking<br />
large amounts of the same type of food.<br />
The open position also accommodates<br />
different cuts of meat with varying<br />
thicknesses, allowing you to cook each<br />
piece to your liking.<br />
“Open Grill” refers to using the appliance<br />
with the co<strong>ve</strong>r laying flat, creating a double,<br />
flat cooking surface in this Position.<br />
The foods you are grilling will ha<strong>ve</strong> to be<br />
turned o<strong>ve</strong>r for cooking. When the appliance<br />
is used as an Open Grill, the grill plates<br />
should be used.<br />
Griddle:<br />
Use the appliance as a Griddle to cook<br />
pancakes, eggs, French toast, hash browns<br />
and breakfast meats.<br />
Using the Griddle function is a wonderful<br />
way to prepare breakfast for two or for a<br />
large family.<br />
The large Surface Area allows you to cook<br />
a variety of different foods at the same time,<br />
or large amounts of your favorite food.<br />
When you use the appliance as a Griddle,<br />
open the co<strong>ve</strong>r so it lays flat, creating a<br />
double, flat cooking surface. In this position,<br />
the foods you are preparing will ha<strong>ve</strong> to be<br />
turned o<strong>ve</strong>r for cooking. When using this<br />
cooking function, the griddle plates should<br />
be used.<br />
Assembly Instructions:<br />
Place panini press & health grill on a clean<br />
flat surface where you intend to cook.<br />
The panini press & health grill can be<br />
positioned in three ways:<br />
• Closed Position: Upper plate/co<strong>ve</strong>r rests<br />
flat on lower plate/base. This is your starting<br />
and heating position when using the Contact<br />
Grill or Panini Press functions.<br />
15
• Flat Position: – Upper plate/co<strong>ve</strong>r is le<strong>ve</strong>l<br />
with lower plate/base. The upper and lower<br />
plates line up to create one large cooking<br />
surface. The panini press & health grill is<br />
in this position when it is used as an Open<br />
Grill or Griddle.<br />
• Open Position: Upper plate/co<strong>ve</strong>r is open<br />
and in the 105° position. Open the co<strong>ve</strong>r<br />
to this position before using the appliance<br />
as a Contact Grill or Panini Press.<br />
To adjust the panini press & health grill to<br />
this position, simply lift it come to a locking<br />
position. The unit will stay in this position<br />
until you close the co<strong>ve</strong>r or continue to<br />
open it to the Flat Position. The co<strong>ve</strong>r will<br />
stay in the upright position until you lower<br />
the handle for cooking. When this is done,<br />
the co<strong>ve</strong>r will release itself so that it lies flat<br />
on the top of the food you are preparing.<br />
This allows you to cook your food e<strong>ve</strong>nly<br />
from both top and bottom. When you lift the<br />
handle to open the unit after cooking the<br />
co<strong>ve</strong>r will remain in the flat position, parallel<br />
with the lower plate. In order to lock the<br />
co<strong>ve</strong>r back into the upright position, you<br />
must close the unit, without any food in<br />
place, and open it again.<br />
To adjust the unit to this position, locate the<br />
hinge release le<strong>ve</strong>r on the right arm. With<br />
your left hand on the handle, use your right<br />
hand to slide the le<strong>ve</strong>r toward you. Push<br />
the handle back until the co<strong>ve</strong>r rests flat on<br />
the counter. The unit will stay in this position<br />
until you lift the handle and co<strong>ve</strong>r to return<br />
it to the closed position.<br />
Hinge<br />
Release<br />
Le<strong>ve</strong>r<br />
If the panini press & health grill is already<br />
in the open position and you wish to adjust<br />
it to the flat position, pull the handle slightly<br />
toward you and then lift the hinge release<br />
le<strong>ve</strong>r. Push the handle back until the co<strong>ve</strong>r<br />
rests in the flat position. Pulling the handle<br />
forward slightly before lifting the hinge<br />
release switch will take some of the pressure<br />
off of the hinge and you will be able to<br />
adjust the appliance more easily.<br />
To insert cooking plates:<br />
Adjust the panini press & health grill to the<br />
Flat Position (see abo<strong>ve</strong>) with the controls<br />
16
directly in front of you. Insert one plate at<br />
a time. Each plate is designed to fit in either<br />
the upper housing or the lower housing of<br />
the panini press & health grill. The word<br />
“lower” or “upper” is embossed into each<br />
grill or griddle plate to let you know where<br />
to attach the plate. Pick up the lower<br />
grill/griddle plate with the cutouts for the<br />
heating element facing down.<br />
If you are facing the unit the drip spout<br />
should be at the forward right-hand corner<br />
of the plate. Locate the metal brackets at<br />
the center of the housing. Tilt the back end<br />
of the plate and line up the cutouts at the<br />
back of the plate with the metal brackets.<br />
Slide the plate underneath the brackets<br />
and push down the front end of the plate.<br />
It will snap into place. Turn the unit around<br />
and insert the matching grill or griddle plate<br />
into the upper housing as you did with the<br />
first plate.<br />
Upper Plate<br />
Release Button<br />
Lower Plate<br />
Release Button<br />
as a Contact Grill or Panini Press, only one<br />
drip cup is needed. Place the cup directly<br />
below the Grease spout while cooking.<br />
Grease from the food will run off the plates<br />
through the grease spout and into the drip<br />
cups. Grease should be safely disposed<br />
of after cooking. The drip cups can be<br />
cleaned in the dishwasher. When using the<br />
appliance as an Open Grill or Griddle, both<br />
drip cups should be used. Place the cups<br />
at either end of the unit directly below the<br />
grease spouts.<br />
Once the appliance is assembled properly,<br />
plug the cord into a standard electrical<br />
outlet. You are now ready to begin cooking.<br />
To remo<strong>ve</strong> cooking plates:<br />
Adjust panini press & health grill to Flat<br />
Position (see abo<strong>ve</strong>).<br />
Locate the plate release buttons on one<br />
side of the unit. Press firmly on button and<br />
the plate will popup slightly from the base.<br />
Grasp the plate with two hands, slide it out<br />
from under the metal brackets, and lift it<br />
out of the base. Press on the other plate<br />
release button to remo<strong>ve</strong> the other cooking<br />
plate in the same manner. Upper Plate<br />
Release Button Lower Plate Release Button<br />
Hinge Release Le<strong>ve</strong>r.<br />
Position drip cups:<br />
When using the panini press & health grill<br />
17
Operating Instructions:<br />
Once the panini press & health grill is<br />
assembled properly and you are ready to<br />
begin cooking, turn the Selector to the left<br />
to choose the Griddle function or to the<br />
right to choose the Grill/Panini function,<br />
depending on what you intend to cook.<br />
When the knob is turned to either function,<br />
a red indicator light will illuminate to indicate<br />
that the power is on.<br />
If you intend to use the appliance as a<br />
Contact Grill, Panini Press or Flat Grill, turn<br />
the Grill/ Panini Control to the desired<br />
temperature for cooking. Settings range<br />
from Warm (95°) to sear (220°).<br />
If you intend to use the appliance as a<br />
Griddle, turn the Griddle Control to the<br />
desired temperature for cooking.<br />
Temperature settings range from 95° to<br />
220°. If you intend to use the appliance as<br />
a Flat Grill or Griddle, but you do not need<br />
the entire surface, use the bottom plate.<br />
It may take up to 10 minutes to reach<br />
operating temperature, depending on the<br />
temperature le<strong>ve</strong>l that was set. When the<br />
thermostat has reached operating<br />
temperature, a green indicator light inside<br />
the chosen control will indicate that the<br />
appliance is ready for cooking. During<br />
operation, the light will continue to turn on<br />
and off as the thermostat regulates the<br />
temperature. This is normal.<br />
The temperature controls are used to set<br />
and maintain the temperature of the cooking<br />
surface. You may vary the setting of the<br />
control knob at any time during cooking,<br />
and may wish to do so depending on the<br />
types of foods on the cooking plate. Always<br />
exercise caution when handling the panini<br />
press & health grill during cooking. To open<br />
the appliance grasps the black plastic area<br />
of the handle. This part of the handle stays<br />
cool to the touch while cooking. The arms<br />
are made of die-cast aluminum and will<br />
become hot during use. Do not touch them<br />
18<br />
during or immediately following cooking.<br />
The unit housing will become hot during<br />
use. The co<strong>ve</strong>r is made of stainless steel<br />
and will become <strong>ve</strong>ry hot and should not<br />
be touched during or immediately following<br />
cooking. If you need to adjust the co<strong>ve</strong>r is<br />
sure to use an o<strong>ve</strong>n mitt to pre<strong>ve</strong>nt burns.<br />
The lower housing is made of plastic, and<br />
while it will become <strong>ve</strong>ry warm it will not<br />
burn you. If you need to mo<strong>ve</strong> the unit<br />
during cooking is sure to handle it from the<br />
base only. Do not touch the co<strong>ve</strong>r.<br />
Allow the unit to cool down before handling<br />
(at least 30 minutes).<br />
NOTE: The first time you use the panini<br />
press & health grill, it may ha<strong>ve</strong> a slight<br />
odor and may smoke a bit. This is normal<br />
and common to appliances with nonstick<br />
surfaces.<br />
The unit comes with a black<br />
cleaning/scraping tool. This can be used<br />
for cleaning the grill and Griddle plates<br />
after you ha<strong>ve</strong> finished cooking and the<br />
unit has cooled down completely (at least<br />
30 minutes). Using the cleaning tool on a<br />
hot surface for too long will cause the plastic<br />
to melt.<br />
Maintenance:<br />
• Ne<strong>ve</strong>r use metal utensils, as they will scratch<br />
the nonstick plates. Instead, use only<br />
wooden or heat-proof plastic utensils.<br />
• Ne<strong>ve</strong>r lea<strong>ve</strong> plastic utensils in contact with<br />
the hot grill plates. This includes the<br />
provided cleaning tool.<br />
• In between recipes, scrape excess food<br />
buildup through grease channels and into<br />
drip cups, then wipe off any residue with a<br />
paper towel before proceeding with next<br />
recipe.<br />
• Allow the unit to cool down completely (at<br />
least 30 minutes) before cleaning.
Cleaning and Care:<br />
CAUTION: Before cleaning appliance,<br />
make sure it has cooled down completely.<br />
Once you ha<strong>ve</strong> finished cooking, turn the<br />
Selector Control to the OFF position and<br />
unplug the power cord from the wall outlet.<br />
Allow the unit to cool down for at least 30<br />
minutes before handling.<br />
Use the cleaning/scraping tool to remo<strong>ve</strong><br />
any lefto<strong>ve</strong>r food from the cooking plate.<br />
The scraping tool can be washed by hand<br />
or in the dishwasher. Dispose of grease<br />
from drip cups. The drip cups can be<br />
cleaned by hand or in the dishwasher. Press<br />
the Plate Release Buttons to remo<strong>ve</strong> plates<br />
from the housing. Be sure that the plates<br />
ha<strong>ve</strong> cooled completely before handling<br />
(at least 30 minutes). The cooking plates<br />
can be washed in the dishwasher.<br />
19