

38897 trailer cart manual - Harbor Freight Tools
38897 trailer cart manual - Harbor Freight Tools
38897 trailer cart manual - Harbor Freight Tools

Create successful ePaper yourself
Turn your PDF publications into a flip-book with our unique Google optimized e-Paper software.
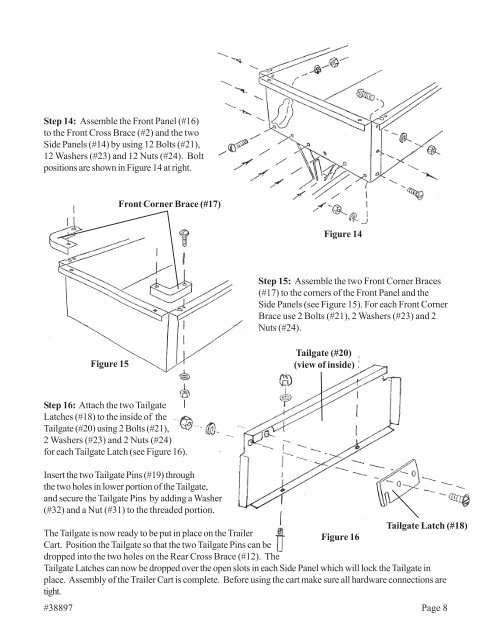
Step 14: Assemble the Front Panel (#16)<br />
to the Front Cross Brace (#2) and the two<br />
Side Panels (#14) by using 12 Bolts (#21),<br />
12 Washers (#23) and 12 Nuts (#24). Bolt<br />
positions are shown in Figure 14 at right.<br />
Front Corner Brace (#17)<br />
Figure 14<br />
Step 15: Assemble the two Front Corner Braces<br />
(#17) to the corners of the Front Panel and the<br />
Side Panels (see Figure 15). For each Front Corner<br />
Brace use 2 Bolts (#21), 2 Washers (#23) and 2<br />
Nuts (#24).<br />
Figure 15<br />
Tailgate (#20)<br />
(view of inside)<br />
Step 16: Attach the two Tailgate<br />
Latches (#18) to the inside of the<br />
Tailgate (#20) using 2 Bolts (#21),<br />
2 Washers (#23) and 2 Nuts (#24)<br />
for each Tailgate Latch (see Figure 16).<br />
Insert the two Tailgate Pins (#19) through<br />
the two holes in lower portion of the Tailgate,<br />
and secure the Tailgate Pins by adding a Washer<br />
(#32) and a Nut (#31) to the threaded portion.<br />
Tailgate Latch (#18)<br />
The Tailgate is now ready to be put in place on the Trailer<br />
Figure 16<br />
Cart. Position the Tailgate so that the two Tailgate Pins can be<br />
dropped into the two holes on the Rear Cross Brace (#12). The<br />
Tailgate Latches can now be dropped over the open slots in each Side Panel which will lock the Tailgate in<br />
place. Assembly of the Trailer Cart is complete. Before using the <strong>cart</strong> make sure all hardware connections are<br />
tight.<br />
#<strong>38897</strong> Page 8


