

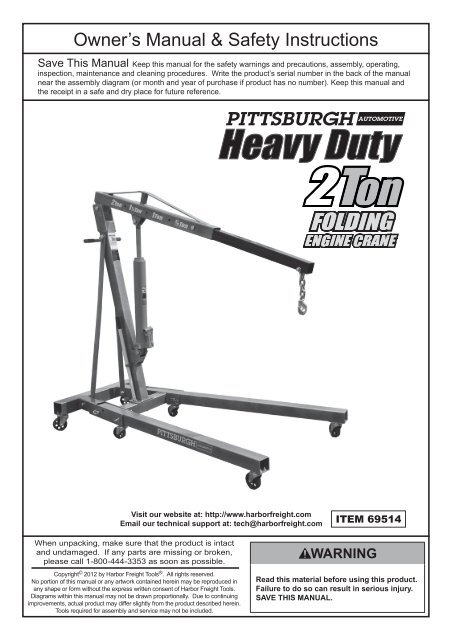
Jack Parts List and Diagram - Harbor Freight Tools
Jack Parts List and Diagram - Harbor Freight Tools
Jack Parts List and Diagram - Harbor Freight Tools

Create successful ePaper yourself
Turn your PDF publications into a flip-book with our unique Google optimized e-Paper software.
Table of Contents<br />
SAFETY SETUP<br />
OPERATION MAINTENANCE<br />
Safety.......................................................... 2<br />
Specifications.............................................. 4<br />
Setup........................................................... 4<br />
Operation..................................................... 7<br />
WARNING SYMBOLS AND DEFINITIONS<br />
Maintenance................................................ 8<br />
<strong>Parts</strong> <strong>List</strong>s <strong>and</strong> <strong>Diagram</strong>s........................... 10<br />
Warranty..................................................... 12<br />
This is the safety alert symbol. It is used to alert you to potential personal injury hazards.<br />
Obey all safety messages that follow this symbol to avoid possible injury or death.<br />
Indicates a hazardous situation which, if not avoided,<br />
will result in death or serious injury.<br />
Indicates a hazardous situation which, if not avoided,<br />
could result in death or serious injury.<br />
Indicates a hazardous situation which, if not avoided,<br />
could result in minor or moderate injury.<br />
Addresses practices not related to personal injury.<br />
IMPORTANT SAFETY INFORMATION<br />
General Safety Warnings<br />
Read all safety warnings <strong>and</strong> instructions.<br />
Failure to follow the warnings <strong>and</strong> instructions may result in serious injury.<br />
Save all warnings <strong>and</strong> instructions for future reference.<br />
1. Study, underst<strong>and</strong>, <strong>and</strong> follow all instructions<br />
before operating this device.<br />
2. Do not exceed 2 ton rated capacity<br />
for the Engine Crane.<br />
3. Use only on hard, level surfaces.<br />
4. Before moving, lower the load to<br />
the lowest possible point.<br />
5. Use only sling or chains with a rated capacity<br />
greater than the weight of the load being lifted.<br />
6. Do not allow load to swing or drop<br />
violently while lowering or moving.<br />
7. Do not make any alterations or modifications to<br />
Engine Crane. Do not adjust safety valve.<br />
8. Properly extend leg extensions <strong>and</strong> secure<br />
boom in proper setting before use.<br />
9. Follow capacities marked on boom; capacity<br />
decreases as boom lengthens.<br />
10. Wear ANSI-approved safety goggles <strong>and</strong><br />
heavy-duty work gloves during use.<br />
11. Verify replacement jack has same rating,<br />
mounting points <strong>and</strong> maximum length.<br />
12. Do not use for aircraft purposes.<br />
Page 2 For technical questions, please call 1-800-444-3353. Item 69514
13. Inspect before every use; do not use<br />
if parts loose or damaged.<br />
14. Keep your work area clean <strong>and</strong> well lit.<br />
Cluttered work areas invite accidents.<br />
15. Keep byst<strong>and</strong>ers, children, <strong>and</strong> visitors away<br />
while operating Engine Crane. Distractions<br />
can cause you to lose control.<br />
16. Stay alert. Watch what you are doing, <strong>and</strong> use<br />
common sense when operating a jack. Do not use<br />
a jack while tired or under the influence of drugs,<br />
alcohol, or medication. A moment of inattention while<br />
operating jacks may result in serious personal injury.<br />
17. Follow instructions in the “Inspection, Maintenance,<br />
And Cleaning” section of this manual. Use<br />
of unauthorized parts or failure to follow<br />
maintenance instructions may create a risk of<br />
injury <strong>and</strong> may void any applicable warranty.<br />
18. Maintain labels <strong>and</strong> nameplates on the<br />
Engine Crane. These carry important<br />
information. If unreadable or missing, contact<br />
<strong>Harbor</strong> <strong>Freight</strong> <strong>Tools</strong> for a replacement.<br />
19. Before use, read manufacturer’s instruction<br />
manual for the object you will lift.<br />
20. Industrial applications must follow<br />
OSHA requirements.<br />
21. The warnings, precautions, <strong>and</strong> instructions<br />
discussed in this manual cannot cover all possible<br />
conditions <strong>and</strong> situations that may occur. The<br />
operator must underst<strong>and</strong> that common sense <strong>and</strong><br />
caution are factors, which cannot be built into this<br />
product, but must be supplied by the operator.<br />
SAFETY<br />
SAVE THESE INSTRUCTIONS.<br />
MAINTENANCE OPERATION<br />
SETUP<br />
Item 69514<br />
For technical questions, please call 1-800-444-3353.<br />
Page 3
Specifications<br />
Specifications<br />
<strong>Jack</strong> Capacity 8 Ton<br />
SAFETY SETUP<br />
OPERATION MAINTENANCE<br />
Assembly<br />
Part<br />
#32<br />
14x90<br />
mm<br />
Part<br />
#8<br />
14x100<br />
mm<br />
Boom Positions<br />
2 Ton 84 IN.<br />
1-1/2 Ton 89 IN.<br />
1 Ton 95 IN.<br />
1/2 Ton 100 IN.<br />
Meets 2005 ANSI/ASME PALD st<strong>and</strong>ards.<br />
Part<br />
#11<br />
16x80<br />
mm<br />
Part<br />
#20<br />
16x90<br />
mm<br />
Part<br />
#15<br />
16x100<br />
mm<br />
Part<br />
#16<br />
16x110<br />
mm<br />
Part<br />
#2<br />
12x80<br />
mm<br />
Part<br />
#25<br />
8x20<br />
mm<br />
Part<br />
#29<br />
8x12<br />
mm<br />
TO PREVENT SERIOUS INJURY AND DEATH: The correct bolts must be used during<br />
assembly. Carefully compare bolts to Bolt Identification illustration above <strong>and</strong> the measurements shown in<br />
the parts list <strong>and</strong> assembly diagrams near the end of this manual to make sure that the correct bolts are used<br />
in the correct place.<br />
WARNING! For safety <strong>and</strong> ease of assembly, use two people to assemble the Shop Crane.<br />
CAUTION! DO NOT TIGHTEN ANY BOLTS UNTIL YOU ARE FULLY FINISHED WITH ASSEMBLY.<br />
OTHERWISE PARTS WILL NOT LINE UP PROPERLY.<br />
Page 4 For technical questions, please call 1-800-444-3353. Item 69514
1.<br />
22 23<br />
24<br />
25<br />
(Assembled)<br />
28<br />
27<br />
2923<br />
21 26<br />
Figure A<br />
Slide the Legs into the front of the Base<br />
<strong>and</strong> Lock Legs in place using the Lock Pins.<br />
To insert the Lock Pins, lift up on front of Base<br />
until holes line up. After all four Lock Pins are<br />
inserted, insert one R-Pin through small hole at<br />
end of each Lock Pin until it snaps into place.<br />
Note: Make sure Lock Pins are<br />
secure before proceeding.<br />
2.<br />
8<br />
Base Assembly<br />
9 10<br />
Figure B<br />
30<br />
(Assembled)<br />
Use the Bolts, Washers, <strong>and</strong> Nuts to secure the<br />
bottom of the Post to the Base.<br />
3.<br />
Bolt (16)<br />
Support<br />
Washers<br />
Bolt (15)<br />
Nut<br />
Nut<br />
Washer<br />
Support<br />
Post<br />
Figure C<br />
Leg<br />
Bolt (15)<br />
Post<br />
Support<br />
Leg<br />
The bends of the<br />
Supports face out<br />
at the top <strong>and</strong> in<br />
at the bottom as<br />
shown above.<br />
Use two Bolts, Washers <strong>and</strong> Nuts to fasten the lower<br />
ends of the Supports to the inside of the Frame,<br />
then use one Bolt, Washer <strong>and</strong> Nut to fasten the top<br />
ends of the Supports <strong>and</strong> the H<strong>and</strong>le to the Post.<br />
H<strong>and</strong>le<br />
Support<br />
Figure D<br />
Support<br />
(Not shown)<br />
Post<br />
Note: Slide the H<strong>and</strong>le between the Supports<br />
<strong>and</strong> Post, align all holes, then secure in place.<br />
4.<br />
Bolt (16)<br />
Nut<br />
Washer<br />
Figure E<br />
Boom<br />
Use the Bolt, Washer <strong>and</strong> Nut to attach<br />
the Boom to the top of the Post.<br />
SAFETY<br />
MAINTENANCE OPERATION<br />
SETUP<br />
Item 69514<br />
For technical questions, please call 1-800-444-3353.<br />
Page 5
SAFETY SETUP<br />
OPERATION MAINTENANCE<br />
5.<br />
Bolt (11)<br />
Bolt (20)<br />
Figure F<br />
Nut<br />
Washer<br />
<strong>Jack</strong><br />
Nut<br />
Washer<br />
Use a Bolt, Washer <strong>and</strong> Nut to attach lower end of<br />
the <strong>Jack</strong> to the Post <strong>and</strong> another Bolt, Washer <strong>and</strong><br />
Nut to attach the top of the <strong>Jack</strong> to the Boom.<br />
6.<br />
Bolt (32)<br />
Figure H: Assembled Engine Crane<br />
Nut<br />
Washer<br />
Figure G<br />
Boom Extension<br />
Bolt (2)<br />
Nut<br />
Washer<br />
Slide the Boom Extension into the Boom <strong>and</strong> use the<br />
Bolt, Washer <strong>and</strong> Nut to secure at the desired load<br />
rating. Use the Bolt, Washer <strong>and</strong> Nut to attach the<br />
Hook <strong>and</strong> Chain to the end of the Boom Extension.<br />
Page 6 For technical questions, please call 1-800-444-3353. Item 69514
Operating Instructions<br />
Read ENTIRE IMPORTANT SAFETY INFORMATION section at beginning of this manual<br />
including all text under subheadings therein before set up or use of this product.<br />
Note: Once Assembly is complete, tighten ALL Bolts before initial operation.<br />
Lifting <strong>and</strong> Lowering<br />
5. To raise the Boom, turn the <strong>Jack</strong>’s release valve<br />
fully clockwise (right). Insert the H<strong>and</strong>le into the<br />
<strong>Jack</strong> <strong>and</strong> pump (up <strong>and</strong> down) repeatedly until<br />
the item has been lifted to the desired height.<br />
SAFETY<br />
WARNING! Fully tighten the release valve<br />
or else the <strong>Jack</strong> may lower or may not<br />
be able to reach the full height.<br />
1.<br />
2.<br />
3/4 Ton Load<br />
Figure I<br />
Locate the hole on the Boom with a weight limit<br />
higher than the weight you will be lifting.<br />
For example: Locate the 1 TON hole on the Boom<br />
for a load that is under one Ton. See Figure 9.<br />
Bolt<br />
Figure J<br />
Nut<br />
Washer<br />
Adjust the Boom Extension<br />
so the hole furthest from the<br />
hook-end aligns with the chosen hole on the<br />
Boom. Secure into place by inserting the Bolt<br />
through all aligned holes <strong>and</strong> tightening in place<br />
with the Washer <strong>and</strong> Nut. See Figure 10 above.<br />
WARNING! Do not st<strong>and</strong> under an object that is<br />
being lifted by the Engine Crane. Be aware of the<br />
possibility of a load slipping off the Hook <strong>and</strong> Chain. An<br />
item that falls from the Crane can cause serious injury.<br />
3. Move the Crane so that the Hook <strong>and</strong> Chain<br />
is directly above the item to be lifted.<br />
4. Securely attach the Hook <strong>and</strong> Chain to the item.<br />
WARNING! DO NOT MOVE THE CRANE WHEN<br />
UNDER LOAD. The Casters are not designed to<br />
be rolled when the Crane is lifting heavy objects.<br />
6. To lower the Crane, SLOWLY turn the <strong>Jack</strong>’s<br />
release valve counterclockwise (left).<br />
Folding the Frame<br />
WARNING! Do not fold crane while loaded.<br />
1. Lower Crane all the way.<br />
2. Remove R-Pins from the front Lock Pins. Remove<br />
the front Lock Pins. Leave rear Lock Pins in.<br />
3. Raise Leg until it rests against H<strong>and</strong>le.<br />
4. Insert a front Lock Pin into the middle hole of<br />
the Base, for each Leg, <strong>and</strong> reinsert R-Pins.<br />
Bleeding Instructions<br />
IMPORTANT! Before first use, check for proper<br />
hydraulic oil level <strong>and</strong> thoroughly test the<br />
equipment. If it does not work properly, bleed<br />
excess air from its hydraulic system as follows:<br />
1. Open Release Valve <strong>and</strong> lower <strong>Jack</strong> completely.<br />
2. Remove Oil Plug <strong>and</strong> fill with hydraulic<br />
oil (sold separately) to full level.<br />
3. Apply downward pressure to the Boom <strong>and</strong><br />
Pump the <strong>Jack</strong> H<strong>and</strong>le quickly several times.<br />
4. Check the Oil Fill Hole <strong>and</strong>, if necessary, top<br />
off the Oil Fill Hole with hydraulic oil.<br />
5. Replace the Oil Plug <strong>and</strong> close the Release Valve.<br />
6. Test the equipment several times for proper operation<br />
before attempting to lift a load. If, after bleeding,<br />
the equipment still does not appear to be working<br />
properly, do not use the equipment until it has<br />
been repaired by a qualified service technician.<br />
MAINTENANCE OPERATION<br />
SETUP<br />
Item 69514<br />
For technical questions, please call 1-800-444-3353.<br />
Page 7
Maintenance <strong>and</strong> Servicing<br />
SAFETY SETUP<br />
OPERATION MAINTENANCE<br />
Procedures not specifically explained in this<br />
manual must be performed only by a<br />
qualified technician.<br />
TO PREVENT SERIOUS INJURY<br />
FROM ACCIDENTAL OPERATION:<br />
Do not use damaged equipment. If abnormal<br />
noise or vibration occurs, have the problem<br />
corrected before further use.<br />
Cleaning, Maintenance, <strong>and</strong> Lubrication<br />
1. Before each use, inspect the general condition<br />
of the <strong>Jack</strong>. Check for broken, cracked, or bent<br />
parts, loose or missing parts, <strong>and</strong> any condition that<br />
may affect the proper operation of the product. If a<br />
problem occurs, have the problem corrected before<br />
further use.<br />
Do not use damaged equipment.<br />
2. Before each use, thoroughly test the <strong>Jack</strong><br />
for proper operation prior to its actual use. If<br />
the <strong>Jack</strong> appears not to be working properly,<br />
follow Bleeding instructions on page 9.<br />
3. Change the hydraulic oil at least<br />
once every three years:<br />
a. With the <strong>Jack</strong> fully lowered, remove the Oil<br />
Filler Plug on the side of the Housing.<br />
b. Tip the <strong>Jack</strong> to allow the old hydraulic oil<br />
to drain out of the Housing completely,<br />
<strong>and</strong> dispose of the old hydraulic oil in<br />
accordance with local regulations.<br />
c. With the <strong>Jack</strong> upright, completely fill the Housing<br />
with a high quality hydraulic oil (not included) until<br />
the oil just begins to run out of the Oil Fill Hole.<br />
d. Open the valve Release Screw <strong>and</strong> pump<br />
the H<strong>and</strong>le to bleed air from the system.<br />
e. Reinstall the Oil Filler Plug.<br />
4. Wipe dry with a clean cloth. Then, store the<br />
<strong>Jack</strong> in a safe, dry location out of reach of<br />
children <strong>and</strong> other non-authorized people.<br />
Page 8 For technical questions, please call 1-800-444-3353. Item 69514
Troubleshooting<br />
TO PREVENT SERIOUS INJURY: Use caution when troubleshooting malfunctioning<br />
jack. Stay clear of supported load. Completely resolve all problems before use. If<br />
solutions presented in Troubleshooting guide do not solve the problem, have a qualified technician inspect <strong>and</strong> repair<br />
jack before use. After jack is repaired: Test it carefully without a load by raising <strong>and</strong> lowering it fully, checking<br />
for proper operation, BEFORE RETURNING JACK TO OPERATION.<br />
DO NOT USE A DAMAGED OR<br />
MALFUNCTIONING JACK!<br />
SAFETY<br />
<strong>Jack</strong> will<br />
not lift at<br />
its weight<br />
capacity<br />
X<br />
POSSIBLE SYMPTOMS<br />
Chain<br />
<strong>and</strong>/or<br />
Hook<br />
lowers<br />
under<br />
load<br />
X<br />
Pump<br />
stroke<br />
feels<br />
spongy<br />
Chain<br />
<strong>and</strong>/or<br />
Hook<br />
will not<br />
lift all<br />
the way<br />
H<strong>and</strong>le<br />
moves<br />
up when<br />
<strong>Jack</strong> is<br />
under<br />
load<br />
X X X<br />
X<br />
X<br />
X<br />
Oil<br />
leaking<br />
from<br />
Filler<br />
Plug<br />
PROBABLE SOLUTION<br />
(Make certain that the <strong>Jack</strong><br />
is not supporting a load<br />
while attempting a solution.)<br />
Check that Release Valve is<br />
closed fully.<br />
Bleed air from the system.<br />
Valves may be blocked <strong>and</strong> may<br />
not close fully. To flush the valves:<br />
1. Lower the Chain / Hook<br />
<strong>and</strong> securely close the<br />
Release Valve.<br />
2. Manually lift the Chain /<br />
Hook several inches.<br />
3. Open the release valve <strong>and</strong><br />
force the Chain / Hook down<br />
as quickly as possible.<br />
<strong>Jack</strong> may be low on oil. Check<br />
the oil level <strong>and</strong> refill if needed.<br />
<strong>Jack</strong> may require bleeding -<br />
see instructions on page 9.<br />
PLEASE READ THE FOLLOWING CAREFULLY<br />
X<br />
Unit may have too much<br />
hydraulic oil inside, check fluid<br />
level <strong>and</strong> adjust if needed.<br />
THE MANUFACTURER AND/OR DISTRIBUTOR HAS PROVIDED THE PARTS LIST AND ASSEMBLY DIAGRAM<br />
IN THIS MANUAL AS A REFERENCE TOOL ONLY. NEITHER THE MANUFACTURER OR DISTRIBUTOR<br />
MAKES ANY REPRESENTATION OR WARRANTY OF ANY KIND TO THE BUYER THAT HE OR SHE IS<br />
QUALIFIED TO MAKE ANY REPAIRS TO THE PRODUCT, OR THAT HE OR SHE IS QUALIFIED TO REPLACE<br />
ANY PARTS OF THE PRODUCT. IN FACT, THE MANUFACTURER AND/OR DISTRIBUTOR EXPRESSLY<br />
STATES THAT ALL REPAIRS AND PARTS REPLACEMENTS SHOULD BE UNDERTAKEN BY CERTIFIED AND<br />
LICENSED TECHNICIANS, AND NOT BY THE BUYER. THE BUYER ASSUMES ALL RISK AND LIABILITY<br />
ARISING OUT OF HIS OR HER REPAIRS TO THE ORIGINAL PRODUCT OR REPLACEMENT PARTS<br />
THERETO, OR ARISING OUT OF HIS OR HER INSTALLATION OF REPLACEMENT PARTS THERETO.<br />
MAINTENANCE OPERATION<br />
SETUP<br />
Item 69514<br />
For technical questions, please call 1-800-444-3353.<br />
Page 9
<strong>Parts</strong> <strong>List</strong>s <strong>and</strong> <strong>Diagram</strong>s<br />
Crane <strong>Parts</strong> <strong>List</strong> <strong>and</strong> <strong>Diagram</strong><br />
SAFETY SETUP<br />
OPERATION MAINTENANCE<br />
Part Description Qty<br />
1 Hook & Chain 1<br />
2 Hex Bolt M12x80 1<br />
3 Lock Washer Ø12 1<br />
4 Flat Washer Ø12 1<br />
5 Hex Nut M12 1<br />
6 Boom Extension 1<br />
7 Boom 1<br />
8 Hex Bolt M14x100 2<br />
9 Flat Washer Ø14 3<br />
10 Hex Nut M14 3<br />
11 Hex Bolt M16x80 1<br />
151213<br />
22<br />
23<br />
24<br />
25<br />
16<br />
31<br />
161213<br />
21<br />
20<br />
17<br />
14<br />
18<br />
26<br />
28<br />
27<br />
Part Description Qty<br />
12 Flat Washer Ø16 6<br />
13 Hex Nut M16 6<br />
14 Main Post 1<br />
15 Hex Bolt M16x100 2<br />
16 Hex Bolt M16x110 2<br />
17 Support 2<br />
18 H<strong>and</strong>le 1<br />
19 8 Ton Long Ram <strong>Jack</strong> 1<br />
20 Hex Bolt M16x90 1<br />
21 Base 1<br />
12 13<br />
11<br />
29 23<br />
12 13<br />
19<br />
8<br />
12 13<br />
9<br />
32<br />
10<br />
9<br />
7<br />
2<br />
10<br />
30<br />
Part Description Qty<br />
22 Hex Nut M8 16<br />
23 Lock Washer Ø8 24<br />
24 3½" Swivel Caster 4<br />
25 Hex Bolt M8x20 16<br />
26 Lock Pin 4<br />
27 R Pin 4<br />
28 3" Swivel Caster 2<br />
29 Hex Bolt M8x12 8<br />
30 Leg 2<br />
31 H<strong>and</strong>rail 1<br />
32 Hex Bolt M14X90 1<br />
6<br />
1<br />
3 4 5<br />
Note: Some parts are listed <strong>and</strong> shown for illustration purposes only,<br />
<strong>and</strong> are not available individually as replacement parts.<br />
Page 10 For technical questions, please call 1-800-444-3353. Item 69514
<strong>Jack</strong> <strong>Parts</strong> <strong>List</strong> <strong>and</strong> <strong>Diagram</strong><br />
Part Description Qty<br />
1A Piston Rod 1<br />
2A O-Ring 1<br />
3A Top Cap 1<br />
4A Rectangle Ring 1<br />
5A Cover 1<br />
6A Cylinder 1<br />
7A Piston 1<br />
8A Socket 1<br />
9A Locking Spring 3<br />
10A Axis Pin 2<br />
11A Dust Ring 1<br />
12A Pump Body 1<br />
Part Description Qty<br />
13A Pump Core 1<br />
14A Snap Ring 1<br />
15A O-Ring 1<br />
16A Washer 1<br />
17A Base 1<br />
18A Bolt M5x12 2<br />
19A Trapezoid Ring 1<br />
20A Bowl Ring 1<br />
21A O-Ring 1<br />
22A Piston 1<br />
23A Washer 1<br />
24A Steel Ball Ø4 1<br />
Part Description Qty<br />
25A Spring Base 1<br />
26A Rectangle Ring 1<br />
27A Screw 1<br />
28A Adjustable Screw 1<br />
29A Adjustable Spring 1<br />
30A Linkage 1<br />
31A Steel Ball Ø6 3<br />
32A Rectangle Ring 1<br />
33A Release Valve Rod 1<br />
34A Round Pin 1<br />
Note: When re-ordering parts from this list,<br />
use the part number with the “A” suffix.<br />
SAFETY<br />
2<br />
3<br />
4<br />
1<br />
2 2<br />
2 0<br />
2 1<br />
Record Product’s Serial Number Here:<br />
3 4<br />
3 3<br />
7<br />
5<br />
1 9<br />
3 2<br />
3 1<br />
1 3<br />
1 4<br />
1 5<br />
2 3<br />
2 7 2 6 2 8 2 9 2 5 2 4<br />
1 7<br />
6<br />
8<br />
9<br />
1 0<br />
3 0<br />
1 1<br />
1 2<br />
1 6<br />
3 1<br />
1 8<br />
MAINTENANCE OPERATION<br />
SETUP<br />
Note: If product has no serial number, record month <strong>and</strong> year of purchase instead.<br />
Note: Some parts are listed <strong>and</strong> shown for illustration purposes only,<br />
<strong>and</strong> are not available individually as replacement parts.<br />
Item 69514<br />
For technical questions, please call 1-800-444-3353.<br />
Page 11
Limited 90 Day Warranty<br />
<strong>Harbor</strong> <strong>Freight</strong> <strong>Tools</strong> Co. makes every effort to assure that its products meet high quality <strong>and</strong> durability st<strong>and</strong>ards,<br />
<strong>and</strong> warrants to the original purchaser that this product is free from defects in materials <strong>and</strong> workmanship for the<br />
period of 90 days from the date of purchase. This warranty does not apply to damage due directly or indirectly,<br />
to misuse, abuse, negligence or accidents, repairs or alterations outside our facilities, criminal activity, improper<br />
installation, normal wear <strong>and</strong> tear, or to lack of maintenance. We shall in no event be liable for death, injuries<br />
to persons or property, or for incidental, contingent, special or consequential damages arising from the use of<br />
our product. Some states do not allow the exclusion or limitation of incidental or consequential damages, so the<br />
above limitation of exclusion may not apply to you. THIS WARRANTY IS EXPRESSLY IN LIEU OF ALL OTHER<br />
WARRANTIES, EXPRESS OR IMPLIED, INCLUDING THE WARRANTIES OF MERCHANTABILITY AND FITNESS.<br />
To take advantage of this warranty, the product or part must be returned to us with transportation charges<br />
prepaid. Proof of purchase date <strong>and</strong> an explanation of the complaint must accompany the merch<strong>and</strong>ise.<br />
If our inspection verifies the defect, we will either repair or replace the product at our election or we may<br />
elect to refund the purchase price if we cannot readily <strong>and</strong> quickly provide you with a replacement. We will<br />
return repaired products at our expense, but if we determine there is no defect, or that the defect resulted<br />
from causes not within the scope of our warranty, then you must bear the cost of returning the product.<br />
This warranty gives you specific legal rights <strong>and</strong> you may also have other rights which vary from state to state.<br />
3491 Mission Oaks Blvd. • PO Box 6009 • Camarillo, CA 93011 • (800) 444-3353


