

Airless Paint Sprayer - Harbor Freight Tools
Airless Paint Sprayer - Harbor Freight Tools
Airless Paint Sprayer - Harbor Freight Tools

You also want an ePaper? Increase the reach of your titles
YUMPU automatically turns print PDFs into web optimized ePapers that Google loves.
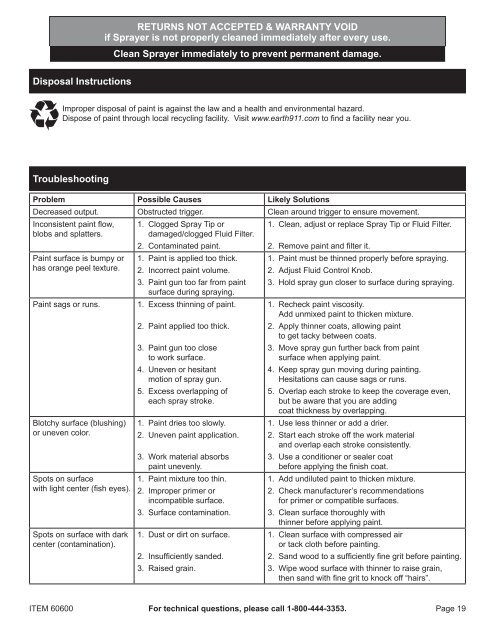
RETURNS NOT ACCEPTED & WARRANTY VOID<br />
if <strong>Sprayer</strong> is not properly cleaned immediately after every use.<br />
Clean <strong>Sprayer</strong> immediately to prevent permanent damage.<br />
Disposal Instructions<br />
Improper disposal of paint is against the law and a health and environmental hazard.<br />
Dispose of paint through local recycling facility. Visit www.earth911.com to find a facility near you.<br />
Troubleshooting<br />
Problem Possible Causes Likely Solutions<br />
Decreased output. Obstructed trigger. Clean around trigger to ensure movement.<br />
Inconsistent paint flow,<br />
blobs and splatters.<br />
<strong>Paint</strong> surface is bumpy or<br />
has orange peel texture.<br />
<strong>Paint</strong> sags or runs.<br />
Blotchy surface (blushing)<br />
or uneven color.<br />
Spots on surface<br />
with light center (fish eyes).<br />
Spots on surface with dark<br />
center (contamination).<br />
1. Clogged Spray Tip or<br />
damaged/clogged Fluid Filter.<br />
2. Contaminated paint.<br />
1. <strong>Paint</strong> is applied too thick.<br />
2. Incorrect paint volume.<br />
3. <strong>Paint</strong> gun too far from paint<br />
surface during spraying.<br />
1. Excess thinning of paint.<br />
2. <strong>Paint</strong> applied too thick.<br />
3. <strong>Paint</strong> gun too close<br />
to work surface.<br />
4. Uneven or hesitant<br />
motion of spray gun.<br />
5. Excess overlapping of<br />
each spray stroke.<br />
1. <strong>Paint</strong> dries too slowly.<br />
2. Uneven paint application.<br />
3. Work material absorbs<br />
paint unevenly.<br />
1. <strong>Paint</strong> mixture too thin.<br />
2. Improper primer or<br />
incompatible surface.<br />
3. Surface contamination.<br />
1. Dust or dirt on surface.<br />
2. Insufficiently sanded.<br />
3. Raised grain.<br />
1. Clean, adjust or replace Spray Tip or Fluid Filter.<br />
2. Remove paint and filter it.<br />
1. <strong>Paint</strong> must be thinned properly before spraying.<br />
2. Adjust Fluid Control Knob.<br />
3. Hold spray gun closer to surface during spraying.<br />
1. Recheck paint viscosity.<br />
Add unmixed paint to thicken mixture.<br />
2. Apply thinner coats, allowing paint<br />
to get tacky between coats.<br />
3. Move spray gun further back from paint<br />
surface when applying paint.<br />
4. Keep spray gun moving during painting.<br />
Hesitations can cause sags or runs.<br />
5. Overlap each stroke to keep the coverage even,<br />
but be aware that you are adding<br />
coat thickness by overlapping.<br />
1. Use less thinner or add a drier.<br />
2. Start each stroke off the work material<br />
and overlap each stroke consistently.<br />
3. Use a conditioner or sealer coat<br />
before applying the finish coat.<br />
1. Add undiluted paint to thicken mixture.<br />
2. Check manufacturer’s recommendations<br />
for primer or compatible surfaces.<br />
3. Clean surface thoroughly with<br />
thinner before applying paint.<br />
1. Clean surface with compressed air<br />
or tack cloth before painting.<br />
2. Sand wood to a sufficiently fine grit before painting.<br />
3. Wipe wood surface with thinner to raise grain,<br />
then sand with fine grit to knock off “hairs”.<br />
ITEM 60600<br />
For technical questions, please call 1-800-444-3353.<br />
Page 19


