

Multi-Use Transfer Pump - Harbor Freight Tools
Multi-Use Transfer Pump - Harbor Freight Tools
Multi-Use Transfer Pump - Harbor Freight Tools

You also want an ePaper? Increase the reach of your titles
YUMPU automatically turns print PDFs into web optimized ePapers that Google loves.
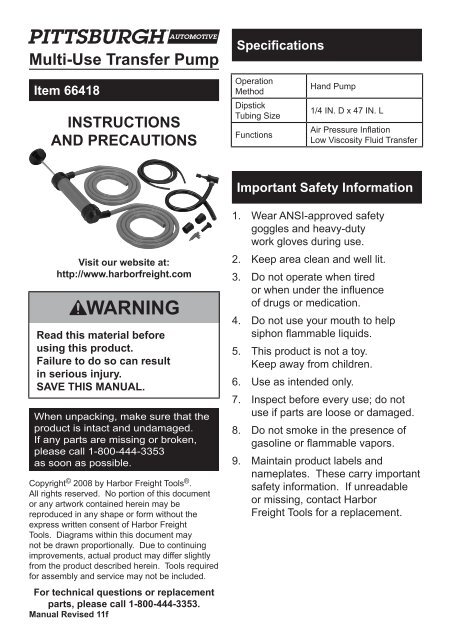
<strong>Multi</strong>-<strong>Use</strong> <strong>Transfer</strong> <strong>Pump</strong><br />
Specifications<br />
Item 66418<br />
INSTRUCTIONS<br />
AND PRECAUTIONS<br />
Operation<br />
Method<br />
Dipstick<br />
Tubing Size<br />
Functions<br />
Hand <strong>Pump</strong><br />
1/4 IN. D x 47 IN. L<br />
Air Pressure Inflation<br />
Low Viscosity Fluid <strong>Transfer</strong><br />
Important Safety Information<br />
Visit our website at:<br />
http://www.harborfreight.com<br />
Read this material before<br />
using this product.<br />
Failure to do so can result<br />
in serious injury.<br />
SAVE THIS MANUAL.<br />
When unpacking, make sure that the<br />
product is intact and undamaged.<br />
If any parts are missing or broken,<br />
please call 1‐800‐444‐3353<br />
as soon as possible.<br />
Copyright © 2008 by <strong>Harbor</strong> <strong>Freight</strong> <strong>Tools</strong> ® .<br />
All rights reserved. No portion of this document<br />
or any artwork contained herein may be<br />
reproduced in any shape or form without the<br />
express written consent of <strong>Harbor</strong> <strong>Freight</strong><br />
<strong>Tools</strong>. Diagrams within this document may<br />
not be drawn proportionally. Due to continuing<br />
improvements, actual product may differ slightly<br />
from the product described herein. <strong>Tools</strong> required<br />
for assembly and service may not be included.<br />
For technical questions or replacement<br />
parts, please call 1‐800‐444‐3353.<br />
Manual Revised 11f<br />
1. Wear ANSI-approved safety<br />
goggles and heavy-duty<br />
work gloves during use.<br />
2. Keep area clean and well lit.<br />
3. Do not operate when tired<br />
or when under the influence<br />
of drugs or medication.<br />
4. Do not use your mouth to help<br />
siphon flammable liquids.<br />
5. This product is not a toy.<br />
Keep away from children.<br />
6. <strong>Use</strong> as intended only.<br />
7. Inspect before every use; do not<br />
use if parts are loose or damaged.<br />
8. Do not smoke in the presence of<br />
gasoline or flammable vapors.<br />
9. Maintain product labels and<br />
nameplates. These carry important<br />
safety information. If unreadable<br />
or missing, contact <strong>Harbor</strong><br />
<strong>Freight</strong> <strong>Tools</strong> for a replacement.
Operating Instructions<br />
Read the ENTIRE<br />
IMPORTANT SAFETY<br />
INFORMATION section<br />
at the beginning of this<br />
document including all<br />
text under subheadings<br />
therein before set up or<br />
use of this product.<br />
WARNING! After siphoning or<br />
transferring gasoline or any<br />
flammable material, rinse the pump<br />
and hose with detergent to remove<br />
flammable fluid and fumes.<br />
Note: Refer to the Parts List<br />
and Assembly Diagram for<br />
the following instructions.<br />
Siphoning<br />
1. Insert one end of each<br />
of the Orange Hoses (D)<br />
into a Connector (A).<br />
2. Insert the Orange Hose ends<br />
into the <strong>Pump</strong> (C) intake and<br />
discharge ports and slide the<br />
Connectors over the Ports.<br />
3. Put the intake hose (near the<br />
pump handle) into the liquid to<br />
be pumped. Put the bottom hose<br />
into the discharge container.<br />
4. <strong>Pump</strong> the Handle.<br />
Note: The discharge container must<br />
be lower than the intake hose.<br />
Note: You will have to pump<br />
three to four times before the<br />
liquid will start to flow.<br />
<strong>Pump</strong>ing Air<br />
1. Attach a Connector (A) to the<br />
Air Pressure Hose (E).<br />
2. Insert the hose into the<br />
<strong>Pump</strong> (C) discharge port.<br />
Press firmly into the port.<br />
Slide the Connector over the port.<br />
3. Lift up the air chock lever on<br />
the Air Pressure Hose, and<br />
insert the Inflator Adapter (G)<br />
into the chock. Fold back the<br />
lever to lock the Adapter.<br />
4. Insert the Adapter into the<br />
beach ball or air mattress<br />
inflator tube and commence<br />
pumping the handle to inflate.<br />
Oil/Fuel <strong>Transfer</strong><br />
1. Attach the Orange Hoses as<br />
instructed in steps 1 and 2<br />
under Siphoning.<br />
2. Squeeze one end of Dipstick Tube<br />
(F) into the Tapered Adapter (B)<br />
until snug. Insert the free end of the<br />
tube into the engine dipstick port<br />
and while rotating the tube in either<br />
a clockwise or counterclockwise<br />
direction, feed the tube in until it<br />
bottoms up in the engine sump.<br />
3. Attach the tapered end of the<br />
Adapter (B) into the end of<br />
Orange Hose of the Intake Port.<br />
4. Put the Hose connected<br />
to the discharge port in<br />
the target container.<br />
5. <strong>Pump</strong> the handle to discharge<br />
the oil into the container.<br />
Note: The end of discharge hose<br />
must be located below engine sump.<br />
Page 2 For technical questions, please call 1-800-444-3353. SKU 66418
Maintenance<br />
1. Before and after each use,<br />
inspect the tubes for possible<br />
cracks, tears or loose fittings.<br />
Replace and/or tighten as needed.<br />
2. Occasionally lubricate the<br />
plunger by lifting it to its highest<br />
position, placing a few drops of<br />
lubricating oil at the plunger base<br />
and pumping it a few times.<br />
3. Store in a cool location, away from<br />
heat and out of reach of children.<br />
Record Serial Number Here:<br />
<br />
Note: If product has no serial<br />
number, record month and<br />
year of purchase instead.<br />
Note: Some parts are listed and<br />
shown for illustration purposes<br />
only, and are not available<br />
individually as replacement parts.<br />
Parts List and Assembly Diagram<br />
Part Description Qty<br />
A Connectors 2<br />
B Tapered Adapter 1<br />
C <strong>Pump</strong> 1<br />
D Orange Hoses 2<br />
Intake Port<br />
Part Description Qty<br />
E Air Pressure Hose 1<br />
F Dipstick Tube 1<br />
G Inflator Adapter 1<br />
F<br />
E<br />
C<br />
D<br />
A<br />
Discharge Port<br />
G<br />
B<br />
SKU 66418<br />
For technical questions, please call 1-800-444-3353.<br />
Page 3
PLEASE READ THE FOLLOWING CAREFULLY<br />
THE MANUFACTURER AND/OR DISTRIBUTOR HAS PROVIDED THE PARTS LIST IN THIS<br />
DOCUMENT AS A REFERENCE TOOL ONLY. NEITHER THE MANUFACTURER OR DISTRIBUTOR<br />
MAKES ANY REPRESENTATION OR WARRANTY OF ANY KIND TO THE BUYER THAT HE<br />
OR SHE IS QUALIFIED TO MAKE ANY REPAIRS TO THE PRODUCT, OR THAT HE OR SHE IS<br />
QUALIFIED TO REPLACE ANY PARTS OF THE PRODUCT. IN FACT, THE MANUFACTURER AND/<br />
OR DISTRIBUTOR EXPRESSLY STATES THAT ALL REPAIRS AND PARTS REPLACEMENTS<br />
SHOULD BE UNDERTAKEN BY CERTIFIED AND LICENSED TECHNICIANS, AND NOT BY<br />
THE BUYER. THE BUYER ASSUMES ALL RISK AND LIABILITY ARISING OUT OF HIS OR<br />
HER REPAIRS TO THE ORIGINAL PRODUCT OR REPLACEMENT PARTS THERETO, OR<br />
ARISING OUT OF HIS OR HER INSTALLATION OF REPLACEMENT PARTS THERETO.<br />
3491 Mission Oaks Blvd. • PO Box 6009 • Camarillo, CA 93011 • (800) 444-3353


