

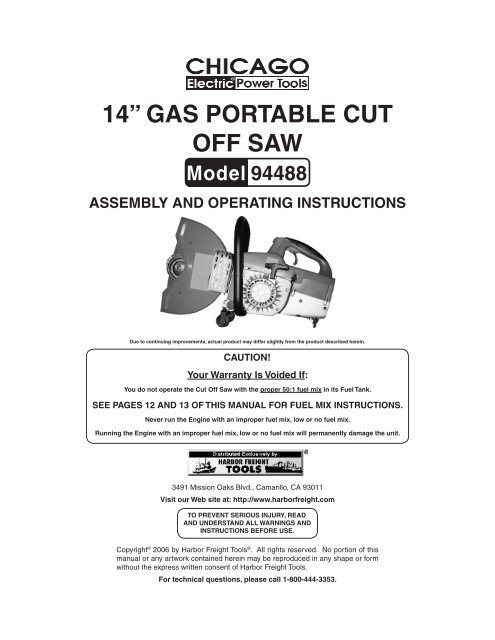
14â GAS PORTABLE CUT OFF SAW - Harbor Freight Tools
14â GAS PORTABLE CUT OFF SAW - Harbor Freight Tools
14â GAS PORTABLE CUT OFF SAW - Harbor Freight Tools

You also want an ePaper? Increase the reach of your titles
YUMPU automatically turns print PDFs into web optimized ePapers that Google loves.
14” <strong>GAS</strong> <strong>PORTABLE</strong> <strong>CUT</strong><br />
<strong>OFF</strong> <strong>SAW</strong><br />
Model 94488<br />
ASSEMBLY AND OPERATING INSTRUCTIONS<br />
Due to continuing improvements, actual product may differ slightly from the product described herein.<br />
CAUTION!<br />
Your Warranty Is Voided If:<br />
You do not operate the Cut Off Saw with the proper 50:1 fuel mix in its Fuel Tank.<br />
SEE PAGES 12 AND 13 OF THIS MANUAL FOR FUEL MIX INSTRUCTIONS.<br />
Never run the Engine with an improper fuel mix, low or no fuel mix.<br />
Running the Engine with an improper fuel mix, low or no fuel mix will permanently damage the unit.<br />
3491 Mission Oaks Blvd., Camarillo, CA 93011<br />
Visit our Web site at: http://www.harborfreight.com<br />
TO PREVENT SERIOUS INJURY, READ<br />
AND UNDERSTAND ALL WARNINGS AND<br />
INSTRUCTIONS BEFORE USE.<br />
Copyright © 2006 by <strong>Harbor</strong> <strong>Freight</strong> <strong>Tools</strong> ® . All rights reserved. No portion of this<br />
manual or any artwork contained herein may be reproduced in any shape or form<br />
without the express written consent of <strong>Harbor</strong> <strong>Freight</strong> <strong>Tools</strong>.<br />
For technical questions, please call 1-800-444-3353.
PRODUCT SPECIFICATIONS<br />
Required Saw Blade Type 14” Diameter (Not Included)<br />
7/64” to 1/4” Thickness<br />
Composite Abrasive or Diamond Abrasive<br />
Rated at a Minimum 4700 RPM<br />
1” Diameter Spindle Hole<br />
Maximum Saw Blade Speed 4700 RPM<br />
Saw Blade Rotation Clockwise<br />
Maximum Cutting Depth 4-1/2”<br />
Drive Type<br />
Belt Driven<br />
Belt Type<br />
10X840 Li (3/4” Width)<br />
Spindle Diameter<br />
1” Diameter<br />
Noise Level<br />
110 dBA @ 3 Feet<br />
Engine Specifications 3.8 HP / Recoil Start / Air Cooled<br />
Engine Idle Speed: 2400 RPM<br />
64cc Displacement / 49mm Cylinder Bore / Single Cylinder / 34mm Piston Stroke<br />
Fuel Mix: Unleaded Gasoline with Octane Rating of 91 / Two Stroke Engine Oil / Ratio 50:1<br />
Fuel Tank Capacity: 0.4 Gallons<br />
Ignition Type: Electronically Controlled Magneto<br />
Spark Plug Type: Bosch WSR 6F or NGK BPMR 7A; M14 x 1.25 Thread<br />
Engine Approvals: 2003 U.S. EPA<br />
Emission Control: EM / TWC<br />
Overall Dimensions 29-1/2” L x 14” W x 12” H<br />
Product Weight<br />
29.5 Pounds<br />
The Emission Control System for this Cut Off Saw is warranted for standards set by the U.S.<br />
Environmental Protection Agency. For warranty information, refer to the back two pages of this manual.<br />
SAVE THIS MANUAL<br />
You will need this manual for the safety warnings and precautions, assembly, operating,<br />
inspection, maintenance and cleaning procedures, parts list and assembly diagram.<br />
Keep your invoice with this manual. Write the invoice number on the inside of the front<br />
cover. Keep this manual and invoice in a safe and dry place for future reference.<br />
GENERAL SAFETY RULES AND PRECAUTIONS<br />
WARNING!<br />
READ AND UNDERSTAND ALL INSTRUCTIONS<br />
Failure to follow all instructions listed below may result in<br />
electric shock, fire, and/or serious injury.<br />
SAVE THESE INSTRUCTIONS<br />
WORK AREA<br />
1.<br />
2.<br />
Keep your work area clean and well lit. Cluttered benches and dark areas invite<br />
accidents.<br />
Do not operate power tools in explosive atmospheres, such as in the presence<br />
of flammable liquids, gases, or dust. Power tools create sparks which may<br />
ignite the dust or fumes.<br />
SKU 94488 For technical questions, please call 1-800-444-3353 PAGE
3.<br />
Keep bystanders, children, and visitors away while operating a power tool.<br />
Distractions can cause you to lose control. Provide barriers or shields as needed.<br />
PERSONAL SAFETY<br />
1.<br />
2.<br />
3.<br />
4.<br />
5.<br />
Stay alert. Watch what you are doing, and use common sense when operating<br />
a power tool. Do not use a power tool while tired or under the influence<br />
of drugs, alcohol, or medication. A moment of inattention while operating power<br />
tools may result in serious personal injury.<br />
Dress properly. Do not wear loose clothing or jewelry. Contain long hair.<br />
Keep your hair, clothing, and gloves away from moving parts. Loose clothes,<br />
jewelry, or long hair can be caught in moving parts.<br />
Remove adjusting keys or wrenches before turning the Cut Off Saw on. A<br />
wrench or a key that is left attached to a rotating part of the machine may result in<br />
personal injury.<br />
Do not overreach. Keep proper footing and balance at all times. Proper footing<br />
and balance enables better control of the power tool in unexpected situations.<br />
Use safety equipment. Always wear ANSI-approved safety impact goggles when<br />
using this product. Proper hearing and breathing protection must also be used.<br />
TOOL USE AND CARE<br />
1.<br />
2.<br />
3.<br />
4.<br />
5.<br />
6.<br />
Do not force the tool. Use the correct tool for your application. The correct<br />
tool will do the job better and safer at the rate for which it is designed.<br />
Do not use the Cut Off Saw if the Engine’s Kill Switch (5D) does not immediately<br />
turn it off. Any tool that cannot be controlled with its Kill Switch is dangerous<br />
and must be replaced.<br />
Store idle tools out of reach of children and other untrained persons. <strong>Tools</strong><br />
are dangerous in the hands of untrained users.<br />
Maintain tools with care. Properly maintained tools are less likely to malfunction<br />
and are easier to control. Do not use a damaged tool. Tag damaged tools “Do not<br />
use” until repaired.<br />
Check for misalignment or binding of moving parts, breakage of parts, and any<br />
other condition that may affect the tool’s operation. If damaged, have the tool<br />
serviced before using. Many accidents are caused by poorly maintained tools.<br />
Use only accessories that are recommended by the manufacturer for your<br />
model. Accessories that may be suitable for one tool may become hazardous<br />
when used on another tool.<br />
SKU 94488 For technical questions, please call 1-800-444-3353 PAGE
SERVICE<br />
1.<br />
2.<br />
Tool service must be performed only by qualified repair personnel. Service or<br />
maintenance performed by unqualified personnel could result in a risk of injury.<br />
When servicing a tool, use only identical replacement parts. Follow instructions<br />
in the “Inspection, Maintenance, And Cleaning” section of this manual.<br />
Use of unauthorized parts or failure to follow maintenance instructions may create<br />
a risk of electric shock or injury.<br />
SPECIFIC SAFETY General RULES AND PRECAUTIONS<br />
1.<br />
2.<br />
3.<br />
4.<br />
5.<br />
6.<br />
7.<br />
Maintain labels and nameplates on the Cut Off Saw. These carry important information.<br />
If unreadable or missing, contact <strong>Harbor</strong> <strong>Freight</strong> <strong>Tools</strong> for a replacement.<br />
Industrial applications must follow OSHA guidelines.<br />
Never stand on the Cut Off Saw. Serious injury could result if the Saw is tipped.<br />
Never leave the Cut Off Saw unattended when it is running. Turn off the Saw<br />
before leaving.<br />
Do not allow children and other unauthorized people to handle or play with<br />
the Cut Off Saw. Keep children and other bystanders away from the working<br />
area.<br />
This Cut Off Saw is designed for outdoor use only. Do not operate the Cut Off<br />
Saw in a closed area or in a poorly ventilated area. When running, the Engine of<br />
this Cut Off Saw produces carbon monoxide, a colorless, odorless, toxic fume<br />
that, when inhaled, can cause serious personal injury or death. Whenever<br />
possible, use a carbon monoxide detector (not included) to detect excessive<br />
carbon monoxide fumes in the work area and in the surrounding area.<br />
Do not force the Cut Off Saw. This tool will do the work better and safer at the<br />
speed and capacity for which it was designed.<br />
FIRE AND EXPLOSION PRECAUTIONS<br />
1.<br />
2.<br />
3.<br />
Gasoline fuel and fumes are flammable, and potentially explosive. Use proper<br />
fuel storage and handling procedures. Always have multiple ABC class fire extinguishers<br />
nearby.<br />
Keep the Cut Off Saw and surrounding areas clean at all times.<br />
When spills of fuel or oil occur, they must be cleaned up immediately. Dispose<br />
of fluids and cleaning materials as per any local, state, or federal codes and regulations.<br />
Store oil rags in a covered metal container.<br />
SKU 94488 For technical questions, please call 1-800-444-3353 PAGE
4.<br />
5.<br />
6.<br />
7.<br />
Never store fuel or other flammable materials near the Cut Off Saw.<br />
Do not smoke, or allow sparks, flames, or other sources of ignition around<br />
the Cut Off Saw.<br />
Keep grounded conductive objects, such as tools, away from exposed, live<br />
electrical parts and connections to avoid sparking or arcing. These events<br />
could ignite fumes or vapors.<br />
Do not refill the Fuel Tank while the Engine is running or while the Engine is<br />
still hot. Do not operate the Cut Off Saw with known leaks in the fuel system.<br />
MECHANICAL PRECAUTIONS<br />
1.<br />
2.<br />
3.<br />
Prior to performing service, maintenance, or cleaning procedures, always<br />
make sure the Engine is off. Allow the Engine and Cut Off Saw to<br />
completely cool. Then, remove the spark plug from the Engine.<br />
Do not alter or adjust any part of the Cut Off Saw or Engine that is assembled<br />
and supplied by the manufacturer.<br />
Always follow scheduled Cut Off Saw and Engine maintenance.<br />
CHEMICAL PRECAUTIONS<br />
1.<br />
2.<br />
Avoid contact with hot fuel, oil, exhaust fumes, and solid surfaces.<br />
Avoid body contact with fuels, oils, and lubricants used in the Cut Off Saw and<br />
Engine. If swallowed, seek medical treatment immediately. Do not induce vomiting<br />
if fuel is swallowed. For skin contact, immediately wash with soap and water. For<br />
eye contact, immediately flush eyes with clean water.<br />
NOISE PRECAUTION<br />
Prolonged exposure to high noise levels is hazardous to hearing. Always wear<br />
ANSI-approved hearing protection when operating or working around the Cut Off<br />
Saw when it is running.<br />
<strong>SAW</strong> BLADE PRECAUTIONS<br />
1.<br />
Only use Saw Blades with the following specifications:<br />
a.<br />
b.<br />
c.<br />
14” Diameter.<br />
From 7/64” to 1/4” thickness.<br />
1” Diameter spindle mounting hole.<br />
SKU 94488 For technical questions, please call 1-800-444-3353 PAGE
d.<br />
Only composite abrasive or diamond abrasive Saw Blades rated at a minimum<br />
of 4,700 RPM.<br />
2.<br />
3.<br />
4.<br />
5.<br />
6.<br />
7.<br />
8.<br />
9.<br />
10.<br />
11.<br />
12.<br />
13.<br />
14.<br />
Never use carbide-tipped, woodcutting, or circular machine Saw Blades. They<br />
can cause severe personal injury from reactive forces, blade contact, or thrown<br />
objects.<br />
Only cut asphalt, concrete, stone, brick, and plastics with this Cut Off Saw.<br />
Inspect the Saw Blade frequently, and replace immediately if the Blade is<br />
cracked, or warped. Cracked or warped Saw Blades may shatter or break and<br />
cause serious personal injury.<br />
Always install the Saw Blade so that the arrow on the Blade points in the direction<br />
of the rotation of the spindle.<br />
Keep hands and fingers away from the cutting area and Saw Blade.<br />
Never attempt to cut more than one workpiece at a time.<br />
When cutting a large workpiece, make sure its entire length is properly supported.<br />
If necessary, use a roller stand (not included).<br />
Allow the Saw Blade to spin up to full speed before feeding it into a workpiece.<br />
When turning off the Cut Off Saw, allow the Saw Blade to spin down and stop on<br />
its own. Do not press against the Saw Blade to stop it.<br />
Do not force the Saw Blade into the workpiece when cutting. Apply moderate<br />
pressure, allowing the Saw Blade to cut without being forced.<br />
To avoid accidental injury, always wear heavy duty work gloves when changing<br />
the Saw Blade.<br />
The Saw Blade will become hot while cutting. Allow the Saw Blade to completely<br />
cool before handling.<br />
Turn off the Cut Off Saw and allow the Saw Blade to completely stop if the<br />
Saw Blade is to be backed out of an uncompleted cut.<br />
Never attempt to remove material stuck in the Cut Off Saw while it is operating.<br />
KICKBACK PRECAUTIONS<br />
1.<br />
2.<br />
Make sure the workpiece is free from nails, metal rebar, and any other foreign<br />
objects that could damage the Saw Blade or cause “kickback”.<br />
Causes and operator prevention of “kickback”: Kickback is a sudden reaction<br />
to a pinched, bound, or misaligned Saw Blade, causing an uncontrolled Cut Off<br />
Saw to lift up and out from the workpiece toward the operator. When the Saw Blade<br />
SKU 94488 For technical questions, please call 1-800-444-3353 PAGE
is pinched or bound tightly by the kerf closing down, the Saw Blade stalls and the<br />
engine reaction drives the Cut Off Saw rapidly back toward the operator. If the Saw<br />
Blade becomes twisted or misaligned in the cut, the teeth at the back edge of the<br />
Saw Blade can raise the Cut Off Saw (walk up) toward the operator. Kickback is a<br />
result of tool misuse and/or incorrect operating procedures or conditions and can<br />
be avoided by taking proper precautions as given below:<br />
• Maintain control of the Cut Off Saw at all times. Never allow the rotating Saw<br />
Blade to rest on the workpiece without holding on to the Saw with both hands.<br />
• When the Saw Blade is binding, or when interrupting a cut for any reason,<br />
turn off the Cut Off Saw and hold the Saw motionless until the Saw Blade<br />
comes to a complete stop. Never attempt to remove the Saw Blade from the<br />
workpiece or pull the Saw backward while the Saw Blade is in motion or kickback<br />
may occur. Investigate and take corrective actions to eliminate the cause<br />
of Saw Blade binding.<br />
• When restarting the Cut Off Saw on a workpiece, center the Saw Blade<br />
in the pre-cut kerf and check that the Saw Teeth are not engaged into the<br />
workpiece. If the Saw Blade is binding, the Cut Off Saw may walk up or kickback<br />
as the Saw is restarted.<br />
• Support large panels with roller stands (not included) to minimize the risk<br />
of Saw Blade pinching and kickback. Large panels tend to sag under their<br />
own weight. Supports must be placed under the panel and near the outer edge<br />
of the panel.<br />
• Do not use a dull or damaged Saw Blade. Unsharpened or improperly set<br />
Saw Blades produce a narrow kerf causing excessive friction, Saw Blade binding<br />
and kickback.<br />
• Push the Saw Blade past the workpiece prior to release.<br />
• Make sure to check the Blade Guard for proper operation. Never disable<br />
the Guard. Do not use the Cut Off Saw if the Guard assembly does not operate<br />
properly. Before each use, make sure the Blade Guard does not touch the<br />
Saw Blade.<br />
MISC. PRECAUTIONS<br />
1.<br />
WARNING! Some dust created by power sanding, sawing, grinding, drilling, and<br />
other construction activities, contain chemicals known (to the State of California) to<br />
cause cancer, birth defects or other reproductive harm. Some examples of these<br />
chemicals are: lead from lead-based paints, crystalline silica from bricks and cement<br />
or other masonry products, arsenic and chromium from chemically treated<br />
lumber. Your risk from these exposures varies, depending on how often you do this<br />
type of work. To reduce your exposure to these chemicals: work in a well ventilated<br />
SKU 94488 For technical questions, please call 1-800-444-3353 PAGE
area, and work with approved safety equipment, such as those dust masks that are<br />
specially designed to filter out microscopic particles.<br />
(California Health & Safety Code § 25249.5, et seq.)<br />
2.<br />
3.<br />
WARNING! People with pacemakers should consult their physician(s) before using<br />
this product. Electromagnetic fields in close proximity to a heart pacemaker could<br />
cause interference to or failure of the pacemaker.<br />
WARNING! The warnings and precautions discussed in this manual cannot cover<br />
all possible conditions and situations that may occur. It must be under stood by the<br />
operator that common sense and caution are factors which cannot be built into this<br />
product, but must be supplied by the operator.<br />
SAVE THESE INSTRUCTIONS<br />
Caution! Your Warranty is voided if:<br />
You do not operate the Cut Off Saw with the proper 50:1 fuel mix in its Fuel<br />
Tank. Never run the Engine with an improper fuel mix, low or no fuel mix. Running<br />
the Engine with an improper fuel mix, low or no fuel mix will permanently damage<br />
the unit.<br />
SEE PAGES 12 AND 13 OF THIS MANUAL FOR FUEL MIX INSTRUCTIONS.<br />
UNPACKING<br />
When unpacking, check to make sure all the parts shown on the Parts Lists on pages<br />
19 through 26 are included. If any parts are missing or broken, please call <strong>Harbor</strong> <strong>Freight</strong><br />
<strong>Tools</strong> at the number shown on the cover of this manual as soon as possible.<br />
PRODUCT FEATURES<br />
(See Figure A, page 11, for details.)<br />
1.<br />
2.<br />
3.<br />
4.<br />
Saw Blade (23F): Use only composite abrasive or diamond abrasive Blades (not<br />
included). Depending on the material to be cut, these Blades are made of different<br />
materials. Make sure to choose the right Blade for the material being cut. The<br />
Saw Blade should be 14” in diameter. From 7/64” to 1/4” thickness, and with a 1”<br />
diameter spindle mounting hole. The Saw Blade should be rated at a minimum of<br />
4,700 RPM.<br />
Flanges (22F): Clamp and support the composite or diamond Saw Blade (23F).<br />
Hex Bolt (25F): Tightens the Flange (22F).<br />
Blade Guard (19F): Safety guard. Directs sparks and dust away from the operator.<br />
SKU 94488 For technical questions, please call 1-800-444-3353 PAGE
5.<br />
6.<br />
7.<br />
8.<br />
9.<br />
10.<br />
11.<br />
12.<br />
13.<br />
14.<br />
15.<br />
16.<br />
17.<br />
18.<br />
19.<br />
20.<br />
Front Handle (3G): Use to securely hold the Cut Off Saw when operating.<br />
Spark Plug Cover (4D): A removable cover for access to the Spark Plug (2B).<br />
Kill Switch (5D): Engine stops when this switch is pressed and held.<br />
Full Throttle Lock Button (9D): To lock the Throttle Trigger (10D) in wide open<br />
position, press this button while the Throttle Trigger is fully depressed. Pressing and<br />
releasing the Throttle Trigger will return the Throttle Trigger to its idle position.<br />
Throttle Trigger (10D): Controls the Engine speed. Pulling back on the Throttle<br />
Trigger opens the throttle and the Engine accelerates. Releasing the Throttle Trigger<br />
slows down the Engine.<br />
Rear Handle (7D): Use to securely hold the Cut Off Saw when operating.<br />
Filter Cover Lock Lever (13E): Locks the Air Filter Cover (1E). Pull back on the<br />
Filter Cover Lock Lever to open the Air Filter Cover.<br />
Pre-Filter 1 (2E), Pre-Filter 2 (3E), Filter Housing (4E), Paper Air Filter (5E),<br />
Secondary Filter (6E): Filters the air, preventing dirt and debris from entering the<br />
Carburetor (7C).<br />
Choke Lever (5C): Turning this Lever counterclockwise closes the Carburetor.<br />
Use the Choke Lever to prime the Engine (cold starting). Turn clockwise for normal<br />
operation.<br />
Starter Grip (3A): Pull to start Engine.<br />
Fuel Tank Cap (16C): Open this Cap for filling the Fuel Tank (2C, 10C). Close the<br />
Fuel Tank Cap prior to for starting and operation.<br />
Decompression Valve (7B): Press down on this Valve to make starting easier.<br />
When air pressure in the Engine reaches a preset value, the Valve automatically<br />
closes.<br />
Belt Tensioner with Tensioning Nut (35F): For V-Belt tension adjustment. Turn<br />
the Nut clockwise to loosen the V-Belt. Turn the Nut counterclockwise to add more<br />
tension to the V-Belt.<br />
Muffler (9B): Reduces both noise and emissions.<br />
Blade Guard Positioning Knob (38F): Loosen the Knob to adjust the Blade Guard<br />
(19F) position.<br />
Shaft Lock (34F): Press and hold the Shaft Lock to facilitate Saw Blade (23F)<br />
changing and installation.<br />
REV 07e<br />
SKU 94488 For technical questions, please call 1-800-444-3353 PAGE
19F<br />
22F<br />
3G<br />
4D<br />
5D<br />
9D<br />
.<br />
7D<br />
24F<br />
25F<br />
10D<br />
23F<br />
(NOT INCLUDED)<br />
9B<br />
3A<br />
5C<br />
38F<br />
16C<br />
34F<br />
7B<br />
35F<br />
13E<br />
6E<br />
5E<br />
2E, 3E<br />
4E<br />
FIGURE A<br />
SKU 94488 For technical questions, please call 1-800-444-3353 PAGE 10
ASSEMBLY INSTRUCTIONS<br />
CAUTION! Make sure to wear ANSI-approved safety impact eyeglasses when<br />
performing any assembly of the Cut Off Saw. Also, when installing or replacing the<br />
Saw Blade (23F) (not included) wear heavy duty work gloves to avoid accidental<br />
cuts to the hands and fingers.<br />
To Install A Saw Blade:<br />
1.<br />
2.<br />
3.<br />
4.<br />
5.<br />
6.<br />
Make sure to refer to the “<strong>SAW</strong> BLADE PRECAUTIONS” section on page 6 of<br />
this manual to select the correct size and type of Saw Blade to install in the Cut<br />
Off Saw.<br />
Press down on the Shaft Lock (34F) to hold the Blade Shaft (16F) in position.<br />
(See Figure A.)<br />
Loosen and remove the Hex Bolt (25F). Then, remove the Washer (24F) and outer<br />
Flange (22F). (See Figure A.)<br />
Mount the new Saw Blade (23F) on the Blade Shaft (16F). IMPORTANT: Make<br />
sure the arrow shown on the Saw Blade points in the same direction as the arrow<br />
shown on the Blade Guard (19F). (See Figure A.)<br />
Once the Saw Blade (23F) is mounted on the Blade Shaft (16F), replace the outer<br />
Flange (22F) and Washer (24F). Then, firmly tighten the Hex Bolt (25F) to secure<br />
the Saw Blade in place. (See Figure A.)<br />
Make sure to check the Blade Guard (19F) for proper operation. If necessary, loosen<br />
the Blade Guard Positioning Knob (38F) to adjust the Blade Guard (19F) position.<br />
Never disable the Guard. Do not use the Cut Off Saw if the Guard assembly does<br />
not operate properly. Before each use, make sure the Blade Guard does not touch<br />
the Saw Blade. (See Figure A.)<br />
PRE-START INSTRUCTIONS<br />
To Fill The Fuel Tank:<br />
1.<br />
2.<br />
WARNING! Your Warranty is voided if: You do not operate the Cut Off Saw with<br />
the proper 50:1 fuel mix in its Fuel Tank. Never run the Engine with an improper<br />
fuel mix, low or no fuel mix. Running the Engine with an improper fuel mix, low or<br />
no fuel mix will permanently damage the unit.<br />
To obtain the proper 50:1 fuel mix, combine two cycle oil with unleaded gasoline<br />
(minimum 91 octane rating) in a clean, approved container. Cover and shake to<br />
thoroughly mix before each fueling. Refer to the Chart below for proper mix quantities.<br />
NOTE: Mix only enough fuel for a few days work. The maximum storage time<br />
of mixed fuel is 3 months. (See Table A.)<br />
SKU 94488 For technical questions, please call 1-800-444-3353 PAGE 11
3.<br />
Once the proper fuel mix is obtained, remove the Fuel Tank Cap (16C). Fill the Fuel<br />
Tank (2C, 10C) approximately 3/4 full with the fuel mix (the Fuel Tank capacity is<br />
0.4 gallons). Then, replace the Fuel Tank Cap. (See Figure A.)<br />
FUEL MIX QUANTITIES<br />
Ratio Two Cycle Oil Unleaded Gasoline (91 Octane)<br />
50:1 4 Fl. Oz. 1.5 Gal.<br />
50:1 8 Fl. Oz. 3 Gal.<br />
50:1 16 Fl. Oz. 6 Gal.<br />
Table A<br />
OPERATING INSTRUCTIONS<br />
Note: Please read and familiarize yourself with the How To Stop The Cut Off Saw<br />
instructions on page 13 before operating.<br />
To Start The Cut Off Saw:<br />
1.<br />
2.<br />
WARNING! Wear ANSI-approved safety impact goggles, hearing protection, and<br />
NIOSH-approved dust mask/respirator during use.<br />
Place the Cut Off Saw on flat, level ground, so that the Saw Blade (23F) does not<br />
contact any objects or the ground. Orient the saw away from your body.<br />
3G<br />
5D<br />
9D<br />
10D<br />
7B<br />
FIGURE B<br />
3A<br />
5C<br />
1D<br />
3.<br />
Pull the Throttle Trigger (10D) all the way back, press down on the Full Throttle Lock<br />
Button (9D) and Release the Throttle Trigger (10D). (See Figure B.)<br />
REV 07e<br />
SKU 94488 For technical questions, please call 1-800-444-3353 PAGE 12
4.<br />
5.<br />
Press down on the Decompression Valve (7B) and turn the Kill Switch (5D) out of<br />
the off position. (See Figure B.)<br />
Set the Choke Lever (5C) to the appropriate position. (See Figure B.)<br />
If the Engine is cold.<br />
If the Engine is warm (even if the Engine has already been run but is still cold).<br />
If the Engine is warm (normal position for warm start).<br />
6.<br />
7.<br />
8.<br />
9.<br />
10.<br />
11.<br />
Hold the Front Handle (3G) with your left hand, and place your right foot on the rear<br />
section of the Main Housing (1D). Place your foot only on the flat portion of the<br />
Main Housing, otherwise the unit could become unstable or components could be<br />
damaged. (See Figure B.) Firmly press the Cut Off Saw to the ground.<br />
Hold the Starter Grip (3A) securely, and maintain balance while slowly pulling out<br />
the Starter Rope (4A) for a short distance. Then, pull out the Starter Rope quickly<br />
about 2-1/2”. (See Figure B.) After pulling, bring Starter Grip (3A) slowly to the<br />
housing before releasing it.<br />
If the Engine does not start, press the Decompression Valve (7B) again and attempt<br />
to start the Engine. (See Figure B.) It may take repeated attempts (8-16 tries) to<br />
start the engine.<br />
If the Engine runs for a while but then stops, press the Decompression Valve (7B).<br />
Move the Choke Lever (5C) to and restart the Engine.<br />
(See Figure B.)<br />
As soon as the Engine starts, squeeze the Throttle Trigger (10D) briefly and let up.<br />
The Full Throttle Lock Button (9D) will revert to its original position, causing the<br />
Engine to idle. (See Figure B.)<br />
NOTE: If the Engine is new, or has been stored for a long period of time, pull the<br />
Starter Grip (3A) several times to ensure sufficient fuel is delivered into the fuel line<br />
and combustion chamber of the Engine. (See Figure B.)<br />
To Stop The Cut Off Saw:<br />
Allow the Engine to idle. Then, press and hold the Kill Switch (5D) located at the<br />
front of the Rear Handle (7D). (See Figure B.)<br />
To Operate The Cut Off Saw:<br />
1.<br />
NOTE: During the break-in phase, which takes about eight hours of use, the Cut<br />
Off Saw must not be operated at high speeds without a load (do not pull the Throttle<br />
Trigger (10D) beyond 3/4 of full throttle). Following this procedure will lengthen the<br />
service life of the Saw.<br />
After running the Cut Off Saw for an extended period of time, allow the Engine to<br />
REV 07e<br />
SKU 94488 For technical questions, please call 1-800-444-3353 PAGE 13
idle for several minutes to dissipate the heat. This will prevent some engine parts<br />
(ignition system, carburetor, etc.) from being damaged by overheating.<br />
2.<br />
3.<br />
4.<br />
5.<br />
IMPORTANT: The Saw Blade (23F) will not rotate when the Engine idles.<br />
(See Figure A.)<br />
When the Cut Off Saw is ready to operate, gently pull the Throttle Trigger (10D)<br />
backward to accelerate the Engine. Once the Engine accelerates, the Saw Blade<br />
will begin to rotate and speed up. When the blade speed is up and stable, you can<br />
begin to move the Saw slowly toward the object to be cut.<br />
While holding the Cut Off Saw firmly, approach the object to be cut with the Saw<br />
Blade and increase pressure on the Cut Off Saw slowly until the Saw Blade is at<br />
the desired depth of cut. Move forward along a straight line to complete the cut.<br />
To stop or halt the cut (when a cut is completed, or the engine runs out of fuel during<br />
the cut, or an abnormal sound is heard), first lift the Saw Blade (23F) out of the<br />
cut. Then, release the Throttle Trigger (10D). Wait until the Engine slows down to<br />
idle speed and the Saw Blade stops rotating. Then, turn off the Saw.<br />
(See Figure A.)<br />
INSPECTION, MAINTENANCE, AND CLEANING<br />
1.<br />
2.<br />
3.<br />
WARNING! Always make sure the Cut Off Saw is in the “<strong>OFF</strong>” position prior to<br />
performing any service, maintenance, or cleaning of the Saw or the Engine.<br />
Before each use, inspect the general condition of the Cut Off Saw. Check for loose<br />
screws, misalignment or binding of moving parts, cracked or broken Saw Blade,<br />
loose connections, and any other condition that may affect the safe operation of<br />
the Cut Off Saw. If abnormal noise or vibration occurs, have the problem corrected<br />
before further use.<br />
Do not use damaged equipment.<br />
To adjust the V-Belt (3F) tension:<br />
a.<br />
b.<br />
c.<br />
Loosen and remove the Screws (1F) on the Transmission Box Cover (2F). Then,<br />
remove the Transmission Box Cover. (See Figure C, next page.)<br />
Loosen the three Hex Bolts (11F) on the Bearing Plate (12F).<br />
(See Figure C.)<br />
Turn the Tensioning Nut (35F) clockwise to increase tension on the V-Belt (3F).<br />
Turn the Tensioning Nut counterclockwise to decrease tension on the V-Belt (or<br />
turn the Bolt (14F) clockwise or counterclockwise). (See Figure C.)<br />
d.<br />
Tighten the three Hex Bolts (11F) on the Bearing Plate (12F).<br />
(See Figure C.)<br />
REV 07e<br />
SKU 94488 For technical questions, please call 1-800-444-3353 PAGE 14
e.<br />
Replace the Transmission Box Cover (2F), and secure it with the Screws (1F).<br />
(See Figure C.)<br />
SCREW<br />
(1F)<br />
V-BELT<br />
(3F)<br />
HEX BOLT<br />
(11F)<br />
BOLT<br />
(14F)<br />
TRANSMISSION BOX COVER<br />
(2F)<br />
FIGURE C<br />
TENSIONING NUT<br />
(35F)<br />
HEX BOLT<br />
(11F)<br />
4.<br />
To clean the Pre-Filter 1 (2E), Pre-Filter 2 (3E), Filter Housing (4E), Paper Air<br />
Filter (5E), and Secondary Filter (6E): It is recommended to clean the Pre-Filter<br />
1, Pre-Filter 2, Filter Housing, Paper Air Filter, and Secondary Filter every 48 hours<br />
of use. To do so, pull the Filter Cover Lock Lever (13E) backward to allow the Air<br />
Filter Cover (1E) swing open. Remove the Pre-Filter 1, Pre Filter 2, Filter Housing,<br />
and Paper Air Filter in succession. Clean and dry the parts or replace if necessary.<br />
Once cleaned or replaced, install the parts in reverse order of removal and close<br />
the Air Filter Cover. (See Figure D.)<br />
AIR COVER<br />
LOCK LEVER<br />
(13E)<br />
SECONDARY<br />
FILTER<br />
(6E)<br />
FILTER HOUSING<br />
(4E)<br />
AIR FILTER COVER<br />
(1E)<br />
FIGURE D<br />
PAPER AIR<br />
FILTER<br />
(5E)<br />
PRE-FILTER 1<br />
(2E)<br />
PRE-FILTER 2<br />
(3E)<br />
5.<br />
To service the Spark Plug (2B): If the Engine loses power, is difficult to start, or<br />
runs poorly at idling speed, first check the condition of the Spark Plug. To check<br />
the Spark Plug:<br />
a.<br />
Remove the Spark Plug Cover (4D) located at the front of the Rear Handle (7D).<br />
(See Figure E.)<br />
REV 07e<br />
SKU 94488 For technical questions, please call 1-800-444-3353 PAGE 15
.<br />
c.<br />
d.<br />
e.<br />
f.<br />
Remove the Spark Plug Wire (18). Then, unscrew and remove the Spark Plug<br />
(2B). (See Figure E.)<br />
Clean off the carbon build-up on the Spark Plug (2B). (See Figure E.)<br />
Check the electrode gap to see if it is 0.020”. If necessary, readjust.<br />
(See Figure E.)<br />
Replace the Spark Plug (2B) after every 100 operating hours, or earlier if the<br />
electrodes are badly eroded (a Bosch WSR 6 F or NGK BPMR 7A is recommended<br />
for replacement). (See Figure E.)<br />
Replace the Spark Plug (2B), Spark Plug Wire (18), and Spark Plug Cover (4D).<br />
(See Figure E.)<br />
SPARK PLUG<br />
COVER<br />
(4D)<br />
SPARK PLUG WIRE<br />
(18)<br />
SPARK PLUG<br />
(2B)<br />
FIGURE E<br />
0.020”<br />
6.<br />
7.<br />
When storing the Saw, make sure to store the unit in a clean, dry, safe location<br />
out of reach of children and other unauthorized people. For long periods of storage,<br />
drain and clean the Fuel Tank (2C, 10C).<br />
CAUTION! All maintenance, service, or repairs not mentioned in this manual<br />
must only be performed by a qualified service technician.<br />
SKU 94488 For technical questions, please call 1-800-444-3353 PAGE 16
TROUBLESHOOTING<br />
Problem<br />
Engine will not start or runs<br />
poorly.<br />
Engine smokes excessively<br />
when running.<br />
Saw Blade not rotating up<br />
to full speed.<br />
Poor quality of cut.<br />
Kill Switch does not turn off<br />
Engine.<br />
Possible Solution<br />
1. Check for amount of fuel.<br />
2. Make sure Choke Lever is in proper position.<br />
3. Make sure Spark Plug Wire is not loose.<br />
4.<br />
Check condition of Spark Plug. Wipe off any access fuel<br />
with a clean, dry cloth. Prior to reinstalling the spark<br />
plug, vent the combustion chamber by pulling the start<br />
grip several times.<br />
5. Make sure Air Filter assembly is clean<br />
6.<br />
7.<br />
Make sure to press Decompression Valve before<br />
starting. Clean/replace valve if it pops up without being<br />
pulled when unit is off.<br />
Have a qualified service technician check the ignition<br />
system.<br />
8. Have a qualified technician check/adjust the carburetor.<br />
The carburetor is not set to run satisfactorily at<br />
altitudes above 5,000 ft.<br />
1. Check for proper mix of fuel.<br />
2. Check Air Filter condition.<br />
1. Check for proper mix and amount of fuel.<br />
2. Check condition of Spark Plug.<br />
3. Adjust tension on V-Belt.<br />
4. Check Air Filter.<br />
1. Make sure Blade is undamaged.<br />
2. Make sure Saw Blade is properly installed.<br />
Immediately discontinue use of Cut Off Saw. Have a<br />
qualified service technician check the Kill Switch.<br />
PLEASE READ THE FOLLOWING CAREFULLY<br />
THE MANUFACTURER AND/OR DISTRIBUTOR HAS PROVIDED THE PARTS LIST AND<br />
ASSEMBLY DIAGRAM IN THIS MANUAL AS A REFERENCE TOOL ONLY. NEITHER THE<br />
MANUFACTURER OR DISTRIBUTOR MAKES ANY REPRESENTATION OR WARRANTY<br />
OF ANY KIND TO THE BUYER THAT HE OR SHE IS QUALIFIED TO REPLACE ANY PARTS<br />
OF THE PRODUCT. IN FACT, THE MANUFACTURER AND/OR DISTRIBUTOR EXPRESSLY<br />
STATES THAT ALL REPAIRS AND PARTS REPLACEMENTS SHOULD BE UNDERTAKEN BY<br />
CERTIFIED AND LICENSED TECHNICIANS, AND NOT BY THE BUYER. THE BUYER AS-<br />
SUMES ALL RISKS AND LIABILITY ARISING OUT OF HIS OR HER REPAIRS TO THE ORIGI-<br />
NAL PRODUCT OR REPLACEMENT PARTS THERETO, OR ARISING OUT OF HIS OR HER<br />
INSTALLATION OF REPLACEMENT PARTS THERETO.<br />
REV 07e<br />
SKU 94488 For technical questions, please call 1-800-444-3353 PAGE 17
PARTS LIST/ASSEMBLY DIAGRAM<br />
CRANKSHAFT HOUSING ASSEMBLY<br />
Part Description Q’ty<br />
1 Screw (M5 x 20) 10<br />
2 Plug 1<br />
3 Cover 1<br />
4 Screw (M5 x 20) 3<br />
5 Washer (5) 3<br />
6 Coil 1<br />
7 Oil Seal (17 x 28 x 7) 1<br />
8 Crankshaft Housing (Left) 1<br />
9 Ball Bearing (6203) 1<br />
Part Description Q’ty<br />
10 Gasket 1<br />
11 Positioning Sleeve 2<br />
12 Crankshaft Housing (Right) 1<br />
13 Oil Seal (15 x 24 x 7) 1<br />
14 Oil Needle 1<br />
15 Ball Bearing (6202) 1<br />
16 Cover 1<br />
17 Plug 1<br />
18 Spark Plug Wire 1<br />
18<br />
NOTE:<br />
Some parts are listed and shown for illustration purposes only,<br />
and are not available individually as replacement parts.<br />
SKU 94488 For technical questions, please call 1-800-444-3353 PAGE 18
PARTS LIST/ASSEMBLY DIAGRAM<br />
CRANKSHAFT & PISTON ASSEMBLY<br />
Part Description Q’ty.<br />
1A Flywheel/Starter Cover 1<br />
2A Screw Plug 1<br />
3A Starter Grip 1<br />
4A Starter Rope 1<br />
5A Rewind Spring 1<br />
6A Spring Cover 1<br />
7A Rope Rotor 1<br />
8A Pawl 1<br />
9A Spring Clip 1<br />
10A Collar Nut 1<br />
11A Starter Cup 1<br />
12A Flywheel 1<br />
13A Crankshaft 1<br />
14A Locking Clip 2<br />
15A Piston Pin 1<br />
Part Description Q’ty.<br />
16A Piston 1<br />
17A Piston Ring 2<br />
18A Needle Cage 1<br />
19A Washer 1<br />
20A Clutch Shoe 3<br />
21A Retainer 3<br />
22A Clutch 1<br />
23A Tension Spring 3<br />
24A Ring 1<br />
25A Retainer Ring (30) 1<br />
26A Bearing (6200) 1<br />
27A V-Belt Pulley 1<br />
28A Washer 1<br />
29A Collar Nut (M8 x 1) 1<br />
30A Rope Bushing 1<br />
17A<br />
24A 25A26A 27A 28A 29A<br />
1A<br />
2A<br />
3A<br />
4A<br />
30A<br />
5A<br />
6A<br />
7A 8A<br />
9A 10A 11A<br />
16A<br />
31A 14A15A<br />
12A 13A<br />
18A<br />
19A 20A 21A<br />
22A<br />
23A<br />
NOTE:<br />
Some parts are listed and shown for illustration purposes only,<br />
and are not available individually as replacement parts.<br />
SKU 94488 For technical questions, please call 1-800-444-3353 PAGE 19
PARTS LIST/ASSEMBLY DIAGRAM<br />
CYLINDER & MUFFLER ASSEMBLY<br />
Part Description Qty.<br />
1B Cylinder 1<br />
2B Spark Plug 1<br />
3B Cylinder Cover 1<br />
4B Screw (M5 x 16) 3<br />
5B Screw (M5 x 20) 4<br />
6B Washer 1<br />
7B Decompression Valve 1<br />
Part Description Qty.<br />
8B Exhaust Gasket 1<br />
9B Muffler Assembly 1<br />
10B Screw (M5 x 16) 2<br />
11B Muffler Guard 1<br />
12B Screw M5 x 12 1<br />
13B Gasket, Cylinder Base 1<br />
13B<br />
NOTE:<br />
Some parts are listed and shown for illustration purposes only,<br />
and are not available individually as replacement parts.<br />
REV 07i<br />
SKU 94488 For technical questions, please call 1-800-444-3353 PAGE 20
PARTS LIST/ASSEMBLY DIAGRAM<br />
FUEL TANK & CARBURETOR<br />
Part Description Qty.<br />
1C Screw (M5 x 20) 8<br />
2C Fuel Tank (Left) 1<br />
3C Pin 2<br />
4C Rubber Mount 2<br />
5C Choke Lever 1<br />
6C Air Hose 1<br />
7C Carburetor 1<br />
8C Screw (M5 x 65) 2<br />
9C Split Pin 2<br />
10C Fuel Tank (Right) 1<br />
11C Connecting Hose 1<br />
12C Sleeve 1<br />
Part Description Qty.<br />
13C Manifold 1<br />
14C Hose Clip 1<br />
15C O-Ring 1<br />
16C Fuel Tank Cap 1<br />
17C Washer 1<br />
18C Tank Vent 1<br />
19C Gasket 1<br />
20C Fuel Pick-Up Filter 1<br />
21C Hose 1<br />
22C “U” Rubber Tube 1<br />
23C Screw Bracket 1<br />
24C Screw (M4 x 5) 1<br />
21C<br />
22C<br />
20C<br />
14C<br />
18C<br />
16C<br />
13C<br />
19C<br />
17C<br />
12C<br />
1C<br />
15C<br />
2C<br />
11C<br />
3C<br />
4C<br />
5C<br />
6C<br />
8C<br />
7C 9C<br />
23C 24C<br />
10C<br />
NOTE:<br />
Some parts are listed and shown for illustration purposes only,<br />
and are not available individually as replacement parts.<br />
SKU 94488 For technical questions, please call 1-800-444-3353 PAGE 21
PARTS LIST/ASSEMBLY DIAGRAM<br />
HANDLE & MAIN COVER ASSEMBLY<br />
Part Description Qty.<br />
1D Main Cover 1<br />
2D Side Sealing Cover 1<br />
3D Front Sealing Cover 1<br />
4D Spark Plug Cover 1<br />
5D Kill Switch 1<br />
6D Screw (ST2.9 x 13) 2<br />
7D Handle molding 1<br />
8D Torsion Spring 1<br />
9D Control Button 1<br />
Part Description Qty.<br />
10D Throttle Trigger 1<br />
11D Trigger Pin 1<br />
12D Torsion Spring 1<br />
13D Shaft 1<br />
14D Throttle Triggering Wire 1<br />
15D Flameout Wire 1<br />
16D Positioning Plank 1<br />
17D Retainer Ring 4 1<br />
NOTE:<br />
Some parts are listed and shown for illustration purposes only,<br />
and are not available individually as replacement parts.<br />
SKU 94488 For technical questions, please call 1-800-444-3353 PAGE 22
PARTS LIST/ASSEMBLY DIAGRAM<br />
AIR FILTER ASSEMBLY<br />
Part Description Qty.<br />
1E Filter Cover 1<br />
2E Pre-Filter I 1<br />
3E Pre-Filter 2 1<br />
4E Filter Housing 1<br />
5E Paper Air Filter 1<br />
6E Secondary Filter 1<br />
7E Screw (ST2.9 x 19) 2<br />
8E Half Round 1<br />
Part Description Qty.<br />
9E Filter Base 1<br />
10E Gasket 1<br />
11E Screw (M5 x 16) 2<br />
12E Flat Spring 1<br />
13E Filter Cover Lock Lever 1<br />
14E Torsion Spring 1<br />
15E Pin (B3 x 32) 1<br />
16E Screw (M5 x 12) 1<br />
15E<br />
14E<br />
13E<br />
12E<br />
9E<br />
10E<br />
7E 8E<br />
6E<br />
5E<br />
4E<br />
3E<br />
1E<br />
2E<br />
16E<br />
NOTE:<br />
Some parts are listed and shown for illustration purposes only,<br />
and are not available individually as replacement parts.<br />
SKU 94488 For technical questions, please call 1-800-444-3353 PAGE 23
PARTS LIST/ASSEMBLY DIAGRAM<br />
TRANSMISSION BOX & <strong>CUT</strong>TER ASSEMBLY<br />
Part Description Qty.<br />
1F Screw (M5 x 20) 9<br />
2F Transmission Box Cover 1<br />
3F V-Belt (10X840Li) 1<br />
4F Nut (M10 – Left) 1<br />
5F Washer (10) 1<br />
6F Belt Pulley Assy. 1<br />
7F Washer (12) 1<br />
8F Clip (35) 2<br />
9F Ball Bearing (6202) 2<br />
10F Ring 1<br />
11F Bolt (M8 x 30) 2<br />
12F Bearing Plate 1<br />
13F Transmission Box 1<br />
14F Bolt (M8 x 30) 1<br />
15F Woodruff Key (4 x 13) 2<br />
16F Blade Shaft 1<br />
17F Washer 2<br />
18F Rubber Ring 1<br />
19F Blade Guard Assy. 1<br />
Part Description Qty.<br />
20F Lock Washer 2<br />
21F Round Lock Nut 1<br />
22F Flange 2<br />
23F Saw Blade (14” Diameter – Not Included) 0<br />
24F Washer 1<br />
25F Hex Bolt 1<br />
26F Bolt (M8 x 35) 2<br />
27F Anchor Plate 1<br />
28F Screw (M6 x 12.5) 2<br />
29F Rod Sleeve 1<br />
30F Spring 1<br />
31F Rod 1<br />
32F End Cap 1<br />
33F Dust Shield 1<br />
34F Shaft Lock 1<br />
35F Belt Tensioner w/Tensioning Nut 1<br />
36F Clamping Lever 1<br />
37F Cover 1<br />
38F Blade Guard Positioning Knob 1<br />
22F 24F<br />
25F<br />
34F<br />
33F<br />
32F<br />
31F<br />
30F<br />
29F<br />
27F<br />
28F<br />
26F<br />
20F<br />
21F 22F INCLUDED<br />
23F<br />
NOT<br />
19F<br />
38F<br />
36F<br />
37F<br />
35F<br />
16F 17F18F<br />
15F<br />
1F<br />
2F<br />
12F<br />
4F 5F 6F7F8F9F10F11F<br />
3F<br />
13F<br />
NOTE:<br />
Some parts are listed and shown for illustration purposes only,<br />
and are not available individually as replacement parts.<br />
14F<br />
SKU 94488 For technical questions, please call 1-800-444-3353 PAGE 24
PARTS LIST/ASSEMBLY DIAGRAM<br />
FRONT HANDLE & SUPPORT ASSEMBLY<br />
Part Description Qty.<br />
1G Handle Bracket 1<br />
2G Screw (M5 x 12) 2<br />
3G Handle Frame 1<br />
4G Screw (M5 x 24) 2<br />
5G Spring Lock (8) 2<br />
Part Description Qty.<br />
6G Screw (M5 x 25) 2<br />
7G Washer (8) 2<br />
8G Wheel 2<br />
9G Support 1<br />
10G Wheel Shaft 2<br />
1G<br />
2G<br />
3G<br />
4G<br />
10G<br />
9G<br />
8G<br />
7G<br />
5G<br />
6G<br />
NOTE:<br />
Some parts are listed and shown for illustration purposes only,<br />
and are not available individually as replacement parts.<br />
SKU 94488 For technical questions, please call 1-800-444-3353 PAGE 25
Limited 90 Day<br />
warranty<br />
<strong>Harbor</strong> <strong>Freight</strong> <strong>Tools</strong> Co. makes every effort to assure that its products meet high quality and durability standards,<br />
and warrants to the original purchaser that this product is free from defects in materials and workmanship for<br />
the period of ninety days from the date of purchase. This warranty does not apply to damage due directly or<br />
indirectly, to misuse, abuse, negligence or accidents, repairs or alterations outside our facilities, or to lack of<br />
maintenance. We shall in no event be liable for death, injuries to persons or property, or for incidental, contingent,<br />
special or consequential damages arising from the use of our product. Some states do not allow the exclusion or<br />
limitation of incidental or consequential damages, so the above limitation of exclusion may not apply to you. This<br />
warranty is expressly in lieu of all other warranties, express or implied, including<br />
the warranties of merchantability and fitness.<br />
To take advantage of this warranty, the product or part must be returned to us with transportation charges prepaid.<br />
Proof of purchase date and an explanation of the complaint must accompany the merchandise. If our inspection<br />
verifies the defect, we will either repair or replace the product at our election or we may elect to refund the purchase<br />
price if we cannot readily and quickly provide you with a replacement. We will return repaired products at our<br />
expense, but if we determine there is no defect, or that the defect resulted from causes not within the scope of<br />
our warranty, then you must bear the cost of returning the product.<br />
This warranty gives you specific legal rights and you may also have other rights which vary from state to state.<br />
3491 Mission Oaks Blvd. • PO Box 6009 • Camarillo, CA 93011 • (800) 444-3353<br />
Emission Control System<br />
Warranty<br />
United States Emission Control Defects<br />
Warranty Statement<br />
The the United States Environmental Protection Agency (herein<br />
EPA) and <strong>Harbor</strong> <strong>Freight</strong> <strong>Tools</strong> ® (herein HFT) are pleased to explain<br />
the emission control system warranty on your 1995 and later Small<br />
Off-Road Engine (herein engine). The engine must be designed,<br />
built and equipped to meet stringent anti-smog standards. New<br />
off-road, spark-ignition engines certified for model year 1997 and<br />
later, must meet such standards set forth by the EPA. HFT must<br />
warrant the emission control system on your engine for the periods<br />
of time described below, provided there has been no abuse, neglect<br />
or improper maintenance of your engine.<br />
Your emission control system may include parts such as the<br />
carburetor or fuel-injection system, and the ignition system. Also<br />
included may be hoses, belts, connectors and other emissionrelated<br />
assemblies.<br />
Where a warrantable condition exists, HFT will repair your engine<br />
at no cost to you including diagnosis, parts and labor.<br />
Manufacturer’s Warranty Coverage<br />
The 1995 and later engines are warranted for two (2) years. If any<br />
emission-related part on your engine is defective, the part will be<br />
repaired or replaced by HFT.<br />
<strong>Harbor</strong> <strong>Freight</strong> <strong>Tools</strong> Emission Control Defects<br />
Warranty Coverage<br />
Engines are warranted for a period of two (2) years relative to<br />
emission control parts defects, subject to the provisions set forth<br />
below. If any emission related part on your engine is defective, the<br />
part will be repaired or replaced by HFT.<br />
Owner’s Warranty Responsibilities<br />
- As the engine owner, you are responsible for the performance<br />
of the required maintenance listed in your Owner’s Manual.<br />
HFT recommends that you retain all receipts covering maintenance<br />
on your engine, but HFT cannot deny warranty<br />
solely for the lack of receipts or for your failure to ensure the<br />
performance of all scheduled maintenance.<br />
- As the engine owner, you should, however, be aware that<br />
HFT may deny you warranty coverage if your engine or a part<br />
has failed due to abuse, neglect, improper maintenance, or<br />
unapproved modifications.<br />
- You are responsible for shipping your engine to a HFT warranty<br />
station as soon as a problem exists. Contact the HFT<br />
Customer Service department at the number below to make<br />
shipping arrangements. The warranty repairs should be<br />
completed in a reasonable amount of time, not to exceed 30<br />
days.<br />
If you have any questions regarding your warranty rights and responsibilities,<br />
you should contact the <strong>Harbor</strong> <strong>Freight</strong> <strong>Tools</strong> Customer<br />
Service Department at 1-800-444-3353.<br />
<strong>Harbor</strong> <strong>Freight</strong> <strong>Tools</strong> Emission Control Defects<br />
Warranty Provisions<br />
1. Length of Coverage<br />
HFT warrants to a first retail purchaser and each subsequent<br />
purchaser that the engine is free from defects in materials<br />
and workmanship that cause the failure of warranted parts<br />
for a period of two (2) years after the date of delivery to the<br />
first retail purchaser.<br />
2. No Charge Repair or Replacement<br />
Repair or replacement of any warranted part will be performed<br />
at no charge to the owner if the work is performed through a<br />
warranty station authorized by HFT. For emissions warranty<br />
SKU 94488 For technical questions, please call 1-800-444-3353 PAGE 26
service, contact the HFT Customer Service Department at<br />
1-800-444-3353.<br />
3. Consequential Damages Coverage<br />
Coverage under this warranty shall also extend to the failure of<br />
any engine components caused by the failure of any warranted<br />
part while it is still covered under this warranty.<br />
4. Coverage Exclusions<br />
Warranty claims shall be filed in accordance with the provisions<br />
of the HFT warranty policy explained in the box at the<br />
top of the previous page. HFT shall not be liable for any loss<br />
of use of the engine, for any alternative usage, for any damage<br />
to goods, loss of time, or inconvenience. Warranty coverage<br />
shall also be excluded for any part which fails, malfunctions,<br />
or is damaged due to failure to follow the maintenance and<br />
operating instructions set forth in the Owner’s Manual including,<br />
but not limited to:<br />
(a) use of parts which are not authorized by HFT<br />
(b) improper installation, adjustment or repair of the engine<br />
or of any warranted part unless performed by an authorized<br />
warranty center<br />
(c)<br />
failure to follow recommendations on fuel use contained<br />
in the Owner’s Manual<br />
(d) improper or inadequate maintenance of any warranted<br />
parts<br />
(e) repairs performed outside of the authorized warranty<br />
service dealers<br />
(f)<br />
alterations by changing, adding to or removing parts from<br />
the engine.<br />
5. Service and Maintenance<br />
Component parts which are not scheduled for replacement<br />
as required maintenance or are scheduled only for regular<br />
inspection to the effect of “repair or replace as necessary”<br />
are warranted for the warranty period. Any warranted part<br />
which is scheduled for replacement as required maintenance<br />
is warranted for the period of time up to the first scheduled<br />
replacement point for that part. Any replacement part, provided<br />
it is equivalent in durability and performance, may be<br />
used in performance of maintenance or repairs. The owner<br />
is responsible for commissioning a qualified technician/mechanic<br />
to perform all required maintenance, as outlined in the<br />
Inspection, Cleaning, and Maintenance section on page<br />
14 of this manual.<br />
6. Warranted Parts<br />
1) Fuel Metering System<br />
i) Carburetor and its internal parts.<br />
ii) Fuel pump (if so equipped).<br />
iii)<br />
Cold start enrichment system.<br />
2) Air Induction System<br />
i) Intake pipe/manifold.<br />
ii)<br />
Air cleaner.<br />
3) Ignition System<br />
i) Spark plug.<br />
ii)<br />
Magneto ignition system.<br />
4) Catalyst System (if so equipped)<br />
i) Exhaust pipe stud.<br />
ii) Muffler.<br />
iii)<br />
Catalytic converter (if so equipped).<br />
5) Miscellaneous items Used in Above Systems<br />
i) Vacuum, temperature and time sensitive valves and<br />
switches.<br />
ii) Hoses, belts, connectors, and assemblies.<br />
SKU 94488 For technical questions, please call 1-800-444-3353 PAGE 27


