883201 Instr - Richeson Art
883201 Instr - Richeson Art
883201 Instr - Richeson Art

Create successful ePaper yourself
Turn your PDF publications into a flip-book with our unique Google optimized e-Paper software.
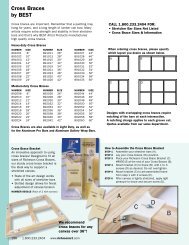
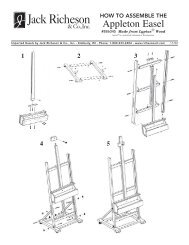
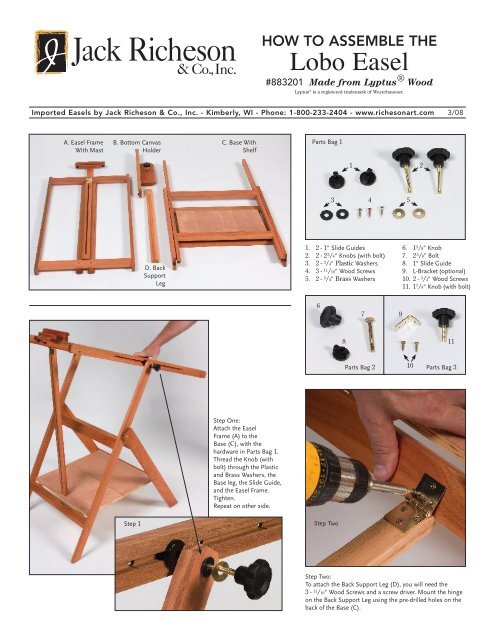
HOW TO ASSEMBLE THE<br />
Lobo Easel<br />
#<strong>883201</strong> Made from Lyptus ® Wood<br />
Lyptus ® is a registered trademark of Weyerhaueser.<br />
Imported Easels by Jack <strong>Richeson</strong> & Co., Inc. - Kimberly, WI - Phone: 1-800-233-2404 - www.richesonart.com 3/08<br />
A. Easel Frame<br />
With Mast<br />
B. Bottom Canvas<br />
Holder<br />
C. Base With<br />
Shelf<br />
Parts Bag 1<br />
1 2<br />
3 4 5<br />
D. Back<br />
Support<br />
Leg<br />
1. 2 - 1" Slide Guides<br />
2. 2 - 2 3 /4" Knobs (with bolt)<br />
3. 2 - 3 /4" Plastic Washers<br />
4. 3 - 11 /16" Wood Screws<br />
5. 2 - 3 /4" Brass Washers<br />
6. 1 3 /8" Knob<br />
7. 2 3 /8" Bolt<br />
8. 1" Slide Guide<br />
9. L-Bracket (optional)<br />
10. 2 - 3 /4" Wood Screws<br />
11. 1 7 /8" Knob (with bolt)<br />
6<br />
7<br />
9<br />
8<br />
11<br />
Parts Bag 2 10 Parts Bag 3<br />
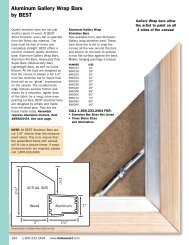
Step One:<br />
Attach the Easel<br />
Frame (A) to the<br />
Base (C), with the<br />
hardware in Parts Bag 1.<br />
Thread the Knob (with<br />
bolt) through the Plastic<br />
and Brass Washers, the<br />
Base leg, the Slide Guide,<br />
and the Easel Frame.<br />
Tighten.<br />
Repeat on other side.<br />
Step 1<br />
Step Two<br />
Step Two:<br />
To attach the Back Support Leg (D), you will need the<br />
3 - 11 /16" Wood Screws and a screw driver. Mount the hinge<br />
on the Back Support Leg using the pre-drilled holes on the<br />
back of the Base (C).
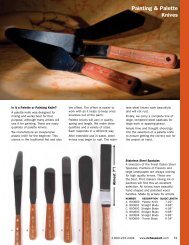
Step Three:<br />
In Parts Bag 2 you will find the<br />
Slide Guide System to join the hinged<br />
Support Legs together. Thread the 2 3 /8"<br />
Bolt through both legs, the Slide Guide<br />
and into the Knob. Tighten at desired<br />
angle.<br />
Step Three<br />
Step Six<br />
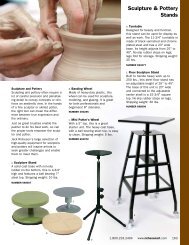
Step Four:<br />
Turn the Top Canvas<br />
Holder section of the<br />
adjustable Mast around.<br />
Step Six:<br />
Loosen the knob on the Bottom Canvas Holder (B) and<br />
slide onto the Mast. Tighten at desired height.<br />
Step Four<br />
Optional: In Parts Bag 3<br />
there is an L-Bracket that<br />
can be attached to the back<br />
of the adjustable Mast to<br />
hold the Mast up when<br />
no canvas is in place.<br />
Mount with the 2 - 3 /4"<br />
Wood Screws into the<br />
pre-drilled holes.<br />
Step Four<br />
Step Five:<br />
To adjust the height of the<br />
adjustable Mast, insert the<br />
1 7 /8" Knob (with bolt).<br />
Tighten at desired height.