
You also want an ePaper? Increase the reach of your titles
YUMPU automatically turns print PDFs into web optimized ePapers that Google loves.
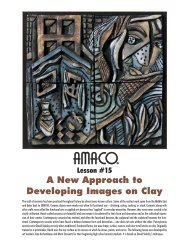
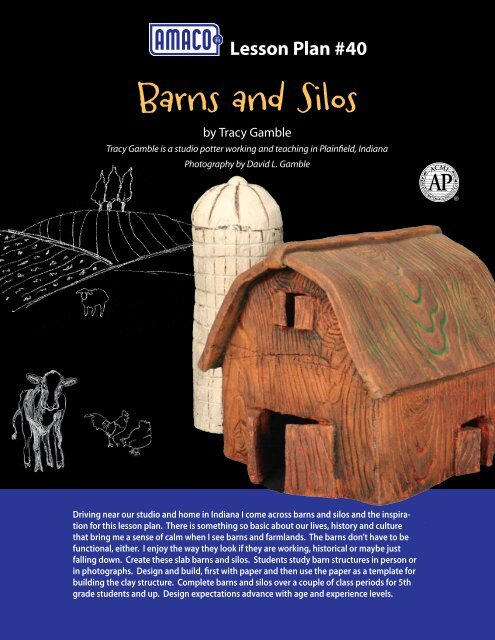
<strong>Lesson</strong> Plan #<strong>40</strong><br />
<strong>Barns</strong> and <strong>Silos</strong><br />
by Tracy Gamble<br />
Tracy Gamble is a studio potter working and teaching in Plainfield, Indiana<br />
Photography by David L. Gamble<br />
Jennifer Hoolihan, Asheville NC<br />
Driving near our studio and home in Indiana I come across barns and silos (Chickens: and the LM-53 inspiration<br />
for this lesson plan. There is something so basic about our lives, LM-41 history Chartreuse and , LM-54 culture Coral)<br />
Orchid,<br />
that bring me a sense of calm when I see barns and farmlands. The barns don’t have to be<br />
functional, either. I enjoy the way they look if they are working, historical or maybe just<br />
falling down. Create these slab barns and silos. Students study barn structures in person or<br />
in photographs. Design and build, first with paper and then use the paper as a template for<br />
building the clay structure. Complete barns and silos over a couple of class periods for 5th<br />
grade students and up. Design expectations advance with age and experience levels.
tools & Materials<br />
l AMACO® Low Fire Clay White #27 or Red #77<br />
(approximately 5 lbs. per student)<br />
l Copy Paper, heavy sketch paper, cardboard<br />
(for paper design and templates/patterns)<br />
l Ruler<br />
l Scissors<br />
l Masking Tape<br />
l AMACO® Slab Roller or AMACO® Rolling Pin<br />
l Rib - smoothing<br />
l AMACO® Fettling Knife (11192H)<br />
l Textures and texture tools<br />
l AMACO® Double-Ended Clay Shapers—<br />
11126L No. 6 Angle Chisel/Flat Chisel or<br />
11128N No. 2 Taper Point/Cup Round<br />
l AMACO® Wire Clay Cutter (11017N)<br />
l AMACO® Scoring Tools (11199R)<br />
l Vinegar and vinegar brushes<br />
l Wooden skewers<br />
l AMACO® Brush–Fitch Fan, Series 28, No. 6 (11183R)<br />
l AMACO® Sponge (11239J)<br />
l AMACO Velvet Underglazes<br />
l AMACO® Gloss Decorating Colors (GDCs)<br />
<strong>Lesson</strong> Plan Goals and Objectives<br />
l Students will design and plan a structure.<br />
l Students will create a clay vessel using textured slabs.<br />
l Students will learn and use proper slab-building<br />
techniques to create structures.<br />
l Students will glaze and personalize their work.<br />
l The lesson incorporates art history, aesthetics, and<br />
criticism with a hands-on activity.<br />
l Students will be able to identify patterns and visual styles<br />
from American culture.<br />
This lesson is suitable for 5th grade students and up.<br />
National Visual Arts Standards<br />
l Understanding the visual arts in relation to history<br />
and culture.<br />
l Understanding and applying media, techniques<br />
and processes.<br />
l Using knowledge of structures and functions.<br />
l Choosing and evaluating a range of subject matter,<br />
symbols, and ideas.<br />
l Reflecting upon and assessing the characteristics and<br />
merits of their work and the work of others.<br />
l Making connections between visual arts and other<br />
disciplines.<br />
Technique<br />
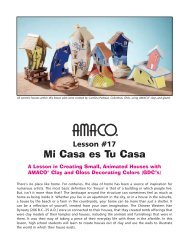
Creating <strong>Barns</strong> & <strong>Silos</strong><br />
1<br />
2<br />
Finished clay barn.<br />
Paper template.<br />
1. Right side–design for barn in paper<br />
Left side–clay barn<br />
Design and construct barn out of paper and tape together to<br />
ensure fit. Then use paper as templates/patterns to cut pieces<br />
from textured clay slabs to create barn in clay.<br />
2. Roll slabs with a slab roller or rolling pin with a thickness<br />
of 3 /8" to 1 /2" and smooth with rib. Texture slab with, pieces of<br />
wood (as pictured), stamps, texture molds, and other found<br />
objects. There are too many texture tools possibilities to list.<br />
Be creative and find some good textures to use on slabs.
3<br />
8<br />
3. Place paper templates/patterns on textured slabs and cut<br />
using a fettling knife or a cutting tool.<br />
4<br />
8. Cut silo and silo roof from textured slab. Heights and widths<br />
of silos can vary. Many silos seem to be taller than the barns.<br />
9<br />
4. Sides, ends and roof of barn.<br />
9. Roll Silo and cut thru on a diagonal for a clean edged<br />
seam.<br />
5<br />
10<br />
5. “Raise” build your barn. Score where parts are to be<br />
attached with a scoring tool or wooden skewer. Connect using<br />
vinegar to moisten scored area only and press together.<br />
6<br />
10. Score area and connect using vinegar to moisten scored<br />
area only.<br />
11<br />
6. Secure connection with a coil and smooth with finger.<br />
11. Press together and gently smooth to maintain texture.<br />
7<br />
12<br />
7. Finish barn by adding details–cutting out doors, windows, etc.<br />
12. Curve silo roof into a dome shape, then score top of silo<br />
and roof, moisten with vinegar, attach and smooth.
13 14<br />
13. Bisque fire to Cone 04. Glaze Decoration<br />
14. Brush on one to two coats of underglaze.<br />
Tips for Success<br />
l Make sure the clay slabs are stiff enough to hold shape<br />
when putting walls and roof together. The slabs should<br />
be stiff enough to assemble but pliable enough to apply<br />
texture. Plan on using approximately five pounds of clay<br />
per student.<br />
l Design roof large enough for over hang on all sides of barn.<br />
l Add roof design details of clay strips to cover any cracks in<br />
the clay that may appear when bending clay to attach roof.<br />
15<br />
15. If textured, lightly wipe some of the underglaze off, the<br />
barn and silo, with a damp sponge. Use a bucket of water<br />
nearby and rinse sponge in bucket when necessary.<br />
Other low fire glazes can be used as an alternative or in<br />
addition to the matt finish of the underglazes.<br />
Glossary<br />
Bisque: Unglazed ceramic after the first firing.<br />
Fire: To heat the clay in a kiln at a very high temperature until<br />
it is hard and it becomes ceramic.<br />
Glaze: A special clear or colored liquid mixture applied to<br />
ceramic surfaces that become hard and glass-like when fired<br />
to the right temperature in a kiln.<br />
Scoring: Carving tiny slits into the moist clay with a fork or<br />
scoring tool before adding slip and joining.<br />
Sculpture: A three-dimensional work of art which is intended<br />
to be viewed from all sides. It can be made out of materials<br />
such as plaster, stone, wood, metal, and clay.<br />
Template: A shaped piece used as a pattern.<br />
Underglaze: A colored decoration applied to bisque or<br />
greenware and usually covered with a glaze before firing.<br />
Join us on Facebook<br />
www.facebook.com/pages/AMACO-American-Art-Clay-Company/69237618823<br />
amaco.com (800) 374-1600 Teacher Support 8am-5pm EST M-F<br />
Share ideas, techniques, upload galleries of artwork or<br />
classroom projects, post special events, charity events, and<br />
workshops. Please join us!<br />
For more lesson plans ideas,<br />
visit amaco.com/amaco-lesson-plans/