Lesson PLan #41 - Amaco
Lesson PLan #41 - Amaco
Lesson PLan #41 - Amaco

You also want an ePaper? Increase the reach of your titles
YUMPU automatically turns print PDFs into web optimized ePapers that Google loves.
PG1<br />
America’s Most Trusted Glazes<br />
LUGs and Velvets<br />
transfer<br />
image<br />
<strong>Lesson</strong> Plan <strong>#41</strong><br />
amaco.com (800) 374-1600 Teacher Support 8am-5pm EST M-F<br />
Learn more at cm-imagetransfer.com<br />
Paul Andrew Wandless<br />
Chicago, IL<br />
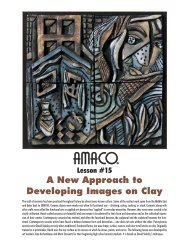
The advantage of drawing and painting with ceramics on a plaster slab is having the luxury<br />
of time when working on an image. The underglazes and slips get absorbed and are held in<br />
the plaster until you’re ready to pour the casting slip over it.<br />
The image created on the plaster slab is transferred to clay using the monoprint process,<br />
which is a printmaking technique. This method of creating an image requires working from<br />
foreground to background when making your images; because the information is reversed<br />
during the transfer (printing) process. This means when you’re overlapping colors, the first<br />
ones applied are the foreground, then layers over the top of these initial colors develop into<br />
the background. The colors can also be applied side-by-side, without overlapping, so the<br />
image you see is what you get when reversed.<br />
Image Transfer: How TO MAKE a Clay Monoprint<br />
by Paul Andrew Wandless<br />
tools & Materials<br />
• AMACO® Underglazes<br />
• AMACO® White Underglaze<br />
• AMACO® Semi-Moist Underglazes<br />
• AMACO® Gloss Decorating Colors<br />
• AMACO® Clay<br />
• AMACO® Underglazes Applicator<br />
• AMACO® Casting Slip<br />
• Paint brushes<br />
• Plaster<br />
• Tape<br />
• Pencil<br />
• Water<br />
• Sponge<br />
<strong>Lesson</strong> PLAN Goals and Objectives<br />
• Draw a design onto plaster with ceramic underglazes<br />
suitable for transfer onto a ceramic slab for firing.<br />
• Drawing and painting techniques will be reversed as<br />
foreground painting precedes background.<br />
• Students will learn how to draw a layered design suitable<br />
for transfer, which will incorporate a reversal of drawing and<br />
painting techniques, such as required in monoprintmaking.<br />
National Visual Arts Standards<br />
• Understanding and applying media, techniques,<br />
and processes.<br />
• Making connections between visual arts and other<br />
disciplines.<br />
• Choosing and evaluating a range of subject matter,<br />
symbols, and ideas.<br />
1. Mask out the<br />
print area on the<br />
plaster with tape.<br />
Tape borders.<br />
2. Sketch the<br />
outlines of your<br />
design, keeping<br />
in mind that the<br />
image and any<br />
text will be<br />
reversed in the<br />
transfer process.<br />
The first few<br />
prints won’t look<br />
exactly the way<br />
you expect until<br />
this way of<br />
drawing becomes<br />
more comfortable<br />
for you.<br />
3. Use AMACO®<br />
Underglazes in a<br />
squeeze applicator<br />
to create permanent<br />
outlines. You can<br />
use water to erase or<br />
soften your outlines.
PG2<br />
Image Transfer: How to make a Clay Monoprint<br />
4. Unwanted<br />
pencil lines can<br />
be erased with<br />
a damp sponge.<br />
They will also<br />
burn out during<br />
firing if not<br />
erased.<br />
6. Use AMACO®<br />
Gloss Decorating<br />
colors (GDC’s) in<br />
areas where you<br />
want a gloss finish<br />
that pops from the<br />
background colors.<br />
5. Use AMACO®<br />
Semi-Moist<br />
Underglazes to<br />
shade as you would<br />
with watercolors.<br />
Because you’re<br />
working in reverse<br />
process here, these<br />
shadings will be<br />
the blush of skin<br />
tones on the image’s<br />
surface when<br />
transferred.<br />
7. Apply the<br />
background colors<br />
for the figure.<br />
8. Cover details. 9. Background<br />
colors are<br />
complete.<br />
10. Apply face<br />
background.<br />
11. Finish face<br />
background<br />
12. Create the<br />
backdrop behind<br />
the figure and<br />
around head.<br />
13. Add<br />
background around<br />
the head with<br />
AMACO® Semi-Moist<br />
Underglazes. Streak<br />
the background into<br />
the Godhead halo.
PG3<br />
Image Transfer: How to make a Clay Monoprint<br />
14. Moisten and<br />
let the color run to<br />
creat the flowing<br />
backdrop.<br />
15. Adding and<br />
darkening the flow of<br />
underglazes;<br />
adding more<br />
complexity to the<br />
flowing background.<br />
16. Add another<br />
layer behind or<br />
over that flowing<br />
color by first<br />
removing the<br />
tape masks and<br />
then cleaning the<br />
borders where<br />
there was some<br />
run-off. Remove<br />
over painted tape<br />
borders.<br />
17. Clean borders.<br />
18. Apply new tape. 19. Apply white<br />
Underglaze to the<br />
background behind<br />
figure and flowing<br />
halo. The layering<br />
behind the portrait<br />
figure helps to create<br />
an illusion of<br />
dimensionality.<br />
20. Now the image<br />
is complete and<br />
you can remove<br />
the tape borders.<br />
22. Apply slip to<br />
the adhering edge<br />
by brush casting<br />
slip (same as you’re<br />
going to use to<br />
pour the image)<br />
onto the edge of<br />
the clay strip.<br />
21. Once the image is<br />
complete and is dry<br />
to the touch, create a<br />
clay dam that works<br />
as a mold box for<br />
the casting slip to be<br />
poured and firmed up<br />
to create the clay print.<br />
To make this clay dam,<br />
roll out a clay slab approximately<br />
3/8 of an<br />
inch thick and cut into<br />
1" strips.<br />
23. Building your<br />
dam. Make the wall<br />
around the slab<br />
by attaching it to<br />
the surface of the<br />
plaster slab around<br />
the image.
PG4<br />
Image Transfer: How to make a Clay Monoprint<br />
24. Finished dam.<br />
26. Allow the<br />
casting slip to<br />
harden for about<br />
15 minutes.<br />
When firm to<br />
the touch, cut<br />
off the clay walls.<br />
After cutting off<br />
the clay walls,<br />
check to see if it is<br />
strong enough to<br />
remove.<br />
25. Pour casting slip<br />
over the image to<br />
desired thickness.<br />
Start at one end and<br />
work your way over<br />
to the other side. If<br />
the casting slip is thin,<br />
it will level out on its<br />
own. If the casting slip<br />
is a little thick, you'll<br />
need to level it out<br />
with a spreader.<br />
27. Place a piece of<br />
plastic cling wrap<br />
on back of clay<br />
print and then a<br />
piece of cardboard.<br />
Carefully flip it over<br />
and remove the<br />
plaster bat. The clay<br />
print can continue<br />
to dry on the piece<br />
of cardboard.<br />
Drywall or a wooden<br />
board work just<br />
fine as well<br />
28. Finished Project.<br />
by Paul Andrew Wandless<br />
Join us on Facebook<br />
www.facebook.com/pages/AMACO-American-Art-Clay-Company/69237618823<br />
Share ideas, techniques, upload galleries of artwork or classroom projects,<br />
post special events, charity events, and workshops. Please join us!<br />
For more lesson plans ideas, visit amaco.com