Lesson #15 - Amaco
Lesson #15 - Amaco
Lesson #15 - Amaco

Create successful ePaper yourself
Turn your PDF publications into a flip-book with our unique Google optimized e-Paper software.
<strong>Lesson</strong> <strong>#15</strong><br />
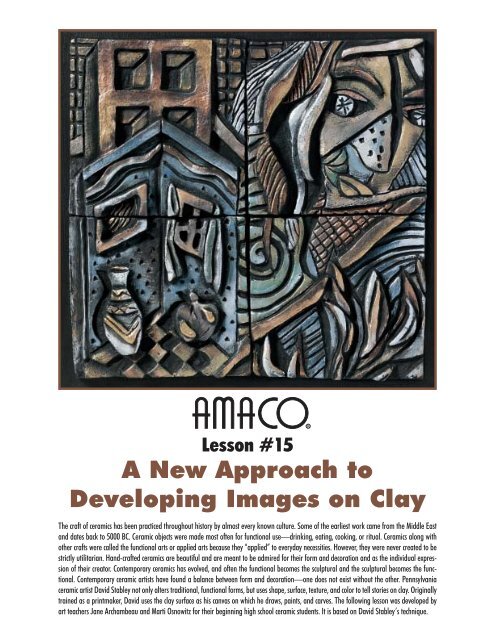
A New Approach to<br />
Developing Images on Clay<br />
The craft of ceramics has been practiced throughout history by almost every known culture. Some of the earliest work came from the Middle East<br />
and dates back to 5000 BC. Ceramic objects were made most often for functional use—drinking, eating, cooking, or ritual. Ceramics along with<br />
other crafts were called the functional arts or applied arts because they “applied” to everyday necessities. However, they were never created to be<br />
strictly utilitarian. Hand-crafted ceramics are beautiful and are meant to be admired for their form and decoration and as the individual expression<br />
of their creator. Contemporary ceramics has evolved, and often the functional becomes the sculptural and the sculptural becomes the functional.<br />
Contemporary ceramic artists have found a balance between form and decoration—one does not exist without the other. Pennsylvania<br />
ceramic artist David Stabley not only alters traditional, functional forms, but uses shape, surface, texture, and color to tell stories on clay. Originally<br />
trained as a printmaker, David uses the clay surface as his canvas on which he draws, paints, and carves. The following lesson was developed by<br />
art teachers Jane Archambeau and Marti Osnowitz for their beginning high school ceramic students. It is based on David Stabley’s technique.
<strong>Lesson</strong> Goals and<br />
Objectives:<br />
1. Students learn to make story telling<br />
plates or tiles based on David Stabley’s technique.<br />
2. The lesson incorporates art history, aesthetics,<br />
and criticism with a hands on activity.<br />
3. The lesson focuses on various ceramic<br />
techniques and important composition and<br />
design elements essential to creating a uniquely<br />
designed plate or tiles; fundamental technical<br />
skills for using specialty finishing products to<br />
create non-traditional surfaces; and selfexpression.<br />
Notes: ________________________<br />
____________________________<br />
____________________________<br />
Background<br />
Preparation:<br />
“Secret Sun Flowers” by Jessica Holewinski, Whitmer High School, Toledo, Ohio.<br />
9. Describe the techniques and materials<br />
used in this lesson plan — slab building,<br />
carving, and finishing techniques.<br />
Notes: ________________________<br />
____________________________<br />
____________________________<br />
Glossary:<br />
Slip — clay that has been<br />
watered down to a creamy consistency<br />
Template — a positive pattern<br />
Triptych — a work of art consisting<br />
of three hinged or folding<br />
panels<br />
Supplies:<br />
1. This lesson is designed for high school<br />
students, but can be used with modification for<br />
middle school students, as well.<br />
2. Show slides or, if possible, original work<br />
by contemporary artists who are using nontraditional<br />
approaches to the clay surface.<br />
3. Show students the work that David<br />
Stabley does and explain his process.<br />
4. Explain what narrative art is and how this<br />
applies to Stabley’s work.<br />
5. Discuss the difference between the real<br />
world and fantasy or dream worlds.<br />
6. Show the students work by Chagall, Klee,<br />
and Matisse.<br />
7. Teach the students about foreground,<br />
middle ground, and background as well as<br />
other design and technical elements.<br />
8. Provide students with books, plant catalogs,<br />
old calendars, etc. for students to use to<br />
research ideas, and develop their drawings.<br />
Cover Photo: “Summer Breeze” by Kristin<br />
Kowalski, Whitmer High School, Toledo, Ohio.<br />
Bisque — unglazed pottery<br />
after first firing<br />
Composition — the organization<br />
of a work of art<br />
Fire — a term used in ceramics;<br />
to heat the clay in a kiln at a very<br />
high temperature until it is dry<br />
and hard and becomes pottery.<br />
Incise — to engrave or carve a<br />
design into a surface<br />
Narrative — a narrated story<br />
Patina — corrosion (usually<br />
brown or green) that appears on<br />
copper or its alloys<br />
Score — to scratch or “rough<br />
up” surfaces of clay that are to<br />
be joined together.<br />
Scoring — a method of joining<br />
two parts of clay together that<br />
have dried to a leather hard<br />
stage by scratching the two surfaces<br />
and spreading slip<br />
between them as a “glue.”<br />
2<br />
AMACO ® Rub n’ Buff ®<br />
Metallic Finishes<br />
AMACO ® Clay Shapers<br />
Clay<br />
Brush (for cleaning)<br />
Ceramic Carving Tools<br />
“Shoe House” by David Stabley,<br />
Danville, Pennsylvania.
Additional Supplies:<br />
Cotton swabs<br />
Drywall<br />
Large dinner plate to use as<br />
mold<br />
Latex house paint—black or any<br />
dark color<br />
Paper<br />
Paper towels<br />
Pencils<br />
Rags—small, clean, polyester<br />
Plastic for wrapping clay<br />
Sponges<br />
Vinegar<br />
Slab Roller or Rolling Pin<br />
Kiln<br />
Instructions:<br />
1. Students develop a design on paper that<br />
tells a story about an event in their lives, a<br />
vacation spot, an imaginary place, a dream,<br />
etc. The designs must include foreground, middle<br />
ground, and background and should<br />
include objects that are large, medium, and<br />
small. All designs must have objects that overlap<br />
in some areas and should have raised or<br />
built up areas that result from adding extra<br />
clay. Plates should have added objects that<br />
extend off the edges. The tiles should have a<br />
minimum of two horizontal curved lines to<br />
divide space and a minimum of three vertical<br />
or diagonal line elements. Line designs should<br />
extend across all tiles to reach edges.<br />
“Springtime” by Krissy Dutridge, Whitmer<br />
High School, Toledo, Ohio.<br />
2. A large dinner plate is used as a<br />
form/mold for making plates. Tiles are cut<br />
from slabs. The project should include a set<br />
of four equal size square tiles to form a larger<br />
square or a set of three long rectangular<br />
tiles placed together to create a triptych<br />
design.<br />
3. The final designs are on paper that is the<br />
exact size as the ceramic plate or the multiple<br />
tiles.<br />
4. If making a plate, cover the plate form<br />
with dampened paper towels.<br />
5. Roll a clay slab to approximately 3 /8"<br />
thick. For the plate, cut it to the proper size<br />
and place it on top of the paper towels. Be<br />
careful not to disturb the paper towels or<br />
the clay will stick to the plate and break<br />
and crack as it dries. For the tiles, cut the<br />
tiles to equal size and arrange on a piece of<br />
drywall<br />
6. Place the drawn design on top of the<br />
clay. With a needle tool use the dot-to-dot<br />
method to poke through the paper into the<br />
clay tracing the main outlines of the<br />
design.<br />
7. Attach levels of clay and extrusions by<br />
scoring and using vinegar.<br />
8. When the clay is leather hard, carve<br />
patterns, texture, and detail using a variety<br />
of ceramic carving tools. A dry paint brush is<br />
used to brush away the clay residue that<br />
results from the carving.<br />
9. Be sure that the clay does not become<br />
too hard throughout the carving process.<br />
Since it may take several class periods, students<br />
should wrap their pieces in damp<br />
paper towels and place them in plastic bags<br />
to prevent drying.<br />
10. After the fronts of the pieces are complete,<br />
students should clean the backs with a<br />
damp sponge.<br />
11. The plates should be dry enough to be<br />
left off the plate mold that was used. Be sure<br />
the paper towels are removed and the sides<br />
and back are smoothed and cleaned. Dry the<br />
3<br />
tiles on the drywall or between two pieces of<br />
drywall (if this will not effect the design). This<br />
helps keep the tiles from warping.<br />
12. After drying and firing, the plates are<br />
painted with black (or any dark color like<br />
purple or navy blue) latex house paint.<br />
13. Using clean, small rags (polyester works<br />
better than cotton), apply the Rub n’ Buff ® .<br />
Wrap the small rag around the index finger<br />
and squeeze a very small amount of color<br />
onto the rag. Rub it gently on the surface of<br />
piece. Cotton swabs can be used to apply Rub<br />
n’ Buff ® to areas that are hard to reach. The<br />
more rubbing, the less intense the color. Start<br />
from the back relief and work toward the<br />
foreground. The colors dry in a minute or two<br />
and can be overlaid with other colors. The<br />
colors seal themselves and a sealer is not<br />
needed.<br />
“It All Started With A Mouse” by Hamlee<br />
Ross, Whitmer High School, Toledo, Ohio.
David Stabley, Danville, Pennsylvania, created this unique teapot and decorated it with<br />
AMACO ® Rub ’n Buff ® wax metallic finishes.<br />
“Space Perceptions” by Debbie Bailey,<br />
Whitmer High School, Toledo, Ohio.<br />
Additional<br />
Suggestions:<br />
1. More advanced students can use this technique<br />
on three-dimensional forms that are<br />
slab built or wheel thrown—vase, teapot,<br />
goblet, cup, etc. These decorating products are<br />
NOT water safe or food safe and should only<br />
be used on decorative pieces.<br />
2. More specific or different subjects can be<br />
given to the students. Suggested themes are:<br />
dreams, a door to my world, a window on my<br />
imagination, my secret garden, my special<br />
world, etc.<br />
Examples of plates were made by students at<br />
Whitmer High School, Washington Local<br />
School System, Toledo, Ohio, Jane<br />
Archambeau and Marti Osnowitz, ceramics<br />
teachers.<br />
This is one lesson in a series of art plans for<br />
elementary and secondary programs using<br />
American Art Clay Co., Inc. products.<br />
Successful lessons will be considered for future<br />
publication. Send your ideas and slides to<br />
David Gamble, National Marketing Director,<br />
American Art Clay Co, Inc.<br />
“Mystic Morning” by Nichole Suchy, Whitmer High School, Toledo, Ohio.<br />
American Art Clay Co., Inc. • 4717 West Sixteenth Street • Indianapolis, Indiana 46222 • (317)244-6871 • (800)374-1600<br />
4<br />
11885H 25M0500