

caution - Toro
caution - Toro
caution - Toro

You also want an ePaper? Increase the reach of your titles
YUMPU automatically turns print PDFs into web optimized ePapers that Google loves.
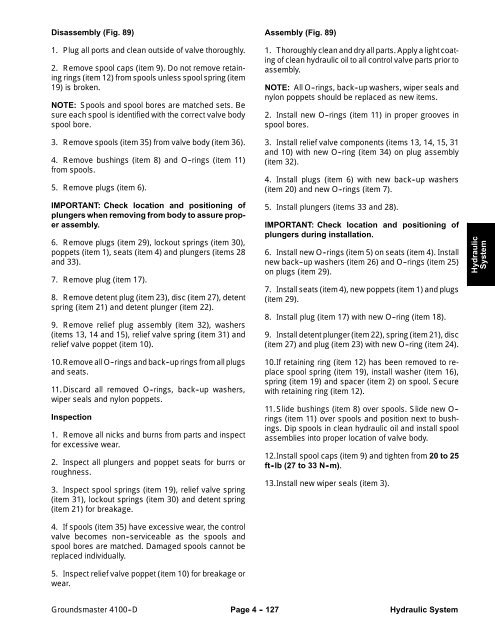
Disassembly (Fig. 89)<br />
1. Plug all ports and clean outside of valve thoroughly.<br />
2. Remove spool caps (item 9). Do not remove retaining<br />
rings (item 12) from spools unless spool spring (item<br />
19) is broken.<br />
NOTE: Spools and spool bores are matched sets. Be<br />
sure each spool is identified with the correct valve body<br />
spool bore.<br />
3. Remove spools (item 35) from valve body (item 36).<br />
4. Remove bushings (item 8) and O--rings (item 11)<br />
from spools.<br />
5. Remove plugs (item 6).<br />
IMPORTANT: Check location and positioning of<br />
plungers when removing from body to assure proper<br />
assembly.<br />
6. Remove plugs (item 29), lockout springs (item 30),<br />
poppets (item 1), seats (item 4) and plungers (items 28<br />
and 33).<br />
7. Remove plug (item 17).<br />
8. Remove detent plug (item 23), disc (item 27), detent<br />
spring (item 21) and detent plunger (item 22).<br />
9. Remove relief plug assembly (item 32), washers<br />
(items 13, 14 and 15), relief valve spring (item 31) and<br />
relief valve poppet (item 10).<br />
10.Remove all O--rings and back--up rings from all plugs<br />
and seats.<br />
11.Discard all removed O--rings, back--up washers,<br />
wiper seals and nylon poppets.<br />
Inspection<br />
1. Remove all nicks and burns from parts and inspect<br />
for excessive wear.<br />
2. Inspect all plungers and poppet seats for burrs or<br />
roughness.<br />
3. Inspect spool springs (item 19), relief valve spring<br />
(item 31), lockout springs (item 30) and detent spring<br />
(item 21) for breakage.<br />
4. If spools (item 35) have excessive wear, the control<br />
valve becomes non--serviceable as the spools and<br />
spool bores are matched. Damaged spools cannot be<br />
replaced individually.<br />
5. Inspect relief valve poppet (item 10) for breakage or<br />
wear.<br />
Assembly (Fig. 89)<br />
1. Thoroughly clean and dry all parts. Apply a light coating<br />
of clean hydraulic oil to all control valve parts prior to<br />
assembly.<br />
NOTE: All O--rings, back--up washers, wiper seals and<br />
nylon poppets should be replaced as new items.<br />
2. Install new O--rings (item 11) in proper grooves in<br />
spool bores.<br />
3. Install relief valve components (items 13, 14, 15, 31<br />
and 10) with new O--ring (item 34) on plug assembly<br />
(item 32).<br />
4. Install plugs (item 6) with new back--up washers<br />
(item 20) and new O--rings (item 7).<br />
5. Install plungers (items 33 and 28).<br />
IMPORTANT: Check location and positioning of<br />
plungers during installation.<br />
6. Install new O--rings (item 5) on seats (item 4). Install<br />
new back--up washers (item 26) and O--rings (item 25)<br />
on plugs (item 29).<br />
7. Install seats (item 4), new poppets (item 1) and plugs<br />
(item 29).<br />
8. Install plug (item 17) with new O--ring (item 18).<br />
9. Install detent plunger (item 22), spring (item 21), disc<br />
(item 27) and plug (item 23) with new O--ring (item 24).<br />
10.If retaining ring (item 12) has been removed to replace<br />
spool spring (item 19), install washer (item 16),<br />
spring (item 19) and spacer (item 2) on spool. Secure<br />
with retaining ring (item 12).<br />
11.Slide bushings (item 8) over spools. Slide new O--<br />
rings (item 11) over spools and position next to bushings.<br />
Dip spools in clean hydraulic oil and install spool<br />
assemblies into proper location of valve body.<br />
12.Install spool caps (item 9) and tighten from 20 to 25<br />
ft -lb (27 to 33 N -m).<br />
13.Install new wiper seals (item 3).<br />
Hydraulic<br />
System<br />
Groundsmaster 4100--D<br />
Page 4 - 127<br />
Hydraulic System


