Getting Started with Biograph Infiniti Software - Bio-Medical ...
Getting Started with Biograph Infiniti Software - Bio-Medical ...
Getting Started with Biograph Infiniti Software - Bio-Medical ...

You also want an ePaper? Increase the reach of your titles
YUMPU automatically turns print PDFs into web optimized ePapers that Google loves.
<strong>Getting</strong> <strong>Started</strong> <strong>with</strong><br />
<strong>Bio</strong>Graph <strong>Infiniti</strong><br />
Thought Technology Ltd.<br />
2180 Belgrave Avenue, Montreal, QC H4A 2L8 Canada<br />
Tel: (800) 361-3651 ۰ (514) 489-8251 Fax: (514) 489-8255<br />
E-mail: mail@thoughttechnology.com<br />
Webpage: http://www.thoughttechnology.com
The Manufacturer:<br />
Product Name:<br />
Product No.:<br />
Device Name:<br />
Device No.:<br />
EC<br />
REP<br />
Thought Technology Ltd.<br />
2180 Belgrave Avenue<br />
Montreal, Quebec, Canada<br />
H4A 2L8<br />
+1 (514) 489-8251<br />
mail@thoughttechnology.com<br />
ProComp <strong>Infiniti</strong> System<br />
ProComp5 <strong>Infiniti</strong> System<br />
FlexComp <strong>Infiniti</strong> System<br />
MyoTrac <strong>Infiniti</strong> System<br />
ProComp2 System<br />
T7110M, T7120M, T7150M, T7160M,<br />
T7170M, T7500M, T7520M, T7550M,<br />
T7555M, T9800<br />
T7535<br />
ProComp <strong>Infiniti</strong>,<br />
FlexComp <strong>Infiniti</strong>,<br />
MyoTrac <strong>Infiniti</strong>,<br />
ProComp 5 <strong>Infiniti</strong><br />
ProComp 2<br />
SA7500, SA7550, SA9800, SA7525, SA7400<br />
EMERGO EUROPE<br />
Molenstraat 15<br />
2513 BH, The Hague<br />
The Netherlands<br />
Tel: +31.70.345.8570<br />
Fax: +31.70.346.7299<br />
<strong>Getting</strong> <strong>Started</strong> <strong>with</strong> <strong>Bio</strong>Graph <strong>Infiniti</strong>
Type BF (Battery-powered Floating) Equipment<br />
Internally powered equipment<br />
Continuous operation<br />
Read Instruction Manual – Refer to applicable hardware manuals for additional information.<br />
CAUTION<br />
<br />
WARNING<br />
<br />
<br />
<br />
<br />
<br />
<br />
<br />
<br />
<br />
<br />
<br />
<br />
<br />
US Federal Law restricts this device to sale by, or on order of, a physician or any other practitioner licensed by<br />
the law of the state in which he or she practices to use or order the use of this device.<br />
Do not operate Active Sensors <strong>with</strong>in 10 feet of an operating cellular phone, similar radio transmitting device,<br />
other powerful radio interference producing sources such as arc welders, radio thermal treatment equipment, x-<br />
ray machines, or any other equipment that produces electrical sparks.<br />
All encoders are totally isolated from line (110 or 220VAC) power due to battery operation and fiber optic<br />
connections to computers. However, many hospitals and the FDA require that computers, printers and any<br />
other equipment used <strong>with</strong> medical devices be electrically isolated from line voltage to UL or CSA medical safety<br />
standards.<br />
The PC used <strong>with</strong> device must be placed outside the patient/client environment (more than 3 meters or 10 feet)<br />
or the PC must comply <strong>with</strong> EN 60601-1-1 (system safety).<br />
After use, the Disposable Electrodes may be a biohazard. Handle, and when applicable, dispose of these<br />
materials in accordance <strong>with</strong> accepted medical practice and any applicable local, state and federal laws and<br />
regulations.<br />
Reusable electrodes present a potential risk of cross-infection especially when used on abraded skin, unless<br />
they are restricted to a single patient or sterilized between patients. If sterilizing electrodes, employ only gas<br />
sterilization.<br />
Radiated radio frequency electromagnetic fields can cause performance degradation in the MyoScan-Pro EMG<br />
sensor. In the worst case, an RF field strength of 22mV/M can cause an increase of 1V in the signal reading<br />
from a MyoScan-Pro sensor. Be sure to keep in mind that a very relaxed muscle should provide an EMG<br />
reading of approximately 1–3V.<br />
Due to the slight risk of inducing photosensitive epileptic seizures, proceed <strong>with</strong> caution when using repetitive<br />
EP/ERP visual stimuli protocols <strong>with</strong> <strong>Bio</strong>Graph <strong>Infiniti</strong> 5.0 (Protocol Generator algorithm/Evoked Potential screen<br />
instrument) and the AV Sync sensor. If a seizure appears to be starting, stop the visual stimulus immediately.<br />
Explosion Hazard; Do not use in the presence of a flammable anesthetic mixture <strong>with</strong> air, or <strong>with</strong> Oxygen or<br />
Nitrous Oxide.<br />
Not to be immersed in water<br />
Take care in arranging patient and sensor cables to avoid risk of patient entanglement or strangulation.<br />
The operator is responsible for ensuring the safety of any devices controlled or triggered by <strong>Infiniti</strong> equipment or<br />
software, or by any software or hardware receiving data from <strong>Infiniti</strong> equipment. <strong>Infiniti</strong> equipment must not be<br />
configured or connected in such a way that failure in its data acquisition, processing or control functions can<br />
trigger patient feedback stimulus that poses an unacceptable level of risk.<br />
Use of any equipment in a biofeedback context should be immediately terminated upon any sign of treatmentrelated<br />
distress or discomfort.<br />
Not to be connected to a patient undergoing MRI, Electro surgery or defibrillation.<br />
ATTENTION<br />
<br />
<br />
<br />
<br />
<br />
<br />
<br />
Sensors damaged by static electricity are not covered under warranty. To prevent static discharge from<br />
damaging the sensor and/or encoders, use anti-static mats or sprays in your working area. A humidifier may<br />
also be used to prevent static environments by conditioning hot, dry air.<br />
Do not apply any electrode gel or equivalent directly on the sensor snaps. Always use electrodes as a medium<br />
between the sensor and the client.<br />
Not for diagnostic purposes, not defibrillator proof, not for critical patient monitoring.<br />
To prevent voiding warranty by breaking connector pins, carefully align white guiding dot on sensor plug <strong>with</strong><br />
slot on sensor input.<br />
Sharp bends or winding the fiber optic cable in a loop smaller than 4 inches (10cm) may destroy the cable.<br />
A fiber optic cable not fully pushed into its receptacle may cause the unit not to operate; make sure that both<br />
ends of the cable are fully inserted into their receptive jacks and the nut is tightened firmly.<br />
Make sure to remove electrodes from sensor snaps immediately after use.<br />
<strong>Getting</strong> <strong>Started</strong> <strong>with</strong> <strong>Bio</strong>Graph <strong>Infiniti</strong><br />
i
Do not plug third party sensors directly into instrument inputs. Plug only Thought Technology Active Sensor<br />
cable connectors into instrument inputs. All electrodes and third party sensors must be connected to active<br />
sensors, either directly or through an adapter.<br />
Remove batteries when the device is not being used for an extended period of time. Please dispose of batteries<br />
following local regulations.<br />
INTENDED PURPOSE<br />
<strong>Bio</strong>feedback, Relaxation & Muscle Re-education purposes.<br />
CONTRAINDICATIONS<br />
None<br />
NOTE<br />
<br />
<br />
<br />
<br />
<br />
No preventative inspections required; maintenance must be performed by qualified personnel.<br />
The supplier will make available, upon request, circuit diagrams, component parts lists and description or other<br />
information required for the repair of product by qualified personnel.<br />
If a fiber optic or patient cable is damaged or breaks please replace.<br />
Due to the essential performance and intended use of the device, testing for immunity to electromagnetic<br />
disturbances was not required and was not performed. The device may be susceptible at levels below<br />
IEC60601-1-2 immunity test levels.<br />
The operator must be familiar <strong>with</strong> typical characteristics of signals acquired by this equipment, and be able to<br />
detect anomalies in the acquired signal that could interfere <strong>with</strong> treatment effectiveness. Depending on the<br />
importance of signal integrity, it may be advisable to continuously monitor the raw signals, in time and/or<br />
frequency domain, while the device is being used for biofeedback or other purposes. If anomalies are observed<br />
on acquired signals, and if you suspect a problem <strong>with</strong> electromagnetic interference, contact Thought<br />
Technology for a technical note on identification and remediation.<br />
MAINTENANCE AND CALIBRATION<br />
<br />
<br />
STORAGE<br />
Wipe encoder <strong>with</strong> a clean cloth<br />
Factory testing and calibration ensure equipment accuracy and frequency response. The user may invoke a<br />
self-calibration function that will recalibrate certain device parameters (see section in hardware manual). Contact<br />
Thought Technology for factory recalibration if necessary.<br />
Store in its original case at up to 90% humidity / 30C°<br />
TRANSPORTATION<br />
<br />
Transport in its original case<br />
Guidance and manufacturer's declaration – electromagnetic emissions<br />
The <strong>Infiniti</strong> system is intended for use in the electromagnetic environment specified below. The customer or the user of the <strong>Infiniti</strong><br />
system should assure that it is used in such an environment.<br />
Emissions test Compliance Electromagnetic environment – guidance<br />
RF emissions<br />
CISPR 11<br />
RF emissions<br />
CISPR 11<br />
Harmonic emissions<br />
IEC 61000-3-2<br />
Voltage fluctuations/flicker emissions<br />
IEC 61000-3-3<br />
Group 1<br />
Class B<br />
Not applicable<br />
Not applicable<br />
The <strong>Infiniti</strong> system uses RF energy only for its internal function.<br />
Therefore, its RF emissions are very low and are not likely to cause<br />
any interference in nearby electronic equipment.<br />
The <strong>Infiniti</strong> system is suitable for use in all establishments, including<br />
domestic establishments and those directly connected to the public<br />
low-voltage power supply network that supplies buildings used for<br />
domestic purposes.<br />
Manual No. SA7913 Ver. 5.0<br />
<strong>Getting</strong> <strong>Started</strong> <strong>with</strong> <strong>Bio</strong>Graph <strong>Infiniti</strong><br />
ii
Table of Contents<br />
Introduction ............................................................................................................................... 1<br />
Overview .................................................................................................................................................. 1<br />
System Requirements .............................................................................................................................. 1<br />
Before You Begin ..................................................................................................................................... 2<br />
Connecting the Hardware ........................................................................................................................ 2<br />
Starting <strong>Bio</strong>Graph <strong>Infiniti</strong> .......................................................................................................................... 4<br />
Showing or Hiding File Names .............................................................................................................. 5<br />
Enabling Notch Filter Settings ............................................................................................................... 5<br />
Enabling Confidential Setting ................................................................................................................ 6<br />
Using a Compact Flash Card ................................................................................................................... 6<br />
Formatting the Compact Flash .............................................................................................................. 7<br />
Preparing the Compact Flash for Use <strong>with</strong> your Encoder ..................................................................... 7<br />
Recording Sessions .................................................................................................................. 9<br />
Overview .................................................................................................................................................. 9<br />
First Time Run: Entering Key Codes ....................................................................................................... 9<br />
Recording an Open Display Session ..................................................................................................... 11<br />
Defining new open display session settings........................................................................................ 12<br />
Recording a Script Session.................................................................................................................... 13<br />
Defining new script session settings ................................................................................................... 14<br />
Ending a Session ................................................................................................................................... 15<br />
Other Recording Functions .................................................................................................................... 16<br />
Setting Review Mode Auto-Rejection Levels ...................................................................................... 16<br />
Checking the Battery Level ................................................................................................................. 17<br />
Troubleshooting the Start Sequence ..................................................................................................... 18<br />
Reviewing Sessions ................................................................................................................ 19<br />
Overview ................................................................................................................................................ 19<br />
Client Database ..................................................................................................................................... 19<br />
Selecting Review Screens ..................................................................................................................... 19<br />
Rejecting Artifacts .................................................................................................................................. 21<br />
Automatic Rejection of Artifacts .......................................................................................................... 21<br />
Manually Rejecting Artifacts ................................................................................................................ 22<br />
Calculating Statistics .............................................................................................................................. 23<br />
Generating Session Reports .................................................................................................................. 23<br />
Generating Trend Reports ..................................................................................................................... 24<br />
Favorites and Quick Starts ..................................................................................................... 26<br />
Overview ................................................................................................................................................ 26<br />
Starting a session <strong>with</strong> a Favorite .......................................................................................................... 26<br />
From the Desktop or Start Menu ......................................................................................................... 26<br />
From <strong>with</strong>in <strong>Bio</strong>Graph <strong>Infiniti</strong> ............................................................................................................... 27<br />
Recording and Reviewing <strong>with</strong> a Favorite ............................................................................................. 27<br />
Reference ................................................................................................................................ 28<br />
Contacting Thought Technology ............................................................................................................ 28<br />
Returning Equipment ........................................................................................................................... 28<br />
Technical Support ............................................................................................................................... 28<br />
Repair Return Form ............................................................................................................................... 29<br />
Index ........................................................................................................................................ 30<br />
<strong>Getting</strong> <strong>Started</strong> <strong>with</strong> <strong>Bio</strong>Graph <strong>Infiniti</strong><br />
iii
<strong>Getting</strong> <strong>Started</strong> <strong>with</strong> <strong>Bio</strong>Graph <strong>Infiniti</strong>
Overview<br />
Introduction<br />
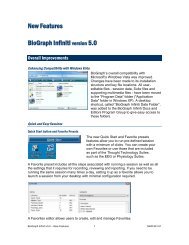
The purpose of this guide is to provide you <strong>with</strong> a rapid overview of the main functions of the <strong>Bio</strong>Graph<br />
<strong>Infiniti</strong> program. It includes an introduction to recording open display and script sessions, as well as basic<br />
functions used for reviewing and reporting upon session data.<br />
This manual uses examples to illustrate how to record open display and script sessions, as well as<br />
functions for reviewing sessions. Screen captures were taken from sessions recorded using the ProComp<br />
<strong>Infiniti</strong> encoder and channel sets, display screens and sample data from the EEG Suite. What you see on<br />
your computer monitor will vary, depending on the encoder type and Application Suites that you are<br />
using.<br />
Please refer to the on-line help manual for a more detailed description of all the functions and features of<br />
the program. To open on-line help, simply press the F1 function key, on your keyboard, from any window<br />
in the program. Because the on-line help manual is designed to provide contextual information, it should<br />
automatically open at the section that discusses the window from which the help was called.<br />
Note:<br />
Important safety information about operating your system is provided in the front matter<br />
of the manual starting on page i.<br />
System Requirements<br />
This list shows the requirements for running <strong>Bio</strong>Graph <strong>Infiniti</strong> 5.0.<br />
Note:<br />
<strong>Bio</strong>Graph <strong>Infiniti</strong> 5.0 is a 32-bit software program. It is not 64-bit compatible.<br />
Intel® Pentium® 4, Intel Centrino®, or Intel Core Duo (or compatible) processor, AMD Athlon XP,<br />
AMD Turion 64 X2 Dual-Core Mobile Technology, AMD Turion 64 Mobile Technology, AMD<br />
Athlon 64 FX, AMD Athlon 64 (or compatible) processor.<br />
Desktop or laptop <strong>with</strong> two monitor capacity.<br />
Microsoft® Windows® 2000 <strong>with</strong> Service Pack 4, Microsoft® Windows® XP Professional or Home<br />
Edition <strong>with</strong> Service Pack 2 or Windows Vista Home Basic, Home Premium, Business, Ultimate, or<br />
Enterprise (certified for 32-bit editions)<br />
50 – 60 gigabytes hard disk space for video recording and processing. (The software needs 2.5<br />
gigabytes of hard drive space to install and run)<br />
512 MB or more of RAM (1 GB recommended)<br />
CD ROM or DVD drive<br />
Video Card (minimum XGA, 1,024 x 768 monitor resolution)<br />
32 bit compatible sound card & speakers<br />
1 to 4 USB ports, depending on the desired number of Pro/Flex <strong>Infiniti</strong> encoders<br />
1 to 4 serial com ports, depending on the desired number of ProComp+ encoders.<br />
Mouse or compatible pointing device<br />
Microsoft Office Basic (for report generation and printing)<br />
Compact Flash Reader (for use <strong>with</strong> compact flash card only)<br />
Webcam 30 frames per second (for video purposes only)<br />
DirectX 9c or later<br />
Internet access (for updating software and receiving technical support)<br />
<strong>Getting</strong> <strong>Started</strong> <strong>with</strong> <strong>Bio</strong>Graph <strong>Infiniti</strong> 1
Before You Begin<br />
Ensure that <strong>Bio</strong>Graph <strong>Infiniti</strong> 5.0 and at least one Application Suite have been installed on your computer.<br />
Note that to ensure compatibility <strong>with</strong> the Windows Vista operating system, <strong>Bio</strong>Graph <strong>Infiniti</strong> 5.0 installs<br />
a different file structure from previous versions. As a result, only Application Suites <strong>with</strong> the version<br />
number 5.0 can be installed after <strong>Bio</strong>Graph <strong>Infiniti</strong> 5.0 has been installed on your computer.<br />
<br />
If this is the first time that you have installed <strong>Bio</strong>Graph <strong>Infiniti</strong><br />
Confirm that your Application Suite is also version 5.0. This indicates that the Application Suite has<br />
been modified to incorporate the changes to the <strong>Bio</strong>Graph <strong>Infiniti</strong> system file structure.<br />
If you are updating <strong>Bio</strong>Graph <strong>Infiniti</strong> from an earlier version to 5.0<br />
The process will also update the file structure of any previously-installed version of an Application<br />
Suite (i.e., version 4.0 installed <strong>with</strong> <strong>Bio</strong>Graph <strong>Infiniti</strong> 4.0). After you have updated <strong>Bio</strong>Graph <strong>Infiniti</strong> to<br />
version 5.0, you cannot install an Application Suite <strong>with</strong> a lower version number.<br />
If you need to install an older version of an Application Suite after installing <strong>Bio</strong>Graph <strong>Infiniti</strong> 5.0, or if you<br />
have problems installing your Application Suites, check for a solution in the FAQ section of the Thought<br />
Technology website or contact our Technical Support (see page 28 for contact information).<br />
Connecting the Hardware<br />
This section describes briefly how to connect a TT-USB device and sensors to an encoder. Detailed<br />
information about your <strong>Infiniti</strong> encoder is provided in its hardware manual.<br />
An <strong>Infiniti</strong> encoder is a multiple-channel battery-operated device<br />
for real-time psychophysiology, biofeedback and data acquisition.<br />
The encoder has a protected pin sensor input for each data<br />
channel (the number of inputs depends on the encoder model).<br />
The encoder samples incoming signals, and digitizes, encodes,<br />
and transmits the sampled data to the TT-USB interface unit.<br />
FlexComp <strong>Infiniti</strong> encoder<br />
It uses a fiber optic cable for transmission to provide maximum<br />
freedom of movement, signal fidelity, and electrical isolation.<br />
The TT-USB interface unit connects to a USB port on the host computer. It receives the data from the<br />
encoder in optical form and converts it into USB format to communicate <strong>with</strong> the software.<br />
USB cable<br />
Encoder<br />
TT-USB interface unit<br />
Unconnected hardware components<br />
Fiber optic cable<br />
<strong>Getting</strong> <strong>Started</strong> <strong>with</strong> <strong>Bio</strong>Graph <strong>Infiniti</strong> 2
Insert one end of the fiber optic cable<br />
carefully into the fiber optic port on the<br />
encoder. Tighten the nut gently so that<br />
the cable won't slip out.<br />
Do the same <strong>with</strong> the other end of the<br />
fiber optic cable and the fiber optic port<br />
of the TT-USB interface unit.<br />
Insert the small connector of the USB<br />
cable into the USB port on the TT-USB<br />
interface device.<br />
Insert the large connector of the USB<br />
cable into the USB port of your PC.<br />
Connected hardware components<br />
USB ports on a PC are generally located at the back of the base unit. You may also find a USB port at the<br />
front of your base unit; you can connect the other end of the USB cable to it. On a laptop, USB ports are<br />
usually located at the side or the back of the laptop.<br />
Before a session can be recorded, the correct sensors must be connected to the encoder. The channel<br />
set or script used for recording determines which sensors to connect. This information is provided in the<br />
user documentation that comes <strong>with</strong> your Application Suite.<br />
Encoder inputs and sensor outputs use the same protected pin design, and are connected <strong>with</strong> special<br />
cables (provided <strong>with</strong> the sensors). When connecting the cable to an encoder or sensor, make sure to<br />
properly line up the guiding dot on the top of the plug <strong>with</strong> the notch in the protected pin socket. Forcing<br />
the plug into the socket in any other position may damage the equipment.<br />
<strong>Getting</strong> <strong>Started</strong> <strong>with</strong> <strong>Bio</strong>Graph <strong>Infiniti</strong> 3
Guiding dot<br />
Notch<br />
Starting <strong>Bio</strong>Graph <strong>Infiniti</strong><br />
To start the software, do one of the following:<br />
<br />
<br />
Select <strong>Bio</strong>Graph <strong>Infiniti</strong> in the Start Menu under Program Files\Thought Technology\<strong>Infiniti</strong>\.<br />
Double-click on the <strong>Bio</strong>Graph <strong>Infiniti</strong> icon on the Desktop.<br />
The program always starts in the Main<br />
Menu window.<br />
From here you can record sessions,<br />
replay or review recorded sessions,<br />
maintain session and client information,<br />
or manage session data recorded on a<br />
Compact Flash memory card.<br />
You can also set global settings that<br />
affect the performance of <strong>Bio</strong>Graph<br />
<strong>Infiniti</strong>.<br />
Note:<br />
Global settings remain in effect<br />
unless you change them.<br />
<strong>Getting</strong> <strong>Started</strong> <strong>with</strong> <strong>Bio</strong>Graph <strong>Infiniti</strong> 4
Showing or Hiding File Names<br />
Channel sets, screens, scripts, and favorites are identified by a Description and File Name. By default,<br />
<strong>Bio</strong>Graph <strong>Infiniti</strong> displays only Descriptions. However, you have the option to display File Names if you<br />
prefer.<br />
The first time you run <strong>Bio</strong>Graph <strong>Infiniti</strong>, it pops up a<br />
message explaining how to display file names.<br />
Script list <strong>with</strong> file names hidden<br />
<br />
Click Close to close the message pop-up.<br />
If you don't want to see this message each time<br />
you reopen the software, select the check box<br />
before you close it.<br />
<br />
<br />
<br />
Select Options at the top left of the main menu screen.<br />
Select Show/Hide File Names from the drop-down menu. The check mark beside Hide indicates that<br />
file names are hidden.<br />
Select Show to display file names.<br />
Script list <strong>with</strong> file names displayed<br />
Enabling Notch Filter Settings<br />
A notch filter is applied to certain raw signals to remove electrical interference caused by the frequency<br />
used to transmit electricity.<br />
<br />
<br />
<br />
Select Options at the top left of the main menu screen.<br />
Select Notch Filters from the drop-down menu.<br />
Select EEG, EMG and/or EKG, and set Frequency to 50Hz or 60Hz, depending on the transmission<br />
frequency used in your country (60Hz for North America, for instance). Then click OK.<br />
<strong>Getting</strong> <strong>Started</strong> <strong>with</strong> <strong>Bio</strong>Graph <strong>Infiniti</strong> 5
Enabling Confidential Setting<br />
The Confidential setting helps protect clients' privacy by masking their names in the client database.<br />
<br />
<br />
<br />
Click Database to open the Main Database window.<br />
From the Settings menu, select Confidential. The check mark indicates<br />
that the setting is enabled.<br />
If you need to disable the Confidential setting, repeat these steps to<br />
remove the check mark.<br />
With the Confidential setting disabled<br />
With the Confidential setting enabled<br />
<br />
If you are using <strong>Bio</strong>Graph <strong>Infiniti</strong> for the first time, read First Time Run: Entering Key Codes on<br />
page 9.<br />
For information about Recording an Open Display Session, go to page 11.<br />
For information about Recording a Script Session, go to page 13.<br />
Information about Reviewing Sessions begins on page 19.<br />
Information about Favorites and Quick Starts is provided on page 26.<br />
Using a Compact Flash Card<br />
You can use FlexComp <strong>Infiniti</strong>, ProComp <strong>Infiniti</strong> and MyoTrac <strong>Infiniti</strong> encoders to record sessions on a<br />
Compact Flash card for later download to the <strong>Bio</strong>Graph <strong>Infiniti</strong> software. Before you can record to a<br />
Compact Flash card, the card must be formatted and prepared for use <strong>with</strong> your encoder.<br />
Note:<br />
<br />
<br />
<strong>Infiniti</strong> encoders are delivered <strong>with</strong> a protective<br />
insert in the Compact Flash slot.<br />
To remove the insert, push the button next to the slot<br />
once to eject it. The card can then be inserted, as<br />
shown. To protect from incorrect insertion the card can<br />
be inserted into the device only one way. When<br />
inserted properly it is flush <strong>with</strong> the device rear.<br />
Use the same procedure to remove the card when it is<br />
no longer required, and reinsert the protective insert.<br />
Eject<br />
Compact Flash slot on a MyoTrac <strong>Infiniti</strong> encoder<br />
<strong>Getting</strong> <strong>Started</strong> <strong>with</strong> <strong>Bio</strong>Graph <strong>Infiniti</strong> 6
Formatting the Compact Flash<br />
<br />
First connect a Compact Flash reader to your computer and insert the<br />
card in it.<br />
Readers come in different sizes and shapes. This picture shows a<br />
typical device.<br />
<br />
Click on My Computer on your computer desktop.<br />
You will see a removable disk listed. This is your Compact Flash card.<br />
The drive letter will vary depending on your computer's configuration.<br />
<br />
<br />
<br />
<br />
Select the removable disk and right-click on it.<br />
From the right-click menu, select Format.<br />
In Format Removable Disk, select FAT from the File system menu, as<br />
shown.<br />
Select the Quick Format check box and then click Start.<br />
This formats your Compact Flash card to the proper format.<br />
<br />
When formatting is finished, click Close.<br />
Preparing the Compact Flash for Use <strong>with</strong> your Encoder<br />
Use this procedure to prepare a FAT-formatted Compact Flash card for use <strong>with</strong> your ProComp <strong>Infiniti</strong>,<br />
ProComp5 <strong>Infiniti</strong>, FlexComp <strong>Infiniti</strong> or MyoTrac <strong>Infiniti</strong> encoder.<br />
Note:<br />
If you have a MyoTrac <strong>Infiniti</strong> encoder, you can optionally prepare the card for recording sessions<br />
using the CF Report Generator <strong>Software</strong> (available on the MyoTrac <strong>Infiniti</strong> CD or from our website<br />
at www.thoughttechnology.com). See the Report Generator User Guide for more information.<br />
<br />
<br />
<br />
Connect the Compact Flash reader to your computer and insert the formatted card in it.<br />
Open <strong>Bio</strong>Graph <strong>Infiniti</strong>.<br />
In the Main Menu screen, do one of the following:<br />
o Click Compact Flash Options.<br />
o From the Options menu, select Compact Flash Options.<br />
<strong>Getting</strong> <strong>Started</strong> <strong>with</strong> <strong>Bio</strong>Graph <strong>Infiniti</strong> 7
In Compact Flash Options,<br />
click Prepare Compact Flash.<br />
<br />
<br />
In Prepare Compact Flash, select Create new MSF and<br />
click OK.<br />
At the warning prompt, click Yes.<br />
<br />
<br />
<br />
In the file browsing window, locate and select the removable disk that is your Compact Flash card.<br />
The drive letter will vary depending on your computer's configuration.<br />
In the Save browser window, do the following:<br />
o<br />
o<br />
o<br />
Ensure that Save as type is Master Files (*.msf).<br />
In File name, type flash.msf.<br />
Click Save.<br />
At the confirmation prompt, click OK.<br />
The system builds the master file on the card.<br />
<br />
At the acknowledgement prompt, click OK and then click Close to exit Compact Flash Options and<br />
return to the Main Menu screen.<br />
Your Compact Flash card is now ready for use. This procedure needs to be done only once.<br />
Note:<br />
Once it has been prepared for use <strong>with</strong> your encoder, the Compact Flash card cannot be used for<br />
other purposes (such as file storage).<br />
<strong>Getting</strong> <strong>Started</strong> <strong>with</strong> <strong>Bio</strong>Graph <strong>Infiniti</strong> 8
Overview<br />
Recording Sessions<br />
With the <strong>Bio</strong>Graph <strong>Infiniti</strong> software you can record two types of session: Open Display and Script. Open<br />
display sessions are generally used for biofeedback training, when flexibility is important and you need to<br />
be able to rapidly change session parameters depending on the client's reactions. Script sessions, on the<br />
other hand, are important for recording assessment or follow-up sessions, where a standardized and<br />
constant approach is more appropriate. While both open display and script sessions can be used for<br />
trend reports, script sessions generally generate more comparable sessions.<br />
Follow these general steps to start recording a session. Detailed explanations are provided in later<br />
sections of this chapter.<br />
Click on Start Open Display Session (page 11) or Start Script Session (page 13).<br />
Select a Client file. This is done from the Client Database window.<br />
Select a previously recorded session and click Start as Selected or define a new session<br />
configuration. This is done from the Start Session window.<br />
To define a new session configuration, depending on the session type, select a channel set and up to<br />
5 display screens or select a script. This is done from the Select Screens or the Script Database<br />
windows.<br />
Verify the sensor connections. This is done from the Channel Set Configuration window.<br />
In the recording window, you can:<br />
o From the Edit menu: set automatic rejection parameters for reviewing the session (page 16);<br />
modify channel set parameters.<br />
o From the Options menu: perform an impedance check on your sensors; zero EMG sensors;<br />
check the battery level of your encoder (page 17); view the channel set configuration; or set open<br />
display statistics.<br />
First Time Run: Entering Key Codes<br />
An encoder key code is associated <strong>with</strong> a given encoder serial number. An application key code is a<br />
number that validates a specific <strong>Bio</strong>Graph <strong>Infiniti</strong> installation. Key codes are unique numbers generated<br />
by Thought Technology and provided to you when you purchase your <strong>Bio</strong>Graph <strong>Infiniti</strong> system.<br />
Note:<br />
If you purchased your encoder and software separately, the key codes should be inside the cover<br />
of the <strong>Bio</strong>Graph <strong>Infiniti</strong> manual. If you purchased them at the same time, you should find the key<br />
codes inside the battery compartment of the encoder and the front cover of the manual. If you<br />
can't find the key codes, contact Thought Technology Technical Support (see page 28 for contact<br />
information) <strong>with</strong> details of your purchase so that we can send you key codes for your system.<br />
If you have upgraded to <strong>Bio</strong>Graph <strong>Infiniti</strong> 5.0 from version 3.1 or earlier, you can no longer use<br />
the original key codes for your existing encoders. Your upgrade package should include new key<br />
codes for your encoders. If you are missing any key codes, contact Thought Technology or your<br />
dealer to receive new ones.<br />
<strong>Getting</strong> <strong>Started</strong> <strong>with</strong> <strong>Bio</strong>Graph <strong>Infiniti</strong> 9
The first time you record a session <strong>with</strong> your new software, <strong>Bio</strong>Graph <strong>Infiniti</strong> will check for the key codes<br />
and ask you to enter them. You will also be asked to enter key codes if you have uninstalled and<br />
reinstalled <strong>Bio</strong>Graph <strong>Infiniti</strong>, or if this is the first time you are using a specific encoder <strong>with</strong> your existing<br />
installation.<br />
If you are using an <strong>Infiniti</strong> encoder in one of the <strong>Infiniti</strong> communication protocols, the program should<br />
detect its serial number automatically and you will be asked to enter the Key Codes for your system.<br />
<br />
When the Encoder Key Codes window opens, click to highlight your unit’s serial number in the left<br />
table, for example, DA1002. This is the same serial number you can see on the back of the unit.<br />
<br />
Type the Encoder Key Code (found inside the battery compartment) into the Key Code text box.<br />
Click on the arrow key to move the serial number from the left table to the right table. The<br />
serial number should now appear in the Configuration Table.<br />
Note:<br />
If you are using a ProComp+ encoder, you will have to type in your encoder's serial number<br />
before you can enter the Key Codes (please refer to the on-line help – press F1 – for more<br />
information on how to do this).<br />
If you are using more than one encoder, repeat this procedure for the other encoders in the list.<br />
<br />
<br />
<br />
When done, click OK.<br />
Enter the Application Key Code (also found inside the<br />
battery compartment) for your system.<br />
Click OK when done.<br />
Note:<br />
Even if you are using more than one encoder, you enter<br />
only one Application Key Code.<br />
If the key codes have been entered properly and there is no problem <strong>with</strong> your encoder setup or your<br />
sensor connections, you will enter recording mode.<br />
If you are recording an open display session, go to page 11; if you are recording a script session, go to<br />
page 13.<br />
<strong>Getting</strong> <strong>Started</strong> <strong>with</strong> <strong>Bio</strong>Graph <strong>Infiniti</strong> 10
Recording an Open Display Session<br />
Click Start Open Display Session. This<br />
takes you through the process of selecting a<br />
client file and setting up the session<br />
parameters for biofeedback or data<br />
acquisition, and launches recording mode.<br />
When the Start Session window appears,<br />
you can select the client file for which the<br />
session will be recorded by clicking on a<br />
name in the leftmost column. When you click<br />
a client name, the list in the middle shows you<br />
all the uncompressed open display sessions<br />
that were recorded for that client.<br />
Note:<br />
Note:<br />
Even if you aren't going to save the session, you must select a client file.<br />
If the session list is empty, it doesn't mean that no sessions were recorded for that client, only<br />
that no open display sessions were recorded for that client.<br />
If you select a session, the list on the right<br />
shows you the channel set name and all the<br />
screens that were used for that session. Click<br />
the Picture View check box to see thumbnail<br />
images of the screens.<br />
<br />
<br />
<br />
<br />
<br />
Click Start to rapidly start a new session<br />
<strong>with</strong> the same client and channel set<br />
settings.<br />
Click Start: Default Settings to start a<br />
new session <strong>with</strong> the default channel set<br />
settings instead of the client settings.<br />
Click Keep Virtual Channel Settings. Select New Screens to keep the client's channel set settings<br />
but change the selected screens.<br />
Click Define New Session to define completely new session settings.<br />
Click Add New Client if you need to create a new client file. The minimum information you need to<br />
enter in the Client Data window is the person's first and last name.<br />
<strong>Getting</strong> <strong>Started</strong> <strong>with</strong> <strong>Bio</strong>Graph <strong>Infiniti</strong> 11
Defining new open display session settings<br />
<br />
After selecting a client file, click Define New<br />
Session to open the session settings.<br />
ProComp <strong>Infiniti</strong><br />
ProComp <strong>Infiniti</strong> or ProComp5 <strong>Infiniti</strong> OR<br />
FlexComp <strong>Infiniti</strong> in ProComp mode<br />
<br />
In the upper left corner, select the proper<br />
communication protocol for your encoder type;<br />
in this example, ProComp <strong>Infiniti</strong>.<br />
FlexComp <strong>Infiniti</strong><br />
MyoTrac <strong>Infiniti</strong><br />
FlexComp <strong>Infiniti</strong><br />
MyoTrac <strong>Infiniti</strong>, <strong>Infiniti</strong>/U-Control and<br />
Dual EMG<br />
MyoTrac 3 MyoTrac 3<br />
Legacy<br />
OEM<br />
ProComp+ or ProComp 2 in standard<br />
mode OR ProComp <strong>Infiniti</strong> or FlexComp<br />
<strong>Infiniti</strong> in Legacy mode<br />
ProComp+ or ProComp 2 in third-party<br />
software mode OR ProComp <strong>Infiniti</strong> or<br />
FlexComp <strong>Infiniti</strong> in Legacy mode<br />
After selecting a protocol, you should see a list of all the channel sets that were designed for this encoder<br />
set to this communication protocol.<br />
Note:<br />
The number and types of channel sets and screens listed in the tables depend on the Application<br />
Suites that are installed on your system.<br />
<br />
Click the "C: EEG" channel set to select it.<br />
After selecting the channel set, you can open<br />
the drop-down list in the upper right corner and<br />
select a screen category. Selecting the "3 user<br />
bands" category lists only the screens of that<br />
category.<br />
Note:<br />
Select "Show all categories" to list all<br />
the screens for the channel set.<br />
<br />
Select up to 5 screens from the table on<br />
the right by clicking on them. To select<br />
more than one screen, press the [Control]<br />
or [Shift] key as you click.<br />
If you have not already done so, at this point you should connect sensors to your encoder. Click Channel<br />
Set Configuration to verify the sensor configuration for the channel set you have selected.<br />
<strong>Getting</strong> <strong>Started</strong> <strong>with</strong> <strong>Bio</strong>Graph <strong>Infiniti</strong> 12
A window opens, where you can see a table<br />
of encoder inputs (in this example, 1C) <strong>with</strong> its<br />
corresponding sensor type (EEG-Z) and a<br />
quick overview of the channel set's virtual<br />
channel structure.<br />
Note:<br />
Click Toggle to switch between<br />
EEG-Z, EEG-Z3 and EEG-Pro/Flex<br />
sensors if you own an older EEG<br />
sensor.<br />
You can also Toggle between<br />
MyoScan-Pro 1600, MyoScan-Pro<br />
400 and MyoScan-Z, if your channel<br />
set includes these EMG sensors.<br />
<br />
Click Close to return to the session settings. Make sure to turn your encoder ON and click OK to<br />
continue when you have selected the screens you want to use.<br />
Note:<br />
If this is the first time you use your system, at this point you will be asked to enter Key Codes (see<br />
page 9 for a description of Key Codes and how to enter them).<br />
If there are no problems <strong>with</strong> your encoder<br />
setup or your sensor connections, you will<br />
enter the Main Frame window in recording<br />
mode.<br />
<br />
To start recording, click the Start button.<br />
Instructions for ending a recording session<br />
are given on page 15.<br />
Recording a Script Session<br />
Click Start Script Session. This takes you through the process of selecting a client file and setting up the<br />
session parameters, and launches recording mode.<br />
<strong>Getting</strong> <strong>Started</strong> <strong>with</strong> <strong>Bio</strong>Graph <strong>Infiniti</strong> 13
The Start Session window is similar to the<br />
one for defining open display sessions. You<br />
can select the client file for which the session<br />
will be recorded by clicking on a name in the<br />
leftmost column. When you click a client<br />
name, the list in the middle shows you all the<br />
uncompressed script sessions that were<br />
recorded for that client.<br />
Note:<br />
If the session list is empty, it doesn't<br />
mean that no sessions were recorded<br />
for that client, only that no script<br />
sessions were recorded for that client.<br />
If you select a session, the list on the right shows you the channel set and script names as well as all the<br />
screens that were used by the script.<br />
<br />
<br />
<br />
<br />
<br />
<br />
Click Start to rapidly start a new session <strong>with</strong> the same client and script settings.<br />
Click Start: Default Settings to start a new session <strong>with</strong> the default channel set settings instead of<br />
the client settings.<br />
Click Keep Virtual Channel Settings. Select New Script to keep the client's channel set and<br />
settings but change the selected script.<br />
Click Define New Session to define completely new session settings.<br />
Click Add New Client to create a new client file. The minimum information you need to enter in the<br />
Client Data window is the person's first and last name.<br />
Click Edit Script Settings to modify script step durations and select different screens for selected<br />
steps.<br />
Defining new script session settings<br />
<br />
<br />
After selecting a client file, click Define New Session to open the session settings.<br />
Select the encoder that you will use for<br />
the session from the list in Encoder<br />
Communication Protocol. (A list of<br />
communication protocols is on page 12.)<br />
After selecting a protocol, you should see a<br />
list of all the scripts that were designed for this<br />
encoder set to this communication protocol.<br />
Note:<br />
The number and types of scripts that<br />
are listed in the table depend on the<br />
Application Suites that are installed<br />
on your system.<br />
<br />
Click the "PI Training Alpha Theta relaxation" script to select it.<br />
After the script is selected, the bottom section shows you the list of screens that are used by the script.<br />
Click the Picture View check box to see thumbnail images of the screens.<br />
<strong>Getting</strong> <strong>Started</strong> <strong>with</strong> <strong>Bio</strong>Graph <strong>Infiniti</strong> 14
If you have not already done so, at this point, you should connect sensors to your encoder. Click<br />
Channel Set Configuration to verify the sensor configuration for the script you have selected.<br />
A window opens, where you can see a table<br />
of encoder inputs (in this example, 1C) <strong>with</strong> its<br />
corresponding sensor type (EEG-Z) and a<br />
quick overview of the script's virtual channel<br />
structure.<br />
Note:<br />
Click Toggle to switch between<br />
EEG-Z, EEG-Z3 and EEG-Pro/Flex<br />
sensors if you own an older EEG<br />
sensor.<br />
You can also use Toggle to switch<br />
between MyoScan-Pro 1600 and<br />
MyoScan-Pro 400, if your channel set<br />
includes these EMG sensors.<br />
<br />
Click Close to return to the session settings. Make sure to turn your encoder ON and click OK to<br />
continue when you have selected the script you want to use.<br />
Note:<br />
If this is the first time you use your system, at this point you will be asked to enter Key Codes (see<br />
page 9 for a description of Key Codes and how to enter them).<br />
If there are no problems <strong>with</strong> your encoder<br />
setup or your sensor connections, you will<br />
enter the Main Frame window in recording<br />
mode.<br />
<br />
To start recording, click the Start button.<br />
Instructions for ending a recording session<br />
follow.<br />
Ending a Session<br />
<br />
To stop recording a session, click the Stop button.<br />
<strong>Getting</strong> <strong>Started</strong> <strong>with</strong> <strong>Bio</strong>Graph <strong>Infiniti</strong> 15
When the stop button is clicked, the program asks if you<br />
want to save the recorded data.<br />
<br />
You can choose to save the session in compressed<br />
format, but, unless you have very little hard drive space<br />
available or you won't need to review the saved<br />
sessions, we recommend that you always Save, which<br />
uses the non-compressed format.<br />
Note:<br />
Compressed sessions can't be<br />
replayed, reviewed or trended<br />
until they are decompressed.<br />
If you choose Save or Save Compressed, the<br />
Session Notes window opens so that you can<br />
enter, if you want, a treatment code, a session<br />
description and other relevant information.<br />
<br />
Click OK to continue.<br />
Next, you are asked if you would like to review the session<br />
right away.<br />
<br />
<br />
If you choose Reviewing mode or Replaying mode, the<br />
program opens the session in the selected mode.<br />
If you click No, the program asks if you want to<br />
record another session <strong>with</strong> the same settings.<br />
<br />
<br />
If you click No, the program reminds you to turn your encoder off.<br />
Click OK to return to the Main Menu Screen.<br />
Other Recording Functions<br />
Setting Review Mode Auto-Rejection Levels<br />
You access Review Mode Auto-Rejection Settings from the Edit menu. It allows you to define the<br />
artifact rejection method you want to use when reviewing sessions. (For a more detailed explanation of<br />
the need for artifact rejection, see page 21.)<br />
Depending on the signal types that your channel set includes and whether it includes the proper Boolean<br />
virtual channels, you can choose between Boolean Rejection or EEG Standard (Physical Channels<br />
Only).<br />
<strong>Getting</strong> <strong>Started</strong> <strong>with</strong> <strong>Bio</strong>Graph <strong>Infiniti</strong> 16
If you access this option either prior to recording a session or when<br />
switching immediately after recording and saving the session, you can select<br />
Reject automatically when switching to Review.<br />
Select this check box to run the auto-rejection function automatically when<br />
you switch to review mode immediately after recording. This allows you to<br />
calculate fairly reliable statistics on the fly. You would use this function if you<br />
want the software to perform preliminary artifact rejection on the session<br />
data.<br />
You still have the option to perform manual artifact rejection on the data at a<br />
later time. Information about manual artifact rejection is found on page 21.<br />
The following example explains how to set an auto-rejection threshold for an EEG channel. For an<br />
example of auto-rejection using Boolean Rejection, see page 21.<br />
<br />
<br />
<br />
<br />
<br />
In Rejection Type, select EEG Standard (Physical channels only).<br />
In the table below, select the EEG channel you want to use for rejecting artifacts. Only one channel<br />
can be selected. For this example, select the "EEG-D" channel.<br />
In the Rejection Threshold (Absolute value) text box, enter the value over which you can be sure<br />
that the signal is definitely an artifact (in this example, 16 micro-volts).<br />
Select the Reject automatically when switching to Review check box.<br />
Click OK.<br />
After you finish recording, when you switch to review mode, the program scans the whole session and<br />
automatically places rejection segments over all the sections that fit the definition. If you save the data<br />
<strong>with</strong>out switching to review mode, when you do open the session for review at a later time, automatic<br />
rejection will be performed using the levels you set here.<br />
Note:<br />
If you modify auto-rejection level or rejection segments during review, the system saves your<br />
modifications.<br />
Checking the Battery Level<br />
Before starting to record a session, you can verify the<br />
level of your encoder's batteries by selecting Battery<br />
Level in the Options menu.<br />
This opens the Battery Level window. If the battery level<br />
is green, the level is acceptable and you can click OK to<br />
continue.<br />
Note:<br />
Note:<br />
If the battery level is yellow, you can still record a<br />
short session, but if it is red, you should change<br />
the batteries in your encoder.<br />
It is not necessary to check the battery level for<br />
the MyoTrac <strong>Infiniti</strong>.<br />
<strong>Getting</strong> <strong>Started</strong> <strong>with</strong> <strong>Bio</strong>Graph <strong>Infiniti</strong> 17
Troubleshooting the Start Sequence<br />
If there are problems <strong>with</strong> your sensor<br />
connections, the program will report those, prior to<br />
accessing the recording screen. If, for example,<br />
you have sensors that are connected but are not<br />
required for this channel set, you will get a<br />
warning message.<br />
You can remove the sensor if you want, or<br />
continue recording by clicking Yes. Keep in mind<br />
that no data is recorded for sensors that are not<br />
defined in the channel set.<br />
If you have connected wrong sensor types, you<br />
will see the Sensor Connections window. All the<br />
sensors that are expected will be listed in the<br />
Expected Sensor column. The Wrong Sensor<br />
Type column shows which sensor type was<br />
actually detected.<br />
You can remove the wrong sensor or replace it<br />
<strong>with</strong> the right one. Click Repeat to check the<br />
sensor connections again until the system no<br />
longer detects a wrong sensor type. The program<br />
will not allow you to record a session <strong>with</strong> the<br />
wrong sensors.<br />
Note:<br />
Note:<br />
If there are sensor connection problems in<br />
addition to extra sensors, this information<br />
won't appear as a separate message. It will<br />
display in the Sensor Connections window.<br />
If the Wrong Sensor Type column is empty,<br />
the correct sensor has been connected.<br />
If you do not connect all the sensors that are required for the selected channel set, the message "Sensor<br />
is not detected" appears in the Wrong Sensor Type column. When a sensor is not connected, the<br />
program replaces its signal value by a constant value of 1. It is possible to record a session <strong>with</strong> missing<br />
sensors but you need to keep in mind that that the corresponding signal will be a flat line and that all<br />
calculations performed from that signal will not be reflecting real physiological changes.<br />
Note:<br />
If you are using a ProComp+ or a ProComp 2, the sensor recognition function does not work and<br />
you have to verify the sensor types yourself.<br />
Please refer to the on-line help for more information on troubleshooting sensor configuration errors.<br />
<strong>Getting</strong> <strong>Started</strong> <strong>with</strong> <strong>Bio</strong>Graph <strong>Infiniti</strong> 18
Overview<br />
Reviewing Sessions<br />
The reviewing mode allows you to perform many important data processing functions that impact directly<br />
on your ability to produce valid session and trend reports. With biofeedback therapy, being able to<br />
demonstrate clinical effectiveness is most easily achieved by showing that the client is learning and that<br />
the effects of the training are being maintained from session to session.<br />
The ability to show a learning curve on a trend report can be an invaluable tool for successful discussions<br />
<strong>with</strong> third-party payers. The <strong>Infiniti</strong> software's reporting abilities allow you to produce such tools, but it<br />
requires that you perform careful artifact rejection on all assessment sessions prior to generating your<br />
reports. Without artifact rejection, the statistical calculations may have little or no meaning.<br />
Generally, when reviewing a session, the following tasks are performed:<br />
<br />
<br />
<br />
<br />
<br />
Selecting reviewing and reporting screens.<br />
Scrolling through the session data to identify areas of interest and placing event markers.<br />
Normalizing the data by performing artifact rejection.<br />
Calculating statistics and generating session reports.<br />
Generating trend reports.<br />
Client Database<br />
In the Main Menu window, click on the Database button or menu option.<br />
This opens the Main Database window.<br />
<br />
Select a client file by clicking on a client<br />
name in the list on the left.<br />
When a client file is selected, all the<br />
sessions that were recorded for that client<br />
are shown in the list on the right.<br />
<br />
When a session file is selected, click<br />
Review/Report or Replay Session.<br />
Selecting Review Screens<br />
This guide describes only the Review/Report functions, using a session from sample client "ProCompInf<br />
Neurofeedbacksample" as an example.<br />
When the Review/Report button is clicked, the Review Session Confirmation screen appears. The<br />
options available in it depend on whether you are reviewing an open display session or a script session.<br />
<strong>Getting</strong> <strong>Started</strong> <strong>with</strong> <strong>Bio</strong>Graph <strong>Infiniti</strong> 19
When reviewing or replaying an open display session, you can click<br />
on Select Channel Set to load a channel set that is different from<br />
the one <strong>with</strong> which the session was recorded.<br />
Note:<br />
Both channel sets must use the same encoder type and<br />
configuration of sensors and inputs. For example, if both<br />
channel sets send EEG signals on physical channels C and<br />
D to a ProComp <strong>Infiniti</strong>, you can use one to record the<br />
session and the other to review it.<br />
Open Display Session<br />
You will most often review a script session using the same script<br />
and channel set as those used to record it.<br />
Note:<br />
You can click on Select Script to load a different script and<br />
channel set. This is not commonly done, because the new<br />
script must have an activity and step structure similar to the<br />
original script.<br />
Script Session<br />
The first time you select a session for reviewing, you have to select one or more review screens.<br />
<br />
Click on Select Screens.<br />
You can review a session <strong>with</strong> any of the<br />
display screens listed in Select Screens<br />
for the selected channel set.<br />
<br />
To select a screen, click on it.<br />
As <strong>with</strong> recording, you can load up to 5<br />
screens for reviewing. To select more<br />
than one screen, press the [Control] or<br />
[Shift] key while clicking.<br />
<br />
<br />
Click OK to return to Review Session<br />
Confirmation.<br />
In Review Session Confirmation click OK to continue.<br />
<strong>Getting</strong> <strong>Started</strong> <strong>with</strong> <strong>Bio</strong>Graph <strong>Infiniti</strong> 20
The session opens in Reviewing mode; you<br />
should see a screen similar to this.<br />
Rejecting Artifacts<br />
The main purpose of reviewing data is to reject artifacts and generate reliable statistics. Session statistics<br />
can only be as good as the data from which they are generated. If the recorded signal is of poor quality,<br />
the statistics will reveal more about the amount of noise affecting your recording than about any progress<br />
your client might be showing. Even <strong>with</strong> the best recording techniques, noise in the signal cannot be<br />
completely avoided. This is why artifact rejection is important.<br />
Artifact rejection can be performed automatically by the software, or manually by the person reviewing<br />
the data (see page 22). Once you have reviewed the session and placed artifact rejection segments<br />
where required, you can generate statistics and print a session report.<br />
Automatic Rejection of Artifacts<br />
You access Review Mode Auto-Rejection Settings from the Edit menu. It allows you to define the<br />
artifact rejection method you want to use when reviewing sessions. Depending on the signal types that<br />
your channel set includes and whether it includes the proper Boolean virtual channels, you can chose<br />
Boolean Rejection or EEG Standard (Physical Channels Only).<br />
In order for you to use Boolean Rejection, your channel set must include<br />
one or more comparator virtual channels. These channels are used to<br />
define the conditions for rejecting sensor readings.<br />
Note:<br />
In review mode, the Review Mode Auto-Rejection Settings<br />
window doesn't show you the option to Reject automatically<br />
when switching to Review. You must run the auto-rejection<br />
feature manually.<br />
For information about setting auto-rejection options in Recording mode, as<br />
well as an example of setting an auto-rejection threshold for an EEG<br />
channel, see page 16.<br />
When you select Boolean Rejection, all Boolean channels in the channel set are listed. Select the<br />
channel(s) that best define the artifact condition(s) you want to use. Then, you can define the Boolean<br />
state you want to use for the rejection. The state (output) of a Boolean channel is either ON or OFF. If the<br />
condition is met, the output is ON, otherwise, it is OFF. By selecting the appropriate state, you reject<br />
either all data that fits the condition or all data that doesn't fit the condition.<br />
<strong>Getting</strong> <strong>Started</strong> <strong>with</strong> <strong>Bio</strong>Graph <strong>Infiniti</strong> 21
For example, if you are measuring skin temperature, although the "normal" body temperature is 37°C,<br />
readings usually vary somewhat from this value. However, readings below 35°C or above 39°C are<br />
generally outside the expected temperature range. To define a Boolean rejection condition that<br />
automatically rejects these readings, you would start by adding three comparator virtual channels to the<br />
channel set. (This is done using Channel Editor.)<br />
V001: Skin Temp > Maximum<br />
(where Maximum is equal to 39)<br />
V002: Skin Temp < Minimum<br />
(where Minimum is equal to 35)<br />
V003: V001 OR V002<br />
Conditional statement that the reading from the physical channel<br />
measuring skin temperature is above a maximum value of 39.<br />
Conditional statement that the reading from the physical channel<br />
measuring skin temperature is below a minimum value of 35.<br />
Combines V001 and V002 <strong>with</strong> Boolean OR into a conditional<br />
statement that the skin temperature reading is either above the<br />
maximum or below the minimum.<br />
<br />
<br />
<br />
<br />
In Rejection Type, click Boolean Rejection to select this option.<br />
From the table below, select the comparator channel you want to use for rejecting artifacts. Only one<br />
channel can be selected. For this example, select "V003: V001 OR V002".<br />
In Boolean state for rejection, select On. (This instructs the system to reject any signal that meets<br />
the condition.)<br />
Click OK to run the auto-rejection function. The program warns you that any previously placed<br />
rejection segments will be deleted. To continue, click Yes.<br />
The program will scan the whole session and automatically place rejection segments over all the sections<br />
where the skin temperature fell outside the defined range. You can review what was rejected and remove<br />
individual segments or all of them at once by right-clicking over a segment and selecting Undo Rejection<br />
Segment or Undo All Rejection Segments. The program will save the rejection settings <strong>with</strong> the<br />
session when you exit review mode.<br />
Manually Rejecting Artifacts<br />
To scroll through the recorded data, click and drag the scroll bar<br />
on the button<br />
bar at the top of the screen. When you locate an artifact, you can place a rejection segment over it.<br />
To manually place an artifact rejection segment over a section of noisy data on a single line graph, follow<br />
these steps.<br />
<br />
<br />
<br />
<br />
<br />
<br />
Select the line graph containing the segment to be rejected. (The selected graph will display a<br />
magenta border.)<br />
Press and hold the [Control] key.<br />
Place the cursor over one end of the segment to be rejected.<br />
Click and hold the left mouse button. (You can release the [Control] key at this point.)<br />
Drag the cursor across the segment to be rejected. The selected segment is highlighted in gray.<br />
At the end of the segment, release the mouse button.<br />
<strong>Getting</strong> <strong>Started</strong> <strong>with</strong> <strong>Bio</strong>Graph <strong>Infiniti</strong> 22
Note:<br />
You can place artifact rejection segments only on single-line graph instruments. If you get an<br />
error message, you have to select a different screen for reviewing.<br />
Calculating Statistics<br />
<br />
To calculate statistics for a session, click<br />
the Calculate Statistics button in the tool<br />
bar.<br />
A message confirms that the program is<br />
processing session data and then the<br />
Statistics window opens.<br />
<br />
Click Close to close the window.<br />
Note:<br />
This is the Statistics window for a<br />
script session. The Statistics window<br />
for an open display session is similar,<br />
but does not display a list of rejection<br />
durations for individual activities.<br />
Generating Session Reports<br />
Two types of session report may be available in review mode.<br />
Text reports are a standard feature of <strong>Bio</strong>Graph <strong>Infiniti</strong>. A text report includes general information about<br />
the session as well as optional information that you select. This can include session notes, session<br />
statistics, session markers, details of settings instruments, and images of screen graphs and trend<br />
instruments. Text reports are generated from Microsoft Word templates, and can be saved or printed<br />
using the Word functions.<br />
Excel reports must be predefined, generally as part of an Application Suite. They can also be<br />
customized for specific analytical uses. For script sessions Excel settings are defined in Script Editor,<br />
while for open display sessions they can be defined in <strong>Bio</strong>Graph <strong>Infiniti</strong>. An Excel report imports the<br />
session statistics from a TXT file and, if designed to do so, subjects them to further analysis. If an Excel<br />
export file and an Excel workbook file have not previously been specified for the session, this option is not<br />
available.<br />
To generate a session report, select the session from the database, click on Review/Report, select<br />
review screens, and then follow these steps:<br />
<br />
<br />
If this is an open display session, from the Options menu select Set Open Display Statistics and<br />
choose the channels for which statistics should be calculated.<br />
If necessary, perform artifact rejection on the recorded data.<br />
Click the Calculate Statistics icon in the tool bar to recalculate the statistics.<br />
<br />
If you have loaded more than one screen, open the screen from which you want to generate the<br />
report. Different screens can generate different reports.<br />
<strong>Getting</strong> <strong>Started</strong> <strong>with</strong> <strong>Bio</strong>Graph <strong>Infiniti</strong> 23
Click the Session Report icon in the tool bar and select the type of report that you want to<br />
generate.<br />
o<br />
o<br />
If you select Generate Excel Report, Microsoft Excel opens and displays your report as a<br />
workbook. You can print or save the report using Excel's Print and Save functions.<br />
If you select Generate Text Report, the Session Report window<br />
opens, and you must continue to the next step.<br />
<br />
<br />
Select report components by placing a check mark in the desired<br />
boxes.<br />
Click Generate Report to generate the report. Word opens and<br />
displays your report as a document. You can print or save the report<br />
using Word's Print and Save functions.<br />
Note:<br />
Microsoft Word and Microsoft Excel must be installed on your<br />
system for these functions to work.<br />
Excel-generated session report<br />
Word-generated session report<br />
Generating Trend Reports<br />
<strong>Bio</strong>Graph <strong>Infiniti</strong> also allows you to create trend reports, which can compare statistics across different<br />
activities <strong>with</strong>in a single session or across multiple sessions.<br />
<br />
<br />
To generate a trend report, go to the Database screen, select a client file and click on Trend Report.<br />
This example uses sessions recorded for sample client "Sarah Trend".<br />
Select the type of session to be trended by clicking on the appropriate radio button at the top. For this<br />
example, select Script Session.<br />
<strong>Getting</strong> <strong>Started</strong> <strong>with</strong> <strong>Bio</strong>Graph <strong>Infiniti</strong> 24
The table on the left lists the scripts (or<br />
the channel sets) used to record sessions<br />
for this client.<br />
Choose "SMR Training Session".<br />
The table on the right displays all the<br />
sessions recorded <strong>with</strong> this script.<br />
<br />
<br />
Pressing the [Control] or [Shift] key, on your keyboard, select all the sessions you want to include in<br />
the trend report and click OK.<br />
In Select Trend Report, choose a trend report and click OK.<br />
The system creates the trend report and displays it on your<br />
computer monitor.<br />
<br />
To generate the report as a document in<br />
Microsoft Word, click Generate Reports.<br />
You can use Word to save and print the<br />
document.<br />
Note:<br />
Microsoft Word must be installed on<br />
your system for this function to work.<br />
For more information on generating trend reports, consult on-line help (F1).<br />
<strong>Getting</strong> <strong>Started</strong> <strong>with</strong> <strong>Bio</strong>Graph <strong>Infiniti</strong> 25
Overview<br />
Favorites and Quick Starts<br />
A Favorite is a predefined session configuration that contains all the settings needed for recording,<br />
replaying, and reviewing a session. Depending on the session type (script or open display), these settings<br />
can include scripts, channel sets and screens, statistics for session reports, auto-rejection settings for<br />
review mode, and Excel data export options. Favorites are intended to simplify and standardize the<br />
process of recording and reviewing sessions.<br />
Favorites are not associated <strong>with</strong> a specific client file. You select a client name after you choose the<br />
Favorite. (This differs from the procedures described in Recording Sessions (page 11 – Open Display,<br />
and page 13 – Script), where you first select a client name and then define the session settings.)<br />
Your Application Suite may include predefined Favorites, and you can define your own Favorites using<br />
the Favorites Editor in <strong>Bio</strong>Graph <strong>Infiniti</strong>.<br />
Starting a session <strong>with</strong> a Favorite<br />
From the Desktop or Start Menu<br />
At the time a Favorite is defined, you have<br />
the option of displaying its icon on your<br />
computer Desktop and adding it to the<br />
Windows Start Menu under Program<br />
Files\Thought Technology\<strong>Infiniti</strong>\Quick<br />
Starts.<br />
When you install an Application Suite that<br />
includes Favorites, they are added to the<br />
Desktop and Start Menu.<br />
If <strong>Bio</strong>Graph <strong>Infiniti</strong> is not already open and there is a Favorite listed in Quick Starts or displayed on<br />
your Desktop, you can quickly start recording a session by selecting or clicking on the Favorite.<br />
<br />
<br />
<strong>Bio</strong>Graph <strong>Infiniti</strong> will open and display the Client Database<br />
window.<br />
Select a client's name and click OK.<br />
If your sensors are correctly connected and your encoder is turned<br />
on, the recording screen will open. The session will be recorded<br />
using the configuration defined in the selected Favorite.<br />
<strong>Getting</strong> <strong>Started</strong> <strong>with</strong> <strong>Bio</strong>Graph <strong>Infiniti</strong> 26
From <strong>with</strong>in <strong>Bio</strong>Graph <strong>Infiniti</strong><br />
If <strong>Bio</strong>Graph <strong>Infiniti</strong> is already open, you can access<br />
Favorites by clicking the Quick Start button in the Main Menu<br />
Screen.<br />
<br />
The Quick Start window opens,<br />
displaying names from the client database<br />
and a list of existing Favorites.<br />
If there is only one Favorite, only the<br />
client names will be displayed.<br />
<br />
Select a client's name and a Favorite and<br />
click OK.<br />
If your sensors are correctly connected<br />
and your encoder is turned on, the<br />
recording screen will open. The session<br />
will be recorded using the configuration<br />
defined in the selected Favorite.<br />
Recording and Reviewing <strong>with</strong> a Favorite<br />
Recording:<br />
When you use a Favorite to start a session, Recording mode is no different from when you manually<br />
define session settings. All the same functions are available. You can check battery level, perform an<br />
impedance check, modify open display session statistics or auto-rejection settings, and so on.<br />
Reviewing:<br />
<br />
<br />
If you select Switch to Reviewing Mode when you finish recording a session <strong>with</strong> a Favorite, you<br />
don't select review screens. Instead, <strong>Bio</strong>Graph <strong>Infiniti</strong> immediately loads the screens and channel set<br />
or script selected when the Favorite was defined and opens the Main Frame screen in Reviewing<br />
mode.<br />
If the session you select for review from the Main Database was recorded using a Favorite, its default<br />
review settings (channel set or script, screens, open display statistics) are those that were set in the<br />
Favorite.<br />
In all other respects, Reviewing mode for a session recorded using a Favorite is no different from when<br />
you manually define session settings. You can generate a session report, modify open display session<br />
statistics or auto-rejection settings, and so on.<br />
<strong>Getting</strong> <strong>Started</strong> <strong>with</strong> <strong>Bio</strong>Graph <strong>Infiniti</strong> 27
Reference<br />
Contacting Thought Technology<br />
Returning Equipment<br />
Be sure to call for an authorization number (RA) before returning any equipment!<br />
Send the unit(s) postage prepaid and insured, <strong>with</strong> proof of purchase to one of the addresses below.<br />
If you are shipping from outside Canada or the USA to Canada, mark the package "Goods to be<br />
repaired – Made in Canada" to avoid unnecessary customs charges.<br />
All customs and duties charges will be billed to you if incurred by sending the unit to the wrong address.<br />
Provide a detailed description of the problem you are experiencing, and your telephone/fax number and<br />
email (see form on the next page of this manual).<br />
In the USA, ship insured to:<br />
Thought Technology Ltd.<br />
Cimetra LLC<br />
20 Gateway Drive<br />
Plattsburgh, New York<br />
12901, USA<br />
In Canada and all other countries, contact your dealer or ship insured to:<br />
Thought Technology Ltd.<br />
2180 Belgrave Avenue<br />
Montreal, Quebec<br />
Canada H4A 2L8<br />
Technical Support<br />
For technical support please refer to the Thought Technology Ltd. website at<br />
www.thoughttechnology.com for frequently asked questions. If your support issue is not covered please<br />
e-mail or telephone at the number below.<br />
(514) 489-8251<br />
techsupport@thoughttechnology.com<br />
<strong>Getting</strong> <strong>Started</strong> <strong>with</strong> <strong>Bio</strong>Graph <strong>Infiniti</strong> 28
Repair Return Form<br />
Name:<br />
Company:<br />
Address:<br />
Telephone Number:<br />
Fax Number:<br />
Date Purchased:<br />
From:<br />
Model Name:<br />
Serial Number:<br />
Problem:<br />
<strong>Getting</strong> <strong>Started</strong> <strong>with</strong> <strong>Bio</strong>Graph <strong>Infiniti</strong> 29
Index<br />
A<br />
Application key codes, 10<br />
Artifact rejection<br />
automatic, 17<br />
EEG rejection threshold, 17<br />
importance of, 21<br />
manual, 22<br />
B<br />
Battery level, 17<br />
C<br />
Channel set configuration, 12, 15<br />
Check battery level, 17<br />
Client confidentiality, 6<br />
Client database, 19<br />
Compact flash<br />
Formatting, 7<br />
Preparing for use, 7<br />
Computer requirements, 1<br />
Confidential settings, 6<br />
Connecting hardware, 2<br />
D<br />
Data compression, 16<br />
Define new session<br />
Script, 14<br />
E<br />
Encoder serial numbers, 10<br />
End session, 15<br />
Extra sensors, 18<br />
F<br />
Favorites, 26<br />
File names, 5<br />
H<br />
Hardware connections, 2<br />
Hide file names, 5<br />
K<br />
Key codes, 10<br />
M<br />
Missing sensors, 18<br />
N<br />
Notch filters, 5<br />
O<br />
On-line help, 1<br />
P<br />
Privacy settings, 6<br />
Q<br />
Quick Starts, 26<br />
R<br />
Recording sessions, 9<br />
Reports<br />
Session, 23<br />
Returning equipment<br />
Instructions, 28<br />
Repair return form, 29<br />
Review screens, 19<br />
Reviewing sessions, 19<br />
S<br />
Safety issues, i<br />
Save data, 16<br />
Screen category, 12<br />
Sensor configuration, 12, 15<br />
Session notes, 16<br />
Session reports, 23<br />
Session statistics, 23<br />
Show file names, 5<br />
Start session<br />
Favorites, 26<br />
Open display, 11<br />
Script, 14<br />
<strong>Getting</strong> <strong>Started</strong> <strong>with</strong> <strong>Bio</strong>Graph <strong>Infiniti</strong> 30
Starting <strong>Bio</strong>Graph <strong>Infiniti</strong>, 4<br />
Stop session, 15<br />
System requirements, 1<br />
W<br />
Wrong sensors, 18<br />
T<br />
Technical support, 28<br />
<strong>Getting</strong> <strong>Started</strong> <strong>with</strong> <strong>Bio</strong>Graph <strong>Infiniti</strong> 31
<strong>Getting</strong> <strong>Started</strong> <strong>with</strong> <strong>Bio</strong>Graph <strong>Infiniti</strong>