general catalogue - T RACE SpA
general catalogue - T RACE SpA
general catalogue - T RACE SpA

You also want an ePaper? Increase the reach of your titles
YUMPU automatically turns print PDFs into web optimized ePapers that Google loves.
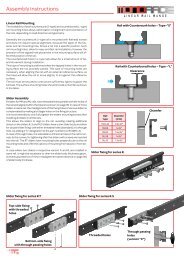
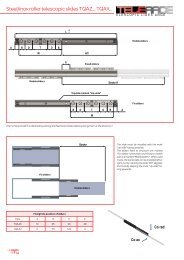
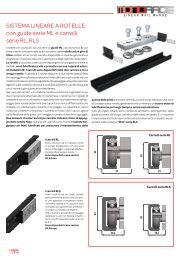
Spliced rails, composed of shorter preselected rails<br />
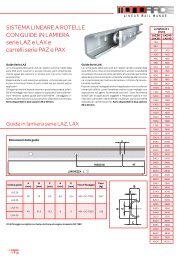
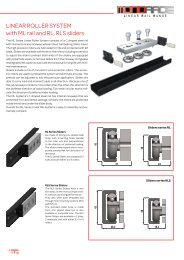
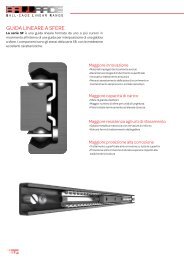
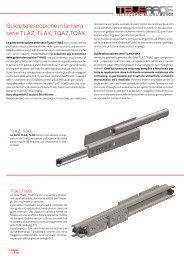
L INEAR R AIL R ANGE<br />
MR and ML rails can be supplied in longer lengths than offered<br />
in catalog, by splicing multiple rail segments together. These<br />
spliced rails must be ordered from the factory, while specifying<br />
the total length and the lengths of individual segments : “Example:<br />
MR43-6000 (4000 + 2000)” The spliced rail will be delivered<br />
in preselected segments length and with additional counterbored<br />
mounting holes added to the joining locations, in addtion<br />
to ground ends.<br />
The customer must add additional mounting holes in his structure<br />
for these additional holes at the joining location. End-screws<br />
for joining is too supplied free, same type as the standard screws<br />
for rails with cylindrical fixing holes.<br />
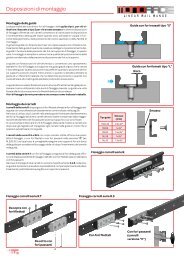
Alignment tool for spliced rails DAGA.<br />
To assure a correct<br />
alignment of the rail<br />
ends, an appropriate<br />
alignment tool can be<br />
purchased as a separate<br />
item. See drawing/table<br />
for product<br />
describtion and<br />
codes, at right side.<br />
Joining area for spliced rails<br />
PITCH 80<br />
A<br />
Additional<br />
holes at joint<br />
Rail type Joining screws Alignment tool A D d E<br />
MRG18 M4-TORX SP DAGA-MR18 16 9 5 1,9<br />
MR28 M5-TORX SP DAGA-MR28 16 11 6 2<br />
MR43 M8-TORX SP DAGA-MR43 22 18 10 3,2<br />
ML28 M5-TORX SP DAGA-ML28 16 11 6 2<br />
ML43 M8-TORX SP DAGA-ML43 22 18 10 3,2<br />
FXR M6-DIN 7984 DAGA-FXR 20 10,5 6,5 4,4<br />
d<br />
E<br />
D<br />
1)<br />
Installation instructions for rails composed of more lengths<br />
1) Begin by supporting the two rail segments at the splice location. Develop a support guide in the area of joining<br />
lengths. Insert the alignment tool DAGA from one end of the rail. Install the mounting screws including the<br />
two at the splice location, but do not fully tighten them, to allow for small rail movements.<br />
2) Place the alignment tool over the splice. Tighten the alignment tool screws to align the rail segments.<br />
Support<br />
3) Verify that rail mounting surfaces (back side and lateral side of the rail) are aligned. If not, it may be neccessary<br />
by use of shims, to maintain aligment after the mounting bolts are tightened and the alignment tool is<br />
removed.<br />
2)<br />
4) Tighten the bolts at the splice location by passing the Allen key through the holes in the alignment tool.<br />
Tighten the other mounting bolts in the rails.<br />
5) Loosen the alignment tool and remove it from one end.<br />
DAGA<br />
3) 4) 5)<br />
Shims<br />
34