Wireless Keyboard and Mouse
Wireless Keyboard and Mouse
Wireless Keyboard and Mouse

Create successful ePaper yourself
Turn your PDF publications into a flip-book with our unique Google optimized e-Paper software.
<strong>Wireless</strong> <strong>Keyboard</strong> <strong>and</strong> <strong>Mouse</strong><br />
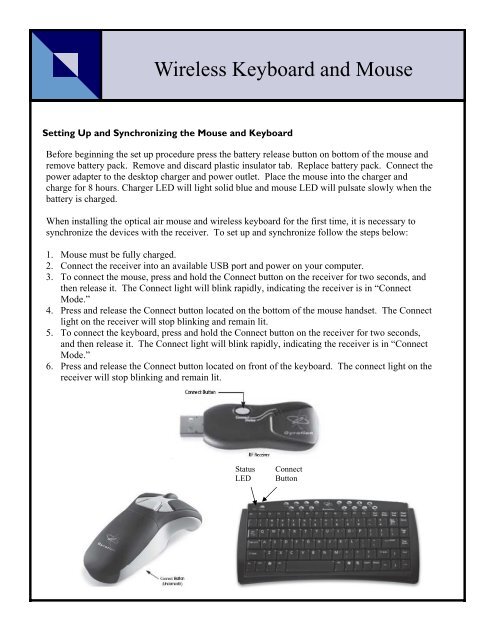
Setting Up <strong>and</strong> Synchronizing the <strong>Mouse</strong> <strong>and</strong> <strong>Keyboard</strong><br />
Before beginning the set up procedure press the battery release button on bottom of the mouse <strong>and</strong><br />
remove battery pack. Remove <strong>and</strong> discard plastic insulator tab. Replace battery pack. Connect the<br />
power adapter to the desktop charger <strong>and</strong> power outlet. Place the mouse into the charger <strong>and</strong><br />
charge for 8 hours. Charger LED will light solid blue <strong>and</strong> mouse LED will pulsate slowly when the<br />
battery is charged.<br />
When installing the optical air mouse <strong>and</strong> wireless keyboard for the first time, it is necessary to<br />
synchronize the devices with the receiver. To set up <strong>and</strong> synchronize follow the steps below:<br />
1. <strong>Mouse</strong> must be fully charged.<br />
2. Connect the receiver into an available USB port <strong>and</strong> power on your computer.<br />
3. To connect the mouse, press <strong>and</strong> hold the Connect button on the receiver for two seconds, <strong>and</strong><br />
then release it. The Connect light will blink rapidly, indicating the receiver is in “Connect<br />
Mode.”<br />
4. Press <strong>and</strong> release the Connect button located on the bottom of the mouse h<strong>and</strong>set. The Connect<br />
light on the receiver will stop blinking <strong>and</strong> remain lit.<br />
5. To connect the keyboard, press <strong>and</strong> hold the Connect button on the receiver for two seconds,<br />
<strong>and</strong> then release it. The Connect light will blink rapidly, indicating the receiver is in “Connect<br />
Mode.”<br />
6. Press <strong>and</strong> release the Connect button located on front of the keyboard. The connect light on the<br />
receiver will stop blinking <strong>and</strong> remain lit.<br />
Status<br />
LED<br />
Connect<br />
Button
Note: It is only necessary to perform the Connect/Connect sequence when setting a device up for the<br />
first time.<br />
Note: <strong>Keyboard</strong> requires 4 AAA batteries.<br />
Note: Your current keyboard <strong>and</strong> mouse will work concurrently with the wireless keyboard <strong>and</strong><br />
mouse.<br />
When not using the keyboard, power it off by holding the Connect button for 7 seconds. It will<br />
confirm it is powering off by flashing its LED indicator three times.<br />
Powering On <strong>and</strong> Off <strong>Mouse</strong> if Necessary:<br />
To Power on:<br />
Press the Connect button. It will confirm it is powering on by flashing its LED light for one<br />
second.<br />
To power off:<br />
Press the Connect button for seven seconds. It will immediately power off <strong>and</strong> be unresponsive<br />
to button clicks. It will confirm it is powering off by flashing its LED indicator three times.<br />
Note: Powering off the mouse is not necessary if mouse is kept in charger.<br />
Using the <strong>Mouse</strong> on the Desktop<br />
The optical air mouse provides great flexibility in how you control your computer, <strong>and</strong> its optical<br />
sensor allows for precise tracking on virtually any surface. However, for optimal performance,<br />
avoid highly reflective glass or mirrored surfaces. To use on the desktop:<br />
1. Remove the mouse from the charging cradle <strong>and</strong> place it on a flat surface.<br />
The Status LED light on the receiver will light solid when communicating<br />
with the mouse h<strong>and</strong>set.<br />
2. Use the mouse like a st<strong>and</strong>ard desktop mouse. For optimal battery life,<br />
avoid using it on dark-colored surfaces.
Using in the Air<br />
The optical air mouse has no line-of-sight requirements so it is not necessary to point the device at the<br />
computer, receiver or monitor.<br />
1. After you set up <strong>and</strong> synchronize the mouse with the receiver,<br />
hold the mouse in a comfortable, relaxed position with your index<br />
finger on the Activation Trigger <strong>and</strong> your thumb at the base of the<br />
Scroll Wheel.<br />
2. Press <strong>and</strong> hold the Activation Trigger with your index finger.<br />
While holding the trigger, flex your wrist up, down <strong>and</strong> sideways<br />
(in a manner similar to using a flashlight). The mouse cursor tracks<br />
the motions of your h<strong>and</strong>. Remember, it is not necessary to point<br />
the mouse at your computer, receiver or monitor.<br />
3. Use your thumb to press the left/right mouse buttons or to operate the scroll wheel.<br />
Note: Double-click the Activation Trigger to keep the cursor continuously active. To stop the<br />
cursor movement, click the trigger once.<br />
Note: Move the cursor over a target <strong>and</strong> release the Activation Trigger before clicking the left<br />
or right mouse buttons. This “parks” the cursor <strong>and</strong> allows you to click more accurately.<br />
Symptom Reason Solution<br />
<strong>Mouse</strong> LED comes on when<br />
activate button is pressed, but<br />
receiver is unresponsive<br />
When using in air, cursor is<br />
visible but shows no movement<br />
Cursor movement is choppy or<br />
erratic<br />
When pressing the Activate button,<br />
the LED on the mouse is<br />
flashing<br />
<strong>Mouse</strong> <strong>and</strong> Receiver not<br />
synchronized<br />
Gyroscope not activated<br />
Radio Interference<br />
Batteries are low<br />
When pressing the Activation Batteries are dead/<strong>Mouse</strong> is off<br />
Trigger, the LED on the mouse is<br />
off<br />
Cursor moves too fast or too slow Speed or acceleration not set<br />
properly<br />
Perform a Connect/Connect sequence<br />
Squeeze or double-click trigger<br />
on bottom of mouse<br />
Move receiver away from other<br />
electronic devices<br />
Recharge battery pack or replace<br />
Recharge battery pack or replace/<br />
Power in on<br />
Change the cursor tracking speed<br />
in the mouse control panel<br />
Cursor drifts on the screen Sensor may require recalibration Place the mouse on the desk for 4<br />
or more seconds to steady the<br />
cursor<br />
<strong>Mouse</strong> LED does not flash in<br />
charging cradle <strong>and</strong> mouse does<br />
not charge<br />
Inadequate battery life<br />
Troubleshooting<br />
Dirty contact/End-of life battery<br />
<strong>Mouse</strong> used on dark-colored<br />
surface<br />
Clean contacts on bottom of<br />
mouse/Replace battery<br />
Use mouse on light-colored surface<br />
to minimize battery drain
Tips for Caring for the <strong>Wireless</strong> <strong>Keyboard</strong>/<strong>Mouse</strong><br />
1. Replace mouse in the cradle at the end of each day to charge for next day’s use.<br />
2. Be aware that the receiver looks much like a flash drive <strong>and</strong> can easily be stolen. Discuss with students<br />
that it is not a flash drive but the receiver for the wireless components.<br />
3. <strong>Keyboard</strong> requires 4 AAA batteries, <strong>and</strong> replacement of these is the school’s responsibility.<br />
4. Be aware that the keyboard keys can be broken off if the keyboard is dropped or h<strong>and</strong>led roughly.