m12a1 30 level: tm 3-4230-209-30&p
m12a1 30 level: tm 3-4230-209-30&p
m12a1 30 level: tm 3-4230-209-30&p

Create successful ePaper yourself
Turn your PDF publications into a flip-book with our unique Google optimized e-Paper software.
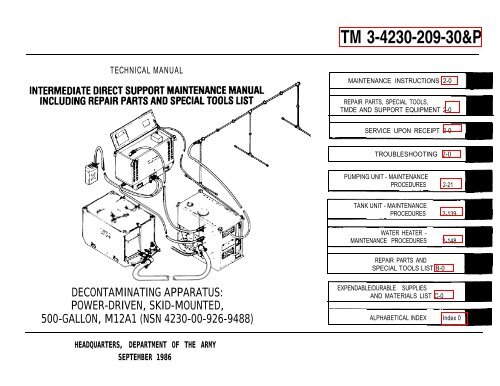
TM 3-42<strong>30</strong>-<strong>209</strong>-<strong>30</strong>&P<br />
TECHNICAL MANUAL<br />
MAINTENANCE INSTRUCTIONS 2-0<br />
REPAIR PARTS, SPECIAL TOOLS,<br />
TMDE AND SUPPORT EQUIPMENT 2-0<br />
SERVICE UPON RECEIPT 2-0<br />
TROUBLESHOOTING 2-0<br />
PUMPING UNIT - MAINTENANCE<br />
PROCEDURES 2-21<br />
TANK UNIT - MAINTENANCE<br />
PROCEDURES 2-139<br />
WATER HEATER -<br />
MAINTENANCE PROCEDURES 2-148<br />
REPAIR PARTS AND<br />
SPECIAL TOOLS LIST B-0<br />
DECONTAMINATING APPARATUS:<br />
POWER-DRIVEN, SKID-MOUNTED,<br />
500-GALLON, M12A1 (NSN 42<strong>30</strong>-00-926-9488)<br />
EXPENDABLE/DURABLE SUPPLIES<br />
AND MATERIALS LIST C-0<br />
ALPHABETICAL INDEX Index 0<br />
HEADQUARTERS, DEPARTMENT OF THE ARMY<br />
SEPTEMBER 1986
WARNING<br />
DANGEROUS CHEMICALS, GASOLINE, HIGH VOLTAGE, AND SCALDING WATER are used in the operation of this equipment.<br />
CARBON MONOXIDE gas is present in the exhaust of the gasoline engine and the liquid fuel water heater.<br />
Death or severe injury may result if personnel fail to observe warnings.<br />
Wear protective clothing and mask during decontaminating operations.<br />
GASOLINE VAPOR in the fuel tank and STB DECONTAMINATING AGENT VAPORS in the tank unit are hazardous. Purge the fuel tank and the tank unit<br />
before performing maintenance. Inspect the fuel tank using outdoor daylight.<br />
An operator must be in attendance at all times during operation of the water heater.<br />
Water must be circulating through the water heater before the fuel is ignited and when the water heater is operating.<br />
Disconnect the negative (ground) and positive cables from the battery terminals before proceeding with control panel removal. Be sure that the electrical<br />
power cable is disconnected from the power source before inspecting and servicing electrical motors, control box, and any rotating parts of the water<br />
heater.<br />
Do not attempt maintenance other than visual inspection during operation of the water heater. Water and fuel lines are pressurized and water<br />
temperatures as high as 212° F (100°C) may be present. Failure to comply may result in serious injury to personnel.<br />
If possible, do not operate the water heater in an enclosed area. The heater must be placed outside the enclosed area or the exhaust gases must be<br />
vented outside to prevent carbon monoxide poisoning. Wearing the field protective mask does not protect the wearer against carbon monoxide gas.<br />
When removing any of the fuel system components disconnect the main power cable from the power source. Do not smoke, use open flame, or spill fuel<br />
in the area. Wipe up any spilled fuel immediately.<br />
If possible, do not attempt to disconnect the inlet water hose when temperature is in excess of 1000 F (38° C). If it is necessary to disconnect the water<br />
hose while the water temperature in the low-pressure heating boiler is above 100° F (38°C), exercise extreme care to prevent scalding. When the inlet<br />
water hose is disconnected, the low-pressure heating boiler drains completely.<br />
Before operating the water heater, make sure the fuel supply and fuel return lines are properly connected.<br />
Keep clear of the exhaust stack during operation of the water heater.<br />
a<br />
TM 3-42<strong>30</strong>-<strong>209</strong>-<strong>30</strong>&P
TM 3-42<strong>30</strong>-<strong>209</strong>-<strong>30</strong>&P<br />
Disconnect positive and negative battery cables from the battery terminals in order to prevent grounding. The battery and battery compar<strong>tm</strong>ent area maybe coated<br />
with acid caused by spillage and/or fumes. Wear protective clothing when working in this area. Before eating, smoking, or touching your f ace or clothing, wash your<br />
hands with a solution of baking soda and water, then flush them with clear water. If battery acid splashes into your eyes, flush them with clean water and obtain medical<br />
trea<strong>tm</strong>ent immediately. Failure to do so may cause blindness.<br />
Never reach under the pump unit skid base subassembly while it is raised from the floor, unless it is securely blocked. Failure to comply may result in a crushed arm.<br />
Make sure thermal delay relays (TD) are not installed in wrong socket. Personnel injury and damage to equipment will result.<br />
When handling asbestos material, always wear an air filtering respirator, gloves, and goggles. Wash face and hands with soap and water before eating or smoking.<br />
Asbestos can cause cancer if handled without protection.<br />
For additional first aid data, see FM 21-11.
TECHNICAL MANUAL<br />
NO. 3-42<strong>30</strong>-<strong>209</strong>-<strong>30</strong>&P<br />
HEADQUARTERS<br />
DEPARTMENT OF THE ARMY<br />
Washington, DC, 29 Sep. 1986<br />
Intermediate Direct Support Maintenance Manual<br />
Including Repair Parts and Special Tools List<br />
DECONTAMINATING APPARATUS:<br />
POWER-DRIVEN, SKID-MOUNTED,<br />
500-GALLON, M12A1<br />
(NSN 42<strong>30</strong>-00-926-9488)<br />
Current as of 14 July 1986 for appendix B<br />
REPORTING ERRORS AND RECOMMENDING IMPROVEMENTS<br />
You can help improve this manual. If you find any mistakes or if you know of a way to improve the procedures, please let us know. Mail your letter, DA<br />
Form 2028 (Recommended Changes to Publications and Blank Forms), or DA Form 2028-2 located in the back of this manual direct to: Commander, US<br />
Army Armament, Munitions and Chemical Command, ATTN: AMSMC-MAR-T(A), Aberdeen Proving Ground, MD 21010-5423. A reply will be furnished<br />
to you.<br />
Page<br />
Illus<br />
Figure<br />
HOW TO USE THIS MANUAL . . . . . . . . . . . . . . . . . . . . . . . . . . . . . . . . . . . . . . . . . . . . . . . . . . . . . . . . . . . . . . . . . . . . . . . . . . . . . v<br />
CHAPTER 1 INTRODUCTION . . . . . . . . . . . . . . . . . . . . . . . . . . . . . . . . . . . . . . . . . . . . . . . . . . . . . . . . . . . . . . . . . . . . . . . . . . . . . . . . . . . . . . 1-1<br />
Chapter Overview . . . . . . . . . . . . . . . . . . . . . . . . . . . . . . . . . . . . . . . . . . . . . . . . . . . . . . . . . . . . . . . . . . . . . . . . . . . . . . . . . . . . . 1-1<br />
Section I General Information . . . . . . . . . . . . . . . . . . . . . . . . . . . . . . . . . . . . . . . . . . . . . . . . . . . . . . . . . . . . . . . . . . . . . . . . . . . . . . . . . . . 1-1<br />
Section II Equipment Description and Data.... . . . . . . . . . . . . . . . . . . . . . . . . . . . . . . . . . . . . . . . . . . . . . . . . . . . . . . . . . . . . . . . . . . . . 1-1<br />
i<br />
TM 3-42<strong>30</strong>-<strong>209</strong>-<strong>30</strong>&P
ii<br />
CHAPTER 2<br />
Section I<br />
TM 3-42<strong>30</strong>-<strong>209</strong>-<strong>30</strong>&P<br />
Illus<br />
Page Figure<br />
MAINTENANCE INSTRUCTIONS . . . . . . . . . . . . . . . . . . . . . . . . . . . . . . . . . . . . . . . . . . . . . . . . . . . . . . . . . . 2-0<br />
2-0<br />
Chapter Overview . . . . . . . . . . . . . . . . . . . . . . . . . . . . . . . . . . . . . . . . . . . . . . . . . . . . . . . . . . . . . . . . . . . . . . . . . . . . . . . . . . . . .<br />
Repair Parts, Special Tools, TMDE, and Support Equipment . . . . . . . . . . . . . . . . . . . . . . . . . . . . . . . . . . . . . . . . . . . . 2-0<br />
Section II<br />
Section Ill<br />
Section IV<br />
Section V<br />
. . . . . . . . . . . . . . . . . . . . . . . . . . . . . . . . . . . . . . . . . . . . . . . . . . . . . . . . . . . . . . .<br />
. . . . . . . . . . . . . . . . . . . . . . . . . . . . . . . .<br />
Maintenance Procedures . . . . . . . . . . . . . . . . . . . . . . . . . . . . . . . . . . . . . . . . . . . . . . . . . . . . . . . . . . . . . . . . . . . . . . . . . . . . . . . 2-21<br />
Preembarkation Inspection of Materiel in Units Alerted for Overseas Movement . . . . . . . . . . . . . . . . . . . . . . . . . . . . . . . 2-245<br />
APPENDIX A REFERENCES A-0<br />
2-0<br />
2-0<br />
APPENDIX B<br />
INTERMEDIATE DIRECT SUPPORT REPAIR PARTS AND SPECIAL TOOLS LIST<br />
. . . . . . . . . . . . . . . . . . . . . . . . . . . . . B-0<br />
Section I<br />
Section II<br />
Group 00<br />
Group 01<br />
Group 02<br />
Introduction . . . . . . . . . . . . . . . . . . . . . . . . . . . . . . . . . . . . . . . . . . . . . . . . . . . . . . . . . . . . . . . . . . . . . . . . . . . . . . . . . . . . . . . . . . B-1<br />
Repair Parts List . . . . . . . . . . . . . . . . . . . . . . . . . . . . . . . . . . . . . . . . . . . . . . . . . . . . . . . . . . . . . . . . . . . . . . . . . . . . . . . . . . . . . .B-1-1<br />
Decontaminating apparatus: power-driven, skid-mounted, 500-gallon, M12A1 . . . . . . . . . . . . . . . . . . . . . . . . . . . . . . . . . B-1-1<br />
Personnel sectional shower assembly . . . . . . . . . . . . . . . . . . . . . . . . . . . . . . . . . . . . . . . . . . . . . . . . . . . . . . . . . . . . . . . . . . . .B-2-1<br />
Decontaminating apparatus pumping unit . . . . . . . . . . . . . . . . . . . . . . . . . . . . . . . . . . . . . . . . . . . . . . . . . . . . . . . . . . . . . . . . . B-3-1<br />
0202 Top access cover assembly.. . . . . . . . . . . . . . . . . . . . . . . . . . . . . . . . . . . . . . . . . . . . . . . . . . . . B-4-1<br />
0203 Cover panel assembly . . . . . . . . . . . . . . . . . . . . . . . . . . . . . . . . . . . . . . . . . . . . . . . . . . . . . . . . . . B-5-1<br />
0204 Cover panel assembly . . . . . . . . . . . . . . . . . . . . . . . . . . . . . . . . . . . . . . . . . . . . . . . . . . . . . . . . . . . . . . . . . . . . . . B-6-1<br />
0205 Access cover . . . . . . . . . . . . . . . . . . . . . . . . . . . . . . . . . . . . . . . . . . . . . . . . . . . . . . . . . . . . . . . . . . . . . . . . . . . . . . . . . . . . B-7-1<br />
0206 Access cover . . . . . . . . . . . . . . . . . . . . . . . . . . . . . . . . . . . . . . . . . . . . . . . . . . . . . . . . . . . . . . . . . . . . . . . . . . . . . . . . . . . . . . . . . . . . B-8-1<br />
0207 Clevis and eye bolt assembly. . . . . . . . . . . . . . . . . . . . . . . . . . . . . . . . . . . . . . . . . . . . . . . . . . . . . . . . . . . . . . B-9-1<br />
0208 Pump unit assembly . . . . . . . . . . . . . . . . . . . . . . . . . . . . . . . . . . . . . . . . . . . . . . . . . . . . . . . . . . . . . . . . . . . . . . . . . . . . . .B-10-1<br />
020801 Gun assembly and<br />
B-11-1<br />
020802 Discharge hose assembly. . . . . . . . . . . . . . . . . . . . . . . . . . . . . . . . . . . . . . . . . . . . . . . . . . . . B-12-1<br />
020803 Tank lid . . . . . . . . . . . . . . . . . . . . . . . . . . . . . . . . . . . . . . . . . . . . . . . . . . . . . . . . . . . . . . . . . . . . . . . . . . . . . . . . . . . . . . . . . . .B-13-1<br />
B-1<br />
B-2<br />
B-3<br />
B-4<br />
B-5<br />
B-6<br />
B-7<br />
B-8<br />
B-9<br />
B-10<br />
B-11<br />
B-12<br />
B-13
Group 03<br />
Group 04<br />
020804 Eductor hose assembly . . . . . . . . . . . . . . . . . . . . . . . . . . . . . . . . . . . . . . . . . . . . . . . . . . . . . . . . . . . . . . . . . . . . . . . B-14-1<br />
020805 Engine fuel tank . . . . . . . . . . . . . . . . . . . . . . . . . . . . . . . . . . . . . . . . . . . . . . . . . . . . . . . . . . . . . . . . . . . . . . . . . . . .<br />
B-15-1<br />
.<br />
020806 Negative battery cable assembly . . . . . . . . . . . . . . . . . . . . . . . . . . . . . . . . . . . . . . . . . . . . . . . . . . . . . . . . . . . . . .<br />
B-16-1<br />
020807 Positive battery cable assembly . . . . . . . . . . . . . . . . . . . . . . . . . . . . . . . . . . . . . . . . . . . . . . . . . . . . . . . . . . . . . .<br />
B-17-1<br />
020808 Pump unit subassembly. . . . . . . . . . . . . . . . . . . . . . . . . . . . . . . . . . . . . . . . . . . . . . . . . . . . . . . . . . . . . . . . . .<br />
B-18-1<br />
02080801 Outlet hose assembly.. . . . . . . . . . . . . . . . . . . . . . . . . . . . . . . . . . . . . . . . . . . . . . . . . . . . . . . . . . . . . . . . . . . B-19-1<br />
02080802 Fairlead assembly . . . . . . . . . . . . . . . . . . . . . . . . . . . . . . . . . . . . . . . . . . . . . . . . . . . . . . . . . . . . . . . . . . . . . . .<br />
02080803 Frame assembly . . . . . . . . . . . . . . . . . . . . . . . . . . . . . . . . . . . . . . . . . . . . . . . . . . . . . . . . . . . . . . . . . . . . .<br />
02080804 Skid base subassembly. . . . . . . . . . . . . . . . . . . . . . . . . . . . . . . . . . . . . . . . . . . . . . . . . . . . . . . . . . . . . . . . .<br />
020808041 Plumbing assembly . . . . . . . . . . . . . . . . . . . . . . . . . . . . . . . . . . . . . . . . . . . . . . . . . . . . . . . . . . . . . . . . . . .<br />
0208080411 Centrifugal pump... . . . . . . . . . . . . . . . . . . . . . . . . . . . . . . . . . . . . . . . . . . . . . . . . . . . . . . . . . . . . . . .<br />
0208080412 Offset valve and<br />
02080804121 Regulating valve. . . . . . . . . . . . . . . . . . . . . . . . . . . . . . . . . . . . . . . . . . . . . . . . . . . . . . . . . . . . . .<br />
0208080413 Regulating valve.... . . . . . . . . . . . . . . . . . . . . . . . . . . . . . . . . . . . . . . . . . . . . . . . . . . . . . . . . . . . . . . .<br />
020808043 Throttle linkage assembly . . . . . . . . . . . . . . . . . . . . . . . . . . . . . . . . . . . . . . . . . . . . . . . . . . . . . . . . . . . . . .<br />
020808044 Pump base skid and<br />
0208080441 Engine mount #1 and<br />
0208080442 Engine mount #2 . . . . . . . . . . . . . . . . . . . . . . . . . . . . . . . . . . . . . . . . . . . . . . . . . . . . . . . . . . . . . . . . . .<br />
020808045 Generator, alternator assembly . . . . . . . . . . . . . . . . . . . . . . . . . . . . . . . . . . . . . . . . . . . . . . . . . . . . . . . . .<br />
020809 Control panel assembly . . . . . . . . . . . . . . . . . . . . . . . . . . . . . . . . . . . . . . . . . . . . . . . . . . . . . . . . . . . . . . . . . . . . . . .<br />
020810 Electrical wiring . . . . . . . . . . . . . . . . . . . . . . . . . . . . . . . . . . . . . . . . . . . . . . . . . . . . . . . . . . . . . . . . . . . . . . . . . . . . . .<br />
Skid mounted decontaminating apparatus tank unit and<br />
0<strong>30</strong>1 Hopper access cover . . . . . . . . . . . . . . . . . . . . . . . . . . . . . . . . . . . . . . . . . . . . . . . . . . . . . . . . . . . . . . . . . . . . . . . . . . . . .<br />
0<strong>30</strong>2 Liquid storage tank . . . . . . . . . . . . . . . . . . . . . . . . . . . . . . . . . . . . . . . . . . . . . . . . . . . . . . . . . . . . . . . . . . . . . . . . . . . . . . .<br />
0<strong>30</strong>3 Suction hose assembly . . . . . . . . . . . . . . . . . . . . . . . . . . . . . . . . . . . . . . . . . . . . . . . . . . . . . . . . . . . . . . . . . . . . . . . . . . . .<br />
0<strong>30</strong>4 Hose assembly . . . . . . . . . . . . . . . . . . . . . . . . . . . . . . . . . . . . . . . . . . . . . . . . . . . . . . . . . . . . . . . . . . . . . . . . . . . . . . . . . .<br />
0<strong>30</strong>5 Regulating valve . . . . . . . . . . . . . . . . . . . . . . . . . . . . . . . . . . . . . . . . . . . . . . . . . . . . . . . . . . . . . . . . . . . . . . . . . . . . . . . . .<br />
0<strong>30</strong>6 Foot valve assembly and<br />
0<strong>30</strong>601 Foot valve . . . . . . . . . . . . . . . . . . . . . . . . . . . . . . . . . . . . . . . . . . . . . . . . . . . . . . . . . . . . . . . . . . . . . . . . . . . . . . . . . .<br />
Liquid fuel water heater . . . . . . . . . . . . . . . . . . . . . . . . . . . . . . . . . . . . . . . . . . . . . . . . . . . . . . . . . . . . . . . . . . . . . . . . . . . . . . . .<br />
0401 Cabinet top cover . . . . . . . . . . . . . . . . . . . . . . . . . . . . . . . . . . . . . . . . . . . . . . . . . . . . . . . . . . . . . . . . . . . . . . . . . . . . . . . .<br />
0402 End panel . . . . . . . . . . . . . . . . . . . . . . . . . . . . . . . . . . . . . . . . . . . . . . . . . . . . . . . . . . . . . . . . . . . . . . . . . . . . . . . . . . . . . . .<br />
0403 Front access cover . . . . . . . . . . . . . . . . . . . . . . . . . . . . . . . . . . . . . . . . . . . . . . . . . . . . . . . . . . . . . . . . . . . . . . . . . . . . . . .<br />
0404 Side panel . . . . . . . . . . . . . . . . . . . . . . . . . . . . . . . . . . . . . . . . . . . . . . . . . . . . . . . . . . . . . . . . . . . . . . . . . . . . . . . . . . . . . . .<br />
0405 Control box assembly . . . . . . . . . . . . . . . . . . . . . . . . . . . . . . . . . . . . . . . . . . . . . . . . . . . . . . . . . . . . . . . . . . . . . . . . . . . . .<br />
040501 Selector valve line . . . . . . . . . . . . . . . . . . . . . . . . . . . . . . . . . . . . . . . . . . . . . . . . . . . . . . . . . . . . . . . . . . . . . . . . . . . .<br />
0406 Water pressure line . . . . . . . . . . . . . . . . . . . . . . . . . . . . . . . . . . . . . . . . . . . . . . . . . . . . . . . . . . . . . . . . . . . . . . . . . . . . . . .<br />
Page<br />
B-20-1<br />
B-21-1<br />
B-22-1<br />
B-23-1<br />
B-24-1<br />
B-25-1<br />
B-26-1<br />
B-27-1<br />
B-28-1<br />
B-29-1<br />
B-<strong>30</strong>-1<br />
B-31-1<br />
B-32-1<br />
B-33-1<br />
B-34-1<br />
B-35-1<br />
B-36-1<br />
B-37-1<br />
B-38-1<br />
B-39-1<br />
B-40-1<br />
B-41-1<br />
B-42-1<br />
B-43-1<br />
B-44-1<br />
B-45-1<br />
Illus<br />
Figure<br />
B-14<br />
B-15<br />
B-16<br />
B-17<br />
B-18<br />
B-19<br />
B-20<br />
B-21<br />
B-22<br />
B-23<br />
B-24<br />
B-25<br />
B-26<br />
B-27<br />
B-28<br />
B-29<br />
B-<strong>30</strong><br />
B-31<br />
B-32<br />
B-33<br />
B-34<br />
B-35<br />
B-36<br />
B-37<br />
B-38<br />
B-39<br />
B-40<br />
B-41<br />
B-42<br />
B-43<br />
B-44<br />
B-45<br />
iii<br />
TM 3-42<strong>30</strong>-<strong>209</strong>-<strong>30</strong>&P
iv<br />
TM 3-42<strong>30</strong>-<strong>209</strong>-<strong>30</strong>&P<br />
Page<br />
Illus<br />
Figure<br />
Group 9999<br />
Section Ill<br />
Section IV<br />
0407 Selector return Iine . . . . . . . . . . . . . . . . . . . . . . . . . . . . . . . . . . . . . . . . . . . . . . . . . . . . . . . . . . . . . . . . . . . . . . . . . . . . . . . B-46-1<br />
0408 Fuel pressure line B-47-1<br />
0409 Power cable assembly . . . . . . . . . . . . . . . . . . . . . . . . . . . . . . . . . . . . . . . . . . . . . . . . . . . . . . . . . . . . . . . . . . . . . . . . . . . . B-48-1<br />
0410 Electrical wiring . . . . . . . . . . . . . . . . . . . . . . . . . . . . . . . . . . . . . . . . . . . . . . . . . . . . . . . . . . . . . . . . . . . . . . . . . . . . . . . . . . B-49-1<br />
0411 Fuel hose assembly and<br />
041101 Fuel tank adapter assembly . . . . . . . . . . . . . . . . . . . . . . . . . . . . . . . . . . . . . . . . . . . . . . . . . . . . . . . . . . . . . . . . . . B-50-1<br />
0412 Hose assembly . . . . . . . . . . . . . . . . . . . . . . . . . . . . . . . . . . . . . . . . . . . . . . . . . . . . . . . . . . . . . . . . . . . . . . . . . . . . . . . . . . B-35-1<br />
0413 Skid base assembly . . . . . . . . . . . . . . . . . . . . . . . . . . . . . . . . . . . . . . . . . . . . . . . . . . . . . . . . . . . . . . . . . . . . . . . . . . . . . . B-51-1<br />
041<strong>30</strong>1 Fluid filter . . . . . . . . . . . . . . . . . . . . . . . . . . . . . . . . . . . . . . . . . . . . . . . . . . . . . . . B-52-1<br />
041<strong>30</strong>2 Magneto assembly . . . . . . . . . . . . . . . . . . . . . . . . . . . . . . . . . . . . . . . . . . . . . . . . . . . . . . . . . . . . . . . . . . . . . . . . . . . B-53-1<br />
041<strong>30</strong>201 Combuster magneto . . . . . . . . . . . . . . . . . . . . . . . . . . . . . . . . . . . . . . . . . . . . . . . . . . . . . . . . . . . . . . . . . . . . . B-54-1<br />
041<strong>30</strong>3 Fuel pump and ignition drive motor . . . . . . . . . . . . . . . . . . . . . . . . . . . . . . . . . . . . . . . . . . . . . . . . . . . . . . . . . . . . . B-55-1<br />
041<strong>30</strong>4 Fuel pump assembly . . . . . . . . . . . . . . . . . . . . . . . . . . . . . . . . . . . . . . . . . . . . . . . . . . . . . . . . . . . . . . . . . . . . . . . . B-56-1<br />
B-57-1<br />
041<strong>30</strong>5 Fuel supply Line<br />
041<strong>30</strong>6 Gage port line . . . . . . . . . . . . . . . . . . . . . . . . . . . . . . . . . . . . . . . . . . . . . . . . . . . . . . . . . . . . . . . . . . . . . . . . . . . . . . . B-58-1<br />
041<strong>30</strong>7 Pump return line . . . . . . . . . . . . . . . . . . . . . . . . . . . . . . . . . . . . . . . . . . . . . . . . . . . . . . . . . . . . . . . . . . . . . . . . . . . . . B-59-1<br />
041<strong>30</strong>8 Purge and bypass return line. . . . . . . . . . . . . . . . . . . . . . . . . . . . . . . . . . . . . . . . . . . . . . . . . . . . . . . . . . . . . . . . . . . B-60-1<br />
0414 Low pressure heating boiler assembly . . . . . . . . . . . . . . . . . . . . . . . . . . . . . . . . . . . . . . . . . . . . . . . . . . . . . . . . . . . . . . . B-61-1<br />
041401 Nozzle holder assembly . . . . . . . . . . . . . . . . . . . . . . . . . . . . . . . . . . . . . . . . . . . . . . . . . . . . . . . . . . . . . . . . . . . . . . . B-62-1<br />
041402 Combustion motor mounting assembly . . . . . . . . . . . . . . . . . . . . . . . . . . . . . . . . . . . . . . . . . . . . . . . . . . . . . . . . . . B-63-1<br />
041403 Nozzle valve line . . . . . . . . . . . . . . . . . . . . . . . . . . . . . . . . . . . . . . . . . . . . . . . . . . . . . . . . . . . . . . . . . . . . . . . . . . . . . B-64-1<br />
041404 Combustion return line . . . . . . . . . . . . . . . . . . . . . . . . . . . . . . . . . . . . . . . . . . . . . . . . . . . . . . . . . . . . . . . . . . . . . . . . B-65-1<br />
Bulk material<br />
BULK-1<br />
Special Tools List . . . . . . . . . . . . . . . . . . . . . . . . . . . . . . . . . . . . . . . . . . . . . . . . . . . . . . . . . . . . . . . . . . . . . . . . . . . . . . . . . . . . . BULK-1<br />
National Stock Number and Part Number Index . . . . . . . . . . . . . . . . . . . . . . . . . . . . . . . . . . . . . . . . . . . . . . . . . . . . . . . . . . . . I-1<br />
B-46<br />
B-47<br />
B-48<br />
B-49<br />
B-50<br />
B-35<br />
B-51<br />
B-52<br />
B-53<br />
B-54<br />
B-55<br />
B-56<br />
B-57<br />
B-58<br />
B-59<br />
B-60<br />
B-61<br />
B-62<br />
B-63<br />
B-64<br />
B-65<br />
BULK<br />
APPENDIX C<br />
EXPENDABLE/DURABLE SUPPLIES AND MATERIALS LIST . . . . . . . . . . . . . . . . . . . . . . . . . . . . . . . . . . . . . . . . . . . . . .<br />
C-0<br />
APPENDIX D<br />
APPENDIX E<br />
ILLUSTRATED LIST OF MANUFACTURE ITEMS . . . . . . . . . . . . . . . . . . . . . . . . . . . . . . . . . . . . . . . . . . . . . . . . . . . . . . . . . . D-O .<br />
TORQUE LIMITS E-0<br />
ALPHABETICAL INDEX . . . . . . . . . . . . . . . . . . . . . . . . . . . . . . . . . . . . . . . . . . . . . . . . . . . . . . . . . . . . . . . . . . . . . . . . . . . . . . . . Index-0 . .
HOW TO USE THIS MANUAL<br />
GENERAL. This manual tells you how to do intermediate direct support<br />
maintenance on the decontaminating apparatus. A chapter overview shows<br />
what functions or data are included to help you in your job. Use this manual<br />
with M12A1 units that have had Modification Work Order (MWO)<br />
3-42<strong>30</strong>-<strong>209</strong>-50-1 applied or were manufactured after January 1985 (serial<br />
numbers 587-2683 and larger). Modified units are identified by a plate mounted<br />
near the M 12A1 nameplate on the pump unit control panel. This manual consists<br />
of the following chapters and appendixes.<br />
Chapter 1. A chapter introducing maintenance of your decontaminating<br />
apparatus.<br />
a. Section I. General Information. Briefly states type of manual, equipment<br />
name, purpose of equipment, maintenance forms, records, and reports,<br />
and reporting equipment improvement recommendations.<br />
b. Section //. Equipment Description and Data. Briefly states equipment<br />
characteristics, capabilities and features, location and description of major<br />
components, and equipment data.<br />
Chapter 2. A separate chapter contains maintenance instructions for the<br />
decontaminating apparatus. The maintenance chapter contains:<br />
a. Section ///. Troubleshooting. Lists some of the troubles and possible<br />
corrective actions that you may take to keep the decontaminating apparatus in<br />
good repair.<br />
b. Section IV. Maintenance Procedures.<br />
(1) An Initial Setup section at the beginning of each maintenance module<br />
covers:<br />
● Test Equipment. Lists any test equipment needed to perform<br />
maintenance.<br />
● Special Tools. Lists special tools required to do specific maintenance<br />
tasks.<br />
● Materials/Parts. Lists repair parts which require 100% replacement<br />
during repair.<br />
● Personnel Required. No maintenance function requires more than<br />
two repairmen.<br />
● References. Lists other technical publications which should be<br />
available while performing the maintenance task.<br />
● Troubleshooting References. Shows references which should be<br />
available when troubleshooting a problem with the decontaminating<br />
apparatus. In all cases the operator’s manual,<br />
TM 3-42<strong>30</strong>-<strong>209</strong>-10, and the unit maintenance manual,<br />
TM 3-42<strong>30</strong>-<strong>209</strong>-20&P, should be available. The specific paragraphs<br />
of this manual for troubleshooting are referenced.<br />
● Equipment Condition. States whether or not the apparatus has<br />
been disassembled and what parts have been removed.<br />
● Special Environmental Conditions. Indicates the special conditions<br />
necessary to do maintenance.<br />
● General Safety Instructions. Gives safety instructions for specific<br />
maintenance functions and for the assembly.<br />
(2) Use the following procedures as they apply to each major component<br />
and as they agree with the Maintenance Allocation Chart (MAC). The<br />
procedures are removal, disassembly, cleaning, inspection, repair, reassembly,<br />
test procedures, installation, final inspection, and adjus<strong>tm</strong>ents.<br />
c. Section V. Preembarkation Inspection of Materiel in Units Alerted for<br />
Overseas Movement. Preembarkation instructions and illustrations are based<br />
on information furnished by the developer.<br />
Appendixes. The separate appendixes are:<br />
a. Appendix A. Lists all references used in the manual.<br />
b. Appendix B. Lists repair parts and special tools required to maintain the<br />
decontaminating apparatus.<br />
c. Appendix C. Lists all expendable/durable supplies and materials<br />
required for intermediate direct support maintenance of the decontaminating<br />
apparatus.<br />
d. Appendix D. Lists all fabricated tools required to perform intermediate<br />
direct support maintenance on the decontaminating apparatus.<br />
e. Appendix E. Lists general torque limits for standard-sized bolts and<br />
screws.<br />
f. Alphabetical Index.<br />
v<br />
TM 3-42<strong>30</strong>-<strong>209</strong>-<strong>30</strong>&P
1-0<br />
TM 3-42<strong>30</strong>-<strong>209</strong>-<strong>30</strong>&P<br />
MAJOR COMPONENTS OF M12A1 DECONTAMINATING APPARATUS
CHAPTER 1<br />
INTRODUCTION<br />
This chapter contains general information, a nomenclature cross-reference list, and equipment description and data.<br />
Section I. GENERAL INFORMATION<br />
1-1. SCOPE.<br />
a. Type of Manual. Intermediate direct support maintenance manual.<br />
b. Model Number and Equipment Name. Decontaminating Apparatus:<br />
Power-Driven, Skid-Mounted, 500-Gallon, M12A1.<br />
c. Purpose of Equipment. Sprays decontaminating materials, fights f fires<br />
with water or foam, deices, cleans vehicles, pumps various fluids, and showers<br />
personnel.<br />
1-2. MAINTENANCE FORMS, RECORDS, AND REPORTS. Depar<strong>tm</strong>ent of<br />
the Army forms and procedures used for equipment maintenance will be those<br />
Described by DA PAM 738-750, The Army Maintenance Management System<br />
(TAMMS).<br />
1-3. OFFICIAL NOMENCLATURE, NAMES, AND DESIGNATIONS. This listing<br />
includes nomenclature cross-references used in this manual.<br />
Common Name<br />
Pump Unit<br />
FUEL SHUT-OFF Valve<br />
NOMENCLATURE CROSS-REFERENCE LIST<br />
Official Nomenclature<br />
Pumping Unit<br />
Globe valve<br />
Fuel Tank Cap<br />
Tank Unit<br />
Personnel Shower Assembly<br />
Water Heater<br />
HEATER RECEPTACLE AND<br />
SWITCH<br />
Prime Detergent Tank<br />
Stem<br />
Tank drain valve<br />
Hopper assembly<br />
Fuel pump and ignition<br />
drive motor<br />
Filler opening cap<br />
Decontaminating Apparatus:<br />
Skid-Mounted Tank Unit<br />
Shower Assembly<br />
Liquid Fuel Water Heater<br />
Toggle switch<br />
Prime Tank Assembly<br />
Quick disconnect clamp<br />
Regulating valve<br />
Tank, liquid storage<br />
Direct current motor<br />
1-4. REPORTING EQUIPMENT IMPROVEMENT RECOMMENDATIONS<br />
(EIR). If your decontaminating apparatus needs improvement, let us know.<br />
Send us an EIR. You, the user, are the only one who can tell us what you don’t<br />
like about your equipment. Let us know why you don’t like the design. Put it on<br />
an SF 368 (Quality Deficiency Report). Mail it to us at: Commander, US Army<br />
Armament, Munitions and Chemical Command, ATTN: AMSMC- MAR-A (A),<br />
Aberdeen Proving Ground, MD2101 0-5423. We’ll send you a reply.<br />
Section II. EQUIPMENT DESCRIPTION AND DATA<br />
1-5. EQUIPMENT CHARACTERISTICS, CAPABILITIES, AND FEATURES. during maintenance. The shower assembly is normally stored on the decon-<br />
Major components are packaged separately to make them easily replaceable<br />
laminating apparatus tank unit.<br />
1-1 TM 3-42<strong>30</strong>-<strong>209</strong>-<strong>30</strong>&P
1-2<br />
TM 3-42<strong>30</strong>-<strong>209</strong>-<strong>30</strong>&P<br />
1-6. LOCATION AND DESCRIPTION OF MAJOR COMPONENTS.<br />
a. Pump Unit.<br />
➀<br />
➁<br />
➂<br />
➃<br />
➄<br />
➅<br />
➆<br />
HOSE ASSEMBLIES. Discharge fluid. Mounted on fixed reel assemblies.<br />
PRIME DETERGENT TANK. A 10 gallon tank. Stores foam or detergents<br />
for mixing in the tank unit and stores water for priming the pump.<br />
ENGINE FUEL TANK. Holds 20 gallons of fuel for gasoline engine.<br />
CONTROL PANEL ASSEMBLY. Contains controls and instruments for<br />
pump unit.<br />
GASOLINE ENGINE. A 20 hp engine. Drives the pump unit and<br />
alternator.<br />
FRAME ASSEMBLY. Supports components of the pump unit.<br />
EXHAUST PIPES. Pipe exhaust fumes away from the engine assembly.<br />
Stored on top of the tank unit assembly.<br />
➇<br />
➈<br />
➉<br />
COVER PANEL ASSEMBLIES. Provide protection from elements,<br />
access to components, and, when removed, ventilation for the gasoline<br />
engine.<br />
CENTRIFUGAL PUMP. Provides the means of pressurizing and transferring<br />
fluids from sources to tank unit, heater, or discharge hoses.<br />
STORAGE BATTERY. Supplies current to start the gasoline engine.<br />
SKID BASE SUBASSEMBLY. Provides base for pump unit subassembly,<br />
alternator, and gasoline engine.<br />
ALTERNATOR/GENERATOR. Powered by a V-belt and a pulley from<br />
gasoline engine. Provides current to the water heater through the<br />
engine alternator junction box behind the HEATER RECEPTACLE AND<br />
SWITCH.
. Tank Unit and Shower Assembly.<br />
1 TANK ASSEMBLY. 500 gallon stainless steel tank with an operating<br />
capacity of 447 gallons of water or 317 gallons of slurry mix.<br />
2 HOPPER ASSEMBLY. Blends bulk powder or chemicals with water,<br />
3 SUCTION HOSE ASSEMBLY. Transfers water from tank unit to pump<br />
unit or from a natural water source to pump unit. Used to fill or drain the<br />
tank unit.<br />
5 TANK DRAIN VALVE. Drains the tank.<br />
6 SHOWER ASSEMBLY. Consists of pipes, couplings, and coupling<br />
halves that form a personnel showering system for a maximum of 24<br />
soldiers.<br />
7 TANK SKID BASE. Supports and provides a base for tank unit.<br />
4 FOOT VALVE ASSEMBLY. Prevents solids from entering the tank when<br />
water is pumped from a natural source.<br />
1-3 TM 3-42<strong>30</strong>-<strong>209</strong>-20&P
1-4<br />
TM 3-42<strong>30</strong>-<strong>209</strong>-<strong>30</strong>&P<br />
c. Water Heater.<br />
CONTROL BOX ASSEMBLY. Contains temperature and pressure<br />
gages and direction label.<br />
POWER CABLE ASSEMBLY. Supplies electrical power to the heater.<br />
WATER HOSE ASSEMBLY. Carries heated water from the heater to the<br />
pump unit.<br />
FUEL HOSE ASSEMBLY. Supplies fuel to the heater.<br />
LOW PRESSURE HEATING BOILER ASSEMBLY. Heats the water.<br />
REMOVABLE PANELS. Allow access to heater subassemblies.<br />
FUEL PUMP AND IGNITION DRIVE MOTOR. Operates fuel pump and<br />
magneto assembly.<br />
FUEL PUMP ASSEMBLY. Supplies fuel under pressure to combustor<br />
assembly.<br />
COMBUSTOR ASSEMBLY. Provides spark for ignition of fuel and injection<br />
of (fuel mixed with air) flame into boiler tubes.<br />
COMBUSTOR MAGNETO. Supplies voltage to igniter plug.
1-7. EQUIPMENT DATA.<br />
a. Operating and Performance Data. See TM 3-42<strong>30</strong>-<strong>209</strong>-10.<br />
b. Dimensions and Weights. See TM 3-42<strong>30</strong>-<strong>209</strong>-20&P.<br />
c. Capabilities and Dry Weight. See TM 3-42<strong>30</strong>-<strong>209</strong>-20&P.<br />
d. Performance. See TM 3-42<strong>30</strong>-<strong>209</strong>-10.<br />
e. Fuel Used for Water Heater. See TM 3-42<strong>30</strong>-<strong>209</strong>-10.<br />
1-5<br />
TM 3-42<strong>30</strong>-<strong>209</strong>-<strong>30</strong>&P
2-0 TM 3-42<strong>30</strong>-<strong>209</strong>-<strong>30</strong>&P<br />
CHAPTER 2<br />
MAINTENANCE INSTRUCTIONS<br />
CHAPTER OVERVIEW<br />
I<br />
This chapter contains general information, troubleshooting, repair of the decontaminating apparatus, and preembarkation inspection of materiel in units alerted<br />
for overseas movement.<br />
I<br />
Section I. REPAIR PARTS, SPECIAL TOOLS, TMDE, AND SUPPORT EQUIPMENT<br />
2-1. COMMON TOOLS AND EQUIPMENT. For authorized common tools and loaded in the decontaminating apparatus pump unit in the tool drawer between<br />
equipment, refer to the Modified Table of Organization and Equipment (MTOE) the upper and lower hose reels and in the water heater top cover inside the tool<br />
applicable to your unit.<br />
carrier.<br />
2-2. SPECIAL TOOLS, TMDE, AND SUPPORT EQUIPMENT. Special tools 2-3. REPAIR PARTS. Repair parts are listed and illustrated in appendix B of<br />
and support equipment are listed in section Ill of appendix B of<br />
this manual.<br />
TM 3-42<strong>30</strong>-<strong>209</strong>-10. Special tools required for intermediate direct support are<br />
Section Il. SERVICE UPON RECEIPT<br />
2-4. CHECKING UNPACKED EQUIPMENT. c. Check to see whether the equipment has been modified (see<br />
a. Inspect the equipment for damage incurred during shipment. If the DA PAM 310-1).<br />
equipment has been damaged, report the damage on SF 364, Report of Discrepancy<br />
(ROD).<br />
b. Check the equipment against the packing slip to see if the shipment is<br />
complete. Report an discrepancies in accordance with the instructions of<br />
DA PAM 738-750.<br />
Section Ill. TROUBLESHOOTING<br />
2-5. TROUBLESHOOTING PROCEDURES. b. This manual cannot list all possible malfunctions that may occur, nor all<br />
a. This section contains troubleshooting information for locating and cor- tests or inspections and corrective actions. If a malfunction is not listed (except<br />
recting most of the troubles which may develop in the decontaminating appara- when malfunction and cause are obvious) or is not corrected by listed correctus.<br />
Each malfunction for an individual component, unit, or system is followed tive actions, notify your supervisor.<br />
by a list of tests or inspections which will help you to determine corrective<br />
actions to take. You should perform the tests/inspections and corrective<br />
2-6. SYMPTOM INDEX. Use the following symptom index for a quick referactions<br />
in the order listed.<br />
ence to symptoms covered in the troubleshooting table.
PUMP UNIT<br />
Centrifugal pump fails to operate. . . . . . . . . . . . . . . . . . . . . . . . . . . . . . . . . . . . . . . . . . . . . . . . . . . . . . . . . . . . . . . . . . . . . . . . . . . . . . . . . . . . . . . . . . . . . . . .<br />
Centrifugal pump pressure low or falling . . . . . . . . . . . . . . . . . . . . . . . . . . . . . . . . . . . . . . . . . . . . . . . . . . . . . . . . . . . . . . . . . . . . . . . . . . . . . .<br />
Gasoline engine fails to start or runs poorly . . . . . . . . . . . . . . . . . . . . . . . . . . . . . . . . . . . . . . . . . . . . . . . . . . . . . . . . . . . . . . . . . . . . . . . . . . . . . . . . . . . . . . . . . . . .<br />
Plumbing valves leak . . . . . . . . . . . . . . . . . . . . . . . . . . . . . . . . . . . . . . . . . . . . . . . . . . . . . . . . . . . . . . . . . . . . . . . . . . . . . . . . . . . . . . . . . . . . . . . . . . . . . . . . . . . . .<br />
24 vdcisnot available at the altenator junction box when HEATER RECEPTACLE AND SWITCH is ON . . . . . . . . . . . . . . . . . . . . . . . . . . . . . . . . . .<br />
Troubleshooting<br />
Procedure<br />
Page<br />
2-3<br />
2-3<br />
2-1<br />
2-3<br />
2-4<br />
WATER HEATER<br />
Combustion motor mounting assembly direct current motor does not operate . . . . . . . . . . . . . . . . . . . . . . . . . . . . . . . . . . . . . . . . . . . . . . . . . . . . . . . . . . . . .<br />
Fuel pump and ignition drive motor does not operate in BURGEON . . . . . . . . . . . . . . . . . . . . . . . . . . . . . . . . . . . . . . . . . . . . . . . . . . . . . . . . .<br />
Fuel pump and ignition drive motor will not start with heater control switch to HEATER ON . . . . . . . . . . . . . . . . . . . . . . . . . . . . . . . . . . . . . . . . . . . . . . . . . .<br />
Fuel fails to ignite . . . . . . . . . . . . . . . . . . . . . . . . . . . . . . . . . . . . . . . . . . . . . . . . . . . . . . . . . . . . . . . . . . . . . . . . . . . . . . . . . . . . . . . . . . . . . . . . . . . . . . . . . . . . . . . . .<br />
Water heater does not heat water . . . . . . . . . . . . . . . . . . . . . . . . . . . . . . . . . . . . . . . . . . . . . . . . . . . . . . . . . . . . . . . . . . . . . . . . . . . . . . . . . . . . . . . . . . . . . . . . . .<br />
Water heater shuts down during operation . . . . . . . . . . . . . . . . . . . . . . . . . . . . . . . . . . . . . . . . . . . . . . . . . . . . . . . . . . . . . . . . . . . . . . . . . . . . . . . . . . . . .<br />
2-7<br />
2-8<br />
2-11<br />
2-20<br />
2-5<br />
2-20<br />
TROUBLESHOOTING<br />
MALFUNCTION<br />
TEST OR INSPECTION<br />
CORRECTIVE ACTION<br />
PUMP UNIT<br />
1. GASOLINE ENGINE FAILS TO START OR RUNS POORLY.<br />
Step 1. Refer to troubleshooting in TM 5-2805-259-14.<br />
Refer to maintenance in TM 5-2805-259-14.<br />
Step 2. Check for tripped CIRCUIT BREAKER CB1.<br />
Reset CIRCUIT BREAKER CB1 to ON.<br />
2-1 TM 3-42<strong>30</strong>-<strong>209</strong>-<strong>30</strong>&P
2-2 TM 3-42<strong>30</strong>-<strong>209</strong>-<strong>30</strong>&P<br />
TROUBLESHOOTING (CONT)<br />
MALFUNCTION<br />
TEST OR INSPECTION<br />
CORRECTIVE ACTION<br />
PUMP UNIT (CONT)<br />
1. GASOLINE ENGINE FAILS TO START OR RUNS POORLY (CONT).<br />
Step 3. Check with multimeter for 24 vdc between switch S1-A and ground.<br />
If voltage is not indicated, replace red wire No. 11 between TB1-A and S1-A.<br />
Step 4. Check with multimeter for 24 vdc between switch S1-C and ground when S1 (STOP, RUN, START SWITCH) is placed to START.<br />
If voltage is not indicated, replace S1 switch. Refer to TM 3-42<strong>30</strong>-<strong>209</strong>-20&P.<br />
Step 5. Check with multimeter for 24 vdc between TB1-C and ground with S1 (STOP, RUN, START SWITCH) in START.<br />
If voltage is not indicated, replace brown wire No. 13.<br />
Step 6. Check with multimeter for continuity between TB1-C3 and engine disconnect connector plug P1, pin C.<br />
If continuity is not indicated, replace electrical cable from TB1 to engine disconnect.
2. CENTRIFUGAL PUMP PRESSURE LOW OR FALLING.<br />
Step 1. Check for damaged or missing key between pump groove pulley and pump shaft.<br />
Replace key (para 2-21).<br />
Step 2. Check centrifugal pump for binding or noisy operation.<br />
Replace centrifugal pump.<br />
Step 3. Check centrifugal pump for vibrations.<br />
Replace centrifugal pump.<br />
3. CENTRIFUGAL PUMP FAILS TO OPERATE.<br />
Check centrifugal pump for broken pump impeller, diffuser, or annular ball bearings.<br />
Replace pump impeller, diffuser, or annular ball bearings (para 2-22).<br />
4. PLUMBING VALVES LEAK.<br />
Step 1. Check for loose pipe connections.<br />
Tighten pipe connections.<br />
Step 2. Check for loose valve body assembly (1).<br />
Tighten valve bonnet nuts and bolts (2).<br />
Step 3. Check for damaged or split valve diaphragm.<br />
Replace valve diaphragm. For VALVE NO. 1 see paragraph 2-23. For<br />
VALVE NOS. 2 and 3 see paragraph 2-24.<br />
Step 4. Check for cracked or broken valve body (1).<br />
Replace valve. For VALVE NOS. 1,2, and 3 see paragraph 2-21.<br />
2-3 TM 3-42<strong>30</strong>-<strong>209</strong>-<strong>30</strong>&P
2-4<br />
TROUBLESHOOTING (CONT)<br />
TM 3-42<strong>30</strong>-<strong>209</strong>-<strong>30</strong>&P<br />
MALFUNCTION<br />
TEST OR INSPECTION<br />
CORRECTIVE ACTION<br />
5. 24 VDC IS NOT AVAILABLE AT THE ALTERNATOR JUNCTION BOX WHEN HEATER RECEPTACLE AND<br />
SWITCH IS ON.<br />
Step 1. Remove alternator input cable (1) from alternator junction box (2) and check for voltage<br />
between connector and ground.<br />
If voltage is indicated, replace alternator junction box.<br />
If voltage is not indicated, check alternator input cable (1) with multimeter for continuity.<br />
If continuity is not indicated, replace alternator input cable (1).<br />
Step 2.<br />
Check for voltage between top of alternator (3) and ground.<br />
If voltage is indicated but system still not working, shut unit down and check ground<br />
lead (4) for continuity. If continuity is not indicated, replace ground lead (4) from<br />
alternator to around on skid base assembly.
WATER HEATER<br />
1. WATER HEATER DOES NOT HEAT WATER<br />
Step 1. 24 vdc is not available from pump unit.<br />
Troubleshoot pump unit. See malfunction 5,<br />
page 2-4.<br />
Step 2. Check for defective thermostatic switch S1<br />
using the following procedures:<br />
a. Remove TD2 tube from its socket.<br />
b. Use multimeter to measure continuity.<br />
Check from TD2 socket, hole 7, to switch<br />
S4-1. If continuity is not indicated, thermostatic<br />
switch S1 in top of the boiler is bad.<br />
Reinstall TD2 tube (para 2-33).<br />
Replace thermostatic switch S1 (para 2-33).<br />
2-5<br />
TM 3-42<strong>30</strong>-<strong>209</strong>-<strong>30</strong>&P
2-6 TM 3-42<strong>30</strong>-<strong>209</strong>-<strong>30</strong>&P<br />
TROUBLESHOOTING (CONT)<br />
MALFUNCTION<br />
TEST OR INSPECTION<br />
CORRECTIVE ACTION<br />
WATER HEATER (CONT)<br />
1. WATER HEATER DOES NOT HEAT WATER (CONT).<br />
Step 3. Check for defective ignition cable (1) using the following procedures:<br />
a. Remove electrical connector (2) from magneto (3) and igniter plug (4) inside the combustor assembly area.<br />
b. Use multimeter to check for continuity between ends of the ignition cable (1) while it is flexed back and forth along its full length.<br />
Replace ignition cable (1) if any breakdown appears.
2. COMBUSTION MOTOR MOUNTING ASSEMBLY DIRECT CURRENT MOTOR DOES NOT OPERATE.<br />
Step 1. Disconnect wire No. 17 from relay K2-A2 and from the motor B1.<br />
Step 2. Use multimeter to check for continuity between ends of wire No. 17 while it is flexed back and forth along its full length. Reinstall if continuity is<br />
indicated.<br />
Replace wire No. 17 if any reading other than continuity is indicated.<br />
2-7 TM 3-42<strong>30</strong>-<strong>209</strong>-<strong>30</strong>&P
2-8<br />
TROUBLESHOOTING (CONT)<br />
TM 3-42<strong>30</strong>-<strong>209</strong>-<strong>30</strong>&P<br />
MALFUNCTION<br />
TEST OR INSPECTION<br />
CORRECTIVE ACTION<br />
WATER HEATER (CONT)<br />
3. FUEL PUMP AND IGNITION DRIVE MOTOR DOES NOT OPERATE IN PURGE ON POSITION.<br />
Step 1. Check wire No. 18 for continuity using the following procedures:<br />
a. Disconnect wire No. 18 from relay K1-A1, and disconnect other end from the<br />
fuel pump and ignition drive motor (1).<br />
b. Use multimeter to check continuity between ends of wire No. 18 while flexing the<br />
entire length of the wire.<br />
Reinstall wire No. 18 if continuity is indicated.<br />
Replace wire No. 18 if defective.
Step 2. Check wire No. 15 for continuity using the following<br />
procedures:<br />
a. Disconnect wire No. 15 from relay K1-X2.<br />
b. Use multimeter to check continuity between ends of wire<br />
No. 15 while flexing the entire length of the wire.<br />
Reinstall wire No. 15 if continuity is indicated.<br />
Replace wire No. 15 if defective.<br />
2-9 TM 3-42<strong>30</strong>-<strong>209</strong>-<strong>30</strong>&P
TM 3-42<strong>30</strong>-<strong>209</strong>-<strong>30</strong>&P<br />
2-10<br />
TROUBLESHOOTING (CONT)<br />
MALFUNCTION<br />
TEST OR INSPECTION<br />
CORRECTIVE ACTION<br />
WATER HEATER (CONT)<br />
3. FUEL PUMP AND IGNITION DRIVE MOTOR DOES NOT OPERATE IN PURGE<br />
ON POSITION (CONT).<br />
Step 3. Check wire No. 14 for continuity using the following<br />
procedures:<br />
a. Disconnect wire No. 14 from relay K1-X1.<br />
b. Use multimeter to check continuity between ends of wire<br />
No. 14 and switch S4-1 while flexing the entire length of<br />
the wire.
4. FUEL PUMP AND IGNITION DRIVE MOTOR WILL NOT START<br />
WITH HEATER CONTROL SWITCH IN HEATER ON POSITION.<br />
Step 1. Check wire No. 3 for continuity using the following<br />
procedures:<br />
a. Remove thermal delay relay tube TD1 from its<br />
socket.<br />
b. Use a multimeter to check continuity between<br />
TD1 socket, hole 2, and switch S4-3.<br />
Replace wire No. 3 from S4, terminal 3, to<br />
terminal delay relay tube TD1 socket, hole 2,<br />
if anything other than continuity is measured.<br />
Reinstall thermal delay relay tube TD1.<br />
2-11 TM 3-42<strong>30</strong>-<strong>209</strong>-<strong>30</strong>&P
2-12<br />
TROUBLESHOOTING (CONT)<br />
TM 3-42<strong>30</strong>-<strong>209</strong>-<strong>30</strong>&P<br />
MALFUNCTION<br />
TEST OR INSPECTION<br />
CORRECTIVE ACTION<br />
WATER HEATER (CONT)<br />
4. FUEL PUMP AND IGNITION DRIVE MOTOR WILL NOT START WITH HEATER CONTROL SWITCH IN HEATER ON POSITION (CONT).<br />
Step 2. Check wire No. 1 for continuity using the following procedures:<br />
a. Remove thermal delay relay tubes TD1 and TD2 from their sockets.<br />
b. Use a multimeter to check continuity between ends of wire No. 1. Stick one multimeter probe into TD1 socket, hole 3, and the other<br />
multimeter probe into TD2 socket, hole 2.<br />
Replace wire No. 1 if anything other than continuity is indicated.<br />
Reinstall thermal delay relay tubes TD1 and TD2 back into their sockets.
Step 3. Check wire No. 7 for continuity using the following procedures:<br />
a. Remove thermal delay relay tube TD1 from its socket. Remove wire No. 7 from relay K2-A1.<br />
b. Use a multimeter to check continuity between ends of wire while it is being flexed. Stick one multimeter probe into thermal delay relay tube<br />
TD1 socket, hole 7, and other multimeter probe to end of wire No. 7.<br />
Reinstall wire No. 7 back onto relay K2-A1 if continuity is indicated and reinstall thermal delay relay TD1 back into its socket.<br />
Replace wire No. 7 between relay K2-A2 and thermal delay relay tube socket, hole 7, if anything other than continuity is measured.<br />
Reinstall thermal delay relay tube TD1 into its socket.<br />
2-13 TM 3-42<strong>30</strong>-<strong>209</strong>-<strong>30</strong>&P
2-14<br />
TROUBLESHOOTING (CONT)<br />
TM 3-42<strong>30</strong>-<strong>209</strong>-<strong>30</strong>&P<br />
MALFUNCTION<br />
TEST OR INSPECTION<br />
CORRECTIVE ACTION<br />
WATER HEATER (CONT)<br />
4. FUEL PUMP AND IGNITION DRIVE MOTOR WILL NOT START WITH HEATER CONTROL SWITCH IN HEATER ON POSITION (CONT).<br />
Step 4. Check wire No. 19 for continuity using the following procedures:<br />
a. Remove thermal delay relay tube TD1 from its socket. Disconnect wire No. 19 from relay K2-A2.<br />
b. Use a multimeter to check for continuity between ends of wire while it is being flexed. Stick one multimeter probe into thermal delay relay tube<br />
TD1 socket, hole 5, and the other multimeter probe to end of wire No. 19.<br />
Reinstall wire No. 19 back onto relay K2-A1 if continuity<br />
is indicated, and reinstall thermal delay relay<br />
tube TD1 .<br />
Replace wire No. 19 in socket base of TD1 at hole 5<br />
and attach to relay K2-A2, if anything other than<br />
continuity is indicated. Reinstall thermal delay relay<br />
tube TD1 into its socket.
Step 5. Check wire No. 5 for continuity using the following procedures:<br />
a. Remove thermal delay relay tube TD2 from its socket. Disconnect wire No. 5 from combustor air pressure switch S3.<br />
b. Use multimeter to check for continuity between ends of wire No. 5 while it is being flexed. Stick one multimeter probe into thermal delay relay<br />
TD2 socket, hole 5, and the other multimeter probe to end of wire No. 5.<br />
Reinstall wire No. 5 back onto combustor air pressure switch S3 if continuity is indicated, and reinstall thermal delay relay tube TD2.<br />
Replace wire No. 5 in socket base of TD2, hole 5, and attach the combustor air pressure switch S3 if anvthina other than continuity is<br />
indicated. Reinstall thermal delay relay TD2 into its socket.<br />
2-15 TM 3-42<strong>30</strong>-<strong>209</strong>-<strong>30</strong>&P
2-16 TM 3-42<strong>30</strong>-<strong>209</strong>-<strong>30</strong>&P<br />
TROUBLESHOOTING (CONT)<br />
MALFUNCTION<br />
TEST OR INSPECTION<br />
CORRECTIVE ACTION<br />
WATER HEATER (CONT)<br />
4. FUEL PUMP AND IGNITION DRIVE MOTOR WILL NOT START WITH HEATER CONTROL SWITCH IN HEATER ON POSITION (CONT).<br />
Step 6. Check wire No. 4 for continuity using the following procedures:<br />
a. Disconnect wire No. 4 from relay K2-A1, and disconnect other end of wire at combustor air pressure switch S3.<br />
b. Use multimeter to check for continuity between ends of wire No. 4 while it is being flexed along its entire length.<br />
Reinstall wire No. 4 back onto combustor air pressure switch S3 and onto relay K2-A1, if continuity is indicated.<br />
Replace wire No. 4 between combustor air pressure switch S3 and relay K2-A1 if anything other than continuity is indicated.
Step 7. Check wire No. 6 for continuity using the following procedures:<br />
a. Remove thermal delay relay tube TD2 and cut splice from wire No. 6 near the S1 switch located in top of the boiler assembly.<br />
b. Use multimeter to check for continuity between ends of wire No. 6 while it is being flexed along its entire length. Stick one multimeter probe<br />
into thermal delay relay TD2 socket, hole 7, and the other multimeter probe onto end of wire No. 6.<br />
Reattach wire No. 6 to thermostatic switch S1 by replacing with new splice if continuity is indicated.<br />
Replace wire No. 6 to the thermal delay relay tube TD2 socket, hole 7. Splice wire near the thermostatic switch S1 on top of boiler, Replace<br />
splice to connect the two wires after stripping wires.<br />
Reinstall thermal delay relay TD2.<br />
2-17 TM 3-42<strong>30</strong>-<strong>209</strong>-<strong>30</strong>&P
2-18 TM 3-42<strong>30</strong>-<strong>209</strong>-<strong>30</strong>&P<br />
TROUBLESHOOTING (CONT)<br />
MALFUNCTION<br />
TEST OR INSPECTION<br />
CORRECTIVE ACTION<br />
WATER HEATER (CONT)<br />
4. FUEL PUMP AND IGNITION DRIVE MOTOR WILL NOT START WITH HEATER CONTROL SWITCH IN HEATER ON POSITION (CONT).<br />
Step 8. Check wire No. 12 for continuity using the following procedures:<br />
a. Cut splice from wire No. 12 near the thermostatic switch S1.<br />
b. Use multimeter to check continuity between ends of wire No. 12 and switch S4-1 while wire is being flexed along its entire length<br />
Strip end of wire and replace new splice if continuity is indicated.<br />
Replace wire No. 12 from switch S4-1, and splice area near the thermostatic switch S1 if anything other than continuity is measured.<br />
Restrip wires and replace splice.
Step 9. Check wire No. 10 for continuity using the following procedures:<br />
a. Disconnect wire No. 10 from switch S4, terminals 1 and 5.<br />
b. Use multimeter to check continuity between ends of wire No. 10 while flexing along its entire length.<br />
Reinstall wire No. 10 to switch S4, terminals 1 and 5, if continuity is indicated.<br />
Replace wire No. 10 on switch S4 between terminals 1 and 5 with new wire if anything other than continuity is indicated.<br />
2-19 TM 3-42<strong>30</strong>-<strong>209</strong>-<strong>30</strong>&P
2-20 TM 3-42<strong>30</strong>-<strong>209</strong>-<strong>30</strong>&P<br />
TROUBLESHOOTING (CONT)<br />
MALFUNCTION<br />
TEST OR INSPECTION<br />
CORRECTIVE ACTION<br />
WATER HEATER (CONT)<br />
5. FUEL FAILS TO IGNITE.<br />
Step 1. Check for excessively worn or defective breaker points in the combustor<br />
magneto(1).<br />
Replace breaker points (para 2-46).<br />
Step 2.<br />
Check for defective ignition cable. See WATER HEATER DOES NOT HEAT<br />
WATER, step 3.<br />
Replace defective ignition cable (para 2-53).<br />
6. WATER HEATER SHUTS DOWN DURING OPERATION.<br />
Step 1. Check for defective thermostatic switch S1. See WATER HEATER DOES NOT<br />
HEAT WATER, step 2.<br />
Replace thermostatic switch S1. See paragraph 2-33.<br />
Step 2.<br />
Check for defective wiring. Follow procedures of FUEL PUMP AND IGNITION<br />
DRIVE MOTOR WILL NOT START WITH HEATER CONTROL SWITCH IN HEATER<br />
ON POSITION.<br />
Replace wiring (para 2-44).
Section IV. MAINTENANCE PROCEDURES<br />
2-7. COVER ASSEMBLY.<br />
This task covers repair.<br />
INITIAL SETUP<br />
Tools and Special Tools<br />
Automotive Maintenance and Repair Field Maintenance<br />
Shop Equipment, Basic, Less Power (SC 4910-95-CL-A31)<br />
Equipment Condition<br />
Removed from pump unit.<br />
References<br />
FM 10-16<br />
LOCATION/lTEM ACTION REMARKS<br />
Cover Assembly/<br />
All areas Sew rips and tears in cover assembly (1) according to FM 10-16.<br />
2-21 TM 3-42<strong>30</strong>-<strong>209</strong>-<strong>30</strong>&P
2-22 TM 3-42<strong>30</strong>-<strong>209</strong>-<strong>30</strong>&P<br />
2-8. TOP ACCESS COVER ASSEMBLY.<br />
This task covers repair.<br />
INITIAL SETUP<br />
Tools and Special Tools<br />
Automotive Maintenance and Repair Field Maintenance<br />
Shop Equipment, Basic, Less Power (SC 4910-95-CL-A31)<br />
Equipment Condition<br />
Removed from pump unit.<br />
Materials/Parts<br />
Adhesive (item 1, app C)<br />
Gasket (fig D-6)<br />
LOCATION/lTEM ACTION REMARKS<br />
Top Access Cover Assembly/<br />
Gasket (1)<br />
Top access cover (2)<br />
Use adhesive to<br />
cover (2).<br />
bond gasket (1)
2-9. COVER PANEL ASSEMBLY.<br />
This task covers:<br />
a. Disassembly<br />
b. Repair<br />
c. Reassembly<br />
INITIAL SETUP<br />
Tools and Special Tools Polyurethane coating (black) (item 28, app C)<br />
Automotive Maintenance and Repair Field Maintenance Polyurethane coating (green) (item 29, app C)<br />
Shop Equipment, Basic, Less Power (SC 4910-95-CL-A31 )<br />
Camloc fastener pliers (4P3)<br />
References<br />
Camloc fastener tool (T26)<br />
TM 3-42<strong>30</strong>-<strong>209</strong>-20&P<br />
TM 43-0139<br />
Materials/Parts<br />
Adhesive (item 1, app C)<br />
Gaskets (fig D-7 and fig D-8)<br />
Paint brush (item 6, app C)<br />
Equipment Condition<br />
Removed from pump unit.<br />
LOCATION/ITEM ACTION REMARKS<br />
Cover Panel Assembly/<br />
Gaskets (1 and 2)<br />
Access cover (3)<br />
Turnlock stud<br />
assemblies (4)<br />
Turnlock fastener<br />
eyelets (5)<br />
Retaining rings (6)<br />
Scrape brittle or damaged gaskets (1 and 2) from access<br />
cover (3). Discard gaskets.<br />
Remove damaged turnlock stud assemblies (4), turnlock<br />
fastener eyelets (5) and retaining rings (6).<br />
2-23 TM 3-42<strong>30</strong>-<strong>209</strong>-<strong>30</strong>&P
2-24 TM 3-42<strong>30</strong>-<strong>209</strong>-<strong>30</strong>&P<br />
2-9. COVER PANEL ASSEMBLY (CONT).<br />
LOCATION/lTEM ACTION REMARKS<br />
Cover Panel Assembly/<br />
Gaskets<br />
Access cover<br />
Replace authorized unserviceable parts.<br />
When gaskets are loose but not brittle or damaged, rebond to access<br />
cover with adhesive. Fabricate gaskets (fig D-8) as required. Fabricate<br />
gaskets (fig D-7) as required.<br />
Repair access cover by straightening dents, removing rust, and repainting<br />
lettering with black polyurethane coating and small paint brush. Use<br />
green polyurethane coating to paint the access cover. Refer to<br />
TM 43-0139.<br />
Repaint REMOVE BEFORE OPERATING using 1-1/2 inch high lettering.<br />
Cover Panel Assembly/<br />
Gaskets (1)<br />
Access cover (2)<br />
Gaskets (3)<br />
Bond gaskets (1) to back side of access cover (2) with adhesive.<br />
Bond gaskets (3) to back side of access cover (2) with<br />
adhesive.<br />
Turnlock stud<br />
Use camloc fastener tool and camloc fastener pliers to<br />
assemblies (4) replace turnlock stud assemblies (4), turnlock fastener<br />
Turnlock fastener eyelets (5), and retaining rings (6).<br />
eyelets (5)<br />
Retaining rings (6)
2-10. COVER PANEL ASSEMBLY.<br />
This task covers:<br />
a. Disassembly c. Reassembly<br />
b. Repair<br />
INITIAL SETUP<br />
Tools and Special Tools<br />
Automotive Maintenance and Repair Field Maintenance<br />
Shop Equipment, Basic, Less Power (SC 4910-95-CL-A31 )<br />
Camloc fastener pliers (4P3)<br />
Camloc fastener tool (T26)<br />
Materials/Parts<br />
Adhesive (item 1, app C)<br />
Gaskets (fig D-8)<br />
Gaskets (fig D-9)<br />
Paint brush (item 6, app C)<br />
Polyurethane coating (black) (item 28, app C)<br />
Polyurethane coating (green) (item 29, app C)<br />
References<br />
TM 3-42<strong>30</strong>-<strong>209</strong>-20&P<br />
TM 43-0139<br />
Equipment Condition<br />
Removed from pump unit,<br />
LOCATION/lTEM ACTION REMARKS<br />
Cover Panel Assembly/<br />
Gaskets (1 and 2)<br />
Access cover (3)<br />
Turnlock stud<br />
assemblies (4)<br />
Turnlock fastener<br />
eyelets (5)<br />
Retaining rings (6)<br />
Scrape brittle or damaged gaskets (1 and 2) from access<br />
cover (3). Discard gaskets.<br />
Remove damaged turnlock stud assemblies (4), turnlock<br />
fastener eyelets (5), and retaining rings (6).<br />
2-25 TM 3-42<strong>30</strong>-<strong>209</strong>-<strong>30</strong>&P
2-26 TM 3-42<strong>30</strong>-<strong>209</strong>-<strong>30</strong>&P<br />
2-10. COVER PANEL ASSEMBLY (CONT).<br />
LOCATION/lTEM ACTION REMARKS<br />
Cover Panel Assembly/<br />
Gaskets<br />
Access cover<br />
Replace authorized unserviceable parts. When gaskets are loose but not<br />
brittle or damaged, rebond to access cover with adhesive. Fabricate gaskets<br />
(fig D-8) as required. Fabricate gaskets (fig D-9) as required.<br />
Repair access cover by straightening dents, removing rust, and repainting<br />
lettering with black polyurethane coating and small paint brush. Use<br />
green polyurethane coating to paint the panel. Refer to TM 43-0139.<br />
Repaint REMOVE BEFORE OPERATING in 1 1/2 inch high letters with<br />
black polyurethane coating.<br />
Cover PaneI Assembly/<br />
Gaskets (1)<br />
Access cover (2)<br />
Gaskets (3)<br />
Turnlock stud<br />
assemblies (4)<br />
Turnlock fastener<br />
eyelets (5)<br />
Retaining rings (6)<br />
Bond gaskets (1) to back side of access cover (2) with adhesive. Cut<br />
holes in gasket (1) at assembly to fit.<br />
Bond gaskets (3) to back side of access cover (2) with adhesive. Cut<br />
holes in gaskets (3) at assembly to fit. After fitted properly trim gasket in<br />
the notch area to clear notch.<br />
Use camloc fastener tool and camloc fastener pliers to replace turnlock<br />
stud assemblies (4), turnlock fastener eyelets (5), and retaining rings (6).
2-11. ACCESS COVER.<br />
This task covers:<br />
a. Disassembly<br />
b. Repair<br />
c. Reassembly<br />
INITIAL SETUP<br />
Tools and Special Tools<br />
Automotive Maintenance and Repair Field Maintenance<br />
Shop Equipment, Basic, Less Power (SC 4910-95-CL-A31)<br />
Camloc fastener pliers (4P3)<br />
Camloc fastener tool (T26)<br />
Materials/Parts<br />
Adhesive (item 1, app C)<br />
Gaskets (fig D-10)<br />
Gaskets (fig D-12)<br />
Paint brush (item 6, app C)<br />
Polyurethane coating (black) (item 28, app C)<br />
Polyurethane coating (green) (item 29, app C)<br />
References<br />
TM 3-42<strong>30</strong>-<strong>209</strong>-20&P<br />
TM 43-0139<br />
Equipment Condition<br />
Removed from pump unit.<br />
LOCATION/lTEM ACTION REMARKS<br />
Access Cover/<br />
Gaskets (1 and 2)<br />
Cover panel (3)<br />
Scrape brittle or damaged gaskets (1 and 2) from cover panel (3). Discard<br />
gaskets.<br />
Turnlock stud<br />
assemblies (4)<br />
Turnlock fastener<br />
eyelets (5)<br />
Retaining rings (6)<br />
Remove damaged turnlock stud assemblies (4), turnlock fastener<br />
eyelets (5), and retaining rings (6).<br />
2-27 TM 3-42<strong>30</strong>-<strong>209</strong>-<strong>30</strong>&P
2-28 TM 3-42<strong>30</strong>-<strong>209</strong>-<strong>30</strong>&P<br />
2-11. ACCESS COVER (CONT).<br />
LOCATION/lTEM ACTION REMARKS<br />
Access Cover/<br />
Gaskets<br />
Cover panel<br />
Replace authorized unserviceable parts. When gaskets are loose but not<br />
brittle or damaged, rebond to cover panel with adhesive. Fabricate gaskets<br />
(fig D-1 2) as required. Fabricate gaskets (fig D-10) as required.<br />
Repair cover paneI by straightening dents, removing rust, and repainting<br />
lettering with black polyurethane coating and small paint brush. Use<br />
green polyurethane coating to paint the panel. Refer to TM 43-0139.<br />
Repaint REMOVE BEFORE OPERATING in 1 1/2 inch high lettering with<br />
black polyurethane coating.<br />
Access Cover/<br />
Gaskets (1)<br />
Cover panel (2)<br />
Gaskets (3)<br />
Turnlock stud<br />
assemblies (4)<br />
Turnlock fastener<br />
eyelets (5)<br />
Retaining rings (6)<br />
Bond gaskets (1) to back side of cover panel (2) with adhesive. Cut holes<br />
in gaskets (1) at assembly to fit.<br />
Bond gaskets (3) to back side of cover panel (2) with adhesive. Cut holes<br />
in gaskets (3) at assembly to fit.<br />
Use camloc fastener tool and camloc fastener pliers to replace turnlock<br />
stud assemblies (4), turnlock fastener eyelets (5), and retaining rings (6).
2-12. ACCESS COVER.<br />
This task covers:<br />
a. Disassembly<br />
b. Repair<br />
c. Reassembly<br />
INITIAL SETUP<br />
Tools and Special TOOLS<br />
Automotive Maintenance and Repair Field Maintenance<br />
Shop Equipment, Basic, Less Power (SC 491 0-95-CL-A31 )<br />
Camloc fastener pliers (4P3)<br />
Camloc fastener tool (T26)<br />
Materials/Parts<br />
Adhesive (item 1, app C)<br />
Gaskets (fig D-10)<br />
Gaskets (fig D-11)<br />
Paint brush (item 6, app C)<br />
Polyurethane coating (black) (item 28, app C)<br />
Polyurethane coating (green) (item 29, app C)<br />
References<br />
TM 3-42<strong>30</strong>-<strong>209</strong>-20&P<br />
TM 43-0139<br />
Equipment Condition<br />
Removed from pump unit.<br />
Unit maintenance authorized components are removed in<br />
TM 3-42<strong>30</strong>-<strong>209</strong>-20&P and are not covered in this manual.<br />
LOCATION/lTEM ACTION REMARKS<br />
Access Cover/<br />
Gaskets (1 and 2)<br />
Cover panel (3)<br />
Scrape brittle or damaged gaskets (1 and 2) from cover panel (3). Discard<br />
gaskets.<br />
Turnlock stud<br />
Remove damaged turnlock stud assemblies (4), turnlock fastener<br />
assemblies (4) eyelets (5), and retaining rings (6).<br />
Turnlock fastener<br />
eyelets (5)<br />
Retaining rings (6)<br />
2-29 TM 3-42<strong>30</strong>-<strong>209</strong>-<strong>30</strong>&P
2-<strong>30</strong> TM 3-42<strong>30</strong>-<strong>209</strong>-<strong>30</strong>&P<br />
2-12. ACCESS COVER (CONT).<br />
LOCATION/lTEM ACTION REMARKS<br />
Access Cover/<br />
Gaskets<br />
Cover panel<br />
Replace authorized unserviceable parts.<br />
When gaskets are loose but not brittle or damaged, rebond to cover panel<br />
with adhesive. Fabricate gaskets (fig D-11) as required. Fabricate gaskets<br />
(fig D-10) as required.<br />
Repair cover panel by straightening dents, removing rust, and repainting<br />
lettering with black polyurethane coating and small paint brush. Use<br />
green polyurethane coating to paint the panel. Refer to TM 43-0139.<br />
Repaint REMOVE BEFORE OPERATING in 1 1/2 inch high letters with<br />
black polyurethane coating.<br />
Access Cover/<br />
Gaskets (1)<br />
Cover panel (2)<br />
Gaskets (3)<br />
Bond gaskets (1) to back side of cover panel (2) with adhesive. Cut holes<br />
in gaskets (1) at assembly to fit.<br />
Bond gaskets (3) to back side of cover panel (2) with adhesive. Cut holes<br />
in gaskets (3) at assembly to fit.<br />
Turnlock stud<br />
Use camloc fastener tool and camloc fastener pliers to replace turnlock<br />
assemblies (4) stud assemblies (4), turnlock fastener eyelets (5), and retaining rings (6).<br />
Turnlock fastener<br />
eyelets (5)<br />
Retaining rings (6)
2-13. CLEVIS AND EYE BOLT ASSEMBLY.<br />
This task covers:<br />
a. Disassembly<br />
b. Repair<br />
c. Reassembly<br />
INITAL SETUP<br />
Tools and Special Tools<br />
Automotive Maintenance and Repair Field Maintenance<br />
Shop Equipment, Basic, Less Power (SC 4910-95-CL-A31 )<br />
Materials/Parts<br />
Polyurethane coating (green) (item 29, app C)<br />
Spacer (fig D-13)<br />
References<br />
TM 3-42<strong>30</strong>-<strong>209</strong>-20&P<br />
Equipment Condition<br />
Removed from pump unit. See TM 3-42<strong>30</strong>-<strong>209</strong>-20&P<br />
LOCATION/lTEM ACTION REMARKS<br />
Clevis and Eye Bolt Assembly/<br />
Nut (1)<br />
Cut nut (1) from bolt (2). Remove bolt (2) from shackle (3), spacer (4), and<br />
Bolt (2) eye bolt (5). Discard nut (1) and bolt (2).<br />
Shackle (3)<br />
Spacer (4)<br />
Eye bolt (5)<br />
Clevis and Eye Bolt Assembly/<br />
Spacer (4)<br />
Replace authorized unserviceable parts.<br />
Replace spacer (4) (fig D-13).<br />
2-31 TM 3-42<strong>30</strong>-<strong>209</strong>-<strong>30</strong>&P
2-32 TM 3-42<strong>30</strong>-<strong>209</strong>-<strong>30</strong>&P<br />
2-13. CLEVIS AND EYE BOLT ASSEMBLY (CONT).<br />
LOCATION/lTEM ACTION REMARKS<br />
Clevis and Eye Bolt Assembly/<br />
Spacer (1)<br />
Eye bolt (2)<br />
Shackle (3)<br />
Bolt (4)<br />
Nut (5)<br />
Insert spacer (1) into large hole in eye bolt (2). Saddle shackle (3) over eye<br />
bolt (2), and aline hole in shackle (3) with hole in spacer (1).<br />
Insert new bolt (4) through holes and screw on new nut (5). Tighten nut (5)<br />
on bolt (4) snug but not tight. Tack-weld nut (5) to bolt (4) after reassembly<br />
is complete.<br />
Paint clevis and eye bolt assembly with polyurethane coating after<br />
welding.<br />
2-14. PUMP UNIT ASSEMBLY.<br />
This task covers:<br />
a. Disassembly c. Reassembly<br />
b. Repair<br />
INITIAL SETUP<br />
Tools and Special Tools<br />
Automotive Maintenance and Repair Field Maintenance<br />
Shop Equipment, Basic, Less Power (SC 491 0-95-CL-A31 )<br />
Materials/Parts<br />
Ground wire (fig D-16)<br />
Transmitter wire (fig D-17)<br />
Equipment Condition<br />
Engine and pump unit protective cover and pump unit panels are removed and<br />
fuel is drained from fuel tank. Unit maintenance authorized components are<br />
removed in TM 3-42<strong>30</strong>-<strong>209</strong>-20&P and are not covered in this manual.<br />
Special Safety Instructions<br />
WARNING<br />
Negative battery cable must be disconnected from the battery any time that<br />
the control panel assembly is being removed or is removed from the pump<br />
unit. See TM 3-42<strong>30</strong>-<strong>209</strong>-20&P.<br />
Battery and battery compar<strong>tm</strong>ent area may be coated with acid due to<br />
spillage and/or fumes. Wear protective clothing when working in this area.<br />
Before eating, smoking, or touching your face or clothing, wash your hands<br />
with a solution of baking soda and water, then flush them with clear water.<br />
If battery acid gets into your eyes, flush them with clean water. Obtain<br />
medical trea<strong>tm</strong>ent immediately. Failure to do so may cause blindness.
Pump Unit Assembly/<br />
Hexagon head self-locking<br />
nuts (1)<br />
Machine screws (2)<br />
Flat washers (3)<br />
Gun bracket (4)<br />
Thread tapping screws (5)<br />
Shell (6)<br />
Remove two hexagon head self-locking nuts (1), two machine screws (2),<br />
and two flat washers (3) securing gun bracket (4). Repeat procedures for<br />
removal of other gun bracket. Remove 14 thread tapping screws (5) and<br />
remove shell (6).<br />
Nut (7)<br />
Nut (8)<br />
Wire (9)<br />
Machine screw (10)<br />
Screw (11)<br />
Wire (12)<br />
Remove nut (7) from top screw of the vacuum gage and nut (8) from the<br />
center stud of the fuel quantity transmitter. Remove wire (9). Reinstall<br />
nuts (7 and 8) to their proper locations and tighten.<br />
Remove machine screw (10) with lock washer from fuel quantity transmitter<br />
flange. Disconnect screw (11) in TB1 -G and remove wire (12). Reattach<br />
machine screw (10) with lock washer and screw (11) and tighten.<br />
2-33 TM 3-42<strong>30</strong>-<strong>209</strong>-<strong>30</strong>&P
2-34<br />
TM 3-42<strong>30</strong>-<strong>209</strong>-<strong>30</strong>&P<br />
2-14. PUMP UNIT ASSEMBLY (CONT).<br />
LOCATION/lTEM<br />
ACTION<br />
Setscrew (13)<br />
Handwheel (14)<br />
Hexagon head self-locking<br />
nut (15)<br />
Machine screw (16)<br />
Electrical connector<br />
cover (17)<br />
Hexagon head cap<br />
screw (18)<br />
Flat washer (19)<br />
Loop clamp (20)<br />
Cable (21)<br />
Hexagon head cap<br />
screw (22)<br />
Alternator assembly (23)<br />
Loosen setscrew (13) and remove handwheel (14) from VALVE NO. 1<br />
MANIFOLD stem.<br />
NOTE<br />
Handwheel maybe held on with a drive pin.<br />
Remove one hexagon head self-locking nut (15), machine screw (16), and<br />
electrical connector cover (17).<br />
Remove hexagon head cap screw (18) and flat washer (19). Slide loop<br />
clamp (20) from cable (21).<br />
Unscrew cable (21) electrical connector from the bottom of the alternator<br />
junction box. Remove hexagon head cap screw (22) from the alternator<br />
assembly (23) and remove cable (21). Reinstall hexagon head cap<br />
screw (22) with resistor lead into alternator assembly (23).
Pump Unit Assembly/<br />
Engine disconnect<br />
cable (24)<br />
Wire (25)<br />
Unscrew engine disconnect cable (24) from rear of engine. Also disconnect<br />
wire (25) connected between STOP-RUN-START SWITCH and the<br />
oil pressure switch.<br />
To remove control paneI assembly, electrical wires<br />
and control cables must be disconnected from the<br />
engine. These wires and cables are subcomponents<br />
of the control panel assembly.<br />
Oil pressure switches on engines manufactured<br />
before January 1969 are at the front end of the<br />
engine.<br />
Oil pressure switches on engines manufactured after<br />
January 1969 are mounted at the rear of the engine.<br />
Tiedown straps (26)<br />
Setscrew (27)<br />
Clamp (28)<br />
Spring (29)<br />
Choke lever (<strong>30</strong>)<br />
Choke rod (31)<br />
Choke cable (32)<br />
Cut and discard electrical tiedown straps (26) securing the choke cable to<br />
the frame. Loosen but don’t remove setscrew (27), until clamp (28) is<br />
2-35 TM 3-42<strong>30</strong>-<strong>209</strong>-<strong>30</strong>&P
2-36 TM 3-42<strong>30</strong>-<strong>209</strong>-<strong>30</strong>&P<br />
2-14. PUMP UNIT ASSEMBLY (CONT).<br />
LOCATION/lTEM ACTION REMARKS<br />
DISASSEMBLY (CONT)<br />
Setscrew (33)<br />
Bolt (34)<br />
Throttle cable (35)<br />
Throttle clamp (36)<br />
Loosen but do not remove setscrew(33) and<br />
cable (35) out of throttle clamp (36).<br />
Hexagon head cap<br />
screws (37)<br />
Lock washers (38)<br />
Control panel assembly (39)<br />
Pump unit<br />
subassembly (40)<br />
Remove 14 hexagon head cap screws (37)<br />
and lock washers (38) securing the control<br />
panel assembly (39). Lift control panel assembly<br />
(39) out of the pump unit subassembly<br />
(40). Make sure dangling cables do not get<br />
tangled with other equipment.
Pump Unit Assembly/<br />
Wire (1)<br />
Wire (2)<br />
Replace authorized unserviceable parts. Fabricate new wire (1) according<br />
to figure D-16. Fabricate new wire (2) according to figure D-17.<br />
REASSEMBLY<br />
Pump Unit Assembly/<br />
Control panel assembly (1) Position control panel assembly (1) into place. Guide loose ends of wires Connect the electrical wiring and cables to the engine<br />
Pump unit subassembly (2) and cables through the pump unit subassembly (2) frame. Secure control as required to make operational. Some minor adjust-<br />
Lock washers (3) panel assembly (1) with 14 lock washers (3) and hexagon head cap ments may be required to get proper movement of the<br />
Hexagon head cap screws (4).<br />
throttle and choke after final assembly.<br />
screws (4)<br />
2-37<br />
TM 3-42<strong>30</strong>-<strong>209</strong>-<strong>30</strong>&P
2-38 TM 3-42<strong>30</strong>-<strong>209</strong>-<strong>30</strong>&P<br />
2-14. PUMP UNIT ASSEMBLY (CONT).<br />
LOCATION/lTEM ACTION REMARKS<br />
REASSEMBLY (CONT)<br />
Throttle cable (5)<br />
Throttle clamp (6)<br />
Throttle adapter (7)<br />
Setscrew (8)<br />
Bolt (9)<br />
Choke cable (10)<br />
Choke lever (11 )<br />
Clamp (12)<br />
Setscrew (13)<br />
Spring (14)<br />
Tiedown straps (15)<br />
Slide throttle cable (5) into throttle clamp (6). Guide end of throttle into the<br />
throttle adapter (7) and tighten setscrew (8). Tighten bolt (9) to tighten<br />
throttle clamp (6).<br />
Route choke cable (10) underneath the frame of the pump unit subassembly<br />
and over to the carburetor as shown. Guide the preformed end<br />
of the choke cable (10) through hole in choke lever (11). Position large<br />
section of choke cable (10) into clamp (12) and tighten setscrew (13) to<br />
secure choke cable (10) in clamp. Attach spring (14) to choke lever (11).<br />
Use new tiedown straps (15) to secure choke cable (10) to the frame to<br />
keep it from flopping.
Pump Unit Assembly/<br />
Wire (16)<br />
Oil pressure switch (17)<br />
Engine disconnect<br />
cable (18)<br />
Hexagon head cap<br />
screw (19)<br />
Cable (20)<br />
Alternator assembly (21)<br />
Alternator junction box (22)<br />
Connect wire (16) from START-RUN-STOP SWITCH to the oil pressure<br />
switch (17) on the engine. Reconnect engine disconnect cable (18) (connetted<br />
to TB1 at one end) to the rear of the engine.<br />
Remove hexagon head cap screw with resistor lead (19) from alternator<br />
assembly (21). Position cable (20) on hexagon head cap screw (19) and<br />
reinstall hexagon head cap screw in alternator assembly (21). Route the<br />
cable (20) over and up to the bottom of alternator junction box (22) and<br />
connect.<br />
2-39 TM 3-42<strong>30</strong>-<strong>209</strong>-<strong>30</strong>&P
2-40 TM 3-42<strong>30</strong>-<strong>209</strong>-<strong>30</strong>&P<br />
2-14. PUMP UNIT ASSEMBLY (CONT).<br />
LOCATION/lTEM ACTION REMARKS<br />
Loop clamp (23) Slide loop clamp (23) around cable (20) and secure with flat washer (24)<br />
Flat washer (24)<br />
and hexagon head cap screw (25).<br />
Hexagon head cap<br />
screw (25)<br />
Electrical connector<br />
cover (26)<br />
Machine screw (27)<br />
Hexagon head self-locking<br />
nut (28)<br />
Handwheel(29)<br />
Setscrew (<strong>30</strong>)<br />
Screw electrical connector cover (26) onto HEATER RECEPTACLE AND<br />
SWITCH socket on the alternator junction box (22). Secure the end of<br />
chain with machine screw (27) and hexagon head self-locking nut (28).<br />
NOTE<br />
Handwheel may be held on with a drive pin.<br />
Slide handwheel (29) onto VALVE NO. 1 MANIFOLD stem and tighten<br />
setscrew (<strong>30</strong>).<br />
Screw (31)<br />
Wire (32)<br />
Machine screw (33)<br />
Nut (34)<br />
Wire (35)<br />
Nut (36)<br />
Remove screw (31) from TB1-G and install wire (32). Remove machine<br />
screw (33) with lock washer from fuel quantity transmitter flange. Insert<br />
machine screw (33) through terminal on end of wire (32) and reinstall<br />
machine screw (33) with lock washer and tighten.<br />
Remove nut (34) from top screw securing the VACUUM GAGE. Attach<br />
terminal lug on end of wire (35) to end of top screw and reattach nut (34).<br />
Remove nut (36) from center stud on fuel quantity transmitter and attach<br />
terminal lug on end of wire (35) to stud. Reattach nut (36) and tighten to<br />
secure wire (35).
Pump Unit Assembly/<br />
Shell (37) Insert shell (37) into position and adjust so edge is recessed about 1/4<br />
Thread tapping screws (38) inch inside the frame. Install 14 thread tapping screws (38) and tighten.<br />
Gun bracket (39)<br />
Machine screws (40)<br />
Flat washers (41)<br />
Hexagon head self-locking<br />
nuts (42)<br />
Position gun bracket (39) onto shell (37) and aline holes. Install two<br />
machine screws (40) and flat washers (41) through gun bracket (39) and<br />
shell. Secure with hexagon head self-locking nuts (42). Repeat procedures<br />
for mounting other gun bracket.<br />
2-15. ENGINE FUEL TANK.<br />
This task covers:<br />
a. Disassembly<br />
b. Repair<br />
c. Reassembly<br />
INITIAL SETUP<br />
Tools and Special Tools<br />
Automotive Maintenance and Repair Field Maintenance<br />
Shop Equipment, Basic, Less Power (SC 4910-95-CL-A31)<br />
Materials/Parts<br />
Antiseizing tape (item 38, app C)<br />
General purpose lubricating oil (item 24, app C)<br />
Polyurethane coating (green) (item 29, app C)<br />
Wire brush (item 7, app C)<br />
References<br />
TM 38-2<strong>30</strong>-1<br />
TM 43-0139<br />
Equipment Condition<br />
Unit maintenance authorized components are removed in<br />
TM 3-42<strong>30</strong>-<strong>209</strong>-20&P and are not covered in this manual.<br />
Special Safety Instructions<br />
WARNING<br />
Gasoline vapor in the fuel tank is hazardous. Purge the fuel tank before<br />
performing maintenance. Smoking or open flame around the fuel tank is<br />
prohibited.<br />
2-41 TM 3-42<strong>30</strong>-<strong>209</strong>-<strong>30</strong>&P
2-42<br />
TM 3-42<strong>30</strong>-<strong>209</strong>-<strong>30</strong>&P<br />
2-15. ENGINE FUEL TANK (CONT).<br />
LOCATION/lTEM ACTION REMARKS<br />
Engine Fuel Tank/<br />
Machine screws (1)<br />
Internal tooth lock<br />
washers (2)<br />
Fuel quantity transmitter (3)<br />
Fuel tank (4)<br />
Gasket (5)<br />
Pipe reducer (6)<br />
Remove pipe reducer (6) from the bottom of the fuel tank (4).<br />
Engine Fuel Tank/<br />
Replace authorized unserviceable parts. Paint exposed external metal<br />
surfaces with polyurethane coating and small paint brush.<br />
Fuel tanks not being returned to the user will be fogged with general<br />
purpose lubricating oil in accordance with TM 38-2<strong>30</strong>-1.
Engine Fuel Tank/<br />
Pipe reducer (1)<br />
Boss (2)<br />
Fuel tank (3)<br />
Gasket (4)<br />
Fuel quantity transmitter (5)<br />
Internal tooth lock<br />
washer (6)<br />
Machine screws (7)<br />
Wrap male threads of pipe reducer (1) with antiseizing tape before<br />
installing it in boss (2). Install pipe reducer (1) into the boss (2) located on<br />
the bottom of the fuel tank (3).<br />
Slide gasket (4) onto fuel quantity transmitter (5) underside, position<br />
against the flange, and aline the mounting holes. Position fuel quantity<br />
transmitter (5) so movable arm will be approximately at a 45 degree angle<br />
inside the tank when secured.<br />
Carefully guide the movable arm through the hole and aline the mounting<br />
holes. Install the five internal tooth lock washers (6) and machine<br />
screws (7). Tighten machine screws evenly against fuel quantity transmitter<br />
(5) flange.<br />
2-43<br />
TM 3-42<strong>30</strong>-<strong>209</strong>-<strong>30</strong>&P
2-44<br />
TM 3-42<strong>30</strong>-<strong>209</strong>-<strong>30</strong>&P<br />
2-16. PUMP UNIT SUBASSEMBLY.<br />
This task covers:<br />
a. Disassembly c. Reassembly<br />
b. Repair<br />
INITIAL SETUP<br />
Tools and Special Tools<br />
References<br />
Automotive Maintenance and Repair Field Maintenance<br />
TM 3-42<strong>30</strong>-<strong>209</strong>-20&P<br />
Shop Equipment, Basic, Less Power (SC 4910-95-CL-A31) TM 43-0139<br />
Materials/Parts<br />
Personnel Required<br />
Adhesive (item 1, app C) 4<br />
Antiseizing tape (item 38, app C)<br />
Paint brush (item 6, app C)<br />
Equipment Condition<br />
Polyurethane coating (green) (item 29, app C)<br />
Unit maintenance authorized components are removed in<br />
Gasket (fig D-21)<br />
TM 3-42<strong>30</strong>-<strong>209</strong>-20&P and are not covered in this manual.<br />
Remove four self-locking nuts (1), flat washers (2) and machine<br />
screws (3), while supporting fairlead assembly (4). Lift fairlead<br />
assembly (4). Repeat for the remaining fairlead assembly (4).
Pump Unit Subassembly/<br />
Outlet hose assembly (5)<br />
Pipe swing joint (6)<br />
Plumbing assembly (7)<br />
Tool box lid (8)<br />
Hexagon head cap<br />
screws (9)<br />
Hexagon self-locking<br />
nuts (10)<br />
Flat washers (11)<br />
Hose reel (12)<br />
Outlet hose assembly (13)<br />
Pipe swing joint (14)<br />
Hexagon head cap<br />
screws (15)<br />
Hexagon self-locking<br />
nuts (16)<br />
Flat washers (17)<br />
Hose reel (18)<br />
Remove outlet hose assembly (5) located between pipe swing joint (6)<br />
and plumbing assembly (7). Remove pipe swing joint (6) only if defective.<br />
Open tool box lid (8) and locate the heads of the four hexagon head cap<br />
screws (9). Remove four hexagon self-locking nuts (10), and flat<br />
washers (11) from the four hexagon head cap screws (9). Carefully work<br />
hose reel (12) out of the unit.<br />
Remove outlet hose assembly (13), located between pipe swing joint (14)<br />
and the plumbing assembly (7). Remove pipe swing joint (14) only if<br />
defective. Locate the four hexagon head cap screw (15) heads inside tool<br />
box area. Remove the four hexagon self-locking nuts (16) and flat washers<br />
(17) while supporting hose reel (18). Carefully work hose reel (18) out<br />
of the unit.<br />
2-45<br />
TM 3-42<strong>30</strong>-<strong>209</strong>-<strong>30</strong>&P
2-46<br />
TM 3-42<strong>30</strong>-<strong>209</strong>-<strong>30</strong>&P<br />
2-16. PUMP UNIT SUBASSEMBLY (CONT).<br />
LOCATION/lTEM<br />
ACTION<br />
REMARKS<br />
DISASSEMBLY (CONT)<br />
Gaskets (19)<br />
Gaskets (20)<br />
Gasket (21)<br />
Gaskets (22)<br />
Gasket (23)<br />
Scrape two gaskets (19), gaskets (20), and one gasket (21) from top of<br />
the metal frame only if they are brittle or damaged.<br />
Scrape two gaskets (22) and one gasket (23) from the frame inside unit.
Pump Unit Subassembly/<br />
Machine bolts (24)<br />
Fiat washers (25)<br />
Hexagon self-locking<br />
nuts (26)<br />
Hexagon head cap<br />
screws (27)<br />
Flat washers (28)<br />
Fuel tank support frame<br />
assembly (29)<br />
Channel clamping<br />
nuts (<strong>30</strong>)<br />
Hexagon head cap<br />
screws (31)<br />
Flat washers (32)<br />
Channel clamping nuts (33)<br />
Brackets (34)<br />
Remove two machine bolts (24), flat washers (25), and hexagon self-locking<br />
nuts (26).<br />
Remove four hexagon head cap screws (27) and flat washers (28). Lift<br />
out fuel tank support frame assembly (29). Do not remove the four channel<br />
clamping nuts (<strong>30</strong>) mounted inside fuel tank support frame<br />
assembly (29) unless defective.<br />
Remove four hexagon head cap screws (31), flat washers (32) and channel<br />
clamping nuts (33) from frame member. Do not remove unless damaged.<br />
Remove two brackets (34) from frame member.<br />
Do not remove fuel tank support frame assembly (29)<br />
unless damaged.<br />
2-47<br />
TM 3-42<strong>30</strong>-<strong>209</strong>-<strong>30</strong>&P
2-48<br />
TM 3-42<strong>30</strong>-<strong>209</strong>-<strong>30</strong>&P<br />
2-16. PUMP UNIT SUBASSEMBLY (CONT).<br />
LOCATION/lTEM ACTION REMARKS<br />
DISASSEMBLY (CONT)<br />
Hexagon self-locking<br />
nut (35)<br />
Hexagon head cap<br />
screw (36)<br />
Loop clamp (37)<br />
Remove one hexagon self-locking nut (35) and hexagon head cap<br />
screw (36). Slide loop clamp (37) from the plumbing assembly.<br />
Hexagon self-locking<br />
nuts (38)<br />
Machine bolts (39)<br />
Flat washers (40)<br />
Hexagon head cap<br />
screws (41)<br />
Angle braces (42)<br />
Remove four hexagon self-locking nuts (38), machine bolts (39), and flat<br />
washers (40). Remove two hexagon head cap screws (41) and two angle<br />
braces (42). Repeat procedures for remaining angle brace.
Pump Unit Subassembly/<br />
Hexagon head cap Remove ten hexagon head cap screws (43) and spring lock washers (44).<br />
screws (43)<br />
Remove two hexagon head cap screws (45) and spring lock<br />
Spring lock washers (44) washers (44).<br />
Hexagon head cap<br />
screws (45)<br />
With one soldier at each corner, lift frame (46) straight up from skid base<br />
Frame assembly (46) subassembly (47).<br />
Skid base subassembly (47)<br />
To remove frame assembly (46), remove discharge<br />
pipes. See plumbing assembly (para 2-21).<br />
2-49<br />
TM 3-42<strong>30</strong>-<strong>209</strong>-<strong>30</strong>&P
2-50 TM 3-42<strong>30</strong>-<strong>209</strong>-<strong>30</strong>&P<br />
2-16. PUMP UNIT SUBASSEMBLY (CONT).<br />
LOCATION/lTEM ACTION REMARKS<br />
REPAIR<br />
Pump Unit Subassembly/<br />
Pump unit frame<br />
assembly (1)<br />
Gaskets (2 and 3)<br />
Replace authorized unserviceable parts.<br />
Clean pump unit frame assembly (1) and paint with polyurethane coating.<br />
See TM 43-0139.<br />
Fabricate gasket (2) according to figure D-21. Using adhesive, bond gasket<br />
(2) to the frame on the two top ends.<br />
Fabricate gasket (3) according to figure D-22. Using adhesive, bond gasket<br />
(3) to the frame on the two top sides.<br />
Gaskets (4 thru 6)<br />
Fabricate gasket (4) according to figure D-23. Using adhesive, bond gasket<br />
(4) to the frame on the top center.<br />
Fabricate gasket (5) according to figure D-24. Using adhesive, bond gasket<br />
(5) to the top of the tank frame assembly.<br />
Fabricate gasket (6) according to figure D-25. Using adhesive, bond gasket<br />
(6) to the top of the tank frame assembly cross member.
Pump Unit Subassembly/<br />
Frame assembly (1) With one soldier at each corner, lift frame assembly (1) up over the skid After frame assembly (1) is positioned on skid base<br />
Skid base subassembly (2) base subassembly (2) and lower into place. Position to aline as many subassembly (2), refer to plumbing assembly<br />
Spring lock washers (3) mounting holes as possible. Install ten spring lock washers (3) and (para 2-21) to install lower discharge pipe.<br />
Hexagon head cap<br />
hexagon head cap screws (4) fingertight. Install two spring lock<br />
screws (4) washers (3) and hexagon head cap screws (5).<br />
Hexagon head cap<br />
screws (5)<br />
2-51<br />
TM 3-42<strong>30</strong>-<strong>209</strong>-<strong>30</strong>&P
2-52 TM 3-42<strong>30</strong>-<strong>209</strong>-<strong>30</strong>&P<br />
2-16. PUMP UNIT SUBASSEMBLY (CONT).<br />
LOCATION/lTEM ACTION REMARKS<br />
REASSEMBLY (CONT)<br />
Pump Unit Subassembly/<br />
Angle brace (6) Place angle brace (6) in place and install two hexagon head cap screws (7)<br />
Hexagon head cap<br />
in the bottom holes. Install four machine bolts (8), flat washer (9) and<br />
screws (7)<br />
hexagon self-locking nuts (10). Tighten only slightly. Repeat procedure<br />
Machine bolts (8)<br />
for remaining bracket.<br />
Flat washers (9)<br />
Hexagon self-locking<br />
nuts (10)<br />
Loop clamp (11)<br />
Plumbing assembly<br />
pipe (12)<br />
Hexagon head cap<br />
screw (13)<br />
Hexagon self-locking<br />
nut (14)<br />
Slide loop clamp (11) around the plumbing assembly pipe (12) just below<br />
connection. Position frame assembly (1) so loop clamp (11) will mate with<br />
tab on frame. Install hexagon head cap screw (13) and secure with<br />
hexagon self-locking nut (14).<br />
Begin to tighten all screws, bolts, and nuts (from 14 back to 4) until tight.
Channel clamping nuts (15)<br />
Brackets (16)<br />
Flat washers (17)<br />
Hexagon head cap<br />
screws (18)<br />
Fuel tank support frame<br />
assembly (19)<br />
Channel clamping nuts (20)<br />
Flat washers (21)<br />
Hexagon head cap<br />
screws (22)<br />
Machine bolts (23)<br />
Flat washers (24)<br />
Hexagon self-locking<br />
nuts (25)<br />
Make sure channel clamping nuts (15) are installed and properly positioned<br />
in frame member. Position brackets (16) to aline holes with channel<br />
clamping nuts (15). Secure each bracket with two flat washers (17) and<br />
hexagon head cap screws (18) and tighten.<br />
Position fuel tank support frame assembly (19) with four channel clamping<br />
nuts (20) installed inside fuel tank support frame assembly (19). Aline<br />
channel clamping nuts (20) so they aline with holes in brackets (16).<br />
Secure with four flat washers (21 ) and hexagon head cap screws (22).<br />
Install two machine<br />
nuts (25).<br />
2-53<br />
TM 3-42<strong>30</strong>-<strong>209</strong>-<strong>30</strong>&P
2-54<br />
TM 3-42<strong>30</strong>-<strong>209</strong>-<strong>30</strong>&P<br />
2-16. PUMP UNIT SUBASSEMBLY (CONT).<br />
LOCATION/lTEM ACTION REMARKS<br />
REASSEMBLY (CONT)<br />
Pump Uniy Subassembly/<br />
Gaskets (26 thru <strong>30</strong>)
Pipe swing joint (31)<br />
Hose reel (32)<br />
Tool box lid (33)<br />
Hexagon head cap<br />
screws (34)<br />
Flat washers (35)<br />
Hexagon self-locking<br />
nuts (36)<br />
Install pipe swing joint (31) onto hose reel (32). Carefully<br />
slide hose reel (32) into the lower opening of the pump unit<br />
subassembly.<br />
Open tool box lid (33) and insert four hexagon head cap<br />
screws (34) through the four holes in the bottom of the tool<br />
box area. Lift hose reel (32) and position onto ends of<br />
hexagon head cap screws (34) and install four flat<br />
washers (35) and hexagon self-locking nuts (36) to secure.<br />
Outlet hose assembly (37)<br />
Plumbing assembly (38)<br />
Pipe swing joint (39)<br />
Hose reel (40)<br />
Hexagon head cap<br />
screws (41)<br />
Flat washers (42)<br />
Hexagon self-locking<br />
nuts (43)<br />
Outlet hose assembly (44)<br />
Wrap male threads of pipe nipple attached to outlet hose<br />
assembly (37) with antiseizing tape before connecting to<br />
pipe swing joint (31). Wrap male threads on plumbing<br />
assembly (38) pipe nipple with antiseizing tape. Install hose<br />
assembly (37) between plumbing assembly (38) and pipe<br />
swing joint (31).<br />
Install pipe swing joint (39) onto hose reel (40). Carefully<br />
slide hose reel (40) into the upper opening of the pump unit<br />
subassembly. Position hose reel to aline holes. Install four<br />
hexagon head cap screws (41), flat washers (42), and<br />
hexagon self-locking nuts (43) and secure. Wrap male<br />
threads of pipe nipple attached to outlet hose<br />
assembly (44). Wrap male threads on plumbing<br />
assembly (38) pipe nipple with antiseizing tape. Install outlet<br />
hose assembly (44) between plumbing assembly (38) and<br />
pipe swing joint (39).<br />
2-55 TM 3-42<strong>30</strong>-<strong>209</strong>-<strong>30</strong>&P
2-56 TM 3-42<strong>30</strong>-<strong>209</strong>-<strong>30</strong>&P<br />
2-16. PUMP UNIT SUBASSEMBLY (CONT).<br />
LOCATION/lTEM ACTION REMARKS<br />
REASSEMBLY (CONT)<br />
Pump Unit Subassembly/<br />
Fairlead assembly (45)<br />
Machine screws (46)<br />
Flat washers (47)<br />
Hexagon self-locking<br />
nuts (48)<br />
Position fairlead assembly (45) inside frame and aline slots to mate with<br />
the holes in frame. Insert four machine screws (46) through holes and slot<br />
on fairlead assembly (45) and secure with flat washers (47) and hexagon<br />
self-locking nuts (48). Repeat for remaining fairlead assembly.<br />
2-17. OUTLET HOSE ASSEMBLY.<br />
This task covers:<br />
a. Disassembly c. Reassembly<br />
b. Repair<br />
INITIAL SETUP<br />
Tools and Special Tools<br />
Automotive Maintenance and Repair Field Maintenance<br />
Shop Equipment, Basic, Less Power (SC 4910-95-CL-A31)<br />
Strap band clamping tools (P38)<br />
Equipment Condition<br />
Outlet hose assembly is removed from pump unit subassembly. See paragraph<br />
2-16 for procedures to disassemble/reassemble.<br />
Materials/Parts<br />
Adhesive (item 1, app C)<br />
Hose (fig D-26)<br />
Hose (fig D-27)
DISASSEMBLY<br />
Outlet Hose Assembly/<br />
Pipe nipple (1)<br />
Hose clamps (2)<br />
Hose (3)<br />
Gasket (4)<br />
Nut (5)<br />
Stem (6)<br />
Remove pipe nipple (1) and retain. Remove two hose clamps (2) by driving<br />
a flat bladed tool between buckles and bands or by cutting off hose (3)<br />
directly behind the end of last hose clamp (2).<br />
Remove gasket (4). Grasp hose (3) and pull<br />
out nut (5). Separate stem (6) from nut (5).<br />
Keep serviceable items.<br />
Outlet Hose Assembly/<br />
Hose clamps (1)<br />
Nut (2)<br />
Stem (3)<br />
Gasket (4)<br />
Replace authorized unserviceable parts. Replace outlet hose if it leaks or<br />
is brittle.<br />
Remove and replace the hose clamps (1) if they are loose or damaged.<br />
Replace the nut (2) if it is out-of-round, cracked, or has damaged threads.<br />
Replace the stem (3) if it is cracked or broken, and replace the gasket (4) if<br />
it is damaged.<br />
2-57<br />
TM 3-42<strong>30</strong>-<strong>209</strong>-<strong>30</strong>&P
2-58<br />
TM 3-42<strong>30</strong>-<strong>209</strong>-<strong>30</strong>&P<br />
2-17. OUTLET HOSE ASSEMBLY (CONT).<br />
LOCATION/lTEM ACTION REMARKS<br />
Outlet Hose Assembly/<br />
Hose (1)<br />
Strap end (2)<br />
Hose clamps (3)<br />
Buckle (4)<br />
Stem (5)<br />
Nut (6)<br />
Fabricate hose (1) according to figure D-26 for the lower hose reel and<br />
according to figure D-27 for the upper hose reel. Thread the strap end (2)<br />
of each hose clamp (3) through the buckle (4) of the hose clamp (3) twice.<br />
Slide two hose clamps (3) onto hose (1).<br />
Insert stem (5) through the hole in nut (6) and then insert both into hose (1)<br />
as a unit until the rear of nut (6) is against the end of hose (1). Slide two<br />
hose clamps (3) over stem (5). Rotate the second hose clamp so that the<br />
buckle (4) is 1800 from the first hose clamp (3) buckle to assure a better<br />
seal. Repeat reassembly procedures for other hose clamps (3).<br />
Frame (7)<br />
Winder (8)<br />
Ratchet tension wrench (9)<br />
Insert the strap end (2) into the frame (7) of strap band clamping tool.<br />
Insert the winder (8) into the frame (7) and insert the strap end (2) through<br />
the winder (8). Use the ratchet tension wrench (9) to turn the winder (8)<br />
and draw the hose clamp (3) tight.
Outlet Hose Assembly/<br />
Punch and holder (10)<br />
Keeping the hose clamp (3) drawn tight, flip the punch and holder (10) on<br />
the frame (7) and strike with hammer to mechanically lock the buckle (4)<br />
to the strap of the hose clamp (3). While still holding the ratchet tension<br />
wrench (9) tight, rock the strap band clamping tool back and forth. The<br />
band will break flush with edge of the bend lock buckle (4).<br />
Tap the broken end of the hose clamp (3) strap with a hammer to eliminate<br />
any sharp edges. Do not hit the nut (6).<br />
Gasket (11)<br />
Pipe nipple (12)<br />
Install gasket (11).<br />
Wrap male threads of pipe nipple (12) with antiseizing tape and install into<br />
one end of the hose assembly.<br />
2-59<br />
TM 3-42<strong>30</strong>-<strong>209</strong>-<strong>30</strong>&P
2-60<br />
TM 3-42<strong>30</strong>-<strong>209</strong>-<strong>30</strong>&P<br />
2-18. FAIRLEAD ASSEMBLY.<br />
This task covers:<br />
a. Disassembly c. Reassembly<br />
b. Repair<br />
INITIAL SETUP<br />
Tools and Special Tools<br />
Equipment Condition<br />
Automotive Maintenance and Repair Field Maintenance Fairlead is removed from pump unit subassembly. See paragraph 2-16<br />
Shop Equipment, Basic, Less Power (SC 4910-95-CL-A31)<br />
for procedures to disassemble/reassemble.<br />
LOCATION/lTEM ACTION REMARKS<br />
DISASSEMBLY<br />
Fairlead Assembly/<br />
Hexagon self-locking<br />
nuts (1)<br />
Brackets (2)<br />
Spacers (3)<br />
Annular ball bearings (4)<br />
Rollers (5)<br />
Shafts (6)<br />
Unscrew and remove four hexagon self-locking nuts (1) and remove the<br />
brackets (2) to take fairlead apart.<br />
Slide four spacers (3), four annular ball bearings (4), and two rollers (5)<br />
from two shafts (6). Retain serviceable items.
Fairfead Assembly/<br />
Pins (7)<br />
Annular ball bearings (8)<br />
Rollers (9)<br />
Push two pins (7) out of the holes of two brackets (2). Slide four annular<br />
ball bearings (8) and two rollers (9) out of two brackets (2).<br />
Fairlead Assembly/<br />
Component parts<br />
Replace authorized unserviceable parts.<br />
Fairlead Assembly/<br />
Annular ball bearings (1) Assemble four annular ball bearings (1) on both ends of two rollers (2) and<br />
Rollers (2)<br />
set the assembled parts into two brackets (3). Push two pins (4) through<br />
Brackets (3)<br />
the holes of two brackets (3) and into the assembled annular ball.<br />
Pins (4) bearings (1) and rollers (2).<br />
2-61 TM 3-42<strong>30</strong>-<strong>209</strong>-<strong>30</strong>&P
2-62 TM 3-42<strong>30</strong>-<strong>209</strong>-<strong>30</strong>&P<br />
2-18. FAIRLEAD ASSEMBLY (CONT).<br />
LOCATION/lTEM ACTION REMARKS<br />
REASSEMBLY (CONT)<br />
Fairlead Assembly/<br />
Rollers (5)<br />
Annular ball bearings (6)<br />
Shafts (7)<br />
Spacers (8)<br />
Hexagon self-locking<br />
nuts (9)<br />
Assemble two rollers (5), four annular ball bearings (6), two shafts (7), and<br />
four spacers (8).<br />
Sllde the threaded ends of two shafts (7) through the four holes om two<br />
brackets (3) Attach four hexagon self-locking nuts (9) and tighten<br />
2-19. FRAME ASSEMBLY.<br />
This task covers:<br />
a. Disassembly c. Reassembly<br />
b. Repair<br />
INITIAL SETUP<br />
Tools and Special Tools<br />
References<br />
Automotive Maintenance and Repair Field Maintenance<br />
TM 3-42<strong>30</strong>-<strong>209</strong>-20&P<br />
Shop Equipment, Basic, Less Power (SC 4910-95-CL-A31) TM 43-0139<br />
Materials/Parts<br />
Paint brush (item 6, app C)<br />
Polyurethane coating (green) (item 29, app C)<br />
Equipment Condition<br />
Unit maintenance authorized components are removed in<br />
TM 3-42<strong>30</strong>-<strong>209</strong>-20&P and are not covered in this manual.
Hexagon self-locking<br />
nuts (1)<br />
Flat washers (2)<br />
Hexagon head cap<br />
screws (3)<br />
Pump frame support (4)<br />
Tool box lid (5)<br />
Hexagon self-locking<br />
nuts (6)<br />
Machine screws (7)<br />
Pawl fastener (8)<br />
Knob (9)<br />
Hexagon head cap<br />
screws (10)<br />
Attach brackets (11)<br />
Center frame support (12)<br />
Channel clamping nuts (13)<br />
Remove two self-locking nuts (1), flat washers (2), and hexagon head<br />
screws (3). Remove pump frame support (4).<br />
Open tool box lid (5). Remove two hexagon self-locking nuts (6) and<br />
machine screws (7). Remove pawl fastener (8) and attaching knob (9).<br />
Remove four hexagon head cap screws (10), and two attach<br />
brackets (11) from center frame support (12).<br />
Do not remove the four channel clamping nuts (13) from the inside of<br />
center frame support (12) vertical members unless they need to be<br />
replaced.<br />
2-63<br />
TM 3-42<strong>30</strong>-<strong>209</strong>-<strong>30</strong>&P
2-64 TM 3-42<strong>30</strong>-<strong>209</strong>-<strong>30</strong>&P<br />
2-19. FRAME ASSEMBLY (CONT).<br />
LOCATION/lTEM ACTION REMARKS<br />
DISASSEMBLY (CONT)<br />
Frame Assembly/<br />
Blind rivets (14) Chisel two blind rivets (14) out of each of the 26 turnlock receptacles (15)<br />
Turnlock receptacles (15) as necessary. Do not remove turnlock receptacles (15) unless defective.<br />
Support angles (16)<br />
Remove the two support angles (16) if installed<br />
Frame Assembly/<br />
Replace all authorized components. Repaint frame assembly with<br />
polyurethane coating and a paint brush as necessary.<br />
Frame Assembly/<br />
Support angles (1)<br />
Turnlock receptacles (2)<br />
Blind rivets (3)<br />
Position support angles (1) onto frame and aline holes.<br />
Position 26 turnlock receptacles (2) into frame and<br />
aline holes. Secure each turnlock receptacle (2) with<br />
two blind rivets (3).
Channel clamping nuts (4)<br />
Center frame support (5)<br />
Attach brackets (6)<br />
Hexagon head cap<br />
screws (7)<br />
Install two channel clamping nuts (4) into each of the vertical frame memhers<br />
of the center frame support (5), only if removed. Position the two<br />
attach brackets (6) on vertical frame member. Aline holes to mate with<br />
channel clamping nuts (4). Secure with four hexagon head cap screws (7).<br />
Pawl fastener (8)<br />
Tool box lid (9)<br />
Knob (10)<br />
Machine screws (11)<br />
Hexagon self-locking<br />
nuts (12)<br />
Pump frame support (13)<br />
Hexagon head cap<br />
screws (14)<br />
Flat washers (15)<br />
Hexagon self-locking<br />
nuts (16)<br />
Position pawl fastener (8) onto inside surface of tool box lid (9). Attach<br />
knob (10) onto pawl fastener (8) and aline mounting holes. Insert two<br />
machine screws (11) through tool box lid (9) and pawl fastener (8) and<br />
secure with two hexagon self-locking nuts (12).<br />
Position pump frame support ( 13) between<br />
the end of unit and aline holes. Secure with<br />
screws (14), flat washers (15), and hexagon<br />
2-65<br />
TM 3-42<strong>30</strong>-<strong>209</strong>-<strong>30</strong>&P
2-66 TM 3-42<strong>30</strong>-<strong>209</strong>-<strong>30</strong>&P<br />
2-20. SKID BASE SUBASSEMBLY.<br />
This task covers:<br />
a. Disassembly c. Reassembly<br />
b. Repair<br />
INITIAL SETUP<br />
Tools and Special Tools<br />
Automotive Maintenance and Repair Field Maintenance<br />
Shop Equipment, Basic, Less Power (SC 4910-95-CL-A31)<br />
Materials/Parts<br />
Antiseizing tape (item 38, app D)<br />
Sealing compound (item 32, app D)<br />
Wooden blocks<br />
References<br />
TM 9-237<br />
TM 43-0139<br />
TM 5-2805-259 series<br />
Equipment Condition<br />
Unit maintenance authorized components are removed in<br />
TM 3-42<strong>30</strong>-<strong>209</strong>-20&P and are not covered in this manual.<br />
Special Safety Instructions<br />
WARNING<br />
Unless the skid base subassembly is securely blocked, never reach under<br />
it while it is raised off the floor. Failure to comply may result in a crushed<br />
arm.<br />
LOCATION/lTEM ACTION REMARKS<br />
Skid Base Subassembly/<br />
Hexagon head cap<br />
screw (1)<br />
Internal tooth lock<br />
washer (2)<br />
Bracket (3)<br />
Alternator generator (4)<br />
Nut (5)<br />
Washer (6)<br />
Ground lead (7)<br />
Nut (8)<br />
Remove hexagon head cap screw (1), internal tooth lock washer (2), and<br />
bracket (3) from alternator generator (4). Remove nut (5), washer (6), and<br />
disconnect ground lead (7). Replace nut (5) and washer (6). Remove<br />
nut (8), washer (9) and groove pulley (10). Remove two hexagon plain<br />
nuts (11), internal tooth lock washers (12), hexagon head cap<br />
screws (13), and internal troth lock washers (14). Remove alternator<br />
generator (4).
Washer (9)<br />
Groove pulley (10)<br />
Hexagon plain nut (11)<br />
Internal tooth lock<br />
washer (12)<br />
Hexagon head cap<br />
screw (13)<br />
Internal tooth lock<br />
washer (14)<br />
2-67 TM 3-42<strong>30</strong>-<strong>209</strong>-<strong>30</strong>&P
2-68 TM 3-42<strong>30</strong>-<strong>209</strong>-<strong>30</strong>&P<br />
2-20. SKID BASE SUBASSEMBLY (CONT).<br />
LOCATION/lTEM ACTION REMARKS<br />
Skid Base Subassembly/<br />
WARNING<br />
Unless it is securely blocked, never reach under the skid<br />
base subassembly while it is raised off the floor. Failure to<br />
comply may result in a crushed arm.<br />
Raise and block skid base subassembly in accordance with local policy.<br />
Hexagon plain nut (15)<br />
Internal tooth lock<br />
washer (16)<br />
Hexagon head cap<br />
screw (17)<br />
Flat washer (18)<br />
Generator support (19)<br />
Remove two hexagon plain nuts (15), internal tooth lock washer (16),<br />
hexagon head cap screw (17) and flat washer (18). Remove ground<br />
lead (7) and generator support (19).
Pipe nipple (20)<br />
Remove pipe nipple (20) and pipe elbow (21) from plumbing<br />
Pipe elbow (21)<br />
assembly (22). Remove four hexagon head cap screws (23). Remove<br />
Plumbing assembly (22) mounting stiffeners (24) and remove the plumbing assembly (22).<br />
Hexagon head cap Remove the four machine mounting pads (25).<br />
screw (23)<br />
Mounting stiffener (24)<br />
Machine mounting pad (25)<br />
NOTE<br />
Two long mounting stiffeners will be<br />
used with Marlow* pumps. Four short<br />
mounting stiffeners will be used with<br />
Ohler** pumps.<br />
*Marlow is a registered trademark of Marlow, a unit of<br />
ITT Fluid Handling Division.<br />
**Ohler is a registered trademark of Ohler Machinery<br />
Co.<br />
2-69 TM 3-42<strong>30</strong>-<strong>209</strong>-<strong>30</strong>&P
2-70<br />
TM 3-42<strong>30</strong>-<strong>209</strong>-<strong>30</strong>&P<br />
2-20. SKID BASE SUBASSEMBLY (CONT).<br />
LOCATION/lTEM<br />
ACTION<br />
REMARKS<br />
DISASSEMBLY (CONT)<br />
Skid Base Subassembly/<br />
Ermine cover (26)<br />
Remove engine cover (26) to allow access to top of engine.<br />
Pipe elbow (27)<br />
Nipple (28) Remove pipe elbow (27), nipple (28), and pipe elbow (29).<br />
Pipe elbow (29)<br />
Drain engine oil and dispose of in accordance with local policy.<br />
Pipe nipple (<strong>30</strong>)<br />
Remove pipe nipple (<strong>30</strong>), stop-check valve (31), pipe coupling (32), pipe<br />
Stop-check valve (31) straight adapter (33), and gasket (34) from the engine (35).<br />
Pipe coupling (32)<br />
Pipe straight adapter (33)<br />
Gasket (34)<br />
Engine (35)
NOTE<br />
The oil pressure switch is mounted at the rear of the engine<br />
if manufactured after January 1969. The oil pressure switch<br />
is mounted at the front of the engine on engines manufactured<br />
prior to January 1969.<br />
Engine components removal will be in accordance with TM 5-2805-259<br />
series.<br />
Electrical lead (36)<br />
Disconnect electrical lead (36), oil pressure switch (37), and tee<br />
Oil pressure switch (37) connector (38) on engines manufactured after January 1969.<br />
Tee connector (38)<br />
Pipe elbow (39)<br />
Disconnect electrical lead (36), oil pressure switch (37), and pipe<br />
elbow (39) on engine manufactured prior to January 1969.<br />
2-71 TM 3-42<strong>30</strong>-<strong>209</strong>-<strong>30</strong>&P
2-72 TM 3-42<strong>30</strong>-<strong>209</strong>-<strong>30</strong>&P<br />
2-20. SKID BASE SUBASSEMBLY (CONT).<br />
LOCATION/lTEM ACTION REMARKS<br />
DISASSEMBLY (CONT)<br />
Skid Base Subassembly/<br />
Hexagon plain nut (40)<br />
Hexagon head cap<br />
screw (41)<br />
Electrical lead (42)<br />
Spacer (43)<br />
Hexagon head cap<br />
screw (44)<br />
Sleeve spacer (45)<br />
Hexagon plain nut (46)<br />
Bracket (47)<br />
Remove hexagon plain nut (40), two hexagon head cap screws (41), and<br />
electrical lead (42). Remove two spacers (43) from behind the plate if<br />
possible.<br />
Remove hexagon head cap screw (44) and sleeve spacer (45). Remove<br />
hexagon plain nut (46) and bracket (47).
Screw (48)<br />
Lock washer (49)<br />
Driver pulley (50)<br />
Setscrew (51)<br />
Hub (52)<br />
Unscrew and remove three screws (48) and<br />
three lock washers (49) from driver<br />
pulley (50). Separate lock washers (49) from<br />
screws (48).<br />
Screw three screws (48) into the alternate<br />
threaded holes of driver pulley (50) and<br />
tighten equally. This drives driver pulley (50)<br />
away from the engine and exposes the<br />
setscrew (51) in hub (52). Remove driver pulley<br />
(50).<br />
Power-take-off adapter (53) Loosen the setscrew (51) in hub (52) and pull hub (52) off of power-take-<br />
Machine key (54) off adapter (53).<br />
Lift machine key (54) out of the slot in power-take-off adapter (53).<br />
2-73 TM 3-42<strong>30</strong>-<strong>209</strong>-<strong>30</strong>&P
2-74 TM 3-42<strong>30</strong>-<strong>209</strong>-<strong>30</strong>&P<br />
2-20. SKID BASE SUBASSEMBLY (CONT).<br />
LOCATION/lTEM ACTION REMARKS<br />
DISASSEMBLY (CONT)<br />
Skid Base Subassembly/<br />
Socket head self-locking<br />
screw (55)<br />
Lock washer (56)<br />
Loosen, remove and discard four socket head self-locking screws (55)<br />
and four lock washers (56). Remove power-take-off adapter (53).<br />
Screw (57)<br />
Throttle clip (58)<br />
Remove screw (57) and throttle clip (58) if engine has a carburetor built by<br />
the Bendix Corporation.<br />
NOTE<br />
Throttle clip is only used on engines that<br />
have Bendix* carburetors.
Hexagon plain nut (59)<br />
Lock washer (60)<br />
Machine bolt (61)<br />
Front engine mount (62)<br />
Machine bolt (63)<br />
Lock washer (64)<br />
Engine (65)<br />
Rear engine mount (66)<br />
Shock mount pad (67)<br />
Remove hexagon plain nut (59), lock washer (60) and machine bolt (61)<br />
from front engine mount (62).<br />
Remove two machine bolts (63) and lock washers (64) securing rear of<br />
engine (65) to rear engine mount (66). Remove engine (65) from shock<br />
mount pads (67). Reinstall three shock mount pads (67), lock washers (60<br />
and 64), machine bolts (63), and hexagon plain nuts (59) onto front engine<br />
mount (62) and rear engine mount (66).<br />
* Bendix is a trade name of Bendix Corporation.<br />
2-75 TM 3-42<strong>30</strong>-<strong>209</strong>-<strong>30</strong>&P
2-76 TM 3-42<strong>30</strong>-<strong>209</strong>-<strong>30</strong>&P<br />
2-20. SKID BASE SUBASSEMBLY (CONT).<br />
LOCATION/lTEM ACTION REMARKS<br />
Skid Base Subassembly/<br />
All<br />
Gasoline engine<br />
Replace authorized unserviceable parts.<br />
When anew or rebuilt gasoline engine is being installed, deprocess it.<br />
Instructions are normally attached to the engine. Typical instructions are<br />
shown here. Deprocess the gasoline engine according to the typical<br />
instructions ONLY if the new gasoline engine instructions are missing.<br />
NOTE<br />
Do not put engine oil in engine at this time. Engine oil is<br />
added after new drain valve has been installed.
2-77 TM 3-42<strong>30</strong>-<strong>209</strong>-<strong>30</strong>&P
2-78<br />
TM 3-42<strong>30</strong>-<strong>209</strong>-<strong>30</strong>&P<br />
2-20. SKID BASE SUBASSEMBLY (CONT).<br />
LOCATION/lTEM ACTION REMARKS<br />
Skid Base Subassembly/<br />
Engine cover<br />
Cut out the area as illustrated.<br />
MODIFICATION TO ENGINE COVER FURNISHED<br />
WITH ENGINE MANUFACTURED AFTER JANUARY<br />
1969. THESE ARE CONFIGURED WITH A MANIFOLD<br />
WHICH DOES NOT INCLUDE PROVISIONS FOR OIL<br />
PRESSURE SWITCH AND THEREFORE REQUIRE<br />
MODIFICATION TO FILLER TUBE LOCATION<br />
AS SHOWN.
Oil filler tube<br />
Remove existing oil filler tube and bend as shown in illustration. Reinstall Oil filler tube must be bent to a new angle on engines<br />
in engine rotated approximately 45 clockwise from original position. Oil manufactured before January 1969.<br />
filler tube must extend through cutout in engine cover.<br />
Oil filler tube<br />
Remove existing oil filler tube and bend as shown in illustration. Reinstall Oil filler tube must be bent to a new angle on engines<br />
in engine rotated approximately 110° clockwise from original position. Oil manufactured after January 1969.<br />
filler tube must extend through cutout in engine cover.<br />
2-79 TM 3-42<strong>30</strong>-<strong>209</strong>-<strong>30</strong>&P
2-80 TM 3-42<strong>30</strong>-<strong>209</strong>-<strong>30</strong>&P<br />
2-20. SKID BASE SUBASSEMBLY (CONT).<br />
LOCATION/lTEM ACTION REMARKS<br />
REASSEMBLY<br />
Skid Base Subassembly/<br />
Machine bolt (1)<br />
Lock washer (2)<br />
Rear engine mount (3)<br />
Shock mount pad (4)<br />
Hexagon plain nut (5)<br />
Lock washer (6)<br />
Machine bolt (7)<br />
Front engine mount (8)<br />
Shock mount pad (9)<br />
Engine (10)<br />
Throttle clip (11)<br />
Screw (12)<br />
Remove two machine bolts (1) and lock washers (2) from rear engine<br />
mount (3). Position two shock mount pads (4) onto rear engine mount<br />
over the holes.<br />
Remove hexagon plain nut (5), lock washer (6), and machine bolt (7) from<br />
front engine mount (8). Position shock mount pad (9) to aline with hole.<br />
Position engine (10) to rest on shock mount pads (4 and 9) and aline the<br />
three sets of holes. Reinstall the two machine bolts (1) and lock<br />
washers (2) through the engine (10) shock mount pads (4) and into rear<br />
engine mount (3). Reinstall machine bolt (7), lock washer (6), and hexagon<br />
plain nut (5) in front engine mount area.<br />
Install throttle clip (11) if engine (10) has a carburetor built by Bendix<br />
Corporation and secure with screw (12) supplied with the engine (10).
2-81<br />
TM 3-42<strong>30</strong>-<strong>209</strong>-<strong>30</strong>&P
2-82<br />
TM 3-42<strong>30</strong>-<strong>209</strong>-<strong>30</strong>&P<br />
2-20. SKID BASE SUBASSEMBLY (CONT).<br />
LOCATION/lTEM ACTION REMARKS<br />
Skid Base Subassembly/<br />
Power-take-off adapter (13)<br />
Socket head self-locking<br />
screw (14)<br />
Lock washer (15)<br />
Position power-take-off adapter (13) onto<br />
rear of engine (10) and aline the holes. Install<br />
socket head self-locking screws (14) and lock<br />
washers (15) to secure.<br />
Machine key (16)<br />
Milled slot (17)<br />
Hub (18)<br />
Setscrew (19)<br />
Insert machine key (16) into the milled<br />
slot (17). Position hub (18) so that the<br />
machine key (16) slides into the grooved area.<br />
Slide hub (18) onto power take-off<br />
adapter (13) and tighten setscrew (19).
Drive pulley (20)<br />
Screws (2 )<br />
Lock washer (22)<br />
Bracket (23)<br />
Hexagon plain nut (24)<br />
Sleeve spacer (25)<br />
Hexagon head cap<br />
screw (26)<br />
Spacer (27)<br />
Electrical lead (28)<br />
Hexagon head cap<br />
screw (29)<br />
Hexagon plain nut (<strong>30</strong>)<br />
Position drive pulley (20) so that holes without threads aline with the holes<br />
in the hub (18). Remove the screws from the threaded holes and add lock<br />
washers (22). Install three screws (21) and lock washers (22) to secure.<br />
Install bracket (23) and secure with hexagon plain nut (24).<br />
Insert sleeve spacer (25) and install hexagon head cap screws (26).<br />
Install spacer (27), electrical lead (28), hexagon head cap screw (29), and<br />
hexagon plain nut (<strong>30</strong>). Install second spacer (27) and hexagon cap<br />
screw (29).<br />
2-83 TM 3-42<strong>30</strong>-<strong>209</strong>-<strong>30</strong>&P
2-84 TM 3-42<strong>30</strong>-<strong>209</strong>-<strong>30</strong>&P<br />
2-20. SKID BASE SUBASSEMBLY (CONT).<br />
LOCATION/lTEM ACTION REMARKS<br />
REASSEMBLY (CONT)<br />
Skid Base Subassembly/<br />
NOTE<br />
The oil pressure switch is mounted at the rear of the engine<br />
if manufactured after January 1969. The oil pressure switch<br />
is mounted at the front of the engine on engines manufactured<br />
prior to January 1969.<br />
Engine components installation and routing will be in accordance<br />
with TM 5-2805-259 series.<br />
Pipe elbow (31)<br />
Oil pressure switch (32)<br />
Electrical lead (33)<br />
Wrap male threads of pipe elbow (31) and oil pressure switch (32) with<br />
antiseizing tape or coat with sealing compound before installing.<br />
Install pipe elbow (31) and oil pressure switch (32). Connect electrical<br />
lead (33).<br />
OR<br />
Tee connector (34)<br />
Wrap male threads of tee connector (34) and oil pressure switch (32) with<br />
antiseizing tape or apply sealing compound before installing.<br />
Install tee connector (34), oil pressure switch (32), and connect electrical<br />
lead (33).
2-85 TM 3-42<strong>30</strong>-<strong>209</strong>-<strong>30</strong>&P
2-86 TM 3-42<strong>30</strong>-<strong>209</strong>-<strong>30</strong>&P<br />
2-20. SKID BASE SUBASSEMBLY (CONT).<br />
LOCATION/ITEM ACTION REMARKS<br />
Skid Base Subassembly<br />
Gasket (35)<br />
Install gasket (35), pipe straight adapter (36), pipe coupling (37), stop-<br />
Pipe straight adapter (36) check valve (38), and pipe nipple (39). Make certain stop-check valve (37)<br />
Pipe coupling (37)<br />
is in closed position before servicing with oil. (Refer to<br />
Stop-check valve (38) TM 5-2805-259-14).<br />
Pipe nipple (39)<br />
Pipe elbow (40)<br />
Nipple (41)<br />
Pipe elbow (42)<br />
Wrap male threads of pipe elbow (40) and nipple (41) with antiseizing tape<br />
or coat threads with sealing compound.<br />
Install pipe elbow (40), nipple (41), and pipe elbow (42).<br />
Engine cover (43) Install engine cover (43).
NOTE<br />
Two long mounting stiffeners will be used with Marlow<br />
pumps. Four short mounting stiffeners will be used with<br />
Ohler pumps.<br />
Machine mounting pad (44)<br />
Plumbing assembly (45)<br />
Mounting stiffener (46)<br />
Hexagon head cap<br />
screw (47)<br />
Pipe elbow (48)<br />
Pipe nipple (49)<br />
Place four machine mounting pads (44) around the four holes on the skid.<br />
Position plumbing assembly (45) onto machine mounting pads (44).<br />
Select proper style of mounting stiffeners (46) for type of pump used.<br />
Install mounting stiffeners (46). Two long stiffeners for Marlow pumps or<br />
four short stiffeners for Ohler. Install four hexagon head cap screws (47)<br />
to secure plumbing assembly (45).<br />
Wrap male threads of pipe elbow (48) and<br />
pipe nipple (49) with antiseizing tape or coat<br />
the threads with sealing compound.<br />
2-87<br />
TM 3-42<strong>30</strong>-<strong>209</strong>-<strong>30</strong>&P
2-88<br />
TM 3-42<strong>30</strong>-<strong>209</strong>-<strong>30</strong>&P<br />
2-20. SKID BASE SUBASSEMBLY (CONT).<br />
LOCATION/ITEM ACTION REMARKS<br />
Skid Base Subassembly/<br />
WARNING<br />
Unless it is securely blocked, never reach under the skid<br />
base subassembly while it is raised off the floor. Failure to<br />
comply may result in a crushed arm.<br />
Raise and block skid base subassembly in accordance with local policy.<br />
Generator support (50)<br />
Hexagon head cap<br />
screws (51)<br />
Flat washer (52)<br />
Ground wire (53)<br />
Internal tooth lock<br />
washer (54)<br />
Hexagon plain nut (55)<br />
Position generator support (50) onto skid over the two holes near center<br />
and insert two hexagon head cap screws (51 ) through flat washers (52),<br />
terminal on ground wire (53) generator support (50), and the skid.<br />
Reach under skid and install two internal tooth lock washers (54) and<br />
hexagon plain nuts (55) to secure.<br />
NOTE<br />
Final adjus<strong>tm</strong>ent of generator<br />
support (50) will be required<br />
after the alternator-generator<br />
V belts have been installed.<br />
The mount will have to be<br />
adjusted so V belt will track<br />
correctly in the pulley groove.<br />
A misalined mount will cause<br />
belt to be thrown off of pulley<br />
or cause excessive wear on<br />
belts.
Alternator generator (56)<br />
Generator bracket (57)<br />
Hexagon head cap<br />
screw (58)<br />
Internal tooth lock<br />
washer (59)<br />
Internal tooth lock<br />
washer (60)<br />
Hexagon plain nut (61)<br />
Grooved pulley (62)<br />
Washer (63)<br />
Nut (64)<br />
Nut (65)<br />
Washer (66)<br />
Bracket (67)<br />
Hexagon head cap<br />
screw (68)<br />
Internal tooth lock<br />
washer (69)<br />
Position alternator generator (56) into generator bracket (57). Insert two<br />
hexagon head cap screws (58) and internal tooth lock washers (59)<br />
through alternator generator (56) and generator bracket (57). Install two<br />
internal tooth lock washers (60) and hexagon plain nut (61).<br />
Install grooved pulley (62), washer (63), and nut (64). Remove the nut (65)<br />
and one washer (66). Attach ground wire (53) to the top stud on alternator<br />
generator (56). Reinstall two washers (66) and secure with nut (65).<br />
Position bracket (67) onto alternator generator (56).<br />
Secure with hexagon head cap screw (68), and internal tooth lock<br />
washer (69).<br />
2-89 TM 3-42<strong>30</strong>-<strong>209</strong>-<strong>30</strong>&P
2-90 TM 3-42<strong>30</strong>-<strong>209</strong>-<strong>30</strong>&P<br />
2-21. PLUMBING ASSEMBLY.<br />
This task covers:<br />
a. Disassembly c. Reassembly<br />
b. Repair<br />
INITIAL SETUP<br />
Tools and Special Tools<br />
Automotive Maintenance and Repair Field Maintenance<br />
Shop Equipment, Basic, Less Power (SC 4910-95-CL-A31)<br />
Equipment Condition<br />
Removed from the skid base subassembly. See paragraph 2-20 for dIsassembly/reassembly<br />
procedures.<br />
Materials/Parts<br />
Antiseizing tape (item 38, app C)<br />
Sealing compound (item 32, app C)<br />
LOCATION/lTEM ACTION REMARKS<br />
Plumbing Assembly/<br />
Pipe to hose straight<br />
adapter (1)<br />
Ball valve (2)<br />
Pipe nipple (3)<br />
Pipe elbow (4)<br />
Metallic pipe (5)<br />
Eductor (6)<br />
Pipe reducer (7)<br />
Pipe nipple (8)<br />
Pipe elbow (9)<br />
Pipe nipple (10)<br />
Unscrew and remove pipe to hose straight adapter (1), ball valve (2), pipe<br />
nipple (3), pipe elbow (4), and metallic pipe (5).<br />
Place the plumbing assembly unit flat. Unscrew and remove eductor (6),<br />
pipe reducer (7), pipe nipple (8), pipe elbow (9), and pipe nipple (10).<br />
Plumbing assembly may be bolted in place on skid<br />
base while being disassembled.
2-91 TM 3-42<strong>30</strong>-<strong>209</strong>-<strong>30</strong>&P
2-92 TM 3-42<strong>30</strong>-<strong>209</strong>-<strong>30</strong>&P<br />
2-21. PLUMBING ASSEMBLY (CONT).<br />
LOCATION/lTEM ACTION REMARKS<br />
Plumbing Assembly/<br />
Metallic pipe (11 )<br />
Pipe nipple (12)<br />
Pipe elbow (13)<br />
Pipe bushing (14)<br />
Diaphragm valve (15)<br />
PIPe to tube eLbow(16)<br />
Surge tank (17)<br />
Pipe elbow (18)<br />
Pipe nipple (19)<br />
Pipe to tube elbow (20)<br />
Pipe bushing (21 )<br />
NOTE<br />
Upper portion of the plumbing assembly<br />
may be separated from the centrifugal<br />
pump by loosening the pipe union.<br />
Unscrew and remove two metallic pipes (11), one pipe<br />
nipple (12), two pipe elbows (13), one pipe bushing<br />
and diaphragm valve (15). Remove pipe to tube<br />
elbow (16), surge tank (17), pipe elbow (18), pipe<br />
nipple (19), pipe to tube elbow (20), and pipe<br />
bushing (21).
2-93 TM 3-42<strong>30</strong>-<strong>209</strong>-<strong>30</strong>&P
2-94 TM 3-42<strong>30</strong>-<strong>209</strong>-<strong>30</strong>&P<br />
2-21. PLUMBING ASSEMBLY (CONT).<br />
LOCATION/lTEM ACTION REMARKS<br />
Plumbing Assembly/<br />
Screw (33)<br />
Unscrew and remove three screws (33) and three<br />
Lock washer (34)<br />
lock washers (34) from grooved pulley (35). Sepa-<br />
Grooved pulley (35) rate lock washers (34) from screws (33).<br />
Setscrew (36)<br />
Hub (37)<br />
Woodruff key (38)<br />
Using three screws (33), screw into the alternate<br />
holes of grooved pulley (35). Tighten three<br />
screws (33) equally, thus driving grooved<br />
pulley (35) away from the pump and exposing the<br />
setscrew (36) in hub (37).<br />
Loosen the setscrew (36) and pull hub (37) off of<br />
the pump shaft.<br />
Lift woodruff key (38) out of the slot in the pump<br />
shaft.
Plumbing Assembly/<br />
Replace authorized unserviceable parts.<br />
Plumbing Assembly/<br />
Woodruff key (1)<br />
Hub (2)<br />
Setscrew (3)<br />
Screw (4)<br />
Grooved pulley (5)<br />
Lock washer (6)<br />
Grooved pulley<br />
assembly (7)<br />
Install woodruff key (1) in key slot in pump shaft.<br />
Make sure that the woodruff key supplied with the<br />
centrifugal pump is installed in the keyway before<br />
Aline the slot in hub (2) with woodruff key (1). Slide hub (2) on until it is attaching grooved pulley assembly (7).<br />
flush with the end of the pump shaft.<br />
Hub (2), setscrew (3), screw (4), grooved pulley (5),<br />
Tighten setscrew (3). Remove three screws (4) from grooved pulley (5). and lock washer (6) are component parts of grooved<br />
pulley assembly (7).<br />
Insert three screws (4) through three lock washers (6) in the alternate<br />
holes in grooved pulley (5). Position the grooved pulley (5) onto the hub,<br />
aline the holes, and install three screws (4) and lock washers (6). Install<br />
three screws (4) into the holes of hub (2). Torque three screws (4) 95 to<br />
100 inch-pounds.<br />
2-95 TM 3-42<strong>30</strong>-<strong>209</strong>-<strong>30</strong>&P
2-98 TM 3-42<strong>30</strong>-<strong>209</strong>-<strong>30</strong>&P<br />
2-21. PLUMBING ASSEMBLY (CONT).<br />
LOCATION/lTEM ACTION REMARKS<br />
Plumbing Assembly/<br />
Centrifugal pump (8)<br />
Using antiseizing tape or sealing compound, wrap or coat the external<br />
Pipe nipple (9)<br />
threads of pipe nipple (9), lower manifold (11), upper manifold (13), pipe<br />
Pipe union (10) bushing (15), pipe nipple (16), and pipe nipple (18).<br />
Lower manifold (11)<br />
Offset valve (12)<br />
Position centrifugal pump (8) upright on a flat surface. Screw together<br />
Upper manifold (13)<br />
pipe nipple (9), pipe union (10), lower manifold (11), offset valve (12), and<br />
upper manifold (13). Then screw into centrifugal pump (8) and hold in<br />
place while each part is tightened, starting from its lowest point, with a<br />
wrench. Do not tighten two parts of pipe union (10). The outlet in lower<br />
manifold (11) must be alined with centrifugal pump (8). Firmly holding<br />
lower manifold (11), tighten offset valve (12) until the handle stem is<br />
opposite the port on lower manifold (11). While holding offset valve (12),<br />
tighten upper manifold (13) until it is tight and alines with the shaft in<br />
centrifugal pump (8).<br />
Pump may be bolted to skid base during reassembly.<br />
Regulating valve (14)<br />
Pipe bushing (15)<br />
Pipe nipple (16)<br />
Pipe elbow (17)<br />
Pipe nipple (18)<br />
Screw regulating valve (14) onto upper manifold (13) and screw pipe<br />
bushing (15) into regulating valve (14). Tighten pipe bushing (15) and<br />
regulating valve (14) until the stem is pointing in the same direction as<br />
offset valve (12).<br />
Screw pipe nipple (16), pipe elbow (17), and pipe nipple (18) together.<br />
Then, as a unit, screw into pipe bushing (15). Tighten pipe nipple (18) and<br />
pipe elbow (17) until the outlet is vertical and is pointing downward.<br />
Tighten pipe nipple (18).
Diaphragm valve (19)<br />
Pipe bushing (20)<br />
Pipe elbow (21 )<br />
Pipe nipple (22)<br />
Metallic pipe (23)<br />
Using antiseizing tape or sealing compound, wrap or coat the external<br />
threads of pipe bushing (20), two pipe elbows (21), pipe nipple (22), and<br />
two metallic pipes (23).<br />
Screw diaphragm valve (19), pipe bushing (20), and one pipe elbow (21)<br />
together. Tighten diaphragm valve (19) until the handle is horizontal and is<br />
pointing in the same direction as the other two handles.<br />
While holding diaphragm valve (19), tighten pipe bushing (20) and pipe<br />
elbow (21). Position pipe elbow (21) so it is horizontal and pointing away<br />
from the handles. Screw the second pipe elbow (21) into the first pipe<br />
elbow (21).<br />
Screw pipe nipple (22) into the second pipe elbow (21). Tighten pipe<br />
nipple (22) until it is directly behind and in line with the front piping. Screw<br />
two metallic pipes (23) in the upright pipe and tighten. Once all parts are<br />
alined, tighten pipe union (10).<br />
Pipe bushing (24)<br />
Using antiseizing tape or sealing compound, wrap or coat the external<br />
Pipe to tube elbow (25) threads of pipe bushing (24), pipe to tube elbow (25), pipe nipple (26), pipe<br />
Pipe nipple (26) elbow (27), and pipe to tube elbow (29).<br />
Pipe elbow (27)<br />
Surge tank (28)<br />
Screw pipe bushing (24) and pipe to tube elbow (25) into the centrifugal<br />
Pipe to tube elbow (29) pump. Tighten until the free end of pipe to tube elbow (25) is pointing<br />
straight up.<br />
Screw pipe nipple (26) and pipe elbow (27) into the centrifugal pump.<br />
Tighten until the free end of pipe elbow (27) is pointing straight up.<br />
Screw surge tank (28) and pipe to tube elbow (29) to pipe elbow (27).<br />
Tighten surge tank (28) and pipe to tube elbow (29) until they are alined<br />
with the shaft of the centrifugal pump.<br />
2-97 TM 3-42<strong>30</strong>-<strong>209</strong>-<strong>30</strong>&P
2-98 TM 3-42<strong>30</strong>-<strong>209</strong>-<strong>30</strong>&P<br />
2-21. PLUMBING ASSEMBLY (CONT).<br />
LOCATION/lTEM ACTION REMARKS<br />
Pipe nipple (<strong>30</strong>)<br />
Using antiseizing tape or sealing compound, wrap or coat the external<br />
Pipe elbow (31) threads of pipe nipple (<strong>30</strong>) and eductor (34).<br />
Screw pipe nipple (<strong>30</strong>) and pipe elbow (31) together; then, as a unit, screw<br />
into the centrifugal pump (8). Tighten until the open end of pipe elbow (31)<br />
is pointing straight back.<br />
Pipe nipple (32)<br />
Screw pipe nipple (32), pipe reducer (33), and eductor (34) together; then,<br />
Pipe reducer (33)<br />
as a unit, screw into pipe elbow (31). Tighten pipe nipple (32), pipe<br />
Eductor (34) reducer (33), and eductor (34).<br />
Eductor (34) must extend at least two inches through<br />
the connector panel. If it does not, use pipe<br />
nipple (32).<br />
Position the side outlet so it is pointing upward.<br />
Metallic pipe (35)<br />
Using antiseizing tape or sealing compound, wrap or coat the external<br />
Pipe elbow (36)<br />
threads of metallic pipe (35), pipe nipple (37), and pipe to hose straight<br />
Pipe nipple (37) adapter (39).<br />
Ball valve (38)<br />
Pipe straight adapter (39) Screw metallic pipe (35) and pipe elbow (36) together; then, as a unit,<br />
screw into the centrifugal pump (8) drain hole.<br />
Tighten and position the open end of pipe elbow (36) so that it is pointing<br />
forward and horizontal.<br />
Screw pipe nipple (37), ball valve (38), and pipe straight adapter (39)<br />
together; then, as a unit, screw into pipe elbow (36).
Tighten and position ball valve (38) so that the stem is pointing straight<br />
up.<br />
NOTE<br />
There are three suppliers of ball valve (38). Two valves<br />
are the same length and need a longer pipe straight<br />
adapter (39). The other ball valve is longer in length and<br />
needs a shorter pipe straight adapter (39).<br />
2-99 TM 3-42<strong>30</strong>-<strong>209</strong>-<strong>30</strong>&P
2-100 TM 3-42<strong>30</strong>-<strong>209</strong>-<strong>30</strong>&P<br />
2-22. CENTRIFUGAL PUMP.<br />
This task covers:<br />
a. Disassembly c. Reassembly<br />
b. Repair<br />
INITIAL SETUP<br />
Tools and Special Tools<br />
Automotive Maintenance and Repair Field Maintenance<br />
Shop Equipment, Basic, Less Power (SC 4910-95-CL-A31)<br />
Wheel puller (fig D-3)<br />
Materials/Parts<br />
Antiseizing tape (item 38, app C)<br />
Automotive and artillery grease (item 22, app C)<br />
Sealing compound (item 32, app C)<br />
Wheel puller (fig D-3)<br />
References<br />
TM 43-0139<br />
Equipment Condition<br />
Pump assembly is removed from the plumbing assembly. Refer to<br />
paragraph 2-21 for disassembly/reassembly procedures.<br />
Special Safety Instructions<br />
WARNING<br />
When handling asbestos material, always wear an air filtering respirator,<br />
gloves, and goggles. Wash face and hands with soap and water before<br />
eating or smoking. Asbestos can cause cancer if handled without protection.<br />
LOCATION/lTEM ACTION REMARKS<br />
Centrifugal Pump/<br />
Woodruff key (1)<br />
Lubrication fitting (2)<br />
Pump breather (3)<br />
Pipe plugs (4)<br />
Hexagon head cap<br />
screws (5)<br />
Lock washers (6)<br />
Pump tank cover (7)<br />
Gasket (8)<br />
Gasket (9)<br />
Centrifugal pump<br />
diffuser (10)<br />
Lift woodruff key (1) out of the shaft keyway. Unscrew and remove<br />
Iubrication fitting (2), pump breather (3), two pipe plugs (4), and eight<br />
hexagon head cap screws (5), and eight lock washers (6).<br />
WARNING<br />
When handling asbestos material, always wear an air filtering<br />
respirator, gloves, and goggles. Wash face and hands<br />
with soap and water before eating or smoking. Asbestos<br />
can cause cancer if handled without protection.<br />
Remove pump tank cover (7), gasket (8), gasket (9), and centrifugal pump<br />
diffuser (10).<br />
Pump breather to be located on right hand side when<br />
facing centrifugal pump from the shaft end. The lubricating<br />
fitting will be on the left hand side.<br />
If the pump impeller does not have two threaded holes<br />
at the locations shown in the illustration, DO NOT<br />
disassemble any further. Enlarge and tap existing<br />
unthreaded holes in the pump impeller.
2-101 TM 3-42<strong>30</strong>-<strong>209</strong>-<strong>30</strong>&P
2-102 TM 3-42<strong>30</strong>-<strong>209</strong>-<strong>30</strong>&P<br />
2-22. CENTRIFUGAL PUMP (CONT).<br />
LOCATION/lTEM ACTION REMARKS<br />
Centrifugal Pump/<br />
Use a drill to enlarge the existing unthreaded holes to 13/64 inch diameter.<br />
Tap the two holes 1/4-20 UNC through the pump impeller at the<br />
location shown.<br />
Cotter pin (11) Remove cotter pin (11), castellated plain nut (12), and flat washer (13).<br />
Castellated plain nut (12)<br />
Flat washer (13)<br />
Using a fabricated wheel puller (fig D-3) (14), screw two 1-1/4 inch long<br />
Wheel puller (14)<br />
screws (fig D-3) (15) into the two tapped holes in pump impeller (16).<br />
Screws (15)<br />
Alternately tighten the screws in the holes until pump impeller (16) is<br />
Pump impeller (16)<br />
released. Slide pump impeller (16) off the shaft (17). Unscrew and remove<br />
Shaft (17)<br />
the two screws (15) and wheel puller (14).<br />
Always use a wheel puller (see figure D-3) to remove<br />
the impeller from the pump shaft. Removal of the<br />
pump impeller by the procedure described below will<br />
prevent damage to the pump shaft seal assembly.
Woodruff key (18)<br />
Shim set (19)<br />
Pump shaft seal assembly<br />
(holder portion) (20)<br />
Carefully slide woodruff key (18), shim set (19), and pump shaft seal<br />
assembly (holder portion) (20) off the shaft.<br />
The pump shaft seal assembly (holder portion and<br />
stationary portion) (20) is issued as an assembly. The<br />
holder portion of the seal assembly may be in the rear<br />
of the pump impeller (16).<br />
Hexagon head cap<br />
Unscrew and remove four hexagon head cap screws (21) and four lock<br />
screws (21) washers (22). Slide bearing housing (23) from pump tank (24).<br />
Lock washers (22)<br />
Bearing housing (23)<br />
Using a soft brass bar, tap lightly around outer edge of pump shaft seal<br />
Pump tank (24)<br />
assembly (stationary portion) (25) to loosen it from its seat in pump<br />
Pump shaft seal assembly tank (24). Remove pump shaft seal assembly (25).<br />
(stationary portion) (25)<br />
2-103 TM 3-42<strong>30</strong>-<strong>209</strong>-<strong>30</strong>&P
2-104 TM 3-42<strong>30</strong>-<strong>209</strong>-<strong>30</strong>&P<br />
2-22. CENTRIFUGAL PUMP (CONT).<br />
LOCATION/lTEM ACTION REMARKS
Centrifugal Pump/<br />
Plain encased seal (1)<br />
Bearing housing (2)<br />
Lubrication fitting (3)<br />
Pump breather (4)<br />
Install plain encased seal (1) in bearing housing (2). Screw lubrication<br />
fitting (3) and pump breather (4) into bearing housing (2). Tighten lubrication<br />
fitting (3) and pump breather (4).<br />
Annular ball bearings (5<br />
and 6)<br />
Shaft (7)<br />
Retaining ring (8)<br />
Pack annular ball bearings (5 and 6) with automotive and artillery grease.<br />
Slide the smaller annular ball bearing (5) onto the threaded end of<br />
shaft (7). Slide the larger annular ball bearing (6) onto unthreaded end of<br />
shaft (7) and secure with retaining ring (8). Slide the assembled shaft unit<br />
into bearing housing (2) until the smaller annular ball bearing (5) contacts<br />
the inner surface of bearing housing (2). Wipe any excess automotive and<br />
artillery grease from the outside of bearing housing (2).<br />
2-105 TM 3-42<strong>30</strong>-<strong>209</strong>-<strong>30</strong>&P
2-106 TM 3-42<strong>30</strong>-<strong>209</strong>-<strong>30</strong>&P<br />
2-22. CENTRIFUGAL PUMP (CONT).<br />
LOCATION/lTEM ACTION REMARKS<br />
Centrifugal Pump/<br />
Bearing end cap (9)<br />
Hexagon head cap<br />
screws (10)<br />
Lock washers (11)<br />
Slide bearing end cap (9) onto shaft (7), press in until it is flush with<br />
bearing housing (2), and aline the four holes.<br />
Insert four hexagon head cap screws (10) through four lock washers (11)<br />
and bearing end cap (9). Install four hexagon head cap screws (10) and<br />
tighten.<br />
Preformed packing (12)<br />
Pump tank (13)<br />
Pump shaft seal assembly<br />
(stationary portion) (14)<br />
Insert preformed packing (12) into pump tank (13). Check inside the shaft<br />
hole of pump tank (13) to be sure that preformed packing (12) is in the<br />
proper location and is seated properly.<br />
Using a small amount of automotive and artillery grease, lubricate the<br />
internal surface of the shaft hole in pump tank (13) and the internal and<br />
external surface of pump shaft seal assembly (stationary portion) (14).<br />
Push the pump shaft seal assembly (stationary portion) (14) into the shaft<br />
hole of pump tank (13). Slide bearing housing (2) onto pump tank (13) and<br />
aline bearing housing (2) so the drain hole is nearly straight down from the<br />
shaft hole.<br />
Preformed packing (12) and pump shaft seal assembly<br />
(14) are issued as an assembly.
Hexagon head cap Insert four hexagon head cap screws (15) and four lock washers (16)<br />
screws (15)<br />
through bearing housing (2) and into the four tapped holes in pump<br />
Lock washers (16) tank (13). Tighten four hexagon head cap screws (15).<br />
Pump shaft seal assembly<br />
(holder portion) (17)<br />
Slide pump shaft seal assembly (holder portion) (17) onto shaft (7) and<br />
press into pump tank (13) hole until it is against the pump shaft shoulder,<br />
2-107 TM 3-42<strong>30</strong>-<strong>209</strong>-<strong>30</strong>&P
2-108 TM 3-42<strong>30</strong>-<strong>209</strong>-<strong>30</strong>&P<br />
2-22. CENTRIFUGAL PUMP (CONT).<br />
LOCATION/lTEM ACTION REMARKS<br />
Centrifugal Pump/<br />
Turn the assembled unit so that the end cup is pointing downward for<br />
easy measurement. It is recommended that the unit be blocked to steady<br />
it while measurements are taken.<br />
Determine the number of shims that will be required for the following<br />
procedures.<br />
Step 1.<br />
Step 2.<br />
Step 3.<br />
Step 4.<br />
Place a very stiff, smooth length of metal such as a machinist’s<br />
parallel over the opening in the pump tank. The metal serves as a<br />
measuring reference point.<br />
Using a depth micrometer or depth rule, measure from the top of<br />
bar “A” to “B” and record the measurement. Measure from bar “A”<br />
to ”C" and record the measurement.<br />
Subtract the recorded measurement “A” to “B” from the recorded<br />
measurement “A” to “C.” This measurement must be between<br />
0.018 to 0.063 inch less than the “A” to “B” measurement.<br />
Using shims of 0.005 or 0.015 inch thickness in any combination,<br />
bring the unit into the established limits of 0.018 to 0.063 inch<br />
clearance.
EXAMPLE<br />
“A” to “C” 2.813 in.<br />
“A” to “B” 2.710 in.<br />
0.103 in.<br />
0.018 min clearance<br />
0.103 differential measurement<br />
0.121 inch of shims required to<br />
obtain minimum clearance<br />
0.063 max clearance<br />
0.103 differential measurement<br />
0.166 inch of shims required to<br />
obtain maximum clearance<br />
2-109 TM 3-42<strong>30</strong>-<strong>209</strong>-<strong>30</strong>&P
2-110 TM 3-42<strong>30</strong>-<strong>209</strong>-<strong>30</strong>&P<br />
2-22. CENTRIFUGAL PUMP (CONT).<br />
LOCATION/lTEM ACTION REMARKS<br />
Centrifugal Pump/<br />
Centrifugal pump<br />
diffuser (24)<br />
Gasket (25)<br />
Insert centrifugal pump diffuser (24) over pump impeller (20) with its boss<br />
fitting in the recess in the top part of pump tank (13). This locks centrifugal<br />
pump diffuser (24) in place while pump impeller (20) is free to spin.<br />
Turn pump impeller (20) again to make sure it is free to spin.<br />
Install gasket (25) onto centrifugal pump diffuser (24).<br />
WARNING<br />
When handling asbestos material, always wear an air filtering<br />
respirator, gloves, and goggles. Wash face and hands<br />
with soap and water before eating or smoking. Asbestos<br />
can cause cancer if handled without protection.<br />
Gasket (26)<br />
Coat face of pump tank (13) where gasket seats with sealing compound<br />
before installing gasket (26).<br />
Position gasket (26) on pump tank (13) and aline its eight holes with the<br />
holes in pump tank (13).<br />
Pump tank cover (27)<br />
Coat face of pump tank cover (27) where gasket<br />
seats with sealing compound before installing.<br />
Position pump tank cover (27) onto pump tank (13)<br />
with the drain hole located at the bottom and the eight<br />
holes alined with those in gasket (26) and pump<br />
tank (13).<br />
Hexagon head cap<br />
screw (28)<br />
Lock washer (29)<br />
Insert eight hexagon head cap screws (28) through<br />
eight lock washers (29), pump tank cover (27),<br />
gasket (26), and into the eight tapped holes in pump<br />
tank (13). Tighten eight hexagon head cap<br />
screws (28).
Pipe plug (<strong>30</strong>)<br />
Woodruff key (31)<br />
Wrap the external threads of two pipe plugs (<strong>30</strong>) with antiseizing tape or<br />
coat with sealing compound.<br />
Screw two pipe plugs (<strong>30</strong>) into pump tank (13) and tighten. Insert<br />
woodruff key (31) into the unthreaded end of shaft (7). Apply antiseizing<br />
tape around woodruff key (31) and shaft (7) to prevent loss.<br />
2-23. OFFSET VALVE AND REGULATING VALVE.<br />
This task covers:<br />
a. Disassembly c. Reassembly<br />
b. Repair<br />
INITIAL SETUP<br />
Tools and Special Tools<br />
Automotive Maintenance and Repair Field Maintenance<br />
Shop Equipment, Basic, Less Power (SC 4910-95-CL-A31)<br />
Equipment Condition<br />
Valve removed from the plumbing assembly.<br />
See paragraph 2-21 for disassembly/reassembly procedures.<br />
2-111 TM 3-42<strong>30</strong>-<strong>209</strong>-<strong>30</strong>&P
2-112 TM 3-42<strong>30</strong>-<strong>209</strong>-<strong>30</strong>&P<br />
2-23. OFFSET VALVE AND REGULATING VALVE (CONT).<br />
LOCATION/lTEM ACTION REMARKS<br />
Offset Valve No. 1/<br />
Handle (1)<br />
Pin (2)<br />
Spring pin (3)<br />
Shaft extension (4)<br />
Bevel gear (5)<br />
Sleeve bearing (6)<br />
Mounting bracket (7)<br />
Setscrew (8)<br />
Bevel gear (9)<br />
Collar (10)<br />
Hexagon head cap<br />
screws (11)<br />
Hexagon plain nuts (12)<br />
Hexagon head cap<br />
screws (13)<br />
Hexagon plain nuts (14)<br />
Lubrication fitting (15)<br />
The offset valve may be disassembled and reassem-<br />
bled without disassembling the plumbing assembly.<br />
Remove handle (1) by driving out pin (2) and spring pin (3). Slide off shaft<br />
extension (4) and bevel gear (5). Remove sleeve bearing (6) from mounting<br />
bracket (7).<br />
Unscrew and remove eight setscrews (8), bevel gear (9), collar (10), two<br />
hexagon head cap screws (11), two hexagon plain nuts (12), two<br />
hexagon head cap screws (13), two hexagon plain nuts (14), and lubrication<br />
fitting (15).<br />
NOTE<br />
Hexagon head cap screws (13) are subcomponents<br />
of the regulating valve. Two are<br />
removed and replaced by hexagon head cap<br />
screws (11) because of the extra length<br />
requirements. If a new regulating valve is<br />
received, use the two screws in the valve<br />
being replaced.<br />
Valve halves (16 and 17) Separate mounting bracket (7) and the two halves (16 and 17) of regulat- Handle (1) is a component part of the regulating<br />
Regulating valve (18) ing valve (18) to gain access to valve diaphragm (1 9). valve (18). The handle is repositioned for the applica-<br />
Valve diaphragm (19)<br />
ble offset valve.
2-113 TM 3-42<strong>30</strong>-<strong>209</strong>-<strong>30</strong>&P
2-114 TM 3-42<strong>30</strong>-<strong>209</strong>-<strong>30</strong>&P<br />
2-23. OFFSET VALVE AND REGULATING VALVE (CONT).<br />
LOCATION/lTEM ACTION REMARKS<br />
Offset Valve/<br />
Replace authorized unserviceable parts<br />
New handle should be reinstalled on the old regulating<br />
valve to turn in.<br />
Offset Valve/<br />
Valve diaphragm (1)<br />
Valve halves (2 and 3)<br />
Regulating valve (4)<br />
Mounting bracket (5)<br />
Hexagon head cap<br />
screw (6)<br />
Hexagon plain nut (7)<br />
Hexagon head cap<br />
screw (8)<br />
Hexagon plain nut (9)<br />
Lubrication fitting (10)<br />
Collar (11 )<br />
Bevel gear (12)<br />
Setscrews (13)<br />
Sleeve bearing (14)<br />
Shaft extension (15)<br />
Bevel gear (16)<br />
Spring pin (17)<br />
Handle (18)<br />
Pin (19)<br />
To reassemble, place valve diaphragm (1) between halves (2 and 3) of<br />
regulating valve (4). Position mounting bracket (5) on top of upper half (2)<br />
of regulating valve (4) with the upright in line with the inlet/outlet ports.<br />
Aline two screw holes and insert two hexagon head cap screws (6)<br />
through mounting bracket (5) and the offset valve. Attach two hexagon<br />
plain nuts (7). Insert two hexagon head cap screws (8) through the offset<br />
valve and attach two hexagon plain nuts (9).<br />
Tighten four hexagon head cap screws (6 and 8) (2 ea) and four hexagon<br />
plain nuts (7 and 9) (2 es).<br />
Screw lubrication fitting (10) into the offset valve and tighten.<br />
Slide collar (11) and bevel gear (12) onto the sleeve around the shaft, then<br />
install and tighten eight setscrews (13). Slide sleeve bearing (14) into<br />
mounting bracket (5). Slide shaft extension (15) through sleeve<br />
bearing (14) and into bevel gear (16). Twist shaft extension (15) until the<br />
holes aline with the holes in bevel gear (16) and insert spring pin (17).<br />
Insert handle (18) onto the shaft, turn handle (18) to aline holes with the<br />
holes in shaft extension (15), and insert pin (19).<br />
Be sure lubrication fitting is positioned away from<br />
mounting bracket (5).
2-115 TM 3-42<strong>30</strong>-<strong>209</strong>-<strong>30</strong>&P
2-116 TM 3-42<strong>30</strong>-<strong>209</strong>-<strong>30</strong>&P<br />
2-24. REGULATING VALVE.<br />
This task covers:<br />
a. Disassembly<br />
b. Repair<br />
c. Reassembly<br />
INITIAL SETUP<br />
Tools and Special Tools<br />
Automotive Maintenance and Repair Field Maintenance<br />
Shop Equipment, Basic, Less Power (SC 4910-95-CL-A31)<br />
Equipment Condition<br />
Removed from plumbing assembly.<br />
See paragraph 2-21 for disassembly/reassembly procedures.<br />
LOCATION/lTEM ACTION REMARKS<br />
Regulating Valve/<br />
Hexagon plain nuts (1)<br />
Hexagon head cap<br />
screws (2)<br />
Lower regulating valve<br />
half (3)<br />
Upper regulating valve<br />
half (4)<br />
Valve diaphragm (5)<br />
Unscrew and remove four hexagon plain nuts (1) and hexagon head cap<br />
screws (2). Separate lower regulating valve half (3) from upper regulating<br />
valve half (4) and remove valve diaphragm (5).<br />
The regulating valve may be disassembled and<br />
reassembled without disassembling the plumbing<br />
assembly.<br />
Regulating Valve/<br />
Replace authorized parts.
2-117 TM 3-42<strong>30</strong>-<strong>209</strong>-<strong>30</strong>&P
2-118<br />
TM 3-42<strong>30</strong>-<strong>209</strong>-<strong>30</strong>&P<br />
2-24. REGULATING VALVE (CONT).<br />
LOCATION/lTEM ACTION REMARKS<br />
Regulating Valve/<br />
Hexagon plain nuts (1)<br />
Hexagaon head cap<br />
screws (2)<br />
Lower regulating valve<br />
half (3)<br />
Upper regulating valve<br />
half (4)<br />
Valve diaphragm (5)<br />
Position valve diaphragm (5) in lower regulating valve half (3). Install upper<br />
regulating valve half (4). Aline all screw holes. Install and tighten four<br />
hexagon head cap screws (2) and nuts (1).<br />
Turn valve handle fully counterclockwise before<br />
reassembly.
2-25.20 HP GASOLINE ENGINE ASSEMBLY.<br />
This task covers:<br />
a. Disassembly c. Repair<br />
b. Replacement d. Reassembly<br />
INITIAL SETUP<br />
Tools and Special Tools<br />
Automotive Maintenance and Repair Field Maintenance<br />
Shop Equipment, Basic, Less Power (SC 4910-95-CL-A31)<br />
Equipment Condition<br />
Gasoline engine is removed from skid base subassembly. See<br />
paragraph 2-20 for disassembly/reassembly procedures.<br />
References<br />
TM 5-2805-259-14<br />
LOCATION/lTEM ACTION REMARKS<br />
Gasoline Engine/<br />
Gasoline Engine/<br />
Gasoline Engine/<br />
See TM 5-2805-259-14.<br />
See skid base subassembly (para 2-20).<br />
See TM 5-2805-259-14.<br />
The governor on the gasoline engine is adjusted and<br />
set to 3,708 rpm in accordance with instructions in the<br />
gasoline engine manual TM 5-2805-259-14. However,<br />
when the gasoline engine is used in the pump<br />
unit assembly, the governor must be adjusted and set<br />
to 3,850 rpm. The procedure for performing the<br />
adjus<strong>tm</strong>ent is described in TM 5-2805-259-14, except<br />
that the setting of 3,850 rpm is to be used. The<br />
tachometer on the control panel assembly is to be<br />
used to verify that the required revolutions are<br />
obtained. A handheld centrifugal tachometer may be<br />
used to confirm the accuracy of the governor adjus<strong>tm</strong>ent.<br />
Gasoline Engine/<br />
See TM 5-2805-259-14.<br />
2-119 TM 3-42<strong>30</strong>-<strong>209</strong>-<strong>30</strong>&P
2-120 TM 3-42<strong>30</strong>-<strong>209</strong>-<strong>30</strong>&P<br />
2-26. PUMP BASE SKID, ENGINE MOUNT 1, ENGINE MOUNT 2.<br />
This task covers:<br />
a. Disassembly c. Reassembly<br />
b. Repair<br />
INITIAL SETUP<br />
Tools and Special Tools Wiping rag (item 31, app C)<br />
Automotive Maintenance and Repair Field Maintenance Chassis and running gear brush (item 5, app C)<br />
Shop Equipment, Basic, Less Power (SC 4910-95-CL-A31) Paint brush (item 6, app C)<br />
Scratch wire brush (item 7, app C)<br />
Materials/Parts Abrasive cloth (item 9, app C)<br />
Polyurethane coating (item 29, app C)<br />
Dry cleaning solvent (item 14, app C)<br />
LOCATION/lTEM ACTION REMARKS<br />
Pump Base Skid, Engine<br />
Mount 1 Engine Mount 2/<br />
Hexagon self-locking nut (1)<br />
Hexagon head cap<br />
screw (2)<br />
Flat washer (3)<br />
Shock mount pad (4)<br />
Machine bolt (5)<br />
Hexagon head cap<br />
screw (6)<br />
Lock washers (7)<br />
Channel assembly (8)<br />
Nut (9)<br />
Skid base (10)<br />
Unscrew and remove hexagon self-locking nut (1), hexagon head cap<br />
screw (2), flat washer (3), and shock mount pad (4).<br />
Remove machine bolt (5), two hexagon head cap screws (6), and lock<br />
washers (7). Remove moveable part of channel assembly (8). Do not<br />
remove the two sets of nuts (channel clamping style) (9), or the stationary<br />
part of channel assembly (8) welded to the skid base (10) unless they<br />
need to be replaced.
Hexagon head cap<br />
screws (11)<br />
Flat washer (12)<br />
Shock mount pad (13)<br />
Machine bolt (14)<br />
Channel assembly (15)<br />
Nut (16)<br />
Unscrew and remove two hexagon head cap screws (11), flat<br />
washers (12), shock mount pads (13), and one machine bolt (14).<br />
Remove moveable part of channel assembly (15).<br />
Do not remove the two sets of nuts (channel clamping style) (16) or the<br />
stationary part of channel assembly (15) unless replacement is required.<br />
Pump Base Skid, Engine<br />
Mount 1, Engine Mount 2/<br />
Replace authorized unserviceable parts.<br />
Use chassis and running gear brush, wiping rags, scratch wire brushes,<br />
abrasive cloth, and dry cleaning solvent to remove paint, grease, and<br />
grime from the pump base skid and around each of the stationary parts of<br />
the channel assemblies. Any cracked or broken welds will be rewelded<br />
(see TM 9-237).<br />
When welding or rewelding the stationary channel assemblies, they will<br />
be located as illustrated.<br />
CAUTION<br />
Altering the mounting will cause misalinement between engine, pump,<br />
and alternator drive pulleys.<br />
Use polyurethane paint and paint brush to touch up unpainted surfaces.<br />
2-121 TM 3-42<strong>30</strong>-<strong>209</strong>-<strong>30</strong>&P
2-122 TM 3-42<strong>30</strong>-<strong>209</strong>-<strong>30</strong>&P<br />
2-26. PUMP BASE SKID, ENGINE MOUNT 1, ENGINE MOUNT 2 (CONT).<br />
LOCATION/lTEM ACTION REMARKS<br />
Pump Base Skid, Engine<br />
Mount 1, Engine Mount 2/<br />
Nut (1)<br />
Channel assembly (2)<br />
Hexagon head cap<br />
screw (3)<br />
Flat washer (4)<br />
Shock mount pad (5)<br />
Machine bolt (6)<br />
Nut (7)<br />
Channel assembly (8)<br />
Hexagon head cap<br />
screws (9)<br />
Lock washers (10)<br />
Machine bolt (11)<br />
Hexagon head cap<br />
screw (12)<br />
Shock mount pad (13)<br />
Flat washer (14)<br />
Hexagon self-locking<br />
nut (15)<br />
If nuts (1) have been moved or replaced, install nuts (1) into the stationary<br />
part of channel assembly (2) and lay the moveable part of channel assembly<br />
(2) alongside. Adjust nuts so they will aline with the drilled holes.<br />
Position moveable part of channel assembly (2) onto stationary part of<br />
channel assembly (2) and aline holes to nuts (1). Install two hexagon head<br />
cap screws (3) through fiat washers (4), shock mount pads (5), moveable<br />
part of channel assembly (2) and into nuts (1).<br />
Install machine bolt (6) through end of stationary part of channel<br />
assembly (2) and into the end of the moveable part of channel<br />
assembly (2).<br />
If nuts (7) have been moved or replaced, install nuts (7) into stationary<br />
part of channel assembly (8) and lay the moveable part of channel assembly<br />
(8) alongside. Adjust nuts so they will aline with the drilled holes.<br />
Position moveable part of channel assembly (8) onto stationary part of<br />
channel assembly (8) and aline holes to nuts (7). Install two hexagon head<br />
cap screws (9) through lock washers (10), moveable part of channel<br />
assembly (8), and into nuts (7).<br />
Install machine bolt (11 ) through stationary part of channel assembly (8)<br />
and into end of the moveable part of channel assembly (8).<br />
Insert one hexagon head cap screw (12) up from the bottom through<br />
channel assembly (8), shock mount pad (13), flat washer (14), and<br />
hexagon self-locking nuts (15).
2-27. ALTERNATOR-GENERATOR ASSEMBLY.<br />
This task covers:<br />
a. Disassembly<br />
b. Repair<br />
c. Reassembly<br />
INITIAL SETUP<br />
Tools and Special Tools<br />
Automotive Maintenance and Repair Field Maintenance<br />
Shop Equipment, Basic, Less Power (SC 4910-95-CL-A31)<br />
Multimeter Ml L-M-1235 AN/URM105.<br />
Equipment Condition<br />
Alternator-generator assembly removed from skid base subassembly. See<br />
paragraph 2-20 for disassembly/reasembly procedures.<br />
LOCATION/lTEM ACTION REMARKS<br />
Alternator-Generator<br />
Assembly/<br />
Hex-head screw (1)<br />
Screws (2 and 3)<br />
Resistor (4)<br />
Alternator-generator (5)<br />
Remove hex-head screw (1) and screws (2 and 3). Remove resistor (4)<br />
from rear of alternator generator (5).<br />
2-123 TM 3-42<strong>30</strong>-<strong>209</strong>-<strong>30</strong>&P
2-124 TM 3-42<strong>30</strong>-<strong>209</strong>-<strong>30</strong>&P<br />
2-27. ALTERNATOR-GENERATOR ASSEMBLY (CONT).<br />
LOCATION/lTEM ACTION REMARKS<br />
Alternator-Generator<br />
Assembly/<br />
Repair by replacing authorized unserviceable items.<br />
Alternator-Generator<br />
Assembly/<br />
Resistor (1)<br />
Alternator generator (2)<br />
Screws (3)<br />
Screw (4)<br />
Hex-head screw (5)<br />
Position resistor (1) on rear of alternator generator (2). Se<br />
screws (3).<br />
Insert screw (4) through resistor terminal lead and secure<br />
Insert hex-head screw (5) through other resistor terminal<br />
2-28. CONTROL PANEL ASSEMBLY.<br />
This task covers:<br />
a. Disassembly c. Repair<br />
b. Cleaning/Inspection d. Reassembly<br />
INITIAL SETUP<br />
Tools and Special Tools<br />
References<br />
Automotive Maintenance and Repair Field Maintenance<br />
TM 3-42<strong>30</strong>-<strong>209</strong>-20&P<br />
Shop Equipment, Basic, Less Power (SC 4910-95-CL-A31) TM 43-0139<br />
Multimeter AN/URM/105C.<br />
Materials/A4Parts<br />
Dry cleaning solvent (item 14, app C)<br />
Polyurethane coating (item 29, app C)<br />
Wiping rag (item 31, app C)<br />
Equipment Condition<br />
Control panel is removed from the pump unit assembly. Refer to<br />
paragraph 2-14 for disassembly/reassembly procedures.
Control Panel Assembly/<br />
Drive screw (1)<br />
DECONTAMINATING<br />
APPARATUS<br />
Identification plate (2)<br />
VALVE NO. 2/LOWER<br />
REEL Identification<br />
plate (3)<br />
CIRCUIT BREAKER/<br />
OFF-ON Identification<br />
plate (4)<br />
VALVE NO. 3/UPPER<br />
REEL Identification<br />
plate (5)<br />
TACHOMETER<br />
Identification plate (6)<br />
FUEL INDICATOR<br />
Identification plate (7)<br />
VACUUM GAGE<br />
Identification plate (8)<br />
AMMETER Identification<br />
plate (9)<br />
GENERATOR Identification<br />
plate (10)<br />
Starting procedure<br />
instruction plate (11)<br />
Disassemble only as far as required for repairs<br />
Remove all the identification plates by removing two drive screws (1)<br />
except for DECONTAMINATING APPARATUS identification plate (2) and<br />
starting procedure instruction plate (11) which are mounted with four<br />
drive screws (1).<br />
2-125<br />
TM 3-42<strong>30</strong>-<strong>209</strong>-<strong>30</strong>&P
2-126 TM 3-42<strong>30</strong>-<strong>209</strong>-<strong>30</strong>&P<br />
2-28. CONTROL PANEL ASSEMBLY (CONT).<br />
LOCATION/lTEM ACTION REMARKS<br />
FUEL SHUT-OFF<br />
Identification plate (12)<br />
OIL PRESSURE SWITCH/<br />
STOP-RUN-START<br />
Identification plate (13)<br />
PRESSURE GAGE<br />
Identification plate (14)<br />
OPEN Identification<br />
plate (15)<br />
CLOSED Identification<br />
plate (16)<br />
VALVE NO. 4/PRIME<br />
Identification plate (17)<br />
THROTTLE Identification<br />
plate (18)<br />
VALVE NO. 1 /MANIFOLD<br />
Identification plate (19)<br />
HEATER RECEPTACLE<br />
AND SWITCH<br />
ON-OFF Identification<br />
plate (20)<br />
DRAIN Identification<br />
plate (21)
Control Panel Assembly/<br />
Hexagon plain nuts (22)<br />
Internal tooth lock<br />
washers (23)<br />
Alternator junction box (24)<br />
Internal tooth lock<br />
washers (25)<br />
Machine bolts (26)<br />
Hexagon nut (27)<br />
Internal tooth lock<br />
washer (28)<br />
Push-pull control<br />
assembly (29)<br />
Hexagon nut (<strong>30</strong>)<br />
Internal tooth lock<br />
washer (31)<br />
Push-pull control<br />
assembly (32)<br />
Refer to TM 3-42<strong>30</strong>-<strong>209</strong>-20&P for removal of individual switches, gages,<br />
and other parts except those listed below.<br />
Remove and retain four hexagon plain nuts (22), four internal tooth lock<br />
washers (23), alternator junction box (24), four internal tooth lock washers<br />
(25), and four machine bolts (26).<br />
Unscrew and remove hexagon nut (27) and internal tooth lock<br />
washer (28), which are component parts of push-pull control<br />
assembly (29).<br />
Remove THROTTLE push-pull control<br />
assembly (29) from the control panel.<br />
Remove hexagon nut (<strong>30</strong>), internal tooth lock<br />
washer (31), and CHOKE push-pull control<br />
assembly (32).<br />
2-127 TM 3-42<strong>30</strong>-<strong>209</strong>-<strong>30</strong>&P
2-128 TM 3-42<strong>30</strong>-<strong>209</strong>-<strong>30</strong>&P<br />
2-28. CONTROL PANEL ASSEMBLY (CONT).<br />
LOCATION/lTEM ACTION REMARKS<br />
DISASSEMBLY (CONT)<br />
Control Panel Assembly/<br />
Screws (33) Unscrew and remove eight screws (33) from TB1 (34) terminal A1-B2-C3- Cable can be repaired in place in most cases. Do not<br />
TB1 (34) E5-F6-H7-18-J9. Unscrew and remove nut (35) from G1. Retain disassemble more than needed for repairs.<br />
Nut (35) screws (33) and nut (35).<br />
Power cable assembly (36)<br />
If not already disconnected, remove power cable assembly (36) from:
2-129 TM 3-42<strong>30</strong>-<strong>209</strong>-<strong>30</strong>&P
2-1<strong>30</strong> TM 3-42<strong>30</strong>-<strong>209</strong>-<strong>30</strong>&P
Control Panel Assembly/<br />
Wipe all switches and gages with a cloth to remove accumulated dirt.<br />
Wipe the control panel surface with a cloth soaked in water or dry cleaning<br />
solvent. Dry thoroughly.<br />
Inspect switches and gages for loose parts or damaged leads.<br />
Inspect gages for cracked glasses.<br />
Inspect identification plates and starting procedure instruction<br />
identification plate for legibility.<br />
Inspect the control panel for dents, and for signs of rust, chipped paint, or<br />
other damage.<br />
Control Panel Assembly/<br />
Power Cable Assembly/<br />
Crimp type terminal lug (1)<br />
Replace authorized unserviceable parts. Repair by replacing crimp type<br />
terminal lugs (1).<br />
Remove approximately 3/8 inch of insulation from wire end, insert wire<br />
through terminal lug barrel, and crimp terminal to wire end.<br />
2-131 TM 3-42<strong>30</strong>-<strong>209</strong>-<strong>30</strong>&P
2-132<br />
TM 3-42<strong>30</strong>-<strong>209</strong>-<strong>30</strong>&P<br />
2-28. CONTROL PANEL ASSEMBLY (CONT).<br />
LOCATION/lTEM ACTION REMARKS<br />
Control Panel Assembly/<br />
Electrical plug<br />
connector (2)<br />
Power Cable Assembly/<br />
Shell (3)<br />
Unscrew shell (3) of electrical plug connector<br />
(2) and slide back on wires to gain access to<br />
unsoldered wires. Solder broken wire(s) or<br />
replace electrical plug connector (2) as applicable.<br />
Solder connections will be soldered in accordance<br />
with MI L-S-6872.<br />
Using an ohmmeter, check cable for continuity and shorts.<br />
Control Panel Assembly/<br />
Power cable assembly (1)<br />
TB1 (2)<br />
Screw (3)<br />
Using the wiring diagram, place the terminals of the color coded or tabbed<br />
wires of power cable assembly (1) onto the correct terminals (B2, C3. E5,<br />
F6, H7, 16 and J9) of TB1 (2). Attach with seven screws (3) and tighten.<br />
NOTE<br />
Refer to paragraph 2-28 for wiring of<br />
pump unit including control panel<br />
assembly.<br />
Reconnect shielded wire to G1, attach nut (4), and tighten. If not already<br />
connected, connect power cable assembly (1) (see following diagram).
Push-pull control<br />
assembly (5)<br />
Control panel (6)<br />
Internal tooth lock<br />
washer (7)<br />
Hexagon nut (8)<br />
Push-pull control<br />
assembly (9)<br />
Internal tooth lock<br />
washer (10)<br />
Hexagon nut (11)<br />
Machine bolts (12)<br />
internal tooth lock<br />
washers (13)<br />
Install CHOKE push-pull control assembly (5) into control panel (6) and<br />
secure with internal tooth lock washer (7) and hexagon nut (8).<br />
Insert THROTTLE push-pull control assembly (9) through the control<br />
panel (6) and secure with internal tooth lock washer (10) and hexagon<br />
nut (11). Insert four machine bolts (12) through internal tooth lock washers<br />
(13) into the control panel (6).<br />
Alternator junction box (14)<br />
Internal tooth lock<br />
washers (15)<br />
Hexagon plain nuts (16)<br />
2-133<br />
TM 3-42<strong>30</strong>-<strong>209</strong>-<strong>30</strong>&P
2-134<br />
TM 3-42<strong>30</strong>-<strong>209</strong>-<strong>30</strong>&P<br />
2-28. CONTROL PANEL ASSEMBLY (CONT).<br />
LOCATION/lTEM<br />
ACTION<br />
REMARKS<br />
Control Panel Assembly/<br />
Drive screws (17)<br />
CLOSED Identification<br />
plate (18)<br />
OPEN Identification<br />
plate (19)<br />
DRAIN Identification<br />
plate (20)<br />
HEATER RECEPTACLE<br />
AND SWITCH ON-OFF<br />
Identification plate (21)<br />
THROTTLE Identification<br />
plate (22)<br />
VALVE NO. 1 /MANIFOLD<br />
Identification plate (23)<br />
VALVE NO. 4/PRIME<br />
Identification plate (24)<br />
PRESSURE GAGE<br />
Identification plate (25)<br />
OIL PRESSURE SWITCH/<br />
STOP-RUN-START<br />
Identification plate (26)<br />
FUEL SHUT-OFF<br />
Identification plate (27)<br />
Use two drive screws (17) to attach each identification plate (18 thru 27)<br />
and (29 thru 36) and four drive screws to attach each identification<br />
plate (28 and 37) to the control panel in the proper locations.<br />
See TM 3-42<strong>30</strong>-<strong>209</strong>-20&P for installation of selected switches, gages,<br />
and other parts.
Starting procedure<br />
Instruction plate (28)<br />
GENERATOR Identification<br />
plate (29)<br />
AMMETER Identification<br />
plate (<strong>30</strong>)<br />
VACUUM GAGE<br />
Identification plate (31)<br />
FUEL INDICATOR<br />
Identification plate (32)<br />
TACHOMETER<br />
Identification plate (33)<br />
VALVE NO. 3/UPPER<br />
REEL Identification<br />
plate (34)<br />
CIRCUIT BREAKER/<br />
OFF-ON Identification<br />
plate (35)<br />
VALVE NO. 2/LOWER<br />
REEL Identification<br />
plate (36)<br />
DECONTAMINATING<br />
APPARATUS<br />
Identification plate (37)<br />
2-135 TM 3-42<strong>30</strong>-<strong>209</strong>-<strong>30</strong>&P
2-136 TM 3-42<strong>30</strong>-<strong>209</strong>-<strong>30</strong>&P<br />
2-28. CONTROL PANEL ASSEMBLY (CONT).<br />
LOCATION/lTEM ACTION REMARKS<br />
DISASSEMBLY/REPAIR/REASSEMBLY<br />
Alternator Junction Box/<br />
Machine screws (1) Remove six machine screws (1), lock washers (2), nuts (3), and cover (4).<br />
Lock washers (2)<br />
Nuts (3)<br />
Cover (4)<br />
All of the following listed items are supplied as part of<br />
the alternator junction box.<br />
Wires (5)<br />
Tag wires (5) to identify for installation on new switch. Unscrew and<br />
Screws (6)<br />
remove two screws (6) securing wires (5) to toggle switch (7). Holding<br />
Toggle switch (7) toggle switch (7), unscrew and remove nut (8). Remove toggle switch (7).<br />
Nut (8)<br />
Tag and unsolder leads to electrical connector (9). Remove four machine<br />
Electrical connector (9) screws (10) and electrical connector (9).<br />
Machine screws (10)<br />
Replace ail unserviceable authorized parts.<br />
Install electrical connector (9) and fasten with four machine screws (10).<br />
Connect electrical leads.<br />
Insert toggle switch (7) through switch hole in the case, screw nut (8) onto<br />
toggle switch (7) threaded stem, and tighten.<br />
Determine identification of wires from the tags applied earlier. Reconnect<br />
wires (5) to correct toggle switch terminals with screws (6) and tighten.<br />
Install cover (4), and secure with six lock washers (2), machine screws (1),<br />
and nuts (3). Tighten.
2-29. ELECTRICAL WIRING.<br />
This task covers:<br />
a. Disassembly c. Reassembly<br />
b. Repair<br />
INITIAL SETUP<br />
Tools and Special Tools<br />
Automotive Maintenance and Repair Field Maintenance<br />
Shop Equipment, Basic, Less Power (SC 4910-95-CL-A31)<br />
Multimeter AN/URM 105C<br />
Equipment Condition<br />
Wiring is removed from the pump unit assembly.<br />
Materials/Parts<br />
Electrical leads (fig D-63 thru D-79).<br />
LOCATION/lTEM ACTION REMARKS<br />
DISASSEMBLY<br />
Electrical Wiring/<br />
Electrical leads<br />
Cut off defective terminal from electrical leads.<br />
Electrical Wiring/<br />
Electrical leads (11 thru 29)<br />
Fabricate new electrical wires. See table below. Refer to wiring schematic<br />
on page 2-129 for wire location. Mark wires according to following table<br />
of connections.<br />
Electrical Wiring/<br />
Electrical leads<br />
Strip 0.375 inch of insulation from electrical leads and crimp terminal lugs<br />
onto exposed wire ends.<br />
2-137 TM 3-42<strong>30</strong>-<strong>209</strong>-<strong>30</strong>&P
2-138<br />
TM 3-42<strong>30</strong>-<strong>209</strong>-<strong>30</strong>&P
2-<strong>30</strong>. TANK UNIT.<br />
This task covers:<br />
a. Disassembly<br />
b. Repair<br />
c. Reassembly<br />
INITIAL SETUP<br />
Tools and Special Tools<br />
References<br />
Automotive Maintenance and Repair Field Maintenance<br />
TM 3-42<strong>30</strong>-<strong>209</strong>-20&P<br />
Shop Equipment, Basic, Less Power (SC 4910-95-CL-A31 )<br />
Personnel Required<br />
Materials/Parts 2<br />
Adhesive (item 1, app C)<br />
Antiseizing tape (item 38, app C)<br />
Equipment Condition<br />
Paint brush (item 6, app C)<br />
Tank unit is assembled. Unit maintenance authorized components removed<br />
Polyurethane coating (black) (item 28, app C)<br />
in TM 3-42<strong>30</strong>-<strong>209</strong>-20&P and are not covered in this manual.<br />
Polyurethane coating (green) (item 29, app C)<br />
LOCATION/lTEM ACTION REMARKS<br />
Tank Unit/<br />
Spring pins (1)<br />
Bracket clamps (2)<br />
Bracket clamps (3)<br />
Remove eight spring pins (1), one<br />
bracket clamp (2), and three bracket<br />
clamps (3).<br />
Quick disconnect<br />
coupling half (4)<br />
Pipe elbow (5)<br />
Nuts (6)<br />
Bolts (7)<br />
Shackles (8)<br />
Unscrew and remove quick disconnect<br />
coupling half (4), pipe elbow (5), cut four<br />
nuts (6) from bolts (7), and remove the<br />
four shackles (8). Discard nuts (6),<br />
bolts (7), and shackles (8).<br />
2-139<br />
TM 3-42<strong>30</strong>-<strong>209</strong>-<strong>30</strong>&P
2-140 TM 3-42<strong>30</strong>-<strong>209</strong>-<strong>30</strong>&P<br />
2-<strong>30</strong>. TANK UNIT (CONT).<br />
LOCATION/lTEM ACTION REMARKS<br />
Tank Unit/<br />
Drive screws (9)<br />
Agitation identification<br />
plate (10)<br />
Hexagon plain nuts (11)<br />
Lock washers (12)<br />
Support pipe (13)<br />
Metallic pipe (14)<br />
Street elbow (15)<br />
Agitator nozzle (16)<br />
Machine screws (17)<br />
Flat washers (18)<br />
Hexagon plain nuts (19)<br />
Rubber pad (20)<br />
Hexagon plain nuts (21)<br />
Lock washers (22)<br />
Hexagon head cap<br />
screws (23)<br />
Tank assembly (24)<br />
Tank skid base (25)<br />
Remove two drive screws (9), agitation<br />
identification plate (10), two hexagon<br />
plain nuts (11), two lock washers (12),<br />
support pipe (13), metallic pipe (16), and<br />
street elbow (15). Crawl in through the<br />
hopper assembly hole, unscrew and<br />
remove agitator nozzle (16), and crawl<br />
out through the hopper assembly hole.<br />
Remove four machine screws (17),<br />
eight flat washers (18), four hexagon<br />
plain nuts (19), and rubber pad (20).<br />
Unscrew and remove eight hexagon<br />
plain nuts (21), eight lock washers (22),<br />
and eight hexagon head cap<br />
screws (23). Using two soldiers and a<br />
lifting device with a 1,000 pound capacity,<br />
lift tank assembly (24) off tank skid<br />
base (25).
Tank Unit/<br />
Replace authorized unserviceable parts.<br />
Paint over all yellow markings currently<br />
on the tank unit. Repaint any chipped or<br />
damaged areas with green<br />
polyurethane coating.<br />
Repaint the former yellow information<br />
signs using black polyurethane coating<br />
in accordance with measurements and<br />
locations shown.<br />
If new shackles are to be installed, tackweld<br />
the nut after the shackle is<br />
attached.<br />
Tank Unit/<br />
Tank assembly (1)<br />
Tank skid base (2)<br />
Hexagon head cap<br />
screws (3)<br />
Lock washers (4)<br />
Hexagon plain nuts (5)<br />
Using two soldiers and a lifting device<br />
with 1,000 pound capacity, position<br />
tank assembly (1) on tank skid base (2)<br />
and aline bolt holes. Insert eight<br />
hexagon head cap screws (3) through<br />
tank assembly (1) and tank skid<br />
base (2). Attach eight lock washers (4)<br />
and eight hexagon plain nuts (5).<br />
Tighten.<br />
2-141 TM 3-42<strong>30</strong>-<strong>209</strong>-<strong>30</strong>&P
2-142 TM 3-42<strong>30</strong>-<strong>209</strong>-<strong>30</strong>&P<br />
2-<strong>30</strong>. TANK UNIT (CONT).<br />
LOCATION/lTEM ACTION REMARKS<br />
Tank Unit/<br />
Rubber pad (6)<br />
Machine screws (7)<br />
Flat washers (8)<br />
Hexagon plain nuts (9)<br />
Position rubber pad (6) on tank skid<br />
base (2), aline holes, and secure with<br />
four machine screws (7), eight fiat<br />
washers (8), and four hexagon plain<br />
nuts (9).<br />
Street elbow (10)<br />
Metallic pipe (11 )<br />
Agitator nozzle (12)<br />
Support pipe (13)<br />
Lock washers (14)<br />
Hexagon plain nuts (15)<br />
Agitation identification<br />
plate (16)<br />
Drive screws (17)<br />
Using antiseizing tape or sealing compound,<br />
wrap or coat the external<br />
threads of street elbow (10), metallic<br />
pipe (11), and agitator nozzle (1 2).<br />
Screw street elbow (10) into the tank<br />
unit (1). Tighten and position street<br />
elbow (10) so its opening is pointing<br />
straight up. Screw metallic pipe (11) into<br />
the opening of the street elbow (10) and<br />
tighten. Slide support pipe (13) around<br />
metallic pipe (11), insert threaded ends<br />
through the bracket, and attach two<br />
lock washers (14) and two hexagon<br />
plain nuts (15). Tighten hexagon plain<br />
nuts (15).<br />
Install agitation identification plate (16)<br />
with two drive screws (17) and tighten.<br />
Crawl inside the tank, screw and tighten<br />
agitator nozzle (12) into the tank, and<br />
then crawl out of the tank.
Bracket clamps (18)<br />
Bracket clamps (19)<br />
Spring pins (20)<br />
Bolts (21)<br />
Nuts (22)<br />
Shackles (23)<br />
Pipe elbow (24)<br />
Quick disconnect<br />
coupling half (25)<br />
Install three bracket clamps (18) and one bracket clamp (19). Insert eight<br />
spring pins (20), into the four posts with one spring pin above and one -<br />
spring pin below each bracket clamp (18 and 19).<br />
Unscrew four bolts (21) and nuts (22) and remove from four shackles (23)<br />
and slide shackles (23) over the four projection tabs welded to the tank.<br />
Reinstall the four bolts (21) and nuts (22) through each shackle (23),<br />
tighten, and tack-weld the nuts to the bolts.<br />
Screw pipe elbow (24) onto the end of<br />
metallic pipe (11). Tighten and position<br />
so that open end of pipe elbow (24) is<br />
pointed toward the hopper assembly<br />
hole.<br />
Using antiseizing tape or sealing compound,<br />
wrap or coat the external<br />
threads of quick disconnect coupling<br />
half (25). Screw quick disconnect coupling<br />
half (25) into pipe elbow (24) and<br />
tighten.<br />
2-143 TM 3-42<strong>30</strong>-<strong>209</strong>-<strong>30</strong>&P
2-144 TM 3-42<strong>30</strong>-<strong>209</strong>-<strong>30</strong>&P<br />
2-31. HOPPER ACCESS COVER.<br />
This task covers disassembly/repair/reassembly.<br />
INITAL SETUP<br />
Tools and Special Tools<br />
Automotive Maintenance and Repair Field Maintenance<br />
Shop Equipment, Basic, Less Power (SC 4910-95-CL-A31)<br />
Materials/Parts<br />
Adhesive (item 1, app C)<br />
Gasket (fig D-28)<br />
Paint brush (item 6, app C)<br />
Polyurethane coating (item 29, app C)<br />
References<br />
TM 3-42<strong>30</strong>-<strong>209</strong>-20&P<br />
Equipment Condition<br />
Hopper access cover removed.<br />
LOCATION/lTEM ACTION REMARKS<br />
DISASSEMBLY/REPAIR/REASSEMBLY<br />
Hopper Access Cover/<br />
Gasket (1)<br />
Hopper lid (2)<br />
Scrape gasket (1) from hopper lid (2) underside if damaged.<br />
Replace authorized unserviceable gasket. Repair the access cover by<br />
fabricating new gasket (1) according to figure D-28 Bond gasket (1) to<br />
hopper lid (2) with adhesive.<br />
Apply adhesive to underside of hopper lid (2) and position new gasket (1)<br />
into proper position. Trim any excess length from gasket for proper fit.
2-32. LIQUID STORAGE TANK.<br />
This task covers:<br />
a. Disassembly c. Reassembly<br />
b. Repair<br />
INITAL SETUP<br />
Tools and Special Tools<br />
Gasket (fig D-32)<br />
Automotive Maintenance and Repair Field Maintenance Sealing compound (item 32, app C)<br />
Shop Equipment, Basic, Less Power (SC 4910-95-CL-A31)<br />
Equipment Condition<br />
Materials/Parts<br />
Liquid storage tank is removed from the tank unit. Unit maintenance autho-<br />
Adhesive (item 1, app C)<br />
rized components are removed in TM 3-42<strong>30</strong>-<strong>209</strong>-20&P and are not covered<br />
Antiseizing tape (item 38, app C)<br />
in this manual.<br />
LOCATION/lTEM ACTION REMARKS<br />
Liquid Storage Tank/<br />
Quick disconnect<br />
coupling half (1)<br />
Pipe elbow (2)<br />
Pipe locknuts (3)<br />
Metallic pipe (4)<br />
Pipe elbow (5)<br />
Pipe nipple (6)<br />
Gasket (7)<br />
Flange body (8)<br />
Unscrew and remove quick disconnect<br />
coupling half (1), pipe elbow (2), two<br />
pipe locknuts (3), metallic pipe (4), pipe<br />
elbow (5), and pipe nipple (6). Remove<br />
gasket (7) from flange body (8) only if it<br />
needs repair.<br />
2-145<br />
TM 3-42<strong>30</strong>-<strong>209</strong>-<strong>30</strong>&P
2-146<br />
TM 3-42<strong>30</strong>-<strong>209</strong>-<strong>30</strong>&P<br />
2-32. LIQUID STORAGE TANK (CONT).<br />
LOCATION/lTEM ACTION REMARKS<br />
Liquid Storage Tank/<br />
Gasket (1)<br />
Replace authorized unserviceable parts.<br />
Scrape old gasket (1) off of the bottom<br />
of the flange and discard. Fabricate a<br />
new gasket (1). (See fig D-32.) Bond<br />
gasket (1) to bottom of the flange using<br />
adhesive.<br />
Liquid Storage Tank/<br />
Pipe nipple (1)<br />
Body (2)<br />
Pipe elbow (3)<br />
Wrap all external threads with antiseizing<br />
tape or coat with sealing compound<br />
before reassembly.<br />
Screw pipe nipple (1) into the body (2)<br />
and pipe elbow (3) onto the end of pipe<br />
nipple (1). Tighten and position pipe nipple<br />
(1) and pipe elbow (3). The opening<br />
in pipe elbow (3) must be pointed so it<br />
alines with the hole in the flange of the<br />
body (2).
Pipe locknuts (4)<br />
Metallic pipe (5)<br />
Body flange (6)<br />
Pipe elbow (7)<br />
Quick disconnect nect<br />
coupling half (8)<br />
Gasket (9)<br />
Screw one pipe locknut (4) onto the longest threaded end<br />
of metallic pipe (5). Insert metallic pipe (5) through the<br />
body flange (6) on the body (2). Screw the other end of<br />
metallic pipe (5) into pipe elbow (3). Screw second pipe<br />
locknut (4) onto metallic pipe (5), protruding above the<br />
body flange (6), and screw two pipe locknuts (4) fingertight<br />
against body flange (6). Tighten metallic pipe (5) and two<br />
pipe locknuts (4).<br />
Screw pipe elbow (7) onto end of metallic pipe (5) and<br />
tighten.<br />
Screw quick disconnect coupling half (8) onto pipe<br />
elbow (7) and tighten.<br />
Coat underside of body flange (6) with adhesive. Position<br />
new gasket (9) form around body flange (6). Trim any<br />
excess gasket (9) to fit.<br />
2-147 TM 3-42<strong>30</strong>-<strong>209</strong>-<strong>30</strong>&P
2-148 TM 3-42<strong>30</strong>-<strong>209</strong>-<strong>30</strong>&P<br />
2-33. LIQUID FUEL WATER HEATER AND CABINET TOP COVER.<br />
This task covers:<br />
a. Disassembly c. Reassembly<br />
b. Repair<br />
INITIAL SETUP<br />
Tools and Special Tools<br />
References<br />
Automotive Maintenance and Repair Field Maintenance FM 10-16<br />
Shop Equipment, Basic, Less Power (SC 4910-95-CL-A31) TM 43-0139<br />
Automotive Maintenance and Repair Shop Equipment:<br />
Organizational Maintenance Common No. 1, Less Power<br />
Personnel Required<br />
(Sc 4910-95-CL-A74) 2<br />
Materials/Parts<br />
Polyurethane coating (black) (item 28, app C)<br />
Polyurethane coating (green) (item 29, app C)<br />
Pressure sensitive tape (item 41, app C)<br />
Equipment Condition<br />
Unit maintenance authorized components are removed in<br />
TM 3-42<strong>30</strong>-<strong>209</strong>-20&P and are not covered in this manual.<br />
LOCATION/lTEM ACTION REMARKS<br />
Liquid Fuel Water Heater and<br />
Cabinet Top Cover/<br />
Clamping catch (1)<br />
Cabinet top cover (2)<br />
Solid rivet (3)<br />
Decal (4)<br />
Plate (5)<br />
Plate (6)<br />
Loosen the two clamping catches (1) holding the cabinet top cover (2)<br />
down. Cut or drill two solid rivets (3) from each clamping catch (1) only if<br />
defective. Remove and discard clamping catches (1).<br />
Scrape decal (4) from underside of cabinet top cover (2) if damaged or<br />
illegible.<br />
Scrape off operating instruction plates (5 and 6) if damaged or illegible.
Hexagon plain nuts (7)<br />
Internal tooth lock<br />
washers (8)<br />
Machine screws (9)<br />
Hexagon plain nuts (10)<br />
Internal tooth lock<br />
washers (11)<br />
Machine screws (12)<br />
Plate (13)<br />
Remove five hexagon plain nuts (7), internal tooth lock washers (8), and<br />
machine screws (9).<br />
Remove three hexagon plain nuts (10), internal tooth lock washers (11),<br />
and machine screws (12). Remove plate (13).<br />
Nuts (14)<br />
Bolts (15)<br />
Shackles (16)<br />
2-149<br />
TM 3-42<strong>30</strong>-<strong>209</strong>-<strong>30</strong>&P
2-150 TM 3-42<strong>30</strong>-<strong>209</strong>-<strong>30</strong>&P<br />
2~3 LIQUID FUEL WATER HEATER AND CABINET TOP COVER (CONT).<br />
LOCATION/lTEM ACTION REMARKS<br />
DISASSEMBLY (CONT)<br />
Liquid Fuel Water Heater and<br />
Cabinet Top Cover/<br />
Solid rivets (17)<br />
Remove or drill out four solid rivets (17) securing water heater<br />
Water heater identification identification plate (18).<br />
plate (18)<br />
Solid rivets (19)<br />
Cut or drill out two solid rivets (19) from two lower sections of clamping<br />
Clamping catch (20) catch (20).<br />
Machine screw (21)<br />
Internal tooth lock<br />
washer (22)<br />
Hexagon plain nuts (23)<br />
Internal tooth lock<br />
washers (24)<br />
Machine screws (25)<br />
Internal tooth lock<br />
washers (26)<br />
Cover (27)<br />
Boiler unit (28)<br />
Remove one machine screw (21) and internal tooth lock washer (22),<br />
three hexagon plain nuts (23), internal tooth lock washers (24), three<br />
machine screws (25), internal tooth lock washers (26), and lift cover (27)<br />
from boiler unit (28).
Quick disconnect<br />
coupling (29)<br />
Pipe elbow (<strong>30</strong>)<br />
Hexagon plain nut (31)<br />
Internal tooth lock<br />
washer (32)<br />
Machine screw (33)<br />
Loop clamp (34)<br />
Hexagon plain nuts (35)<br />
Internal tooth lock<br />
washers (36)<br />
Machine screws (37)<br />
Rear access cover (38)<br />
Cabinet frame (39)<br />
Remove quick disconnect coupling (29) and pipe elbow (<strong>30</strong>) as a unit from<br />
the boiler unit (28).<br />
Remove one hexagon plain nut (31), internal tooth lock washer (32), and<br />
machine screw (33). Slip loop clamp (34) from the bundle of wires running<br />
above the boiler unit (28).<br />
Remove eight hexagon plain nuts (35), internal tooth lock washers (36),<br />
and machine screws (37). Lift rear access cover (38) straight up and out<br />
of the cabinet frame (39).<br />
2-151 TM 3-42<strong>30</strong>-<strong>209</strong>-<strong>30</strong>&P
2-152 TM 3-42<strong>30</strong>-<strong>209</strong>-<strong>30</strong>&P<br />
2-33. LIQUID FUEL WATER HEATER AND CABINET TOP COVER (CONT).<br />
LOCATION/lTEM ACTION REMARKS<br />
DISASSEMBLY (CONT)<br />
Liquid Fuel Water Heater and<br />
Cabinet Top Cover/<br />
Machine screws (40)<br />
Internal tooth lock<br />
washers (41)<br />
Hexagon plain nuts (42)<br />
Internal tooth lock<br />
washers (43)<br />
Access cover (44)<br />
Nonmetallic grommet (45)<br />
Remove three machine screws (40),<br />
internal tooth lock washers (41), three<br />
hexagon plain nuts (42), and internal<br />
tooth lock washers (43) from studs<br />
located on boiler unit (28).<br />
Lift the wire bundle up away from<br />
access cover (44) and make sure nonmetallic<br />
grommet (45) comes out of the<br />
U-slot of access cover. Carefully guide<br />
access cover (44) out from front of the<br />
boiler unit (28).<br />
Slip nonmetallic grommet (45) from wire<br />
bundle and capillary tubes carefully.<br />
Hexagon plain nuts (46)<br />
Internal tooth lock<br />
washers (47)<br />
Machine screws (48)<br />
Access cover (49)<br />
Electrical box<br />
connector (50)<br />
Electrical tiedown<br />
straps (51)<br />
Remove four hexagon plain nuts (46),<br />
internal tooth lock washers (47), and<br />
machine screws (48).<br />
Lift access cover (49) out of the cabinet<br />
frame. Remove electrical box<br />
connector (50) only if damaged. Cut and<br />
discard all electrical tiedown straps (51)<br />
on wire bundle over boiler unit (28).
Machine screw (52)<br />
Internal tooth lock<br />
washer (53)<br />
Loop clamp (54)<br />
Control box (55)<br />
Remove one machine screw (52), internal troth lock washer (53), and<br />
loop clamp (54) securing wire bundle to top inboard corner of the control<br />
box (55). Carefully slip loop clamp (54) from wire bundle and capillary<br />
tubes. Repeat for lower loop clamp holding wires running downward from<br />
control box.<br />
Electrical splice (56)<br />
Cut two electrical splices (56) for the electrical wires to thermostatic<br />
Thermostatic switch (57) switch (57). Remove thermostatic switch (57).<br />
2-153 TM 3-42<strong>30</strong>-<strong>209</strong>-<strong>30</strong>&P
2-154 TM 3-42<strong>30</strong>-<strong>209</strong>-<strong>30</strong>&P<br />
2-33. LIQUID FUEL WATER HEATER AND CABINET TOP COVER (CONT).<br />
LOCATION/lTEM ACTION REMARKS<br />
DISASSEMBLY (CONT)<br />
Liquid Fuel Water Heater and<br />
Cabinet Top Cover/<br />
Quick disconnect coupling Remove quick disconnect coupling half (58) and nonmetallic<br />
half (58) grommet (59).<br />
Nonmetallic grommet (59)<br />
Electrical wiring (60)<br />
Disconnect electrical wiring (60) throughout equipment according to electrical<br />
schematic and table of connections. Disconnect only those connections<br />
necessary for part removal.<br />
NOTE<br />
All electrical leads in this equipment will be fabricated in<br />
paragraph 2-43.
Hexagon plain nuts (61) Remove five hexagon plain nuts (61), internal tooth lock washers (62), The control box does not have to be removed for<br />
Internal tooth lock and machine screws (63), while supporting control box (64). Remove repair. Therefore, items 61 thru 64 need not be<br />
washers (62) control box (64). removed. The control box is shown removed for<br />
Machine screws (63)<br />
clarity.<br />
Control box (64)<br />
2-155<br />
TM 3-42<strong>30</strong>-<strong>209</strong>-<strong>30</strong>&P
2-156 TM 3-42<strong>30</strong>-<strong>209</strong>-<strong>30</strong>&P<br />
2-33. LIQUID FUEL WATER HEATER AND CABINET TOP COVER (CONT).<br />
LOCATION/lTEM ACTION REMARKS
2-157 TM 3-42<strong>30</strong>-<strong>209</strong>-<strong>30</strong>&P
2-158 TM 3-42<strong>30</strong>-<strong>209</strong>-<strong>30</strong>&P<br />
2-33. LIQUID FUEL WATER HEATER AND CABINET TOP COVER (CONT).<br />
LOCATION/lTEM ACTION REMARKS<br />
DISASSEMBLY (CONT)<br />
Liquid Fuel Water Heater and<br />
Cabinet Top Cover/<br />
Hexagon plain nuts (65) Remove 12 plain nuts (65), internal tooth lock washers (66), and machine<br />
Internal tooth lock bolts (67).<br />
washers (66)<br />
Machine bolts (67)<br />
Using at least two soldiers, carefully lift cabinet frame (68) from the skid<br />
Cabinet frame (68) assembly (69) and around boiler assembly (70).<br />
Skid assembly (69)<br />
Boiler assembly (70)
WARNING<br />
During lifting operations of the boiler assembly (70), keep in<br />
mind that the refractory box assembly end may have refractory<br />
castable mix installed. This adds greatly to the weight<br />
at a rate of approximately 55 pounds per cubic foot. Make<br />
allowances for the center of gravity.<br />
Hexagon head cap<br />
screws (71)<br />
Internal tooth lock<br />
washers (72)<br />
Remove eight hexagon head cap screws (71) and internal tooth lock<br />
washers (72). Use a suitable lifting device to lift boiler assembly (70) from<br />
skid assembly (69).<br />
Liquid Fuel Water Heater and<br />
Cabinet Top Cover/<br />
Repair by replacing authorized unserviceable<br />
2-159 TM 3-42<strong>30</strong>-<strong>209</strong>-<strong>30</strong>&P
2-160 TM 3-42<strong>30</strong>-<strong>209</strong>-<strong>30</strong>&P<br />
2-33. LIQUID FUEL WATER HEATER AND CABINET TOP COVER (CONT).<br />
LOCATION/lTEM ACTION REMARKS<br />
Liquid Fuel Water Heater and<br />
Cabinet Top Cover/<br />
Boiler assembly (1)<br />
Skid assembly (2)<br />
Internal tooth lock<br />
washers (3)<br />
Hexagon head cap<br />
screws (4)<br />
WARNING<br />
During lifting operations of the boiler assembly (1), keep in<br />
mind that the refractory box assembly end may have refractory<br />
castable mix installed. This adds greatly to the weight<br />
at a rate of approximately 55 pounds per cubic foot. Make<br />
allowances for the center of gravity.<br />
Use a suitable lifting device to lift boiler assembly (1) onto skid<br />
assembly (2), and aline the eight mounting holes. Secure boiler<br />
assembly (1) with eight internal tooth Iock washers (3) and hexagon head<br />
cap screws (4).
Cabinet frame (5)<br />
Use at least two soldiers to lift cabinet frame (5) up and over the boiler<br />
assembly (1) and position it onto the skid assembly (2). Aline the 12<br />
mounting holes in the cabinet frame (5) and skid assembly (2).<br />
Machine bolts (6)<br />
Install 12 machine bolts (6) through cabinet frame (5) and skid assembly,<br />
Internal tooth lock<br />
and secure underneath with 12 internal tooth lock washers (7) and<br />
washers (7) hexagon plain nuts (8).<br />
Hexagon plain nuts (8)<br />
2-161 TM 3-42<strong>30</strong>-<strong>209</strong>-<strong>30</strong>&P
2-162 TM 3-42<strong>30</strong>-<strong>209</strong>-<strong>30</strong>&P<br />
2-33. LIQUID FUEL WATER HEATER AND CABINET TOP COVER (CONT).<br />
LOCATION/lTEM ACTION REMARKS<br />
REASSEMBLY (CONT)<br />
Liquid Fuel Water Heater and<br />
Cabinet Top Cover/<br />
Control box (9)<br />
Machine screws (10)<br />
Internal tooth lock<br />
washers (11)<br />
Hexagon plain nuts (12)<br />
Electrical wiring (13)<br />
Position control box (9) into cabinet frame (5) and aline the mounting<br />
holes. Install five machine screws (10) through the cabinet frame (5) and<br />
control box (9); secure with five internal tooth lock washers (11) and<br />
hexagon plain nuts (12).<br />
Connect all electrical wiring (13) in the I<br />
dance with wiring schematic and table<br />
2-156 and 2-157).
Pipe elbow (14)<br />
Nonmetallic grommet (15)<br />
Quick disconnect coupling<br />
half (16)<br />
Wrap antiseizing tape around external<br />
threads of the pipe elbow (14) located at<br />
the bottom of the boiler assembly (1).<br />
Insert nonmetallic grommet (15) into<br />
hole in the skid assembly (2). Screw<br />
quick disconnect coupling half (16) onto<br />
pipe elbow (14) and tighten.<br />
Thermostatic switch (17)<br />
Electrical splice (18)<br />
Wrap antiseizing tape around the external threads of thermostatic<br />
switch (17) before installing into top of boiler assembly (1).<br />
Install thermostatic switch (17) into top of boiler assembly (1) and tighten.<br />
Cut and strip electrical wire from thermostatic switch (17). Connect wires<br />
to the electrical wiring with two electrical splices (18). (See pages 2-154<br />
and 2-155.)<br />
2-163 TM 3-42<strong>30</strong>-<strong>209</strong>-<strong>30</strong>&P
2-164 TM 3-42<strong>30</strong>-<strong>209</strong>-<strong>30</strong>&P<br />
2-33. LIQUID FUEL WATER HEATER AND CABINET TOP COVER (CONT).<br />
LOCATION/lTEM ACTION REMARKS<br />
REASSEMBLY (CONT)<br />
Liquid Fuel Water Heater and<br />
Cabinet Top Cover/<br />
Loop clamp (19)<br />
Internal tooth lock<br />
washer (20)<br />
Machine screw (21)<br />
CAUTION<br />
Do not bend or kink capillary tubes. Bends shall have a<br />
radius of 6 inches to prevent kinks. Any damage requires<br />
replacement.<br />
Slide loop clamp (19) around capillary tubes and electrical wires. Position<br />
loop clamp (19) so it alines with screw hole in the upper inboard part of<br />
the control box (9). Install internal tooth lock washer (20) and machine<br />
screw (21). Repeat for lower loop clamp holding wires running downward<br />
from control box (9).<br />
Electrical tiedown strap (22)<br />
Starting at the control box end of the wire bundle, install electrical tiedown<br />
straps (22) along entire length of electrical wires and capillary tube about<br />
four inches apart. Do not pull the electrical tiedown straps so tight that<br />
they smash the capillary tubes.<br />
Access cover (23)<br />
Position access cover (23) onto front of the boiler assembly (1) and<br />
Internal tooth lock<br />
secure with three internal tooth lock washers (24) and hexagon plain<br />
washers (24) nuts (25).<br />
Hexagon plain nuts (25)<br />
Nonmetallic grommet (26)<br />
Slide nonmetallic grommet (26) around electrical wires and capillary tubes<br />
and slide nonmetallic grommet into the notched area of access cover (23).
Access cover (27)<br />
Insert access cover (27) into the cabinet frame (5) and line up the four<br />
Machine screws (28)<br />
holes in each end with holes in the cabinet frame (5). Install four machine<br />
Internal tooth lock screws (28), internal tooth lock washers (29), and hexagon plain nuts (<strong>30</strong>).<br />
washers (29)<br />
Hexagon plain nuts (<strong>30</strong>)<br />
Internal tooth lock<br />
Position access cover (23) to lineup the three holes with holes in access<br />
washers (31)<br />
cover (27). Secure with three internal tooth lock washers (31) and<br />
Machine screws (32) machine screws (32).<br />
Electrical box<br />
connector (33)<br />
Screw electrical<br />
removed.<br />
box connector (33) into access cover (27), if previously<br />
2-165<br />
TM 3-42<strong>30</strong>-<strong>209</strong>-<strong>30</strong>&P
2-166 TM 3-42<strong>30</strong>-<strong>209</strong>-<strong>30</strong>&P<br />
2-33. LIQUID FUEL WATER HEATER AND CABINET TOP COVER (CONT).<br />
LOCATION/lTEM ACTION REMARKS<br />
REASSEMBLY (CONT)<br />
Liquid Fuel Water Heater and<br />
Cabinet Top Cover/<br />
Rear access cover (34)<br />
Machine screws (35)<br />
Internal tooth lock<br />
washers (36)<br />
Hexagon plain nuts (37)<br />
Loop clamp (38)<br />
Machine screw (39)<br />
Internal tooth lock<br />
washer (40)<br />
Hexagon plain nut (41)<br />
Quick disconnect<br />
coupling (42)<br />
Pipe elbow (43)<br />
Insert rear access cover (34) into cabinet frame (5). Position rear access<br />
cover (34) to aline the eight end holes. Install eight machine screws (35)<br />
and secure with eight internal tooth lock washers (36) and hexagon plain<br />
nuts (37).<br />
Coil excess length of capillary tube into a coil no less than six inches in<br />
diameter. Slide loop clamp (38) around the coiled capillary tube and make<br />
sure capillary will not be pinched in the loop clamp (38). Secure with<br />
machine screw (39), internal tooth lock washer (40), and hexagon plain<br />
nut (41).<br />
Wrap the male threads on the pipe coming from the boiler assembly (1)<br />
and quick disconnect coupling (42) with antiseizing tape.<br />
Screw quick disconnect coupling (42) into pipe elbow (43). Screw onto<br />
pipe of boiler assembly (1) as a unit.
Cover (44)<br />
Internal tooth lock<br />
washers (45)<br />
Hexagon plain nuts (46)<br />
Internal tooth lock<br />
washers (47)<br />
Machine screws (48)<br />
Internal tooth lock<br />
washer (49)<br />
Machine screw (50)<br />
Install cover (44) onto the boiler assembly (1). Secure with three internal<br />
tooth lock washers (45) and hexagon plain nuts (46) on the boiler unit<br />
studs.<br />
Install three internal tooth lock washers (47) and machine screws (48).<br />
Install one internal tooth lock washer (49) and machine screw (50).<br />
Clamping catch (51)<br />
Solid rivets (52)<br />
Identification plate (53)<br />
Solid rivets (54)<br />
Position clamping catch (51 ) onto cabinet frame (5) upper edge, aline<br />
holes. Install two solid rivets (52) to secure. Repeat for clamp catch on<br />
other end of unit.<br />
Install identification plate (53), aline holes, and secure with four solid<br />
rivets (54).<br />
2-167 TM 3-42<strong>30</strong>-<strong>209</strong>-<strong>30</strong>&P
2-168<br />
TM 3-42<strong>30</strong>-<strong>209</strong>-<strong>30</strong>&P<br />
2-33. LIQUID FUEL WATER HEATER AND CABINET TOP COVER (CONT).<br />
LOCATION/lTEM<br />
ACTION<br />
REMARKS<br />
REASSEMBLY (CONT)<br />
Liquid Fuel Water Heater and<br />
Cabinet Top Cover/<br />
Shackle (55)<br />
Bolt (56)<br />
Nut (57)<br />
Plate (58)<br />
Machine screws (59)<br />
Internal tooth lock<br />
washers (60)<br />
Hexagon plain nuts (61)<br />
Machine screws (62)<br />
internal tooth lock<br />
washers (63)<br />
Hexagon plain nuts (64)<br />
Decal (65)<br />
Cabinet top cover (66)<br />
Clamping catches (67)<br />
Solid rivets (68)<br />
Slide shackle (55) into place and aline holes. Install bolt (56) and nut (57).<br />
Tack weld nut (57) and bolt (56).<br />
Position plate (58) onto cabinet frame (5) and aline holes. Install three<br />
machine screws (59) through plate (58), cabinet frame (5), and top edge<br />
of control box (9). Secure with three internal tooth lock washers (60) and<br />
hexagon plain nuts (61).<br />
Install five machine screws (62) across top and sides of plate (58). Secure<br />
with five internal tooth lock washers (63) and hexagon plain nuts (64).<br />
Apply new decal (65) to inside surface of cabinet top cover (66).<br />
Position new clamping catches (67) over edge of cabinet top cover (66).<br />
Install two solid rivets (68) through clamping catch and cabinet top cover<br />
and secure.<br />
Close cabinet top cover (66) and latch both clamping catches (67) to<br />
make sure they match.<br />
Screws (59), washers (60), and nuts (61 ) may already<br />
be installed when control box was installed. If so, they<br />
will be removed and reinstalled correctly.<br />
If new cabinet top cover is used, lineup upper and<br />
lower clamping catches to drill holes.
2-34. END PANEL.<br />
This task covers:<br />
a. Disassembly c. Reassembly<br />
b. Repair<br />
INITIAL SETUP<br />
Tools and Special Tools<br />
References<br />
Automotive Maintenance and Repair Field Maintenance TM 43-0139<br />
Shop Equipment, Basic, Less Power (SC 4910-95-CL-A31 )<br />
Camloc fastener pliers (4P3)<br />
Equipment Condition<br />
Camloc fastener tool (T26)<br />
End panel is removed from the water heater.<br />
Materials/Parts<br />
Polyurethane coating (item 29, app C)<br />
Pressure sensitive tape (item 41, app C)<br />
Primer coating (item <strong>30</strong>, app C)<br />
2-169 TM 3-42<strong>30</strong>-<strong>209</strong>-<strong>30</strong>&P
2-170 TM 3-42<strong>30</strong>-<strong>209</strong>-<strong>30</strong>&P<br />
2-34. END PANEL.<br />
LOCATION/lTEM ACTION REMARKS<br />
End Panel/<br />
Retaining ring (1)<br />
Turnlock fastener stud<br />
assemblies (2)<br />
Turnlock fastener<br />
eyelets (3)<br />
Pressure sensitive tape (4)<br />
Remove retaining rings (1), turnlock fastener stud assemblies (2), and<br />
turnlock fastener eyelets (3), as necessary.<br />
Scrape off and discard old pressure sensitive tape (4) from end panel.<br />
End Panel/<br />
Replace authorized unserviceable parts<br />
Repair actions include sheet metal straightening, smoothing and grinding,<br />
applying a primer coating, and applying a final protective coat of<br />
polyurethane coating. See TM 43-0139.<br />
Cut five strips of pressure sensitive tape (4), each 28.25 inches long, from<br />
bulk pressure sensitive tape.<br />
REASSEMBLY<br />
End Panel/<br />
Retaining ring (1)<br />
Turnlock fastener stud<br />
assemblies (2)<br />
Turnlock fastener<br />
eyelets (3)<br />
Pressure sensitive tape (4)<br />
Using camloc fastener tool and camloc fastener pliers, install turnlock<br />
fastener eyelets (3), turnlock fastener stud assemblies (2), and retaining<br />
rings (1), as necessary.<br />
Apply pressure sensitive tape (4) to inside of the end panel
2-35. FRONT PANEL.<br />
This task covers:<br />
a. Disassembly c. Reassembly<br />
b. Repair<br />
INITIAL SETUP<br />
Tools and Special Tools<br />
Automotive Maintenance and Repair Field Maintenance<br />
Shop Equipment, Basic, Less Power (SC 4910-95-CL-A31)<br />
Camloc fastener pliers (4P3)<br />
Camloc fastener tool (T26)<br />
References<br />
TM 43-0139<br />
Equipment Condition<br />
Front panel is removed from the water heater<br />
Materials/Parts<br />
Polyurethane coating (item 29, app C)<br />
Primer coating (item <strong>30</strong>, app C)<br />
LOCATION/lTEM ACTION REMARKS<br />
Front Panel/<br />
Retaining ring (1)<br />
Turnlock fastener stud<br />
assemblies (2)<br />
Turnlock fastener<br />
eyelets (3)<br />
Using proper tools, remove retaining rings (1), turnlock fastener stud<br />
assemblies (2), and turnlock fastener eyelets (3), as necessary.<br />
Front Panel/<br />
Replace authorized unserviceable parts.<br />
Repair actions include sheet metal straightening, smoothing and grinding,<br />
applying a primer coating, and applying a final protective coat of<br />
polyurethane coating. See TM 43-0139.<br />
2-171 TM 3-42<strong>30</strong>-<strong>209</strong>-<strong>30</strong>&P
2-172<br />
TM 3-42<strong>30</strong>-<strong>209</strong>-<strong>30</strong>&P<br />
2-35. FRONT PANEL (CONT).<br />
LOCATION/lTEM<br />
ACTION<br />
REMARKS<br />
Front Panel/<br />
Retaining ring (1)<br />
Turnlock fastener stud<br />
assemblies (2)<br />
Turnlock fastener<br />
eyelets (3)<br />
Using camloc fastener tool and camloc fastener pliers, install turnlock<br />
fastener eyelets (3), turnlock fastener stud assemblies (2), and retaining<br />
rings (1), as necessary.<br />
2-36. SIDE PANEL.<br />
This task covers:<br />
a. Disassembly<br />
b. Repair<br />
c. Reassembly<br />
INITIAL SETUP<br />
Tools and Special Tools<br />
Automotive Maintenance and Repair Field Maintenance<br />
Shop Equipment, Basic, Less Power (SC 4910-95-CL-A31)<br />
Camloc fastener pliers (4P3)<br />
Camloc fastener tool (T26)<br />
Materials/Parts<br />
Polyurethane coating (item 29, app C)<br />
Pressure sensitive tape (item 41, app C)<br />
Primer coating (item <strong>30</strong>, app C)<br />
References<br />
TM 43-0139<br />
Equipment Condition<br />
Side panel is removed from the water heater.
Side Panel/<br />
Retaining rings (1)<br />
Turnlock fastener stud<br />
assemblies (2)<br />
Turnlock fastener<br />
eyelets (3)<br />
Pressure sensitive tape (4)<br />
Using proper tools, remove retaining rings (1), turnlock fastener stud<br />
assemblies (2), and turnlock fastener eyelets (3), as necessary.<br />
Scrape off and discard old pressure sensitive tape (4) from side panel.<br />
Side Panel/<br />
Replace authorized unserviceable parts.<br />
Repair actions include sheet metal straightening, smoothing and grinding,<br />
applying a primer coating, and applying a final protective coat of<br />
polyurethane coating. See TM 43-0139.<br />
Cut six strips of pressure sensitive tape (4), each 21 inches long, from<br />
bulk pressure sensitive tape.<br />
Side Panel/<br />
Retaining ring (1)<br />
Turnlock fastener stud<br />
assemblies (2)<br />
Turnlock fastener<br />
eyelets (3)<br />
Pressure sensitive tape (4)<br />
Using camloc fastener tool and camloc fastener pliers, install turnlock<br />
fastener eyelets (1), turnlock fastener stud assemblies (2), and retaining<br />
rings (1), as necessary.<br />
Apply pressure sensitive tape (4) to inside of side panel.<br />
2-173 TM 3-42<strong>30</strong>-<strong>209</strong>-<strong>30</strong>&P
2-174 TM 3-42<strong>30</strong>-<strong>209</strong>-<strong>30</strong>&P<br />
2-37. CONTROL BOX ASSEMBLY.<br />
This task covers:<br />
a. Disassembly c. Repair<br />
b. Testing d. Reassembly<br />
INITIAL SETUP<br />
Tools and Special Tools<br />
Automotive Maintenance and Repair Field Maintenance<br />
Shop Equipment, Basic, Less Power (SC 4910-95-CL-A31)<br />
Materials/Parts<br />
Adhesive (item 1, app C)<br />
Polyurethane coating (item 29, app C)<br />
Pressure sensitive tape (item 41, app C)<br />
Primer coating (item <strong>30</strong>, app C)<br />
Tube (fig D-33)<br />
Thermal insulation blanket (fig D-35)<br />
References<br />
TM 43-0139<br />
TB 43-180<br />
Equipment Condition<br />
Unit maintenance authorized components removed in TM 3-42<strong>30</strong>-<strong>209</strong>-20&P.<br />
LOCATION/lTEM ACTION REMARKS<br />
DISASSEMBLY<br />
Control Box Assembly/<br />
Hexagon plain nut (1)<br />
Internal tooth lock<br />
washer (2)<br />
Machine screw (3)<br />
Angle bracket (4)<br />
Unscrew and remove two hexagon plain nuts (1), two internal tooth lock<br />
washers (2), and two machine screws (3). Remove angle bracket (4).
2-175 TM 3-42<strong>30</strong>-<strong>209</strong>-<strong>30</strong>&P
2-176 TM 3-42<strong>30</strong>-<strong>209</strong>-<strong>30</strong>&P<br />
2-37. CONTROL BOX ASSEMBLY (CONT).<br />
LOCATION/lTEM ACTION REMARKS<br />
DISASSEMBLY (CONT)<br />
Control Box Assembly/<br />
Switch identification<br />
plate (5)<br />
Thermal delay relay<br />
identification plate (6)<br />
Relay identification plate (7)<br />
Hexagon plain nut (8)<br />
Internal tooth lock<br />
washer (9)<br />
Machine screw (10)<br />
support (11)<br />
Scrape off and discard switch identification plate (5), thermal delay relay<br />
identification plate (6), and relay identification plate (7) only if damaged.<br />
Remove four hexagon plain nuts (8), internal tooth lock washers (9), and<br />
machine screws (10). Remove support (11).<br />
Remove wiring from support (11). Wires will<br />
2-43.<br />
be
Heater control instruction<br />
plate (12)<br />
Temperature selector<br />
instruction plate (13)<br />
Decal (14)<br />
Gage identification<br />
plate (15)<br />
Control box (16)<br />
Scrape heater control instruction plate (12), temperature selector instruction<br />
plate (13), decal (14), gage identification plate (15) from control box<br />
(16) only if damaged.<br />
2-177<br />
TM 3-42<strong>30</strong>-<strong>209</strong>-<strong>30</strong>&P
2-178<br />
TM 3-42<strong>30</strong>-<strong>209</strong>-<strong>30</strong>&P<br />
2-37. CONTROL BOX ASSEMBLY (CONT).<br />
LOCATION/lTEM ACTION REMARKS<br />
Control Box Assembly/<br />
Water pressure gage<br />
Fuel pressure gage<br />
Indicating thermometer<br />
Refer to TB 43-180 for gage and thermometer testing procedures.<br />
Control Box Assembly/<br />
Control box (1) Repair actions for control box (1)<br />
include sheet metal straightening,<br />
smoothing, grinding, applying a primer<br />
coating and a final protective coat of<br />
polyurethane coating. See TM 43-0139.<br />
If damaged, fabricate new thermal insu-<br />
Iation blanket (2) according to<br />
figure D-35.<br />
Thermal insulation<br />
blanket (2)<br />
Identification plates, decals,<br />
and instruction plates<br />
Rebond loose identification plates,<br />
decals, and instruction plates with adhesive.
Control Box Assembly/<br />
Gage identification plate (1) If removed, install new gage identification plate (1), decal (2), temperature<br />
Decal (2)<br />
selector instruction plate (3), and heater control instruction plate (4) onto<br />
Temperature selector front of control box (5).<br />
instruction plate (3)<br />
Heater control instruction<br />
plate (4)<br />
Control box (5)<br />
Support (6)<br />
2-179 TM 3-42<strong>30</strong>-<strong>209</strong>-<strong>30</strong>&P
2-180 TM 3-42<strong>30</strong>-<strong>209</strong>-<strong>30</strong>&P<br />
2-37. CONTROL BOX ASSEMBLY (CONT).<br />
LOCATION/lTEM ACTION REMARKS<br />
Control Box Assembly/<br />
Machine screw (7)<br />
Position support (6) into control box (5) and aline the four holes. Insert<br />
Internal tooth lock four machine screws (7) up from the bottom through the control box (5)<br />
washer (8)<br />
and support (6). Secure with four internal tooth lock washers (8) and<br />
Hexagon plain nut (9) hexagon plain nuts (9).<br />
Thermal delay relay<br />
identification plate<br />
Switch identification<br />
plate (11)<br />
Relay identification<br />
plate (12)<br />
(10)<br />
Install new thermal delay relay identification plate (10), switch<br />
identification plate (11), and relay identification plate (12) if removed.
Angle bracket (13)<br />
Machine screw (14)<br />
Internal tooth lock<br />
washer (15)<br />
Hexagon plain nut (16)<br />
Position angle bracket (13) onto control box (5) and aline the holes. Install<br />
two machine screws (14) and secure with internal tooth lock washer (15)<br />
and hexagon plain nut (16).<br />
2-181 TM 3-42<strong>30</strong>-<strong>209</strong>-<strong>30</strong>&P
2-182 TM 3-42<strong>30</strong>-<strong>209</strong>-<strong>30</strong>&P<br />
2-38. SELECTOR VALVE LINE.<br />
This task covers repair<br />
INITIAL SETUP<br />
Tools and Special Tools<br />
Automotive Maintenance and Repair Field Maintenance<br />
Shop Equipment, Basic, Less Power (SC 4910-95-CL-A31)<br />
Materials/Parts<br />
Tube (fig D-33)<br />
Equipment Condition<br />
Selector valve line removed from heater unit<br />
LOCATION/lTEM ACTION REMARKS<br />
Selector Valve Line/<br />
Fabricate new selector valve line in accordance with figure D-33.<br />
2-39. WATER PRESSURE LINE.<br />
This task covers repair.<br />
INITIAL SETUP<br />
Tools and Special Tools<br />
Automotive Maintenance and Repair Field Maintenance<br />
Shop Equipment, Basic, Less Power (SC 4910-95-CL-A31)<br />
Materials/Parts<br />
Water pressure line (fig D-31)<br />
Equipment Condition<br />
Water pressure line removed from heater unit.<br />
LOCATION/lTEM ACTION REMARKS<br />
Water Pressure Line/<br />
Fabricate new water pressure line in accordance with figure D-31.
2-40. SELECTOR RETURN LINE.<br />
This task covers repair.<br />
INITIAL SETUP<br />
Tools and Special Tools<br />
Automotive Maintenance and Repair Field Maintenance<br />
Shop Equipment, Basic, Less Power (SC 4910-95-CL-A31)<br />
Materials/Parts<br />
Selector return line (fig D-<strong>30</strong>)<br />
Equipment Condition<br />
Selector return line removed from heater unit.<br />
LOCATION/lTEM ACTION REMARKS<br />
Selector Return Line/<br />
Fabricate new selector return line in accordance with figure D-<strong>30</strong>.<br />
2-41. FUEL PRESSURE LINE.<br />
This task covers repair.<br />
INITIAL SETUP<br />
Tools and Special Tools<br />
Automotive Maintenance and Repair Field Maintenance<br />
Shop Equipment, Basic, Less Power (SC 4910-95-CL-A31)<br />
Materials/Parts<br />
Fuel pressure line (fig D-29)<br />
Equipment Condition<br />
Fuel pressure line removed from heater unit.<br />
LOCATION/lTEM ACTION REMARKS<br />
Fuel Pressure Line/<br />
Fabricate new fuel pressure line in accordance with figure D-29.<br />
2-183 TM 3-42<strong>30</strong>-<strong>209</strong>-<strong>30</strong>&P
2-184 TM 3-42<strong>30</strong>-<strong>209</strong>-<strong>30</strong>&P<br />
2-42. POWER CABLE ASSEMBLY.<br />
This task covers:<br />
a. Disassembly<br />
b. Repair<br />
c. Reassembly<br />
INITIAL SETUP<br />
Tools and Special Tools<br />
Automotive Maintenance and Repair Field Maintenance<br />
Shop Equipment, Basic, Less Power (SC 4910-95-CL-A31)<br />
Equipment Condition<br />
Power cable is removed from the water heater.<br />
Materials/Parts<br />
Silicone compound (item 33, app C)<br />
Power cable (fig D-34)<br />
LOCATION/lTEM ACTION REMARKS<br />
Power Cable Assembly/<br />
Screw (1)<br />
Strap (2)<br />
Electrical cable clamp (3)<br />
Power cable (4)<br />
Screws (5)<br />
Electrical plug connector (6)<br />
Unscrew and remove the two screws (1) and strap (2) located on the back<br />
of electrical cable clamp (3). Unscrew electrical cable clamp (3) and slide it<br />
back on power cable (4).<br />
Unscrew and remove the two screws (5) in electrical plug connector (6).<br />
Separate, the two halves.<br />
Using proper tools, cut and scrape off the silicone compound encasing<br />
the wires. Unsolder the wires and remove power cable (4).<br />
Lug terminals (7)<br />
Cut two lug terminals (7) off the other end of power cable (4).
Lug terminals (2)<br />
Electrical wire (3)<br />
Connector pin (4)<br />
Strip approximately 3/8 inch of the rubber coating off the black and white<br />
wires, and insert the wires through two lug terminals (2). Using the proper<br />
tools, crimp two lug terminals (2) onto the two wires.<br />
Using soldering equipment, unsolder the electrical wire (3) from the connector<br />
pin (4) and remove any broken wire strands.<br />
Strip one inch of the rubber coating off the black wire and bend 1/2 inch of<br />
the wire back against itself. Insert the folded black wire into the connector<br />
pin (4) and solder.<br />
The white wire is held against the inner metal strip and<br />
the outer metal elbow section of the electrical plug<br />
connector when assembled.<br />
2-185 TM 3-42<strong>30</strong>-<strong>209</strong>-<strong>30</strong>&P
2-186 TM 3-42<strong>30</strong>-<strong>209</strong>-<strong>30</strong>&P<br />
2-42. POWER CABLE ASSEMBLY (CONT).<br />
LOCATION/lTEM ACTION REMARKS<br />
Power Cable Assembly/<br />
Power cable (1)<br />
Electrical cable clamp (2)<br />
Strip power cable (1) to the proper length as shown in the illustrations.<br />
With the screws and strap removed from electrical cable clamp (2), slide it<br />
back on power cable (1) with the screw holes facing the long part of<br />
power cable (1). Fold the bared end of the black wire back against itself.<br />
Insert the folded black wire into the contact of electrical plug<br />
connector (3), solder the connection, and let it cool.<br />
Electrical plug connector (3)<br />
Screws (4)<br />
Carefully bend power cable (1) 90 degrees and lay it in one half of electrical<br />
plug connector (3) rear section. Aline the keyway with power cable (1)<br />
Position the white wire (bared part) against the upper part of electrical<br />
plug connector (3). Then place the second half of electrical plug<br />
connector (3) rear section on top, insert two screws (4), and tighten.<br />
Screw electrical cable clamp (2) onto electrical plug connector (3) and<br />
tighten handtight.
Strap (5)<br />
Screw (6)<br />
Lug terminal (7)<br />
Hole (8)<br />
Position the strap (5) over the rear section of electrical cable clamp (2),<br />
insert two screws (6) through the strap and into electrical cable clamp (2)<br />
tapped holes, and tighten.<br />
Strip and cut the other end of electrical power cable (1) to the lengths<br />
shown in the illustration. Install two lug terminals (7) on power cable (1) so<br />
its bare wires just protrude through the lug terminal barrel. Using proper<br />
tools, crimp lug terminals (7) to power cable (1).<br />
Using a multimeter set at Xl, zero the meter and measure the resistance<br />
between lug terminal (7) on white wire and the outside of electrical plug<br />
connector (3). The multimeter should read nearly zero ohms. Check from<br />
lug terminal (7) on black wire to electrical plug connector (3) contact pin<br />
with the multimeter. The multimeter should read nearly zero ohms.<br />
Using a multimeter set to highest X setting, zero the meter and measure<br />
the resistance between the electrical plug connector (3) contact pin and<br />
the outer shell. The multimeter should read near infinite resistance.<br />
Using silicone compound, fill electrical plug connector (3) rear section<br />
through the small hole (8) on the side and let it dry.<br />
2-187 TM 3-42<strong>30</strong>-<strong>209</strong>-<strong>30</strong>&P
2-188 TM 3-42<strong>30</strong>-<strong>209</strong>-<strong>30</strong>&P<br />
2-43. ELECTRICAL WIRING.<br />
This task covers:<br />
a. Disassembly c. Reassembly<br />
b. Repair<br />
INITIAL SETUP<br />
Tools and Special Tools<br />
Automotive Maintenance and Repair Field Maintenance<br />
Shop Equipment, Basic, Less Power (SC 4910-95-CL-A31 )<br />
Equipment Condition<br />
Wiring is removed from the water heater.<br />
Materials/Parts<br />
Electrical leads (fig D-36 thru D-55)<br />
LOCATION/lTEM ACTION REMARKS<br />
Electrical Wiring/<br />
Electrical leads (1 thru 20)<br />
Lug terminals (21)<br />
Disassemble electrical leads (1 thru 20) listed in table on page 2-155 by<br />
cutting off any unserviceable lug terminals (21 ) except for electrical<br />
lead (18) which has an electrical plug connector.<br />
Screws (22)<br />
Disassemble electrical lead (18) using the following steps:<br />
Strap (23)<br />
Electrical connector Step 1. Unscrew and remove two screws (22) and a strap (23) located on<br />
cable clamp (24)<br />
Electrical conduit Step 2.<br />
electrical connector cable clamp (24).<br />
Unscrew and slide electrical connector cable clamp (24) and<br />
adapter (25)<br />
Electrical wire (26) Step 3.<br />
electrical conduit adapter (25) back on electrical wire (26).<br />
Unsolder electrical wire (26) from electrical plug connector (27)<br />
Electrical plug<br />
connector (27) Step 4.<br />
Step 5.<br />
contact pin.<br />
If required, slide electrical conduit adapter (25) and electrical<br />
connector cable clamp (24) off electrical wire (26).<br />
Cut off lug terminal (21) on the other end only if it is damaged.
Electrical Wiring/<br />
Electrical leads (1 thru 20)<br />
Electrical leads (1 thru 20) are assembled during the repair procedures for<br />
electrical wiring. Refer to the table on page 2-157 to find the applicable<br />
figure in appendix D for electrical wire fabrication.<br />
Splice connector (21) is also assembled during the repair procedures for<br />
electrical wiring.<br />
Electrical wires (1 thru 20)<br />
Fabricate new electrical wires (1 thru 20). See table on page 2-157. Refer<br />
to wiring schematic on page 2-156 for wire location.<br />
2-189<br />
TM 3-42<strong>30</strong>-<strong>209</strong>-<strong>30</strong>&P
2-190 TM 3-42<strong>30</strong>-<strong>209</strong>-<strong>30</strong>&P<br />
2-43. ELECTRICAL WIRING (CONT).<br />
LOCATION/lTEM ACTION REMARKS<br />
Electrical Wiring/<br />
Splice connector (21) Using splice connector (21) on the ends of electrical leads (6 and 12, The two electrical wires from the fuel solenoid valve<br />
Fuel pump solenoid shown on schematic on page 2-156), connect control box wiring to the are not components of the electrical wiring. They are<br />
valve (22) temperature limit switch (S1). furnished with the fuel pump solenoid valve.<br />
Terminal lug (23)<br />
Terminal lug (24)<br />
The fuel pump solenoid valve (22) wiring can be repaired by stripping<br />
approximately 3/8 inch insulation from the wire. Insert lug terminal (23) on<br />
the ground wire and lug terminal (24) on the input lead. Using the proper<br />
tools, crimp both lug terminals onto the ends of the electrical wire.
Electrical Wiring/<br />
Electrical leads (1 thru 20) The electrical leads (1 thru 20), electrical connector cable clamp (21),<br />
Electrical connector<br />
electrical wire (22), electrical conduit adapter (23), electrical plug connectable<br />
clamp (21)<br />
tor (24), lug terminal (25), and splice connector are repaired and reassem-<br />
Electrical wire (22)<br />
bled, as necessary, during the repair procedures for the electrical wiring.<br />
Electrical conduit<br />
adapter (23)<br />
Electrical plug<br />
connector (24)<br />
Lug terminal (25)<br />
2-44. FUEL HOSE ASSEMBLY AND FILLER OPENING CAP ASSEMBLY.<br />
This task covers:<br />
a. Disassembly c. Reassembly<br />
b. Repair<br />
INITITAL SETUP<br />
Tools and Special Tools<br />
Nonmetallic hose (fig D-56)<br />
Automotive Maintenance and Repair Field Maintenance Lubricant oil (item 24, app C)<br />
Shop Equipment, Basic, Less Power (SC 4910-95-CL-A31 )<br />
Equipment Condition<br />
Materials/Parts<br />
Fuel hose is removed from the water heater.<br />
Electrical insulation tape (item 40, app C)<br />
Gasket (fig D-1 5)<br />
2-191 TM 3-42<strong>30</strong>-<strong>209</strong>-<strong>30</strong>&P
2-192 TM 3-42<strong>30</strong>-<strong>209</strong>-<strong>30</strong>&P<br />
2-44. FUEL HOSE ASSEMBLY AND FILLER OPENING CAP ASSEMBLY (CONT).<br />
LOCATION/lTEM ACTION REMARKS<br />
Fuel Hose Assembly/<br />
Hose clamps (1) Remove two hose clamps (1) by driving a flat bladed tool between the The old style fuel hose assembly with an external solid<br />
Nonmetallic hose (2) buckle and the band, or by cutting off nonmetallic hose assembly (2) wire may be used until the external solid wire breaks.<br />
Rubber hose (3) directly behind hose clamp (1). At that time, the old pipe to hose straight adapter (8)<br />
Quick disconnect<br />
and rubber hose (3) will be discarded and replaced<br />
coupling half (4) Cut and remove the electrical tape holding nonmetallic hose (2) and rub- with a wire reinforced hose eliminating the need for a<br />
Pipe to hose straight ber hose (3) together. separate ground wire.<br />
adapter (5)<br />
Pipe to hose straight<br />
Unscrew and remove quick disconnect coupling half (4). Pull pipe to hose<br />
adapter (6)<br />
straight adapter (5) out of nonmetallic hose (2), then pull nonmetallic<br />
Plug assembly (7)<br />
hose (2) off pipe to hose straight adapter (6). Unscrew and remove pipe to<br />
Pipe to hose straight hose straight adapter (6) from plug assembly (7).<br />
adapter (8)<br />
Quick disconnect<br />
coupling half (9)<br />
Unscrew and remove pipe to hose straight adapter (8) from plug assembly<br />
(7) and remove with rubber hose (3) as an assembly. Unscrew and<br />
remove quick disconnect coupling half (9) from pipe to hose straight<br />
adapter (8).
Remove pipe to two hose straight adapters (8) from rubber hose (3) as<br />
follows:<br />
Pipe to hose straight adapter (8) is reusable if it is not<br />
damaged.<br />
Step 7. Position shell in vise as shown (right). Unscrew and remove male<br />
body (8).<br />
Step 2. Reposition shell in vise as shown (below). Turn rubber hose (3)<br />
clockwise to remove it from the shell.<br />
Step 3. Repeat steps 1 and 2 to remove pipe to hose straight adapter (8)<br />
from the other end of rubber hose (3). Discard damaged hose (3).<br />
Filler Opening Cap Assembly/<br />
Gasket (10)<br />
Remove gasket (10), preformed packing (11), two screws (12), lock<br />
Preformed packing (11) washers (13), and grounding strip (14).<br />
Screws (12)<br />
Lock washers (13)<br />
Unscrew drain cock (15) and pipe elbow (16). If damaged,<br />
Grounding strip (14)<br />
decal (17) from plug assembly (7).<br />
Drain cock (15)<br />
Pipe elbow (16)<br />
Decal (17)<br />
2-193<br />
TM 3-42<strong>30</strong>-<strong>209</strong>-<strong>30</strong>&P
2-194 TM 3-42<strong>30</strong>-<strong>209</strong>-<strong>30</strong>&P<br />
2-44. FUEL HOSE ASSEMBLY AND FILLER OPENING CAP (CONT).<br />
LOCATION/lTEM ACTION REMARKS<br />
Fuel Hose Assembly/<br />
Filler Opening Cap Assembly/<br />
Gasket<br />
Nonmetallic hose<br />
Replace authorized unserviceable parts.<br />
Fabricate new gasket according to figure D-15.<br />
Fabricate new nonmetallic hose according to figure D-56.<br />
Filler Opening Cap Assembly/<br />
Decal (1) -<br />
Pipe elbow (2)<br />
Drain cock (3)<br />
Plug assembly (4)<br />
Grounding strip (5)<br />
Lock washers (6)<br />
Screws (7)<br />
Preformed packing (8)<br />
Gasket (9)<br />
Fuel Hose Assembly/<br />
Rubber hose (10)<br />
Pipe to hose straight<br />
adapter (11)<br />
If removed, replace decal (1). install pipe elbow (2) and drain cock (3) into<br />
plug assembly (4). Position grounding strip (5) on plug assembly (4) and<br />
fasten with two lock washers (6) and screws (7). Install preformed packing<br />
(8) and gasket (9). Fabricate new gasket (9) according to figure D-15.<br />
Assemble both ends of a new rubber hose (10) using the foIlowing procedure.<br />
Step 7. Place rubber hose (1 O) in vise and use a fine tooth hacksaw to<br />
cut its ends square and to the desired length.<br />
Step 2. Using the notches on shell of pipe to hose straight adapter (11)<br />
as a length guide, cut through the cover down to wire braid all the<br />
way around rubber hose (10).<br />
Step 3. Slit the cover lengthwise from cut to end. Use screwdriver and<br />
pliers to remove outer rubber ply to expose the bare wire braid.
Step 4. Pick four strands of wire braid at 90° spacing around the hose.<br />
Bend the strands 1800 to lay on outer cover of hose.<br />
Step 5. Place shell of pipe to hose straight adapter (11) in vise and screw<br />
rubber hose (10) counterclockwise into the shell until it bottoms.<br />
Then back-off one quarter of a turn.<br />
Step 6. Freely lubricate the inside tube of rubber hose (10) and the female<br />
and male threads of pipe to hose straight adapter (11).<br />
2-195 TM 3-42<strong>30</strong>-<strong>209</strong>-<strong>30</strong>&P
2-196 TM 3-42<strong>30</strong>-<strong>209</strong>-<strong>30</strong>&P<br />
2-44. FUEL HOSE ASSEMBLY ANO FILLER OPENING CAP (CONT).<br />
LOCATION/lTEM ACTION REMARKS<br />
Fuel Hose Assembly/ Step 7<br />
Step 8<br />
Step 9<br />
Place male body of pipe to hose straight adapter (11) into vise.<br />
Push and turn shell and rubber hose (10) clockwise onto stem<br />
until large threads engage.<br />
Change to a vertical position in the vise and tighten male body<br />
into shell. Assemble another pipe to hose adapter (11) to other<br />
end to complete the assembly. The completed assembly should<br />
look like the illustration.<br />
Using a multimeter set to measure ohms, zero the meter. Touch<br />
the test leads to both ends of the assembled rubber hose and<br />
pipe to tube couplings. The multimeter should indicate near zero<br />
ohms.<br />
Step 70. Screw quick disconnect coupling half (12) on one end of com-<br />
pleted fuel return line (13) and tighten.<br />
Quick disconnect coupling<br />
half (12)<br />
Fuel return line (13)
Nonmetallic hose (14)<br />
Hose clamps (15)<br />
Pipe to hose straight<br />
adapter (16)<br />
Pipe to hose straight<br />
adapter (17)<br />
Quick disconnect coupling<br />
half (18)<br />
Fuel line (19)<br />
Slide one hose clamp 15) on each end of nonmetallic hose (14). Insert<br />
pipe to hose straight adapter (16) on one end and pipe to hose straight<br />
adapter (17) on the other end.<br />
See page 2-58 for procedures used to tighten hose clamps (15)<br />
Screw quick disconnect coupling half (18) on pipe to hose straight<br />
adapter (16).<br />
Screw end of fuel return line (13) into the top of plug assembly (4) and<br />
tighten.<br />
Screw end of fuel line (19) into pipe elbow (2) on plug assembly (4) and<br />
tighten.<br />
Using electrical insulation tape, tape fuel return line (13) and fuel line (19)<br />
together. Space tape eight equal spaces starting six inches from each<br />
end.<br />
2-197 TM 3-42<strong>30</strong>-<strong>209</strong>-<strong>30</strong>&P
2-198 TM 3-42<strong>30</strong>-<strong>209</strong>-<strong>30</strong>&P<br />
2-45. SKID ASSEMBLY.<br />
This task covers:<br />
a. Disassembly c. Reassembly<br />
b. Repair<br />
INITIAL SETUP<br />
Tools and Special Tools<br />
Automotive Maintenance and Repair Field Maintenance<br />
Shop Equipment, Basic, Less Power (SC 4910-95-CL-A31)<br />
Equipment Condition<br />
Unit maintenance authorized components are removed in<br />
TM 3-42<strong>30</strong>-<strong>209</strong>-20&P and are not covered in this manual.<br />
Materials/Parts<br />
Air cylinder nut (fig D-2)<br />
Wiping rag (item 31, app C)<br />
Fuel supply line (fig D-58)<br />
LOCATION/lTEM ACTION REMARKS<br />
Remove quick disconnect coupling half (1), flat washer (2), slide pipe-to-<br />
tube tee (3), pipe bushing (4), and flat washer (5) from the skid. Separate<br />
pipe-to-tube tee (3), pipe bushing (4), and flat washer (5) only if replacement<br />
is required.<br />
Skid Assembly/<br />
Quick disconnect coupling<br />
half (1)<br />
Flat washer (2)<br />
Pipe-to-tube tee (3)<br />
Pipe bushing (4)<br />
Flat washer (5)<br />
Pipe-to-tube elbow (6) Remove pipe-to-tube elbow (6) and pipe bushing (7) from the bottom of<br />
Pipe bushing (7) fuel pump assembly (8).<br />
Fuel pump assembly (8)
2-199 TM 3-42<strong>30</strong>-<strong>209</strong>-<strong>30</strong>&P
2-200<br />
TM 3-42<strong>30</strong>-<strong>209</strong>-<strong>30</strong>&P<br />
2-45. SKID ASSEMBLY (CONT).<br />
LOCATION/lTEM<br />
ACTION<br />
REMARKS<br />
Skid Assembly/<br />
Pipe-to-tube<br />
elbows (9 and 10)<br />
Pipe-to-tube straight pump (8).<br />
adapter (11)<br />
Remove pipe-to-tube elbows (9 and 10) from the sides of fuel pump (8).<br />
Remove pipe-to-tube straight adapter (11) from the bottom of fuel<br />
Pipe-to-tube tee (12)<br />
Solenoid valve (13)<br />
Pipe-to-tube straight<br />
adapter (14)<br />
Remove pipe-to-tube tee (12) from top of solenoid valve (13), and pipe-totube<br />
straight adapter (14) from the lower opening.
Skid Assembly/<br />
Solenoid valve coupling (1)<br />
Preformed packing (2)<br />
Nut (3)<br />
Data plate (4)<br />
Grommets (5)<br />
Housing (6)<br />
Solenoid coil (7)<br />
Coil insulating washer (8)<br />
DC sleeve assembly (9)<br />
Spring (10)<br />
Plunger seat (11)<br />
Pins (12)<br />
Plunger (13)<br />
Seal (14)<br />
Body (15)<br />
Repair by replacing authorized unserviceable items.<br />
Unscrew and remove coupling (1), preformed packing (2), and nut (3).<br />
Remove data plate (4), grommets (5), housing (6), and solenoid coil (7) as<br />
a unit. Remove coil insulating washer (8).<br />
Using fabricated tool, remove DC sleeve assembly (9). Remove<br />
spring (10), plunger seat (11), two pins (12), plunger (13), and seal (14)<br />
from body (15).<br />
Using a lint-free cloth, wipe all the solenoid valve parts clean.<br />
Assembly is the reverse of the above disassembly procedures.<br />
If the solenoid valve is sluggish during energization<br />
and deenergization, disassemble it. Inspect the<br />
solenoid valve for dirt and wear of the piston and bore.<br />
Dust particles or foreign matter might prevent the seal<br />
from sealing tightly. Disassembly and reassembly procedures<br />
require the use of the fabricated air cylinder<br />
nut (fig D-2).<br />
Replace the solenoid valve if it does not work correctly<br />
after being serviced.<br />
2-203 TM 3-42<strong>30</strong>-<strong>209</strong>-<strong>30</strong>&P
2-204<br />
TM 3-42<strong>30</strong>-<strong>209</strong>-<strong>30</strong>&P<br />
2-45. SKID ASSEMBLY (CONT).<br />
LOCATION/lTEM<br />
ACTION<br />
REMARKS<br />
Skid Assembly/<br />
Solenoid valve (1)<br />
Skid base (2)<br />
Machine screws (3)<br />
Internal tooth lock<br />
washers (4)<br />
Position solenoid valve (1) onto skid base (2) and aline mounting holes. Connect wire according to instructions for wiring<br />
Install two machine screws (3) and internal tooth lock washers (4) up from (p 2-156).<br />
underside of skid base and into bottom of solenoid valve (1).
Quick disconnect coupling<br />
half (15)<br />
Flat washers (16 and 17)<br />
Pipe nipple (18)<br />
Fluid vacuum filter (19)<br />
Pipe bushing (20)<br />
Pipe-to-tube elbow (21)<br />
Remove quick disconnect coupling half (15) and flat washer (16). Remove<br />
flat washer (17), pipe nipple (18), fluid vacuum filter (19), pipe<br />
bushing (20), and pipe-to-tube elbow (21) as a unit. Separate only if<br />
replacement parts are necessary.<br />
2-201 TM 3-42<strong>30</strong>-<strong>209</strong>-<strong>30</strong>&P
2-202 TM 3-42<strong>30</strong>-<strong>209</strong>-<strong>30</strong>&P<br />
2-45. SKID ASSEMBLY (CONT).<br />
LOCATION/lTEM ACTION REMARKS<br />
Skid Assembly/<br />
Machine screws (22) Remove two machine screws (22) and internal tooth lock washers (23)<br />
Internal tooth lock from the inside of skid base (24), directly below solenoid valve (13).<br />
washers (23) Remove solenoid valve (13) from skid base (24).<br />
Skid base (24)
Pipe-to-tube elbow (5)<br />
Pipe bushing (6)<br />
Fluid vacuum filter (7)<br />
Pipe nippIe (8)<br />
Flat washers (9 and 10)<br />
Quick disconnect coupling<br />
half (11)<br />
Wrap antiseizing tape around external pipe threads on pipe-to-tube<br />
elbow (5), pipe bushing (6), and pipe nipple (8). Screw pipe-to-tube<br />
elbow (5) into pipe bushing (6). Install as a unit into fluid vacuum filter (7),<br />
Screw pipe nipple (8) into fluid vacuum filter (7).<br />
Slide one flat washer (9) onto end of pipe nipple (8), and slide end of pipe<br />
nipple (8) through hole in skid base (2). Add flat washer (10) and quick<br />
disconnect coupling half (11) and secure.<br />
2-205<br />
TM 3-42<strong>30</strong>-<strong>209</strong>-<strong>30</strong>&P
2-206 TM 3-42<strong>30</strong>-<strong>209</strong>-<strong>30</strong>&P<br />
2-45. SKID ASSEMBLY (CONT).<br />
LOCATION/lTEM ACTION REMARKS<br />
Skid Assembly/<br />
Pipe-to-tube elbow (12)<br />
Fuel pump assembly (13)<br />
Pipe-to-tube straight<br />
adapter (14)<br />
Pipe-to-tube elbow (15)<br />
Pipe-to-tube straight<br />
adapter (16)<br />
Pipe-to-tube tee (17)<br />
Wrap antiseizing tape around external pipe threads on pipe-to-tube<br />
elbow (12), pipe-to-tube straight adapter (14), pipe-to-tube elbow (15),<br />
pipe-to-tube straight adapter (16), and pipe to-tube tee (17).<br />
Install pipe-to-tube elbow (12) into side of fuel pump assembly (13), and<br />
point open end straight back toward solenoid valve (1). Install pipe-totube<br />
straight adapter (14) into bottom front of fuel pump assembly (13).<br />
Screw pipe-to-tube elbow (15) into side of fuel pump assembly (13).<br />
Position the open end pointing downward.<br />
Install pipe-to-tube straight adapter (16) into lower part of solenoid<br />
valve (1), and pipe-to-tube tee (17) into part on the top of solenoid<br />
valve (1). Position open end of pipe-to-tube tee (17) so it alines with skid<br />
base edges.
2-207<br />
TM 3-42<strong>30</strong>-<strong>209</strong>-<strong>30</strong>&P
2-208 TM 3-42<strong>30</strong>-<strong>209</strong>-<strong>30</strong>&P<br />
2-45. SKID ASSEMBLY (CONT).<br />
LOCATION/lTEM ACTION REMARKS<br />
Skid Assembly/<br />
Pipe-to-tube elbow (18) Wrap antiseizing tape around external pipe thread of pipe-to-tube<br />
Pipe bushing (19) elbow (18), pipe bushing (19), pipe-to-tube tee (20), and pipe bushing (21)<br />
Pipe-to-tube tee (20)<br />
before securing.<br />
Pipe bushing (21)<br />
Screw pipe-to-tube elbow (18) into pipe bushing (19) and then install into<br />
bottom of fuel pump assembly (13). Position so open end of pipe- to-tube<br />
elbow (18) is pointing toward the fluid vacuum filter side of skid base (2).<br />
Flat washers (22 and 23) Screw pipe-to-tube tee (20) and pipe bushing (21) together and install flat<br />
Quick disconnect coupling washer (22) on end of pipe bushing (21). Insert end of pipe bushing (21)<br />
half (24)<br />
through hole of skid base (2) and then add flat washer (23) and quick<br />
disconnect coupling half (24).
2-<strong>209</strong><br />
TM 3-42<strong>30</strong>-<strong>209</strong>-<strong>30</strong>&P
2-210 TM 3-42<strong>30</strong>-<strong>209</strong>-<strong>30</strong>&P<br />
2-46. COMBUSTOR MAGNETO.<br />
This task covers:<br />
a. Disassembly c. Reassembly<br />
b. Repair<br />
INITIAL SETUP<br />
Tools and Special Tools<br />
Automotive Maintenance and Repair Field Maintenance<br />
Shop Equipment, Basic, Less Power (SC 4910-95-CL-A31)<br />
Materials/Parts<br />
Cloth, abrasive crocus (item 9, app C)<br />
Equipment Condition<br />
Combustor magneto assembly removed.<br />
Special Safety Instructions<br />
WARNING<br />
Discharge the fixed capacitor as soon as the ignition distributor<br />
cap is removed. Do not touch any metal parts inside the combustor<br />
ignition magneto until the fixed capacitor has been discharged.<br />
Failure to do so will cause a severe electrical shock.<br />
LOCATION/lTEM ACTION REMARKS<br />
Combustor Magneto/<br />
Machine screw (1)<br />
Internal tooth lock<br />
washer (2)<br />
Ignition distributor cap (3)<br />
Ignition terminal sleeve (4)<br />
Fixed capacitor (5)<br />
Unscrew and remove four machine screws (1) and four internal tooth lock<br />
washers (2).<br />
Touching only the edges, lift off ignition distributor cap (3). Shake ignition<br />
terminal sleeve (4) out of ignition distributor cap (3).<br />
WARNING<br />
Discharge fixed capacitor (5) as soon as ignition distributor<br />
cap (3) is removed. Do not touch any metal parts inside the<br />
combustor ignition magneto until fixed capacitor (5) is fully<br />
discharged. Failure to do so will cause a severe electrical<br />
shock.
Gasket (6)<br />
Retaining ring (7)<br />
Machine screw (8)<br />
Lock washer (9)<br />
Flat washer (1O)<br />
Machine screw (11)<br />
Lock washer (12)<br />
Flat washer (13)<br />
Distributor contact set (14)<br />
Machine screw (15)<br />
Flat washer (16)<br />
Nut (17)<br />
Machine screw (18)<br />
Lock washer (19)<br />
Using a short length of electrical wire from bulk issue (size or type are not<br />
important), discharge fixed capacitor (5) by touching the end of the electrical<br />
wire between the points marked with stars (**).<br />
Remove gasket (6). Remove retaining ring (7). Unscrew and remove<br />
machine screw (8), lock washer (9), flat washer (1O), machine screw (11),<br />
lock washer (12), and flat washer (13).<br />
Lift up distributor contact set (14) and remove machine screw (15), flat<br />
washer (16), and nut (17) which are holding the wires to the contact point.<br />
Remove machine screw (18), lock washer (19), and fixed capacitor (5).<br />
Gasket (6), distributor contact set (14), and fixed<br />
capacitor (5) are component parts of the ignition magneto<br />
parts kit.<br />
2-211 TM 3-42<strong>30</strong>-<strong>209</strong>-<strong>30</strong>&P
2-212 TM 3-42<strong>30</strong>-<strong>209</strong>-<strong>30</strong>&P<br />
2-46. COMBUSTOR MAGENTO (CONT).<br />
LOCATION/lTEM ACTION REMARKS<br />
Combustor Magneto/<br />
Ignition distributor cap (1)<br />
Ignition terminal sleeve (2)<br />
Distributor contact set (3)<br />
Replace authorized unserviceable parts.<br />
Repair ignition distributor cap (1) by replacing ignition terminal sleeve (2).<br />
Minor pitting of distributor contact set (3) points may be repaired by using<br />
crocus cloth. Care must be taken to make sure that contact point face<br />
surfaces are flat and that all the face surfaces contact squarely.<br />
Combustor Magneto/<br />
Fixed capacitor (1)<br />
Machine screw (2)<br />
Lock washer (3)<br />
Distributor contact set (4)<br />
Machine screw (5)<br />
Flat washer (6)<br />
Nut (7)<br />
Retaining ring (8)<br />
Machine screw (9)<br />
Lock washer (1O)<br />
Flat washer (11)<br />
Position fixed capacitor (1) onto the mounting plate. Insert machine<br />
screw (2) through lock washer (3) and fixed capacitor (1). Screw into the<br />
mounting plate and tighten.<br />
Assemble distributor contact set (4) by connecting the wires from the<br />
magneto and fixed capacitor (1) to distributor contact set (4) with machine<br />
screw (5), flat washer (6), and nut (7). Tighten the screw connecting the<br />
wires to distributor contact set (4).<br />
Position distributor contact set (4) onto the mounting plate and install<br />
retaining ring (8). Insert machine screw (9) through lock washer (10), flat<br />
washer (11), and into distributor contact set (4). Then screw into the<br />
mounting plate. Do not tighten fully.<br />
Fixed capacitor (1) and distributor contact set (4) are<br />
component parts of the ignition magneto parts kit.
Machine screw (12)<br />
Lock washer (13)<br />
Flat washer (14)<br />
Insert machine screw (12) through lock washer (13), flat washer (14), and<br />
into distributor contact set (4). Then screw into the mounting plate. Do not<br />
tighten fully.<br />
Shaft (15)<br />
Rotate the shaft (15) while watching the cam (16) turn until the distributor<br />
Cam (16) contact set breaker arm is riding on the highest point of the cam (16).<br />
● PART OF DISTRIBUTOR CONTACT SET<br />
Using a feeler gage inserted in the distributor contact set points, move the<br />
stationary support bracket of the contact set until a gap clearance of<br />
0.015 to 0.018 inch is obtained. Using the proper tool, tighten machine<br />
screws (9 and 12). Recheck the gap clearance to make sure the stationary<br />
support bracket did not move.<br />
2-213 TM 3-42<strong>30</strong>-<strong>209</strong>-<strong>30</strong>&P
2-214<br />
TM 3-42<strong>30</strong>-<strong>209</strong>-<strong>30</strong>&P<br />
2-46. COMBUSTOR MAGNETO (CONT).<br />
LOCATION/lTEM ACTION REMARKS<br />
Combustor Magneto/<br />
Ignition terminal sleeve (17) Insert ignition terminal sleeve (17) into ignition distributor cap (18).<br />
Ignition distributor cap (18)<br />
Gasket (19) is a component part of the ignition magneto<br />
parts kit.<br />
Gasket (19)<br />
Position gasket (19) and ignition distributor cap (18) onto the combustor<br />
Body (20) magneto body (20).<br />
Machine screw (21)<br />
Lock washer (22)<br />
Insert four machine screws (21) through four lock washers (22), ignition<br />
distributor cap (18), and gasket (19). Screw into the combustor magneto<br />
body (20) and tighten.
2-47. FUEL PUMP AND IGNITION DRIVE MOTOR.<br />
This task covers:<br />
a. Disassembly c. Reassembly<br />
b. Repair<br />
INITIAL SETUP<br />
Tools and Special Tools<br />
Automotive Maintenance and Repair Field Maintenance<br />
Shop Equipment, Basic, Less Power (SC 4910-95-CL-A31)<br />
Equipment Condition<br />
Fuel pump and ignition drive motor removed from skid assembly. Refer to<br />
paragraph 2-45 for disassembly/reassembly procedures.<br />
LOCATION/lTEM ACTION REMARKS<br />
Fuel Pump and Ignition<br />
Drive Motor/<br />
Machine screw (1)<br />
Lock washer (2)<br />
Cover (3)<br />
Gasket (4)<br />
Machine screw (5)<br />
Lock washer (6)<br />
Electrical contact brush (7)<br />
Torsion helical spring (8)<br />
Unscrew and remove four machine screws (1), four lock washers (2), Fuel pump and ignition drive motor is shown sepacover<br />
(3), and gasket (4). Inside of opening, remove machine screw (5), rated for illustration purposes only. The torsion helical<br />
and lock washer (6). Remove electrical contact brush (7) by lifting torsion springs (8) and electrical contact brushes (7) will be<br />
helical spring (8). Repeat this procedure to disassemble the electrical removed and reinstalled through the opening under<br />
contact brush on the other side of the direct current motor. cover (3).<br />
TM 3-42<strong>30</strong>-<strong>209</strong>-<strong>30</strong>&P
2-216 TM 3-42<strong>30</strong>-<strong>209</strong>-<strong>30</strong>&P<br />
2-47. FUEL PUMP AND IGNITION DRIVE MOTOR (CONT).<br />
LOCATION/lTEM ACTION REMARKS<br />
Fuel Pump and Ignition<br />
Drive Motor/<br />
Contact brush (1)<br />
Replace authorized unserviceable parts.<br />
Replace electrical contact brushes (1), in pairs when a brush measures<br />
1/4 inch long or less.<br />
Fuel Pump and Ignition<br />
Drive Motor/<br />
Torsion helical spring (1)<br />
Electrical contact brush (2)<br />
Machine screw (3)<br />
Lock washer (4)<br />
Gasket (5)<br />
Cover (6)<br />
Machine screw (7)<br />
Lock washer (8)<br />
Pull upon torsion helical spring (1) and insert electrical contact brush (2).<br />
Insert machine screw (3) through lock washer (4), and the terminal end of<br />
electrical contact brush (2). Screw machine screw (3) into the attachment<br />
point in the end shell of the motor and tighten.<br />
Position gasket (5) and cover (6) together. Insert four machine screws (7)<br />
through four lock washers (8), cover (6), and gasket (5). Screw machine<br />
screws (7) into the end shell of the motor and tighten. Repeat this procedure<br />
to reassemble the electrical contact brush on the other side of the<br />
fuel pump and ignition drive motor.
2-48. FUEL PUMP ASSEMBLY.<br />
This task covers adjus<strong>tm</strong>ent.<br />
INITIAL SETUP<br />
Tools and Special Tools<br />
References<br />
Automotive Maintenance and Repair Field Maintenance TM 3-42<strong>30</strong>-<strong>209</strong>-10<br />
Shop Equipment, Basic, Less Power (SC 4910-95-CL-A31)<br />
Equipment Condition<br />
Materials/Parts<br />
Fuel pump installed in skid assembly.<br />
Automotive gasoline (item 20, app C)<br />
<strong>30</strong> wt motor oil (item 25, app C)<br />
Test gage line (fig D-1)<br />
2-217 TM 3-42<strong>30</strong>-<strong>209</strong>-<strong>30</strong>&P
2-218 TM 3-42<strong>30</strong>-<strong>209</strong>-<strong>30</strong>&P<br />
2-48. FUEL PUMP ASSEMBLY (CONT).<br />
LOCATION/lTEM ACTION REMARKS<br />
Fuel Pump Assembly/<br />
Prepare the water heater and the required equipment for the fuel pressure<br />
test using the following procedures:<br />
Step 1.<br />
Step 2.<br />
Step 3.<br />
Step 4.<br />
Step 5.<br />
Step 6.<br />
Step 7.<br />
Step 8.<br />
Step 9.<br />
Fabricate a test gage line (fig D-1). Attach adapter (1) and pressure<br />
gage (2).<br />
Disconnect the fuel pump assembly nozzle pressure line at the<br />
fuel pump 90 degree elbow (3). Connect and tighten the test line<br />
and pressure gage to the fuel pump assembly at the 90 degree<br />
elbow. Bend the test line and pressure gage so that it is visible<br />
and accessible from the left side of the water heater.<br />
Unscrew and remove the end cap (4) nut from the rotary powerdriven<br />
pump.<br />
Pour one pint of motor oil into a five gallon gasoline can and fill<br />
the rest of the can with combat automotive gasoline. The oil is<br />
used to lubricate the pump.<br />
Remove the fuel hose assembly from the top cabinet door storage<br />
area. Connect the fuel hose assembly to the water heater<br />
and to the five gallon gasoline can. Uncoil the power cable in the<br />
top cabinet storage area.<br />
Place the HEATER ON/PURGE ON switch to PURGE ON position.<br />
(See TM 3-42<strong>30</strong>-<strong>209</strong>-10.)<br />
Use the pump unit assembly for a power source.<br />
Connect the power cable to the pump unit.<br />
Apply power to the water heater. See TM 3-42<strong>30</strong>-<strong>209</strong>-10.<br />
The rotary power-driven pump must be adjusted after<br />
reassembly is complete or whenever pressure is suspected<br />
to be in error. To adjust the pressure, the<br />
rotary power-driven pump must be reinstalled in the<br />
water heater.
2-219<br />
TM 3-42<strong>30</strong>-<strong>209</strong>-<strong>30</strong>&P
2-220 TM 3-42<strong>30</strong>-<strong>209</strong>-<strong>30</strong>&P<br />
2-48. FUEL PUMP ASSEMBLY (CONT).<br />
LOCATION/lTEM ACTION REMARKS<br />
Power Cable to Pump Unit/<br />
Step 10. With the rotary power-driven pump pumping, slightly loosen the<br />
tube coupling nut (5) at the adapter (1) and bleed the test<br />
line (6). When fuel comes out of the tube coupling nut area,<br />
tighten the tube coupling nut (5) at the adapter (1).<br />
Step 11. Leave the HEATER ON/PURGE ON switch in PURGE ON position<br />
for two minutes; then place the HEATER ON/PURGE ON<br />
switch to HEATER ON position.
Step 12. Monitor the pressure to make sure it reads 150 psi. Turn the<br />
pressure adjusting screw (7) (located where the end cap nut<br />
was removed) clockwise or counterclockwise, as necessary,<br />
until an indication of 150 psi pressure is reached. When the<br />
pressure is 150 psi on the test indicator, place the HEATER<br />
ON/PURGE ON switch to PURGE ON position. Screw the end<br />
cap nut (4) onto the rotary power-driven pump adjus<strong>tm</strong>ent<br />
port (8).<br />
Step 13. See TM 3-42<strong>30</strong>-<strong>209</strong>-10 for instructions on how to shut down<br />
the pump unit assembly.<br />
Step 14. Disconnect power cable assembly from the pump unit assembly.<br />
2-221 TM 3-42<strong>30</strong>-<strong>209</strong>-<strong>30</strong>&P
2-222 TM 3-42<strong>30</strong>-<strong>209</strong>-<strong>30</strong>&P<br />
2-48. FUEL PUMP ASSEMBLY (CONT).<br />
LOCATION/lTEM ACTION REMARKS<br />
Power Cable to Pump Unit/ Step 15.<br />
Step 16.<br />
Step 17,<br />
Step 18.<br />
Step 19.<br />
Loosen the tube coupling nut at the adapter to allow fuel to<br />
drain from the fabricated test line.<br />
Disconnect the fuel hose assembly from the water heater and<br />
from the five gallon gasoline can. Dispose of fuel in accordance<br />
with local directives.<br />
Roll up fuel hose assembly and power cable assembly, and<br />
stow in the top cabinet storage area.<br />
Unscrew test line tube coupling nut from the rotary powerdriven<br />
pump. Reconnect the nozzle pressure line and retighten<br />
the tube coupling nut.<br />
Restore the water heater to normal condition.<br />
2-49. FUEL SUPPLY LINE.<br />
This task covers repair.<br />
INITITAL SETUP<br />
Tools and Special Tools<br />
Automotive Maintenance and Repair Field Maintenance<br />
Shop Equipment, Basic, Less Power (SC 4910-95-CL-A31)<br />
Materials/Parts<br />
Fuel supply line (fig D-58)<br />
Equipment Condition<br />
Fuel supply line removed from skid base assembly.<br />
LOCATION/lTEM ACTION REMARKS<br />
Fuel Supply Line/ Fabricate new fuel supply line according to figure D-58
2-50. GAGE PORT LINE.<br />
This task covers repair.<br />
INITITAL SETUP<br />
Tools and Special Tools<br />
Automotive Maintenance and Repair Field Maintenance<br />
Shop Equipment, Basic, Less Power (SC 4910-95-CL-A31 )<br />
Materials/Parts<br />
Gage port line (fig D-60)<br />
Equipment Condition<br />
Gage port line removed from skid base assembly.<br />
LOCATION/lTEM ACTION REMARKS<br />
Gage Port Line/<br />
Fabricate new gage port line according to figure D-60.<br />
2-51. PUMP RETURN LINE.<br />
This task covers repair,<br />
INITITAL SETUP<br />
Tools and Special Tools<br />
Automotive Maintenance and Repair Field Maintenance<br />
Shop Equipment, Basic, Less Power (SC 4910-95-CL-A31)<br />
Materials/Parts<br />
Pump return line (fig D-57)<br />
Equipment Condition<br />
Pump return line removed from skid base assembly.<br />
LOCATION/lTEM ACTION REMARKS<br />
Pump Return Line/<br />
Fabricate new pump return line according to figure D-57.<br />
2-223 TM 3-42<strong>30</strong>-<strong>209</strong>-<strong>30</strong>&P
2-224 TM 3-42<strong>30</strong>-<strong>209</strong>-<strong>30</strong>&P<br />
2-52. PURGE AND BYPASS RETURN LINE.<br />
This task covers repair.<br />
INITITAL SETUP<br />
Tools and Special Tools<br />
Automotive Maintenance and Repair Field Maintenance<br />
Shop Equipment, Basic, Less Power (SC 4910-95-CL-A31)<br />
Equipment Condition<br />
Purge and bypass return line removed from skid base assembly.<br />
Materials/Parts<br />
Purge and bypass return line (fig D-59)<br />
LOCATION/lTEM ACTION REMARKS<br />
Purge and Bypass Return<br />
Line/<br />
Fabricate new purge and bypass return line according to figure D-59.
2-53. LOW PRESSURE HEATING BOILER ASSEMBLY.<br />
This task covers:<br />
a. Disassembly c. Reassembly<br />
b. Repair d. Test<br />
INITITAL SETUP<br />
Tools and Special Tools<br />
Automotive Maintenance and Repair Field Maintenance<br />
Shop Equipment, Basic, Less Power (SC 4910-95-CL-A31)<br />
Test Equipment<br />
M5 Test Set<br />
Materials/Parts<br />
Antiseizing tape (item 38, app C)<br />
Fire box gasket (fig D-20)<br />
Side fire box gasket (fig D-4)<br />
References<br />
TM 3-1040-251-15<br />
TM 3-42<strong>30</strong>-<strong>209</strong>-20&P<br />
Equipment Condition<br />
Unit maintenance authorized components are removed in<br />
TM 3-42<strong>30</strong>-<strong>209</strong>-20&P and are not covered in this manual.<br />
Special Safety Instructions<br />
WARNING<br />
When handling asbestos material, always wear an air filtering<br />
respirator, gloves, and goggles. Wash face and hands with soap<br />
and water before eating or smoking. Asbestos can cause cancer<br />
if handled without protection.<br />
LOCATION/lTEM ACTION REMARKS<br />
Low Pressure Heating<br />
Boiler Assembly/<br />
Electrical lead (1)<br />
Combustion motor<br />
mounting assembly (2)<br />
Hexagon head cap<br />
screws (3)<br />
Internal tooth lock<br />
washers (4)<br />
Gasket (5)<br />
2-225 TM 3-42<strong>30</strong>-<strong>209</strong>-<strong>30</strong>&P
2-226 TM 3-42<strong>30</strong>-<strong>209</strong>-<strong>30</strong>&P<br />
2-53. LOW PRESSURE HEATING BOILER ASSEMBLY (CONT).<br />
LOCATION/lTEM ACTION REMARKS<br />
Low Pressure Heating<br />
Boiler Assembly/<br />
Ignition-combustor cable Remove ignition-combustor cable assembly (6) and nonmetallic<br />
assembly (6) grommet (7).<br />
Nonmetallic grommet (7)<br />
Machine bolts (8)<br />
Internal tooth lock<br />
washers (9)<br />
Combustor assembly (10)<br />
When handling asbestos material, always wear an air<br />
filtering respirator, gloves, and goggles. Wash face and<br />
hands with soap and water before eating or smoking.<br />
Asbestos can cause cancer if handled without protection.<br />
Unscrew and remove eight machine bolts (8) and internal tooth lock<br />
washers (9). Slide out combustor assembly (10).<br />
Gasket (11)<br />
Combustor blower<br />
shroud (12)<br />
Gasket (13)<br />
Remove gasket (11), combustor blower shroud (1 2), and gasket (1 3).
Pressure relief valve<br />
Unscrew and remove pressure relief valve pipe nipple (14), safety relief<br />
pipe nipple (14) valve (15), pipe-to-tube straight adapter (16), and pipe bushing (17).<br />
Safety relief valve (15)<br />
Pipe-to-tube straight<br />
adapter (16)<br />
Pipe bushing (17)<br />
Pipe bushing (18)<br />
Pipe elbow (19)<br />
Low pressure heating<br />
boiler (20)<br />
Unscrew and remove pipe bushing (18) and pipe elbow (19) from low<br />
pressure heating boiler (20).<br />
2-227 TM 3-42<strong>30</strong>-<strong>209</strong>-<strong>30</strong>&P
2-228 TM 3-42<strong>30</strong>-<strong>209</strong>-<strong>30</strong>&P<br />
2-53. LOW PRESSURE HEATING BOILER ASSEMBLY (CONT).<br />
LOCATION/lTEM ACTION REMARKS<br />
Low Pressure Heating<br />
Boiler Assembly/<br />
Machine screws (21)<br />
Internal tooth lock<br />
washers (22)<br />
Hexagon plain nuts (23)<br />
Refractory box<br />
assembly (24)<br />
Refractory lining (25)<br />
Refractory castable mix (26)<br />
WARNING<br />
Be careful when removing the refractory box assembly.<br />
Using a pry bar or a length of 2 X 4 inch lumber will help to<br />
prevent crushed fingers or hands when the last machine<br />
screw is removed.<br />
Remove the four machine screws (21) and internal tooth lock<br />
washers (22) from the bottom side of the low pressure heating boiler (20).<br />
Remove twelve hexagon plain nuts (23), internal tooth lock washers (22)<br />
and machine screws (21) from both sides of<br />
assembly (24).<br />
Support the refractory box and<br />
remove four hexagon plain<br />
nuts (23), internal tooth lock<br />
washers (22), and machine<br />
screws (21 ) from the top side of<br />
the low pressure heating<br />
boiler (20). Remove refractory<br />
box assembly (24), refractory<br />
lining (25) and refractory<br />
castable mix (26), as a unit.
WARNING<br />
When handling asbestos material, always wear an air<br />
filtering respirator, gloves, and goggles. Wash face and<br />
hands with soap and water before eating or smoking.<br />
Asbestos can cause cancer if handled without protection.<br />
Side fire box gaskets (27) Remove the two side fire box gaskets (27) and two fire box gaskets (28). If refractory castable mix has been damaged, the<br />
Fire box gaskets (28)<br />
If installed, remove and discard refractory castable mix (26) and refractory<br />
lining (25) only if damaged.<br />
refractory lining must be replaced.<br />
2-229 TM 3-42<strong>30</strong>-<strong>209</strong>-<strong>30</strong>&P
2-2<strong>30</strong> TM 3-42<strong>30</strong>-<strong>209</strong>-<strong>30</strong>&P<br />
2-53. LOW PRESSURE HEATING BOILER ASSEMBLY (CONT).<br />
LOCATION/lTEM ACTION REMARKS<br />
Low Pressure Heating<br />
Boiler Assembly/<br />
Side fire box gasket (3)<br />
Fire box gasket (4)<br />
Repair by replacing unserviceable components.<br />
Fabricate side fire box gasket (4) (fig D-4) as required.<br />
Fabricate fire box gasket (3) (fig D-20) as required.<br />
Low Pressure Heating<br />
Boiler Assembly/<br />
Refractory lining (1)<br />
Refractory box<br />
assembly (2)<br />
Fire box gaskets (3)<br />
Side fire box gaskets (4)<br />
Machine screws (5)<br />
WARNING<br />
When handling asbestos material, always wear an air<br />
filtering respirator, gloves, and goggles. Wash face and<br />
hands with soap and water before eating or smoking.<br />
Asbestos can cause cancer if handled without protection.<br />
Position new refractory lining (1) into refractory box assembly (2). Install<br />
the top fire box gasket (3) with notched ends facing downward along the<br />
top edge of refractory box assembly (2). Install two side fire box gaskets<br />
(4). Insert a couple machine screws (5) through refractory box assembly<br />
(2) and through each of the gaskets (3 and 4) to hold them in place.
Boiler unit (6)<br />
Internal tooth lock<br />
washers (7)<br />
Position the bottom fire box gasket (3) with notched end facing upward<br />
onto the boiler unit (6) and insert four machine screws (5) with internal<br />
tooth lock washers (7) through the boiler unit (6) and fire box gasket (3)<br />
Hexagon plain nuts (8)<br />
With two or more soldiers, lift the refractory box assembly (2) with gaskets,<br />
screws, and lining in place. Position it onto end of boiler unit (6) and<br />
aline holes. Install remaining machine screws (5) through refractory box<br />
assembly (2) and gaskets (3 and 4). Secure refractory box assembly (2) to<br />
boiler unit (6) with remaining internal tooth lock washers (7) and hexagon<br />
plain nuts (8). Check all the way around the edge of the refractory box<br />
assembly (2) to make sure gaskets (3 and 4) are properly installed.<br />
Tighten all machine screws (5) and hexagon plain nuts (8) equally.<br />
2-231 TM 3-42<strong>30</strong>-<strong>209</strong>-<strong>30</strong>&P
2-232 TM 3-42<strong>30</strong>-<strong>209</strong>-<strong>30</strong>&P<br />
2-53. LOW PRESSURE HEATING BOILER ASSEMBLY (CONT).<br />
LOCATION/lTEM ACTION REMARKS<br />
Low Pressure Heating<br />
Boiler Assembly/<br />
Connector (9)<br />
Pipe bushing (10)<br />
Pipe elbow (11)<br />
Using antiseizing tape or sealing compound, wrap or coat the external<br />
threads of the connector (9) on the bottom of boiler unit (6) and pipe<br />
bushing (10). Screw on and tighten pipe bushing (10) and pipe elbow (11 ).
Safety relief valve (12) Using antiseizing tape or sealing compound, wrap or coat the external<br />
Pressure relief valve pipe threads of safety relief valve (12), pressure relief valve pipe nipple (13),<br />
nipple (13) pipe bushing (14), and pipe-to-tube straight adapter (15).<br />
Pipe bushing (14)<br />
Pipe-to-tube straight<br />
Screw safety relief valve (12) into threaded hole in boiler unit (6) and<br />
adapter (15)<br />
tighten. The valve opening should face downward.<br />
Screw pressure relief valve pipe nipple (13) into safety relief valve (12) and<br />
tighten.<br />
Screw pipe bushing (14) into threaded hole in boiler unit (6) and tighten.<br />
Screw pipe-to-tube straight adapter (15) into pipe bushing (14) and<br />
tighten.<br />
2-233 TM 3-42<strong>30</strong>-<strong>209</strong>-<strong>30</strong>&P
2-234<br />
TM 3-42<strong>30</strong>-<strong>209</strong>-<strong>30</strong>&P<br />
2-53. LOW PRESSURE HEATING BOILER ASSEMBLY (CONT).<br />
LOCATION/lTEM<br />
ACTION<br />
REMARKS<br />
Low Pressure Heating<br />
Boiler Assembly/<br />
Machine bolts (16)<br />
Internal tooth lock<br />
washers (17)<br />
Combustor assembly (18)<br />
Gasket (19)<br />
Combustor blower<br />
shroud (20)<br />
Gasket (21 )<br />
WARNING<br />
When handling asbestos material, always wear an air<br />
filtering respirator, gloves, and goggles. Wash face and<br />
hands with soap and water before eating or smoking.<br />
Asbestos can cause cancer if handled without protection.<br />
Nonmetallic grommet (22)<br />
Ignition-combustor cable<br />
assembly (23)
Hexagon head cap<br />
screws (24)<br />
Internal tooth lock<br />
washers (25)<br />
Combustor motor<br />
mounting assembly (26)<br />
Gasket (27)<br />
When handling asbestos material, always wear an air<br />
filtering respirator, gloves, and goggles. Wash face and<br />
hands with soap and water before eating or smoking.<br />
Asbestos can cause cancer if handled without protection.<br />
Install six hexagon head cap screws (24) and seven internal<br />
tooth lock washers (25) through holes of combustor motor<br />
mounting assembly (26) and gasket (27).<br />
Position assembled unit onto combustor blower shroud (20)<br />
and tighten the six hexagon head cap screws (24).<br />
2-235<br />
TM 3-42<strong>30</strong>-<strong>209</strong>-<strong>30</strong>&P
2-236 TM 3-42<strong>30</strong>-<strong>209</strong>-<strong>30</strong><br />
2-53. LOW PRESSURE HEATING BOILER ASSEMBLY (CONT).<br />
LOCATION/lTEM ACTION REMARKS<br />
Low Pressure Heating<br />
Boiler Assembly/<br />
Quick disconnect coupling<br />
half (1)<br />
Water inlet elbow (2)<br />
Pipe cap (3)<br />
Safety relief valve (4)<br />
Pipe plug (5)<br />
Pipe plugs (6)<br />
Ports (7)<br />
Remove quick disconnect coupling half (1) from<br />
water inlet (2). Wrap external threads of water<br />
inlet (2) and install a one inch pipe cap (3).<br />
Remove safety relief valve (4). Wrap external<br />
threads of 1/2-inch pipe plug (5) before installing<br />
into safety relief valve (4) opening.<br />
Wrap external threads of two of the 1/2-inch pipe<br />
plugs (6) with antiseizing tape before installing into<br />
the two ports (7) and secure.
Low pressure heating boiler<br />
assembly (8)<br />
Raise refractory end of low pressure heating boiler<br />
assembly (8) approximately four inches from the floor<br />
using 2 x 4 inch blocks or other heavy blocking materials.<br />
This will eliminate any air pockets in the boiler.<br />
Water hose (9)<br />
Quick disconnect coupling<br />
half (10)<br />
Port (11)<br />
Connect water hose (9) to quick disconnect coupling<br />
half (10). Fill low pressure heating boiler (8) with water<br />
until water flows from port (11). Shut off water. Disconnect<br />
water hose (9) from quick disconnect coupling<br />
half (10). Remove quick disconnect coupling<br />
half (10).<br />
2-237<br />
TM 3-42<strong>30</strong>-<strong>209</strong>-<strong>30</strong>&
2-238 TM 3-42<strong>30</strong>-<strong>209</strong>-<strong>30</strong>&P<br />
2-53. LOW PRESSURE HEATING BOILER ASSEMBLY (CONT).<br />
LOCATION/lTEM ACTION REMARKS<br />
Low Pressure Heating<br />
Boiler Assembly/<br />
Pipe plug (12)<br />
Pipe elbow (13)<br />
Wrap external threads of a 1/2-inch pipe plug (12) before screwing it into<br />
port (11.<br />
Remove quick disconnect coupling half (10)<br />
from 90° pipe elbow (13).<br />
Continue filliing low pressure heating boiler<br />
assembly (8) until water flows from 90° pipe<br />
elbow (13).<br />
Check valve (14)<br />
Select a check valve (14) (with 1-inch pipe thread to 3/4-14 in NPT) from<br />
the M5 test set. Remove the internal parts of the check valve (14) to make<br />
a reducing bushing.
Valve and hose<br />
assembly (15)<br />
Wrap external threads of check valve (14) with antiseizing tape. Screw<br />
modified check valve (14) into 90° pipe elbow (13) and tighteh.<br />
Attach valve and hose assembly (15) from hand driven reciprocating<br />
pump to modified check valve (14). Make sure all connections are tight<br />
and not leaking. Correct any leaks before continuing with the test.<br />
Hand driven reciprocating<br />
pump (16)<br />
Fill hand driven reciprocating pump (16) with water.<br />
2-239 TM 3-42<strong>30</strong>-<strong>209</strong>-<strong>30</strong>&P
2-240 TM 3-42<strong>30</strong>-<strong>209</strong>-<strong>30</strong>&P<br />
2-53. LOW PRESSURE HEATING BOILER ASSEMBLY (CONT).<br />
LOCATION/lTEM ACTION REMARKS<br />
Low Pressure Heating<br />
Boiler Assembly/<br />
Testing Operation<br />
Operate the hand-driven reciprocating pump. See<br />
TM 3-1040-251-15.<br />
Test that the low pressure heating boiler assembly withstands a<br />
pressure of 225 psi as indicated on the water pressure gage and the<br />
gage of the hand-driven reciprocating pump. Observe that the pressure<br />
of 225 psi, once applied, holds and does not drop after a 5-<br />
minute application.<br />
If pressure testis satisfactory, remove test equipment and return low<br />
pressure heating boiler assembly to service.<br />
If the low-pressure heating boiler assembly shows a pressure drop,<br />
go to Inspection and Repair Operation below.<br />
Inspection and Repair Operation<br />
Look for leaks at:<br />
Sheet metal welds.<br />
Inlet and outlet pipe welds.<br />
Adapter pipe welds for safety relief valve, water pressure gage,<br />
and temperature sensing ports.
Refractory box (17)<br />
If necessary, remove refractory box (17) and check for leaks in the combustion<br />
chamber area and return tubes.<br />
Low Pressure Heating<br />
Boiler Assembly/<br />
Mark any leak as it is found.<br />
Remove pressure and make repairs.<br />
Retest after making repairs. Release pressure.<br />
2-241 TM 3-42<strong>30</strong>-<strong>209</strong>-<strong>30</strong>&P
2-242 TM 3-42<strong>30</strong>-<strong>209</strong>-<strong>30</strong>&P<br />
2-54. COMBUSTION MOTOR MOUNTING ASSEMBLY.<br />
This task covers:<br />
a. Disassembly<br />
b. Repair<br />
c. Reassembly<br />
INITIAL SETUP<br />
Tools and Special Tools<br />
Automotive Maintenance and Repair Field Maintenance<br />
Shop Equipment, Basic, Less Power (SC 4910-95-CL-A31)<br />
Equipment Condition<br />
Combustion motor mounting assembly removed from low pressure heater<br />
boiler assembly.<br />
LOCATION/lTEM ACTION REMARKS<br />
Combustion Motor<br />
Mounting Assembly/<br />
Setscrew (1)<br />
Loosen setscrew (1) from centrifugal fan impeller (2). Remove four<br />
machine screws (3), internal tooth lock washers (4), and direct current<br />
Centrifugal fan impeller (2)<br />
Machine screw (3) motor (5) from motor mounting plate (6).<br />
Internal tooth lock<br />
washer (4)<br />
Direct current motor (5)<br />
Motor mounting plate (6)
Combustion Motor<br />
Mounting Assembly/<br />
Repair by replacing authorized components.<br />
Combustion Motor<br />
Mounting Assembly/<br />
Motor mounting plate (1)<br />
Direct current motor (2)<br />
internal tooth lock screws (4).<br />
washers (3)<br />
Machine screws (4)<br />
Position mounting plate (1) and direct current motor (2) together and aline<br />
holes. Secure with four internal tooth lock washers (3) and machine<br />
Centrifugal fan impeller (5)<br />
Setscrew (6)<br />
Slide centrifugal fan impeller (5) onto shaft of direct current motor (2).<br />
Measure between the flat surfaces of motor mounting plate (1) and the<br />
flat surface of centrifugal fan impeller (5), and adjust for a clearance of<br />
0.590 inches. Tighten setscrew (6).<br />
2-243 TM 3-42<strong>30</strong>-<strong>209</strong>-<strong>30</strong>&P
2-244 TM 3-42<strong>30</strong>-<strong>209</strong>-<strong>30</strong>&P<br />
2-55. NOZZLE VALVE LINE.<br />
This task covers repair.<br />
INITIAL SETUP<br />
Tools and Special Tools<br />
Automotive Maintenance and Repair Field Maintenance<br />
Shop Equipment, Basic, Less Power (SC 4910-95-CL-A31)<br />
Materials/Parts<br />
Nozzle valve line (fig D-62)<br />
Equipment Condition<br />
Nozzle valve line removed from low pressure heater boiler,<br />
LOCATION/lTEM ACTION REMARKS<br />
Nozzle Valve Line/ Fabricate new nozzle valve line according to figure D-62<br />
2-56. COMBUSTOR RETURN LINE.<br />
LOCATION/lTEM ACTION REMARKS<br />
This task covers repair.<br />
INITIAL SETUP<br />
Tools and Special Tools<br />
Automotive Maintenance and Repair Field Maintenance<br />
Shop Equipment, Basic, Less Power (SC 4910-95-CL-A31)<br />
Materials/Parts<br />
Combustor return line (fig D-61)<br />
Equipment Condition<br />
Combustor return line removed from low pressure heater boiler assembly.<br />
LOCATION/lTEM ACTION REMARKS<br />
Combustor Return Line/<br />
Fabricate new combustor return line according to figure D-61.
Section V. PREEMBARKATION INSPECTION OF MATERIEL IN UNITS ALERTED FOR OVERSEAS MOVEMENT<br />
2-57. GENERAL INFORMATION. This inspection is conducted on materiel in 2-59. INSPECTION STANDARDS. Decontaminating apparatus classified seralerted<br />
units scheduled for overseas duty to ensure that such materiel will not viceable must meet or exceed the inspection standards in the following tables:<br />
become unserviceable in a relatively short time. It prescribes a higher percentage<br />
of remaining usable life in serviceable materiel to meet a specific need<br />
Inspection Standard for Pump Unit<br />
beyond minimum serviceability.<br />
Inspection Standard for Water Heater<br />
Inspection Standard for Tank Unit<br />
2-58. PREINSPECTION POINTS. The decontaminating apparatus must be Inspection Standard for Shower Assembly.<br />
thoroughly cleaned of all grease, dirt, or other material that could prevent<br />
proper operation or cover up the true condition of parts.<br />
INSPECTION STANDARD FOR PUMPING UNIT<br />
Item Inspection Standard Item Inspection Standard<br />
Bolts and Screws<br />
Rivets<br />
Electrical Wiring and<br />
Cables<br />
Welds<br />
Instruction and<br />
Nameplates<br />
No stripped threads.<br />
Must be tight.<br />
No loose or damaged connectors, cut or worn insulation,<br />
broken wires or kinks.<br />
Welded joints must not show signs of separation or<br />
failure.<br />
Must be present, legible, and secure.<br />
Paint<br />
Lifting and Tie-Down<br />
Eyes<br />
Control Panel<br />
Engine<br />
Painted surfaces must be in good condition and<br />
free of bare spots, rust and peeling.<br />
Must be free of rust, cracks, breaks, or stripped<br />
threads.<br />
All valves, switches, and knobs must be operable.<br />
The glass windows on the gages must not be<br />
broken.<br />
See TM 5-2805-259-14.<br />
MWO’s<br />
Check that all required MWO’s have been applied<br />
and are properly recorded. (See DA PAM 738-750.)<br />
Hoses<br />
Hoses and fittings must not be deformed or broken.<br />
2-245 TM 3-42<strong>30</strong>-<strong>209</strong>-<strong>30</strong>&P
2-246 TM 3-42<strong>30</strong>-<strong>209</strong>-<strong>30</strong>&P<br />
Item Inspection Standard Item Inspection Standard<br />
Hose Reels Must function properly. Pump Pump body must not be cracked. Check that<br />
pump has been drained.<br />
Plumbing<br />
Must be free of leaks.<br />
Battery See TM 9-6140-200-14.<br />
Gasoline Fuel System Must be free of leaks.<br />
Technical Publications Must be packaged and taped to the top of pump-<br />
Drive Belts Belts must not be cracked or glazed. Check belts ing unit.<br />
for proper tension.<br />
Tools<br />
Must be present and in good condition.<br />
INSPECTION STANDARD FOR WATER HEATER<br />
Item Inspection Standard Item Inspection Standard<br />
Bolts and Screws<br />
Rivets<br />
Electrical Wiring and<br />
Cables<br />
Welds<br />
No stripped threads<br />
Must be tight.<br />
No loose or damaged connectors, cut or worn insulation,<br />
broken wires or kinks.<br />
Welded joints must not show signs of separation or<br />
failure.<br />
Lifting and Tie-down<br />
Eyes<br />
Hoses<br />
Contol Panel<br />
Must be free of rust, cracks, breaks, or stripped<br />
threads.<br />
Hoses and fittings must not be deformed or broken.<br />
All valves, switches, and knobs must be operable.<br />
The glass windows on the gages must not be<br />
broken.<br />
Instruction and<br />
Nameplates<br />
MWO’s<br />
Must be present, legible, and secure<br />
Check that all required MWO’s have been applied<br />
and are properly recorded. (See DA PAM 738-750.)<br />
Fuel System<br />
Water Heating Boiler<br />
Must be free of leaks,<br />
Boiler must be free of leaks. The spark arrestor<br />
must be present and free of damage. Nozzle and<br />
screen must be clean.<br />
Paint<br />
Painted surfaces must be in good condition and<br />
free of bare spots, rust, and peeling.<br />
Tools<br />
Must be present and in good condition
INSPECTION STANDARD FOR TANK UNIT<br />
Item Inspection Standard Item Inspection Standard<br />
Bolts and Screws<br />
Welds<br />
Lifting and Tie-down<br />
Eyes<br />
Paint<br />
Water Tank<br />
No stripped threads.<br />
Welded joints must not show signs of separation or<br />
failure.<br />
Must be free of rust, cracks, breaks, or stripped<br />
threads.<br />
Painted surfaces must be in good condition and<br />
free of bare spots, rust, and peeling.<br />
Must be free of leaks.<br />
Diaphragm Valve<br />
Hoses<br />
Hopper-blender<br />
Must not leak. Must be operable throughout its<br />
entire range from full open to shut off. Protective<br />
cap must be in place.<br />
Hoses and fittings must not be deformed or broken.<br />
Must not be punctured. Numbers on the tank liquid<br />
<strong>level</strong> indicator must be legible. Gaskets must<br />
be present and in good condition. Strainer must<br />
be clean.<br />
INSPECTION STANDARD FOR SHOWER ASSEMBLY<br />
Item Inspection Standard Item Inspection Standard<br />
Pipes Piping must not be bent or broken or have missing Gaskets Must be present in couplings and free of cracks.<br />
lengths. Holes must be clear in the showering section<br />
pipes. Threads must not be stripped. Sediment Strainer The mesh screen must be clean and free of tears.<br />
Quick Release<br />
Couplings<br />
Both halves must be present and not deformed or<br />
broken.<br />
2-247 TM 3-42<strong>30</strong>-<strong>209</strong>-<strong>30</strong>&P
A-O<br />
APPENDIX A<br />
REFERENCES<br />
TM 3-42<strong>30</strong>-<strong>209</strong>-<strong>30</strong>&P<br />
A-1 . ARMY REGULATIONS.<br />
AR 735-11-2. . . . . . . . . . . . . . . . . . . . . . . . . . . . . . . Reporting of ltem and Packaging Discrepancies<br />
AR 746-1 . . . . . . . . . . . . . . . . . . . . . . . . . . . . . . . . . . Packaging of Army Materiel for Shipment and Storage<br />
AR 755-2 . . . . . . . . . . . . . . . . . . . . . . . . . . . . . . . . .. Disposal of Excess. Surplus. Foreign Excess. Captured. and Unwanted Materiel<br />
A-2. DEPARTMENT OF ARMY PAMPHLETS.<br />
DA PAM 310-1 . . . . . . . . . . . . . . . . . . . . . . . . . . . Consolidated Index of Army Publications and Blank Forms<br />
DA PAM 738-750 . . . . . . . . . . . . . . . . . . . . . . . . . .. The Army Maintenance Management Systems (TAMMS)<br />
A-3. FIELD MANUAL.<br />
FM10-16 . . . . . . . . . . . . . . . . . . . . . . . . . . . . . . . . .. General Fabric Repair<br />
FM 21-11 . . . . . . . . . . . . . . . . . . . . . . . . . . . . . . . . .. First Aid for Soldiers<br />
A-4. LUBRICATION ORDERS.<br />
LO 3-42<strong>30</strong>-<strong>209</strong>-10 . . . . . . . . . . . . . . . . . . . . . . . . . . . Decontaminating Apparatus, Power-Driven, Skid-Mounted, Multipurpose, Nonintegral, 500-Gallon,<br />
ABC-M12A1<br />
LO 5-2805-259-12 . . . . . . . . . . . . . . . . . . . . . . . . . . . Engine, Gasoline, 20 HP, Military Standard Models (Model 4A084-2 and 4A084-3) (LI-03524B-10-1A;<br />
TO 38G2-89-41LC-1)<br />
A-5. MILITARY STANDARDS.<br />
MIL-STD-171 . . . . . . . . . . . . . . . . . . . . . . . . . . . . . .. Finishing of Metal and Wood Surfaces<br />
MIL-STD-681 . . . . . . . . . . . . . . . . . . . . . . . . . . . . . . . Identification Coding and Application of Hookup and Lead Wire<br />
A-6. COMMON TABLE OF ALLOWANCES.<br />
CTA 8-100 . . . . . . . . . . . . . . . . . . . . . . . . . . . . . . . . . Army Medical Depar<strong>tm</strong>ent Expendable/Durable Items<br />
CTA 50-970 . . . . . . . . . . . . . . ., . . . . . . . . . . . . . . . Expendable/Durable Items (Except: Medical, Class V, Repair Parts and Heraldic Items)<br />
A-7. TECHNICAL BULLETINS.<br />
TB 43-180 . . . . . . . . . . . . . . . . . . . . . . . . . . . . . . . . . Calibration and Repair Requirements for the Maintenance of Army Material
A-8. TECHNICAL MANUALS<br />
TM 3-1040-251 -15 . . . . . . . . . . . . . . . . . . . . . . . . . . Operator’s, Organizational, Direct Support, General Support and Depot Maintenance Manual: Test Set, Flame<br />
Thrower - Riot Control Agent Disperser Hydrostatic and Volumetric, 6,000 PSI,M5<br />
TM 3-42<strong>30</strong>-<strong>209</strong>-10 . . . . . . . . . . . . . . . . . . . . . . . . Operator’s Manual: Decontaminating Apparatus, Power-Driven, Skid-Mounted, 500-Gallon, M12A1<br />
TM 3-42<strong>30</strong>-<strong>209</strong>-20&P. . . . . . . . . . . . . . . . . . . . . Unit Maintenance Manual Including Repair Parts and Special Tools List: Decontaminating Apparatus, Power-<br />
Driven, Skid-Mounted, 500-Gallon, M12A1<br />
TM 5-2805-259-14 . . . . . . . . . . . . . . . . . . . . . . . . . . Operator’s, Organizational, Direct Support, and General Support Maintenance Manual: Engine, Gasoline, 20 HP<br />
(Military Standard Models 4A084-2) (NSN 2805-00-952-3926) and (Model 4A083-3) (2805-00-872-5972)<br />
(TM-03524B-14; to 38G2-89-411)<br />
TM 9-237 . . . . . . . . . . . . . . . . . . . . . . . . . . . . . . . . . Operator’s Manual for Welding Theory and Application<br />
TM 9-6140-200-14 . . . . . . . . . . . . . . . . . . . . . . . . . Operator’s, Organizational, Direct Support and General Support Maintenance Manual for Lead-Acid Storage<br />
Batteries<br />
TM 38-2<strong>30</strong>-1 . . . . . . . . . . . . . . . . . . . . . . . . . . . . . . . Packaging of Materiel: Preservation (Vol 1)<br />
TM 43-0139 . . . . . . . . . . . . . . . . . . . . . . . . . . . . . . . . Painting Instructions for Field Use<br />
A-9. OTHER PUBLICATIONS.<br />
QSTAG 233 . . . . . . . . . . . . . . . . . . . . . . . . . . . . . . . American-British-Canadian-Austrialian-NewZealand Armies Standardization Program Decontaminating<br />
Apparatus, Power-Driven, Skid- Mounted: Multipurpose, Nonintegral, 500-Gallon, ABC-M12A1<br />
A-1 TM 3-42<strong>30</strong>-<strong>209</strong>-<strong>30</strong>&P
B-O<br />
APPENDIX B<br />
INTERMEDIATE DIRECT SUPPORT MAINTENANCE<br />
REPAIR PARTS AND SPECIAL TOOLS LIST<br />
(INCLUDING DEPOT MAINTENANCE REPAIR PARTS)<br />
TM 3-42<strong>30</strong>-<strong>209</strong>-<strong>30</strong>&P<br />
Section I. INTRODUCTION<br />
B-1. SCOPE. This RPSTL lists and authorizes spares and repair parts; special tools; special test, measurement, and diagnostic equipment (TMDE); and other special<br />
support equipment required for performance of organizational and direct support maintenance of the decontaminating apparatus. It authorizes the requisitioning,<br />
issue, and disposition of spares, repair parts and special tools indicated by the Source, Maintenance and Recoverability (SMR) codes.<br />
B-2. GENERAL. In addition to Section 1, Introduction, this Repair Parts and Special Tools List is divided into the following sections:<br />
a. Section Il. Repair Parts List. A list of spares and repair parts authorized by this RPSTL for use in the performance of maintenance. The list also includes parts<br />
which must be removed for replacement of the authorized parts. Parts lists are composed of functional groups in ascending alphanumeric sequence, with the parts in<br />
each group listed in ascending figure and item number sequence. Bulk materials are listed by item name in FIG. BULK at the end of the section. Repair parts kits are<br />
listed separately in their own functional group within section Il.<br />
b. Section ///. Specia/ Too/s List. Not applicable.<br />
c. Section IV. National Stock Number and Part Number Index. A list, in National item identification number (NIIN) sequence, of all National stock numbered items<br />
appearing in the listing, followed by a list in alphanumeric sequence of all part numbers appearing in the listing. National stock numbers and part numbers are<br />
cross-referenced to each illustration figure and item number appearance.<br />
B-3. EXPLANATION OF COLUMNS (SECTION II).<br />
a. ITEM NO. (Column (1)). Indicates the number used to identify items called out in the illustration.<br />
b. SMR CODE (Column (2)). The Source, Maintenance, and Recoverability (SMR) code is a 5-position code containing supply/requisitioning information,<br />
maintenance <strong>level</strong> authorization criteria, and disposition instruction, as shown in the following breakout:
*Complete Repair: Maintenance capacity, capability, and authority to perform all corrective maintenance tasks of the “Repair” function in a use/user environment in<br />
order to restore serviceability to a failed item.<br />
(1) Source code. The source code tells you how you get an item needed for maintenance, repair, or overhaul of an end item/equipment. Explanations of<br />
source codes follow:<br />
Code<br />
Exp/anation<br />
Stocked items; use the applicable NSN to request/requisition items with these source codes. They are authorized to the <strong>level</strong> indicated by<br />
the code entered in the 3d position of the SMR code.<br />
NOTE: Items coded PC are subject to deterioration.<br />
Items with these codes are not to be requested/requisitioned individually. They are part of a kit which is authorized to the maintenance <strong>level</strong><br />
indicated in the 3d position of the SMR code. The complete kit must be requisitioned and applied.<br />
B-1 TM 3-42<strong>30</strong>-<strong>209</strong>-<strong>30</strong>&P
B-2<br />
TM 3-42<strong>30</strong>-<strong>209</strong>-<strong>30</strong>&P<br />
Items with these codes are not to be requested/requisitioned individually. They must be made from bulk material which is identified by<br />
the part number in the DESCRIPTION AND USABLE ON CODE (UOC) column and listed in the bulk material group in the repair parts<br />
list in this RPSTL. If the item is authorized to you by the 3d position code of the SMR code, but the source code indicates it is made at<br />
a higher <strong>level</strong>, order the item from the higher <strong>level</strong> of maintenance.<br />
Items with these codes are not to be requested/requisitioned individually. The parts that makeup the assembled item must be<br />
requisitioned or fabricated and assembled at the <strong>level</strong> of maintenance indicated by the source code. If the 3d position code of the<br />
SMR code authorizes you to replace the item, but the source code indicates the item is assembled at a higher <strong>level</strong>, order the item<br />
from the higher <strong>level</strong> of maintenance.<br />
XA -<br />
Do not requisition an “XA” -coded item. Order its next higher assembly. (Also, refer to the NOTE below.)<br />
XB - If an “XB” item is not available from salvage, order it using the FSCM and part number given.<br />
XC - Installation drawing, diagram, instruction sheet, field service drawing, that is identified by manufacturer’s part number.<br />
XD - Item is not stocked. Order an “XD” -coded item through normal supply channels using the FSCM and part number given, if no NSN is available.<br />
NOTE<br />
Cannibalization or controlled exchange, when authorized, may be used as a source of supply for items with the above source codes, except for those<br />
source coded “XA”.<br />
(2) Maintenance code. Maintenance codes tell you the <strong>level</strong>(s) of maintenance authorized to USE and REPAIR support items. The maintenance codes are<br />
entered in the third and fourth positions of the SMR code as follows:
(a) The maintenance code entered in the third position tells you the lowest maintenance <strong>level</strong> authorized to remove, replace, and use an item. The<br />
maintenance code entered in the third position will indicate authorization to one of the following <strong>level</strong>s of maintenance:<br />
Code<br />
C -<br />
0 -<br />
F -<br />
H-<br />
L -<br />
D -<br />
Application/Explanation<br />
Crew or operator maintenance done within unit or aviation unit maintenance.<br />
Unit or aviation unit category can remove, replace, and use the item.<br />
Intermediate direct support or aviation intermediate <strong>level</strong> can remove, replace, and use the item.<br />
Intermediate general support <strong>level</strong> can remove, replace, and use the item.<br />
Specialized repair activity can remove, replace, and use the item.<br />
Depot <strong>level</strong> can remove, replace, and use the item.<br />
(b) The maintenance code entered in the fourth position tells you whether or not the item is to be repaired and identifies the lowest maintenance <strong>level</strong> with<br />
the capability to do complete repair (i.e., perform all authorized repair functions).<br />
NOTE<br />
Some limited repair may be done on the item at a lower <strong>level</strong> of maintenance, if authorized by the Maintenance Allocation Chart (MAC) and SMR codes.<br />
This position will contain one of the following maintenance codes:<br />
Code<br />
O-<br />
F -<br />
H -<br />
L -<br />
D-<br />
Z -<br />
B -<br />
B-3<br />
Unit or aviation unit is the lowest <strong>level</strong> that can do complete repair of the item.<br />
Application/Explanation<br />
Intermediate direct support or aviation intermediate is the lowest <strong>level</strong> that can do complete repair of the item.<br />
Intermediate general support is the lowest <strong>level</strong> that can do complete repair of the item.<br />
Specialized repair activity is the lowest <strong>level</strong> that can do complete repair of the item.<br />
Depot is the lowest <strong>level</strong> that can do complete repair of the item.<br />
Nonreparable. No repair is authorized.<br />
No repair is authorized. (No parts or special tools are authorized for the maintenance of a “B” coded item.) However, the item may be reconditioned by<br />
adjusting, lubricating, etc., at the user <strong>level</strong>.<br />
TM 3-42<strong>30</strong>-<strong>209</strong>-<strong>30</strong>&P
B-4 TM 3-42<strong>30</strong>-<strong>209</strong>-<strong>30</strong>&P<br />
(3) Recoverability code. Recoverability codes are assigned to items to indicate the disposition action on unserviceable items. The recoverability code is<br />
entered in the fifth position of the SMR code as follows:<br />
Recoverability<br />
Codes<br />
Z -<br />
O -<br />
F -<br />
H -<br />
D -<br />
L -<br />
A -<br />
Application/Explanation<br />
Nonreparable item. When unserviceable, condemn and dispose of the item at the <strong>level</strong> of maintenance shown in 3d position of SMR code.<br />
Reparable item. When uneconomically reparable, condemn and dispose of the item at unit or aviation unit <strong>level</strong>.<br />
Reparable item. When uneconomically reparable, condemn and dispose of the item at the intermediate direct support or aviation intermediate <strong>level</strong><br />
Reparable item. When uneconomically reparable, condemn and dispose of the item at the intermediate general support <strong>level</strong>.<br />
Reparable item. When beyond lower <strong>level</strong> repair capability, return to depot. Condemnation and disposal of item not authorized below depot <strong>level</strong>.<br />
Reparable item. Condemnation and disposal not authorized below specialized repair activity (SRA).<br />
Item requires special handling or condemnation procedures because of specific reasons (e.g., precious metal content, high dollar value, critical<br />
material, or hazardous material). Refer to appropriate manuals/directives for specific instructions.<br />
c. FSCM (Column (3)). The Federal Supply Code for Manufacturer (FSCM) is a 5-digit numeric code which is used to identify the manufacturer, distributor, or<br />
Government agency, etc., that supplies the item.<br />
d. PART NUMBER (Column (4)). Indicates the primary number used by the manufacturer (individual, company, firm, corporation, or Government activity), which<br />
controls the design and characteristics of the item by means of its engineering drawings, specifications standards, and inspection requirements to identify an item or<br />
range of items.<br />
NOTE<br />
When you use an NSN to requisition an item, the item you receive may have a different part number from the part ordered.<br />
e. DESCRIPTION AND USABLE ON CODE (UOC) (Column (5)). This column includes the following information:<br />
(1) The Federal item name and, when required, a minimum description to identify the item.<br />
(2) Items that are included in kits and sets are listed below the name of the kit or set.<br />
(3) Spare/repair parts that make up an assembled item are listed immediately following the assembled item line entry.<br />
(4) Part numbers for bulk materials are referenced in this column in the line item entry for the item to be manufactured/fabricated.<br />
(5) The statement “END OF FIGURE” appears just below the last item description in column 5 for a given figure in both section II and section Ill.<br />
f. QTY (Column (6)). The QTY (quantity per figure column) indicates the quantity of the item used in the breakout shown on the illustration figure, which is<br />
prepared for a functional group, subfunctional group, or an assembly. A “V” appearing in this column in lieu of a quantity indicates that the quantity is variable and the<br />
quantity may vary from application to application.
B-4. EXPLANATION OF COLUMNS (SECTION IV).<br />
a. NATIONAL STOCK NUMBER (NSN) INDEX.<br />
(1) STOCK NUMBER column. This column lists the NSN by National item identification number<br />
(NIIN) sequence. The NIIN consists of the last nine digits of the<br />
When using this column to locate an item, ignore the first 4 digits of the NSN. However, the complete NSN should be used when ordering items by stock number.<br />
(2) FIG. column. This column lists the number of the figure where the item is identified/located. The figures are in numerical order in section II and section Ill.<br />
(3) ITEM column. The item number identifies the item associated with the figure listed in the adjacent FIG. column. This item is also identified by the NSN<br />
listed on the same line.<br />
b. PART NUMBER INDEX. Part numbers in this index are listed by part number in ascending alphanumeric sequence (i.e., vertical arrangement of letter and<br />
number combination which places the first letter or digit of each group in order A through Z, followed by the numbers O through 9 and each following letter or digit in like<br />
order).<br />
(1) FSCM column. The Federal Supply Code for Manufacturer (FSCM) is a 5-digit numeric code used to identify the manufacturer, distributor, or Government<br />
agency, etc., that supplies the item.<br />
(2) PART NUMBER column. Indicates the primary number used by the manufacturer (individual, firm, corporation, or Government activity), which controls the<br />
design and characteristics of the item by means of its engineering drawings, specifications standards, and inspection requirements to identify an item or range of items.<br />
(3) STOCK NUMBER column. This column lists the NSN for the associated part number and manufacturer identified in the PART NUMBER and FSCM<br />
columns to the left.<br />
(4) FIG. column. This column lists the number of the figure where the item is identified/located in section Il.<br />
(5) ITEM column. The item number is that number assigned to the item as it appears in the figure referenced in the adjacent figure number column.<br />
B-5. SPECIAL INFORMATION.<br />
a. Fabrication Instructions. Bulk materials required to manufacture items are listed in the bulk material functional group of this RPSTL. Part numbers for bulk<br />
materials are also referenced in the description column of the line item entry for the item to be manufactured/fabricated. Detailed fabrication instructions for items<br />
source coded to be manufactured or fabricated are found in appendix D of this manual.<br />
b. Assembly Instructions. Detailed assembly instructions for items source coded to be assembled from component spare/repair parts are found in this manual.<br />
Items that make up the assembly are listed immediately following the assembly item entry or reference is made to an applicable figure.<br />
c. Kits. Line item entries for repair parts kits appear in a group in section II (see table of contents).<br />
d. Index Numbers. Items which have the word BULK in the figure column will have an index number shown in the item number column. This index number is a<br />
cross-reference between the National Stock Number/Part Number index and the bulk material list in section II.<br />
B-5 TM 3-42<strong>30</strong>-<strong>209</strong>-<strong>30</strong>&P
B-6<br />
TM 3-42<strong>30</strong>-<strong>209</strong>-<strong>30</strong>&P<br />
B-6. HOW TO LOCATE REPAIR PARTS.<br />
a. When National Stock Number or Part Number is Not Known:<br />
(1) First. Using the table of contents, determine the assembly group or subassembly group to which the item belongs. This is necessary since figures are<br />
prepared for assembly groups and subassembly groups, and listings are divided into the same groups.<br />
(2) Second. Find the figure covering the assembly group or subassembly group to which the item belongs.<br />
(3) Third. Identify the item on the figure and note the item number.<br />
(4) Fourth. Refer to the Repair Parts List for the figure to find the part number for the item number noted on the figure.<br />
(5) Fifth. Refer to the Part Number Index to find the NSN, if assigned.<br />
b. When National Stock Number or Part Number is Known:<br />
(1) First. Using the index of National Stock Numbers and Part Numbers, find the pertinent National Stock Number or Part Number. The NSN index is in<br />
National Item Identification Number (NIIN) sequence (see B-4a(1)). The part numbers in the PART NUMBER INDEX are listed in ascending alphanumeric sequence (see<br />
B-4b). Both indexes cross-reference you to the illustration figure and item number of the item you are looking for.<br />
(2) Second. After finding the figure and item number, verify that the item is the one you’re looking for, then locate the item number in the repair parts list for<br />
the figure.<br />
B-7. ABBREVIATIONS. Not applicable.
SECTION II TM 3-42<strong>30</strong>-<strong>209</strong>-<strong>30</strong>&P<br />
Section Il.<br />
REPAIR PARTS LIST<br />
* SUPPLIED WITH<br />
IDENTICALLY NUMBERED<br />
PART.<br />
Figure B-1. Decontaminating Apparatus
SECTION II<br />
TM3-42<strong>30</strong>-<strong>209</strong>-<strong>30</strong>&P<br />
(1) (2) (3) (4) (5) (6)<br />
ITEM SMR PART<br />
NO CODE FSCM NUMBER DESCRIPTION AND USABLE ON CODE (UOC) QTY<br />
GROUP 00 DECONTAMINATING APPARATUS<br />
D5-45-3264<br />
FIG. B-1 DECONTAMINATING APPARATUS<br />
1 PAOFA 81361 E5-59-200 HEATER,WATER,LIQUID FUEL (SEE 1<br />
FIG.B-38 FOR ASSEMBLY BREAKDOWN)<br />
2 PAOZZ 81361 C5-45-3256 PIPE,EXHAUST 2<br />
3 PAOFF 81361 D5-45-3233 PUMPING UNIT,DECONT (SEE FIG.B-3 1<br />
FOR ASSEMBLY BREAKDOWN)<br />
4 AOOOO 81361 D5-45-3186 SHOWER ASSEMBLY, (SEE FIG.B-2 FOR 1<br />
ASSEMBLY BREAKDOWN<br />
5 PAOFF 81361 C5-45-3183 TANK UNIT,DECONTAMI 1<br />
DECONTAMINATING APPARATUS, SKID-<br />
MOUNTED (SEE FIG.B-32 FOR ASSEMBLY<br />
BREAKDOWN)<br />
END OF FIGURE<br />
B-1-1
SECTION II<br />
TM 3-42<strong>30</strong>-<strong>209</strong>-<strong>30</strong>&P<br />
Figure B-2. Shower Assembly.
SECTION II<br />
TM3-42<strong>30</strong>-<strong>209</strong>-<strong>30</strong>&P<br />
(1) (2) (3) (4) (5) (6)<br />
ITEM SMR PART<br />
NO CODE FSCM NUMBER DESCRIPTION AND USABLE ON CODE (UOC) QTY<br />
GROUP 01 SHOWER ASSEMBLY D5-45-3186<br />
FIG.B-2 SHOWER ASSEMBLY<br />
1 PAOZZ 96906 MS<strong>209</strong>13-8S PLUG,PIPE 1<br />
2 PAOZZ 35311 SD5179 TEE,PIPE 6<br />
3 PAOZZ 96906 MS27022-6 COUPLING HALF,QUICK 7<br />
4 MOOZZ 81361 C5-45-3185-1 PIPE, MAKE FROM PIPE, METALLIC P/N 12<br />
ASTM A120/NSN 4710-00-152-1020<br />
5 PCCZZ 81361 B5-45-31<strong>30</strong>-1 GASKET 5<br />
6 PAOZZ 96906 MS27024-6 COUPLING HALF,QUICK 14<br />
7 PAOZZ 81361 B5-45-3185-2 PIPE,METALLIC 6<br />
8 PAOZZ 96906 MS27020-6 COUPLING HALF,QUICK 7<br />
9 PAOZZ 96906 MS51953-125 NIPPLE,PIPE 2<br />
10 PAOZZ 81361 B5-45-2590 STRAINER SEDIMENT 1<br />
11 PAOZZ 96906 MS51953-121 NIPPLE,PIPE 1<br />
12 PAOZZ 82666 575GALVI3-1/2 CAP,PIPE 6<br />
END OF FIGURE<br />
B-2-1
SECTION II<br />
TM 3-42<strong>30</strong>-<strong>209</strong>-<strong>30</strong>&P<br />
2<br />
/7<br />
*<br />
SUPPLIED WITH IDENTICALLY<br />
NUMBERED PART.<br />
Figure B-3.<br />
Pumping Unit.
SECTION II<br />
TM3-42<strong>30</strong>-<strong>209</strong>-<strong>30</strong>&P<br />
(1) (2) (3) (4) (5) (6)<br />
ITEM SMR PART<br />
NO CODE FSCM NUMBER DESCRIPTION AND USABLE ON CODE (UOC) QTY<br />
GROUP 02 PUMPING UNIT D5-45-3233<br />
FIG.B-3 PUMPING UNIT<br />
1 PAOFF 81361 E5-45-3221 COVER ASSEMBLY 1<br />
2 PAOZZ 96906 MS51851-65 SCREW,TAPPING,THREA 109<br />
3 PAOZZ 81361 C5-45-2979 COVER,ACCESS 1<br />
4 PAOFF 81361 C5-45-2975 COVER,ACCESS, TOP ASSEMBLY (SEE 1<br />
FIG.B-4 FOR ASSEMBLY BREAKDOWN)<br />
5 PAOFF 81361 C5-45-3266 CLEVIS AND EYE BOLT ASSEMBLY (SEE 4<br />
FIG.B-9 FOR ASSEMBLY BREAKDOWN)<br />
6 PAOZZ 81361 C5-45-<strong>30</strong>11 COVER,ACCESS 1<br />
7 AFOFF 81361 C5-45-<strong>30</strong>12 COVER PANEL ASSEMBLY (SEE FIG.B-5 1<br />
FOR ASSEMBLY BREAKDOWN)<br />
8 PAOFF 81361 C5-45-2973 COVER,ACCESS (SEE FIG.B-7 FOR 1<br />
ASSEMBLY BREAKDOWN)<br />
9 PAOFF 81361 C5-45-2974 COVER,ACCESS (SEE FIG.B-8 FOR 1<br />
ASSEMBLY BREAKDOWN)<br />
10 XAOFA 81361 D5-45-3235 PUMP UNIT ASSEMBLY (SEE FIG.B-10 1<br />
FOR ASSEMBLY BREAKDOWN)<br />
11 PAOZZ 81361 D5-45-2997 COVER,ACCESS 1<br />
12 PAOZZ 96906 MS20613-4P7 RIVET,SOLID 8<br />
13 PAOZZ 82240 NO 3 CATCH,CLAMPING 2<br />
14 PAOZZ 81361 C5-45-2977 COVER,ACCESS 1<br />
15 PAOZZ 81361 B5-45-2990 COVER,ACCESS 2<br />
16 PAOZZ 81361 C5-45-2978 COVER,ACCESS 1<br />
17 AFOFF 81361 C5-45-2972-10 PANEL ASSEMBLY, (SEE FIG.B-6 FOR 1<br />
ASSEMBLY BREAKDOWN)<br />
18 PAOZZ 96906 MS20613-4P4 RIVET,SOLID 8<br />
END OF FIGURE<br />
B-3-1
SECTION II TM3-42<strong>30</strong>-<strong>209</strong>-<strong>30</strong>&P<br />
1<br />
*<br />
NOFURTHER DISASSEMBLY<br />
AUTHORIZED.<br />
Figure B-4.<br />
Top Access Cover Assembly.<br />
(1) (2) [3) (4) (5)<br />
(6)<br />
ITEM SMR PART<br />
NO CODE FSCf’1 NUMBER DESCRIPTION P.IYD USAt3..r. ON C(lDESLU6C) CITY<br />
GROUP 020? TOP ACCESS Cfl’JER hSSEM13LY<br />
c5-~5-?’375<br />
FIG.B-4 TCIF ?.CCESS Cfl\’ER*A3SEMaLY<br />
1 MFFZZ 813S1 D5-45-2975-2 GASKET MAKE FF.3M Ru3BFR SHEET P/N 1<br />
PllLR46089/NSN 9320-09-262-2274. . . . . .<br />
EN2<br />
CIF FIGURE<br />
B-4-1
SECTION II TM3-42<strong>30</strong>-<strong>209</strong>-<strong>30</strong>&P<br />
Figure B-5.<br />
Cover Panel Assembly.<br />
(1) (2) (3) !4) (5) (6)<br />
I TEfl SMR P,A?T<br />
NO CODE FSCM fJIJMaER DE
SECTION II TM3-42<strong>30</strong>-<strong>209</strong>-<strong>30</strong>&P<br />
(1)<br />
1TEM<br />
?40<br />
(2)<br />
SMR<br />
Cf3DE<br />
Figure B-6. Cover, Panel Assembly.<br />
(3) (4) (5)<br />
PART<br />
FSCM NUMBER DESCRIPTION AND USA13LE 13N CflDES(U6C)<br />
(Fj)<br />
QTY<br />
GR6UP 0204 CUVER PANEL ASSEMBLY<br />
C5-45-2972-13<br />
FIG.B-6 C13VER PANEL ASSEMBLY<br />
1 MFFZZ 81361 B5-45-<strong>30</strong>97-2 GASKET M,fiKE FRCKI PACKING MATERIAL<br />
P/N i’1200SERIESlXl-8/NSli 93<strong>30</strong>-00-912-<br />
2707 . . . . . . . . . . . . . . . . . . . . . . . . . . . . . . . .<br />
2 MFFZZ 81361 65-45-<strong>30</strong>97-3 GASKET M1.KE FRClil PACKING MATERIAL<br />
P/N P1200SERIESlX1-8/TLSN 93<strong>30</strong>-00-912-<br />
2707. . ., . . . . . . . . . . . . . . . . . . . . . . . . . . .<br />
3 PAFZZ 81361 C5-45-<strong>30</strong>98-1 CCIVER, ACCESS.........,., . . . . . . . . . . . .<br />
4 PAFZZ 56873 40S5-8 STUOASSEMBLY, TURNL . . . . . . . . . . . . . . . . .<br />
5 PAFZZ 71286 4002N EYELET,TIJRNL(7CK F,4S . . . . . . . . . . . . . . . . .<br />
6 PAFZZ 71286 R4G RI NG, RETAINI NG . . . . . . . . . . . . . . . . . . . . . .<br />
2<br />
2<br />
1<br />
5<br />
5<br />
5<br />
B-6-1<br />
END<br />
13F FIGURE
SECTION II TM3-42<strong>30</strong>-<strong>209</strong>-<strong>30</strong>&P<br />
Figure B-7. Cover Panel Assembly.<br />
(1) (2) (3) (4) (~) (6)<br />
1TEM SMR PART<br />
NO CODE FSCM NUIBER DESCRIPTION AND lJSAi3!_E ON C13DES(lX3C) CITY<br />
GROUP 0205 ACCESS COVER C5-45-2973<br />
FIG.B-7 ACCESS I%VER<br />
1 MFFZZ 81361 B5-45-<strong>30</strong>97-4 GASKET MAKE FRCI?l PAC’’.ING MATERIAL<br />
P/N M200SER’ESIXl-8/NSN 9?<strong>30</strong>-OO-912-<br />
2707 . . . . . . . . . . . . . . . . . . . . . . . . . . . . . . .<br />
2 MFFZZ 81361 B5-45-<strong>30</strong>97-6 GASKET MAKE FRbM PACKING MATERIAL<br />
P/N M20CJSE!7iESlX1-O/NSN 92<strong>30</strong>-00-912-<br />
2707 . . . . . . . . . . . . . . . . . . . . . . . . . . . . . . . .<br />
3 PAFZZ 81361 C5-45-<strong>30</strong>99 COVER, PANEL . . . . . . . . . . . . . . . . . . . . . . . . .<br />
4 PAFZZ 56878 413SS-8 STUD ASSEMBLY, TURNL . . . . . . . . . . . . . . . . .<br />
5 PAFZZ 71286 4002N - EYELET,T’.JRNLOCK FAD. , . . . . . . . . . . . . . . .<br />
6 PAFZZ 71286 R4G RI NG,RETAINING . . . . . . . . . . . . . . . . . . . . .<br />
2<br />
2<br />
1<br />
8<br />
8<br />
8<br />
B-7-1<br />
END 13F FIGURE
SECTION II TM 3-42<strong>30</strong>-<strong>209</strong>-<strong>30</strong>&P<br />
/<br />
4<br />
5<br />
\<br />
\<br />
6<br />
9<br />
a<br />
w“<br />
/<br />
7<br />
8<br />
Figure B-8. Access Cover Panel Assembly.
SECTION II<br />
TM3-42<strong>30</strong>-<strong>209</strong>-<strong>30</strong>&P<br />
(1) (2) (3) (4) (5) (6)<br />
ITEM SMR PART<br />
NO CODE FSCM NUMBER DESCRIPTION AND USABLE ON CODE (UOC) QTY<br />
GROUP 0206 ACCESS COVER C5-45-2974<br />
FIG.B-8 ACCESS COVER<br />
1 XDFZZ 81361 C5-45-3100 COVER,PANEL 1<br />
2 PAOZZ 96906 MS35207-261 SCREW,MACHINE 4<br />
3 MFFZZ 81361 B5-45-<strong>30</strong>97-5 GASKET MAKE FROM PACKING MATERIAL 2<br />
P/N M200SERIES1X1-8/NSN 93<strong>30</strong>-00-912-<br />
2707<br />
4 MFFZZ 81361 B5-45-<strong>30</strong>97-4 GASKET MAKE FROM PACKING MATERIAL 2<br />
P/N M200SERIES1X1-8/NSN 93<strong>30</strong>-00-912-<br />
2707<br />
5 PAOZZ 81361 D5-45-3240 CARRIER,TOOL 1<br />
6 XDOZZ 81361 B5-45-3239 STRIP,POUCH 2<br />
7 PAOZZ 96906 MS35333-39 WASHER,LCOK 4<br />
8 PAOZZ 96906 MS35650-<strong>30</strong>2 NUT,PLAIN,HEXAGON 4<br />
9 PAFZZ 71286 R4G RING,RETAINING 8<br />
10 PAFZZ 71286 4002N EYELET, TURNLOCK FAS 8<br />
11 PAFZZ 56878 40S5-8 STUD ASSEMBLY, TRUNL 8<br />
END OF FIGURE<br />
B-8-1
SECTION II<br />
TM 3-42<strong>30</strong>-<strong>209</strong>-<strong>30</strong>&P<br />
1*<br />
*<br />
SUPPLIED WITH IDENTICALLY<br />
NUMBERED PART.<br />
Figure B-9.<br />
Clevis and Eye Bolt Assembly.
SECTION II<br />
TM3-42<strong>30</strong>-<strong>209</strong>-<strong>30</strong>&P<br />
(1) (2) (3) (4) (5) (6)<br />
ITEM SMR PART<br />
NO CODE FSCM NUMBER DESCRIPTION AND USABLE ON CODE (UOC) QTY<br />
GROUP 0207 CLEVIS AND EYE BOLT<br />
ASSEMBLY C5-45-3266<br />
FIG.B-9 CLEVIS AND EYE BOLT ASSEMBLY<br />
1 PAFZZ 96906 MS70087-1 SHACKLE 1<br />
2 MFFZZ 81361 C5-45-3266-1 SPACER MAKE FROM TUBE, METALLIC P/ 1<br />
N ASTM A 519-74/NSN 4710-01-013-9617<br />
3 PAFZZ 96906 MS51937-5 BOLT,EYE 1<br />
END OF FIGURE<br />
B-9-1
SECTION II TM 3-42<strong>30</strong>-<strong>209</strong>-<strong>30</strong>&P<br />
VIEW A<br />
Figure B-10. Pump Unit Assembly (1 of 4).
SECTION II TM 3-42<strong>30</strong>-<strong>209</strong>-<strong>30</strong>&P<br />
Figure B-10. Pump Unit Assembly (2 of 4).
SECTION II TM 3-42<strong>30</strong>-<strong>209</strong>-<strong>30</strong>&P<br />
/“<br />
,’ ”..<br />
\.<br />
.<br />
F<br />
4!<br />
A<br />
*MUST BE REMOVED HERE<br />
FOR DISASSEMBLY.<br />
.,, -,.,.<br />
Vltw /+<br />
Figure B-10. Pump Unit Assembly (3 of 4).
t<br />
(’<br />
SECTION II<br />
TM 3-42<strong>30</strong>-<strong>209</strong>-<strong>30</strong>&P<br />
50<br />
52<br />
53<br />
E<br />
‘\\ 59A w -15<br />
\<br />
Figure B-10. Pump Unit Assembly (4 of 4).
SECTION II<br />
TM3-42<strong>30</strong>-<strong>209</strong>-<strong>30</strong>&P<br />
(1) (2) (3) (4) (5) (6)<br />
ITEM SMR PART<br />
NO CODE FSCM NUMBER DESCRIPTION AND USABLE ON CODE (UOC) QTY<br />
GROUP 0208 PUMP UNIT ASSEMBLY<br />
D5-45-3235<br />
FIG.B-10 PUMP UNIT ASSEMBLY<br />
1 PAOZZ 96906 MS27183-7 WASHER,FLAT 3<br />
2 PAOZZ 96906 MS51851-65 SCREW,TAPPING 17<br />
3 XDFZZ 81361 C5-45-2986 SHELL 1<br />
4 PAFZZ 96906 MS51922-1 NUT,SELF-LOCKING,HE 4<br />
5 AOOOO 81361 C5-45-2735-10 HOSE ASSEMBLY, DISCHARGE (SEE 2<br />
FIG.B-12 FOR ASSEMBLY BREAKDOWN<br />
6 PAOZZ 81361 C5-45-2701 NOZZLE,FIRE HOSE,FO 2<br />
7 PAOZZ 81361 C5-45-2699 NOZZLE,FIRE HOSE,WA 2<br />
8 PAOOO 81361 C5-45-2563 GUN ASSEMBLY (SEE FIG.B-11 FOR 2<br />
ASSEMBLY BREAKDOWN)<br />
9 PAOZZ 81361 C5-45-2932 ADAPTER,STRAIGHT,PI 2<br />
10 XDFZZ 81361 C5-45-<strong>30</strong>02-2 BRACKET,GUN 1<br />
11 PAFZZ 96906 MS27183-10 WASHER,FLAT 4<br />
12 PAFZZ 96906 MS35190-290 SCREW,MACHINE 4<br />
13 XDFZZ 81361 C5-45-<strong>30</strong>02-1 BRACKET,GUN 1<br />
14 PAOZZ 96906 MS51922-17 NUT,SELF-LOCKING,HE 8<br />
15 PAOZZ 96906 MS27183-14 WASHER,FLAT 9<br />
16 PAOOO 81361 D5-45-2996 LID,TANK (SEE FIG.B-13 FOR 1<br />
ASSEMBLY BREAKDOWN)<br />
17 PAOZZ 81361 B5-45-<strong>30</strong>74 RUBBER STRIP 2<br />
18 XDOZZ 81361 C5-45-2995 STRAP,FUEL TANK 2<br />
19 MOOZZ 81361 B5-45-<strong>30</strong>97-7 GASKET MAKE FROM PACKING MATERIAL 2<br />
P/N M200SERIES1X1-8/NSN 93<strong>30</strong>-00-912-<br />
2707<br />
20 PAFZZ 96906 MS25036-108 TERMINAL,LUG 4<br />
21 MFFZZ 81361 NPNWIRE WIRE, ELECTRICAL MAKE FROM WIRE, 1<br />
ELECTRICAL P/N M5086/1-16-6/NSN<br />
6145-00-946-1361<br />
22 MFFZZ 81361 D5-45-3250 GROUND WIRE MAKE FROM WIRE, 1<br />
ELECTRICAL P/N M5086/1-16-6/NSN<br />
6145-00-946-1361<br />
B-10-1
SECTION II<br />
TM3-42<strong>30</strong>-<strong>209</strong>-<strong>30</strong>&P<br />
(1) (2) (3) (4) (5) (6)<br />
ITEM SMR PART<br />
NO CODE FSCM NUMBER DESCRIPTION AND USABLE ON CODE (UOC) QTY<br />
23 PAOZZ 96906 MS35338-138 WASHER,LOCK 1<br />
24 PAOZZ 96906 MS51958-63 SCREW,MACHINE 1<br />
25 PAOFF 81361 D5-45-3127 TANK,FUEL,ENGINE (SEE FIG.B-15 FOR 1<br />
ASSEMBLY BREAKDOWN)<br />
26 PAOZZ 96906 MS18154-60 SCREW,CAP,HEXAGON 8<br />
27 PAOZZ 96906 MS51922-9 NUT,SELF-LOCKING,HE 4<br />
28 PAOZZ 96906 MS27183-12 WASHER,FLAT 2<br />
29 XDOZZ 27742 5012-3217-102-2 DRAIN HANDLE 1<br />
<strong>30</strong> PAOZZ 81361 B5-45-2992 SHAFT,SHOULDERED EXTENSION 2<br />
31 PAOZZ 96906 MS16562-33 PIN,SPRING 2<br />
32 PAOZZ 81361 C5-45-2991 SLEEVE,EXTENSION 2<br />
33 PAOZZ 81361 B5-45-3267 SLEEVE,LOCKING 2<br />
34 PAOZZ 96906 MS51967-20 NUT,PLIAN,HEXAGON 2<br />
35 AOOOO 81361 C5-45-3199 HOSE ASSEMBLY (SEE FIG.B-14 FOR 1<br />
ASSEMBLY BREAKDOWN)<br />
36 PAOZZ 81361 B5-45-<strong>30</strong>15-10 NIPPLE,PIPE 1<br />
37 PAOZZ 34646 <strong>30</strong>3L5 3-4 IN 316 ELBOW,PIPE 1<br />
CRES<br />
38 PAOZZ 01029 A36TT-3/4 VALVE,BALL 1<br />
39 PAOZZ 81361 D5-45-2967 TANK ASSEMBLY,PRIME DETERGENT 1<br />
40 PAOZZ 81361 C5-45-3146 RETAINER,BATTERY 1<br />
41 PAOFA 96906 MS75047-1 BATTERY,STORAGE 1<br />
42 PAOZZ 96906 MS90725-32 BOLT,MACHINE 1<br />
43 PAOZZ 96906 MS35338-45 WASHER,LOCK 1<br />
44 AOOOO 81361 B5-45-3134 CABLE (SEE FIG.B-17 FOR ASSEMBLY 1<br />
BREAKDOWN)<br />
45 PAOZZ 81348 FFS107TYPEFPOINT SCREW,TAPPING 1<br />
46 PAOZZ 96906 MS21334-5 CLAMP,LOOP 1<br />
47 AOOOO 81361 B5-45-3137 CABLE, NEGATIVE BATTERY (SEE FIG.B- 1<br />
16 FOR ASSEMBLY BREAKDOWN)<br />
48 PAOZZ 81361 B5-45-3147 PAD,BATTERY 1<br />
49 PAOZZ 81361 B5-45-3136 BOLT,HOOK 2<br />
50 XAOFF 81361 D5-45-3231 PUMP UNIT SUBASSEMBLY (SEE FIG.B- 1<br />
18 FOR ASSEMBLY BREAKDOWN)<br />
B-10-2
SECTION II<br />
TM3-42<strong>30</strong>-<strong>209</strong>-<strong>30</strong>&P<br />
(1) (2) (3) (4) (5) (6)<br />
ITEM SMR PART<br />
NO CODE FSCM NUMBER DESCRIPTION AND USABLE ON CODE (UOC) QTY<br />
51 PAOZZ 81361 D5-45-3280 SHAFT ASSEMBLY,FLEX 1<br />
52 XDFFF 81361 D5-45-3236 CONTROL PANEL ASSEMBLY (SEE FIG.B- 1<br />
<strong>30</strong> FOR ASSEMBLY BREAKDOWN)<br />
53 PAFZZ 88044 AN935-416 WASHER,LOCK 14<br />
54 PAFZZ 96906 MS90725-1 SCREW,CAP,HEXAGON 14<br />
55 PAOZZ 50599 R22002CC4-<strong>30</strong> HOSE ASSEMBLY,NONME 1<br />
56 PAOZZ 50599 R22002CC4-9 HOSE ASSEMBLY,NONME 1<br />
57 PAFZZ 96906 MS35206-245 SCREW,MACHINE 1<br />
58 PAFZZ 96906 MS25043-16D COVER,ELECTRICAL 1<br />
59 PAFZZ 96906 MS21333-76 CLAMP,LOOP 2<br />
60 PAFZZ 81361 B5-45-3289 CABLE ASSEMBLY 1<br />
61 AFFFF 81361 C5-45-3248 ELECTRICAL WIRING (SEE FIG.B-31 1<br />
FOR ASSEMBLY BREAKDOWN)<br />
62 PAFZZ 96906 MS21044-N08 NUT,SELF-LOCKING HEXAGON 1<br />
END OF FIGURE<br />
B-10-3/(B-10-4 BLANK)
SECTION II<br />
TM 3-42<strong>30</strong>-<strong>209</strong>-<strong>30</strong>&P<br />
*SUPPLIED WITH IDENTICAL<br />
NUMBERED PART.<br />
**NO FURTHER DISASSEMBLE<br />
AUTHORIZED.<br />
Figure B-11. Gun Assembly and Slurry Nozzle Assembly.
SECTION II<br />
TM3-42<strong>30</strong>-<strong>209</strong>-<strong>30</strong>&P<br />
(1) (2) (3) (4) (5) (6)<br />
ITEM SMR PART<br />
NO CODE FSCM NUMBER DESCRIPTION AND USABLE ON CODE (UOC) QTY<br />
GROUP 020801 GUN ASSEMBLY C5-45-2563<br />
AND GROUP 02080101 SLURRY NOZZLE<br />
ASSEMBLY C5-45-2700<br />
FIG.B-11 GUN ASSEMBLY AND<br />
SLURRY NOZZLE ASSEMBLY<br />
1 PAOOO 81361 C5-45-2700 NOZZLE ASSEMBLY,SLU 1<br />
2 PAOZZ 52659 S7756-1 ORIFICE AND DEFLECT 1<br />
3 PAOZZ 52659 S7770 SPACER,RING 1<br />
4 PAOZZ 96906 MS16625-4156 RING,RETAINING 1<br />
5 PCCZZ 81361 B5-45-2934 GASKET 1<br />
6 PAOZZ 81361 C5-45-2911 ADAPTER,STRAIGHT, PIPE 1<br />
7 PAOZZ 81361 C5-45-2920 VALVE,BALL 1<br />
END OF FIGURE<br />
B-11-1
SECTION II TM3-42<strong>30</strong>-<strong>209</strong>-<strong>30</strong>&P<br />
4<br />
Figure B-12. Discharge Hose Assembly.<br />
(1) (2) (3) (4) (5) (6)<br />
ITEM SMR PART<br />
NO CODE FSCtl NUIBER DESCRIPTION AND USAELE ON COCJES(U3C) QTY<br />
GROUP 020802 DISCHARGE HOSE ASSEMBLY<br />
C5-45-2735-1O<br />
FIG. B-12 DISCHARGE HOSE ASSEMBLY<br />
1 PAOZZ 8 361 B5-45-2635 GASKET . . . . . . . . . . . . . . . . . . . . . . . . . . . . . . 2<br />
2 PA5ZZ 8 361 B5-45-29<strong>30</strong> COIJPLI NG, HALF,MODIF . . . . . . . . . . . . . . . . . 2<br />
3 PAOZZ f? 361 B5-45-2682 NUT . . . . . . . . . . . . . . . . . . . . . . . . . . . . . . . . . 2<br />
4 PAOZZ 77414 P8S-2 CLAMP,HOSE. . . . . . . . . . . . . . . . . . . . . . . . . 4<br />
5 MOOZZ 81361 C5-45-2736-2 HOSE MAKE FRCIM H@3E,NONMETALLIC P/ V<br />
N 421B-lINCHID/NSN 47?0-00-595-4103.<br />
END 13F FIGURE<br />
B-12-1
SECTION<br />
II<br />
TM 3-42<strong>30</strong>-<strong>209</strong>-<strong>30</strong>&P<br />
n<br />
//<br />
I & I 1<br />
J *<br />
*No FURTHER DISASSEMBLY<br />
AuTHORIZED.<br />
Figure B-13.<br />
Tank Lid.<br />
(1) (2) (3)<br />
(4)<br />
ITEM SMR PART<br />
NO c6DE FSCM NUMBER DESCR1 PT 10N AND USABLE ON CODES ( UOC ) QTY<br />
(5)<br />
GROUP 020803 TANK LID<br />
CS-45-2996<br />
(6)<br />
FIG. B-13 TANK LID<br />
1 PAOZZ 92878 58671<br />
2 PAOZZ 96906 MS51958-63<br />
3 PAOZZ 99862 CL-22-KA-18<br />
4 PAOZZ 96906 MS21044C3<br />
KNOB......CO>O.,.CO>o ‘“”’”’””’ ;<br />
SCREW,MACHI NE . . . . . . . . . . . . . . . . . . . . . . .<br />
WIRE ROPE ASSEMBLY . . . . . . . . . . . . . . . . . 1<br />
NUT,SELF-LOCKING,HE . . . . . . . . . . . . . . . . . 1<br />
END OF FIGURE<br />
B-13-1
SECTION II TM3-42<strong>30</strong>-<strong>209</strong>-<strong>30</strong>&P<br />
4<br />
Figure B-14.<br />
Eductor Hose Assembly.<br />
(1) (2) (3)<br />
(4) (5) (6)<br />
ITEM SMR PART<br />
NO COOE FSCM NU’lBER DESCRIPTION AND USABLE ON Ct3DES(UOC) QTY<br />
GROUP 020804<br />
EI’IUCTCIR HOSE A.SSEMBLY<br />
C5-45-3139<br />
FIG. B-14 EDUCTOR HOSE ASSEMBLY<br />
1 PAOZZ 81361 B5-45-3200 GASKET. . . . . . . . . . . . . . . . . . . . . . . . . . . . . . 2<br />
2 PAOZZ 81361 B5-45-3201 STEM . . . . . . . . . . . . . . . . . . . . . . . . . . . . . . . . 2<br />
3 PAOZZ 81361 65-45-3202 NUT . . . . . . . . . . . . . . . . . . . . . . . . . . . . . . . . . 2<br />
4 PAOZZ 77414 P8S-2 CLAMP, H~SE. ..,,,....,.,.. . . . . . . . . . . . 4<br />
5 M06ZZ 81361 CS-45-3265 HOSE,RUBBER MAKE 7ROM HOSE, 1<br />
NONMETALLIC P/’N 124WW/NSN 4720-00-<br />
961-3522 . . . . . . . . . . . . . . . . . . . . . . . . . . . .<br />
END oF FIGuRE<br />
B-14-1/(B-14-2<br />
blank)
SECTION II<br />
TM 3-42<strong>30</strong>-<strong>209</strong>-<strong>30</strong>&P<br />
Figure B-15.<br />
Engine Fuel Tank.
SECTION II<br />
TM3-42<strong>30</strong>-<strong>209</strong>-<strong>30</strong>&P<br />
(1) (2) (3) (4) (5) (6)<br />
ITEM SMR PART<br />
NO CODE FSCM NUMBER DESCRIPTION AND USABLE ON CODE (UOC) QTY<br />
GROUP 020805 ENGINE FUEL TANK<br />
D5-45-3127<br />
FIG.B-15 ENGINE FUEL TANK<br />
1 PAOZZ 96906 MS35645-1 CAP,FILLER OPENING 1<br />
2 PAFZZ 96906 MS51958-63 SCREW,MACHINE 5<br />
3 PAFZZ 96906 MS35338-138 WASHER,LOCK 5<br />
4 PAFZZ 70040 FGS3 TRANSMITTER,LIQUID 1<br />
5 PAFZZ 81361 B5-45-3225 GASKET 1<br />
6 XDFZZ 81361 D5-45-3127-1 TANK,FUEL: 20 GALLON 1<br />
7 PAFZZ 79470 3325X4X2 REDUCER,PIPE 1<br />
8 PAOZZ 96906 MS90908-1 STRAINER ELEMENT 1<br />
END OF FIGURE<br />
B-15-1
SECTION II TM3-42<strong>30</strong>-<strong>209</strong>-<strong>30</strong>&P<br />
1<br />
/<br />
1*<br />
P<br />
‘N ‘“<br />
*SUPPLIEDWITH<br />
IDENTICALLY NUMBERED<br />
PART.<br />
Figure B-16. Negative Battery Cable.<br />
(1) (2) (3) (4) (5) (6)<br />
1TEM SMR PART<br />
NO CODE FSCM NUMBER DESCRIPTION AND USABLE ON CODES(WC) QTY<br />
GROUP 020806 NEGATIVE BATTERY CABLE<br />
B5-45-3137<br />
FIG. B-16 NEGATIVE BATTERY CABLE<br />
1 PAOZZ 96906 MS75004-2 TERMINAL, L~ . . . . . . . . . . . . . . . . . . . . . . . . 1<br />
2 PAOZZ 96906 MS25036-127 TERMINAL, LO . . . . . . . . . . . . . . . . . . . . . . . 2<br />
3 MOOZZ 81361 B5-45-3137-1 CABLE, NEGATIVE BATTERY 48 IN LG 1<br />
MAKE FROM CABLE ELECTRICAL P/N<br />
M13486/1-11 . . . . . . . . . . . . . . . . . . . . . . . . .<br />
B-16-1<br />
END OF FIGURE
(<br />
SECTION II TM3-42<strong>30</strong>-<strong>209</strong>-<strong>30</strong>&P<br />
1 2<br />
I<br />
*suppLIEDwlTH<br />
IDENTICALLYNUMBERED<br />
PART.<br />
Figure 13-17. Positive Battery<br />
Cable.<br />
(1) (2) (3) (4) (5) (6)<br />
ITEM SMR PART<br />
NO CODE FSCM NUIBER DESCRIPTION AND LSABLE ON CCJ13ES(Lh3C) QTY<br />
GRCNJP 020807 POSITIVE BATTERY CABLE<br />
B5-45-3134<br />
FIG.B-17 POSITIVE BATTERY CABLE<br />
1 PAOZZ 96906 MS75004-1 TERMINAL, LO . . . . . . . . . . . . . . . . . . . . . . . . 1<br />
2 PAOZZ 96906 MS25036-127 TERMINAL, LUG . . . . . . . . . . . . . . . . . . . . . . . . 2<br />
3 MOCIZZ 81361 B5-45-3134-1 CABLE, POSITIVE, 8ATTERY: 52 iN. 1<br />
LG MAKE FRtlM CABLE ELECTRICAL P/N<br />
M13486/1-11 . . . . . . . . . . . . . . . . . . . . . . . . .<br />
END<br />
13F FIGURE<br />
B-17-1
SECTION II TM 3-42<strong>30</strong>-<strong>209</strong>-<strong>30</strong>&P<br />
7<br />
J \ \<br />
/<br />
9-<br />
?<br />
8<br />
Figure B-18. Pump Unit Subassembly (1 of 3).<br />
io
(’<br />
SECTION<br />
II<br />
TM 3-42<strong>30</strong>-<strong>209</strong>-<strong>30</strong>&P<br />
Figure B-18. Pump Unit Subassembly (2 of 3).
SECTION II<br />
TM 3-42<strong>30</strong>-<strong>209</strong>-<strong>30</strong>&P<br />
31 90<br />
<strong>30</strong><br />
Figure B-18. Pump Unit Subassembly (3 of 3).
SECTION II<br />
TM3-42<strong>30</strong>-<strong>209</strong>-<strong>30</strong>&P<br />
(1) (2) (3) (4) (5) (6)<br />
ITEM SMR PART<br />
NO CODE FSCM NUMBER DESCRIPTION AND USABLE ON CODE (UOC) QTY<br />
GROUP 020808 PUMP UNIT SUBASSEMBLY<br />
D5-45-3231<br />
FIG.B-18 PUMP UNIT ASSEMBLY<br />
1 XDOZZ 81361 C5-45-2976 PANEL 1<br />
2 XDOZZ 81361 D5-45-3203-5 PLATE, IDENTIFICATION DISCHARGE 2<br />
3 PAOZZ 96906 MS21318-20 SCREW,DRIVE 46<br />
4 PAOZZ 96906 MS27020-6 COUPLING HALF,QUICK 2<br />
5 PAOZZ 81361 B5-59-381 CAP,PRTECTIVE,DUST 1<br />
6 MOOZZ 81361 C5-45-2641-1 CHAIN, MAKE FROM CHAIN, WELDLESS P/ 3<br />
N RRC271/NSN 4010-00-781-3129<br />
7 PAOZZ 96906 MS87006-3 HOOK,CHAIN,S 3<br />
8 PAOZZ 81361 B5-45-3268 CAP,PRTECTIVE,DUST 1<br />
9 PAOZZ 81361 B5-45-3132-2 COUPLING HALF,QUICK 1<br />
10 PAOZZ 81361 C5-45-2627-9 ELBOW,PIPE 1<br />
11 XDOZZ 1361 D5-45-3203-4 PLATE, IDENTIFICATIO SUCTION 1<br />
N<br />
12 PAOZZ 96906 MS51851-65 SCREW,TAPPING 1<br />
13 PAOZZ 81361 C5-45-32<strong>30</strong> BOLT,MACHINE 1<br />
14 PAOZZ 96906 MS51922-17 NUT,SELF-LOCKING 9<br />
15 PAOZZ 27742 1701-3192-700 CRANK,HAND 2<br />
16 XDFZZ 81361 C5-45-3192 HOSE REEL 2<br />
17 PAFZZ 96906 MS27183-14 WASHER,FLAT 16<br />
18 PAFZZ 81361 C5-45-2723 SWING JOINT,PIPE 2<br />
19 AFFFF 81361 C5-45-3216-10 HOSE ASSEMBLY OUTLET (SEE FIG.B-19 2<br />
FOR ASSEMBLY BREAKDOWN)<br />
20 PAFZZ 96906 MS27183-10 WASHER,FLAT 8<br />
21 PAFZZ 96906 MS51922-1 NUT,SELF-LOCKING 8<br />
22 XDFFF 81361 C5-45-2982 FAIRLEAD ASSEMBLY (SEE FIG.B-20 2<br />
FOR ASSEMBLY BREAKDOWN)<br />
23 PAFZZ 96906 MS18154-60 SCREW,CAP,HEXAGON 8<br />
24 PAFZZ 96906 MS35190-290 SCREW,MACHINE 8<br />
25 AFFFF 81361 C5-45-3216-20 HOSE ASSEMBLY, OUTLET (SEE FIG.B- 1<br />
19 FOR ASSEMBLY BREAKDOWN)<br />
B-18-1
SECTION II<br />
TM3-42<strong>30</strong>-<strong>209</strong>-<strong>30</strong>&P<br />
(1) (2) (3) (4) (5) (6)<br />
ITEM SMR PART<br />
NO CODE FSCM NUMBER DESCRIPTION AND USABLE ON CODE (UOC) QTY<br />
26 MFFZZ 81361 B5-45-<strong>30</strong>97-10 GASKET MAKE FROM PACKING MATERIAL 2<br />
P/N M200SERIES1X1-8/NSN 93<strong>30</strong>-00-912-<br />
2707<br />
27 MFFZZ 81361 B5-45-<strong>30</strong>97-2 GASKET: MAKE FROM PACKING MATERIAL 1<br />
P/N M200SERIES1X1-8/NSN 93<strong>30</strong>-00-912-<br />
2707<br />
28 MFFZZ 81361 B5-45-<strong>30</strong>97-12 GASKET MAKE FROM PACKING MATERIAL 1<br />
P/N M200SERIES1X1-8/NSN 93<strong>30</strong>-00-912-<br />
2707<br />
29 MFFZZ 81361 B5-45-<strong>30</strong>97-6 GASKET MAKE FROM PACKING MATERIAL 2<br />
P/N M200SERIES1X1-8/NSN 93<strong>30</strong>-00-912-<br />
2707<br />
<strong>30</strong> MFFZZ 81361 B5-45-<strong>30</strong>97-11 GASKET 1 IN W, MAKE FROM PACKING 2<br />
MATERIAL P/N M200SERIES1X1-8/NSN<br />
93<strong>30</strong>-00-912-2707<br />
31 XDFZZ 81361 C5-45-2994 FRAME ASSEMBLY 1<br />
32 PAFZZ 96906 MS90725-33 BOLT,MACHINE 3<br />
33 PAFZZ 96906 MS27183-12 WASHER,FLAT 8<br />
34 PAFZZ 81361 B5-45-<strong>30</strong>38 NUT,CHANNEL CLAMPIN 8<br />
35 XDFZZ 81361 B5-45-<strong>30</strong>27 BRACKET 2<br />
36 PAFZZ 96906 MS35338-46 WASHER,LOCK 12<br />
37 PAFZZ 96906 MS51922-9 NUT,SELF-LOCKING,HE 3<br />
38 XAFFF 81361 D5-45-3241 SKID BASE SUB ASSY (SEE FIG.B-22 1<br />
FOR ASSEMBLY BREAKDOWN)<br />
39 PBFZZ 81361 C5-45-3255 CLAMP,LOOP 1<br />
40 PAFZZ 96906 MS18154-58 SCREW,CAP,HEXAGON 12<br />
41 XAFFF 81361 E5-45-2984 FRAME ASSEMBLY (SEE FIG.B-21 FOR 1<br />
ASSEMBLY BREAKDOWN)<br />
END OF FIGURE<br />
B-18-2/(B-18-3 BLANK)
SECTION II<br />
TM 3-42<strong>30</strong>-<strong>209</strong>-<strong>30</strong>&P<br />
1<br />
*~ C5-45-321 6-10<br />
C5-45-3216-20<br />
Figure B-19.<br />
Outlet Hose Assembly.
SECTION II<br />
TM3-42<strong>30</strong>-<strong>209</strong>-<strong>30</strong>&P<br />
(1) (2) (3) (4) (5) (6)<br />
ITEM SMR PART<br />
NO CODE FSCM NUMBER DESCRIPTION AND USABLE ON CODES (UOC) QTY<br />
GROUP 02080801 OUTLET HOSE ASSEMBLY<br />
C5-45-3216-10 AND C5-45-3216-20<br />
FIG.B-19 OUTLET HOSE ASSEMBLY<br />
1 XDFZZ 31361 B5-45-<strong>30</strong>15-2 NIPPLE,PIPE 1<br />
2 PAFZZ 81361 B5-45-2635 GASKET 2<br />
3 PAFZZ 81361 B5-45-29<strong>30</strong> COUPLING,HALF,MODIF 2<br />
4 PAFZZ 81361 B5-45-2682 NUT 2<br />
5 PAFZZ 77414 P8S-2 CLAMP,HOSE 4<br />
6 MFFZZ 81361 C5-45-2736-8 HOSE 13.75 IN. LG MAKE FROM HOSE, V<br />
NONMETALLIC P/N 421B-1INCHID/NSN<br />
4720-00-595-4103<br />
7 MFFZZ 81361 C5-45-2736-9 HOSE 19.75 IN. LG MAKE FROM HOSE, V<br />
NONMETALLIC P/N 421B-1INCHID/NSN<br />
4720-00-595-4103<br />
END OF FIGURE<br />
B-19-1
SECTION II<br />
TM 3-42<strong>30</strong>-<strong>209</strong>-<strong>30</strong>&P<br />
.<br />
Figure B-20.<br />
Fairlead Assembly.<br />
S
SECTION II<br />
TM3-42<strong>30</strong>-<strong>209</strong>-<strong>30</strong>&P<br />
(1) (2) (3) (4) (5) (6)<br />
ITEM SMR PART<br />
NO CODE FSCM NUMBER DESCRIPTION AND USABLE ON CODE (UOC) QTY<br />
GROUP 02080802 FAIRLEAD ASSEMBLY<br />
C5-45-2982<br />
FIG.B-20 FAIRLEAD ASSEMBLY<br />
1 PAFZZ 96906 MS51922-17 NUT,SELF-LOCKING 4<br />
2 XDFZZ 81361 C5-45-<strong>30</strong>66 BRACKET 2<br />
3 XDFZZ 81361 B5-45-<strong>30</strong>67 SPACER 4<br />
4 XDFZZ 81361 B5-45-<strong>30</strong>35 SHAFT 2<br />
5 PAFZZ 81361 B5-45-<strong>30</strong>89 BEARING,BALL,ANNULA 8<br />
6 XDFZZ 81361 B5-45-<strong>30</strong>68 ROLLER 2<br />
7 XDFZZ 81361 B5-45-<strong>30</strong>34 PIN 2<br />
8 PAFZZ 81361 C5-45-2982-2 BUSHING 2<br />
END OF FIGURE<br />
B-20-1
SECTION II TM 3-42<strong>30</strong>-<strong>209</strong>-<strong>30</strong>&P<br />
4K<br />
1<br />
10<br />
XZ-llliK%@?Z-7<br />
w w *fi&ggj&<br />
**<br />
NO FURTHER DISASSE<br />
AUTHORIZED.<br />
‘8<br />
Figure B-21.<br />
Frame Assembly.
SECTION II<br />
TM3-42<strong>30</strong>-<strong>209</strong>-<strong>30</strong>&P<br />
(1) (2) (3) (4) (5) (6)<br />
ITEM SMR PART<br />
NO CODE FSCM NUMBER DESCRIPTION AND USABLE ON CODE (UOC) QTY<br />
GROUP 02080803 FRAME ASSEMBLY<br />
E5-45-2984<br />
FIG.B-21 FRAME ASSEMBLY<br />
1 XDFZZ 81361 C5-45-<strong>30</strong>33-2 ANGLE, SUPPORT FRONT 1<br />
2 XDFZZ 81361 E5-45-2984-6 ANGLE,PUMP FRAME 1<br />
3 PAFZZ 81361 B5-45-<strong>30</strong>38 NUT,CHANNEL CLAMPIN 4<br />
4 XDFZZ 81361 B5-45-<strong>30</strong>39 BRACKET,ATTACH 2<br />
5 PAFZZ 96906 MS18154-60 SCREW,CAP,HEXAGON 4<br />
6 XDFZZ 81361 C5-45-<strong>30</strong>33-1 ANGLE ASSEMBLY 2<br />
7 PAFZZ 96906 MS24661-9 RIVET,BLIND 52<br />
8 PAFZZ 71286 244-22 RECEPTACLE,TURNLOCK 26<br />
9 PAFZZ 96906 MS35207-263 SCREW,MACHINE 2<br />
10 PAFZZ 94222 44-99-116-12 FASTENER,PAWL 1<br />
11 PAFZZ 96906 MS21044N3 NUT,SELF-LOCKING 2<br />
END OF FIGURE<br />
B-21-1
SECTION II TM 3-42<strong>30</strong>-<strong>209</strong>-<strong>30</strong>&P<br />
-1 8 I<br />
20<br />
*SUPPLIED WITH IDENTICALLY<br />
NUMBERED PART.<br />
A FURTHER DISASSEMBLY<br />
NEXT ILLUSTRATION.<br />
ON<br />
“14<br />
Figure B-22.<br />
Skid Base Assembly (1 of 3).
( (’<br />
SECTION II TM 3-42<strong>30</strong>-<strong>209</strong>-<strong>30</strong>&P<br />
A<br />
/Lb<br />
4<br />
@21<br />
/<br />
28<br />
O<br />
* B<br />
VIEW B<br />
VIEW A<br />
FOR ENGINES MFG AFTER<br />
JANUARY 1969<br />
*sIJpPLIED<br />
WITH IDENTICALLY<br />
NUMBERED PART<br />
A FURTHER DISASSEMBLY<br />
NEXT ILLUSTRATION.<br />
ON<br />
40*<br />
VIEW D<br />
FOR ENGINES MFD BEFORE JANUARY 1969<br />
VIEW C<br />
Figure B-22. Skid Base Assembly (2 of 3).
SECTION II TM 3-42<strong>30</strong>-<strong>209</strong>-<strong>30</strong>&P<br />
-44*<br />
*SUPPLIED WITH IDENTICALLY<br />
NUMBERED PART.<br />
Figure B-22. Skid Base Assembly (3 of 3).
SECTION II<br />
TM3-42<strong>30</strong>-<strong>209</strong>-<strong>30</strong>&P<br />
(1) (2) (3) (4) (5) (6)<br />
ITEM SMR PART<br />
NO CODE FSCM NUMBER DESCRIPTION AND USABLE ON CODE (UOC) QTY<br />
GROUP 02080804 SKID BASE SUBASSEMBLY<br />
D5-45-3241<br />
FIG.B-22 SKID BASE SUBASSEMBLY<br />
1 PAOZZ 96906 MS90728-90 SCREW,CAP,HEXAGON 2<br />
2 PAOZZ 96906 MS35333-43 WASHER,LOCK 4<br />
3 XDFZZ 81361 C5-45-3232 SUPPORT, GENERATOR 1<br />
4 PAFZZ 96906 MS27183-14 WASHER,FLAT 2<br />
5 PAFZZ 96906 MS90728-87 SCREW,CAP,HEXAGON 2<br />
6 PAFZZ 81361 C5-45-3290 CABLE ASSEMBLY 1<br />
7 PAOZZ 96906 MS51967-8 NUT,PLAIN,HEXAGON 6<br />
8 PAFZZ 81361 C5-45-3191 COVER,ENGINE 1<br />
9 XDOFF 81361 D5-45-3288 GENERATOR,ENGINE AC ALTERNATOR 1<br />
ASSEMBLY(SEE FIG.B-29 FOR ASSEMBLY<br />
BREAKDOWN)<br />
10 PAOZZ 81361 C5-45-3229 BRACKET,ANGLE GENERATOR 1<br />
11 PAOZZ 96906 MS35333-44 WASHER,LOCK 3<br />
12 PAOZZ 96906 MS90725-109 SCREW,CAP,HEXAGON 1<br />
13 PAOZZ 81361 D5-45-3312 PULLEY,GROOVE 1<br />
14 PAFZZ 96906 MS51967-11 NUT,PLAIN,HEXAGON 2<br />
15 XDFZZ 81361 B5-45-2993-02 STIFFENER,MOUNTING USE WITH OHLER 4<br />
PUMP<br />
16 XDFZZ 81361 B5-45-2993-01 STIFFNER,MOUNTING USE WITH MARLOW 2<br />
PUMP<br />
17 PAFZZ 96906 MS90725-117 SCREW,CAP,HEXAGON 4<br />
18 PAFZZ 81361 B5-45-3109-1 PAD,MACHINE MOUNTIN 4<br />
19 AFFFF 81361 D5-45-<strong>30</strong>29 PLUMBING ASSEMBLY (SEE FIG.B-23 1<br />
FOR ASSEMBLY BREAKDOWN)<br />
20 PAFZZ 81361 B5-45-<strong>30</strong>15-10 NIPPLE,PIPE 1<br />
21 PAFZZ 39428 4821K15 ELBOW,PIPE 1<br />
22 PAOZZ 20796 3V315-4 BELTS,V,MATCHED SET 1<br />
23 PAOZZ 24161 3VX280 BELT 1<br />
24 XDFZZ 81361 C5-45-3271 TEE CONNECTOR USED ON ENGINES MFD 1<br />
AFTER JANUARY 1969 ONLY<br />
B-22-1
SECTION II<br />
TM3-42<strong>30</strong>-<strong>209</strong>-<strong>30</strong>&P<br />
(1) (2) (3) (4) (5) (6)<br />
ITEM SMR PART<br />
NO CODE FSCM NUMBER DESCRIPTION AND USABLE ON CODE (UOC) QTY<br />
25 PAFZZ 81361 B5-45-3215 SWITCH,PRESSURE 1<br />
26 PAFZZ 79470 3400X2 ELBOW,PIPE 1<br />
27 XDFZZ 79470 3328X2 NIPPLE 1<br />
28 PAFZZ 26759 101240 ELBOW,PIPE 4<br />
29 PAFZZ 81361 B5-45-3<strong>30</strong>7 NIPPLE,PIPE 1<br />
<strong>30</strong> PAFZZ 81361 B5-45-3<strong>30</strong>6 VALVE,STOP-CHECK OIL DRAIN 1<br />
31 PAFZZ 07860 A46070 COUPLING,PIPE 1<br />
32 PAFZZ 01276 2000-8-8B ADAPTER,STRAIGHT,PI 1<br />
33 PAFZZ 97403 13213E3283 GASKET 1<br />
34 PAFZZ 81361 C5-45-3247 LEAD,ELECTRICAL 1<br />
35 PAFZZ 96906 MS14<strong>30</strong>7-1 ELBOW,PIPE USED ON ENGINES MFD 1<br />
PRIOR TO JANUARY 1969 ONLY<br />
36 XDFZZ 81361 B5-45-3246-2 SPACER 1<br />
37 PAFZZ 81361 B5-45-3246-1 SPACER,SLEEVE 2<br />
38 PAFZZ 96906 MS90725-69 SCREW,CAP,HEXAGON 1<br />
39 PAFZZ 96906 MS90725-14 SCREW,CAP,HEXAGON 2<br />
40 PAFHH 97403 13206E1000MARK3 ENGINE,GASOLINE 1<br />
41 PAOOO 81361 C5-45-3157 THROTTLE LINKAGE ASSEMBLY (SEE 1<br />
FIG.B-27 FOR ASSEMBLY BREAKDOWN)<br />
42 XDFZZ 81361 C5-45-3281 CLIP,THROTTLE LINKAGE ASSEMBLY: 1<br />
USED ONLY W/BENDIX CARBURETOR<br />
EQUIPPED ENGINES<br />
43 PAOZZ 96906 MS90725-62 SCREW,CAP,HEXAGON 4<br />
44 XDFFF 81361 D5-45-2988 SKID,PUMP BASE (SEE FIG.B-28 FOR 1<br />
ASSEMBLY BREAKDOWN)<br />
45 PAOZZ 16004 B47457 GASKET 2<br />
46 PAOZZ 96906 MS35338-46 WASHER,LOCK 4<br />
47 PAOZZ 81361 B5-45-3165 MUFFLER,EXHAUST 2<br />
48 PAFZZ 96906 MS35338-45 WASHER,LOCK 4<br />
49 PAFZZZ 81361 B5-45-3205 SCREW,SELF-LOCKING 4<br />
50 PAFZZ 81361 C5-45-3180 PULLEY,GROOVE ASSEMBLY 1<br />
51 PAFZZ 81361 C5-45-3164 ADAPTER,POWER TAKE- 1<br />
52 PAFZZ 96906 MS20066-381 KEY,NMACHINE 1<br />
END OF FIGURE<br />
B-22-2/(B-22-3 blank)
SECTIONII<br />
TM 3-42<strong>30</strong>-<strong>209</strong>-<strong>30</strong>&P<br />
*<br />
*FURTHER DISASSEMBLY<br />
NEXT ILLUSTRATION<br />
Figure B-23. Plumbing Assembly (1 of2).
o<br />
SECTION<br />
II<br />
TM 3-42<strong>30</strong>-<strong>209</strong>-<strong>30</strong>&P<br />
23<br />
/w<br />
11 UI<br />
LI<br />
18<br />
w<br />
f!!!!)’<br />
19 ,/”<br />
+<br />
/<br />
-SUPPLIED WITH IDENTICALLY<br />
/<br />
NUMBERED PART. /<br />
/<br />
1/’<br />
Figure B-23. Plumbing Assembly (2 of 2).
SECTION II<br />
TM3-42<strong>30</strong>-<strong>209</strong>-<strong>30</strong>&P<br />
(1) (2) (3) (4) (5) (6)<br />
ITEM SMR PART<br />
NO CODE FSCM NUMBER DESCRIPTION AND USABLE ON CODE (UOC) QTY<br />
GROUP 020808041 PLUMBING ASSEMBLY<br />
D5-45-<strong>30</strong>29<br />
FIG.B-23 PLUMBING ASSEMBLY<br />
1 PAFZZ 81361 C5-45-3270 EDUCATOR C5-45-3270 REPLACES C5-45- 1<br />
2804 WHICH MAY BE ON FIELD UNITS<br />
2 PAFZZ 81361 D5-45-<strong>30</strong>29 ITEM REDUCER,PIPE 1<br />
6<br />
3 PAFZZ 96906 MS51953-199 NIPPLE,PIPE 1<br />
4 PAFZZ 88044 AN914-8C ELBOW,PIPE 1<br />
5 XDFZZ 81361 B5-45-<strong>30</strong>15-8 NIPPLE,PIPE 1<br />
6 PAFZZ 81361 B5-45-<strong>30</strong>20-5 ADAPTER,STRAIGHT,PI 1 INCH 1<br />
6 PAFZZ 81361 B5-45-<strong>30</strong>20-7 ADAPTER,STRAIGHT,PI 2 INCH 1<br />
7 PAFZZ 81361 D5-45-3217-1 VALVE,BALL USED WITH STRAIGHT 1<br />
ADAPTER P/N B5-45-<strong>30</strong>20-5 ONLY<br />
7 PAFZZ 81361 C5-45-3282 VALVE,BALL USED WITH STRAIGHT 1<br />
ADAPTER P/N B5-45-<strong>30</strong>20-7 ONLY<br />
7 PAFZZ 81361 C5-45-3278 VALVE,BALL USED WITH STRAIGHT 1<br />
ADAPTER P/N B5-45-<strong>30</strong>20-7 ONLY<br />
8 PAFZZ 81361 B5-45-<strong>30</strong>15-12 NIPPLE,PIPE 1<br />
9 PAFZZ 14351 X5062 ELBOW,PIPE 1<br />
10 PAFZZ 81361 B5-45-<strong>30</strong>15-11 PIPE,METALLIC 2<br />
11 XDFZZ 81361 B5-45-<strong>30</strong>15-3 PIPE,METALLIC 2<br />
12 PAFZZ 81361 C5-45-2980 MANIFOLD,UPPER 1<br />
13 XDFZZ 81361 B5-45-<strong>30</strong>15-14 NIPPLE,PIPE 1<br />
14 PAFZZ 81361 D5-45-<strong>30</strong>29ITEM17 ELBOW,PIPE 2<br />
15 PAFZZ <strong>30</strong>003 2519481-2 BUSHING,PIPE 2<br />
16 PAFFF 81361 C5-45-3276-4 VALVE,REGULATING,FL (SEE FIG.B-26 2<br />
FOR ASSEMBLY BREAKDOWN)<br />
17 AFFFF 81361 C5-45-3272 VALVE, OFFSET (SEE FIG.B-25 FOR 1<br />
ASSEMBLY BREAKDOWN)<br />
18 PAFZZ 39428 4825K19 UNION PIPE 1<br />
19 PAFZZ 81361 C5-45-<strong>30</strong>15-15 NIPPLE,PIPE 1<br />
20 PAFZZ <strong>30</strong>780 1-2X1-4PTRSS BUSHING,PIPE 1<br />
B-23-1
SECTION II<br />
TM3-42<strong>30</strong>-<strong>209</strong>-<strong>30</strong>&P<br />
(1) (2) (3) (4) (5) (6)<br />
ITEM SMR PART<br />
NO CODE FSCM NUMBER DESCRIPTION AND USABLE ON CODE (UOC) QTY<br />
21 PAFZZ 96906 MS20822-4-4K ELBOW,PIPE TO TUBE 2<br />
22 PAFZZ 81361 C5-45-2656 TANK,SURGE 1<br />
23 PAFZZ 81361 D5-45-<strong>30</strong>29ITEM20 ELBOW,PIPE 1<br />
24 PAFZZ 18876 8489705 NIPPLE,PIPE 1<br />
25 PAFZZ 81361 C5-45-3181 PULLEY,GROOVE ASSEMBLY 1<br />
26 PAFFF 81361 D5-45-2835 PUMP,CENTRIFUGAL (SEE FIG.B-24 FOR 1<br />
ASSEMBLY BREAKDOWN<br />
27 PAFZZ 81361 C5-45-2981 MANIFOLD,LOWER 1<br />
28 XDFZZ 81361 B5-45-<strong>30</strong>15-2 NIPPLE,PIPE 2<br />
29 PAFZZ 80204 ANSI B16.3 ELBOW,PIPE 1<br />
END OF FIGURE<br />
B-23-2
SECTION II TM 3-42<strong>30</strong>-<strong>209</strong>-<strong>30</strong>&P 9<br />
1 I<br />
I<br />
,;<br />
I<br />
I<br />
25<br />
Figure B-24. Centrifugal Pump.
SECTION II<br />
TM3-42<strong>30</strong>-<strong>209</strong>-<strong>30</strong>&P<br />
(1) (2) (3) (4) (5) (6)<br />
ITEM SMR PART<br />
NO CODE FSCM NUMBER DESCRIPTION AND USABLE ON CODE (UOC) QTY<br />
GROUP 0208080411 CENTRIFUGAL PUMP<br />
D5-45-2835<br />
FIG.B-24 CENTRIFUGAL PUMP<br />
1 PAFZZ 96906 MS35<strong>30</strong>7-360 SCREW,CAP,HEXAGON 16<br />
2 PAFZZ 96906 MS35338-141 WASHER,LOCK 16<br />
3 XAFZZ 81361 D5-45-2776 COVER, TANK,PUMP 1<br />
4 PAFZZ 81361 B5-45-2777 GASKET 1<br />
5 PAFZZ 96906 MS9358-14 NUT,PLAIN,CASTELLAT 1<br />
6 PAFZZ 81361 B5-45-2775 GASKET 1<br />
7 PAFZZ 79500 61H506-1 WASHER,FLAT 1<br />
8 PAFZZ 81361 C5-45-2774 DIFFUSER 1<br />
9 XAFZZ 81361 C5-45-2768 IMPELLER,PUMP 1<br />
10 PAOZZ 38455 24454 BREATHER 1<br />
11 XDFZZ 81361 C5-45-2750 HOUSING,BEARING 1<br />
12 PAFZZ 52676 SKF6205 BEARING,BALL,ANNULA 1<br />
13 PAFZZ 96906 MS35756-9 KEY,WOODRUFF 1<br />
14 XAFZZ 81361 C5-45-2751 SHAFT 1<br />
15 PAFZZ 96906 MS35756-15 KEY,WOODRUFF 1<br />
16 PAFZZ 96906 MS24665-<strong>30</strong>2 PIN,COTTER 1<br />
17 XAFZZ 81361 C5-45-2755 CAP,BEARING END 1<br />
18 PAFZZ 96906 MS166<strong>30</strong>-4100 RING,RETAINING 1<br />
19 PAFZZ 82796 SKF6<strong>30</strong>5 BEARING,BALL,ANNULA 1<br />
20 PAOZZ 96906 MS15003-1 FITTING,LUBRICATION 1<br />
21 PAFZZ 81361 B5-45-2754 SEAL,PLAIN ENCASED 1<br />
22 XDOZZ 81348 WWP471PLUG2-11-1 PLUG 2<br />
-2NPT<br />
23 XAFZZ 81361 E5-45-2756 TANK,PUMP 1<br />
24 PAFZZ 81361 C5-45-3311 0SEAL ASSEMBLY 1<br />
25 PAFZZ 81361 B5-45-2770 SHIM SET 1<br />
END OF FIGURE<br />
B-24-1
SECTION II TM 3-42<strong>30</strong>-<strong>209</strong>-<strong>30</strong>&P<br />
\<br />
< \<br />
3<br />
/7<br />
*SUPPLIED WITH<br />
IDENTICALLY NUMBERED<br />
PART.<br />
1*<br />
**NO FURTHER DISASSEMBLY<br />
AUTHORIZED.<br />
Figure B-25. Offset Valve and Regulating Valve.
SECTION II<br />
TM3-42<strong>30</strong>-<strong>209</strong>-<strong>30</strong>&P<br />
(1) (2) (3) (4) (5) (6)<br />
ITEM SMR PART<br />
NO CODE FSCM NUMBER DESCRIPTION AND USABLE ON CODE (UOC) QTY<br />
GROUP 0208080412 OFFSET VALVE<br />
C5-45-3272 AND<br />
GROUP 02080804121 REGULATING VALVE<br />
C5-45-3276-5<br />
FIG.B-25 OFFSET VALVE AND<br />
REGULATING VALVE<br />
1 PAFFF 81361 C5-45-3276-5 VALVE,REGULATING 1<br />
2 PAFZZ 96906 MS51968-11 NUT,PLAIN,HEXAGON 2<br />
3 PAFZZ 19243 2 IN GRADE R-2 DIAPHRAGM,VALVE 1<br />
4 PAOZZ 96906 MS15003-1 FITTING,LUBRICATION 1<br />
5 PAFZZ 96906 MS90727-90 SCREW,CAP,HEXAGON 2<br />
6 PAFZZ 96906 MS51967-11 NUT,PLAIN,HEXAGON 2<br />
7 PAFZZ 81361 C5-45-3310 BRACKET 1<br />
8 PAFZZ 81361 B5-45-3274 EXTENSION,SHAFT 1<br />
9 PAFZZ 71041 FB1012-8 BEARING,SLEEVE 1<br />
10 PAFZZ 81361 B5-45-3273 GEAR,BEVEL 1<br />
11 PAFZZ 81361 B5-45-<strong>30</strong>90 GEAR,BEVEL 1<br />
12 PAFZZ 96906 MS51965-52 SETSCREW 4<br />
13 PAFZZ 969006 MS51965-66 SETSCREW 4<br />
14 PAFZZ 81361 C5-45-3299 ADAPTER 1<br />
15 PAFZZ 96906 MS16562-51 PIN,SPRING 3<br />
16 PAFZZ 96906 MS90727-93 SCREW,CAP,HEXAGON 2<br />
END OF FIGURE<br />
B-25-1
SECTION II TM 3-42<strong>30</strong>-<strong>209</strong>-<strong>30</strong>&P<br />
2<br />
\<br />
*<br />
NO FURTHER DISASSEMBLY<br />
AUTHORIZED.<br />
Figure B-26. Regulating Valve.
SECTION II<br />
TM3-42<strong>30</strong>-<strong>209</strong>-<strong>30</strong>&P<br />
(1) (2) (3) (4) (5) (6)<br />
ITEM SMR PART<br />
NO CODE FSCM NUMBER DESCRIPTION AND USABLE ON CODE (UOC) QTY<br />
GROUP 0208080413 REGULATING VALVE<br />
C5-45-3276-4<br />
FIG.B-26 REGULATING VALVE<br />
1 PAFZZ 96906 MS90727-90 SCREW,CAP,HEXAGON 4<br />
2 PAFZZ 96906 MS15003-1 FITTING,LUBRICATION 1<br />
3 PAFZZ 96906 MS51968-11 NUT,PLAIN,HEXAGON 4<br />
4 PAFZZ 19243 11/4 GRADE R-2 DIAPHRAGM 1<br />
END OF FIGURE<br />
B-26-1
SECTION II<br />
TM 3-42<strong>30</strong>-<strong>209</strong>-<strong>30</strong>&P<br />
v6<br />
I<br />
Figure B-27.<br />
Throttle Linkage Assembly.
SECTION II<br />
TM3-42<strong>30</strong>-<strong>209</strong>-<strong>30</strong>&P<br />
(1) (2) (3) (4) (5) (6)<br />
ITEM SMR PART<br />
NO CODE FSCM NUMBER DESCRIPTION AND USABLE ON CODE (UOC) QTY<br />
GROUP 020808043 THROTTLE LINKAGE<br />
ASSEMBLY C5-45-3157<br />
FIG.B-27 THROTTLE LINKAGE ASSEMBLY<br />
1 PAOZZ 81361 B5-45-3160 STRAP,RETAINING 1<br />
2 PAOZZ 96906 MS35338-46 WASHER,LOCK 1<br />
3 PAOZZ 96906 MS18154-58 SCREW,CAP,HEXAGON 1<br />
4 PAOZZ 81361 B5-45-3159 CLAMP,LOOP 1<br />
5 PAOZZ 81361 B5-45-3157-1 ROD,THROTTLE 1<br />
6 PAOZZ 96906 MS24665-1012 PIN,COTTER 1<br />
7 PAOZZ 96906 MS27183-7 WASHER,FLAT 2<br />
8 PAOZZ 81361 C5-45-3228 LEVER,REMOTE CONTRO USED FOR BENDIX 1<br />
9 XDOZZ 81361 C5-45-3285 SWIVEL 1<br />
10 PAOZZ 96906 MS35650-<strong>30</strong>2 NUT,PLAIN,HEXAGON 3<br />
11 PAOZZ 81361 B5-45-3161 ADAPTER,THROTTLE 1<br />
12 PAOZZ 96906 MS51964-49 SETSCREW 1<br />
13 PAOZZ 96906 MS51967-8 NUT,PLAIN,HEXAGON 1<br />
END OF FIGURE<br />
B-27-1
SECTION II TM 3-42<strong>30</strong>-<strong>209</strong>-<strong>30</strong>&P<br />
8<br />
8* ,<br />
A<br />
?’- 4<br />
s.. \\\e-1* /1<br />
/<br />
o<br />
0<br />
0 ‘<br />
0<br />
/--”-’ /~**<br />
*<br />
SUPPLIED WITH IDENTICALLY<br />
**<br />
NUMBERED PART.<br />
NO FURTHER DISASSEMBLY<br />
AUTHORIZED.<br />
Figure B-28. Pump Base Skid and Engine Mount #1 and Engine Mount #2
SECTION II<br />
TM3-42<strong>30</strong>-<strong>209</strong>-<strong>30</strong>&P<br />
(1) (2) (3) (4) (5) (6)<br />
ITEM SMR PART<br />
NO CODE FSCM NUMBER DESCRIPTION AND USABLE ON CODE (UOC) QTY<br />
GROUP 020808044 PUMP BASE SKID<br />
D5-45-2988 AND<br />
GROUP 0208080441 ENGINE MOUNT #1<br />
C5-45-2964 AND<br />
GROUP 0208080442 ENGINE MOUNT #2<br />
C5-45-2965<br />
FIG.B-28 PUMP BASE SKID AND<br />
ENGINE MOUNT #1 & ENGINE MOUNT #2<br />
1 XDFFF 81361 C5-45-2964 MOUNT,ENGINE ASSEMBLY 1<br />
2 PAFZZ 81361 B5-45-3119 BOLT,MACHINE 1<br />
3 PAFZZ 81361 B5-45-3101 BRACKET,ENGINE ALIG 1<br />
4 PAFZZ 96906 MS90725-65 SCREW,CAP,HEXAGON 2<br />
5 PAFZZ 96906 MS35338-46 WASHER,LOCK 2<br />
6 PAFZZ 81361 B5-45-3109-2 PAD,MACHINE 2<br />
7 XAFZZ 96195 P4008 NUT SQUARE W/SPRING 2<br />
8 PAFFF 81361 C5-45-2965 BRACKET,ENGINE MOUN ASSEMBLY #2 1<br />
9 PAFZZ 81361 B5-45-3119 BOLT,MACHINE 1<br />
10 PAFZZ 81361 B5-45-3109-1 PAD,MACHINE MOUNTIN 1<br />
11 PAFZZ 96906 MS27183-18 WASHER,FLAT 1<br />
12 PAFZZ 96906 MS51922-33 NUT,SELF-LOCKING,HE 1<br />
13 PAFZZ 96906 MS18154-59 SCREW,CAP,HEXAGON 2<br />
14 PAFZZ 96906 MS35338-46 WASHER,LOCK 2<br />
15 PAFZZ 96906 MS90728-114 SCREW,CAP,HEXAGON 1<br />
16 XAFZZ 96195 P4008 NUT SQUARE W/SPRING 2<br />
END OF FIGURE<br />
B-28-1
SECTION II TM 3-42<strong>30</strong>-<strong>209</strong>-<strong>30</strong>&P<br />
*<br />
SUPPLIED WITH IDENTICALLY<br />
NUMBERED<br />
PART.<br />
Figure B-29. Generator, Alternator Assembly.
SECTION II<br />
TM3-42<strong>30</strong>-<strong>209</strong>-<strong>30</strong>&P<br />
(1) (2) (3) (4) (5) (6)<br />
ITEM SMR PART<br />
NO CODE FSCM NUMBER DESCRIPTION AND USABLE ON CODE (UOC) QTY<br />
GROUP 020808045 GENERATOR,ALTERNATOR<br />
ASSEMBLY B5-45-3288<br />
FIG.B-29 GENERATOR,ALTERNATOR<br />
ASSEMBLY<br />
1 PAFZZ 91637 RH50-<strong>30</strong>-1PCT RESISTOR,FIXED,WIRE 1<br />
2 PAFZZ 76761 N1026-1 GENERATOR-ALTERNATO 1<br />
END OF FIGURE<br />
B-29-1
SECTION II<br />
TM 3-42<strong>30</strong>-<strong>209</strong>-<strong>30</strong>&P<br />
5.<br />
A<br />
/<br />
10<br />
\<br />
\\<br />
h<br />
\I@ o<br />
@<br />
112<br />
11<br />
4<br />
K. d?$g’~. . 1 t 13<br />
\<br />
c:,<br />
\~ ~~ F \<br />
T?<br />
0<br />
%0<br />
o<br />
\ 17 15<br />
\ o<br />
\<br />
o<br />
\<br />
/? Q ~yh \ \<br />
\ \ 20<br />
\<br />
0<br />
0<br />
15<br />
o ‘\<br />
19<br />
17<br />
0<br />
18<br />
21<br />
Figure B-<strong>30</strong>. Control Panel Assembly (1 of 4).<br />
11<br />
A FURTHER DISASSEMBLY<br />
ON NEXT ILLUSTRATION.
“( >,.,<br />
[<br />
SECTION II<br />
TM 3-42<strong>30</strong>-<strong>209</strong>-<strong>30</strong>&P<br />
22<br />
22*<br />
Figure B-<strong>30</strong>. Control Panel Assembly (2 of4)<br />
NEXT ILLUSTRATION
SECTIONII<br />
TM 3-42<strong>30</strong>-<strong>209</strong>-<strong>30</strong>&P<br />
26 ~, ,,<br />
36 w —<br />
49*<br />
/<br />
Llv Figure B-<strong>30</strong>. Control Panel Assembly (3 of 4).
y<br />
(<br />
SECTION<br />
II<br />
TM 3-42<strong>30</strong>-<strong>209</strong>-<strong>30</strong>&P<br />
5,5<br />
:D<br />
Figure B-<strong>30</strong>. Control Panel Assembly (4 of 4).
SECTION II<br />
TM3-42<strong>30</strong>-<strong>209</strong>-<strong>30</strong>&P<br />
(1) (2) (3) (4) (5) (6)<br />
ITEM SMR PART<br />
NO CODE FSCM NUMBER DESCRIPTION AND USABLE ON CODE (UOC) QTY<br />
GROUP 020809 CONTROL PANEL ASSEMBLY<br />
D5-45-3236<br />
FIG.B-<strong>30</strong> CONTROL PANEL ASSEMBLY<br />
1 XDFZZ 81361 D5-45-3203-23 PLATE,IDENTIFICATIO 1<br />
DECONTAMINATING APPARATUS<br />
2 XDFZZ 81361 D5-45-3203-9 PLATE, IDENTIFICATION VALVE #2 1<br />
3 PAFZZ 81361 D5-45-3203-24 PLATE,IDENTIFICATIO CIRCUIT BREAKER 1<br />
4 XDFZZ 81361 D5-45-3203-10 PLATE, IDENTIFICATION VALVE #3 1<br />
5 XDFZZ 81361 D5-45-3203-17 PLATE, IDENTIFICATION TACHOMETER 1<br />
6 XDFZZ 81361 D5-45-3203-14 PLATE, IDENTIFICATION FUEL 1<br />
INDICATOR<br />
7 XDFZZ 81361 D5-45-3203-12 PLATE, IDENTIFICATION VACUUM GAGE. 1<br />
8 PAFZZ 81361 B5-45-3298 PLATE,IDENTIFICATIO AMETER 1<br />
9 XDFZZ 81361 D5-45-3203-16 PLATE, IDENTIFICATION GENERATOR 1<br />
10 PAFZZ 81361 D5-45-3203-19 PLATE,INSTRUCTION STARING 1<br />
PRODEDURE<br />
11 PAFZZ 96906 MS21318-20 SCREW,DRIVE 48<br />
12 XDFZZ 81361 D5-45-3203-15 PLATE, IDENTIFICATION FUEL SHUT- 1<br />
OFF<br />
13 XDFZZ 81361 D5-45-3203-21 PLATE,IDENTIFICATIO OIL PRESSURE 1<br />
SWITCH<br />
14 XDFZZ 81361 D5-45-3203-13 PLATE, IDENTIFICATION PRESSURE 1<br />
GAGE<br />
15 XDFZZ 81361 D5-45-3203-6 PLATE, IDENTIFICATION CLOSED 2<br />
16 PAFZZ 81361 D5-45-3203-11 PLATE,IDENTIFICATIO VALVE #4 1<br />
17 XDFZZ 81361 D5-45-3203-7 PLATE, IDENTIFICATION OPEN 2<br />
18 XDFZZ 81361 D5-45-3203-18 PLATE, IDENTIFICATION THROTTLE 1<br />
19 XDFZZ 81361 D5-45-3203-8 PLATE, IDENTIFICATION VALVE #1 1<br />
20 XDFZZ 81361 D5-45-3203-22 PLATE,IDENTIFICATIO HEATER, 1<br />
RECEPTACLE AND SWTICH ON-OFF<br />
21 XDFZZ 81361 D5-45-3203-2 PLATE,IDENTIFICATIO DRAIN 1<br />
22 PAFZZ 81361 D5-45-3313 JUNCTION BOX 1<br />
B-<strong>30</strong>-1
SECTION II<br />
TM3-42<strong>30</strong>-<strong>209</strong>-<strong>30</strong>&P<br />
(1) (2) (3) (4) (5) (6)<br />
ITEM SMR PART<br />
NO CODE FSCM NUMBER DESCRIPTION AND USABLE ON CODE (UOC) QTY<br />
23 PAFZZ 96906 MS25<strong>30</strong>6-222 SWITCH,TOGGLE 1<br />
24 PAFZZ 96906 MS51967-5 NUT,PLAIN,HEXAGON 1<br />
25 PAFZZ 96906 MS35338-41 WASHER,LOCK 8<br />
26 PAOZZ 96906 MS21044N3 NUT,SELF-LOCKING HEXAGON 1<br />
27 PAOZZ 96906 MS27183-8 WASHER,FLAT 12<br />
28 PAOZZ 81361 C5-45-2740 GAGE,PRESSURE,DIAL 1<br />
29 PAFZZ 96906 MS3367-1-0 STRAP,TIEDOWN,ELECT 1<br />
<strong>30</strong> PAOZZ 70040 6474533 AMMETER 1<br />
31 PAFZZ 19207 6184184 CONTROL ASSEMBLY, PUSH,CHOKE 1<br />
32 PAOZZ 96906 MS35207-272 SCREW,MACHINE 3<br />
33 PAOZZ 96906 MS35916-2 TACHOMETER,MECHANIC 1<br />
34 PAFZZ 96906 MS90725-32 BOLT,MACHINE 4<br />
35 PAFZZ 96906 MS3105-16 SHELL,ELECTRICAL 1<br />
36 PAOZZ 88044 AN816-4-4B ADAPTER,STRAIGHT,PI 2<br />
37 PAOZZ 81361 B5-45-<strong>30</strong>17-2 SPACER,SLEEVE 3<br />
38 PAOZZ 88044 AN916-2 ELBOW,PIPE 1<br />
39 PAFZZ 96906 MS35691-21 NUT,PLAIN,HEXAGON 1<br />
40 PAFZZ 96906 MS35338-46 WASHER,LOCK 1<br />
41 PAOZZ 81361 C5-45-2646 GAGE,VACUUM,DIAL INDICATING 1<br />
42 PAOZZ 81361 B5-45-<strong>30</strong>17-1 SPACER,SLEEVE 3<br />
43 PAOZZ 79470 3400X2 ELBOW,PIPE 1<br />
44 PAOZZ 81361 B5-45-3195 HOSE ASSEMBLY,NONME 2<br />
45 PAOZZ 26759 101240 ELBOW,PIPE 2<br />
46 PAOZZ 81361 B5-45-<strong>30</strong>93 VALVE,GLOBE 1<br />
47 PAOZZ 96906 MS35207-270 SCREW,MACHINE 3<br />
48 PAOZZ 70040 6432691 INDICATOR,LIQUID FUEL LEVEL 1<br />
49 PAOZZ 96906 MS24541-2 INDICATOR,PRESSURE OIL 1<br />
50 PAFZZ 81361 C5-45-2862-2 CONTROL ASSEMBLY, PUSH 1<br />
51 XAFZZ 81361 D5-45-3227 PANEL 1<br />
52 PAOZZ 96906 MS15569-7 LAMP,INCANDESCENT 1<br />
53 PAOZZ 96906 MS35207-267 SCREW,MACHINE 4<br />
54 XDOZZ 81361 B5-45-3287 SWITCH SHIELD 1<br />
55 PAOZZ 74193 006-10211 BOOT ASSEMBLY 1<br />
56 PAOZZ 96906 MS35206-228 SCREW,MACHINE 2<br />
B-<strong>30</strong>-2
SECTION II<br />
TM3-42<strong>30</strong>-<strong>209</strong>-<strong>30</strong>&P<br />
(1) (2) (3) (4) (5) (6)<br />
ITEM SMR PART<br />
NO CODE FSCM NUMBER DESCRIPTION AND USABLE ON CODE (UOC) QTY<br />
57 PAOZZ 96906 MS35333-37 WASHER,LOCK 2<br />
58 PAOZZ 74193 JA1-B3-A-20-2 CIRCUIT BREAKER 1<br />
59 PAOZZ 81361 B5-45-3<strong>209</strong> TERMINAL BOARD 1<br />
60 PFAZZ 81361 D5-45-3237 CABLE ASSEMBLY,POWE 1<br />
61 PAFZZ 00779 42599-2 TERMINAL,QUICK DISCONNECT 1<br />
62 PAFZZ 96906 MS3106R18-1P CONNECTOR,PLUG,ELEC 1<br />
63 PAFZZ 96906 MS25036-108 TERMINAL,LUG 10<br />
64 PAOZZ 96906 MS25089-2C SWITCH,PUSH FUEL INDICATOR 1<br />
65 PAOZZ 81361 B5-45-3208 SWITCH,ROTARY STOP-RUN-START 1<br />
66 PAOZZ 96906 MS25089-1C SWITCH,PUSH MAGNETO GROUND 1<br />
67 PAOZZ 13445 PL16GREEN LIGHT,INDICATOR 1<br />
END OF FIGURE<br />
B-<strong>30</strong>-3/(B-<strong>30</strong>-4 BLANK)
SECTION II TM 3-42<strong>30</strong>-<strong>209</strong>-<strong>30</strong>&P<br />
31<br />
31 #<br />
6<br />
p!LL -A<br />
0(4J- a,<br />
& /51 .;, ~’<br />
1<br />
1<br />
1<br />
49 48 50 49 12 11 7 12<br />
.<br />
,&~* ==-=-%, ,&lJ- -===+<br />
,6-+,<br />
47 46 15 14<br />
10 15<br />
45<br />
!<br />
t<br />
A-q)<br />
43<br />
/ 42 44<br />
43<br />
I<br />
21 20 1’6<br />
21<br />
/<br />
37 36 38 37<br />
34 33 34<br />
Figure B-31. Electrical Wiring.
SECTION II<br />
TM3-42<strong>30</strong>-<strong>209</strong>-<strong>30</strong>&P<br />
(1) (2) (3) (4) (5) (6)<br />
ITEM SMR PART<br />
NO CODE FSCM NUMBER DESCRIPTION AND USABLE ON CODE (UOC) QTY<br />
GROUP 020810 ELECTRICAL WIRING<br />
C5-45-3248<br />
FIG.B-31 ELECTRICAL WIRING<br />
1 AFFFF 81361 D5-45-3248-11 LEAD,ELECTRICAL: 14 IN. LG 1<br />
2 MFFZZ 81361 TB1-A/S1-A WIRE, MAKE FROM WIRE,ELECTRICAL 1<br />
P/N MM2946/NSN 6145/00-500-<strong>30</strong>79<br />
3 PAFZZ 96906 MS25036-108 TERMINAL,LUG 2<br />
4 AFFFF 81361 D5-45-3248-12 LEAD,ELECTRICAL: 17 IN. LG 1<br />
5 MFFZZ 81361 TB1-B/S2-A WIRE, MAKE FROM WIRE,ELECTRICAL 1<br />
P/N MM2946/NSN 6145-00-500-<strong>30</strong>79<br />
6 PAFZZ 96906 MS25036-108 TERMINAL,LUG 2<br />
7 AFFFF 81361 D5-45-3248-13 LEAD,ELECTRICAL: 14.5 IN. LG 1<br />
8 MFFZZ 81361 TB1-C/S1-C WIRE, MAKE FROM WIRE,ELECTRICAL 1<br />
P/N MM2946/NSN 6145-00-500-<strong>30</strong>79<br />
9 PAFZZ 96906 MS25036-108 TERMINAL,LUG 2<br />
10 AFFFF 81361 D5-45-3248-14 LEAD,ELECTRICAL: 12 IN. LG. 1<br />
11 MFFZZ 81361 TB1-E/M1-A WIRE MAKE FROM WIRE ELECTICAL P/ 1<br />
N MM2946/NSN 6145-00-500-<strong>30</strong>79<br />
12 PAFZZ 96906 MS25036-108 TERMINAL,LUG 2<br />
13 AFFFF 81361 D5-45-3248-15 LEAD,ELECTRICAL: 13.5 IN. LG 1<br />
14 MFFZZ 81361 TB1-F/S1-B WIRE, MAKE FROM WIRE,ELECTRICAL 1<br />
P/N MM2946/NSN 6145-00-500-<strong>30</strong>79<br />
15 PAFZZ 96906 MS25036-108 TERMINAL,LUG 2<br />
16 AFFFF 81361 D5-45-3248-16 LEAD,ELECTRICAL: 12.5 IN. LG 1<br />
17 MFFZZ 81361 TB1-H/M1-B WIRE, MAKE FROM WIRE,ELECTRICAL 1<br />
P/N MM2946/NSN 6145-00-500-<strong>30</strong>79<br />
18 PAFZZ 96906 MS25036-108 TERMINAL,LUG 2<br />
19 AFFFF 81361 D5-45-3248-17 LEAD,ELECTRICAL: 13 IN. LG 1<br />
20 MFFZZ 81361 TB1-AC1/DS1-A WIRE, MAKE FROM WIRE,ELECTRICAL 1<br />
P/N MM2946/NSN 6145-00-500-<strong>30</strong>79<br />
21 PAFZZ 96906 MS25036-108 TERMINAL,LUG 2<br />
22 AFFFF 81361 D5-45-3248-18 LEAD,ELECTRICAL: 12.5 IN. LG 1<br />
B-31-1
SECTION II<br />
TM3-42<strong>30</strong>-<strong>209</strong>-<strong>30</strong>&P<br />
(1) (2) (3) (4) (5) (6)<br />
ITEM SMR PART<br />
NO CODE FSCM NUMBER DESCRIPTION AND USABLE ON CODE (UOC) QTY<br />
23 MFFZZ 81361 TB1-AC2/DS1-B WIRE, MAKE FROM WIRE,ELECTRICAL 1<br />
P/N MM2946/NSN 6145-00-500-<strong>30</strong>79<br />
24 PAFZZ 96906 MS25036-108 TERMINAL,LUG 2<br />
25 AFFFF 81361 D5-45-3248-19 LEAD,ELECTRICAL: 23.5 IN. LG 1<br />
26 MFFZZ 81361 CB1-A/M4-B WIRE, MAKE FROM WIRE,ELECTRICAL 1<br />
P/N MM2946/NSN 6145-00-500-<strong>30</strong>79<br />
27 PAFZZ 00779 42599-2 TERMINAL,QUICK DISC 1<br />
28 PAFZZ 81349 CM15ED3<strong>30</strong>G03 CAPACITOR,FIXED 1<br />
29 AFFFF 81361 D5-45-3248-20 LEAD,ELECTRICAL: 19 IN. LG 1<br />
<strong>30</strong> MFFZZ 81361 J1-H/S4-A WIRE, MAKE FROM WIRE,ELECTRICAL 1<br />
P/N MM2946/NSN 6145-00-500-<strong>30</strong>79<br />
31 PAFZZ 96906 MS25036-108 TERMINAL,LUG 2<br />
32 AFFFF 81361 D5-45-3248-21 LEAD,ELECTRIAL: 22.5 IN. LG 1<br />
33 MFFZZ 81361 S4-B/S1-A WIRE, MAKE FROM WIRE,ELECTRICAL 1<br />
P/N MM2946/NSN 6145-00-500-<strong>30</strong>79<br />
34 PAFZZ 96906 MS25036-108 TERMINAL,LUG 2<br />
35 AFFFF 81361 D5-45-3248-22 LEAD,ELECTRICAL: 14 IN. LG 1<br />
36 MFFZZ 81361 S1-A/S6-A WIRE, MAKE FROM WIRE, ELECTRICAL 1<br />
P/N MM2946/NSN 6145-00-500-<strong>30</strong>79<br />
37 PAFZZ 96906 MS25036-108 TERMINAL,LUG 2<br />
38 AFFFF 81361 D5-45-3248-23 LEAD,ELECTRICAL: 5 IN. LG 1<br />
39 MFFZZ 81361 S6-B/M3-A WIRE, MAKE FROM WIRE,ELECTRICAL 1<br />
P/N MM2946/NSN 6145-00-500-<strong>30</strong>79<br />
40 PAFZZ 96906 MS25036-108 TERMINAL,LUG 2<br />
41 AFFFF 81361 D5-45-3248-24 LEAD,ELECTRICAL: 29.5 IN. LG 1<br />
42 MFFZZ 81361 M3-B/R1-A WIRE, MAKE FROM WIRE,ELECTRICAL 1<br />
P/N M2946/NSN 6145-00-500-<strong>30</strong>79<br />
43 PAFZZ 96906 MS25036-108 TERMINAL,LUG 2<br />
44 AFFFF 81361 D5-45-3248-25 LEAD,ELECTRICAL: 13 IN. LG 1<br />
45 MFFZZ 81361 R1-B/GND WIRE, MAKE FROM WIRE,ELECTRICAL 1<br />
P/N MM2946/NSN 6145-00-500-<strong>30</strong>79<br />
46 PAFZZ 96906 MS25036-108 TERMINAL,LUG 2<br />
47 AFFFF 81361 D5-45-3248-26 LEAD,ELECTRICAL: 14 IN. LG 1<br />
48 MFFZZ 1361 TB1-A1/CB1-B WIRE, MAKE FROM WIRE,ELECTRICAL 1<br />
P/N MM2946/NSN 6145-00-500-<strong>30</strong>79<br />
B-31-2
SECTION II<br />
TM3-42<strong>30</strong>-<strong>209</strong>-<strong>30</strong>&P<br />
(1) (2) (3) (4) (5) (6)<br />
ITEM SMR PART<br />
NO CODE FSCM NUMBER DESCRIPTION AND USABLE ON CODE (UOC) QTY<br />
49 PAFZZ 96906 MS25036-108 TERMINAL,LUG 2<br />
50 AFFFF 81361 D5-45-3248-31 LEAD,ELECTRICAL: 20 IN. LG 1<br />
51 MFFZZ 81361 M4-A/TB1-A WIRE, MAKE FROM WIRE,ELECTRICAL 1<br />
P/N MM2946/NSN 6145-00-500-<strong>30</strong>79<br />
52 PAFZZ 96906 MS25036-108 TERMINAL,LUG 2<br />
END OF FIGURE<br />
B-31-3
SECTION II TM 3-42<strong>30</strong>-<strong>209</strong>-<strong>30</strong>&P 3<br />
/<br />
T4<br />
I<br />
I<br />
I<br />
1 1<br />
10<br />
11<br />
\<br />
\<br />
I<br />
\<br />
\ I<br />
14 ‘, I<br />
4<br />
AFuRTtiERDISASSEMBLY<br />
ON NEXT ILLUSTRATION.<br />
Figure B-32. Skid Mounted Decontaminating Apparatus Tank Unit and Hopper Access Cover (1 of 2).
(i<br />
SECTION II TM 3-42<strong>30</strong>-<strong>209</strong>-<strong>30</strong>&P 19<br />
:1<br />
Figure B-32. Skid Mounted Decontaminating Apparatus Tank Unit and Hopper Access Cover (2 of 2).<br />
32
SECTION II<br />
TM3-42<strong>30</strong>-<strong>209</strong>-<strong>30</strong>&P<br />
(1) (2) (3) (4) (5) (6)<br />
ITEM SMR PART<br />
NO CODE FSCM NUMBER DESCRIPTION AND USABLE ON CODE (UOC) QTY<br />
GROUP 03 SKID MOUNTED DECONTAMINAT-<br />
ING APPARATUS TANK UNIT C5-45-3183<br />
AND GORUP 0<strong>30</strong>1 HOPPER ACCESS COVER<br />
C5-45-<strong>30</strong>01<br />
FIG.B-32 TANK UNIT AND<br />
HOPPER ACCESS COVER<br />
1 AOOOO 81361 C5-45-3190 HOSE ASSEMBLY, SUCTIN (SEE FIG. B- 1<br />
34 FOR ASSEMBLY BREAKDOWN)<br />
2 PAFZZ 96906 MS70087-1 SHACKLE 4<br />
3 AOOOO 81361 C5-59-317 HOSE ASSEMBLY (SEE FIG. B-35 FOR 1<br />
ASSEMBLY BREAKDWON)<br />
4 PAOZZ 81361 B5-45-3153 BOLT ASSEMBLY, HOPPER COVER 2<br />
5 PAOZZ 81361 C5-45-<strong>30</strong>01 COVER,ACCESS HOPPER 1<br />
6 XAOZZ 81361 C5-45-<strong>30</strong>01-3 LID,HOPPER 1<br />
7 PAFZZ 81361 B5-45-2889-1 GASKET 1<br />
8 PAOZZ 8161 C5-45-2739 STRAINER ELEMENT, SEDIMENT 1<br />
9 PAOZZ 96906 MS21318-20 SCREW,DRIVE 6<br />
10 XDOZZ 81361 D5-45-3203-3 PLATE,IDENTIFICATIO 1<br />
11 PAOFF 81361 D5-45-3117 TANK,LIQUID STORAGE (SEE FIG.B-33 1<br />
FRO ASSEMBLY BREAKDOWN)<br />
12 PAFZZ 81361 B5-45-3132-1 COUPLING HALF,QUICK 1<br />
13 XDFZZ 81361 LM5-45-3183ITEM2 ELBOW 1<br />
3<br />
14 AOOOO 81361 C5-45-3178 VALVE ASSY, FOOT (SEE FIG. B-37 FOR 1<br />
ASSEMLBY BREAKDOWN)<br />
15 PAOZZ 96906 MS21316-56 THUMBSCREW 1<br />
16 PAFZZ 96906 MS16562-226 PIN,SPRING 8<br />
17 PAFZZ 81361 C5-45-<strong>30</strong>05-20 CLIP,SPRING TENSION 3<br />
18 PAFZZ 81361 C5-45-<strong>30</strong>05-<strong>30</strong> CLAMP,BRACKET 1<br />
19 XAFFF 81361 B5-45-3135 TANK ASSEMBLY 1<br />
20 PAFZZ 96906 MS51967-2 NUT,PLAIN,HEXAGON 2<br />
21 PAFZZ 96906 MS35338-44 WASHER,LOCK 2<br />
22 XDFZZ 81361 D5-45-3203-1 PLATE,IDENTIFICATIO AGITATION 1<br />
B-32-1
SECTION II<br />
TM3-42<strong>30</strong>-<strong>209</strong>-<strong>30</strong>&P<br />
(1) (2) (3) (4) (5) (6)<br />
ITEM SMR PART<br />
NO CODE FSCM NUMBER DESCRIPTION AND USABLE ON CODE (UOC) QTY<br />
23 XDFZZ 81348 WWH171 SUPPORT PIPE 1<br />
24 XDFZZ 81361 B5-45-<strong>30</strong>15-13 PIPE,METALLIC 1<br />
25 XDFZZ 81361 B5-45-2691 NOZZLE,AGITATOR 1<br />
26 XDFZZ 81361 LM5-45-3135ITEM2 ELBOW 1<br />
1<br />
27 PAOZZ 81361 5-45-3277 REDUCER,PIPE 2<br />
28 PAOOO 81361 C5-45-3276-5 VALVE,REGULATING (SEE FIG.B-36 FOR 1<br />
ASSEMBLY BREAKDOWN)<br />
29 XDOZZ 80205 NAS3106-28-28 U BOLT 1<br />
<strong>30</strong> XDOZZ 81361 D5-45-3203-2 PLATE,IDENTIFICATIO DRAIN 1<br />
31 PAOZZ 96906 MS392<strong>30</strong>-10 ELBOW,PIPE 1<br />
32 PAOZZ 81361 B5-45-3132-2 COUPLING HALF,QUICK 1<br />
33 PAOZZ 96906 MS51971-3 NUT,PLAIN,HEXAGON 8<br />
34 PAOZZ 96906 MS35338-141 WASHER,LOCK 8<br />
35 XDOZZ 81361 C5-45-3<strong>30</strong>3 SUPPORT,CROSS BAR 1<br />
36 PAOZZ 96906 MS90725-34 BOLT,MACHINE 2<br />
37 PAOZZ 9690 MS51967-5 NUT,PLAIN,HEXAGON 2<br />
38 PAOZZ 96906 MS35338-45 WASHER,LOCK 2<br />
39 PAFZZ 96906 MS27183-11 WASHER,FLAT 8<br />
40 PCFZZ 81361 C5-45-3<strong>30</strong>5 PAD RUBBER 1<br />
41 PAFZZ 96906 MS35206-285 SCREW,MACHINE 4<br />
42 PAFZZ 96906 MS35<strong>30</strong>7-358 SCREW,CAP,HEXAGON 8<br />
43 XAFZZ 81361 B5-45-3189 BASE,SKID,TANK 1<br />
END OF FIGURE<br />
B-32-2
SECTION II TM 3-42<strong>30</strong>-<strong>209</strong>-<strong>30</strong>&P<br />
1L<br />
2<br />
/ /3<br />
Figure B-33.<br />
Liquid Storage Tank.
SECTION II<br />
TM3-42<strong>30</strong>-<strong>209</strong>-<strong>30</strong>&P<br />
(1) (2) (3) (4) (5) (6)<br />
ITEM SMR PART<br />
NO CODE FSCM NUMBER DESCRIPTION AND USABLE ON CODE (UOC) QTY<br />
GROUP 0<strong>30</strong>2 LIQUID STORAGE TANK<br />
C5-45-3117<br />
FIG.B-33 LIQUID STORAGE TANK<br />
1 PAFZZ 81361 B5-45-3132-1 COUPLING HALF QUICK 1<br />
2 PAFZZ 81361 D5-45-3117ITEM15 ELBOW,PIPE 2<br />
3 XAFZZ 81361 C5-45-2845 BODY 1<br />
4 MFFZZ 81361 B5-45-2889-3 GASKET MAKE FROM RUBBER GASKET P/N 1<br />
B5-45-2889/NSN 9390-00-922-6550<br />
5 PAFZZ 81361 B5-45-<strong>30</strong>15-7 NIPPLE,PIPE 1<br />
6 PAFZZ 81361 B5-45-3128 PIPE,METALLIC 1<br />
7 XDFZZ 81361 D5-45-3117ITEM16 NUT 2<br />
END OF FIGURE<br />
B-33-1
SECTION II TM3-42<strong>30</strong>-<strong>209</strong>-<strong>30</strong>&P 4<br />
\ /<br />
Figure B-34. Suction Hose Assembly.<br />
(1) (2) (3)<br />
(4) (5) (6)<br />
ITEM SMR PART<br />
NO CODE FSCM NUMBER DESCRIPTION AND USABLE 13V CODES (U5C) QTY<br />
GROUP 0<strong>30</strong>3 SUCTION HGSE ASSEMBLY<br />
C5-45-3190<br />
FIG.B-34 SUCT16N HOSE ASSEMBLY<br />
1 PAOZZ 81361 B5-45-31<strong>30</strong>-2 GASKET . . . . . . . . . . . . . . . . . . . . . . . . . . . . . . 4<br />
2 PAOZZ 81361 B5-45-3174-2 COUPLING I+AI.F, QUICK . . . . . . . . . . . . . . . . . 2<br />
3 PAOZZ 77414 0-16S CLAMP, HOSE. . . . . . . . . . . . . . . . . . . . . . . . 4<br />
4 PAOZZ 81361 CS-45-2798 HOSE, NCNYMETALLIC . . . . . . . . . . . . . . . . . . . 1<br />
END f3F FIGURE<br />
B-34-1<br />
(
SECTION II TM3-42<strong>30</strong>-<strong>209</strong>-<strong>30</strong>&P<br />
I<br />
1<br />
Figure B-35. Hose assembly<br />
(1) (2) (3) (4) (5) (6)<br />
ITEM SMR PART<br />
NO CODE FSCM NUIBER DESCRIPTION AND USABLE ON CODES(UOC) QTY<br />
GROUP 0<strong>30</strong>4 HOSE ASSEMBLY C5-59-317<br />
FIG.B-35<br />
HCISE ASSEMBLY<br />
1 PAIYZZ 81361 B5-45-2635 GASKET . . . . . . . . . . . . . . . . . . . . . . . . . . . . . . 1<br />
2 PAOZZ 80691 D101 CISUPLI NGHALF, QUICK . . . . . . . . . . . . . . . . . 2<br />
3 PACIZZ 72661 MS1l ADAPTER, STRAIGHT,PI . . . . . . . . . . . . . . . . . 2<br />
4 PAf3ZZ 77414 P8S-2 CLAMP, HOSE . . . . . . . . . . . . . . . . . . . . . . . . . . 4<br />
5 PAOZZ 81361 C5-45-2736-7 H13SE, NONMETALLI C....,.,. . . . . . . . . . . . 1<br />
END OF<br />
FIGURE<br />
B-35-1
SECTION II TM 3-42<strong>30</strong>-<strong>209</strong>-<strong>30</strong>&P<br />
1<br />
*<br />
I<br />
.’1<br />
I<br />
I<br />
I<br />
I<br />
I<br />
I<br />
/<br />
I /’<br />
I /’<br />
I/’<br />
,.<br />
*NO FURTHER DISASSEMBLY<br />
AUTHORIZED.<br />
Figure B-36. Regulating Valve.
SECTION II<br />
TM3-42<strong>30</strong>-<strong>209</strong>-<strong>30</strong>&P<br />
(1) (2) (3) (4) (5) (6)<br />
ITEM SMR PART<br />
NO CODE FSCM NUMBER DESCRIPTION AND USABLE ON CODE (UOC) QTY<br />
GROUP 0<strong>30</strong>5 REGULATING VALVE<br />
C5-45-3276-5<br />
FIG.B-36 REGULATING VALVE<br />
1 PAOZZ 96906 MS15003-1 FITTING,LUBRICATION 1<br />
2 PAOZZ 96906 MS90727-90 SCREW,CAP,HEXAGON 4<br />
3 PAOZZ 19243 2 IN GRADE R-2 DIAPHRAGM,VALVE 1<br />
4 PAOZZ 96906 MS51968-11 NUT,PLAIN,HEXAGON 4<br />
END OF FIGURE<br />
B-36-1
1bo<br />
SECTION II TM 3-42<strong>30</strong>-<strong>209</strong>-<strong>30</strong>&P<br />
4<br />
*<br />
)!!)<br />
L<br />
,2<br />
I<br />
I<br />
I<br />
&<br />
d<br />
6<br />
/3<br />
11<br />
*NO FURTHER DISASSEMBLY<br />
AUTHORIZED.<br />
1<br />
Ii<br />
Figure B-37. Foot Valve Assembly and Foot Valve.
SECTION II<br />
TM3-42<strong>30</strong>-<strong>209</strong>-<strong>30</strong>&P<br />
(1) (2) (3) (4) (5) (6)<br />
ITEM SMR PART<br />
NO CODE FSCM NUMBER DESCRIPTION AND USABLE ON CODE (UOC) QTY<br />
GROUP 0<strong>30</strong>6 FOOT VALVE ASSEMBLY<br />
C5-45-3178 AND<br />
GROUP 0<strong>30</strong>601 FOOT VALVE C5-45-2598<br />
FIG.B-37 FOOT VALVE ASSEMBLY<br />
AND FOOT VALVE<br />
1 PAOZZ 81361 B5-45-3132-2 COUPLING HALF,QUICK 1<br />
2 PAOZZ 81346 WWP471 BUSHING,PIPE 1<br />
3 PAOOO 81361 C5-45-2598 VALVE,FOOT 1<br />
4 PAOZZ 96906 MS51967-5 NUT,PLAIN,HEXAGON 3<br />
5 PAOZZ 96906 MS35751-16 BOLT,SQUARE NECK 1<br />
6 XAOZZ 38455 21109 WEIGHT, SUCTION VALVE UPPER 1<br />
7 PAOZZ 38455 31049 DIAPHRAGM,VALVE 1<br />
8 XAOZZ 38455 21033 WEIGHT, SUCTION VALVE LOWER 1<br />
9 PAOZZ 88044 AN935-416 WASHER,LOCK 1<br />
10 PAOZZ 96906 MS51967-2 NUT,PLAIN,HEXAGON 1<br />
11 XAOZZ 38455 31046 SEAT AND BOTTOM STRAINER 1<br />
12 PAOZZ 96906 MS90725-43 SCREW,CAP,HEXAGON 3<br />
END OF FIGURE<br />
B-37-1
SECTION II TM 3-42<strong>30</strong>-<strong>209</strong>-<strong>30</strong>&P<br />
,14<br />
*SUPPLIED<br />
NUMBERE<br />
AFURTHER<br />
ON NEXT ILLUSTRATION. ’16<br />
Figure B-38. M2 Liquid Fuel Water Heater (1 of 4).<br />
ṭ
t<br />
\<br />
SECTION<br />
II<br />
TM 3-42<strong>30</strong>-<strong>209</strong>-<strong>30</strong>&P<br />
K/.w A!<br />
,A<br />
42/<br />
“INN%<br />
AFURTHER DISASSEMBLY<br />
ON NEXT ILLUSTRATION.<br />
‘d 0“”<br />
o<br />
*Y ‘ “<br />
z’””’. ‘, ~41<br />
\<br />
\<br />
0’ “ ~15<br />
14<br />
Figure B-38. M2 Liquid Fuel Water Heater (2 of 4).
SECTION II TM 3-42<strong>30</strong>-<strong>209</strong>-<strong>30</strong>&P<br />
I & 54<br />
i’<br />
L .1<br />
VIEW A<br />
/A<br />
4 57<br />
56<br />
*SUPPLIED WITH<br />
IDENTICALLY NUMBERED<br />
PART.<br />
A FURTHER DISASSEMBLY ON<br />
NEXT ILLUSTRATION.<br />
Figure B-38. M2 Liquid Fuel Water Heater (3 of 4).
(~<br />
SECTION<br />
II<br />
TM 3-42<strong>30</strong>-<strong>209</strong>-<strong>30</strong>&P<br />
I<br />
la<br />
1 l{ ‘il I<br />
68<br />
67<br />
Figure B-38. M2 Liquid Fuel Water Heater (4 of 4).
SECTION II<br />
TM3-42<strong>30</strong>-<strong>209</strong>-<strong>30</strong>&P<br />
(1) (2) (3) (4) (5) (6)<br />
ITEM SMR PART<br />
NO CODE FSCM NUMBER DESCRIPTION AND USABLE ON CODE (UOC) QTY<br />
GROUP 04 LIQUID FUEL WATER HEATER<br />
E5-59-200<br />
FIG.B-38 LIQUID FUEL WATER HEATER<br />
1 PAOFF 81361 E5-59-365 COVER,ACCESS SIDE (SEE FIG.B-42 2<br />
FOR ASSEMBLY BREAKDOWN)<br />
2 PAOZZ 96906 MS35207-261 SCREW,MACHINE 20<br />
3 PAFZZ 81361 C5-45-3<strong>30</strong>8 CATCH,CLAMPING 2<br />
4 PAFZZ 96906 MS20613-4P7 RIVET,SOLID 4<br />
5 PAOFF 81361 E5-59-323 COVER,TOP,CABINET (SEE FIG.B-39 1<br />
FOR ASSEMBLY BREAKDOWN)<br />
6 PAOZZ 96906 MS35206-279 SCREW,MACHINE 8<br />
7 PAOZZ 96906 MS35206-277 SCREW,MACHINE 4<br />
8 PAOZZ 81361 D5-45-3240 CARRIER,TOOL 1<br />
9 XDOZZ 81361 B5-59-403 STRIP,POUCH 1<br />
10 PAOZZ 96906 MS27183-10 WASHER,FLAT 4<br />
11 PAOZZ 96906 MS51967-2 NUT,PLAIN,HEXAGON 26<br />
12 XDOFF 81361 D5-59-273 PANEL,END (SEE FIG.B-40 FOR 1<br />
ASSEMBLY BREAKDOWN)<br />
13 PAFZZ 96906 MS70087-1 SHACKLE 4<br />
14 PAOZZ 96906 MS35333-39 WASHER,LOCK 68<br />
15 PAOZZ 96906 MS24629-46 SCREW,TAPPING 44<br />
16 MOOZZ 81361 C5-59-328 PANEL, SKID,RIGHT MAKE FROM METAL, 1<br />
SHEET P/N ASTM A366/NSN 9515-00-237-<br />
1855<br />
17 PAOFF 81361 D5-59-364 COVER,ACCESS (SEE FIG.B-41 FOR 1<br />
ASSEMBLY BREAKDOWN)<br />
18 PAFZZ 96906 MS20470B3-4 RIVET,SOLID 4<br />
19 PAFZZ 81361 C5-59-413 PLATE,IDENTIFICATIO WATER HEATER 1<br />
20 XDFZZ 81361 C5-59-226-2 PLATE 1<br />
21 XDFZZ 81361 C5-59-226-1 PLATE OPERATING INSTRUCTIONS 1<br />
22 PAFZZ 96906 MS35206-280 SCREW,MACHINE 8<br />
23 PAOZZ 96906 MS35333-40 PLATE 23<br />
24 MOOZZ 81361 C5-59-329 PANEL MAKE FROM METAL SHEET P/N 2<br />
ASTM A366/NSN 9515-00-237-1855<br />
B-38-1
SECTION II<br />
TM3-42<strong>30</strong>-<strong>209</strong>-<strong>30</strong>&P<br />
(1) (2) (3) (4) (5) (6)<br />
ITEM SMR PART<br />
NO CODE FSCM NUMBER DESCRIPTION AND USABLE ON CODE (UOC) QTY<br />
25 XDFZZ 81361 C5-59-327 SHEET 1<br />
26 PAFZZ 96906 MS20613-4P4 RIVET,SOLID 4<br />
27 PAOZZ 96906 MS35650-<strong>30</strong>2 NUT,PLAIN,HEXAGON 24<br />
28 PAOZZ 81361 B5-59-407 BRACKET,ANGLE 1<br />
29 PAOZZ 96906 MS51960-65 SCREW,MACHINE 4<br />
<strong>30</strong> PAOZZ 90598 TCA463 SUPPORT,TOP DOOR 1<br />
31 AFOFF 81361 D5-59-311 HOSE ASSEMBLY (SEE FIG.B-50 FOR 1<br />
ASSEMBLY BREAKDOWN)<br />
32 PAOFF 81361 C5-59-360 CABLE ASSEMBLY,POWE (SEE FIG.B-48 1<br />
FOR ASSEMBLY BREAKDOWN)<br />
33 AOOOO 81361 C5-59-317 HOSE ASSEMLBY, (SEE FIG.B-35 FOR 1<br />
ASSEMBLY BREAKDOWN)<br />
34 PAFZZ 81361 B5-45-3132-3 DOUPLING HALF,QUICK 1<br />
35 PAFZZ 93480 BW1044 ELBOW,PIPE 1<br />
36 PAFZZ 81361 D5-59-326 PLATE,REAR,TOP 1<br />
37 PAFZZ 839<strong>30</strong> 400WSS10 CLAMP,LOOP 3<br />
38 PAFZZ 96906 MS35489-25 GROMMET,NONMETALLIC 1<br />
39 PAFZZ 96906 MS27020-6 COUPLING HALF,QUICK 1<br />
40 PAOZZ 81361 B5-59-381 CAP,PROTECTIVE,DUST 2<br />
41 XDOZZ 81361 C5-59-396 COVER 1<br />
42 PAFZZ 81361 D5-59-395 COVER,ACCESS 1<br />
43 PAOZZ 96906 MS35489-11 GROMMET,NONMETALLIC 1<br />
44 PAFZZ 81361 D5-59-325 COVER,ACCESS TOP, FRONT 1<br />
45 PAFZZ 81361 B5-59-410 BOX CONNECTOR,ELECT ELECTRICAL 1<br />
46 PAOZZ 96906 MS3367-1-9 STRAP,TIEDOWN,ELECT 9<br />
47 PAFFF 81361 E5-59-<strong>30</strong>1 CONTROL BOX,WATER ASSEMBLY (SEE 1<br />
FIG.B-43 FOR ASSEMBLY BREAKDOWN)<br />
48 PAOZZ 96906 MS90723-14 NUT,SHEET SPRING 7<br />
49 AFOFF 81361 B5-59-349 LINE, PRESSURE, WATER (SEE FIG.B- 1<br />
45 FOR ASSEMBLY BREAKDOWN)<br />
50 PAFZZ 96906 MS35489-3 GROMMET,NONMETALLIC 1<br />
51 PAOZZ 81361 D5-59-336 COVER,ACCESS 1<br />
52 PAFZZ 73168 67100-0-200 SWITCH,THERMOSTATIC 200 DEGREES F 1<br />
53 PAFZZ 81361 B5-59-422 INSULATOR,DISK 1<br />
54 PAFZZ 81361 B5-59-322 UNION,CONNECTOR 1<br />
55 PAFZZ 81361 B5-59-421 KEY,WOODRUFF 2<br />
B-38-2
SECTION II<br />
TM3-42<strong>30</strong>-<strong>209</strong>-<strong>30</strong>&P<br />
(1) (2) (3) (4) (5) (6)<br />
ITEM SMR PART<br />
NO CODE FSCM NUMBER DESCRIPTION AND USABLE ON CODE (UOC) QTY<br />
56 AFFFF 81361 D5-59-210 WIRING, ELECTRICAL (SEE FIG.B-49 1<br />
FOR ASSEMBLY BREAKDOWN)<br />
56 AFFFF 81361 C5-59-218 WIRING, ELECTRICAL (SEE FIG.B-49 1<br />
FOR ASSEMBLY BREAKDOWN)<br />
57 AFOFF 81361 C5-59-405 LINE, SELECTOR RETURN (SEE FIG.B- 1<br />
46 FOR ASSEMBLY BREAKDOWN)<br />
58 PAFZZ 96906 MS39157-3 NIPPLE,TUBE 1<br />
59 AFOFF 81361 C5-59-352 LINE, FUEL PRESSURE (SEE FIG.B-47 1<br />
FOR ASSEMBLY BREAKDOWN)<br />
60 XAFZZ 81361 B5-59-274 FRAME,CABINET 1<br />
61 PAFFA 81361 E5-59-285 BOILER,HEATING,LOW PRESSURE (SEE 1<br />
FIG.B-61 FOR ASSEMBLY BREAKDOWN)<br />
62 PAFZZ 96906 MS35489-46 GROMMET,NONMETALLIC 1<br />
63 PAFZZ 96906 MS18154-58 SCREW,CAP,HEXAGON 8<br />
64 PAFZZ 96906 MS35333-42 WASHER,LOCK 8<br />
65 XAFFF 81361 E5-59-362 SKID ASSEMLBY (SEE FIG.B-51 FOR 1<br />
ASSEMBLY)<br />
66 PAFZZ 96906 MS51967-5 NUT,PLAIN,HEXAGON 12<br />
67 PAFZZ 96906 MS35333-41 WASHER,LOCK 12<br />
68 PAFZZ 96906 MS90725-33 BOLT,MACHINE 12<br />
END OF FIGURE<br />
B-38-3/(B-38-4 BLANK)
SECTION II TM3-42<strong>30</strong>-<strong>209</strong>-<strong>30</strong>&P<br />
AUTHORIZED.<br />
Figure B-39.<br />
Cabinet Top Cover.<br />
(1) (2)<br />
ITEM<br />
SMR<br />
(3) (4) (5)<br />
PART<br />
NO cODE FSCM NUIBER DESCRIPTION AND USABLE ON CCKIES(UJC) CITY<br />
GROUP 0401 CABINET TOP COVER<br />
E5-59-323<br />
(6)<br />
FIG. B-39 CABINET TOP COVER<br />
1 XDFZZ 81361 C5-59-418<br />
DECAL. . . . . . . . . . . . . . . . . . . . . ...... 1<br />
END OF FIGURE<br />
B-39-1
T<br />
SECTIUN 11 TM3-42<strong>30</strong>-<strong>209</strong>-<strong>30</strong>&P<br />
( ( ‘<br />
\*<br />
*<br />
NOFURTHER DISASSEMBLY<br />
d<br />
AUTHORIZED.<br />
Figure B-40.<br />
End Panel,<br />
(1) (2) (3) (4)<br />
(5) (6)<br />
ITEM SMR PART<br />
NCI CODE FSCM NUIBER DESCRIPTION AND USABLE (3N C13DES(LKJC) (2TY<br />
GROUP 0402 END PANEL<br />
D5-59-273<br />
FIG.S-40 END PANEL<br />
1 PAFZZ 56878 40S5-8 STUD ASSEMBLY, TURNL, . . . . . . . . . . . . . . . . 12<br />
2 PAFZZ 71286 4002N EYELET,TURNLOCK FAD . . . . . . . . . . . . . . . . . 12<br />
3 PAFZZ 18876 7613189 RI NG, RETAINING . . . . . . . . . . . . . . . . . . . . . . 12<br />
END<br />
13F FIGURE<br />
B-40-1
v<br />
SECTION 11 TM3-42<strong>30</strong>-<strong>209</strong>-<strong>30</strong>UP<br />
2<br />
3<br />
‘-.<br />
\<br />
/’<br />
\<br />
e<br />
*NO FURTHER DISASSEMBLY<br />
AUTHORIZED.<br />
Figure B-41.<br />
Front Panel.<br />
(1) (2) (3) (4) (5) (6)<br />
ITEM SflR PART<br />
NO CODE FSCM NUMBER DESCRIPTION AND USABLE fYN CODES (WC) CJTY<br />
GRf3UP 0403<br />
D5-59-364<br />
FRU5JT PANEL<br />
FIG.B-41 FRONT PANEL<br />
1 PAFZZ 56878 40S5-8<br />
2 PAFZZ 71286 4002N<br />
3 PAFZZ 18876 7613189<br />
STUD ASSEMBLY, TURNLt . . . . . . . . . . . . . . . . 9<br />
EYELET,T(JRNLCICK FAD . . . . . . . . . . . . . . . . . 9<br />
RING, RETAINI NG . . . . . . . . . . . . . . . . . . . . . . 9<br />
END<br />
CIF FIGURE<br />
B-41-1
f ‘<br />
SECTIIYN 11 Tr’13-42<strong>30</strong>-<strong>209</strong>-<strong>30</strong>aP<br />
/<br />
1<br />
o<br />
1<br />
/<br />
0<br />
*<br />
NOFURTHER DISASSEMBLY<br />
AUTHORIZED.<br />
(1) (2) (3) (4)<br />
ITEM SMR PART<br />
NO CCIDE FSCM NIJIBER<br />
Figure B-42. Side Panel.<br />
(5) (6)<br />
DESCR1PTI13N AND USABLE ON CODES(WC) CITY<br />
GROUP 0404 SIDE PANEL<br />
E5-59-365<br />
FIG.B-42 SIDE PANEL<br />
1 PAFZZ 56878 40S5-8<br />
2 PAFZZ 71286 4002N<br />
3 PAFZZ 71286 R4G<br />
STUD ASSEMBLY, TURNL . . . . . . . . . . . . . . . . 15<br />
EYELET, TURNLCICK FAD . . . . . . . . . . . . . . . . . 15<br />
RI NG, REIAINI NG. . . . . . . . . . . . . . . . . . . . . 15<br />
END CIF FIGURE<br />
B-42-1
SECTION II TM 3-42<strong>30</strong>-<strong>209</strong>-<strong>30</strong>&P<br />
/6<br />
18<br />
7<br />
17<br />
*suppLIED WITH<br />
IDENTICALLY NUMBERED<br />
PART.<br />
AFURTHER DISASSEMBLY<br />
ON NEXT ILLUSTRATION.<br />
F/gure B-43. Control Box Assembly (1 of 2).
t’<br />
SECTION H<br />
TM 3-42<strong>30</strong>-<strong>209</strong>-<strong>30</strong>&P<br />
29<br />
Figure B-43. Control Box Assembly (2 of 2).
SECTION II<br />
TM3-42<strong>30</strong>-<strong>209</strong>-<strong>30</strong>&P<br />
(1) (2) (3) (4) (5) (6)<br />
ITEM SMR PART<br />
NO CODE FSCM NUMBER DESCRIPTION AND USABLE ON CODE (UOC) QTY<br />
GROUP 0405 CONTROL BOX ASSEMBLY<br />
E5-59-<strong>30</strong>1<br />
FIG.B-43 CONTROL BOX ASSEMBLY<br />
1 PAOZZ 81361 C5-59-332 THERMOMETER,INDICAT 1<br />
2 PAOZZ 81361 C5-59-203-1 GAGE,PRESSURE,DIAL FUEL 1<br />
3 PAOZZ 81361 C5-59-203-2 GAGE,PRESSURE,DIAL WATER 1<br />
4 MFOZZ 81361 B5-59-412 INSULATION BLANKET, MAKE FROM 1<br />
INSULATION BLANKET P/N PF336F/NSN<br />
5640-00-905-3631<br />
5 XDFZZ 81361 C5-59-<strong>30</strong>5 BRACKET, ANGLE 1<br />
6 PAOZZ 96906 MS35207-261 SCREW,MACHINE 10<br />
7 PAOZZ 79470 46X4X4 ADAPTER,STRAIGHT,PI 1<br />
8 PAOZZ 88044 AN916-2 ELBOW,PIPE 1<br />
9 PAOZZ 66640 166D1 BUSHING,PIPE 1<br />
10 PAOZZ 96906 MS39164-3 TEE,PIPE TO TUBE 1<br />
11 PAOZZ 96906 MS28778-5 PACKING,PREFORMED 1<br />
12 PAOZZ 81361 C5-59-387 VALVE,CHECK 1<br />
13 PAOZZ 81361 C5-59-386 VALVE,REGULATING, TEMPERATURE 1<br />
14 PAOZZ 96906 MS35333-39 WASHER,LOCK 31<br />
15 PAOZZ 96906 MS35650-<strong>30</strong>2 NUT,PLAIN,HEXAGON 11<br />
16 PAOZZ 96906 MS35691-61 NUT,PLAIN,HEXAGON 1<br />
17 PAOZZ 96906 MS18064-9 SETSCREW 1<br />
18 PAOZZ 81361 C5-59-399 HANDLE,MANUAL CONTR 1<br />
19 PAFZZ 81361 B5-59-<strong>30</strong>9 PLATE,INSTRUCTION TEMPERATURE 1<br />
SELECTOR<br />
20 PAFZZ 81361 B5-45-3<strong>30</strong>4 DECAL 1<br />
21 XDFZZ 81361 B5-59-<strong>30</strong>7 PLATE, IDENTIFICATION GAGE 1<br />
22 PAOZZ 96906 MS35489-7 GROMMET,NONMETALLIC 2<br />
23 AFOFF 81361 C5-59-398 LINE, SELECTOR VALVE (SEE FIG.B-44 1<br />
FOR ASSEMBLY BREAKDOWN)<br />
24 PAOZZ 96906 MS39162-3 ELBOW,PIPE TO TUBE 1<br />
25 PAOZZ 96906 MS24166D1 RELAY,ELECTROMAGNET 2<br />
26 PAOZZ 70563 12C120 RELAY,THERMAL 1<br />
B-43-1
SECTION II<br />
TM3-42<strong>30</strong>-<strong>209</strong>-<strong>30</strong>&P<br />
(1) (2) (3) (4) (5) (6)<br />
ITEM SMR PART<br />
NO CODE FSCM NUMBER DESCRIPTION AND USABLE ON CODE (UOC) QTY<br />
27 PAOZZ 70563 12N02 RELAY, THERMAL 1<br />
28 XDFZZ 81361 B5-59-415 PLATE, IDENTIFICATION, HEATER 1<br />
SWITCH<br />
29 PAOZZ 96906 MS35059-23 SWITCH, TOGGLE, HEATER-ON, PURGE-ON 1<br />
<strong>30</strong> XDFZZ 81361 C5-59-310 SUPPORT, THERMAL RELAY 1<br />
31 XDFZZ 81361 B5-59-414 PLATE, IDENTIFICATION RELAY, TIME 1<br />
DELAY<br />
32 PAOZZ 96906 MS35489-11 GROMMET,NONMETALLIC 1<br />
33 XAFZZ 81361 E5-59-257 BOX, CONTROL 1<br />
34 XDFZZ 81361 B5-59-<strong>30</strong>6 PLATE, IDENTIFICATION RELAY 1<br />
35 PAFZZ 81361 B5-59-<strong>30</strong>8 PLATE, INSTRUCTION HEATER CONTROL 1<br />
END OF FIGURE<br />
B-43-2
SECTION 11 TM3-42<strong>30</strong>-<strong>209</strong>-<strong>30</strong>&P<br />
Figure B-44. Selector Valvelike.<br />
(1) (2) (3) (4) (5) (6)<br />
1TEM SMR PART<br />
No CODE FSCM NUMBER DESCRIPTION AND USABLE CiN CCJOES(LKJC) (2TY<br />
GROUP 040501 SELECTOR VALVE LINE<br />
CS-59-398<br />
FIG.B-44 SELECTOR VALVE LINE<br />
1 PAFZZ 96906 MS39166-3 NUT, T~E COUPLING . . . . . . . . . . . . . . . . . . . 2<br />
2 MFFZZ 81361 C5-59-398-1 TU3E, MAKE FROM T~E,METALLIC P/N 1<br />
MILT3520/NSN 4710-00-880-1091 . . . . . . .<br />
B-44-1<br />
END OF FIGURE
j<br />
i<br />
, )<br />
SECTION<br />
II<br />
TM3-42<strong>30</strong>-<strong>209</strong>-<strong>30</strong>&P<br />
1<br />
1<br />
\<br />
Figure B-45.<br />
Water Pressure Line.<br />
(1) (2) (3) (4) (5)<br />
(6)<br />
ITEM SMR<br />
PART<br />
NO CODE FSCM hL#lBER DESCRIPTIIYN AND USABLE ON C5DES(UCJC) QTY<br />
GROUP 0406 WATER PRESSURE LINE<br />
B5-59-349<br />
FIG.B-45 WATER PRESSURE LINE<br />
1 PAFZZ 96906 MS39166-3 NUT, TUBE CUIJPLING. ,.,.. . . . . . . . . . . . . . 2<br />
2 rlFFZZ 81361 B5-59-349-1 TUE MAKE FRf3M TUBE,METALLIC P/N 1<br />
M1LT3520/NSN 4710-00-880-1091 . . . . . . .<br />
END OF<br />
FIGURE<br />
B-45-1
SECTION 11 TM3-42<strong>30</strong>-<strong>209</strong>-<strong>30</strong>8P<br />
Figure B-46.<br />
Selector Return Line.<br />
(1) (2) (3) (4) (5) (6)<br />
1TEM SMR PART<br />
NO cODE FSCM NU’lBER DESCRIPTION AND USABLE ON CODES(WC) QTY<br />
GROUP 0407 SELECTOR RETURN LINE<br />
C5-59-”405<br />
FIG.B-46 SELECTOR RETURN LINE<br />
1 PAFZZ 96906 MS39166-3 NUT, TUBE COUPLING . . . . . . . . . . . . . . . . 2<br />
2 MFFZZ 81361 C5-59-405-1 TUBE MAKE FROM TUBE,METALLIC P/N 1<br />
t11LT3520/NSN 4710-00-8<strong>30</strong>-1091. . . . . . ~<br />
END<br />
CIF FIGURE<br />
B-46-1
,V,<br />
(<br />
SECTION II TM3-42<strong>30</strong>-<strong>209</strong>-<strong>30</strong>8P<br />
1<br />
Figure B-47.<br />
Fuel Pressure Line.<br />
(1) (2) (3) (4)<br />
[5) [61<br />
ITEM SMR PART<br />
Nd CODE FSCM NUIBER DESCRIPTICJN AND USABLE ON CODES (~C) CITY<br />
GROUP 0408 FUEL PRE.SSIJRE LINE<br />
CS-59-352<br />
FIG.B-47 FUEL PRESSURE LINE<br />
1 PAFZZ 96906 MS39166-3 NUT, TUBE CtYUPLING, . . . . . . . . . . . . . . . . . . 2<br />
2 MFFZZ 81361 CS-59-352-1 TLBE MAKE FROrl TUBE,METALLIC P/N 1<br />
MILT35.20/NSN 4710-00-880-1091, ,....,<br />
END CJF FIGURE<br />
B-47-1
SECTION II TM 3-42<strong>30</strong>-2 <strong>30</strong>&P<br />
3<br />
Figure B-48.<br />
Power Cabie Assembly.
SECTION II<br />
TM3-42<strong>30</strong>-<strong>209</strong>-<strong>30</strong>&P<br />
(1) (2) (3) (4) (5) (6)<br />
ITEM SMR PART<br />
NO CODE FSCM NUMBER DESCRIPTION AND USABLE ON CODE (UOC) QTY<br />
GROUP 0409 POWER CABLE ASSEMBLY<br />
C5-59-360<br />
FIG.B-48 POWER CABLE ASSEMBLY<br />
1 PAFZZ 96906 MS3108B16-12S CONNECTOR,PLUG,ELEC 1<br />
2 PAFZZ 81349 M85049/41-8A CLAMP,CABLE,ELECTRI 1<br />
3 MFFZZ 81361 C5-59-360-1 CABLE,POWER MAKE FROM CABLE,POWER 1<br />
P/N MILO5756B/NSN 6145-00-548-1076<br />
4 PAFZZ 96906 MS25036-112 TERMINAL,LUG 2<br />
END OF FIGURE<br />
B-48-1
SECTION II TM 3-42<strong>30</strong>-<strong>209</strong>-<strong>30</strong>&P<br />
431<br />
+=+= —,<br />
,p4-n+==c4q<br />
52 51 47 53<br />
,d=fJ- 4,<br />
60 59 54<br />
1<br />
1<br />
I<br />
I<br />
61<br />
4<br />
I<br />
W —,<br />
33<br />
I<br />
Figure B-49.<br />
Electrical<br />
Wiring.
SECTION II<br />
TM3-42<strong>30</strong>-<strong>209</strong>-<strong>30</strong>&P<br />
(1) (2) (3) (4) (5) (6)<br />
ITEM SMR PART<br />
NO CODE FSCM NUMBER DESCRIPTION AND USABLE ON CODE (UOC) QTY<br />
GROUP 0410 ELECTRICAL WIRING<br />
C5-59-218 AND D5-59-210<br />
FIG.B-49 ELECTRICAL WIRING<br />
1 MFFZZ 81361 C5-59-218-1 LEAD, ELECTRICAL:1/2 IN.LG,MAKE 1<br />
FROM WIRE,ELECTRICAL P/N MM2946 /<br />
NSN 6145-00-500-<strong>30</strong>79<br />
2 AFFFF 81361 C5-59-218-2 LEAD, ELECTRICAL: 6 IN. LG 1<br />
3 MFFZZ 81361 TD2-3/G WIRE, CUT FROM WIRE,ELECTRICAL P/ 1<br />
N MM2946/NSN 6145-00-500-<strong>30</strong>79<br />
4 PAFZZ 96906 MS25036-103 TERMINAL LUG 1<br />
5 AFFFF 81361 C5-59-218-3 LEAD, ELECTRICAL: 8.25 IN. LG 1<br />
6 MFFZZ 81361 TD1-2/S4-3 WIRE, CUT FROM WIRE,ELECTRICAL P/ 1<br />
N MM2946/NSN 6145-00-500-<strong>30</strong>79<br />
7 PAFZZ 96906 MS25036-101 TERMINAL,LUG 1<br />
8 AFFFF 81361 C5-59-218-4 LEAD, ELECTRICAL: 23 IN. LG 1<br />
9 MFFZZ 81361 K2-A1/S3 WIRE, CUT FROM WIRE,ELECTRICAL P/1 1<br />
N MM2946/NSN 6145-00-500-<strong>30</strong>79<br />
10 PAFZZ 96906 MS25036-103 TERMINAL,LUG 1<br />
11 PAFZZ 96906 MS25036-101 TERMINAL,LUG 1<br />
12 AFFFF 81361 C5-59-218-5 LEAD, ELECTRICAL: 19 IN. LG 1<br />
13 MFFZZ 81361 TD2-5/S3 WIRE, CUT FROM WIRE,ELECTRICAL P/ 1<br />
N MM2946/NSN 6145-00-500-<strong>30</strong>79<br />
14 PAFZZ 96906 MS25036-101 TERMINAL,LUG 1<br />
15 MFFZZ 81361 C5-59-218-6 LEAD, CUT FROM WIRE, ELECTRICAL P/N 1<br />
MM2946/NSN 6145-00-500-<strong>30</strong>79<br />
16 AFFFF 81361 C5-59-218-7 LEAD, ELECTRICAL: 11.50 IN, LG 1<br />
17 MFFZZ 81361 K2-A1/TD1-7 WIRE, CUT FROM WIRE,ELECTRICAL P/ 1<br />
N MM2946/NSN 6145-00-500-<strong>30</strong>79<br />
18 PAFZZ 96906 MS25036-103 TERMINAL,LUG 1<br />
19 AFFFF 81361 C5-59-218-8 LEAD, ELECTRICAL: 35 IN. LG 1<br />
20 MFFZZ 81361 K2-A2/S2 WIRE, CUT FROM WIRE,ELECTRICAL P/ 1<br />
N MM2946/NSN 6145-00-500-<strong>30</strong>79<br />
21 PAFZZ 96906 MS25036-103 TERMINAL,LUG 1<br />
B-49-1
SECTION II<br />
TM3-42<strong>30</strong>-<strong>209</strong>-<strong>30</strong>&P<br />
(1) (2) (3) (4) (5) (6)<br />
ITEM SMR PART<br />
NO CODE FSCM NUMBER DESCRIPTION AND USABLE ON CODE (UOC) QTY<br />
22 PAFZZ 00779 42599-2 TERMINAL,QUICK DISC 1<br />
23 AFFFF 81361 C5-59-218-9 LEAD, ELECTRICAL: <strong>30</strong> IN. LG 1<br />
24 MFFZZ 81361 S4-2/S2 WIRE, CUT FROM WIRE,ELECTRICAL P/ 1<br />
N MM2946/NSN 6145-00-500-<strong>30</strong>79<br />
25 PAFZZ 96906 MS25036-101 TERMINAL,LUG 1<br />
26 PAFZZ 00779 42599-2 TERMINAL,QUICK DISC 1<br />
27 AFFFF 81361 C5-59-218-10 LEAD, ELECTRICAL: 1.75 IN. LG 1<br />
28 MFFZZ 81361 S4-1/S4-5 WIRE, CUT FROM WIRE,ELECTRICAL P/ 1<br />
N MM2946/NSN 6145-00-500-<strong>30</strong>79<br />
29 PAFZZ 96906 MS25036-101 TERMINAL,LUG 2<br />
<strong>30</strong> AFFFF 81361 C5-59-218-11 LEAD, ELECTRICAL: 4.50 IN. LG 1<br />
31 MFFZZ 81361 K2-X2/S4-6 WIRE, CUT FROM WIRE,ELECTRICAL P/ 1<br />
N MM2946/NSN 6145-00-500-<strong>30</strong>79<br />
32 PAFZZ 96906 MS25036-101 TERMINAL,LUG 2<br />
33 AFFFF 81361 C5-59-218-12 LEAD, ELECTRICAL: 62 IN. LG 1<br />
34 MFFZZ 81361 S1/S4-1 WIRE, CUT FROM WIRE,ELECTRICAL P/ 1<br />
N MM2946/NSN 6145-00-500-<strong>30</strong>79<br />
35 PAFZZ 96906 MS25036-101 TERMINAL,LUG 1<br />
36 AFFFF 81361 C5-59-218-13 LEAD, ELECTRICAL: 9 IN. LG 1<br />
37 MFFZZ 81361 K2-X1/G WIRE, CUT FROM WIRE,ELECTRICAL P/ 1<br />
N MM2946/NSN 6145-00-500-<strong>30</strong>79<br />
38 PAFZZ 96906 MS25036-101 TERMINAL,LUG 1<br />
39 PAFZZ 96906 MS25036-103 TERMINAL,LUG 1<br />
40 AFFFF 81361 C5-59-218-14 LEAD,ELECTRICAL: 9.50 IN. LG 1<br />
41 MFFZZ 81361 K1-X1/S4-1 WIRE, CUT FROM WIRE,ELECTRICAL P/ 1<br />
N MM2946/NSN 6145-00-500-<strong>30</strong>79<br />
42 PAFZZ 96906 MS25036-157 TERMINAL,LUG 2<br />
43 AFFFF 81361 C5-59-218-15 LEAD, ELECTRICAL: 9 IN. LG 1<br />
44 MFFZZ 81361 K1-X2/G WIRE, CUT FROM WIRE,ELECTRICAL P/ 1<br />
N MM2946/NSN 6145-00-500-<strong>30</strong>79<br />
45 PAFZZ 96906 MS25036-101 TERMINAL,LUG 1<br />
46 PAFZZ 96906 MS25036-103 TERMINAL,LUG 1<br />
47 AFFFF 81361 C5-59-218-16 LEAD, ELECTRICAL: 5.25 IN. LG 1<br />
48 MFFZZ 81361 K1-A2/K2-A2 WIRE, CUT FROM WIRE,ELECTRICAL P/ 1<br />
N MM3565/NSN 6145-00-295-2814<br />
B-49-2
SECTION II<br />
TM3-42<strong>30</strong>-<strong>209</strong>-<strong>30</strong>&P<br />
(1) (2) (3) (4) (5) (6)<br />
ITEM SMR PART<br />
NO CODE FSCM NUMBER DESCRIPTION AND USABLE ON CODE (UOC) QTY<br />
49 PAFZZ 96906 MS25036-112 TERMINAL,LUG 2<br />
50 AFFFF 81361 C5-59-218-17 LEAD, ELECTRICAL: 11 IN. LG 1<br />
51 MFFZZ 81361 K2-A2/MOT WIRE, CUT FROM WIRE,ELECTRICAL P/ 1<br />
N MM3565/NSN 6145-00-295-2814<br />
52 PAFZZ 96906 MS25036-112 TERMINAL,LUG 1<br />
53 PAFZZ 96906 MS27144-1 CONNECTOR,PLUG,ELEC 1<br />
54 AFFFF 81361 C5-59-218-18 LEAD, ELECTRICAL: 56 IN. LG 1<br />
55 MFFZZ 81361 K1-A1/MOT WIRE, CUT FROM WIRE,ELECTRICAL P/ 1<br />
N MM3565/NSN 6145-00-295-2814<br />
56 PAFZZ 96906 MS25036-112 TERMINAL,LUG 1<br />
57 PAFZZ 81361 B5-59-409 CONNECTOR ASSEMBLY 1<br />
58 AFFFF 81361 C5-59-218-19 LEAD, ELECTRICAL: 11.50 IN. LG 1<br />
59 MFFZZ 81361 K2-A2/TD1-5 WIRE, CUT FROM WIRE,ELECTRICAL P/ 1<br />
N MM2946/NSN 6145-00-500-<strong>30</strong>79<br />
60 PAFZZ 96906 MS25036-103 TERMINAL,LUG 1<br />
61 AFFFF 81361 C5-59-218-20 LEAD, ELECTRICAL: 8 IN. LG 1<br />
62 MFFZZ 81361 B1/G WIRE, CUT FROM WIRE,ELECTRICAL P/ 1<br />
N MM3565/NSN 6145-00-295-2814<br />
63 PAFZZ 96906 MS25036-157 TERMINAL,LUG 2<br />
64 PAFZZ 81349 M7928/5-3 SPLICE,CONDUCTOR 2<br />
END OF FIGURE<br />
B-49-3
SECTION II TM 3-42<strong>30</strong>-<strong>209</strong>-<strong>30</strong>&P<br />
P =- 1 ,<br />
“<br />
\<br />
u ‘v<br />
11<br />
/<br />
**<br />
Q<br />
v<br />
&\~7<br />
3* 3<br />
17<br />
**<br />
*<br />
SUPPLIED WITH IDENTICALLY<br />
NUMBERED PART.<br />
NO FURTHER DISASSEMBLY<br />
AUTHORIZED.<br />
Figure B-50. Fuel Hose Assembly and Fuel Tank Adapter Assembly.
SECTION II<br />
TM3-42<strong>30</strong>-<strong>209</strong>-<strong>30</strong>&P<br />
(1) (2) (3) (4) (5) (6)<br />
ITEM SMR PART<br />
NO CODE FSCM NUMBER DESCRIPTION AND USABLE ON CODE (UOC) QTY<br />
GROUP 0411 FUEL HOSE ASSEMBLY<br />
D5-59-311 AND<br />
GROUP 041101 FUEL TANK ADAPTER<br />
ASSEMBLY D5-59-459<br />
FIG.B-50 FUEL HOSE ASSEMBLY AND FUEL<br />
TANK ADAPTER<br />
1 PAFZZ 81361 C5-59-318-2 HOSE,NONMETALLIC 1<br />
2 PAFZZ 24161 7207-318 ADAPTER,STRAIGHT PI 1<br />
3 PAFZZ 24161 7236-0404-5 ADAPTER,STRAIGHT,PI 2<br />
4 PAFFF 81361 D5-59-459 CAP,FILLER OPENING 1<br />
5 PAFZZ 96906 MS35782-4 COCK,DRAIN 1<br />
6 PAFZZ 96906 MS24629-3 SCREW,TAPPING 2<br />
7 PAFZZ 96906 MS35333-35B WASHER,LOCK 2<br />
8 PAFZZ 81361 C5-59-457 GROUDING STRIP 1<br />
9 MFFZZ 81361 NPNGASKETTYPEIII GASKET MAKE FROM GASKET P/N 1<br />
MILG432/NSN 53<strong>30</strong>-00-298-7165<br />
10 PAFZZ 96906 MS28775-217 PACKING,PREFORMED 2<br />
11 PAFZZ 96906 MS51952-1 ELBOW,PIPE 1<br />
12 PAFZZ 81361 B5-59-451 DECAL 1<br />
13 MFFZZ 81361 D5-59-311-9 HOSE,RUBBER MAKE FROM HOSE, 1<br />
NONMETALLIC P/N 3658-0601/NSN 4720-<br />
01-124-3740<br />
14 PAFZZ 77414 P3 CLAMP,HOSE 2<br />
15 PAFZZ 95138 3M3 ADAPTER,STRAIGHT,PI 1<br />
16 PAFZZ 78357 VHC6F COUPLING HALF,QUICK 1<br />
17 PAFZZ 81361 E150-1-12-1 COUPLING HALF,QUICK 1<br />
END OF FIGURE<br />
B-50-1
SECTION<br />
II<br />
TM 3-42<strong>30</strong>-<strong>209</strong>-<strong>30</strong>&P<br />
6 .10<br />
A<br />
FIJI<br />
ON NEXT ILLUSTRATION<br />
Figure B-5 1. Skid Base Assembly (1 of 2).<br />
.-
(<br />
SECTION II TM 3-42<strong>30</strong>-<strong>209</strong>-<strong>30</strong>&P<br />
31<br />
21<br />
Figure B-5 1. Skid Base Assembly (2 of 2).
SECTION II<br />
TM3-42<strong>30</strong>-<strong>209</strong>-<strong>30</strong>&P<br />
(1) (2) (3) (4) (5) (6)<br />
ITEM SMR PART<br />
NO CODE FSCM NUMBER DESCRIPTION AND USABLE ON CODE (UOC) QTY<br />
GROUP 0413 SKID BASE ASSEMBLY<br />
E5-59-362<br />
FIG.B-51 SKID BASE ASSEMBLY<br />
1 PAOZZ 81361 D150-1-13-2 CAP,PROTECTIVE,DUST 1<br />
2 PAFZZ 78357 VHNGF COUPLING HALF QUICK 1<br />
3 PAFZZ 96906 MS27183-19 WASHER,FLAT 2<br />
4 PAFZZ 96906 MS39163-3 TEE,PIPE TO TUBE 1<br />
5 AFOFF 81361 B5-59-347 LINE, PURGE AND BYPASS (SEE FIG B- 1<br />
60 FOR ASSEMBLY BREAKDOWN)<br />
6 PAFZZ 15182 AN912-1 BUSHING,PIPE 1<br />
7 PAFZZ 96906 MS39164-3 TEE,PIPE TO TUBE 1<br />
8 AFOFF 81361 B5-59-393 LINE, PUMP RETURN (SEE FIG.B-50 1<br />
FOR ASSEMBLY BREAKDOWN)<br />
9 PAFZZ 96906 MS39162-3 ELBOW,PIPE TO TUBE 1<br />
10 PAFZZ 96906 MS27183-22 WASHER,FLAT 2<br />
11 PAFZZ 88044 AN911-3 NIPPLE,PIPE 1<br />
12 PAFFF 81361 C5-59-344 FILTER,FLUID (SEE FIG.B-52 FOR 1<br />
ASSEMBLY BREAKDOWN)<br />
13 PAFZZ 88044 AN912-2 BUSHING,PIPE 1<br />
14 PAFZZ 96906 MS39162-5 ELBOW,PIPE TO TUBE 2<br />
15 AFOFF 81361 B5-59-345 LINE, FUEL SUPPLY (SEE FIG. B-57 1<br />
FOR ASSEMBLY BREAKDOWN)<br />
16 PAFZZ 96906 MS39158-3 ADAPTER,STRAIGHT,PI 2<br />
17 AFOFF 81361 B5-59-346 LINE, GAGE PORT (SEE FIG.B-58 FOR 1<br />
ASSEMBLY BREAKDOWN)<br />
18 PAOZZ 96906 MS35650-<strong>30</strong>2 NUT,PLAIN,HEXAGON 2<br />
19 PAOZZ 96906 MS35333-39 WASHER,LOCK 10<br />
20 PAOZZ 839<strong>30</strong> 400WSS10 CLAMP,LOOP 2<br />
21 PAOZZ 96906 MS35207-261 SCREW,MACHINE 1<br />
22 PAOZZ 78357 AMPH4 PLUG,PROTECTIVE, DUST 1<br />
23 PAFZZ 78357 BVHC4F COUPLING HALF,QUICK 1<br />
24 PAOZZ 96906 MS35649-83 NUT,PLAIN,HEXAGON 2<br />
25 PAOZZ 96906 MS35333-38 WASHER,LOCK 1<br />
B-51-1
SECTION II<br />
TM3-42<strong>30</strong>-<strong>209</strong>-<strong>30</strong>&P<br />
(1) (2) (3) (4) (5) (6)<br />
ITEM SMR PART<br />
NO CODE FSCM NUMBER DESCRIPTION AND USABLE ON CODE (UOC) QTY<br />
26 PAOZZ 96906 MS35206-243 SCREW,MACHINE 2<br />
27 AOOOO 81361 C5-59-373 PUMP ASSY, FUEL (SEE FIG.B-56 FOR 1<br />
ASSEMBLY BREAKDOWN)<br />
28 PAOZZ 90598 TM3946 DRIVE ARM 2<br />
29 PAOZZ 80205 NAS561C6-13 PIN,SPRING 2<br />
<strong>30</strong> PAOFF 81361 D5-59-202 MOTOR,DIRECT CURREN (SEE FIG. B-55 1<br />
FOR ASSEMBLY BREAKDOWN)<br />
31 AOOOO 81361 C5-59-268 MAGNETO ASSY (SEE FIG. B-53 FOR 1<br />
ASSEMBLY BREAKDOWN)<br />
32 XDFZZ 81361 E5-59-258 BASE,SKID 1<br />
33 PAOZZ 96906 MS90725-6 SCREW,CAP,HEXAGON 8<br />
34 PAOZZ 96906 MS35333-40 WASHER,LOCK 8<br />
35 PAFZZ 81978 V5D24360 VALVE,SOLENOID FUEL 1<br />
36 PAOZZ 96906 MS18154-60 SCREW,CAP,HEXAGON 2<br />
37 PAOZZ 96906 MS35333-42 WASHER,LOCK 2<br />
END OF FIGURE<br />
B-51-2
SECTION<br />
II<br />
TM3-42<strong>30</strong>-<strong>209</strong>-<strong>30</strong>&P<br />
5<br />
*<br />
Figure B-52.<br />
Fluid Filter.<br />
(1) (2) (3) (4) (5) (6)<br />
1TEM SMR PART<br />
NO CODE FSCM NUIBER DESCRIPTION AND USABLE !’JN CODES(U15CI (JTY<br />
GRO(JP 041<strong>30</strong>1 FLU19 FILTER<br />
C5-59-344<br />
FIG.B-52 FLUID FILTER<br />
1 PAOZZ 13800 E94RT<br />
2 PAOZZ 13800 31<strong>30</strong>0<br />
3 XAFZZ 81361 CS-59-344-1<br />
4 PAOZZ 13800 32104<br />
5 XAOZZ 81361 C5-59-344-2<br />
FILTER ELEtIENT, FLUI . . . . . . . . . . . . . . . . . 1<br />
GASKET . . . . . . . . . . . . . . . . . . . . . . . . . . . . . . 1<br />
COVER, FILTER . . . . . . . . . . . . . . . . . . . . . . . . 1<br />
GASKET . . . . . . . . . .. o....... . . . . . . . . . . . 1<br />
NUT, COVER . . . . . . . . . . . . . . . . . . . . . . . . . . . 1<br />
END<br />
13F FIGURE<br />
B-52-1
(<br />
(<br />
SECTION<br />
II<br />
TM3-42<strong>30</strong>-<strong>209</strong>-<strong>30</strong>8P<br />
Figure B-53. Magneto Assembly.<br />
(1) (2) (3) (4) (5)<br />
ITEM SMR PART<br />
NO CaDE FSCM NIFIBER DESCRIPT113N AND USABLE<br />
(6)<br />
ON CODES(U3C) (JTY<br />
GROUP 041<strong>30</strong>2 MAGNETO ASSEMBLY<br />
CS-59-268<br />
FIG.B-53<br />
MAGNETO ASSEMBLY<br />
1 PAOZZ 90598 TM3946 DRIVE ARM . . . . . . . . . . . . . . . . . . . . . . . . . . . 1<br />
2 PAOZZ 80205 NAS56106-13 PIN,SPRING. . . . . . . . . . . . . . . . . . . . . . . . . 1<br />
3 PAOFF 81361 D5-59-252 MAGNETO, IGNITIfJN (SEE FIG.B-54 FOR 1<br />
ASSEMBLY BREAKDOWN) . . . . . . . . . . . . . . . . .<br />
END OF<br />
FIGURE<br />
B-53-1
SECTION II TM 3-42<strong>30</strong>-<strong>209</strong>-<strong>30</strong>&P<br />
2<br />
1 I<br />
,--<br />
16<br />
*<br />
SUPPLIED WITH IDENTICALLY<br />
**NUMBERED PART.<br />
NO FURTHER DISASSEMBLY<br />
AUTHORIZED.<br />
Figure B-54. Combustor Magneto
SECTION II<br />
TM3-42<strong>30</strong>-<strong>209</strong>-<strong>30</strong>&P<br />
(1) (2) (3) (4) (5) (6)<br />
ITEM SMR PART<br />
NO CODE FSCM NUMBER DESCRIPTION AND USABLE ON CODE (UOC) QTY<br />
GROUP 041<strong>30</strong>201 COMBUSTOR MAGNETO<br />
D5-59-252<br />
FIG.B-54 COMBUSTOR MAGNETO<br />
1 PAFZZ 96906 MS35206-264 SCREW,MACHINE 4<br />
2 PAFZZ 96906 MS35333-39 WASHER,LOCK 4<br />
3 PAFZZ 96906 MS16633-1015 RING,RETAINING 1<br />
4 KFFZZ 82796 W2437 CONTACT SET,DISTRIB PART OF KIT P/N 1<br />
SK112<br />
5 PAFZZ 96906 MS35206-228 SCREW,MACHINE 1<br />
6 PAFZZ 96906 MS35338-41 WASHER,LOCK 1<br />
7 PAFZZ 96906 MS27183-6 WASHER,FLAT 1<br />
8 PAFZZ 96906 MS35206-241 SCREW,MACHINE 1<br />
9 PAFZZ 96906 MS35333-38 WASHER,LOCK 1<br />
10 KFFZZ 82796 153968 CAPACITOR,FIXED PART OF KIT P/N 1<br />
SK112<br />
11 PAFZZ 88044 AN960-8 WASHER,FLAT 1<br />
12 PAFZZ 96906 MS35338-42 WASHER,LOCK 1<br />
13 PAFZZ 96906 MS35206-243 SCREW,MACHINE 1<br />
14 KFFZZ 82796 K2498 GASKET PART OF KIT P/N SK112 1<br />
15 PAFZZ 82796 P2474 SLEEVE,IGNITION 1<br />
16 PAFZZ 82796 PX24<strong>30</strong>A CAP,IGNITION DISTRI 1<br />
PAFZZ 82796 SK112 PARTS KIT,IGNITION MAGNETO 1<br />
CAPACITOR,FIXED ( 1)B-54-10<br />
CONTACT SET DISTRIB ( 1)B-54-4<br />
GASKET ( 1)B-54-14<br />
END OF FIGURE<br />
B-54-1
SECTION II TM 3-42<strong>30</strong>-<strong>209</strong>-<strong>30</strong>&P<br />
*NO FURTHER DISASSEMBLY<br />
AUTHORIZED<br />
Figure B-55. Fuel Pump and Ignition Drive Motor.
SECTION II<br />
TM3-42<strong>30</strong>-<strong>209</strong>-<strong>30</strong>&P<br />
(1) (2) (3) (4) (5) (6)<br />
ITEM SMR PART<br />
NO CODE FSCM NUMBER DESCRIPTION AND USABLE ON CODE (UOC) QTY<br />
GROUP 041<strong>30</strong>3 FUEL PUMP AND IGNITION<br />
DRIVE MOTOR D5-59-202<br />
FIG.B-55 FUEL PUMP AND IGNITION<br />
DRIVE MOTOR<br />
1 XDFZZ 51064 D25593 SPRING,HELICAL 1<br />
2 PAFZZ 96906 MS35206-243 SCREW,MACHINE 8<br />
3 PAFZZ 78189 C4008-14-00 WASHER,LOCK 10<br />
4 XDFZZ 51064 D25808-1 COVER 2<br />
5 XDFZZ 51064 D25807 GASKET 2<br />
6 PAFZZ 96906 MS35214-42 SCREW,MACHINE 2<br />
7 PAFZZ 51064 D25594-1 BRUSH,ELECTRICAL CO 2<br />
END OF FIGURE<br />
B-55-1
SECT1ON 11 TM3-42<strong>30</strong>-<strong>209</strong>-<strong>30</strong>&P 2<br />
Figure B-56.<br />
Fuel Pump Assembly.<br />
(1) (2) (3) (4) (5) (6)<br />
ITEM SMR PART<br />
NO CODE FSCM NUMBER Description AND LJSA13LE 6N CfiDES(UOC) CITY<br />
GROUP 041<strong>30</strong>4 FUEL PUMP ASSEMBLY<br />
C5-59-373<br />
FIG.B-56<br />
FUEL<br />
PUMP ASSEHBLY<br />
1 PAOZZ 81361 C5-59-369 PUIP,RCITARY<br />
2 PAOZZ 90598 TM3946 DRIVE ARM,..<br />
3 PAf3ZZ 80205 NAS561C6-13 PIN,SPRING.<br />
PD}’ER DRIVEN . . . . . . . . . . . 1<br />
. ...,, . . . . . . . . . . . . . . . . . 1<br />
. . . . . . ,,,,,, . . . . . . . . . . . 1<br />
END OF<br />
FIGURE<br />
B-56-1
(<br />
SECT1flN 11 TM3-42<strong>30</strong>-<strong>209</strong>-<strong>30</strong>&P<br />
CY1<br />
Figure B-57.<br />
Fuel Supply Line.<br />
(1) (2) (3) (4) (5) (6)<br />
1TEN SMR PART<br />
NO CODE FSCM NUMBER 0ESCRIPTI13N AND USABLE ON CODES(UCIC) CITY<br />
GR13UP 041<strong>30</strong>5 FUEL S~JPPLY LINE<br />
C5-59-345<br />
FIG.B-57 FUEL SUPPLY LINE<br />
1 PAFZZ 96906 MS39166-5 NUT, TUBE COUPLING . . . . . . . . . . . . . . . . . . . 2<br />
2 MFFZZ 81361 B5-59-345-1 TUBE MAKE FROM TUBE, METALLIC P/N 1<br />
S5281/NSN 4710-OO-335-2FJ1 O. ..,,.... .<br />
B-57-1<br />
END CIF FIGURE
SECTION 11 TM3-42<strong>30</strong>-<strong>209</strong>-<strong>30</strong>8P<br />
1<br />
1<br />
Figure B-58.<br />
Gage Port Line.<br />
(1) (2) (3) (4) (5)<br />
1TEM SMR PART<br />
No CODE FSCM NUIBER DESCRIPTION AND USABLE<br />
ON CODES(U3C)<br />
(6)<br />
(2TY<br />
GROUP 041<strong>30</strong>6 GAGE PORT LINE<br />
85-59-346<br />
FIG.B-58 GAGE PORT LINE<br />
1 PAFZZ 96906 MS39166-3 NUT, TUBE COIJPLING . . . . . . . . . . . .. o..... 2<br />
2 MFFZZ 81361 B5-59-346-1 TUBE MAKE FROM TUBE, METP.LLIC P/N 1<br />
MILT3520/NSN 4710-00-880-1091 . . . . . . .<br />
B-58-1<br />
END OF FIGURE<br />
1’
(<br />
(“<br />
SECTIIYN II TM3-4Z!<strong>30</strong>-<strong>209</strong>-<strong>30</strong>8P<br />
Figure B-59.<br />
Pump Return Line.<br />
(1) (2) (3) (4) (5) (6)<br />
1TEM SMR PART<br />
NO CODE FSCM NUMBER DESCRIPTION AND USABLE ON CODES(LUC) CITY<br />
GROUP 041<strong>30</strong>7 PUMP RETURN LINE<br />
B5-59-393<br />
FIG.B-59 PUIP RETl#?N LINE<br />
1 PAFZZ 96906 MS39166-3 NUT, TU3ECCIUPL1 NG . . . . . . . . . . . . . . . . . . . 2<br />
2 MFFZZ 81361 65-59-393-1 T~E MAKE FROM T~E, METALLIC P/N 1<br />
MILT3520/NSN 4710-00-880-1091 ..,.,..<br />
B-59-1<br />
END OF FIGURE
SECTION II l?13-42<strong>30</strong>-<strong>209</strong>-<strong>30</strong>aP<br />
1<br />
\ 2<br />
“c)<br />
1<br />
Figure B-60.<br />
Purge and Bypass Return Line.<br />
(1) (2) (3) (4) (5)<br />
(6)<br />
ITEM SMR PART<br />
w CCIDE FSCM NUMBER DESCRIPTION AND USABLE ON CUDES(WC) QTY<br />
GROUP 041<strong>30</strong>8 PURGE AND BYPASS RETURN<br />
LINE B5-59-347<br />
FIG.B-60 PURGE AND BYPASS RETURN<br />
LINE<br />
1 PAFZZ 96906 MS39166-3 NUT, TLX3EC!3UPLIN3 . . . . . . . . . . . . . . . . . . . 2<br />
2 MFFZZ 81361 B5-59-347-1 TME MAKE FR13M TUE3E, METALLIC P/N 1<br />
MILT3520/NSN 4710-00-880-1091 . . . . . . .<br />
END OF FIGURE<br />
B-60-1 @60-2<br />
blank)
SECTION II TM 3-42<strong>30</strong>-<strong>209</strong>-<strong>30</strong>&P<br />
11<br />
1<br />
AFURTHER DISASSEMBLY<br />
ON NEXT ILLUSTRATION.<br />
23<br />
Figure B-61. Boiler Assembly (1 of 2)
(<br />
()<br />
SECTION II<br />
TM 3-42<strong>30</strong>-<strong>209</strong>-<strong>30</strong>&P<br />
35<br />
*NO<br />
FURTHER DISASSEMBLY<br />
AUTHORIZED,<br />
Figure B-61. Boiler Assembly (2 of 2)
SECTION II<br />
TM3-42<strong>30</strong>-<strong>209</strong>-<strong>30</strong>&P<br />
(1) (2) (3) (4) (5) (6)<br />
ITEM SMR PART<br />
NO CODE FSCM NUMBER DESCRIPTION AND USABLE ON CODE (UOC) QTY<br />
GROUP 0414 LOW PRESSURE HEATING<br />
BOILER ASSEMBLY<br />
E5-59-285<br />
FIG.B-61 BOILER ASSEMBLY<br />
1 PAOZZ 96906 MS90725-5 SCREW,CAP,HEXAGON 34<br />
2 PAOZZ 96906 MS35333-40 WASHER,LOCK 34<br />
3 AFFFF 81361 C5-59-<strong>30</strong>2 MOTOR MOUNTING ASSEMBLY, 1<br />
COMBUSTION (SEE FIG.B-63 FOR<br />
ASSEMBLY (BREAKDOWN)<br />
4 PAFZZ 81361 B5-59-<strong>30</strong>0 GASKET 1<br />
5 XDFZZ 81361 D5-59-201 BLOWER SHROUD, COMBUSTOR 1<br />
6 PAFZZ 96906 MS51953-80B NIPPLE,PIPE 1<br />
7 PAFZZ 81361 C5-59-321 VALVE,SAFETY RELIEF 1<br />
8 PAFZZ 96906 MS39158-3 ADAPATER,STRAIGHT,PI 1<br />
9 PAFZZ 66640 166D1 BUSHING,PIPE 1<br />
10 PAFZZ 81361 B5-59-343 GASKET 2<br />
11 PAOZZ 81361 C5-59-450 SWITCH,PRESSURE 1<br />
12 PAOZZ 96906 MS51967-2 NUT,PLAIN,HEXAGON 24<br />
13 AFOFF 81361 B5-59-350 LINE, CONBUSTION RETURN (SEE FIG.B- 1<br />
65 FOR ASSEMBLY BREAKDOWN)<br />
14 PAOZZ 96906 MS35489-7 GROMMET,NONMETALLIC 2<br />
15 PAFZZ 96906 MS35489-14 GROMMET,NONMETALLIC 1<br />
16 PAFZZ 81361 D5-59-374 COMBUSTOR ASSEMBLY 1<br />
17 PAFZZ 96906 MS35333-41 WASHER,LOCK 8<br />
18 PAFZZ 96906 MS90725-31 BOLT,MACHINE 8<br />
19 XDOZZ 90598 TRF3107 COMBUSTOR PLATE 1<br />
20 XDOOO 81361 D5-59-377 NOZZLE HOLDER ASSEMBLY (SEE FIG.B- 1<br />
62 FOR ASSEMBLY BREAKDOWN)<br />
21 PAFZZ 81361 C5-59-341 CABLE ASSEMBLY,IGNI 1<br />
22 PAOZZ 81361 B5-59-299 GASKET 1<br />
23 PAOZZ 81361 C5-59-213 COVER,ACCESS 1<br />
24 PAOZZ 11583 806X2 IGNITER,SPARK,GAS 1<br />
B-61-1
SECTION II<br />
TM3-42<strong>30</strong>-<strong>209</strong>-<strong>30</strong>&P<br />
(1) (2) (3) (4) (5) (6)<br />
ITEM SMR PART<br />
NO CODE FSCM NUMBER DESCRIPTION AND USABLE ON CODE (UOC) QTY<br />
25 AFOFF 81361 B5-59-394 LINE, NOZZLE VALVE (SEE FIG.B-64 1<br />
FOR ASSEMBLY BREAKDOWN)<br />
26 PAOZZ 96906 MS35206-242 SCREW,MACHINE 2<br />
27 PAOZZ 81361 C5-59-294 ARRESTER,SPARK 1<br />
28 PAOZZ 96906 MS35333-72 WASHER,LOCK 2<br />
29 PAOZZ 96906 MS35649-284 NUT,PLAIN,HEXAGON 2<br />
<strong>30</strong> PAFZZ 88044 AN912-3 BUSHING,PIPE 1<br />
31 MFFZZ 81361 B5-59-296 GASKET MAKE FROM ASBESTOS SHEET P/ 2<br />
N MILA7021/NSN 53<strong>30</strong>-00-527-9900<br />
UOC:D12<br />
32 MFFZZ 8136 B5-59-295 GASKET MAKE FROM ASBESTOS SHEET P/ 2<br />
N MILA7021/NSN 53<strong>30</strong>-00-527-9900<br />
UOC:D12<br />
33 XDFZZ 81361 D5-59-247 BOX 1<br />
UOC:D12<br />
34 PAFZZ 81361 D5-59-417 LINING 1<br />
UOC:D12<br />
35 PAFZZ 96906 MS392<strong>30</strong>-6 ELBOW,PIPE 1<br />
36 PAOZZ 81361 B5-59-339 SWITCH,THERMOSTATIC FLAME 1<br />
END OF FIGURE<br />
B-61-2
SECTION 11 TM3-42<strong>30</strong>-<strong>209</strong>-<strong>30</strong>&P<br />
*NO FURTHER DISASSEMBLY<br />
AUTHORIZED.<br />
Figure B-62.<br />
Nozzle Holder Assembly.<br />
(1) (2) (3) (4) (5)<br />
ITEM SMR PART<br />
NO CODE FSCM NUMBER DESCRIPT1aN AND USABLE ON CODF.S(~C) r3TY<br />
GRCIUP 041401 N6ZZLE H6LDER ASSEMBLY<br />
D5-59-377<br />
(6)<br />
FIG.B-62 NOZZLE HULDER ASSEMBLY<br />
1 PAflZZ 90598 TR3336<br />
NUZZLE, OIL BURNER . . . . . . . . . . . . . . . . . . . 1<br />
END OF FIGURE<br />
B-62-1
(<br />
SECTION 11 TM3-42<strong>30</strong>-<strong>209</strong>-<strong>30</strong>&P<br />
( ‘)<br />
2 4<br />
\ 3<br />
FigureB-63. Combustion Motor Mounting Assembly.<br />
(1) (2) (3) (4)<br />
(5) (6)<br />
1TEM SMR PART<br />
NO CODE FSCM NUIBER DESCRIPTION AND USABLE ON CCIDES(U6C) QTY<br />
GROUP 041402 COf’lBUSTICI!l MCITUR<br />
MOUNTING ASSEMBLY C5-59-<strong>30</strong>2<br />
FIG.B-63 CCMIBUSTIIYN M13T13R<br />
MOUNTING<br />
ASSEMBLY<br />
1 PAFZZ 81361 D5-59-265 MOTOR,DIRECTCURREN . . . . . . , . . . . . . . . . . 1<br />
2 XDFZZ 81361 C5-59-217 PLATE,MOUNTING. . . . . . . . . .,,,, ,,.., . 1<br />
3 PAFZZ 96906 MS35333-40 WASHER,LOCK. . . . . . . . ..,.,, ....,, .... 4<br />
4 PAFZZ 96906 MS35206-276 SCREW,MACHINE. . . . . . ,..,, ..,,, . . . . . , 4<br />
5 PAFZZ 81361 D5-59-238 IMPELLER,FAN, CENTRI . . . . . . . . . . ,.,,. . 1<br />
ENO OF<br />
F<br />
GURE<br />
B-63-1
SECTION II TM3-42<strong>30</strong>-<strong>209</strong>-<strong>30</strong>8P<br />
Figure B-64.<br />
Nozzle Valvelike,<br />
(1) (2) (3) (4) (5) (6)<br />
ITEM SMR PART<br />
NO CODE FSC14 NUMBER DESCRImTION AND USABLE ON C6DES(UOC) QTY<br />
GRCIUP 041403 NOZZLE VAI.VE LINE<br />
65-59-394<br />
FIG.B-64 NOZZLE VALVE LINE<br />
1 PAFZZ 96906 MS39166-3<br />
2 MFFZZ 81361 B5-59-394-I<br />
NUT, 7UBECIIJPL1NG . . . . . . . . . . . . . . . . . . . 2<br />
TUBE, STEEL MAKE FROM TUBE, 1<br />
METALLIC P/N MILT3520/NSN 4710-00-<br />
880-1091 . . . . . . . . . . . . . . . . . . . . . . . . . . . .<br />
END OF FIGIJRE<br />
B-64-1
(<br />
(<br />
SECTICIN<br />
II<br />
TM3-42<strong>30</strong>-<strong>209</strong>-<strong>30</strong>&P<br />
1<br />
1<br />
Figure f3-65. Combustion Return Line.<br />
(1) (2) (3) (4) (5)<br />
(6)<br />
I TEN SMR PART<br />
No CODE FSCM NUMBER DESCRIPTION AND USABLE UN CODES(UCJC) QTY<br />
GROUP 041404 CC5MBUSTICJNRETURN LINE<br />
B5-59-350<br />
FIG.B-65 COMBUSTION RETURN LINE<br />
1 PAFZZ 96906 MS39166-3 NUT, TUBE COUPLING . . . . . . . . . . . . . . . . . . 2<br />
2 MFFZZ 81361 B5-59-350-1 T~E MAKE FROM T~E.,METALLIC P/N 1<br />
MILT3520/NSN 4710-00-880-1091, . . . . . .<br />
END OF FIGURE<br />
B-65-1
SECTION II<br />
TM3-42<strong>30</strong>-<strong>209</strong>-<strong>30</strong>&P<br />
(1) (2) (3) (4) (5) (6)<br />
ITEM SMR PART<br />
NO CODE FSCM NUMBER DESCRIPTION AND USABLE ON CODE (UOC) QTY<br />
GROUP 9999 BULK MATERIALS<br />
FIG.BULK<br />
1 PAOZZ 96906 M13486/1-11 CABLE,ELECTRICAL V<br />
UOC:D12<br />
2 PAFZZ 81349 MILA7021 ASBESTOS SHEET 1<br />
3 PAFZZ 81349 MILC5756B CABLE,POWER V<br />
4 PAOZZ 81348 RRC271 CHAIN,WELDLESS V<br />
5 PAFZZ 81349 MILG432 GASKET V<br />
6 PAOZZ 24161 421B-1INCHID HOSE,NONMETALLIC THIS HOSE MUST BE V<br />
REQUESITIONED BYT U/M & QTY AND WILL<br />
BE RECEIVED PRECUT<br />
7 PCOZZ 24161 124WW HOSE,NONMETALLIC V<br />
8 PAFZZ 24161 3658-0601 HOSE,NONMETALLIC V<br />
9 PAFZZ 45255 PF336F INSULATION BLANKET V<br />
10 PAOZZ 81346 ASTM A366 METAL SHEET V<br />
11 PCFZZ 81361 B5-45-2889 NONMETALLIC SPECIAL 14 FOORT ROLL V<br />
12 PAOZZ 81346 ASTM A120 PIPE,METALLIC V<br />
13 PCOZZ 99806 M200SERIES1X1-8 PLASTIC STRIP,PRESS V<br />
14 PAFZZ 81349 MILR46089 RUBBER SHEET V<br />
15 PAFZZ 04741 S5281 TUBE,METALLIC V<br />
16 PAFZZ 81346 ASTM A 519-74 TUBE,METALLIC V<br />
17 PAFZZ 81349 MILT3520 TUBE,METALLIC V<br />
18 PAFZZ 81349 M5086/1-16-6 WIRE,ELECTRICAL V<br />
19 PAFZZ 99974 MM3565 WIRE,ELECTRICAL V<br />
20 PAFZZ 99974 MM2946 WIRE,ELECTRICAL V<br />
END OF FIGURE<br />
BULK-1
SECTION IV<br />
TM3-42<strong>30</strong>-<strong>209</strong>-<strong>30</strong>&P<br />
Section IV. NATIONAL STOCK NUMBER AND PART NUMBER INDEX<br />
NATIONAL STOCK NUMBER INDEX<br />
STOCK NUMBER FIG. ITEM STOCK NUMBER FIG. ITEM<br />
4820-00-007-2251 B-10 38 59<strong>30</strong>-00-065-1932 B-<strong>30</strong> 65<br />
47<strong>30</strong>-00-011-6452 B-44 1 6625-00-066-1278 B-<strong>30</strong> <strong>30</strong><br />
B-45 1 5<strong>30</strong>5-00-068-0498 B-10 54<br />
B-46 1 5<strong>30</strong>5-00-068-0501 B-61 1<br />
B-47 1 5<strong>30</strong>5-00-068-0502 B-51 33<br />
B-58 1 4720-00-071-0615 B-35 5<br />
B-59 1 5<strong>30</strong>5-00-071-1322 B-38 29<br />
B-60 1 5<strong>30</strong>5-00-071-1788 B-22 5<br />
B-65 1 5<strong>30</strong>5-00-071-2056 B-22 1<br />
B-65 1 5<strong>30</strong>5-00-071-2070 B-28 15<br />
4820-00-018-<strong>30</strong>77 B-37 3 5<strong>30</strong>5-00-071-2237 B-22 39<br />
6240-00-019-0878 B-<strong>30</strong> 52 5975-00-074-2072 B-38 46<br />
47<strong>30</strong>-00-022-2499 B-22 31 5340-00-074-2116 B-38 37<br />
53<strong>30</strong>-00-0<strong>30</strong>-3212 B-24 4 B-51 20<br />
5<strong>30</strong>5-00-044-4153 B-22 12 5<strong>30</strong>5-00-078-7039 B-32 15<br />
5310-00-045-3299 B-54 12 5340-00-078-9652 B-21 10<br />
5310-00-045-4007 B-<strong>30</strong> 25 5310-00-080-6004 B-10 15<br />
B-54 6 5310-00-080-6004 B-18 17<br />
5<strong>30</strong>6-00-050-0347 B-9 3 B-22 4<br />
47<strong>30</strong>-00-050-4208 B-24 20 5310-00-081-4219 B-10 28<br />
B-25 4 B-18 33<br />
B-26 2 5310-00-082-1404 B-54 7<br />
B-36 1 4710-00-082-4920 B-2 7<br />
47<strong>30</strong>-00-053-0266 B-50 11 5310-00-087-4652 B-10 14<br />
4410-00-057-0225 B-61 34 B-18 14<br />
5315-00-058-5088 B-51 29 B-20 1<br />
B-53 2 5310-00-088-1251 B-10 4<br />
B-56 3 B-18 21<br />
6140-00-059-3528 B-10 41 5310-00-103-2893 B-24 5<br />
5<strong>30</strong>5-00-059-3659 B-10 24 5940-00-113-8191 B-16 2<br />
B-13 2 B-17 2<br />
B-15 2 5<strong>30</strong>5-00-115-9526 B-18 40<br />
4820-00-061-1952 B-11 7 B-27 3<br />
I-1
SECTION IV<br />
TM3-42<strong>30</strong>-<strong>209</strong>-<strong>30</strong>&P<br />
NATIONAL STOCK NUMBER AND PART NUMBER INDEX<br />
NATIONAL STOCK NUMBER INDEX<br />
STOCK NUMBER FIG. ITEM STOCK NUMBER FIG. ITEM<br />
B-38 63 5940-00-143-4794 B-49 52<br />
5320-00-119-6819 B-38 18 B-49 56<br />
42<strong>30</strong>-00-127-2560 B-7 3 3110-00-144-8518 B-24 12<br />
5935-00-137-4671 B-10 58 3110-00-144-8519 B-24 19<br />
2910-00-141-9758 B-15 1 3110-00-157-6060 B-20 5<br />
5940-00-143-4771 B-49 4 4710-00-162-1020 BULK 12<br />
B-49 10 5925-00-163-6547 B-<strong>30</strong> 58<br />
B-49 18 5310-00-167-0721 B-38 67<br />
B-49 21 B-61 17<br />
B-49 39 5935-00-167-7775 B-49 53<br />
B-49 46 5325-00-174-5315 B-48 22<br />
B-49 60 B-61 14<br />
5940-00-143-4777 B-49 42 5325-00-185-0001 B-38 62<br />
B-49 63 47<strong>30</strong>-00-186-7799 B-51 11<br />
5940-00-143-4780 B-10 20 47<strong>30</strong>-00-188-1880 B-61 6<br />
B-<strong>30</strong> 63 4410-00-191-3124 B-38 5<br />
B-31 3 4410-00-191-3142 B-38 36<br />
B-31 6 5<strong>30</strong>5-00-191-3641 B-3 2<br />
B-31 9 B-10 2<br />
B-31 12 B-18 12<br />
B-31 15 47<strong>30</strong>-00-193-7078 B-23 9<br />
B-31 18 47<strong>30</strong>-00-194-0215 B-61 <strong>30</strong><br />
B-31 21 5310-00-194-1483 B-22 11<br />
B-31 24 5940-00-195-5487 B-<strong>30</strong> 59<br />
B-31 31 47<strong>30</strong>-00-196-0916 B-37 2<br />
B-31 34 47<strong>30</strong>-00-196-1469 B-2 11<br />
B-31 37 47<strong>30</strong>-00-196-1501 B-2 9<br />
B-31 40 47<strong>30</strong>-00-196-1572 B-23 3<br />
B-31 43 5315-00-200-3586 B-27 6<br />
B-31 46 5365-00-200-7377 B-54 3<br />
B-31 49 47<strong>30</strong>-00-202-6771 B-35 3<br />
B-31 52 5310-00-208-9255 B-13 4<br />
5940-00-143-4794 B-48 4 5310-00-<strong>209</strong>-0296 B-24 7<br />
B-49 49 6680-00-221-1037 B-<strong>30</strong> 48<br />
I-2
SECTION IV<br />
TM3-42<strong>30</strong>-<strong>209</strong>-<strong>30</strong>&P<br />
NATIONAL STOCK NUMBER AND PART NUMBER INDEX<br />
NATIONAL STOCK NUMBER INDEX<br />
STOCK NUMBER FIG. ITEM STOCK NUMBER FIG. ITEM<br />
47<strong>30</strong>-00-221-2141 B-2 1 5310-00-275-9310 B-51 24<br />
47<strong>30</strong>-00-222-1819 B-51 13 5325-00-276-6100 B-61 15<br />
5310-00-225-6993 B-28 12 5325-00-276-6101 B-38 50<br />
5<strong>30</strong>6-00-225-8496 B-61 18 5935-00-276-9413 B-48 1<br />
5<strong>30</strong>6-00-225-8497 B-10 42 47<strong>30</strong>-00-277-5644 B-18 10<br />
B-<strong>30</strong> 34 47<strong>30</strong>-00-277-5683 B-22 35<br />
5<strong>30</strong>6-00-225-8498 B-18 32 47<strong>30</strong>-00-277-6988 B-38 58<br />
B-38 68 47<strong>30</strong>-00-277-9386 B-43 9<br />
5<strong>30</strong>6-00-225-8499 B-32 36 B-51 6<br />
5<strong>30</strong>5-00-225-8507 B-37 12 B-61 9<br />
2920-00-229-5235 B-54 47<strong>30</strong>-00-278-2507 B-50 14<br />
47<strong>30</strong>-00-231-5622 B-<strong>30</strong> 38 47<strong>30</strong>-00-278-4603 B-22 32<br />
B-43 8 5325-00-282-2045 B-5 5<br />
5015-00-234-1864 B-24 16 B-6 5<br />
9515-00-237-1855 BULK 10 B-7 5<br />
47<strong>30</strong>-00-239-0215 B-23 15 B-8 10<br />
47<strong>30</strong>-00-246-5495 B-2 2 B-40 2<br />
47<strong>30</strong>-00-248-9340 B-43 7 B-41 2<br />
47<strong>30</strong>-00-249-3919 B-38 35 B-42 2<br />
59<strong>30</strong>-00-253-0426 B-<strong>30</strong> 64 47<strong>30</strong>-00-282-7460 B-23 21<br />
47<strong>30</strong>-00-253-4420 B-32 31 53<strong>30</strong>-00-285-3825 B-52 4<br />
5<strong>30</strong>5-00-253-5614 B-18 3 47<strong>30</strong>-00-287-0547 B-<strong>30</strong> 36<br />
B-<strong>30</strong> 11 47<strong>30</strong>-00-287-1603 B-22 28<br />
B-32 9 B-<strong>30</strong> 45<br />
47<strong>30</strong>-00-254-2744 B-61 35 5325-00-290-8021 B-21 8<br />
47<strong>30</strong>-00-254-6211 B-43 24 5325-00-291-9366 B-38 43<br />
B-51 9 B-43 32<br />
5310-00-261-6192 B-55 3 6145-00-295-2814 BULK 19<br />
9320-00-262-2274 BULK 14 5975-00-295-9697 B-38 45<br />
5<strong>30</strong>5-00-269-3213 B-22 43 53<strong>30</strong>-00-297-5948 B-22 45<br />
5<strong>30</strong>5-00-269-3215 B-28 4 53<strong>30</strong>-00-298-7165 BULK 5<br />
5<strong>30</strong>5-00-269-3219 B-22 38 42<strong>30</strong>-00-<strong>30</strong>1-4104 B-23 1<br />
40<strong>30</strong>-00-270-5436 B-18 7 4710-00-335-2610 BULK 15<br />
I-3
SECTION IV<br />
TM3-42<strong>30</strong>-<strong>209</strong>-<strong>30</strong>&P<br />
NATIONAL STOCK NUMBER AND PART NUMBER INDEX<br />
NATIONAL STOCK NUMBER INDEX<br />
STOCK NUMBER FIG. ITEM STOCK NUMBER FIG. ITEM<br />
53<strong>30</strong>-00-345-7854 B-32 7 2520-00-560-4871 B-24 10<br />
53<strong>30</strong>-00-352-5542 B-52 2 47<strong>30</strong>-00-570-2929 B-43 10<br />
2920-00-358-74<strong>30</strong> B-54 15 B-51 7<br />
40<strong>30</strong>-00-360-0<strong>30</strong>4 B-9 1 5<strong>30</strong>5-00-576-5417 B-24 1<br />
B-32 2 5310-00-576-5752 B-8 7<br />
B-38 13 B-38 14<br />
47<strong>30</strong>-00-374-6949 B-50 3 B-43 14<br />
5365-00-402-4349 B-11 3 B-51 19<br />
5310-00-407-9566 B-10 43 B-54 2<br />
B-22 48 5310-00-579-0079 B-<strong>30</strong> 57<br />
B-32 38 53<strong>30</strong>-00-579-7914 B-50 10<br />
53<strong>30</strong>-00-446-1694 B-24 6 2920-00-580-3435 B-61 24<br />
4820-00-456-9789 B-<strong>30</strong> 46 5310-00-582-5965 B-10 53<br />
5340-00-460-3956 B-18 8 B-32 21<br />
5975-00-477-4150 B-<strong>30</strong> 55 B-37 9<br />
6145-00-500-<strong>30</strong>79 BULK 20 47<strong>30</strong>-00-585-2<strong>30</strong>7 B-23 4<br />
5310-00-515-8058 B-54 11 4720-00-595-4103 BULK 6<br />
5325-00-515-9685 B-38 38 5310-00-595-7237 B-38 64<br />
47<strong>30</strong>-00-516-4450 B-2 8 B-51 37<br />
B-18 4 5365-00-598-1474 B-5 6<br />
B-38 39 B-6 6<br />
3120-00-525-8667 B-25 9 B-7 6<br />
53<strong>30</strong>-00-527-9900 BULK 2 B-8 9<br />
4410-00-542-5656 B-1 1 B-40 3<br />
5310-00-543-2739 B-61 28 B-41 3<br />
6145-00-548-1076 BULK 3 B-42 3<br />
5940-00-549-6581 B-17 1 6105-00-608-0533 B-63 1<br />
5940-00-549-6583 B-16 1 5315-00-616-5525 B-24 13<br />
5310-00-550-11<strong>30</strong> B-38 23 5315-00-616-55<strong>30</strong> B-24 15<br />
B-51 34 2590-00-618-4184 B-<strong>30</strong> 31<br />
B-61 2 5<strong>30</strong>5-00-632-2777 B-32 42<br />
B-63 3 5<strong>30</strong>5-00-637-1123 B-55 6<br />
5310-00-559-0070 B-51 25 5310-00-637-9541 B-18 36<br />
B-54 9 B-22 46<br />
I-4
SECTION IV<br />
TM3-42<strong>30</strong>-<strong>209</strong>-<strong>30</strong>&P<br />
NATIONAL STOCK NUMBER AND PART NUMBER INDEX<br />
NATIONAL STOCK NUMBER INDEX<br />
STOCK NUMBER FIG. ITEM STOCK NUMBER FIG. ITEM<br />
B-27 2 5310-00-761-6882 B-32 20<br />
B-28 5 B-37 10<br />
B-28 14 B-38 11<br />
B-<strong>30</strong> 40 B-61 12<br />
47<strong>30</strong>-00-639-97<strong>30</strong> B-22 26 5310-00-763-8920 B-10 34<br />
B-<strong>30</strong> 43 5<strong>30</strong>5-00-773-2708 B-43 17<br />
47<strong>30</strong>-00-640-5752 B-50 16 5905-00-777-0577 B-29 1<br />
47<strong>30</strong>-00-640-63<strong>30</strong> B-15 7 4010-00-781-3129 BULK 4<br />
59<strong>30</strong>-00-655-1582 B-43 29 53<strong>30</strong>-00-787-7417 B-2 5<br />
4520-00-675-6518 B-38 <strong>30</strong> 53<strong>30</strong>-00-787-7432 B-34 1<br />
5340-00-680-4375 B-3 13 5325-00-799-1019 B-5 4<br />
47<strong>30</strong>-00-684-4022 B-51 2 B-6 4<br />
5310-00-685-3228 B-22 2 B-7 4<br />
5945-00-686-6877 B-43 25 B-8 11<br />
2920-00-708-0640 B-54 16 B-40 1<br />
5<strong>30</strong>5-00-709-8531 B-25 16 B-41 1<br />
5<strong>30</strong>5-00-709-8540 B-25 5 B-42 1<br />
B-26 1 47<strong>30</strong>-00-801-1147 B-51 23<br />
B-36 2 5365-00-806-0204 B-11 4<br />
5<strong>30</strong>5-00-716-8128 B-22 17 5365-00-808-6933 B-24 18<br />
47<strong>30</strong>-00-720-4914 B-23 24 47<strong>30</strong>-00-808-7447 B-2 10<br />
5<strong>30</strong>5-00-724-6736 B-25 12 5310-00-809-<strong>30</strong>78 B-32 39<br />
5<strong>30</strong>5-00-724-6748 B-25 13 5310-00-809-<strong>30</strong>79 B-51 3<br />
5<strong>30</strong>5-00-724-6798 B-27 12 5310-00-809-4058 B10 11<br />
5340-00-724-7038 B-10 59 B-18 20<br />
59<strong>30</strong>-00-728-4328 B-<strong>30</strong> 23 B-38 10<br />
5945-00-729-1106 B-43 27 6685-00-809-4297 B-<strong>30</strong> 41<br />
5310-00-732-0558 B-22 7 6685-00-809-4298 B-<strong>30</strong> 28<br />
B-27 13 4210-00-809-4862 B-10 7<br />
5315-00-732-1005 B-22 52 5310-00-809-5998 B-28 11<br />
42<strong>30</strong>-00-735-9931 B-1 5 5310-00-809-8544 B-10 1<br />
4820-00-752-9040 B-50 5 B-27 7<br />
2910-00-752-9138 B-15 8 5310-00-809-8546 B-<strong>30</strong> 27<br />
5315-00-753-3893 B-32 16 5315-00-809-8786 B-25 15<br />
47<strong>30</strong>-00-761-3891 B-23 6<br />
I-5
SECTION IV<br />
TM3-42<strong>30</strong>-<strong>209</strong>-<strong>30</strong>&P<br />
NATIONAL STOCK NUMBER AND PART NUMBER INDEX<br />
NATIONAL STOCK NUMBER INDEX<br />
STOCK NUMBER FIG. ITEM STOCK NUMBER FIG. ITEM<br />
5310-00-811-3494 B-10 62 47<strong>30</strong>-00-838-6856 B-23 29<br />
53<strong>30</strong>-00-811-9471 B-12 1 B-33 2<br />
B-19 2 <strong>30</strong><strong>30</strong>-00-840-9344 B-22 23<br />
B-35 1 5310-00-842-1190 B-43 16<br />
53<strong>30</strong>-00-811-9472 B-11 5 5935-00-843-4117 B-<strong>30</strong> 35<br />
5940-00-813-0698 B-49 7 5315-00-843-7986 B-10 31<br />
B-49 11 47<strong>30</strong>-00-845-6678 B-2 6<br />
B-49 14 5<strong>30</strong>6-00-845-7961 B-37 5<br />
B-49 25 59<strong>30</strong>-00-847-9863 B-<strong>30</strong> 66<br />
B-49 29 5910-00-850-9074 B-31 28<br />
B-49 32 5355-00-854-9098 B-13 1<br />
B-49 35 5<strong>30</strong>5-00-855-0957 B-38 15<br />
B-49 38 5<strong>30</strong>5-00-855-0962 B-50 6<br />
5940-00-813-0698 B-49 45 5340-00-855-2942 B-51 22<br />
5977-00-814-7558 B-55 7 5320-00-855-7392 B-3 12<br />
4210-00-816-5585 B-10 6 B-38 4<br />
47<strong>30</strong>-00-816-5589 B-11 1 47<strong>30</strong>-00-857-3228 B-18 18<br />
4320-00-820-1835 B24 8 42<strong>30</strong>-00-857-9317 B-11 2<br />
42<strong>30</strong>-00-820-1846 B-10 8 2805-00-872-5972 B-22 40<br />
42<strong>30</strong>-00-821-1761 B-32 8 42<strong>30</strong>-00-872-6992 B-12 3<br />
4320-00-821-1765 B-23 26 B-19 4<br />
42<strong>30</strong>-00-823-5402 B-23 22 42<strong>30</strong>-00-872-6994 B-14 3<br />
47<strong>30</strong>-00-823-5403 B-10 9 42<strong>30</strong>-00-872-6995 B-14 2<br />
6680-00-825-2076 B-<strong>30</strong> 33 4410-00-872-7693 B-61 16<br />
5365-00-829-1681 B-24 25 5310-00-877-5797 B-21 11<br />
53<strong>30</strong>-00-829-2764 B-24 21 B-<strong>30</strong> 26<br />
47<strong>30</strong>-00-8<strong>30</strong>-2615 B-12 4 <strong>30</strong><strong>30</strong>-00-880-2020 B-22 22<br />
B-14 4 5310-00-880-7744 B-<strong>30</strong> 24<br />
B-19 5 B-32 37<br />
B-35 4 B-37 4<br />
53<strong>30</strong>-00-833-7491 B-43 11 B-38 66<br />
5935-00-834-4904 B-<strong>30</strong> 62<br />
I-6
SECTION IV<br />
TM3-42<strong>30</strong>-<strong>209</strong>-<strong>30</strong>&P<br />
NATIONAL STOCK NUMBER AND PART NUMBER INDEX<br />
NATIONAL STOCK NUMBER INDEX<br />
STOCK NUMBER FIG. ITEM STOCK NUMBER FIG. ITEM<br />
5310-00-880-7745 B-25 2 6210-00-901-9<strong>30</strong>1 B-<strong>30</strong> 67<br />
B-26 3 42<strong>30</strong>-00-902-3225 B-1 3<br />
B-36 4 4720-00-902-4378 B-10 55<br />
5310-00-880-8189 B-22 14 59<strong>30</strong>-00-902-5066 B-61 36<br />
B-25 6 4810-00-902-8452 B-51 35<br />
6105-00-881-0553 B-51 <strong>30</strong> 47<strong>30</strong>-00-902-8989 B-51 4<br />
5<strong>30</strong>5-00-889-<strong>30</strong>02 B-61 26 47<strong>30</strong>-00-902-8990 B-57 1<br />
47<strong>30</strong>-00-893-9547 B-23 20 47<strong>30</strong>-00-902-8991 B-51 14<br />
4720-00-900-1615 B-50 1 59<strong>30</strong>-00-903-1909 B-38 52<br />
4520-00-900-2341 B-63 5 6140-00-903-4002 B-10 44<br />
47<strong>30</strong>-00-900-3296 B-51 16 5340-00-903-4764 B-51 1<br />
B-61 8 43<strong>30</strong>-00-903-5389 B-52 1<br />
6685-00-900-3723 B-43 1 5320-00-903-5549 B-21 7<br />
6685-00-900-3724 B-43 2 5340-00-903-8585 B-18 5<br />
6685-00-900-3725 B-43 3 B-38 40<br />
47<strong>30</strong>-00-900-6279 B-50 3 5935-00-904-1381 B-49 57<br />
5945-00-900-6282 B-43 26 5140-00-904-6101 B-8 5<br />
47<strong>30</strong>-00-900-7521 B-18 9 B-38 8<br />
B-32 32 5640-00-905-3631 BULK 9<br />
B-37 1 47<strong>30</strong>-00-905-6355 B-50 17<br />
47<strong>30</strong>-00-900-7522 B-32 12 4410-00-906-0980 B-61 21<br />
B-33 1 4720-00-907-2705 B-<strong>30</strong> 44<br />
4520-00-900-7998 B-51 28 4320-00-907-8312 B-56 1<br />
B-53 1 6150-00-908-0782 B-38 32<br />
B-56 2 4820-00-908-3177 B-43 13<br />
53<strong>30</strong>-00-900-9687 B-14 1 2920-00-909-<strong>30</strong>01 B-53 3<br />
2990-00-900-9688 B-22 47 45<strong>30</strong>-00-909-5908 B-62 1<br />
5310-00-901-0585 B-38 48 93<strong>30</strong>-00-912-2707 BULK 13<br />
4820-00-901-1946 B-61 7 5310-00-913-8881 B-32 33<br />
53<strong>30</strong>-00-901-5524 B-61 22 6150-00-915-5752 B-<strong>30</strong> 60<br />
53<strong>30</strong>-00-901-5525 B-61 4 53<strong>30</strong>-00-921-6224 B-22 33<br />
53<strong>30</strong>-00-901-5526 B-61 10 9390-00-922-6550 BULK 11<br />
6680-00-901-9297 B-10 51 4820-00-923-2517 B-23 7<br />
59<strong>30</strong>-00-901-9<strong>30</strong>0 B-22 25<br />
I-7
SECTION IV<br />
TM3-42<strong>30</strong>-<strong>209</strong>-<strong>30</strong>&P<br />
NATIONAL STOCK NUMBER AND PART NUMBER INDEX<br />
NATIONAL STOCK NUMBER INDEX<br />
STOCK NUMBER FIG. ITEM STOCK NUMBER FIG. ITEM<br />
4720-00-924-4203 B-10 56 5310-00-934-9751 B-43 15<br />
47<strong>30</strong>-00-924-5331 B-10 36 B-51 18<br />
B-22 20 5310-00-934-9759 B-61 29<br />
47<strong>30</strong>-00-924-5497 B-23 8 47<strong>30</strong>-00-935-5395 B-2 3<br />
5365-00-925-2518 B-<strong>30</strong> 37 B-38 34<br />
5365-00-925-4026 B-<strong>30</strong> 42 5340-00-936-2336 B-18 39<br />
42<strong>30</strong>-00-9<strong>30</strong>-1981 B-32 4 42<strong>30</strong>-00-938-2836 B-10 33<br />
4820-00-9<strong>30</strong>-1982 B-37 7 6620-00-938-8212 B-<strong>30</strong> 49<br />
5<strong>30</strong>6-00-9<strong>30</strong>-4269 B-10 49 5<strong>30</strong>5-00-942-2196 B-10 26<br />
5340-00-9<strong>30</strong>-4271 B-27 4 B-18 23<br />
<strong>30</strong>20-00-9<strong>30</strong>-4277 B-23 25 B-21 5<br />
<strong>30</strong>40-00-9<strong>30</strong>-4278 B-<strong>30</strong> 50 B-51 36<br />
2590-00-9<strong>30</strong>-4279 B-10 48 42<strong>30</strong>-00-943-3858 B-27 11<br />
9320-00-9<strong>30</strong>-4281 B-10 17 42<strong>30</strong>-00-943-5536 B-3 1<br />
4710-00-9<strong>30</strong>-4402 B-33 6 53<strong>30</strong>-00-943-5537 B-15 5<br />
4720-00-9<strong>30</strong>-4403 B-34 4 5340-00-945-6759 B-27 1<br />
47<strong>30</strong>-00-9<strong>30</strong>-4404 B-33 5 47<strong>30</strong>-00-945-7154 B-23 14<br />
47<strong>30</strong>-00-9<strong>30</strong>-4405 B-34 2 47<strong>30</strong>-00-946-1122 B-23 2<br />
5<strong>30</strong>5-00-9<strong>30</strong>-4813 B-22 49 6145-00-946-1361 BULK 18<br />
42<strong>30</strong>-00-9<strong>30</strong>-4960 B-10 32 47<strong>30</strong>-00-947-7096 B-10 37<br />
42<strong>30</strong>-00-9<strong>30</strong>-5472 B-28 6 B-22 21<br />
42<strong>30</strong>-00-9<strong>30</strong>-5473 B-22 18 47<strong>30</strong>-00-947-9695 B-23 23<br />
B-28 10 5940-00-948-9686 B-<strong>30</strong> 61<br />
5<strong>30</strong>6-00-9<strong>30</strong>-5605 B-28 2 B-31 27<br />
B-28 9 B-49 22<br />
5310-00-933-8120 B-10 23 B-49 26<br />
B-15 3 5310-00-951-7<strong>209</strong> B-51 10<br />
4710-00-934-1650 B-23 10 5<strong>30</strong>6-00-952-8258 B-18 13<br />
5365-00-934-7852 B-22 37 5<strong>30</strong>5-00-954-3937 B-10 12<br />
6150-00-934-7853 B-22 34 B-18 24<br />
5310-00-934-9751 B-8 8 5<strong>30</strong>5-00-958-0585 B-<strong>30</strong> 32<br />
B-27 10 4720-00-961-3522 BULK 7<br />
B-38 27 47<strong>30</strong>-00-965-6520 B-34 3<br />
I-8
SECTION IV<br />
TM3-42<strong>30</strong>-<strong>209</strong>-<strong>30</strong>&P<br />
NATIONAL STOCK NUMBER AND PART NUMBER INDEX<br />
NATIONAL STOCK NUMBER INDEX<br />
STOCK NUMBER FIG. ITEM STOCK NUMBER FIG. ITEM<br />
5840-00-974-5159 B-18 34 5<strong>30</strong>5-00-995-3440 B-<strong>30</strong> 47<br />
B-21 3 47<strong>30</strong>-00-995-3527 B-50 15<br />
5310-00-975-2075 B-<strong>30</strong> 39 5<strong>30</strong>5-01-010-2362 B-28 13<br />
42<strong>30</strong>-00-980-5004 B-12 2 4710-01-013-9617 BULK 16<br />
B19 3 2910-01-034-5201 B-10 25<br />
5310-00-984-3806 B-10 27 42<strong>30</strong>-01-035-2040 B-10 39<br />
B18 37 47<strong>30</strong>-01-050-2215 B-35 2<br />
5<strong>30</strong>5-00-984-4988 B-<strong>30</strong> 56 47<strong>30</strong>-01-071-8229 B-32 27<br />
B-54 5 5940-01-079-1647 B-49 64<br />
5<strong>30</strong>5-00-984-6189 B-54 8 47<strong>30</strong>-01-091-3585 B-2 12<br />
5<strong>30</strong>5-00-984-6191 B-51 26 4720-01-124-3740 BULK 6<br />
B-54 13 4010-01-124-3741 B-13 3<br />
B-55 2 42<strong>30</strong>-01-124-3836 B-10 16<br />
5<strong>30</strong>5-00-984-6193 B-10 57 42<strong>30</strong>-01-124-3838 B-25 8<br />
5<strong>30</strong>5-00-984-6211 B-54 1 42<strong>30</strong>-01-128-5859 B-22 8<br />
5975-00-984-6582 B-<strong>30</strong> 29 42<strong>30</strong>-01-128-9912 B-23 27<br />
5310-00-984-7042 B-24 2 42<strong>30</strong>-01-128-9913 B-23 12<br />
5310-00-984-7042 B-32 34 42<strong>30</strong>-01-129-0837 B-22 51<br />
5<strong>30</strong>5-00-988-1171 B-32 41 5340-01-129-<strong>30</strong>94 B-6 3<br />
5<strong>30</strong>5-00-988-1720 B-63 4 42<strong>30</strong>-01-129-3106 B-22 41<br />
5<strong>30</strong>5-00-988-1721 B-38 7 42<strong>30</strong>-01-132-1610 B-32 5<br />
5<strong>30</strong>5-00-988-1723 B-38 6 <strong>30</strong>20-01-132-3697 B-25 10<br />
5<strong>30</strong>5-00-988-1724 B-38 22 <strong>30</strong>20-01-136-1467 B-25 11<br />
5<strong>30</strong>5-00-989-7434 B-21 9 <strong>30</strong>20-01-136-2216 B-22 50<br />
5<strong>30</strong>5-00-990-6444 B-8 2 47<strong>30</strong>-01-141-2550 B-23 19<br />
B-38 2 42<strong>30</strong>-01-145-7463 B-27 8<br />
B-43 6 9905-01-147-0851 B-43 19<br />
B-51 21 9905-01-159-8077 B-43 35<br />
5340-00-990-8712 B-10 46 47<strong>30</strong>-01-167-2781 B-23 18<br />
5<strong>30</strong>5-00-993-1851 -<strong>30</strong> 53 5935-01-168-0800 B-48 2<br />
2990-00-994-0827 B-1 2 9905-01-169-7642 B-<strong>30</strong> 3<br />
5320-00-994-7076 B-3 18 5340-01-181-1645 B-38 17<br />
B-38 26 5340-01-181-3563 B-3 6<br />
5<strong>30</strong>5-00-995-1102 B-10 45<br />
I-9
SECTION IV<br />
TM3-42<strong>30</strong>-<strong>209</strong>-<strong>30</strong>&P<br />
NATIONAL STOCK NUMBER AND PART NUMBER INDEX<br />
NATIONAL STOCK NUMBER INDEX<br />
STOCK NUMBER FIG. ITEM STOCK NUMBER FIG. ITEM<br />
40<strong>30</strong>-01-181-3680 B-3 5 5340-01-193-<strong>30</strong>22 B-3 3<br />
5340-01-183-2905 B-43 18 5340-01-193-<strong>30</strong>23 B-61 23<br />
5340-01-183-5019 B-5 3 5340-01-193-<strong>30</strong>24 B-38 44<br />
4520-01-185-9474 B-50 4 6140-01-193-4839 B-10 40<br />
5340-01-186-6421 B-3 15 5315-01-193-7446 B-38 55<br />
5340-01-186-6424 B-3 8 3120-01-194-3320 B-20 8<br />
<strong>30</strong>40-01-186-6481 B-10 <strong>30</strong> 5340-01-194-3338 B-3 14<br />
9905-01-187-7529 B-<strong>30</strong> 8 5340-01-194-3339 B-38 42<br />
59<strong>30</strong>-01-187-75<strong>30</strong> B-61 11 5340-01-194-7194 B-3 4<br />
7690-01-187-7537 B-43 20 6110-01-194-9800 B-<strong>30</strong> 22<br />
47<strong>30</strong>-01-087-7539 B-22 29 42<strong>30</strong>-01-194-9804 B-10 60<br />
4820-01-187-7562 B-22 <strong>30</strong> 42<strong>30</strong>-01-194-9805 B-22 6<br />
5340-01-187-7589 B-38 3 4820-01-194-9815 B-25 1<br />
5340-01-188-3170 B-22 10 B-32 28<br />
5340-01-188-3171 B-38 28 4820-01-194-9816 B-23 16<br />
<strong>30</strong>40-01-189-1198 B-25 7 42<strong>30</strong>-01-195-1747 B-50 8<br />
5340-01-189-7608 B-38 51 42<strong>30</strong>-01-195-1748 B-24 24<br />
2990-01-190-1112 B61 27 7690-01-195-1756 B-50 12<br />
4240-01-190-2854 B-32 18 42<strong>30</strong>-01-195-6464 B-27 5<br />
5340-01-190-6766 B-38 1 4820-01-204-0513 B25 3<br />
5340-01-190-9688 B-3 9 B-36 3<br />
5340-01-191-5340 B-3 16 5340-01-208-5809 B-3 11<br />
4240-01-191-5668 B-28 3 5310-01-213-4845 B-50 7<br />
54<strong>30</strong>-01-191-5858 B-32 11 9905-01-225-5989 B-38 19<br />
4240-01-193-2984 B-38 47 4520-01-225-5998 B-38 61<br />
9905-01-193-2992 B-<strong>30</strong> 16 43<strong>30</strong>-01-225-6023 B-51 12<br />
9905-01-193-2994 B-<strong>30</strong> 10 2510-01-225-6025 B-28 8<br />
5340-01-193-<strong>30</strong>16 B-32 17 4820-01-228-7567 B-43 12<br />
I-10
SECTION IV<br />
TM3-42<strong>30</strong>-<strong>209</strong>-<strong>30</strong>&P<br />
NATIONAL STOCK NUMBER AND PART NUMBER INDEX<br />
PART NUMBER INDEX<br />
FSCM PART NUMBER STOCK NUMBER FIG. ITEM<br />
78357 AMPH4 5340-00-855-2942 B51 22<br />
80204 ANSI B16.3 47<strong>30</strong>-00-838-6856 B-23 29<br />
88044 AN816-4-4B 47<strong>30</strong>-00-287-0547 B-<strong>30</strong> 36<br />
88044 AN911-3 47<strong>30</strong>-00-186-7799 B-51 11<br />
15182 AN912-1 47<strong>30</strong>-00-277-9386 B-51 6<br />
88044 AN912-2 47<strong>30</strong>-00-222-1819 B-51 13<br />
88044 AN912-3 47<strong>30</strong>-00-194-0215 B-61 <strong>30</strong><br />
88044 AN914-8C 47<strong>30</strong>-00-585-2<strong>30</strong>7 B-23 4<br />
88044 AN916-2 47<strong>30</strong>-00-231-5622 B-<strong>30</strong> 38<br />
B-43 8<br />
88044 AN935-416 5310-00-582-5965 B-10 53<br />
B-37 9<br />
88044 AN960-8 5310-00-515-8058 B-54 11<br />
81346 ASTM A 519-74 4710-01-013-9617 BULK 16<br />
81346 ASTM A120 4710-00-162-1020 BULK 12<br />
81346 ASTM A366 9515-00-237-1855 BULK 10<br />
01029 A36TT-3/4 4820-00-007-2251 B-10 38<br />
07860 A46070 47<strong>30</strong>-00-022-2499 B-22 31<br />
78357 BVHC4F 47<strong>30</strong>-00-801-1147 B-51 23<br />
93480 BW1044 47<strong>30</strong>-00-249-3919 B-38 35<br />
81361 B1/G B-49 62<br />
16004 B47457 53<strong>30</strong>-00-297-5948 B-22 45<br />
81361 B5-45-2590 47<strong>30</strong>-00-808-7447 B-2 10<br />
81361 B5-45-2635 53<strong>30</strong>-00-811-9471 B-12 1<br />
B-19 2<br />
B-35 1<br />
81361 B5-45-2682 42<strong>30</strong>-00-872-6992 B-12 3<br />
B-19 4<br />
81361 B5-45-2691 B-32 25<br />
81361 B5-45-2754 53<strong>30</strong>-00-829-2764 B-24 21<br />
81361 B5-45-2770 5365-00-829-1681 B-24 25<br />
81361 B5-45-2775 53<strong>30</strong>-00-446-1694 B-24 6<br />
81361 B5-45-2777 53<strong>30</strong>-00-0<strong>30</strong>-3212 B-24 4<br />
I-11
SECTION IV<br />
TM3-42<strong>30</strong>-<strong>209</strong>-<strong>30</strong>&P<br />
NATIONAL STOCK NUMBER AND PART NUMBER INDEX<br />
PART NUMBER INDEX<br />
FSCM PART NUMBER STOCK NUMBER FIG. ITEM<br />
81361 B5-45-2889 9390-00-922-6550 BULK 11<br />
81361 B5-45-2889-1 53<strong>30</strong>-00-345-7854 B-32 7<br />
81361 B5-45-2889-3 B-33 4<br />
81361 B5-45-29<strong>30</strong> 42<strong>30</strong>-00-980-5004 B-12 2<br />
B-19 3<br />
81361 B5-45-2934 53<strong>30</strong>-00-811-9472 B-11 5<br />
81361 B5-45-2990 5340-01-186-6421 B-3 15<br />
81361 B5-45-5992 <strong>30</strong>40-01-186-6481 B-10 <strong>30</strong><br />
81361 B5-45-2993-01 B-22 16<br />
81361 B5-45-2993-02 B-22 15<br />
81361 B5-45-<strong>30</strong>15-10 47<strong>30</strong>-00-924-5331 B-10 36<br />
B-22 20<br />
81361 B5-45-<strong>30</strong>15-11 4710-00-934-1650 B-23 10<br />
81361 B5-45-<strong>30</strong>15-12 47<strong>30</strong>-00-924-5497 B-23 8<br />
81361 B5-45-<strong>30</strong>15-13 B-32 24<br />
81361 B5-45-<strong>30</strong>15-14 B-23 13<br />
31361 B5-45-<strong>30</strong>15-2 B-19 1<br />
B-23 28<br />
81361 B5-45-<strong>30</strong>15-3 B-23 11<br />
81361 B5-45-<strong>30</strong>15-7 47<strong>30</strong>-00-9<strong>30</strong>-4404 B-33 5<br />
81361 B5-45-<strong>30</strong>15-8 B-23 5<br />
81361 B5-45-<strong>30</strong>17-1 5365-00-925-4026 B-<strong>30</strong> 42<br />
81361 B5-45-<strong>30</strong>17-2 5365-00-925-2518 B-<strong>30</strong> 37<br />
81361 B5-45-<strong>30</strong>20-5 47<strong>30</strong>-00-761-3891 B-23 6<br />
81361 B5-45-<strong>30</strong>20-7 B-23 6<br />
81361 B5-45-<strong>30</strong>27 B-18 35<br />
81361 B-20 7<br />
81361 B5-45-<strong>30</strong>35 B-20 4<br />
81361 B5-45-<strong>30</strong>38 5840-00-974-5159 B-18 34<br />
B-21 3<br />
81361 B5-45-<strong>30</strong>39 B-21 4<br />
81361 B5-45-<strong>30</strong>67 B-20 3<br />
81361 B5-45-<strong>30</strong>68 B-20 6<br />
I-12
SECTION IV<br />
TM3-42<strong>30</strong>-<strong>209</strong>-<strong>30</strong>&P<br />
NATIONAL STOCK NUMBER AND PART NUMBER INDEX<br />
PART NUMBER INDEX<br />
FSCM PART NUMBER STOCK NUMBER FIG. ITEM<br />
81361 B5-45-<strong>30</strong>74 9320-00-9<strong>30</strong>-4281 B-10 17<br />
81361 B5-45-<strong>30</strong>89 3110-00-157-6060 B-20 5<br />
81361 B5-45-<strong>30</strong>90 <strong>30</strong>20-01-136-1467 B-25 11<br />
81361 B5-45-<strong>30</strong>93 4820-00-456-9789 B-<strong>30</strong> 46<br />
81361 B5-45-<strong>30</strong>97-1 B-5 2<br />
81361 B5-45-<strong>30</strong>97-10 B-18 26<br />
81361 B5-45-<strong>30</strong>97-11 B-18 <strong>30</strong><br />
81361 B5-45-<strong>30</strong>97-12 B-18 28<br />
81361 B5-45-<strong>30</strong>97-2 B-5 1<br />
B-6 1<br />
B-18 27<br />
81361 B5-45-<strong>30</strong>97-3 B-6 2<br />
81361 B5-45-<strong>30</strong>97-4 B-7 1<br />
B-8 4<br />
81361 B5-45-<strong>30</strong>97-5 B-8 3<br />
81361 B5-45-<strong>30</strong>97-6 B-7 2<br />
B-18 29<br />
81361 B5-45-<strong>30</strong>97-7 B-10 19<br />
81361 B5-45-3101 4240-01-191-5668 B-28 3<br />
81361 B5-45-3109-1 42<strong>30</strong>-00-9<strong>30</strong>-5473 B-22 18<br />
B-28 10<br />
81361 B5-45-3109-2 42<strong>30</strong>-00-9<strong>30</strong>-5472 B-28 6<br />
81361 B5-45-3119 5<strong>30</strong>6-00-9<strong>30</strong>-5605 B-28 2<br />
B-28 9<br />
81361 B5-45-3128 4710-00-9<strong>30</strong>-4402 B-33 6<br />
81361 B5-45-31<strong>30</strong>-1 53<strong>30</strong>-00-787-7417 B-2 5<br />
81361 B5-45-31<strong>30</strong>-2 53<strong>30</strong>-00-787-7432 B-34 1<br />
81361 B5-45-3132-1 47<strong>30</strong>-00-900-7522 B-32 12<br />
B-33 1<br />
81361 B5-45-3132-2 47<strong>30</strong>-00-900-7521 B-18 9<br />
B-32 32<br />
B-37 1<br />
81361 B5-45-3132-3 47<strong>30</strong>-00-935-5395 B-38 34<br />
81361 B5-45-3134 6140-00-903-4002 B-10 44<br />
I-13
SECTION IV<br />
TM3-42<strong>30</strong>-<strong>209</strong>-<strong>30</strong>&P<br />
NATIONAL STOCK NUMBER AND PART NUMBER INDEX<br />
PART NUMBER INDEX<br />
FSCM PART NUMBER STOCK NUMBER FIG. ITEM<br />
81361 B5-45-3134-1 B-17 3<br />
81361 B5-45-3135 B-32 19<br />
81361 B5-45-3136 5<strong>30</strong>6-00-9<strong>30</strong>-4269 B-10 49<br />
81361 B5-45-3137 B-10 47<br />
81361 B5-45-3137-1 B-16 3<br />
81361 B5-45-3147 2590-00-9<strong>30</strong>-4279 B-10 48<br />
81361 B5-45-3153 42<strong>30</strong>-00-9<strong>30</strong>-1981 B-12 4<br />
81361 B5-45-3157-1 42<strong>30</strong>-01-195-6464 B-27 5<br />
81361 B5-45-3159 5340-00-9<strong>30</strong>-4271 B-27 4<br />
81361 B5-45-3160 5340-00-945-6759 B-27 1<br />
81361 B5-45-3161 42<strong>30</strong>-00-943-3858 B-27 11<br />
81361 B5-45-3165 2990-00-900-9688 B-22 47<br />
81361 B5-45-3174-2 47<strong>30</strong>-00-9<strong>30</strong>-4405 B-34 2<br />
81361 B5-45-3185-2 4710-00-082-4920 B-2 7<br />
81361 B5-45-3189 B-32 43<br />
81361 B545-3195 4720-00-907-2705 B-<strong>30</strong> 44<br />
81361 B5-45-3200 53<strong>30</strong>-00-900-9687 B-14 1<br />
81361 B5-45-3201 42<strong>30</strong>-00-872-6995 B-14 2<br />
81361 B5-45-3202 42<strong>30</strong>-00-872-6994 B-14 3<br />
81361 B5-45-3205 5<strong>30</strong>5-00-9<strong>30</strong>-4813 B-22 49<br />
81361 B5-45-3208 59<strong>30</strong>-00-065-1932 B-<strong>30</strong> 65<br />
81361 B5-45-3<strong>209</strong> 5940-00-195-5487 B-<strong>30</strong> 59<br />
81361 B5-45-3215 59<strong>30</strong>-00-901-9<strong>30</strong>0 B-22 25<br />
81361 B5-45-3225 53<strong>30</strong>-00-943-5537 B-15 5<br />
81361 B5-45-3239 B-8 6<br />
81361 B5-45-3246-1 5365-00-934-7852 B-22 37<br />
81361 B5-45-3246-2 B-22 36<br />
81361 B5-45-3267 42<strong>30</strong>-00-938-2836 B-10 33<br />
81361 B5-45-3268 5340-00-460-3956 B-18 8<br />
81361 B5-45-3273 <strong>30</strong>20-01-132-3697 B-25 10<br />
81361 B5-45-3274 42<strong>30</strong>-01-124-3838 B-25 8<br />
81361 B5-45-3287 B-<strong>30</strong> 54<br />
81361 B5-45-3289 42<strong>30</strong>-01-194-9804 B-10 60<br />
81361 B5-45-3298 9905-01-187-7529 B-<strong>30</strong> 8<br />
I-14
SECTION IV<br />
TM3-42<strong>30</strong>-<strong>209</strong>-<strong>30</strong>&P<br />
NATIONAL STOCK NUMBER AND PART NUMBER INDEX<br />
PART NUMBER INDEX<br />
FSCM PART NUMBER STOCK NUMBER FIG. ITEM<br />
81361 B5-45-3<strong>30</strong>4 7690-01-187-7537 B-43 20<br />
81361 B5-45-3<strong>30</strong>6 4820-01-187-7562 B-22 <strong>30</strong><br />
81361 B5-45-3<strong>30</strong>7 47<strong>30</strong>-01-187-7539 B-22 29<br />
81361 B5-59-274 B-38 60<br />
81361 B5-59-295 B-61 32<br />
81361 B5-59-296 B-61 31<br />
81361 B5-59-299 53<strong>30</strong>-00-901-5524 B-61 22<br />
81361 B5-59-<strong>30</strong>0 53<strong>30</strong>-00-901-5525 B-61 4<br />
81361 B5-59-<strong>30</strong>6 B-43 34<br />
81361 B5-59-<strong>30</strong>7 B-43 21<br />
81361 B5-59-<strong>30</strong>8 9905-01-159-8077 B-43 35<br />
81361 B5-59-<strong>30</strong>9 9905-01-147-0851 B-43 19<br />
81361 B5-59-322 47<strong>30</strong>-00-878-0095 B-38 54<br />
81361 B5-59-339 59<strong>30</strong>-00-902-5066 B-61 36<br />
81361 B5-59-343 53<strong>30</strong>-00-901-5526 B-61 10<br />
81361 B5-59-345 B-51 15<br />
81361 B5-59-345 B-57 2<br />
81361 B5-59-346 B-51 17<br />
81361 B5-59-346-1 B-58 2<br />
81361 B5-59-347 B-51 5<br />
81361 B5-59-347-1 B-60 2<br />
81361 B5-59-349 B-38 49<br />
81361 B5-59-349-1 B-45 2<br />
81361 B5-59-350 B-61 13<br />
81361 B5-59-350-1 B-65 2<br />
81361 B5-59-381 5340-00-908-8585 B-18 5<br />
B-38 40<br />
81361 B5-59-393 B-51 8<br />
81361 B5-59-393-1 B-59 2<br />
81361 B5-59-394 B-61 25<br />
81361 B5-59-394-1 B-64 2<br />
81361 B5-59-403 B-38 9<br />
81361 B5-59-407 5340-01-188-3171 B-38 28<br />
81361 B5-59-409 5935-00-904-1381 B-49 57<br />
I-15
SECTION IV<br />
TM3-42<strong>30</strong>-<strong>209</strong>-<strong>30</strong>&P<br />
NATIONAL STOCK NUMBER AND PART NUMBER INDEX<br />
PART NUMBER INDEX<br />
FSCM PART NUMBER STOCK NUMBER FIG. ITEM<br />
81361 B5-59-410 5975-00-295-9697 B-38 45<br />
81361 B5-59-412 B-43 4<br />
81361 B5-59414 B-43 31<br />
81361 B5-59-415 B-43 28<br />
81361 B5-59-421 5315-01-193-7446 B-38 55<br />
81361 B5-59-422 B-38 53<br />
81361 B5-59-451 7690-01-195-1756 B-50 12<br />
81361 CB1-A/M4-B B-31 26<br />
99862 CL-22-KA-18 4010-01-124-3741 B-13 3<br />
81349 CM5ED3<strong>30</strong>G03 5910-00-850-9074 B-31 28<br />
78189 C4008-14-00 5310-00-261-6192 B-55 3<br />
81361 C5-45-2563 42<strong>30</strong>-00-820-1846 B-10 8<br />
81361 C5-45-2598 4820-00-018-<strong>30</strong>77 B-37 3<br />
81361 C5-45-2627-9 47<strong>30</strong>-00-277-5644 B-18 10<br />
81361 C5-45-2641-1 B-18 6<br />
81361 C5-45-2646 6685-00-809-4297 B-<strong>30</strong> 41<br />
81361 C5-45-2656 42<strong>30</strong>-00-823-5402 B-23 22<br />
81361 C5-45-2699 4210-00-809-4862 B-10 7<br />
81361 C5-45-2700 47<strong>30</strong>-00-816-5589 B-11 1<br />
81361 C5-45-2701 4210-00-816-5585 B-10 6<br />
81361 C5-45-2723 47<strong>30</strong>-00-857-3228 B-18 18<br />
81361 C5-45-2735-10 B-10 5<br />
81361 C5-45-2736-2 B-12 5<br />
81361 C5-45-2736-7 4720-00-071-0615 B-35 5<br />
81361 C5-45-2736-8 B-19 6<br />
81361 C5-45-2736-9 B-19 7<br />
81361 C5-45-2739 42<strong>30</strong>-00-821-1761 B-32 8<br />
81361 C5-45-2740 6685-00-809-4298 B-<strong>30</strong> 28<br />
81361 C5-45-2750 B-24 11<br />
81361 C5-45-2751 B-24 14<br />
81361 C5-45-2755 B-24 17<br />
81361 C5-45-2768 B-24 9<br />
81361 C5-45-2774 4320-00-820-1835 B-24 8<br />
I-16
SECTION IV<br />
TM3-42<strong>30</strong>-<strong>209</strong>-<strong>30</strong>&P<br />
NATIONAL STOCK NUMBER AND PART NUMBER INDEX<br />
PART NUMBER INDEX<br />
FSCM PART NUMBER STOCK NUMBER FIG. ITEM<br />
81361 C5-45-2798 4720-00-9<strong>30</strong>-4403 B-34 4<br />
81361 C5-45-2845 B-33 3<br />
81361 C5-45-2862-2 <strong>30</strong>40-00-9<strong>30</strong>-4278 B-<strong>30</strong> 50<br />
81361 C5-45-2711 B-11 6<br />
81361 C5-45-2920 4820-00-061-1952 B-11 7<br />
81361 C5-45-2932 47<strong>30</strong>-00-823-5403 B-10 9<br />
81361 C5-45-2964 B-28 1<br />
81361 C5-45-2964 2510-01-225-6025 B-28 8<br />
81361 5-45-2972-10 B-3 17<br />
81361 C5-45-2973 5340-01-186-6424 B-3 8<br />
81361 C5-45-2974 5340-01-190-9688 B-3 9<br />
81361 C5-45-2975 5340-01-194-7194 B-3 4<br />
81361 C5-45-2976 B-18 1<br />
81361 C5-45-2977 5340-01-194-3338 B-3 14<br />
81361 C5-45-2978 5340-01-191-5340 B-3 16<br />
81361 C5-45-2979 5340-01-193-<strong>30</strong>22 B-3 3<br />
81361 C5-45-2980 42<strong>30</strong>-01-128-9913 B-23 12<br />
81361 C5-45-2981 42<strong>30</strong>-01-128-9912 B-23 27<br />
81361 C5-45-2982 B-18 22<br />
81361 C5-45-2982-2 3120-01-194-3320 B-20 8<br />
81361 C5-45-2986 B-10 3<br />
81361 C5-45-2991 42<strong>30</strong>-00-9<strong>30</strong>-4960 B-10 32<br />
81361 C5-45-2994 B-18 31<br />
81361 C5-45-2995 B-10 18<br />
81361 C5-45-<strong>30</strong>01 42<strong>30</strong>-01-132-1610 B-32 5<br />
81361 C5-45-<strong>30</strong>01-3 B-32 6<br />
81361 C5-45-<strong>30</strong>02-1 B-10 13<br />
81361 C5-45-<strong>30</strong>02-2 B-10 10<br />
81361 C5-45-<strong>30</strong>05-20 5340-01-193-<strong>30</strong>16 B-32 17<br />
81361 C5-45-<strong>30</strong>05-<strong>30</strong> 4240-01-190-2854 B-32 18<br />
81361 C5-45-<strong>30</strong>11 5340-01-181-3563 B-3 6<br />
81361 C5-45-<strong>30</strong>12 B-3 7<br />
81361 C5-45-<strong>30</strong>15-15 47<strong>30</strong>-01-141-2550 B-23 19<br />
81361 C5-45-<strong>30</strong>33-1 B-21 6<br />
I-17
SECTION IV<br />
TM3-42<strong>30</strong>-<strong>209</strong>-<strong>30</strong>&P<br />
NATIONAL STOCK NUMBER AND PART NUMBER INDEX<br />
PART NUMBER INDEX<br />
FSCM PART NUMBER STOCK NUMBER FIG. ITEM<br />
81361 C5-45-<strong>30</strong>33-2 B-21 1<br />
81361 C5-45-<strong>30</strong>66 B-20 2<br />
81361 C5-45-<strong>30</strong>96 5340-01-183-5019 B-5 3<br />
81361 5-45-<strong>30</strong>98-1 5340-01-129-<strong>30</strong>94 B-6 3<br />
81361 C5-45-<strong>30</strong>99 42<strong>30</strong>-00-127-2560 B-7 3<br />
81361 C5-45-3100 B-8 1<br />
81361 C5-45-3146 6140-01-193-4839 B-10 40<br />
81361 C5-45-3157 42<strong>30</strong>-01-129-3106 B-22 41<br />
81361 C5-45-3164 42<strong>30</strong>-01-129-0837 B-22 51<br />
81361 C5-45-3178 B-32 14<br />
81361 C5-45-3180 <strong>30</strong>20-01-136-2216 B-22 50<br />
81361 C5-45-3181 <strong>30</strong>20-00-9<strong>30</strong>-4277 B-23 25<br />
81361 C545-3183 42<strong>30</strong>-00-735-9931 B-1 5<br />
81361 C5-45-3185-1 B-2 4<br />
81361 C5-45-3190 B-32 1<br />
81361 C5-45-3191 42<strong>30</strong>-01-128-5859 B-22 8<br />
81361 C5-45-3192 B-18 16<br />
81361 C5-45-3199 B-10 35<br />
81361 C5-45-3216-10 B-18 19<br />
81361 C5-45-3216-20 B-18 25<br />
81361 C5-45-3228 42<strong>30</strong>-01-145-7463 B-27 8<br />
81361 5-45-3229 5340-01-188-3170 B-22 10<br />
81361 C5-45-32<strong>30</strong> 5<strong>30</strong>6-00-952-8258 B-18 13<br />
81361 C5-45-3232 B-22 3<br />
81361 C5-45-3247 6150-00-934-7853 B-22 34<br />
81361 C5-45-3248 B-10 61<br />
81361 5-45-3255 5340-00-936-2336 B-18 39<br />
81361 C5-45-3256 2990-00-994-0827 B-1 2<br />
81361 C5-45-3265 B-14 5<br />
81361 C5-45-3266 40<strong>30</strong>-01-181-3680 B-3 5<br />
81361 C5-45-3266-1 B-9 2<br />
81361 C5-45-3270 42<strong>30</strong>-00-<strong>30</strong>1-4104 B-23 1<br />
81361 C5-45-3271 B-22 24<br />
81361 C5-45-3272 B-23 17<br />
I-18
SECTION IV<br />
TM3-42<strong>30</strong>-<strong>209</strong>-<strong>30</strong>&P<br />
NATIONAL STOCK NUMBER AND PART NUMBER INDEX<br />
PART NUMBER INDEX<br />
FSCM PART NUMBER STOCK NUMBER FIG. ITEM<br />
81361 C5-45-3276-4 4820-01-194-9816 B-23 16<br />
81361 C5-45-3276-5 4820-01-194-9815 B-25 1<br />
B-32 28<br />
81361 C5-45-3278 4820-01-220-0847 B-23 7<br />
81361 C5-45-3281 B-22 42<br />
81361 C5-45-3282 4820-01-261-6003 B-23 7<br />
81361 C5-45-3285 B-27 9<br />
81361 C5-45-3290 42<strong>30</strong>-01-194-9805 B-22 6<br />
81361 C5-45-3299 B-25 14<br />
81361 C5-45-3<strong>30</strong>3 B-32 35<br />
81361 C5-45-3<strong>30</strong>5 B-32 40<br />
81361 C5-45-3<strong>30</strong>8 5340-01-187-7589 B-38 3<br />
81361 C5-45-3310 <strong>30</strong>40-01-189-1198 B-25 7<br />
81361 C5-45-3311 42<strong>30</strong>-01-195-1748 B-24 24<br />
81361 C5-59-203-1 6685-00-900-3724 B-43 2<br />
81361 C5-59-203-2 6685-00-900-3725 B-43 3<br />
81361 C5-59-213 5340-01-193-<strong>30</strong>23 B-61 23<br />
81361 C5-59-217 B-63 2<br />
81361 C5-59-218 B-38 56<br />
81361 C5-59-218-1 B-49 1<br />
81361 C5-59-218-10 B-29 27<br />
81361 C5-59-218-11 B-49 <strong>30</strong><br />
81361 C5-59-218-12 B-49 33<br />
81361 C5-59-218-13 B-49 36<br />
81361 C5-59-218-14 B-49 40<br />
81361 C5-59-218-15 B-49 43<br />
81361 C5-59-218-16 B-49 47<br />
81361 C5-59-218-17 B-49 50<br />
81361 C5-59-218-18 B-49 54<br />
81361 C5-59-218-19 B-49 58<br />
81361 C5-59-218-2 B-49 2<br />
81361 C5-59-218-20 B-49 61<br />
81361 C5-59-218-3 B-49 5<br />
81361 C5-59-218-4 B-49 8<br />
I-19
SECTION IV<br />
TM3-42<strong>30</strong>-<strong>209</strong>-<strong>30</strong>&P<br />
NATIONAL STOCK NUMBER AND PART NUMBER INDEX<br />
PART NUMBER INDEX<br />
FSCM PART NUMBER STOCK NUMBER FIG. ITEM<br />
81361 C5-59-218-5 B-49 12<br />
81361 C5-59-218-6 B-49 15<br />
81361 C5-59-218-7 B-49 16<br />
81361 C5-59-218-8 B-49 19<br />
81361 C5-59-218-9 B-49 23<br />
81361 C5-59-226-1 B-38 21<br />
81361 C5-59-226-2 B-38 20<br />
81361 C5-59-268 B-51 31<br />
81361 C5-59-294 2990-01-190-1112 B-61 27<br />
81361 C5-59-<strong>30</strong>2 B-61 3<br />
81361 C5-59-<strong>30</strong>5 B-43 5<br />
81361 C5-59310 B-43 <strong>30</strong><br />
81361 C5-59-317 B-32 3<br />
B-38 33<br />
81361 C5-59-318-2 4720-00-900-1615 B-50 1<br />
81361 C5-59-321 4820-00-901-1946 B-61 7<br />
81361 C5-59-327 B-38 25<br />
81361 C5-59-328 B-38 16<br />
81361 C5-59-329 B-38 24<br />
81361 C5-59-332 6685-00-900-3723 B-43 1<br />
81361 C5-59-341 4410-00-906-0980 B-61 21<br />
81361 C5-59-344 43<strong>30</strong>-01-225-6023 B-51 12<br />
81361 C5-59-344-1 B-52 3<br />
81361 C5-59-344-2 B-52 5<br />
81361 C5-59-352 B-38 59<br />
81361 C5-59-352-1 B-47 2<br />
81361 C5-59-360 6150-00-908-0782 B-38 32<br />
81361 C5-59-360-1 B-48 3<br />
81361 C5-59-369 4320-00-907-8312 B-56 1<br />
81361 C5-59-373 B-51 27<br />
81361 C5-59-386 4820-00-908-3177 B-43 13<br />
81361 C5-59-387 4820-01-228-7567 B-43 12<br />
81361 C5-59-396 B-38 41<br />
81361 C5-59-398 B-43 23<br />
I-20
SECTION IV<br />
TM3-42<strong>30</strong>-<strong>209</strong>-<strong>30</strong>&P<br />
NATIONAL STOCK NUMBER AND PART NUMBER INDEX<br />
PART NUMBER INDEX<br />
FSCM PART NUMBER STOCK NUMBER FIG. ITEM<br />
81361 C5-59-398-1 B-44 2<br />
81361 C5-59-399 5340-01-183-2905 B-43 18<br />
81361 C5-59-405 B-38 57<br />
81361 C5-59-405-1 B-46 2<br />
81361 C5-59-413 9905-01-225-5989 B-38 19<br />
81361 C5-59-418 B-39 1<br />
81361 C5-59-450 59<strong>30</strong>-01-187-75<strong>30</strong> B-61 11<br />
81361 C5-59-457 42<strong>30</strong>-01-195-1747 B-50 8<br />
80691 D101 47<strong>30</strong>-01-050-2215 B-35 2<br />
81361 D150-1-13-2 5340-00-903-4764 B-51 1<br />
51064 D25593 B-55 1<br />
51064 D25594-1 5977-00-814-7558 B-55 7<br />
51064 D25807 B-55 5<br />
51064 D25808-1 B-55 4<br />
81361 D5-45-2776 B-24 3<br />
81361 D5-45-2835 4320-00-821-1765 B-23 26<br />
81361 D5-45-2967 42<strong>30</strong>-01-035-2040 B-10 39<br />
81361 D5-45-2975-2 B-4 1<br />
81361 D5-45-2988 B-22 44<br />
81361 D5-45-2996 42<strong>30</strong>-01-124-3836 B-10 16<br />
81361 D5-45-2997 5340-01-208-5809 B-3 11<br />
81361 D5-45-<strong>30</strong>29 B-22 19<br />
81361 D5-45-<strong>30</strong>29 ITEM 47<strong>30</strong>-00-946-1122 B-23 2<br />
6<br />
81361 D5-45-<strong>30</strong>291 TEM17 47<strong>30</strong>-00-945-7154 B-23 14<br />
81361 D5-45-<strong>30</strong>291 TEM20 47<strong>30</strong>-00-947-9695 B-23 23<br />
81361 D5-45-3117 54<strong>30</strong>-01-191-5858 B-32 11<br />
81361 D5-45-31171 TEM15 47<strong>30</strong>-00-838-6856 B-33 2<br />
81361 D5-45-31171TEM16 B-33 7<br />
81361 D5-45-3127 2910-01-034-5201 B-10 25<br />
81361 D5-45-3127-1 B-15 6<br />
81361 D5-45-3186 B-1 4<br />
81361 D5-45-3203-1 B-32 22<br />
81361 D5-45-3203-10 B-<strong>30</strong> 4<br />
I-21
SECTION IV<br />
TM3-42<strong>30</strong>-<strong>209</strong>-<strong>30</strong>&P<br />
NATIONAL STOCK NUMBER AND PART NUMBER INDEX<br />
PART NUMBER INDEX<br />
FSCM PART NUMBER STOCK NUMBER FIG. ITEM<br />
81361 D5-45-3203-11 9905-01-193-2992 B-<strong>30</strong> 16<br />
81361 D5-45-3203-12 B-<strong>30</strong> 7<br />
81361 D5-45-3203-13 B-<strong>30</strong> 14<br />
81361 D5-45-3203-14 B-<strong>30</strong> 6<br />
81361 D5-45-3203-15 B-<strong>30</strong> 12<br />
81361 D5-45-3203-16 B-<strong>30</strong> 9<br />
81361 D5-45-3203-17 B-<strong>30</strong> 5<br />
81361 D5-45-3203-18 B-<strong>30</strong> 18<br />
81361 D5-45-3203-19 9905-01-193-2994 B-<strong>30</strong> 10<br />
81361 D5-45-3203-2 B-<strong>30</strong> 21<br />
B-32 <strong>30</strong><br />
81361 D5-45-3203-21 B-<strong>30</strong> 13<br />
81361 D5-45-3203-22 B-<strong>30</strong> 20<br />
81361 D5-45-3203-23 B-<strong>30</strong> 1<br />
81361 D5-45-3203-24 9905-01-169-7642 B-<strong>30</strong> 3<br />
81361 D5-45-3203-3 B-32 10<br />
81361 D5-45-3203-4 B-18 11<br />
81361 D5-45-3203-5 B-18 2<br />
81361 D5-45-3203-6 B-<strong>30</strong> 15<br />
81361 D5-45-3203-7 B-<strong>30</strong> 17<br />
81361 D5-45-3203-8 B-<strong>30</strong> 19<br />
81361 D5-45-3203-9 B-<strong>30</strong> 2<br />
81361 D5-45-3217-1 4820-00-923-2517 B-23 7<br />
81361 D5-45-3227 B-<strong>30</strong> 51<br />
81361 D5-45-3231 B-10 50<br />
81361 D5-45-3233 42<strong>30</strong>-00-902-3225 B-1 3<br />
81361 D5-45-3235 B-3 10<br />
81361 D5-45-3236 B-10 52<br />
81361 D5-45-3237 6150-00-915-5752 B-<strong>30</strong> 60<br />
81361 D5-45-3240 5140-00-904-6101 B-8 5<br />
B-38 8<br />
81361 D5-45-3241 B-18 38<br />
81361 D5-45-3248-11 B-31 1<br />
81361 D5-45-3248-12 B-31 4<br />
I-22
SECTION IV<br />
TM3-42<strong>30</strong>-<strong>209</strong>-<strong>30</strong>&P<br />
NATIONAL STOCK NUMBER AND PART NUMBER INDEX<br />
PART NUMBER INDEX<br />
FSCM PART NUMBER STOCK NUMBER FIG. ITEM<br />
81361 D5-45-3248-13 B-31 7<br />
81361 D5-45-3248-14 B-31 10<br />
81361 D5-45-3248-15 B-31 13<br />
81361 D5-45-3248-16 B-31 16<br />
81361 D5-45-3248-17 B-31 19<br />
81361 D5-45-3248-18 B-31 22<br />
81361 D5-45-3248-19 B-31 25<br />
81361 D5-45-3248-20 B-31 29<br />
81361 D5-45-3248-21 B-31 32<br />
81361 D5-45-3248-22 B-31 35<br />
81361 D5-45-3248-23 B-31 38<br />
81361 D5-45-3248-24 B-31 41<br />
81361 D5-45-3248-25 B-31 44<br />
81361 D5-45-3248-26 B-31 47<br />
81361 D5-45-3248-31 B-31 50<br />
81361 D5-45-3250 B-10 22<br />
81361 D5-45-3280 6680-00-901-9297 B-10 51<br />
81361 D5-45-3288 B-22 9<br />
81361 D5-45-3312 <strong>30</strong>20-01-094-3<strong>30</strong>3 B-22 13<br />
81361 D5-45-3313 6110-01-194-9800 B-<strong>30</strong> 22<br />
81361 D5-59-201 B-61 5<br />
81361 D5-59-202 6105-00-881-0553 B-51 <strong>30</strong><br />
81361 D5-59-210 B-38 56<br />
81361 D5-59-238 4520-00-900-2341 B-63 5<br />
81361 D5-59-247 B-61 33<br />
81361 D5-59-252 2920-00-909-<strong>30</strong>01 B-53 3<br />
81361 D5-59-265 6105-00-608-0533 B-63 1<br />
81361 D5-59-273 B-38 12<br />
81361 D5-59-311 B-38 31<br />
81361 D5-59-311-9 B-50 13<br />
81361 D5-59-325 5340-01-193-<strong>30</strong>24 B-38 44<br />
81361 D5-59-336 4410-00-191-3142 B-38 36<br />
81361 D5-59-336 5340-01-189-7608 B-38 51<br />
I-23
SECTION IV<br />
TM3-42<strong>30</strong>-<strong>209</strong>-<strong>30</strong>&P<br />
NATIONAL STOCK NUMBER AND PART NUMBER INDEX<br />
PART NUMBER INDEX<br />
FSCM PART NUMBER STOCK NUMBER FIG. ITEM<br />
81361 D5-59-364 5340-01-181-1645 B-38 17<br />
81361 D5-59-374 4410-00-872-7693 B-61 16<br />
81361 D5-45-59-377 B-61 20<br />
81361 D5-59-395 5340-01-194-3339 B-38 42<br />
81361 D5-59-417 4410-00-057-0225 B-61 34<br />
81361 D5-59-459 4520-01-185-9474 B-50 4<br />
81361 E150-1-12-1 47<strong>30</strong>-00-905-S355 B-50 17<br />
81361 E5-45-2756 B-24 23<br />
81361 E5-45-2984 B-18 41<br />
81361 E5-45-2984-6 B-21 2<br />
81361 E5-45-3221 42<strong>30</strong>-00-943-5536 B-3 1<br />
81361 E5-59-200 4410-00-542-5656 B-1 1<br />
81361 E5-59-257 B-43 33<br />
81361 E5-59-258 B-51 32<br />
81361 E5-59-285 4520-01-225-5998 B-38 61<br />
81361 E5-59-<strong>30</strong>1 4240-01-193-2984 B-38 47<br />
81361 E5-59-323 4410-00-191-3124 B-38 5<br />
81361 E5-59-362 B-38 65<br />
81361 E5-59-365 5340-01-190-6766 B-38 1<br />
13800 E94RT 43<strong>30</strong>-00-903-5389 B-52 1<br />
71041 FB1012-8 3120-00-525-8667 B-25 9<br />
81348 FFS107TYPEFPOINT 5<strong>30</strong>5-00-995-1102 B-10 45<br />
70040 FGS3 6680-234-2111 B-15 4<br />
74193 JA1-B3-A-20-2 5925-00-163-6547 B-<strong>30</strong> 58<br />
81361 J1-H/S4-A B-31 <strong>30</strong><br />
81361 K1-A1/MOT B-49 55<br />
81361 K1-A2/K2-A2 B-49 48<br />
81361 K1-X1/S4-1 B-49 41<br />
81361 K1-X2/G B-49 44<br />
81361 K2-A1/S3 B-49 9<br />
81361 K2-A1/TD1-7 B-49 51<br />
81361 K2-A2/S2 B-49 20<br />
81361 K2-A2-TD1-5 B-49 59<br />
I-24
SECTION IV<br />
TM3-42<strong>30</strong>-<strong>209</strong>-<strong>30</strong>&P<br />
NATIONAL STOCK NUMBER AND PART NUMBER INDEX<br />
PART NUMBER INDEX<br />
FSCM PART NUMBER STOCK NUMBER FIG. ITEM<br />
81361 K2-X1/G B-49 37<br />
81361 K2-X1/G B-49 37<br />
82796 K2498 B-54 14<br />
81361 LM5-45-31351TEM2 B-32 26<br />
1<br />
81361 LM5-45-31831TEM2 B-32 13<br />
3<br />
81349 MILA7021 53<strong>30</strong>-00-527-9900 BULK 2<br />
81349 MILC5756B 6145-00-548-1076 BULK 3<br />
81349 MILG432 53<strong>30</strong>-00-298-7165 BULK 5<br />
81349 MILR46089 9320-00-262-2274 BULK 14<br />
81349 MILT3520 BULK 17<br />
99974 MM2946 6145-00-500-<strong>30</strong>79 BULK 20<br />
99974 MM3565 6145-00-295-2814 BULK 19<br />
72661 MS11 47<strong>30</strong>-00-202-6771 B-35 3<br />
96906 MS14<strong>30</strong>7-1 47<strong>30</strong>-00-277-5683 B-22 35<br />
96906 MS15003-1 47<strong>30</strong>-00-050-4208 B-24 20<br />
B-25 4<br />
B-26 2<br />
B-36 1<br />
96906 MS15569-7 6240-00-019-0878 B-<strong>30</strong> 52<br />
96906 MS16562-226 5315-00-753-3893 B-32 16<br />
96906 MS16562-33 5315-00-843-7986 B-10 31<br />
96906 MS16562-51 5315-00-809-8786 B-25 15<br />
96906 MS16625-4156 5365-00-806-0204 B-11 4<br />
96906 MS166<strong>30</strong>-4100 5365-00-808-6933 B-24 18<br />
96906 MS16633-1015 5365-00-200-7377 B-54 3<br />
96906 MS18064-9 5<strong>30</strong>5-00-773-2708 B-43 17<br />
96906 MS18154-58 5<strong>30</strong>5-00-115-9526 B-18 40<br />
B-27 3<br />
B-38 63<br />
96906 MS18154-59 5<strong>30</strong>5-01-010-2362 B-28 13<br />
96906 MS1854-60 5<strong>30</strong>5-00-942-2196 B-10 26<br />
I-25
SECTION IV<br />
TM3-42<strong>30</strong>-<strong>209</strong>-<strong>30</strong>&P<br />
NATIONAL STOCK NUMBER AND PART NUMBER INDEX<br />
PART NUMBER INDEX<br />
FSCM PART NUMBER STOCK NUMBER FIG. ITEM<br />
B-18 23<br />
B-21 5<br />
B-51 36<br />
96906 MS20066-381 5315-00-732-1005 B-22 52<br />
96906 MS20470B3-4 5320-00-119-6819 B-38 18<br />
96906 MS20613-4P4 5320-00-994-7076 B-3 18<br />
B-38 26<br />
96906 MS20613-4P7 5320-00-855-7392 B-3 12<br />
B-38 4<br />
96906 MS20822-4-4K 47<strong>30</strong>-00-282-7460 B-23 21<br />
96906 MS<strong>209</strong>13-8S 47<strong>30</strong>-00-221-2141 B-2 1<br />
96906 MS21044-N08 5310-00-811-3494 B-10 62<br />
96906 MS21044C3 5310-00-208-9255 B-13 4<br />
96906 MS21044N3 5310-00-877-5797 B-21 11<br />
B-<strong>30</strong> 26<br />
96906 MS21316-56 5<strong>30</strong>5-00-078-7039 B-32 15<br />
96906 MS21318-20 5<strong>30</strong>5-00-253-5614 B-18 3<br />
B-<strong>30</strong> 11<br />
B-32 9<br />
96906 MS21333-76 5340-00-724-7038 B-10 59<br />
96906 MS21334-5 5340-00-990-8712 B-10 46<br />
96906 MS24166D1 5945-00-686-6877 B-43 25<br />
96906 MS24541-2 6620-00-938-8212 B-<strong>30</strong> 49<br />
96906 MS24629-3 5<strong>30</strong>5-00-855-0962 B-50 6<br />
96906 MS24629-46 5<strong>30</strong>5-00-855-0957 B-38 15<br />
96906 MS24661-9 5320-00-903-5549 5549 B-21<br />
96906 MS24665-1012 5315-00-200-3586 B-27 6<br />
96906 MS24665-<strong>30</strong>2 5315-00-234-1864 B-24 16<br />
96906 MS25036-101 5940-00-813-0698 B-49 7<br />
B-49 11<br />
B-49 14<br />
B-49 25<br />
B-49 29<br />
I-26
SECTION IV<br />
TM3-42<strong>30</strong>-<strong>209</strong>-<strong>30</strong>&P<br />
NATIONAL STOCK NUMBER AND PART NUMBER INDEX<br />
PART NUMBER INDEX<br />
FSCM PART NUMBER STOCK NUMBER FIG. ITEM<br />
B-49 32<br />
B-49 35<br />
B-49 38<br />
B-49 45<br />
96906 MS25036-103 5940-00-143-4771 B-49 4<br />
B-49 10<br />
B-49 18<br />
B-49 21<br />
B-49 39<br />
B-49 46<br />
B-49 60<br />
96906 MS25036-108 5940-00-143-4780 B-10 20<br />
B-<strong>30</strong> 63<br />
B-31 3<br />
B-31 6<br />
B-31 9<br />
B-31 12<br />
B-31 15<br />
B-31 18<br />
B-31 21<br />
B-31 24<br />
B-31 31<br />
B-31 34<br />
96906 MS25036-108 5940-00-143-4780 B-31 37<br />
B-31 40<br />
B-31 43<br />
B-31 46<br />
B-31 49<br />
B-31 52<br />
96906 MS25036-112 5940-00-143-4794 B-48 4<br />
B-49 49<br />
B49 52<br />
B-49 56<br />
I-27
SECTION IV<br />
TM3-42<strong>30</strong>-<strong>209</strong>-<strong>30</strong>&P<br />
NATIONAL STOCK NUMBER AND PART NUMBER INDEX<br />
PART NUMBER INDEX<br />
FSCM PART NUMBER STOCK NUMBER FIG. ITEM<br />
96906 MS25036-127 5940-00-113-8191 B-16 2<br />
B-17 2<br />
96906 MS25036-157 5940-00-143-4777 B-49 42<br />
B-49 63<br />
96906 MS25043-16D 5935-00-137-4671 B-10 58<br />
96906 MS25089-1C 59<strong>30</strong>-00-847-9863 B-<strong>30</strong> 66<br />
96906 MS25089-2C 59<strong>30</strong>-00-253-0426 B-<strong>30</strong> 64<br />
96906 MS25<strong>30</strong>6-222 59<strong>30</strong>-00-728-4328 B-<strong>30</strong> 23<br />
96906 MS27020-6 47<strong>30</strong>-00-516-4450 B-2 8<br />
B-18 4<br />
B-38 39<br />
96906 MS27022-6 47<strong>30</strong>-00-935-5395 B-2 3<br />
96906 MS27024-6 47<strong>30</strong>-00-845-6678 B-2 6<br />
96906 MS27144-1 5935-00-167-7775 B-49 53<br />
96906 MS27183-10 5310-00-809-4058 B-10 11<br />
B-18 20<br />
B-38 10<br />
96906 MS27183-11 5310-00-809-<strong>30</strong>78 B-32 39<br />
96906 MS27183-12 5310-00-081-4219 B-10 28<br />
B-18 33<br />
96906 MS27183-14 5310-00-080-6004 B-10 15<br />
B-18 17<br />
B-22 4<br />
96906 MS27183-18 5310-00-809-5998 B-28 11<br />
96906 MS27183-19 5310-00-809-<strong>30</strong>79 B-51 3<br />
96906 MS27183-22 5310-00-951-7<strong>209</strong> B-51 10<br />
96906 MS27183-6 5310-00-082-1404 B-54 7<br />
96906 MS27183-7 5310-00-809-8544 B-10 1<br />
B-27 7<br />
96906 MS27183-8 5310-00-809-8546 B-<strong>30</strong> 27<br />
96906 MS28775-217 53<strong>30</strong>-00-579-7914 B-50 10<br />
96906 MS28778-5 53<strong>30</strong>-00-833-7491 B-43 11<br />
96906 MS3105-16 5935-00-843-4117 B-<strong>30</strong> 35<br />
I-28
SECTION IV<br />
TM3-42<strong>30</strong>-<strong>209</strong>-<strong>30</strong>&P<br />
NATIONAL STOCK NUMBER AND PART NUMBER INDEX<br />
PART NUMBER INDEX<br />
FSCM PART NUMBER STOCK NUMBER FIG. ITEM<br />
96906 MS3106R18-1P 5935-00-834-4904 B-<strong>30</strong> 62<br />
96906 MS3108B16-12S 5935-00-276-9413 B-48 1<br />
96906 MS3367-1-0 5975-00-984-6582 B-<strong>30</strong> 29<br />
96906 MS3367-1-9 5975-00-074-2072 B-38 46<br />
96906 MS35059-23 59<strong>30</strong>-00-655-1582 B-43 29<br />
96906 MS35190-290 5<strong>30</strong>5-00-954-3937 B-10 12<br />
B-18 24<br />
96906 MS35206-228 5<strong>30</strong>5-00-984-4988 B-<strong>30</strong> 56<br />
96906 MS35206-228 5<strong>30</strong>5-00-984-4988 B-56 5<br />
96906 MS35206-241 5<strong>30</strong>5-00-984-6189 B-54 8<br />
96906 MS35206-242 5<strong>30</strong>5-00-889-<strong>30</strong>02 B-61 26<br />
96906 MS35206-243 5<strong>30</strong>5-00-984-6191 B-51 26<br />
B-54 13<br />
B-55 2<br />
96906 MS35206-245 5<strong>30</strong>5-00-984-6193 B-10 57<br />
96906 MS35206-264 5<strong>30</strong>5-00-984-6211 B-54 1<br />
96906 MS35206-276 5<strong>30</strong>5-00-988-1720 B-63 4<br />
96906 MS35206-277 5<strong>30</strong>5-00-988-1721 B-38 7<br />
96906 MS35206-279 5<strong>30</strong>5-00-988-1723 B-38 6<br />
96906 MS35206-280 5<strong>30</strong>5-00-988-1724 B-38 22<br />
96906 MS35206-285 5<strong>30</strong>5-00-988-1171 B-32 41<br />
96906 MS35207-261 5<strong>30</strong>5-00-990-6444 B-8 2<br />
B-38 2<br />
B-43 6<br />
B-51 21<br />
96906 MS35207-263 5<strong>30</strong>5-00-989-7434 B-21 9<br />
96906 MS35207-267 5<strong>30</strong>5-00-993-1851 B-<strong>30</strong> 53<br />
96906 MS35207-270 5<strong>30</strong>5-00-995-3440 B-<strong>30</strong> 47<br />
96906 MS35207-272 5<strong>30</strong>5-00-958-0585 B-<strong>30</strong> 32<br />
96906 MS35214-42 5<strong>30</strong>5-00-637-1123 B-55 6<br />
96906 MS35<strong>30</strong>7-358 5<strong>30</strong>5-00-632-2777 B-32 42<br />
96906 MS35<strong>30</strong>7-360 5<strong>30</strong>5-00-576-5417 B-24 1<br />
96906 MS35333-35B 5310-01-213-4845 B-50 7<br />
I-29
SECTION IV<br />
TM3-42<strong>30</strong>-<strong>209</strong>-<strong>30</strong>&P<br />
NATIONAL STOCK NUMBER AND PART NUMBER INDEX<br />
PART NUMBER INDEX<br />
FSCM PART NUMBER STOCK NUMBER FIG. ITEM<br />
96906 MS35333-37 5310-00-579-0079 B-<strong>30</strong> 57<br />
96906 MS35333-38 5310-00-559-0070 B-51 25<br />
B-54 9<br />
96906 MS35333-39 5310-00-576-5752 B-8 7<br />
B-38 14<br />
B-43 14<br />
B-51 19<br />
B-54 2<br />
96906 MS35333-40 5310-00-550-11<strong>30</strong> B-38 23<br />
B-51 34<br />
B-61 2<br />
B-63 3<br />
96906 MS35333-41 5310-00-167-0721 B-38 67<br />
B-61 17<br />
96906 MS35333-42 5310-00-595-7237 B-38 64<br />
B-51 37<br />
96906 MS35333-43 5310-00-685-3228 B-22 2<br />
96906 MS35333-44 5310-00-194-1483 B-22 11<br />
96906 MS35333-72 5310-00-543-2739 B-61 28<br />
96906 MS35338-138 5310-00-933-8120 B-10 23<br />
B-15 3<br />
96906 MS35338-141 5310-00-984-7042 B-24 2<br />
B-32 34<br />
96906 MS35338-41 5310-00-045-4007 B-<strong>30</strong> 25<br />
B-54 6<br />
96906 MS35338-42 5310-00-045-3299 B-54 12<br />
96906 MS35338-44 5310-00-582-5965 B-32 21<br />
96906 MS35338-45 5310-00-407-9566 B-10 43<br />
B-22 48<br />
B-32 38<br />
96906 MS35338-46 5310-00-637-9541 B-18 36<br />
B-22 46<br />
B-27 2<br />
I-<strong>30</strong>
SECTION IV<br />
TM3-42<strong>30</strong>-<strong>209</strong>-<strong>30</strong>&P<br />
NATIONAL STOCK NUMBER AND PART NUMBER INDEX<br />
PART NUMBER INDEX<br />
FSCM PART NUMBER STOCK NUMBER FIG. ITEM<br />
B-28 5<br />
B-28 14<br />
B-<strong>30</strong> 40<br />
96906 MS35489-11 5325-00-291-9366 B-38 43<br />
B-43 32<br />
96906 MS35489-14 5325-00-276-6100 B-61 15<br />
96906 MS35489-25 5325-00-515-9685 B-38 38<br />
96906 MS35489-3 5325-00-276-6101 B-38 50<br />
96906 MS35489-46 5325-00-185-0001 B-38 62<br />
96906 MS35489-7 5325-00-174-5315 B-43 22<br />
B-61 14<br />
96906 MS35645-1 2910-00-141-9758 B-15 1<br />
96906 MS35649-284 5310-00-934-9759 B-61 29<br />
96906 MS35649-83 5310-00-275-9310 B-51 24<br />
96906 MS35650-<strong>30</strong>2 5310-00-934-9751 B-8 8<br />
B-27 10<br />
B-38 27<br />
B-43 15<br />
B-51 18<br />
96906 MS35691-21 5310-00-975-2075 B-<strong>30</strong> 39<br />
96906 MS35691-61 5310-00-842-1190 B-43 16<br />
96906 MS35751-16 5<strong>30</strong>6-00-845-7961 B-37 5<br />
96906 MS35756-15 5315-00-616-55<strong>30</strong> B-24 15<br />
96906 MS35756-9 5315-00-616-5525 B-24 13<br />
96906 MS35782-4 4820-00-752-9040 B-50 5<br />
96906 MS35916-2 6680-00-825-2076 B-<strong>30</strong> 33<br />
96906 MS39157-3 47<strong>30</strong>-00-277-6988 B-38 58<br />
96906 MS39158-3 47<strong>30</strong>-00-900-3296 B-51 16<br />
B-61 8<br />
96906 MS39162-3 47<strong>30</strong>-00-254-6211 B-43 24<br />
B-51 9<br />
96906 MS39162-5 47<strong>30</strong>-00-902-8991 B-51 14<br />
96906 MS39163-3 47<strong>30</strong>-00-902-8989 B-51 4<br />
I-31
SECTION IV<br />
TM3-42<strong>30</strong>-<strong>209</strong>-<strong>30</strong>&P<br />
NATIONAL STOCK NUMBER AND PART NUMBER INDEX<br />
PART NUMBER INDEX<br />
FSCM PART NUMBER STOCK NUMBER FIG. ITEM<br />
96906 MS39164-3 47<strong>30</strong>-00-570-2929 B-43 10<br />
B-51 7<br />
96906 MS39166-3 47<strong>30</strong>-00-011-6452 B-44 1<br />
B-45 1<br />
B-46 1<br />
B-47 1<br />
B-58 1<br />
B-59 1<br />
B-60 1<br />
B-64 1<br />
B-65 1<br />
96906 MS39166-5 47<strong>30</strong>-00-902-8990 B-57 1<br />
96906 MS392<strong>30</strong>-10 47<strong>30</strong>-00-253-4420 B-32 31<br />
96906 MS392<strong>30</strong>-6 47<strong>30</strong>-00-254-2744 B-61 35<br />
96906 MS51851-65 5<strong>30</strong>5-00-191-3641 B-3 2<br />
B-10 2<br />
B-18 12<br />
96906 MS51922-1 5310-00-088-1251 B-10 4<br />
B-18 21<br />
96906 MS51922-17 5310-00-087-4652 B-10 14<br />
B-18 14<br />
B-20 1<br />
96906 MS51922-33 5310-00-225-6993 B-28 12<br />
96906 MS51922-9 5310-00-984-3806 B-10 27<br />
B-18 37<br />
96906 MS51937-5 5<strong>30</strong>6-00-050-0347 B-9 3<br />
96906 MS51952-1 47<strong>30</strong>-00-053-0266 B-50 11<br />
96906 MS51953-121 47<strong>30</strong>-00-196-1469 B-2 11<br />
96906 MS51953-125 47<strong>30</strong>-00-196-1501 B-2 9<br />
96906 MS51953-199 47<strong>30</strong>-00-196-1572 B-23 3<br />
96906 MS51953-80B 47<strong>30</strong>-00-188-1880 B-61 6<br />
96906 MS51958-63 5<strong>30</strong>5-00-059-3859 B-10 24<br />
B-13 2<br />
I-32
SECTION IV<br />
TM3-42<strong>30</strong>-<strong>209</strong>-<strong>30</strong>&P<br />
NATIONAL STOCK NUMBER AND PART NUMBER INDEX<br />
PART NUMBER INDEX<br />
FSCM PART NUMBER STOCK NUMBER FIG. ITEM<br />
B-15 2<br />
96906 MS51960-65 5<strong>30</strong>5-00-071-1322 B-38 29<br />
96906 MS51964-49 5<strong>30</strong>5-00-724-6798 B-27 12<br />
96906 MS51965-52 5<strong>30</strong>5-00-724-6736 B-25 12<br />
96906 MS51965-66 5<strong>30</strong>5-00-724-6748 B-25 13<br />
96906 MS51967-11 5310-00-880-8189 B-22 14<br />
B-25 6<br />
96906 MS51967-2 5310-00-761-6882 B-32 20<br />
B-37 10<br />
B-38 11<br />
B-61 12<br />
96906 MS51967-20 5310-00-763-8920 B-10 34<br />
96906 MS51967-5 5310-00-880-7744 B-<strong>30</strong> 24<br />
B-32 37<br />
B-37 4<br />
B-38 66<br />
96906 MS51967-8 5310-00-732-0558 B-22 7<br />
B-27 13<br />
96906 MS51968-11 5310-00-880-7745 B-25 2<br />
B-26 3<br />
B-36 4<br />
96906 MS51971-3 5310-00-913-8881 B-32 33<br />
96906 MS70087-1 40<strong>30</strong>-00-360-0<strong>30</strong>4 B-9 1<br />
B-32 2<br />
B-38 13<br />
96906 MS75004-1 5940-00-549-6581 B-17 1<br />
96906 MS75004-2 5940-00-549-6583 B-16 1<br />
96906 MS75047-1 6140-00-059-3528 B-10 41<br />
96906 MS87006-3 40<strong>30</strong>-00-270-5436 B-18 7<br />
I-33
SECTION IV<br />
TM3-42<strong>30</strong>-<strong>209</strong>-<strong>30</strong>&P<br />
NATIONAL STOCK NUMBER AND PART NUMBER INDEX<br />
PART NUMBER INDEX<br />
FSCM PART NUMBER STOCK NUMBER FIG. ITEM<br />
96906 MS90723-14 5310-00-901-0585 B-38 48<br />
96906 MS90725-1 5<strong>30</strong>5-00-068-0498 B-10 54<br />
96906 MS90725-109 5<strong>30</strong>5-00-044-4153 B-22 12<br />
96906 MS90725-117 5<strong>30</strong>5-00-716-8128 B-22 17<br />
96906 MS90725-14 5<strong>30</strong>5-00-071-2237 B-22 39<br />
96906 MS90725-31 5<strong>30</strong>6-00-225-8496 B-61 18<br />
96906 MS90725-32 5<strong>30</strong>6-00-225-8497 B-10 42<br />
B-<strong>30</strong> 34<br />
96906 MS90725-33 5<strong>30</strong>6-00-225-8498 B-18 32<br />
B-38 68<br />
96906 MS90725-34 5<strong>30</strong>6-00-225-8499 B-32 36<br />
96906 MS90725-43 5<strong>30</strong>5-00-225-8507 B-37 12<br />
96906 MS90725-5 5<strong>30</strong>5-00-068-0501 B-61 1<br />
96906 MS90725-6 5<strong>30</strong>5-00-068-0502 B-51 33<br />
96906 MS90725-62 5<strong>30</strong>5-00-269-3213 B-22 43<br />
96906 MS90725-65 5<strong>30</strong>5-00-269-3215 B-28 4<br />
96906 MS90725-69 5<strong>30</strong>5-00-269-3219 B-22 38<br />
96906 MS90727-90 5<strong>30</strong>5-00-709-8540 B-25 5<br />
B-26 1<br />
B-36 2<br />
96906 MS90727-93 5<strong>30</strong>5-00-709-8531 B-25 16<br />
96906 MS90728-114 5<strong>30</strong>5-00-071-2070 B-28 15<br />
96906 MS90728-87 5<strong>30</strong>5-00-071-1788 B-22 5<br />
96906 MS90728-90 5<strong>30</strong>5-00-071-2056 B-22 1<br />
96906 MS90908-1 2910-00-752-9138 B-15 8<br />
96906 MS9358-14 5310-00-103-2893 B-24 5<br />
96906 M13486/1-11 BULK 1<br />
99806 M200SERIES1X1-8 93<strong>30</strong>-00-912-2707 BULK 13<br />
81361 M3-B/R1-A B-31 42<br />
81361 M4-A/TB1-A B-31 51<br />
81349 M5086/1-16-6 6145-00-946-1361 BULK 18<br />
81349 M7928/5-3 5940-01-079-1647 B-49 64<br />
81349 M85049/41-8A 5935-01-168-0800 B-48 2<br />
I-34
SECTION IV<br />
TM3-42<strong>30</strong>-<strong>209</strong>-<strong>30</strong>&P<br />
NATIONAL STOCK NUMBER AND PART NUMBER INDEX<br />
PART NUMBER INDEX<br />
FSCM PART NUMBER STOCK NUMBER FIG. ITEM<br />
80205 NAS3106-28-28 B-32 29<br />
80205 NAS561C6-13 5315-00-058-5088 B-51 29<br />
B-56 3<br />
80205 NAS56106-13 5315-00-058-5088 B-53 2<br />
82240 NO 3 5340-00-680-4375 B-3 13<br />
81361 NPNGASKETTYPEIII B-50 9<br />
81361 NPNWIRE B-10 21<br />
76761 N1026-1 B-29 2<br />
45255 PF336F 5640-00-905-3631 BULK 9<br />
13445 PL16GREEN 6210-00-901-9<strong>30</strong>1 B-<strong>30</strong> 67<br />
82796 PX24<strong>30</strong>A 2920-00-708-0640 B-54 16<br />
82796 P2474 2920-00-358-74<strong>30</strong> B-54 15<br />
77414 P3 47<strong>30</strong>-00-278-2507 B-50 14<br />
96195 P4008 B-28 7<br />
B-28 16<br />
77414 P8S-2 47<strong>30</strong>-00-8<strong>30</strong>-2615 B-12 4<br />
B-14 4<br />
B-19 5<br />
77414 P8S-2 47<strong>30</strong>-00-8<strong>30</strong>-2615 B-35 4<br />
91637 RH50-<strong>30</strong>-1PCT 5905-00-777-0577 B-29 1<br />
81348 RRC271 4010-00-781-3129 BULK 4<br />
81361 R1-B/GND B-31 45<br />
50599 R22002CC4-<strong>30</strong> 4720-00-902-4378 B-10 55<br />
50599 R22002CC4-9 4720-00-924-4203 B-10 56<br />
71286 R4G 5365-00-598-1474 B-5 6<br />
B-6 6<br />
B-7 6<br />
B-8 9<br />
B-42 3<br />
35311 SD5179 47<strong>30</strong>-00-246-5495 B-2 2<br />
52676 SKF6205 3110-00-144-8518 B-24 12<br />
82796 SKF6<strong>30</strong>5 3110-00-144-8519 B-24 19<br />
82796 SK112 2920-00-229-5235 B-54<br />
I-35
SECTION IV<br />
TM3-42<strong>30</strong>-<strong>209</strong>-<strong>30</strong>&P<br />
NATIONAL STOCK NUMBER AND PART NUMBER INDEX<br />
PART NUMBER INDEX<br />
FSCM PART NUMBER STOCK NUMBER FIG. ITEM<br />
81361 S1-A/S6-A B-31 36<br />
81361 S1/S4-1 B-49 34<br />
81361 S4-B/S1-A B-31 33<br />
81361 S4-1/S4-5 B-49 28<br />
81361 S4-2/S2 B-49 24<br />
04741 S5281 4710-00-335-2610 BULK 15<br />
81361 S6-B/M3-A B-31 39<br />
52659 S7756-1 42<strong>30</strong>-00-857-9317 B-11 2<br />
52659 S7770 5365-00-402-4349 B-11 3<br />
81361 TB1-A/S1-A B-31 2<br />
81361 TB1-AC1/DS1-A B-31 20<br />
81361 TB1-AC2/DS1-B B-31 23<br />
81361 TB1-A1/CB1-B B-31 48<br />
81361 TB1-B/S2-A B-31 5<br />
81361 TB1-C/S1-C B-31 8<br />
81361 TB1-E/M1-A B-31 11<br />
81361 TB1-F/S1-B B-31 14<br />
81361 TB1-H/M1-B B-31 17<br />
90598 TCA463 4520-00-675-6518 B-38 <strong>30</strong><br />
81361 TD1-2/S4-3 B-49 6<br />
81361 TD2-3/G B-49 3<br />
81361 TD2-5/S3 B-49 13<br />
90598 TM3946 4520-00-900-7998 B-51 28<br />
B-53 1<br />
B-56 2<br />
90598 TRF3107 B-61 19<br />
90598 TR3336 45<strong>30</strong>-00-909-5908 B-62 1<br />
78357 VHC6F 47<strong>30</strong>-00-640-5752 B-50 16<br />
78357 VHNGF 47<strong>30</strong>-00-684-4022 B-51 2<br />
81978 V5D24360 4810-00-902-8452 B-51 35<br />
81348 WWH171 B-32 23<br />
81346 WWP471 47<strong>30</strong>-00-196-0916 B-37 2<br />
81348 WWP471PLUG2-11-1 B-24 22<br />
-2NPT<br />
I-36
SECTION IV<br />
TM3-42<strong>30</strong>-<strong>209</strong>-<strong>30</strong>&P<br />
NATIONAL STOCK NUMBER AND PART NUMBER INDEX<br />
PART NUMBER INDEX<br />
FSCM PART NUMBER STOCK NUMBER FIG. ITEM<br />
82796 W2437 B-54 4<br />
14351 X5062 47<strong>30</strong>-00-193-7078 B-23 9<br />
77414 0-16S 47<strong>30</strong>-00-965-6520 B-34 3<br />
74193 006-10211 5975-00-477-4150 B-<strong>30</strong> 55<br />
<strong>30</strong>780 1-2X1-4PTRSS 47<strong>30</strong>-00-893-9547 B-23 20<br />
26759 101240 47<strong>30</strong>-00-287-1603 B-22 28<br />
B-<strong>30</strong> 45<br />
19243 11/4 GRADE R-2 4820-01-203-5627 B-26 4<br />
70563 12C120 5945-00-900-6282 B-43 26<br />
70563 12N02 5945-00-729-1106 B-43 27<br />
24161 124WW 4720-00-961-3522 BULK 7<br />
97403 13206E1000MARK3 2805-00-872-5972 B-22 40<br />
97403 13213E3283 53<strong>30</strong>-00-921-6224 B-22 33<br />
82796 153968 B-54 10<br />
66640 166D1 47<strong>30</strong>-00-277-9386 B-43 9<br />
B-61 9<br />
27742 1701-3192-700 5340-00-094-6089 B-18 15<br />
19243 2 IN GRADE R-2 4820-01-204-0513 B-25 3<br />
B-36 3<br />
01276 2000-8-8B 47<strong>30</strong>-00-278-4603 B-22 32<br />
38455 21033 B-37 8<br />
38455 21109 B-37 6<br />
71286 244-22 5325-00-290-8021 B-21 8<br />
38455 24454 2520-00-560-4871 B-24 10<br />
<strong>30</strong>003 2519481-2 47<strong>30</strong>-00-239-0215 B-23 15<br />
95138 3M3 47<strong>30</strong>-00-995-3527 B-50 15<br />
24161 3VX280 <strong>30</strong><strong>30</strong>-00-840-9344 B-22 23<br />
20796 3V315-4 <strong>30</strong><strong>30</strong>-00-880-2020 B-22 22<br />
34646 <strong>30</strong>3L5 3-4 IN 316 47<strong>30</strong>-00-947-7096 B-10 37<br />
CRES<br />
38455 31046 B-37 11<br />
38455 31049 4820-00-9<strong>30</strong>-1982 B-37 7<br />
13800 31<strong>30</strong>0 53<strong>30</strong>-00-352-5542 B-52 2<br />
I-37
SECTION IV<br />
TM3-42<strong>30</strong>-<strong>209</strong>-<strong>30</strong>&P<br />
NATIONAL STOCK NUMBER AND PART NUMBER INDEX<br />
PART NUMBER INDEX<br />
FSCM PART NUMBER STOCK NUMBER FIG. ITEM<br />
13800 32104 53<strong>30</strong>-00-285-3825 B-52 4<br />
79470 3325X4X2 47<strong>30</strong>-00-640-63<strong>30</strong> B-15 7<br />
79470 3328X2 B-22 27<br />
79470 3400X2 47<strong>30</strong>-00-639-97<strong>30</strong> B-22 26<br />
B-<strong>30</strong> 43<br />
24161 3658-0601 4720-01-124-3740 BULK 8<br />
56878 40S5-8 5325-00-799-1019 B-5 4<br />
B-6 4<br />
B-7 4<br />
B-8 11<br />
B-40 1<br />
B-41 1<br />
B-42 1<br />
839<strong>30</strong> 400WSS10 5340-00-074-2116 B-38 37<br />
B-51 20<br />
71286 4002N 5325-00-282-2045 B-5 5<br />
B-6 5<br />
B-7 5<br />
B-8 10<br />
B-40 2<br />
71286 4002N 5325-00-282-2045 B-41 2<br />
B-42 2<br />
24161 421B-1INCHID 4720-00-595-4103 BULK 6<br />
00779 42599-2 5940-00-948-9686 B-<strong>30</strong> 61<br />
B-31 27<br />
B-49 22<br />
B-49 26<br />
94222 44-99-116-12 5340-00-078-9652 B-21 10<br />
79470 46X4X4 47<strong>30</strong>-00-248-9340 B-43 7<br />
39428 4821K15 47<strong>30</strong>-00-947-7096 B-22 21<br />
39428 4825K19 47<strong>30</strong>-01-167-2781 B-23 18<br />
81361 5-45-3277 47<strong>30</strong>-01-071-8229 B-32 27<br />
27742 5012-3217-102-2 B-10 29<br />
I-38
SECTION IV<br />
TM3-42<strong>30</strong>-<strong>209</strong>-<strong>30</strong>&P<br />
NATIONAL STOCK NUMBER AND PART NUMBER INDEX<br />
PART NUMBER INDEX<br />
FSCM PART NUMBER STOCK NUMBER FIG. ITEM<br />
82666 575GALVI3-1/2 47<strong>30</strong>-01-091-3585 B-2 12<br />
92878 58671 5355-00-854-9098 B-13 1<br />
79500 61H506-1 5310-00-<strong>209</strong>-0296 B-24 7<br />
19207 6184184 2590-00-618-4184 B-<strong>30</strong> 31<br />
70040 6432691 6680-00-221-1037 B-<strong>30</strong> 48<br />
70040 6474533 6625-00-066-1278 B-<strong>30</strong> <strong>30</strong><br />
73168 67100-0-200 59<strong>30</strong>-00-903-1909 B-38 52<br />
24161 7207-318 47<strong>30</strong>-00-900-6279 B-50 2<br />
24161 7236-0404-5 47<strong>30</strong>-00-374-6949 B-50 3<br />
18876 7613189 5365-00-598-1474 B-40 3<br />
B-41 3<br />
11583 806X2 2920-00-580-3435 B-61 24<br />
18876 8489705 47<strong>30</strong>-00-720-4914 B-23 24<br />
I-39
C-0 TM 3-42<strong>30</strong>-<strong>209</strong>-<strong>30</strong>&P<br />
APPENDIX C<br />
EXPENDABLE/DURABLE SUPPLIES AND MATERIALS LIST<br />
Section 1. INTRODUCTION<br />
C-1. SCOPE. This appendix lists expendable supplies and materials you will<br />
c. Column (3) - National Stock Number. This is the National stock number<br />
need to operate and maintain the decontaminating apparatus. This listing is for assigned to the item; use it to request or requisition the item.<br />
informational purposes only and is not authority to requisition the listed items.<br />
d. Column (4) - Description. Indicates the Federal item name and, if<br />
These items are authorized to you by CTA 50-970, Expendable/Durable Items required, a description to identify the item. The last line for each item indicates<br />
(Except Medical, Class V, Repair Parts, and Heraldic Items), or CTA 8-100,<br />
the Federal Supply Code for Manufacturer (FSCM) in parentheses followed by<br />
Army Medical Depar<strong>tm</strong>ent Expendable/Durable Items.<br />
the part number.<br />
e. Column (5) - Unit of Measure (U/M). Indicates the measure used in<br />
C-2. EXPLANATION OF COLUMNS<br />
performing the actual maintenance function, This measure is expressed by a<br />
a. Column (1) - Item Number. This number is assigned to the entry in the two-character alphabetical abbreviation (e.g., ea, in. pr). If the unit of measure<br />
listing and is referenced in the narrative instructions to identify the material<br />
differs from the unit of issue, requisition the lowest unit of issue that will satisfy<br />
(e.g., “Use dry cleaning solvent, item 14, app. C“).<br />
your requirements.<br />
b. Column (2) - Level. This column identifies the lowest <strong>level</strong> of maintenance<br />
that requires the listed item.<br />
C - Operator/Crew Maintenance<br />
0- Unit Maintenance<br />
F - Intermediate Direct Support Maintenance<br />
Section Il. EXPENDABLE/DURABLE SUPPLIES AND MATERIALS LIST<br />
(1)<br />
ITEM<br />
NUMBER<br />
(2)<br />
LEVEL<br />
(3)<br />
NATIONAL<br />
STOCK<br />
NUMBER<br />
(4)<br />
DESCRIPTION<br />
(5)<br />
U/M<br />
1<br />
o<br />
8040-00-165-8614<br />
ADHESIVE liquid form<br />
(04963) EC1<strong>30</strong>0L<br />
1 qt can<br />
QT<br />
2<br />
c<br />
6850-00-950-6489<br />
ANTIFOAM COMPOUND, SILICONE<br />
(71984) ANTIFOAM B<br />
5 gal can<br />
GL
3 C 6850-00-656-0926 ANTISETTING COMPOUND LB<br />
DECONTAMINATING SLURRY<br />
(81349)MILA51027<br />
12-1/2 LB CAN<br />
4 O BATTERY WATER<br />
(81348)O-B-41<br />
6810-00-286-3783 1 GAL GL<br />
6810-00-297-9540 5 GAL BOTTLE GL<br />
5 C 7920-00-255-7536 BRUSH,CHASSIS AND RUNNING GEAR EA<br />
(81348)H-B-181<br />
6 C 8020-00-205-6511 BRUSH,PAINT,1 IN. EA<br />
(81348)H-B-491<br />
7 C 7920-00-291-5815 BRUSH,WIRE,SCRATCH,TYPE 2,CLASS 1 EA<br />
(81348)H-B-178<br />
8 C 6810-00-255-0472 CALCIUM HYPOCHLORITE,TECHNICAL LB<br />
(81348)O-C-114<br />
100 LB DRUM<br />
9 O CLOTH,ABRASIVE<br />
(81348)P-C-451<br />
5350-00-192-5047 50 PER PG EA<br />
5350-00-192-5049 500 PER PG EA<br />
5350-00-192-5050 50 PER PG EA<br />
5350-00-192-5051 50 PER PG EA<br />
10 O 80<strong>30</strong>-00-281-2726 COATING COMPOUND,METALLIC KT<br />
(81349)DOD-P-15328<br />
1 GAL<br />
C-1
TM3-42<strong>30</strong>-<strong>209</strong>-<strong>30</strong>&P<br />
(1) (2) (3) (4) (5)<br />
National<br />
Item<br />
Stock<br />
Number Level Number Description U/M<br />
11 C 6850-00-297-6653 DECONTAMINATING AGENT STB LB<br />
(81349)MIL-D-12468<br />
50 LB DRUM<br />
12 C 79<strong>30</strong>-00-985-6911 DETERGENT,GENERAL PURPOSE LIQUID FORM GL<br />
(77902)TRITONX100<br />
5 GAL CAN<br />
13 C 9140-00-286-5294 DIESEL FUEL GRADE DF-2 GL<br />
(81348)VUF800GRADEDF2RE<br />
14 C 6850-00-274-5421 DRY CLEANING SOLVENT LIQUID FORM GL<br />
(81348)P-D-680<br />
5 GAL CAN<br />
15 O 8010-00-889-7345 ENAMEL,RED QT<br />
(80244)TT-E-489<br />
16 C 8010-00-286-7758 ENAMEL YELLOW NO. 13538 QT<br />
(80244)TT-E-489G<br />
1 QT CAN<br />
17 O 8010-01-193-0520 EPOXY,PRIMER COATING KT<br />
(81349)MIL-P-5<strong>30</strong><strong>30</strong><br />
1 GAL KIT<br />
18 C 4210-00-223-9877 FOAM LIQUID,FIRE EXTINGUISHING GL<br />
(87119)FORMULATIONM5718<br />
5 GAL CAN<br />
19 C 9140-00-247-4365 FUEL OIL, BURNER GRADE NO. 2 GL<br />
(81348)VVF815<br />
C-2
TM3-42<strong>30</strong>-<strong>209</strong>-<strong>30</strong>&P<br />
20 C 91<strong>30</strong>-00-148-7103 GASOLINE,AUTOMOTIVE GRADE GL<br />
REGULAR MOGAS UNLEADED<br />
(81348)VVG001690/A<br />
21 O 8415-00-823-7457 GLOVES,CHEMICAL AND OIL PROTECTIVE PR<br />
(81348)ZZ-G-381<br />
22 C 9150-00-190-0905 GREASE,AUTOMOTIVE AND ARTILLERY LB<br />
(96<strong>30</strong>6)BRAYCOTE 610<br />
6.5 LB CAN<br />
23 C 9140-00-242-6748 KEROSENE GL<br />
(81348)VVK211<br />
24 C 9150-00-231-2361 LUBRICATING OIL,GENERAL PURPOSE, PL-M QT<br />
(19203)814370<br />
1 QT CAN<br />
25 C 9150-00-186-6681 LUBRICATING OIL:<strong>30</strong> WT QT<br />
(81349)MIL-L-2104<br />
26 C 9150-00-231-6689 LUBRICATING OIL,GENERAL PURPOSE,PL-S QT<br />
(19204)14-0-2834-10<br />
1 QT CAN<br />
27 F METAL BAR STEEL<br />
(81348)QQS637<br />
9150-00-596-2325 .750 IN. DIA 10 TO 12 FT LG FT<br />
9150-00-554-2382 1 IN. DIA 10 TO 12 FT LG FT<br />
C-3
TM3-42<strong>30</strong>-<strong>209</strong>-<strong>30</strong>&P<br />
(1) (2) (3) (4) (5)<br />
National<br />
Item<br />
Stock<br />
Number Level Number Description U/M<br />
28 O 8010-01-141-2419 POLYURETHANE COATING(BLACK) KT<br />
(81349)MIL-C-46168B<br />
1 QT KIT<br />
29 C 8010-01-160-6741 POLYURTETHANE COATING(GREEN 383) KT<br />
(81349)MIL-C-46168B<br />
1 QT KIT<br />
<strong>30</strong> O 8010-00-082-1714 "PRIMER,COATING" KT<br />
(81349)MIL-P-52192<br />
31 C 7920-00-205-1711 "RAG, WIPING: COTTON" LB<br />
(58536) AA-A-531<br />
50 LB BE<br />
32 O 80<strong>30</strong>-00-999-6313 SEALING COMPOUND OZ<br />
(06589) 19749<br />
1.5 OZ TUBE<br />
33 F 6850-00-880-7616 SILICONE COMPOUND OZ<br />
(81349)9005-0201-000<br />
8 OZ TUBE<br />
34 C 6810-00-264-6618 "SODIUM BICARBONATE,TECHNICAL" LB<br />
POWDER FORM<br />
(81348)O-S-576<br />
1 LB BOX<br />
35 C 6810-00-233-1715 "SODIUM CARBONATE,ANHYDROUS TECHNICAL" LB<br />
(58536)A-A-41<br />
100 LB BAG<br />
C-4
TM3-42<strong>30</strong>-<strong>209</strong>-<strong>30</strong>&P<br />
36 C 6810-00-174-6581 SODIUM HYDROXIDE,TECHNICAL LB<br />
FLAKE FORM<br />
(70829)1<strong>30</strong>6<br />
100 LB DRUM<br />
37 F 6810-00-249-9354 SULFURIC ACID, ELECTROLYTE GL<br />
LIQUID FORM<br />
(19207) 10675529<br />
1 GAL BOTTLE<br />
38 O 80<strong>30</strong>-00-889-3535 TAPE, ANTISEIZING EA<br />
WHITE 1/2-IN.WD 260 IN. LG<br />
(81755) P5025-2R<br />
39 O TAPE,GREEN FT<br />
(20310) 3277<br />
40 C 5970-00-419-4290 TAPE, INSULATION, ELECTRICAL FT<br />
BLACK PLASTIC<br />
(<strong>209</strong>99) 7-1/2 BLACK<br />
108 FT ROLL<br />
41 C 7510-00-816-8077 TAPE, PRESSURE SENSITIVE<br />
(81348) L-T-80<br />
3 IN. WIDE, 60 YD ROLL<br />
42 C 91<strong>30</strong>-00-256-8613 TURBINE FUEL, AVIATION GL<br />
(81349) MILT5624<br />
GRADE JP-4<br />
43 C 91<strong>30</strong>-00-273-2379 TURBINE FUEL, AVIATION GL<br />
(81349) MILT5624<br />
GRADE JP-5<br />
C-5
D-O<br />
APPENDIX D<br />
ILLUSTRATED LIST OF MANUFACTURED ITEMS<br />
TM 3-42<strong>30</strong>-<strong>209</strong>-<strong>30</strong>&P<br />
D-1 . INTRODUCTION.<br />
a. This appendix includes complete instructions for making items authorized<br />
to be manufactured or fabricated at intermediate direct support <strong>level</strong>.<br />
b. A part number index cross-references the item to be fabricated with the<br />
figure number covering fabrication.<br />
c. All bulk materials needed to manufacture an item are listed in a table on<br />
the illustration.<br />
D-2. PART NUMBER INDEX.<br />
Part Number<br />
B5-45-2889-1<br />
B5-45-2889-3<br />
B5-45-<strong>30</strong>97-1<br />
B5-45-<strong>30</strong>97-10<br />
B5-45-<strong>30</strong>97-11<br />
B5-45-<strong>30</strong>97-12<br />
B5-45-<strong>30</strong>97-2<br />
B5-45-<strong>30</strong>97-2<br />
B5-45-<strong>30</strong>97-3<br />
B5-45-<strong>30</strong>97-4<br />
B5-45-<strong>30</strong>97-5<br />
B5-45-<strong>30</strong>97-6<br />
B5-45-<strong>30</strong>97-6<br />
B5-45-<strong>30</strong>97-7<br />
B5-59-295<br />
B5-59-296<br />
B5-59-345<br />
B5-59-346<br />
B5-59-347<br />
B5-59-349<br />
B5-59-350<br />
B5-59-393<br />
B5-59-394<br />
B5-59-412<br />
Item<br />
Gasket<br />
Gasket<br />
Gasket<br />
Gasket<br />
Gasket<br />
Gasket<br />
Gasket (with holes)<br />
Gasket (without holes)<br />
Gasket<br />
Gasket<br />
Gasket<br />
Gasket (with holes)<br />
Gasket (without holes)<br />
Gasket<br />
Gasket<br />
Gasket<br />
Fuel supply line<br />
Gage port line<br />
Purge and bypass return line<br />
Water pressure line<br />
Combustor return line<br />
Pump return line<br />
Nozzle valve line<br />
Insulation blanket<br />
Figure<br />
Number<br />
D-28<br />
D-32<br />
D-7<br />
D-22<br />
D-21<br />
D-25<br />
D-8<br />
D-23<br />
D-9<br />
D-10<br />
D-11<br />
D-12<br />
D-24<br />
D-14<br />
D-4<br />
D-28<br />
D-58<br />
D-60<br />
D-59<br />
D-31<br />
D-61<br />
D-57<br />
D-62<br />
D-35<br />
Part Number<br />
C5-45-2736-2<br />
C5-45-2736-8<br />
C5-45-2736-9<br />
C5-45-2975-2<br />
C5-45-3248-11<br />
C5-45-3248-12<br />
C5-45-3248-13<br />
C5-45-3248-14<br />
C5-45-3248-15<br />
C5-45-3248-16<br />
C5-45-3248-17<br />
C5-45-3248-18<br />
C5-45-3248-19<br />
C5-45-3248-20<br />
C5-45-3248-21<br />
C5-45-3248-22<br />
C5-45-3248-23<br />
C5-45-3248-24<br />
C5-45-3248-25<br />
C5-45-3248-26<br />
C5-45-3248-29<br />
C5-45-3266-1<br />
C5-59-218-1<br />
C5-59-218-10<br />
C5-59-219-11<br />
C5-59-218-12<br />
C5-59-218-13<br />
C5-59-218-14<br />
C5-59-218-15<br />
C5-59-219-16<br />
C5-59-218-17<br />
C5-59-218-18<br />
C5-59-218-19<br />
C5-59-218-2<br />
Hose<br />
Hose<br />
Hose<br />
Gasket<br />
Electrical lead<br />
Electrical lead<br />
Electrical lead<br />
Electrical lead<br />
Electrical lead<br />
Electrical lead<br />
Electrical lead<br />
Electrical lead<br />
Electrical lead<br />
Electrical lead<br />
Electrical lead<br />
Electrical lead<br />
Electrical lead<br />
Electrical lead<br />
Electrical lead<br />
Electrical lead<br />
Electrical lead<br />
Spacer<br />
Electrical lead<br />
Electrical lead<br />
Electrical lead<br />
Electrical lead<br />
Electrical lead<br />
Electrical lead<br />
Electrical lead<br />
Electrical lead<br />
Electrical lead<br />
Electrical lead<br />
Electrical lead<br />
Electrical lead<br />
Figure<br />
Number<br />
D-19<br />
D-27<br />
D-26<br />
D-6<br />
D-63<br />
D-64<br />
D-65<br />
D-66<br />
D-67<br />
D-68<br />
D-69<br />
D-70<br />
D-71<br />
D-72<br />
D-73<br />
D-74<br />
D-75<br />
D-76<br />
D-77<br />
D-78<br />
D-79<br />
D-1 3<br />
D-36<br />
D-45<br />
D-46<br />
D-47<br />
D-48<br />
D-49<br />
D-50<br />
D-51<br />
D-52<br />
D-53<br />
D-54<br />
D-37
Part Number<br />
Figure<br />
Item Number Part Number Item<br />
Figure<br />
C5-59-218-20<br />
C5-59-218-3<br />
C5-59-218-4<br />
C5-59-218-5<br />
C5-59-218-6<br />
C5-59-219-7<br />
C5-59-218-8<br />
C5-59-218-9<br />
C5-59-352<br />
C5-59-360-1<br />
C5-59-398<br />
Electrical lead<br />
Electrical lead<br />
Electrical lead<br />
Electrical lead<br />
Electrical lead<br />
Electrical lead<br />
Electrical lead<br />
Electrical lead<br />
Fuel pressure line<br />
Power cable<br />
Tube<br />
D-55<br />
D-38<br />
D-39<br />
D-40<br />
D-41<br />
D-42<br />
D-43<br />
D-44<br />
D-29<br />
D-34<br />
D-33<br />
C5-59-405<br />
D5-45-3250<br />
MILW5086-1-16-6<br />
NPN<br />
NPN<br />
NPN<br />
NPN<br />
NPNGASKETTYPEIII<br />
5-59-311-9<br />
594-0<br />
Selector return line<br />
Ground wire<br />
Transmitter wire<br />
Test gage line<br />
Air cylinder nut<br />
Wheel puller<br />
Steel strap<br />
Gasket<br />
Rubber hose<br />
Electrical wire<br />
D-<strong>30</strong><br />
D-16<br />
D-1 7<br />
D-1<br />
D-2<br />
D-3<br />
D-5<br />
D-1 5<br />
D-56<br />
D-18<br />
QTY<br />
DESCRIPTION<br />
PART NO.<br />
11 ADAPTER, STRAIGHT PIPE TO TUBE (1) (USE<br />
NSN 47<strong>30</strong>-00-248-9340)<br />
2 NUT, TUBE COUPLING (2) (USE<br />
NSN 4370-00-011-6452)<br />
11 TUBE, METALLIC (3) (USE NSN 4710-00-880-1091<br />
CUT APPROXIMATELY 2 FT LONG)<br />
11 GAGE, PRESSURE, DIAL INDICATING (4)<br />
(USE NSN 6685-01-015-6489)<br />
Figure D-1. Test gage line.<br />
D-1 TM 3-42<strong>30</strong>-<strong>209</strong>-<strong>30</strong>&P
D-2 TM 3-42<strong>30</strong>-<strong>209</strong>-<strong>30</strong>&P<br />
MATERIAL<br />
MATERIAL<br />
QTY DESCRIPTION PART NO.<br />
QTY<br />
DESCRIPTION<br />
PART NO.<br />
1 NUT, HEXAGON PLAIN (USE STANDARD 5/8 IN.<br />
NUT, NSN 5310-00-543-5635)<br />
2 PIN (MAKE FROM NONELECTRICAL WIRE 1/1 6 IN.<br />
DIA MAX. NSN 9505-00-294-7373)<br />
1. DRILL 2 HOLES 1/8 INCH DEEP.<br />
2. PRESS FIT THE PINS IN THE HOLES<br />
3. ALL DIMENSIONS ARE IN INCHES.<br />
1 METAL BAR (USE COLD ROLLED STEEL<br />
NSN 9510-00-596-2031)<br />
2 HEXAGON HEAD CAP SCREWS 1/4-20 UNC-2A,<br />
1 1/4 IN. LONG MS35<strong>30</strong>7-<strong>30</strong>9 (96906)<br />
(NSN 5<strong>30</strong>5-00-579-5238)<br />
1. ROUND ALL CORNERS AND EDGES.<br />
2. DRILL 2 HOLES 5/16 INCH DEEP.<br />
3. ALL DIMENSIONS ARE IN INCHES.<br />
Figure D-2. Air cylinder nut.<br />
Figure D-3. Wheel puller
WARNING<br />
MATERIAL<br />
WHEN HANDLING ASBESTOS MATERIAL, ALWAYS WEAR QTY DESCRIPTION PART No.<br />
AN AIR FILTERING RESPIRATOR, GLOVES, AND GOGGLES.<br />
WASH FACE AND HANDS WITH SOAP AND WATER BEFORE 1 STEEL STRAP (USE BULK ISSUE FLAT STRIP STEEL<br />
EATING OR SMOKING. ASBESTOS CAN CAUSE CANCER IF<br />
HOT OR COLD ROLLED STEEL 0.0359 INCH<br />
HANDLED WITHOUT PROTECTION.<br />
THICK - QQ-5-698)<br />
MATERIAL<br />
ALL DIMENSIONS ARE IN INCHES,<br />
QTY DESCRIPTION PART NO.<br />
1 GASKET B5-59-295<br />
1. USE BULK ISSUE ASBESTOS SHEETING FROM NSN 53<strong>30</strong>-00-527-9900.<br />
2. CUT LENGTH OF ASBESTOS SHEETING AS ILLUSTRATED.<br />
3. DRILL SIX HOLES AS ILLUSTRATED.<br />
4. ALL DIMENSIONS ARE IN INCHES.<br />
D-3<br />
Figure D-4. Gasket B5-59-295<br />
Figure D-5. Steel strap.<br />
TM 3-42<strong>30</strong>-<strong>209</strong>-<strong>30</strong>&P
D-4 TM 3-42<strong>30</strong>-<strong>209</strong>-<strong>30</strong>&P<br />
MATERIAL<br />
MATERIAL<br />
I QTY DESCRIPTION PART NO. QTY DESCRIPTION PART NO.<br />
1 RUBBER SHEET MIL-R-46089 (81 349) 1 PACKING MATERIAL M200 SERIES 1 X 1-8 (99806)<br />
I 1. CUT BULK ISSUE RUBBER SHEET TO DIMENSIONS SHOWN. 1. CUT BULK ISSUE PACKING MATERIAL 28.75 INCHES LONG<br />
2. ALL DIMENSIONS ARE IN INCHES. 2. PERFORATE HOLES, AS REQUIRED, DURING ASSEMBLY.<br />
3. ALL DIMENSIONS ARE IN INCHES.<br />
Figure D-6. Gasket C5-45-2975-2.<br />
Figure D-7. Gasket B5-45-<strong>30</strong>97-1.
I<br />
MATERIAL<br />
QTY DESCRIPTION PART NO.<br />
1 PACKING MATERIAL M200 SERIES 1 X 1-8 (99806)<br />
1. CUT BULK ISSUE PACKING MATERIAL 20.75 INCHES LONG<br />
2. PERFORATE HOLES, AS REQUIRED, DURING ASSEMBLY.<br />
3. ALL DIMENSIONS ARE IN INCHES.<br />
MATERIAL<br />
QTY DESCRIPTION PART NO<br />
1 PACKING MATERIAL M200 SERIES 1 X 1-8 (99806)<br />
1. CUT BULK ISSUE PACKING MATERIAL 28.25 INCHES LONG.<br />
2. PERFORATE HOLES, AS REQUIRED, DURING ASSEMBLY,<br />
3. ALL DIMENSIONS ARE IN INCHES,<br />
Figure D-8. Gasket B5-45-<strong>30</strong>97-2<br />
Figure D-9. Gasket B5-45-<strong>30</strong>97-3.<br />
D-5 TM 3-42<strong>30</strong>-<strong>209</strong>-<strong>30</strong>&P
D-6 TM2-42<strong>30</strong>-<strong>209</strong>-<strong>30</strong>&P<br />
MATERIAL<br />
MATERIAL<br />
QTY DESCRIPTION PART NO. QTY DESCRIPTION PART NO.<br />
1 PACKING MATERIAL M200 SERIES 1 X 1-8 (99806) 1 PACKING MATERIAL M200 SERIES 1 X 1-8 (99806)<br />
1. CUT BULK ISSUE PACKING MATERIAL 21.50 INCHES LONG. 1. CUT BULK ISSUE PACKING MATERIAL 23.25 INCHES LONG.<br />
2. PERFORATE HOLES, AS REQUIRED, DURING ASSEMBLY. 2. PERFORATE HOLES, AS REQUIRED, DURING ASSEMBLY.<br />
3. ALL DIMENSIONS ARE IN INCHES. 3. ALL DIMENSIONS ARE IN INCHES.<br />
Figure D-10. Gasket 65-45-<strong>30</strong>97-4.<br />
Figure D-11. Gasket B5-45-<strong>30</strong>97-5.
MATERIAL<br />
MATERIAL<br />
QTY DESCRIPTION PART NO. QTY DESCRIPTION PART No.<br />
1 PACKING MATERIAL M200 SERIES 1 X 1-8 (99806) 1 TUBE, METALLIC ASTM A 519-74 (81346)<br />
1. CUT BULK ISSUE PACKING MATERIAL <strong>30</strong> INCHES LONG. 1. CUT A 0.500 INCH LONG PIECE FROM BULK ISSUE TUBING.<br />
2. PERFORATE HOLES, AS REQUIRED, DURING ASSEMBLY. 2. FILE OFF ANY ROUGH EDGES.<br />
3. ALL DIMENSIONS ARE IN INCHES. 3. ALL DIMENSIONS ARE IN INCHES.<br />
Figure D-12. Gasket B5-45-<strong>30</strong>97-6.<br />
Figure D-13. Spacer C5-45-3266-1.<br />
D-7 TM 3-42<strong>30</strong>-<strong>209</strong>-<strong>30</strong>&P
D-8 TM 3-42<strong>30</strong>-<strong>209</strong>-<strong>30</strong>&P<br />
MATERIAL<br />
MATERIAL<br />
QTY DESCRIPTION PART NO. QTY DESCRIPTION PART NO.<br />
2 PACKING MATERIAL M200 SERIES 1 X 1-8 (99806) 1 GASKET MILG432 (81349)<br />
1. CUT BULK ISSUE PACKING MATERIAL 40.19 INCHES LONG. 1. CUT BULK GASKET MATERIAL AS ILLUSTRATED FROM<br />
2. FORM TO FIT INSIDE FUEL TANK STRAP C5-45-2995. NSN 53<strong>30</strong>-00-298-7165.<br />
3. ALL DIMENSIONS ARE IN INCHES. 2. ALL DIMENSIONS ARE IN INCHES.<br />
Figure D-14. Gasket B5-45-<strong>30</strong>97-7.<br />
Figure D-15. Gasket NPNGASKETTYPEIII.
MATERIAL<br />
QTY DESCRIPTION PART NO.<br />
1 WIRE, ELECTRICAL M5086/1-16-6 (81349)<br />
2 LUG, TERMINAL MS25036-108<br />
1. CUT BULK ISSUE ELECTRICAL WIRE 29.50 INCHES LONG.<br />
2. STRIP 0.375 INCH INSULATION FROM EACH END AND CRIMP<br />
TERMINAL LUG ON EACH END.<br />
3. ALL DIMENSIONS ARE IN INCHES.<br />
MATERIAL<br />
QTY DESCRIPTION PART NO<br />
1 WIRE, ELECTRICAL M5086/1-16-6 (81349)<br />
2 LUG, TERMINAL MS25036-108<br />
1. CUT BULK ELECTRICAL WIRE 13 INCHES LONG.<br />
2. STRIP 0.375 INCH INSULATION FROM EACH END AND CRIMP<br />
TERMINAL LUG ON EACH END.<br />
3. ALL DIMENSIONS ARE IN INCHES.<br />
Figure D-16. Ground D5-45-3250.<br />
Figure D-1 7. Transmitter wire MLW5086-1-16-6<br />
D-9 TM 3-42<strong>30</strong>-<strong>209</strong>-<strong>30</strong>&P
D-10 TM 3-42<strong>30</strong>-<strong>209</strong>-<strong>30</strong>&P<br />
MATERIAL<br />
QTY DESCRIPTION PART NO.<br />
1 WIRE, ELECTRICAL 594-0 (79550)<br />
1. CUT BULK ISSUE ELECTRICAL WIRE 45 INCHES LONG.<br />
2. STRIP 0.750 INCH OF INSULATION FROM EACH END.<br />
3. ALL DIMENSIONS ARE IN INCHES.<br />
MATERIAL<br />
QTY DESCRIPTION PART NO.<br />
1 HOSE ASSEMBLY 421B -1 INCH ID (24161)<br />
1. CUT BULK HOSE ASSEMBLY 50 FEET ± 2 INCHES LONG.<br />
2. DIMENSIONS ARE IN FEET AND INCHES.<br />
Figure D-18. Electrical wire 594-0.<br />
Figure D-19. Hose C5-45-2736-2.
MATERIAL<br />
WHEN HANDLING ASBESTOS MATERIAL, ALWAYS WEAR AN<br />
AIR FILTERING RESPIRATOR, GLOVES, AND GOGGLES. WASH<br />
FACE AND HANDS WITH SOAP AND WATER BEFORE EATING<br />
OR SMOKING. ASBESTOS CAN CAUSE CANCER IF HANDLED<br />
WITHOUT Protection.<br />
MATERIAL<br />
QTY DESCRIPTION PART NO.<br />
1 PACKING MATERIAL M200 SERIES 1 X 1-8 (99806)<br />
1. CUT BULK PACKING MATERIAL 26.5 INCHES LONG.<br />
2. ALL DIMENSIONS ARE IN INCHES,<br />
QTY DESCRIPTION PART NO.<br />
1 GASKET 65-59-296<br />
1. USE BULK ISSUE ASBESTOS SHEETING FROM NSN 53<strong>30</strong>-00-527-9900.<br />
2. CUT LENGTH OF ASBESTOS SHEETING AS ILLUSTRATED.<br />
3. DRILL FOUR HOLES AS ILLUSTRATED.<br />
4. ALL DIMENSIONS ARE IN INCHES.<br />
D-1 1<br />
Figure D-20. Gasket 65-59-296.<br />
Figure D-21. Gasket 65-45-<strong>30</strong>97-11.<br />
TM 3-42<strong>30</strong>-<strong>209</strong>-<strong>30</strong>&P
D-12 TM3-42<strong>30</strong>-<strong>209</strong>-<strong>30</strong>&P<br />
MATERIAL<br />
MATERIAL<br />
QTY DESCRIPTION PART NO. QTY DESCRIPTION PART NO.<br />
I 1 PACKING MATERIAL M200 SERIES 1 X 1-8 (99806) 1 PACKING MATERIAL M200 SERIES 1 X 1-8 (99806)<br />
1. CUT BULK PACKING MATERIAL 51 INCHES LONG. 1. CUT BULK PACKING MATERIAL 20.75 INCHES LONG.<br />
2. DIMENSIONS ARE IN FEET AND INCHES. 2. ALL DIMENSIONS ARE IN INCHES.<br />
Figure D-22. Gasket B5-45-<strong>30</strong>97- 10.<br />
Figure D-23. Gasket B5-45-<strong>30</strong>97-2.
I<br />
MATERIAL<br />
MATERIAL<br />
QTY DESCRIPTION PART NO. QTY DESCRIPTION PART NO<br />
1 PACKING MATERIAL M200 SERIES 1 X 1-8 (99806) 1 PACKING MATERIAL M200 SERIES 1 X 1-8 (99806)<br />
1. CUT BULK PACKING MATERIAL <strong>30</strong> INCHES LONG. 1. CUT BULK PACKING MATERIAL 10.5 INCHES LONG<br />
2. ALL DIMENSlONS ARE IN INCHES. 2. ALL DIMENSIONS ARE IN INCHES,<br />
Figure D-24. Gasket B5-45-<strong>30</strong>97-6.<br />
Figure D-25. Gasket B5-45-<strong>30</strong>97-12.<br />
D-13 TM 3-42<strong>30</strong>-<strong>209</strong>-<strong>30</strong>&P
D-14 TM 3-42<strong>30</strong>-<strong>209</strong>-<strong>30</strong>&P<br />
I<br />
I<br />
MATERIAL<br />
QTY DESCRIPTION PART NO.<br />
1 HOSE ASSEMBLY 421B -1 INCH ID (24161)<br />
1. CUT BULK HOSE ASSEMBLY 13.750 INCHES LONG.<br />
2. ALL DIMENSIONS ARE IN INCHES.<br />
MATERIAL<br />
QTY DESCRIPTION PART NO.<br />
1 HOSE ASSEMBLY 421 B-1 INCH ID (24161)<br />
1. CUT BULK HOSE ASSEMBLY 19.750 INCHES LONG.<br />
2. ALL DIMENSIONS ARE IN INCHES.<br />
Figure D-26. Hose C5-45-2736-8.<br />
Figure D-27. Hose C5-45-2736-9.
MATERIAL<br />
QTY DESCRIPTION PART NO.<br />
1 NONMETALLIC SPECIAL CV1 402 (74951)<br />
SHAPED SECTION<br />
1. CUT A PIECE 60.3 INCHES LONG FROM BULK ISSUE NONMETALLIC<br />
SPECIAL SHAPED SECTION.<br />
2. FORM INTO CIRCULAR SHAPE.<br />
3. ALL DIMENSIONS ARE IN INCHES.<br />
Figure D-28. Gasket 85-45-2889-1.<br />
D-15 TM 3-42<strong>30</strong>-<strong>209</strong>-<strong>30</strong>&P
D-16 TM 3-42<strong>30</strong>-<strong>209</strong>-<strong>30</strong>&P<br />
MATERIAL<br />
QTY DESCRIPTION PART NO<br />
1 TUBE, METALLIC MILT3520 (81349)<br />
2 NUT, TUBE COUPLING MS39166-3<br />
1. CUT A PIECE 15.94 INCHES LONG FROM BULK METALLIC TUBE AND<br />
BEND AS SHOWN.<br />
2. ASSEMBLE TUBE COUPLING NUT ON EACH END AND DOUBLE FLARE<br />
EACH END 45° PER SAE STD J533.<br />
3. ALL DIMENSIONS ARE IN INCHES.<br />
Figure D-29. Fuel pressure line C5-59-352.
1<br />
2<br />
TUBE, METALLIC MILT3520 (81349)<br />
NUT, TUBE COUPLING<br />
MS39166-3<br />
1.<br />
2.<br />
3.<br />
CUT A PIECE 16.00 INCHES LONG FROM BULK METALLIC TUBE AND<br />
BEND AS SHOWN.<br />
ASSEMBLE TUBE COUPLING NUT ON EACH END AND DOUBLE FLARE<br />
EACH END 45° PER SAE STD J533.<br />
ALL DIMENSIONS ARE IN INCHES.<br />
D-17<br />
Figure D-<strong>30</strong>. Selector return line C5-59-405.<br />
TM 3-42<strong>30</strong>-<strong>209</strong>-<strong>30</strong>&P
D-18 TM 3-42<strong>30</strong>-<strong>209</strong>-<strong>30</strong>&P<br />
MATERIAL<br />
QTY DESCRIPTION PART NO<br />
MATERIAL<br />
QTY DESCRIPTION PART NO<br />
1<br />
2<br />
TUBE, METALLIC MILT3520 (81349)<br />
NUT, TUBE COUPLING<br />
MS39166-3<br />
1 NONMETALLIC SPECIAL SHAPED CV1 402 (74951)<br />
SECTION<br />
1.<br />
2.<br />
3.<br />
CUT A PIECE 21.12 INCHES LONG FROM BULK METALLIC TUBE AND<br />
BEND AS SHOWN.<br />
ASSEMBLE TUBE COUPLING NUT ON EACH END AND DOUBLE FLARE<br />
EACH END 45° PER SAE STD J533.<br />
ALL DIMENSIONS ARE IN INCHES.<br />
1. CUT A PIECE 68 INCHES LONG FROM BULK ISSUE NONMETALLIC<br />
SPECIAL SHAPED SECTION.<br />
2. ALL DIMENSIONS ARE IN INCHES.<br />
Figure D-31. Water pressure line B5-59-349. Figure D-32. Gasket 85-45-2889-3.
MATERIAL<br />
QTY DESCRIPTION PART NO.<br />
1 TUBE, METALLIC MILT3520 (81349)<br />
2 NUT, TUBE COUPLING MS39166-3<br />
1. CUT 6 INCH LENGTH OF BULK ISSUE METALLIC TUBE.<br />
2. BEND AS INDICATED.<br />
3. ASSEMBLE COUPLING NUT ON EACH END AND DOUBLE FLARE EACH<br />
END 45° PER SAE STD J533.<br />
4. ALL DIMENSIONS ARE IN INCHES.<br />
MATERIAL<br />
QTY DESCRIPTION PART NO.<br />
1 CABLE, POWER, ELECTRICAL MILC5756B (81349)<br />
1. CUT A PIECE 25 FEET ± 2 INCHES LONG FROM BULK ISSUE POWER<br />
CABLE.<br />
2. DIMENSIONS ARE IN FEET AND INCHES.<br />
Figure D-33. Selector valve line C5-59-398.<br />
Figure D-34. Power cable C5-59-360- 1.<br />
D-19 TM 3-42<strong>30</strong>-<strong>209</strong>-<strong>30</strong>&P
D-20<br />
TM 3-42<strong>30</strong>-<strong>209</strong>-<strong>30</strong>&P<br />
MATERIAL<br />
QTY DESCRIPTlON PART NO.<br />
1 INSULATION BLANKET<br />
PF336F (45255)<br />
1. CUT A PIECE 8.75 INCHES LONG FROM BULK ISSUE INSULATION<br />
BLANKET.<br />
2. CUT THREE INDENTURES SPACED AS INDICATED.<br />
3. ALL DIMENSIONS ARE IN INCHES.<br />
MATERIAL<br />
QTY<br />
1<br />
DESCRIPTION<br />
WIRE, ELECTRICAL<br />
1. CUT BULK ELECTRICAL WIRE 2 INCHES LONG.<br />
2. STRIP 0.375 INCH INSULATION FROM BOTH ENDS<br />
3. ALL DIMENSIONS ARE IN INCHES.<br />
PART NO.<br />
MM2946 (99974)<br />
Figure D-35. Insulation blanket B5-59-412<br />
Figure D-36. Electrical lead C5-59-218- 1.
MATERIAL<br />
QTY DESCRIPTION PART NO.<br />
1 WIRE, ELECTRICAL MM2946 (99974)<br />
1 LUG, TERMINAL MS25036-103<br />
1. CUT BULK ELECTRICAL WIRE 6 INCHES LONG.<br />
2. STRIP 0.375 INCH INSULATION FROM BOTH ENDS AND CRIMP<br />
TERMINAL LUG ON ONE END.<br />
3. ALL DIMENSIONS ARE IN INCHES.<br />
MATERIAL<br />
QTY DESCRIPTION PART NO<br />
1 WIRE, ELECTRICAL MM2946 (99974)<br />
2 LUG, TERMINAL MS25036-101<br />
1. CUT BULK ELECTRICAL WIRE 8.25 INCHES LONG.<br />
2. STRIP 0.375 INCH INSULATION FROM BOTH ENDS AND CRIMP<br />
TERMINAL LUG ON ONE END.<br />
3. ALL DIMENSIONS ARE IN INCHES.<br />
Figure D-37. Electrical lead C5-59-218-2.<br />
Figure D-38. Electrical lead C5-59-218-3,<br />
D-21 TM 3-42<strong>30</strong>-<strong>209</strong>-<strong>30</strong>&P
D-22 TM 3-42<strong>30</strong>-<strong>209</strong>-<strong>30</strong>&P<br />
MATERIAL<br />
QTY DESCRIPTION PART NO.<br />
1 WIRE, ELECTRICAL MM2946 (99974)<br />
1 LUG, TERMINAL MS25036-101<br />
1 LUG, TERMINAL MS25036-103<br />
1. CUT BULK ELECTRICAL WIRE 23 INCHES LONG.<br />
2. STRIP 0.375 INCH INSULATION FROM BOTH ENDS AND CRIMP<br />
TERMINAL LUG ON EACH END.<br />
3. ALL DIMENSIONS ARE IN INCHES.<br />
MATERIAL<br />
QTY DESCRIPTION PART NO.<br />
1 WIRE, ELECTRICAL MM2946 (99974)<br />
1 LUG, TERMINAL MS25036-101<br />
1. CUT BULK ELECTRICAL WIRE 19 INCHES LONG.<br />
2. STRIP 0.375 INCH INSULATION FROM BOTH ENDS AND CRIMP<br />
TERMINAL LUG ON ONE END.<br />
3. ALL DIMENSIONS ARE IN INCHES.<br />
Figure D-39. Electrical lead C5-59-218-4.<br />
Figure D-40. Electrical lead C5-59-218-5.
MATERIAL<br />
QTY DESCRIPTION PART NO.<br />
1 WIRE, ELECTRICAL MM2946 (99974)<br />
1. CUT BULK ELECTRICAL WIRE 55 INCHES LONG,<br />
2. STRIP 0.375 INCH INSULATION FROM BOTH ENDS.<br />
3. ALL DIMENSIONS ARE IN INCHES.<br />
MATERIAL<br />
QTY DESCRIPTION PART NO,<br />
1 WIRE, ELECTRICAL MM2946 (99974)<br />
1 LUG, TERMINAL MS25036-103<br />
1. CUT BULK ELECTRICAL WIRE 11.50 INCHES LONG.<br />
2. STRIP 0.375 INCH INSULATION FROM BOTH ENDS AND CRIMP<br />
TERMINAL LUG ON ONE END.<br />
3. ALL DIMENSIONS ARE IN INCHES.<br />
Figure D-41. Electrical lead C5-59-218-6.<br />
Figure D-42. Electrical lead C5-59-218-7.<br />
D-23 TM 3-42<strong>30</strong>-<strong>209</strong>-<strong>30</strong>&P
D-24 TM 3-42<strong>30</strong>-<strong>209</strong>-<strong>30</strong>&P<br />
MATERIAL<br />
QTY DESCRIPTION PART NO.<br />
1 WIRE, ELECTRICAL MlL-W-16878/4<br />
1 LUG, TERMINAL MS25036-103<br />
1 TERMINAL, QUICK DISCONNECT 42599-2 (00779)<br />
1. CUT BULK ELECTRICAL WIRE 35 INCHES LONG AND STRIP 0.375 INCH<br />
INSULATION FROM BOTH ENDS.<br />
2. CRIMP TERMINAL LUG ON ONE END AND QUICK DISCONNECT<br />
TERMINAL TO OTHER END.<br />
3. ALL DIMENSIONS ARE IN INCHES.<br />
MATERIAL<br />
QTY DESCRIPTION PART NO.<br />
1 WIRE, ELECTRICAL MM2946 (99974)<br />
1 LUG, TERMINAL MS25036-103<br />
1 TERMINAL, QUICK DISCONNECT 42599-2 (00779)<br />
1. CUT BULK ELECTRICAL WIRE <strong>30</strong> INCHES LONG AND STRIP 0.375 INCH<br />
INSULATION FROM BOTH ENDS.<br />
2. CRIMP TERMINAL LUG ON ONE END AND QUICK DISCONNECT<br />
TERMINAL TO OTHER END.<br />
3. ALL DIMENSIONS ARE IN INCHES.<br />
Figure D-43. Electrical lead C5-59-218-8.<br />
Figure D-44. Electrical lead C5-59-218-9.
MATERIAL<br />
QTY DESCRIPTION PART NO.<br />
1 WIRE, ELECTRICAL MM2946 (99974)<br />
2 LUG, TERMINAL MS25036-101<br />
1. CUT BULK ELECTRICAL WIRE 1.75 INCHES LONG.<br />
2. STRIP 0.375 INCH INSULATION FROM BOTH ENDS AND CRIMP<br />
TERMINAL LUG ON EACH END.<br />
3. ALL DIMENSIONS ARE IN INCHES.<br />
MATERIAL<br />
QTY DESCRIPTION PART NO<br />
1 WIRE, ELECTRICAL MM2946 (99974)<br />
2 LUG, TERMINAL MS25036-101<br />
1. CUT BULK ELECTRICAL WIRE 4.5 INCHES LONG.<br />
2. STRIP 0.375 INCH INSULATION FROM BOTH ENDS AND CRIMP<br />
TERMINAL LUG ON EACH END.<br />
3. ALL DIMENSIONS ARE IN INCHES.<br />
Figure D-45. Electrical lead C5-59-218-10.<br />
Figure D-46. Electrical lead C5-59-218-11.<br />
D-25 TM 3-42<strong>30</strong>-<strong>209</strong>-<strong>30</strong>&P
D-26 TM 3-42<strong>30</strong>-<strong>209</strong>-<strong>30</strong>&P<br />
MATERIAL<br />
MATERIAL<br />
QTY DESCRIPTION PART NO. QTY DESCRIPTION PART NO.<br />
1 WIRE, ELECTRICAL MM2946 (99974) 1 WIRE, ELECTRICAL MM2946 (99974)<br />
1 LUG, TERMINAL MS25036-101 1 LUG, TERMINAL MS25036-103<br />
1 LUG, TERMINAL MS25036-101<br />
1. CUT BULK ELECTRICAL WIRE 62 INCHES LONG.<br />
2. STRIP 0.375 INCH INSULATION FROM BOTH ENDS AND CRIMP 1. CUT BULK ELECTRICAL WIRE 9 INCHES LONG.<br />
TERMINAL LUG ON ONE END.<br />
3. ALL DIMENSIONS ARE IN INCHES. TERMINAL LUG ON EACH END.<br />
3. ALL DIMENSIONS ARE IN INCHES.<br />
2. STRIP 0.375 INCH INSULATION FROM BOTH ENDS A ND CRIMP<br />
Figure D-4 7. Electrical lead C5-59-218-12.<br />
Figure D-48. Electrical lead C5-59-218-<br />
3.
MATERIAL<br />
QTY DESCRIPTION PART NO.<br />
11 WIRE, ELECTRICAL MM2946 (99974)<br />
2 LUG, TERMINAL MS25036-157<br />
1. CUT BULK ELECTRICAL WIRE 9.50 INCHES LONG.<br />
2. STRIP 0.375 INCH INSULATION FROM BOTH ENDS AND CRIMP<br />
TERMINAL LUG ON EACH END.<br />
3. ALL DIMENSIONS ARE IN INCHES.<br />
MATERIAL<br />
QTY DESCRIPTION PART NO.<br />
1 WIRE, ELECTRICAL MM2946 (99974)<br />
1 LUG, TERMINAL MS25036-103<br />
1 LUG, TERMINAL MS25036-101<br />
1. CUT BULK ELECTRICAL WIRE 9 INCHES LONG.<br />
2. STRIP 0.375 INCH INSULATION FROM BOTH ENDS CRIMP TERMINAL<br />
LUG ON EACH END.<br />
3. ALL DIMENSIONS ARE IN INCHES.<br />
Figure D-49. Electrical lead C5-59-218-14.<br />
Figure D-50. Electrical lead C5-59-218-15.<br />
D-27 TM 3-42<strong>30</strong>-<strong>209</strong>-<strong>30</strong>&P
D-28 TM 3-42<strong>30</strong>-<strong>209</strong>-<strong>30</strong>&P<br />
MATERIAL<br />
QTY DESCRIPTION PART NO.<br />
1 1 WIRE, ELECTRICAL MM3565 (99974)<br />
I 2 LUG, TERMINAL MS25036-112<br />
I<br />
I<br />
1. CUT BULK ELECTRICAL WIRE 5.25 INCHES LONG.<br />
2. STRIP 0.375 INCH INSULATION FROM BOTH ENDS AND CRIMP<br />
TERMINAL LUG ON EACH END.<br />
3. ALL DIMENSIONS ARE IN INCHES.<br />
MATERIAL<br />
QTY DESCRIPTION PART NO.<br />
1 WIRE, ELECTRICAL MM3565 (99974)<br />
1 LUG, TERMINAL MS25036-112<br />
1 CONNECTOR, PLUG, ELECTRICAL MS27144-1<br />
1. CUT BULK ELECTRICAL WIRE 11 INCHES LONG AND STRIP 0.375 INCH<br />
INSULATION FROM BOTH ENDS.<br />
2. CRIMP TERMINAL LUG ON ONE END AND ATTACH ELECTRICAL PLUG<br />
CONNECTOR TO OTHER END.<br />
3. ALL DIMENSIONS ARE IN INCHES.<br />
Figure D-51. Electrical lead C5-59-218-16.<br />
Figure D-52. Electrical lead C5-59-218-17.
MATERIAL<br />
QTY DESCRIPTION PART NO.<br />
1 WIRE, ELECTRICAL MM3565 (99974)<br />
1 LUG, TERMINAL MS25036-112<br />
1 CONNECTOR ASSEMBLY B5-59-409 (81361)<br />
1. CUT BULK ELECTRICAL WIRE 56 INCHES LONG AND STRIP 0.375 INCH<br />
INSULATION FROM BOTH ENDS.<br />
2. CRIMP TERMINAL LUG ON ONE END AND ATTACH CONNECTOR<br />
ASSEMBLY TO OTHER END. SEE PAGE 2-242.<br />
3. ALL DIMENSIONS ARE IN INCHES.<br />
MATERIAL<br />
QTY DESCRIPTION PART NO.<br />
1 WIRE, ELECTRICAL MM2946 (99974)<br />
1 LUG, TERMINAL MS25036-103<br />
1. CUT BULK ELECTRICAL WIRE 11.50 INCHES LONG.<br />
2. STRIP 0.375 INCH INSULATION FROM BOTH ENDS AND CRIMP<br />
TERMINAL LUG ON ONE END.<br />
3. ALL DIMENSIONS ARE IN INCHES:<br />
Figure D-53. Electrical lead C5-59-218-18.<br />
Figure D-54. Electrical lead C5-59-218-19.<br />
D-29 TM 3-42<strong>30</strong>-<strong>209</strong>-<strong>30</strong>&P
D-<strong>30</strong><br />
MATERIAL<br />
MATERIAL<br />
QTY DESCRIPTION PART NO. QTY DESCRIPTION PART NO<br />
1 WIRE, ELECTRICAL MM3565 (99974) 1 HOSE, NONMETALLIC 3658-0601 (24161)<br />
1 LUG, TERMINAL MS25036-157<br />
1. CUT A PIECE 25 FOOT LONG FROM BULK ISSUE NONMETALLIC HOSE.<br />
1. CUT BULK ELECTRICAL WIRE 8 INCHES LONG. 2. DIMENSIONS ARE IN FEET AND INCHES.<br />
2. STRIP 0.375 INCH INSULATION FROM BOTH ENDS AND CRIMP<br />
TERMINAL LUG ON EACH END.<br />
3. ALL DIMENSIONS ARE IN INCHES.<br />
Figure D-55. Electrical lead C5-59-218-20.<br />
Figure D-56. Rubber hose C5-59-311-9.
MATERIAL<br />
MATERIAL<br />
QTY DESCRIPTION PART NO. QTY DESCRIPTION PART NO<br />
1 TUBE, METALLIC MILT3520 (81349) 1<br />
2 NUT, COUPLING MS391 66-3 2<br />
TUBE, METALLIC S5281 (04741)<br />
NUT, TUBE COUPLING<br />
MS39166-5<br />
1. CUT A PIECE 8.94 INCHES LONG FROM BULK ISSUE METALLIC TUBE 1.<br />
AND BEND AS SHOWN.<br />
2. ASSEMBLE COUPLING NUT ON EACH END AND DOUBLE FLARE EACH 2.<br />
END 45° PER SAE STD J533.<br />
3. ALL DIMENSIONS ARE IN INCHES. 3.<br />
CUT A PIECE 9 INCHES LONG FROM BULK ISSUE METALLIC TUBE AND<br />
BEND AS SHOWN.<br />
ASSEMBLE TUBE COUPLING NUT ON EACH END AND DOUBLE FLARE<br />
EACH END 45° PER SAE STD J533.<br />
ALL DIMENSIONS ARE IN INCHES.<br />
Figure D-57. Pump return line B5-59-393.<br />
Figure D-58. Fuel supply line B5-59-345.<br />
D-31<br />
TM 3-42<strong>30</strong>-<strong>209</strong>-<strong>30</strong>&P
D-32<br />
TM 3-42<strong>30</strong>-<strong>209</strong>-<strong>30</strong>&P<br />
MATERIAL<br />
QTY<br />
1<br />
1<br />
DESCRIPTION<br />
PART NO.<br />
TUBE, METALLIC MI LT3520 (81349) 1<br />
NUT, TUBE COUPLING MS39166-3 2<br />
MATERIAL<br />
QTY<br />
DESCRIPTION<br />
PART NO.<br />
TUBE, METALLIC MILT3520 (81349)<br />
NUT, TUBE COUPLING<br />
MS39166-3<br />
1<br />
2<br />
3<br />
CUT A PIECE 31.50 INCHES LONG FROM BULK ISSUE METALLIC TUBE<br />
AND BEND AS SHOWN.<br />
ASSEMBLE TUBE COUPLING NUT ON EACH END AND DOUBLE FLARE<br />
EACH END 45°PER SAE STD J533.<br />
ALL DIMENSIONS ARE IN INCHES.<br />
1.<br />
2.<br />
3.<br />
CUT A PIECE 14.68 INCHES LONG FROM BULK ISSUE METALLIC TUBE<br />
AND BEND AS SHOWN.<br />
ASSEMBLE TUBE COUPLING NUT ON EACH END AND DOUBLE FLARE<br />
EACH END 45° PER SAE STD J533.<br />
ALL DIMENSIONS ARE IN INCHES.<br />
Figure D-59. Purge and bypass return line B5-59-347.<br />
Figure D-60. Gage port line B5-59-346.
MATERIAL<br />
QTY DESCRIPTION PART NO.<br />
1 TUBE, METALLIC MILT3520 (81349)<br />
2 NUT, TUBE COUPLING MS391 66-5<br />
1. CUT A PIECE 24.75 INCHES LONG FROM BULK ISSUE METALLIC TUBE<br />
AND BEND AS SHOWN.<br />
2. ASSEMBLE TUBE COUPLING NUT ON EACH END AND DOUBLE FLARE<br />
EACH END 45° PER SAE STD J533.<br />
3. ALL DIMENSIONS ARE IN INCHES.<br />
Figure D-6 1. Combustor return line B5-59-350.<br />
D-33<br />
TM 3-42<strong>30</strong>-<strong>209</strong>-<strong>30</strong>&P
D-34 TM 3-42<strong>30</strong>-<strong>209</strong>-<strong>30</strong>&P<br />
MATERIAL<br />
QTY DESCRIPTION PART NO.<br />
1<br />
1<br />
1<br />
2.<br />
3.<br />
TUBE, METALLIC MILT3520 (81349)<br />
NUT, TUBE COUPLING<br />
MS39166-3<br />
CUT A PIECE 11.00 INCHES LONG FROM BULK ISSUE METALLIC TUBE<br />
AND BEND AS SHOWN.<br />
ASSEMBLE TUBE COUPLING NUT ON EACH END AND DOUBLE FLARE<br />
EACH END 45° PER SAE STD J533.<br />
ALL DIMENSIONS ARE IN INCHES.<br />
Figure D-62. Nozzle valve line B5-59-394.
MATERIAL<br />
QTY DESCRIPTION PART NO.<br />
1 WIRE, ELECTRICAL MM2946<br />
2 LUG, TERMINAL MS25036-8<br />
1. CUT BULK ELECTRICAL WIRE 14.00 INCHES LONG.<br />
2. STRIP 0.375 INCH INSULATION FROM EACH END AND CRIMP<br />
TERMINAL LUG ON EACH END.<br />
3. ALL DIMENSIONS ARE IN INCHES.<br />
Figure D-63. Electrical wire C5-45-3248- 11.<br />
D-35 TM 3-42<strong>30</strong>-<strong>209</strong>-<strong>30</strong>&P
D-36 TM 3-42<strong>30</strong>-<strong>209</strong>-<strong>30</strong>&P<br />
MATERIAL<br />
QTY DESCRIPTION PART NO.<br />
1 WIRE, ELECTRICAL MM2946<br />
2 LUG, TERMINAL MS25036-8<br />
1. CUT BULK ELECTRICAL WIRE 17.00 INCHES LONG.<br />
2. STRIP 0.375 INCH INSULATION FROM EACH END AND CRIMP<br />
TERMINAL LUG ON EACH END.<br />
3. ALL DIMENSIONS ARE IN INCHES.<br />
Figure D-64. Electrical wire C5-45-3248-12.
MATERIAL<br />
QTY<br />
DESCRIPTION<br />
PART NO.<br />
1 WIRE, ELECTRICAL<br />
2 LUG, TERMINAL<br />
MM2946<br />
MS25036-8<br />
1. CUT BULK ELECTRICAL WIRE 14.50 INCHES LONG.<br />
2. STRIP 0.375 INCH INSULATION FROM EACH END AND CRIMP<br />
TERMINAL LUG ON EACH END.<br />
3. ALL DIMENSIONS ARE IN INCHES.<br />
Figure D-65. Electrical wire C5-45-3248- 13.<br />
D-37 TM 3-42<strong>30</strong>-<strong>209</strong>-<strong>30</strong>&P
D-38 TM 3-42<strong>30</strong>-<strong>209</strong>-<strong>30</strong>&P<br />
MATERIAL<br />
QTY DESCRIPTION PART NO.<br />
1 WIRE, ELECTRICAL MM2946<br />
2 LUG, TERMINAL MS25036-8<br />
1. CUT BULK ELECTRICAL WIRE 12.00 INCHES LONG.<br />
2. STRIP 0.375 INCH INSULATION FROM EACH END AND CRIMP<br />
TERMINAL LUG ON EACH END.<br />
3. ALL DIMENSIONS ARE IN INCHES.<br />
Figure D-66. Electrical wire C5-45-3248-14.
MATERIAL<br />
QTY DESCRIPTION PART NO<br />
1 WIRE, ELECTRICAL MM2946<br />
2 LUG, TERMINAL MS25036-8<br />
1. CUT BULK ELECTRICAL WIRE 13.50 INCHES LONG.<br />
2. STRIP 0.375 INCH INSULATION FROM EACH END AND CRIMP<br />
TERMINAL LUG ON EACH END.<br />
3. ALL DIMENSIONS ARE IN INCHES.<br />
Figure D-67. Electrical wireC5-45-3248-15.<br />
D-39<br />
TM 3-42<strong>30</strong>-<strong>209</strong>-<strong>30</strong>&P
D-40<br />
TM 3-42<strong>30</strong>-<strong>209</strong>-<strong>30</strong>&P<br />
MATERIAL<br />
QTY DESCRIPTION PART NO.<br />
1 WIRE, ELECTRICAL MM2946<br />
2 LUG, TERMINAL MS25036-8<br />
1. CUT BULK ELECTRICAL WIRE 12.50 INCHES LONG.<br />
2. STRIP 0.375 INCH INSULATION FROM EACH END AND CRIMP<br />
TERMINAL LUG ON EACH END.<br />
3. ALL DIMENSIONS ARE IN INCHES.<br />
Figure D-68. Electrical wire C5-45-3248-16.
MATERIAL<br />
QTY DESCRIPTION PART NO.<br />
1 WIRE, ELECTRICAL MM2946<br />
2 LUG, TERMINAL MS25036-8<br />
1. CUT BULK ELECTRICAL WIRE 13.00 INCHES LONG.<br />
2. STRIP 0.375 INCH INSULATION FROM EACH END AND CRIMP<br />
TERMINAL LUG ON EACH END.<br />
3. ALL DIMENSIONS ARE IN INCHES.<br />
Figure D-69. Electrical wire C5-45-3248-17.<br />
D-41 TM 3-42<strong>30</strong>-<strong>209</strong>-<strong>30</strong>&P
D-42 TM 3-42<strong>30</strong>-<strong>209</strong>-<strong>30</strong>&P<br />
MATERIAL<br />
QTY DESCRIPTION PART NO.<br />
1 WIRE, ELECTRICAL MM2946<br />
2 LUG, TERMINAL MS25036-8<br />
1. CUT BULK ELECTRICAL WIRE 12.50 INCHES LONG.<br />
2. STRIP 0.375 INCH INSULATION FROM EACH END AND CRIMP<br />
TERMINAL LUG ON EACH END.<br />
3. ALL DIMENSIONS ARE IN INCHES.<br />
Figure 0-70. Electrical wire C5-45-3248-18.
Figure D-71. Electrical wire C5-45-3248-19.<br />
D-43 TM 3-42<strong>30</strong>-<strong>209</strong>-<strong>30</strong>&P
E-1 TM 3-42<strong>30</strong>-<strong>209</strong>-<strong>30</strong>&P
D-44 TM 3-42<strong>30</strong>-<strong>209</strong>-<strong>30</strong>&P<br />
MATERIAL<br />
QTY DESCRIPTION PART NO.<br />
1 WIRE, ELECTRICAL MM2946<br />
2 LUG, TERMINAL MS25036-8<br />
1. CUT BULK ELECTRICAL WIRE 19.00 INCHES LONG.<br />
2. STRIP 0.375 INCH INSULATION FROM EACH END AND CRIMP<br />
TERMINAL LUG ON EACH END.<br />
3. ALL DIMENSIONS ARE IN INCHES.<br />
Figure D-72. Electrical wire C5-45-3248-20.
MATERIAL<br />
QTY DESCRIPTION PART NO.<br />
1 WIRE, ELECTRICAL MM2946<br />
2 LUG, TERMINAL MS250368<br />
1. CUT BULK ELECTRICAL WIRE 22.50 INCHES LONG.<br />
2. STRIP 0.375 INCH INSULATION FROM EACH END AND CRIMP<br />
TERMINAL LUG ON EACH END.<br />
3. ALL DIMENSIONS ARE IN INCHES.<br />
Figure D-73. Electrical wire C5-45-3248-21.<br />
D-45<br />
TM 3-42<strong>30</strong>-<strong>209</strong>-<strong>30</strong>&P
D-46 TM 3-42<strong>30</strong>-<strong>209</strong>-<strong>30</strong>&P<br />
MATERIAL<br />
QTY DESCRIPTlON PART NO.<br />
1 WIRE, ELECTRICAL MM2946<br />
2 LUG, TERMINAL MS25036-6<br />
1. CUT BULK ELECTRICAL WIRE 14.00 INCHES LONG.<br />
2. STRIP 0.375 INCH INSULATION FROM EACH END AND CRIMP<br />
TERMINAL LUG ON EACH END.<br />
3. ALL DIMENSIONS ARE IN INCHES.<br />
Figure D-74. Electrical wire C5-45-3248-22.
MATERIAL<br />
QTY DESCRIPTION PART NO.<br />
1 WIRE, ELECTRICAL MM2946<br />
2 LUG. TERMINAL MS25036-8<br />
1. CUT BULK ELECTRICAL WIRE 5.00 INCHES LONG.<br />
2. STRIP 0.375 INCH INSULATION FROM EACH END AND CRIMP<br />
TERMINAL LUG ON EACH END.<br />
3. ALL DIMENSIONS ARE IN INCHES.<br />
Figure D-75. Electrical wire C5-45-3248-23.<br />
D-47<br />
TM 3-42<strong>30</strong>-<strong>209</strong>-<strong>30</strong>&P
D-48 TM 3-42<strong>30</strong>-<strong>209</strong>-<strong>30</strong>&P<br />
MATERIAL<br />
QTY DESCRIPTION PART NO.<br />
1 WIRE, ELECTRICAL MM2946<br />
2 LUG. TERMINAL MS250364<br />
1. CUT BULK ELECTRICAL WIRE 29.50 INCHES LONG.<br />
2. STRIP 0.375 INCH INSULATION FROM EACH END AND CRIMP<br />
TERMINAL LUG ON EACH END.<br />
3. ALL DIMENSIONS ARE IN INCHES.<br />
Figure D-76. Electrical wire C5-45-3248-24.
MATERIAL<br />
QTY DESCRIPTION PART NO.<br />
1 WIRE, ELECTRICAL MM2946<br />
2 LUG, TERMINAL MS250388<br />
1. CUT BULK ELECTRICAL WIRE 13.00 INCHES LONG.<br />
2. STRIP 0.375 INCH INSULATION FROM EACH END AND CRIMP<br />
TERMINAL LUG ON EACH END.<br />
3. ALL DIMENSIONS ARE IN INCHES.<br />
Figure D-77. Electrical wire C5-45-3248-25.<br />
D-49 TM 3-42<strong>30</strong>-<strong>209</strong>-<strong>30</strong>&P
D-50 TM 3-42<strong>30</strong>-<strong>209</strong>-<strong>30</strong>&P<br />
MATERIAL<br />
QTY DESCRIPTION PART NO.<br />
1 WIRE, ELECTRICAL MM2946<br />
1 LUG, TERMINAL MS25036-8<br />
1 LUG, TERMINAL 42599-2<br />
1. CUT BULK ELECTRICAL WIRE 20.00 INCHES LONG.<br />
2. STRIP 0.375 INCH INSULATION FROM EACH END AND CRIMP<br />
TERMINAL LUG ON EACH END.<br />
3. ALL DIMENSIONS ARE IN INCHES.<br />
Figure D-78. Electrical wire C5-45-3248-26.
MATERIAL<br />
QTY DESCRIPTION PART NO.<br />
1 WIRE, ELECTRICAL MM2946<br />
2 LUG. TERMINAL MS25036-6<br />
1. CUT BULK ELECTRICAL WIRE 11.50 INCHES LONG.<br />
2. STRIP 0.375 INCH INSULATION FROM EACH END AND CRIMP<br />
TERMINAL LUG ON EACH END.<br />
3. ALL DIMENSIONS ARE IN INCHES.<br />
Figure D-79. Electrical wire C5-45-3248-27.<br />
D-51 TM 3-42<strong>30</strong>-<strong>209</strong>-<strong>30</strong>&P
E-O<br />
APPENDIX E<br />
TORQUE LIMITS<br />
TM 3-42<strong>30</strong>-<strong>209</strong>-<strong>30</strong>&P<br />
E-1. INTRODUCTION.<br />
a. This appendix includes a standard torque table of the most commonly<br />
torqued screws, bolts, and nuts.<br />
b. Use these torque values when torque values are not specified.<br />
c. The torque table values are given in inch-pounds. If a torque wrench is<br />
calibrated in foot-pounds, divide the listed number by 12 to obtain the desired<br />
torque.<br />
Dry Torque Values in Inch-Pounds for Tightening Nuts’<br />
Bolt, Stud,<br />
or Screw<br />
Size<br />
8-32 7-9<br />
8-36 7-9<br />
10-24 12-15<br />
1/4-20 25-<strong>30</strong><br />
1/4-28 <strong>30</strong>-40<br />
5/16-18 48-55<br />
5/16-24 60-85<br />
3/8-16 95-110<br />
3/8-24 95-110<br />
7/16-14 140-155<br />
7/16-20 270-<strong>30</strong>0<br />
1/2-13 240-290<br />
1/2-20 290-410<br />
9/16-12 <strong>30</strong>0-420<br />
9/16-18 480-600<br />
On standard bolts. studs, and screws having a tensile<br />
strength of 125,000 to 140,000 psi<br />
Shear type nuts (AN320,<br />
AN364, or equivalent)<br />
STANDARD TORQUE TABLE (INCH-POUNDS)<br />
Tension type nuts and<br />
threaded machine<br />
parts (AN310,<br />
AN365. or equivalent)<br />
On bolts, studs, and screws having<br />
a tensile strength of 140,000<br />
to 160,000 psi<br />
Any nut, except shear type<br />
12-15 14-17 15-18<br />
12-15 14-17 15-18<br />
20-25 23-<strong>30</strong> 25-35<br />
40-50 45-49 50-68<br />
50-70 60-80 70-90<br />
80-90 85-117 90-144<br />
100-140 120-172 140-203<br />
160-185 173-217 185-248<br />
160-190 175-271 190-351<br />
235-255 245-342 255-428<br />
450-500 475-628 500-756<br />
400-480 440-636 480-792<br />
480-690 585-840 690-990<br />
500-700 600-845 700-990<br />
800-1,000 900-1,220 1,000-1,440<br />
On high-strength bolts, studs,<br />
and screws having a tensile<br />
strength of 160,000 psi and<br />
over<br />
Any nut, except shear type
Index-O<br />
ALPHABETICAL INDEX<br />
TM 3-42<strong>30</strong>-<strong>209</strong>-<strong>30</strong>&P<br />
Subject<br />
Page<br />
Subject<br />
Page<br />
Access cover . . . . . . . . . . . . . . . . . . . . . . . . . . . . . . .2-27,2-29<br />
Alternator-generator assembly. . . . . . . . . . . . . . . . . . . . . . . . . . . .2-123<br />
Centrifugal pump . . . . . . . . . . . . . . . . . . . . . . . . . . . . . . . . . . . . . . .2-100<br />
Checking unpacked equipment. . . . . . . . . . . . . . . . . . . . . . . . . . . .2-0<br />
Clevis and eyebolt assembly . . . . . . . . . . . . . . . . . . . . . . . . . . . . . .2-31<br />
Combustion motor mounting assembly . . . . . . . . . . . . . . . . . . . . .2-242<br />
Combustor magneto . . . . . . . . . . . . . . . . . . . . . . . . . . . . . . . . . . . . .2-210<br />
Combustor return line . . . . . . . . . . . . . . . . . . . . . . . . . . . . . . . . . . . .2-244<br />
Common tools and equipment. . . . . . . . . . . . . . . . . . . . . . . . . . . .2-0<br />
Control box assembly . . . . . . . . . . . . . . . . . . . . . . . . . . . . . . . . . . . .2-174<br />
Control panel assembly . . . . . . . . . . . . . . . . . . . . . . . . . . . . . . . . . .2-124<br />
Cover assembly . . . . . . . . . . . . . . . . . . . . . . . . . . . . . . .2-21<br />
Cover panel assembly . . . . . . . . . . . . . . . . . . . . . . . . . . . . . . . . . . . 2-23,2-25<br />
Electrical wiring . . . . . . . . . . . . . . . . . . . . . . . . . . . . . . . . . .2-137, 2-188<br />
End panel . . . . . . . . . . . . . . . . . . . . . . . . . . . . . . . . . .2-169<br />
Engine fuel tank . . . . . . . . . . . . . . . . . . . . . . . . . . . . . . . . . . . . . . . . .2-41<br />
Equipment characteristics, capabilities, and features . . . . . . . . .1-1<br />
Equipment data . . . . . . . . . . . . . . . . . . . . . . . . . . . . .1-5<br />
Expendable/durable supplies and materials list . . . . . . . . . . . . . .C-0<br />
Fairlead assembly . . . . . . . . . . . . . . . . . . . . . . . . . . . . . . . . . . . . . . .2-60<br />
Frame assembly . . . . . . . . . . . . . . . . . . . . . . . . . . . . . . . . . . . . . . . .2-62<br />
Front panel . . . . . . . . . . . . . . . . . . . . . . . . . . . . . . . . . .2-171<br />
Fuel hose and filler opening cap assembly. . . . . . . . . . . . . . . . . . .2-191<br />
Fuel pressure line . . . . . . . . . . . . . . . . . . . . . . . . . . . .2-183<br />
A<br />
C<br />
E<br />
F<br />
Fuel pump and ignition drive motor. . . . . . . . . . . . . . . . . . . . . . . . .2-21 5<br />
Fuel pump assembly . . . . . . . . . . . . . . . . . . . . . . . . . . . . . . . . . . . . .2-217<br />
Fuel supply line . . . . . . . . . . . . . . . . . . . . . . . . . . . . .2-222<br />
Gage port line . . . . . . . . . . . . . . . . . . . . . . . . . . . .2-223<br />
Gasoline engine assembly, 20HP . . . . . . . . . . . . . . . . . . . . . . . . . .2-119<br />
Hopper access cover . . . . . . . . . . . . . . . . . . . . . . . . . . . . . . . . . . . .2-144<br />
How to use this manual . . . . . . . . . . . . . . . . . . . . . . . . . . . . . . . . . .v<br />
Illustrated list of manufactured items list . . . . . .<br />
Liquid fuel water heater and cabinet top cover. . . . . . . . . . . . . . . 2-148<br />
Liquid storage tank . . . . . . . . . . . . . . . . . . . . . . . . . . . . . . . . . . . . . 2-145<br />
Location and description of major components . . . . . . . . . . . . . . 1-2<br />
Low pressure heating boiler assembly. . . . . . . . . . . . . . . . . . . . . . 2-224<br />
G<br />
H<br />
I<br />
L<br />
M<br />
. . . . . . . . . . D-O<br />
Maintenance forms, records and reports . . . . . .. . . . . . . . . . . . . . . 1-1<br />
Maintenance procedures . . . . . . . . . . . . . . . . . . . . . . . . . . . . . . ...2-21<br />
Nozzle valve line . . . . . . . . . . . . . . . . . . . . . . . . . . . . . . . . . . . ...2-244<br />
N
Subject<br />
o<br />
Page<br />
Official nomenclature, names, and designations. . . . . . . . . . .1-1<br />
Offset valve and regulating valve . . . . . . . . . . . . . . . . . . . . . . . . . .2-111<br />
Outlet hose assembly . . . . . . . . . . . . . . . . . . . . . . . . . . . . . . . . . . . .2-56<br />
Plumbing assembly . . . . . . . . . . . . . . . . . . . . . . . . . . . . . . . . . . . ...2-90<br />
Power cable assembly . . . . . . . . . . . . . . . . . . . . . . . . . . . . . . . . ...2-184<br />
Preembarkation inspection of materiel in units alerted for<br />
overseas movement . . . . . . . . . . . . . . . . . . . . . . . . . . . . . . . . . ..2-245<br />
Pump base skid, engine mount 1, engine mount 2............2-120<br />
Pump return line . . . . . . . . . . . . . . . . . . . . . . . . . . . . . . . . . . . . . ...2-223<br />
Pump unit assembly . . . . . . . . . . . . . . . . . . . . . . . . . . . . . . . . . . ...2-32<br />
Pump unit subassembly . . . . . . . . . . . . . . . . . . . . . . . . . . . . . . . ...2-44<br />
Purge and bypass return line . . . . . . . . . . . . . . . . . . . . . . . . . . . ...2-224<br />
References . . . . . . . . . . . . . . . . . . . . . . . . . . . . . . . . . . . . . . . . . . . .A-0<br />
Regulating valve . . . . . . . . . . . . . . . . . . . . . . . . . . . . . . . . . . . . . ...2-116<br />
Repair parts and special tools list . . . . . . . . . . . . . . . . . . . . . . . . . .B-0<br />
Reporting equipment improvement recommendations (EIR) . . .1-1<br />
Reporting errors and recommending improvements . . . . . . . . . . i<br />
P<br />
R<br />
Subject<br />
s<br />
Page<br />
Selector return line . . . . . . . . . . . . . . . . . . . . . . . . . . . . . . . . . . . . . .2-183<br />
Selector valve line . . . . . . . . . . . . . . . . . . . . . . . . . . . . . . . . . . . . . . .2-182<br />
Service upon receipt . . . . . . . . . . . . . . . . . . . . . . . . . . . . . . . . . . . . .2-0<br />
Side panel . . . . . . . . . . . . . . . . . . . . . . . . . . . . . . . . . . . . . . . . . . . . .2-172<br />
Skid assembly . . . . . . . . . . . . . . . . . . . . . . . . . . . . . . . . . . . . . . . . . .2-198<br />
Skid base subassembly . . . . . . . . . . . . . . . . . . . . . . . . . . . . . . . . . .2-66<br />
Special tools, TMDE, and support equipment . . . . . . . . . . . . . . . .2-0<br />
Tank unit . . . . . . . . . . . . . . . . . . . . . . . . . . . . . . . . . . . . . . . . . . . . . .2-139<br />
Top access cover assembly . . . . . . . . . . . . . . . . . . . . . . . . . . . . . .2-22<br />
Torque limits . . . . . . . . . . . . . . . . . . . . . . . . . . . . . . . . . . . . . . . . . . .E-0<br />
Troubleshooting procedures . . . . . . . . . . . . . . . . . . . . . . . . . . . . . .2-0<br />
Water pressure line . . . . . . . . . . . . . . . . . . . . . . . . . . . . . . . . . . . . . . 2-182<br />
T<br />
w<br />
Index-1<br />
TM3-42<strong>30</strong>-<strong>209</strong>-<strong>30</strong>&P
By Order of the Secretary of the Army:<br />
JOHN A. WICKHAM, JR.<br />
General, United States Army<br />
Chief of Staff<br />
Official:<br />
R. L. DILWORTH<br />
Brigadier General, United States Army<br />
The Adjutant General<br />
Distribution:<br />
To be distributed in accordance with DA Form 12-28, quantity required block<br />
172, Intermediate Direct Support.<br />
U.S. GOVERNMENT PRINTING OFFICE : 1993 0 - 342-421 (61862)
PIN:060833-OO0