Operating Instructions Cordless telephone DET387x ... - Switel.com
Operating Instructions Cordless telephone DET387x ... - Switel.com
Operating Instructions Cordless telephone DET387x ... - Switel.com

You also want an ePaper? Increase the reach of your titles
YUMPU automatically turns print PDFs into web optimized ePapers that Google loves.
<strong>Operating</strong> <strong>Instructions</strong><br />
<strong>Cordless</strong> <strong>telephone</strong><br />
<strong>DET387x</strong><br />
ENGLISH<br />
1
Contents<br />
1 Safety Information . . . . . . . . . . . . . . . . . . . . . . . . . . . 3<br />
2 Preparing the Telephone . . . . . . . . . . . . . . . . . . . . . . 4<br />
3 <strong>Operating</strong> Elements . . . . . . . . . . . . . . . . . . . . . . . . . . 6<br />
4 Preliminary Information . . . . . . . . . . . . . . . . . . . . . . . 6<br />
5 Telephoning . . . . . . . . . . . . . . . . . . . . . . . . . . . . . . . . 8<br />
6 Other Features . . . . . . . . . . . . . . . . . . . . . . . . . . . . . . 10<br />
7 Call List / Redialling . . . . . . . . . . . . . . . . . . . . . . . . . . 11<br />
8 Phone Book . . . . . . . . . . . . . . . . . . . . . . . . . . . . . . . . 11<br />
9 Setting Up the Telephone . . . . . . . . . . . . . . . . . . . . . . 12<br />
10 Telephone Answering Machine (TAM) . . . . . . . . . . . . 15<br />
11 Registering/Deregistering handsets . . . . . . . . . . . . . . 19<br />
12 <strong>Operating</strong> in a PBX / Supplementary Services . . . . . . 19<br />
13 Appendix . . . . . . . . . . . . . . . . . . . . . . . . . . . . . . . . . . 20<br />
14 Technical Data . . . . . . . . . . . . . . . . . . . . . . . . . . . . . . 22<br />
15 Declaration of Conformity . . . . . . . . . . . . . . . . . . . . . 23<br />
16 Guarantee . . . . . . . . . . . . . . . . . . . . . . . . . . . . . . . . . 23<br />
2
1 Safety Information<br />
Please read this operating instruction manual thoroughly.<br />
Intended use<br />
The <strong>telephone</strong> is suitable for telephoning within a public <strong>telephone</strong> network<br />
system. Any other use is considered unintended use. Unauthorised<br />
modification or reconstruction is not permitted. Under no circumstances<br />
open the device or <strong>com</strong>plete any repair work yourself.<br />
Installation location<br />
Prevent excessive exposure to smoke, dust, vibration, chemicals, moisture,<br />
heat and direct sunlight.<br />
Do not use the handset in potentially explosive areas.<br />
Power adapter plug<br />
Attention: Only use the power adapter plug supplied because<br />
other power supplies could damage the <strong>telephone</strong>.<br />
Ensure access to the power adapter plug is not obstructed by<br />
furniture or such.<br />
Rechargeable batteries<br />
Attention: Never throw batteries into a fire. Only use batteries<br />
of the same type. Pay attention to correct polarity. Incorrect<br />
polarity of the batteries represents a risk of explosion during<br />
charging.<br />
Power failure<br />
The <strong>telephone</strong> cannot be used to make calls in the event of a power failure.<br />
Always keep a cord connected <strong>telephone</strong> which operates without an<br />
external power supply available in case of emergency situations.<br />
Medical equipment<br />
Attention: Never use the <strong>telephone</strong> in the vicinity of medical<br />
equipment. Effects on such equipment cannot be fully ruled<br />
out.<br />
DECT 1 <strong>telephone</strong>s can cause an unpleasant humming sound in hearing<br />
aids.<br />
1 DECT: Digital Enhanced <strong>Cordless</strong> Tele<strong>com</strong>munication = Standard for<br />
cordless <strong>telephone</strong>s.<br />
Disposal<br />
In order to dispose of your device, take it to a collection point provided<br />
by your local public waste authorities (e.g. recycling centre).<br />
The adjacent symbol indicates that the device must not be disposed<br />
of in normal domestic waste!<br />
According to laws on the disposal of electronic and electrical devices,<br />
owners are obliged to dispose of old electronic and electrical devices in<br />
a separate waste container.<br />
Batteries must be disposed of at the<br />
point of sale or at the appropriate<br />
collection points provided by the<br />
public waste authorities.<br />
Packaging materials must be disposed of according to local regulations.<br />
3
2 Preparing the Telephone<br />
Safety information<br />
Attention: It is essential to read the Safety Information in<br />
Chapter 1 before starting up.<br />
Checking the package contents<br />
The package contains:<br />
Content DET3871 DET3872 1 DET3873 1 DET3874 1<br />
Base station with power 1 1 1 1<br />
adapter plug<br />
Charging station with − 1 2 3<br />
power adapter plug<br />
Handset 1 2 3 4<br />
Telephone connection 1 1 1 1<br />
cable<br />
Batteries 2 4 6 8<br />
<strong>Operating</strong> instructions 1 1 1 1<br />
1 Visit www.switel.<strong>com</strong> to find out whether the <strong>telephone</strong> set is already<br />
available.<br />
Connecting the base station<br />
Attention: Position the base station at least 1 meter away<br />
from other electronic devices, otherwise there is a risk of mutual<br />
disturbance.<br />
Connect the base station as illustrated in the diagram. For reasons of<br />
safety, only use the power adapter plug and <strong>telephone</strong> connection line<br />
supplied.<br />
Only use the power adapter plug labelled VD060045D / 6 V<br />
DC / 450 mA with the base station!<br />
Connecting the charging station 2<br />
Connect the charging station as illustrated in the diagram. For safety reasons,<br />
only use the power adapter plug supplied.<br />
4
Only use the power adapter plug labelled VD060020J / 6 V<br />
DC / 200 mA with the charging station!<br />
2 Only applies for <strong>telephone</strong> sets with at least two handsets; refer to<br />
Checking the package contents".<br />
Inserting the batteries<br />
Open the battery <strong>com</strong>partment cover. Insert the batteries in the battery<br />
<strong>com</strong>partment. Close the battery <strong>com</strong>partment.<br />
Only use NiMH rechargeable batteries of the type AAA cell,<br />
1.2 V / 500 mAh! Never use standard batteries/primary cells!<br />
Pay attention to correct polarity.<br />
Charging the batteries<br />
Before the handset is used for the first time, insert it in the<br />
base station/charging station for at least 16 hours.<br />
The handset warms up during the charging process. This is normal and<br />
does not represent a risk. Do not charge the handset with charging units<br />
from other manufacturers. The battery charge status is indicated in the<br />
display. When the battery charge has reached its lower limit, the battery<br />
icon flashes in the display and an acoustic alarm signal is issued (if<br />
the option is switched on / menu item<br />
HS SETTINGS > TONE SETUP > BATTERY TONE ). It indicates approx.<br />
10 minutes call time is remaining.<br />
Setting the time and date on the handset<br />
When started up for the first time, the handset does not indicate the correct<br />
time (e.g. for entries in the call list/answering machine). The date and<br />
time are set using the menu option HS SETTINGS > DATE & TIME.<br />
Setting the display language<br />
The display language can be set to one of the 13 different languages<br />
available. When delivered, the language is set to Deutsch" (German).<br />
Change the setting using the menu option HS SETTINGS > LANGUAGE.<br />
Automatic answering<br />
If the Auto Answer function is activated (default state on delivery), a call is<br />
automatically taken on removing the handset from the base station. The<br />
automatic answering function is activate/deactivated using the menu option<br />
HS SETTINGS > AUTO ANSWER.<br />
5
3 <strong>Operating</strong> Elements<br />
The buttons in this operating manual are subsequently depicted with a<br />
uniform contour. Therefore, slight deviations in the appearance of the<br />
symbols on the <strong>telephone</strong> buttons <strong>com</strong>pared to those depicted here are<br />
possible.<br />
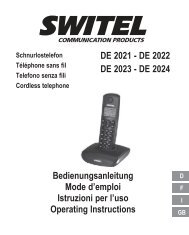
Handset<br />
1 Earpiece<br />
2 Scroll up/down<br />
3 Softkey (Int / C=Cancel,<br />
Mute microphone)<br />
4 On−hook button<br />
5 Ringing tone off<br />
6 R−button<br />
7 Microphone<br />
8 Phone book button<br />
9 Redial button<br />
10 Key lock<br />
11 Digit keys<br />
12 Off−hook button<br />
13 Softkey (Menu/OK)<br />
14 Display<br />
Base station<br />
1 Charging contacts<br />
9<br />
2 Loudspeaker<br />
3 Forward/Back<br />
8<br />
4 Start/Stop<br />
7<br />
5 Locate handset (Paging)<br />
6 Volume control<br />
7 Answering machine on/off<br />
8 Delete<br />
9 Display<br />
4 Preliminary Information<br />
This chapter provides basic information on using the operating instruction<br />
manual and the <strong>telephone</strong>.<br />
Description of operating sequences in the manual<br />
Displays the contour of buttons<br />
Press the button depicted briefly<br />
2 sec. Press the button depicted for 2 seconds<br />
Enter digits or letters<br />
Handset rings<br />
Base station rings<br />
Remove the handset from the base station<br />
Place the handset in the base station<br />
NAME Depicts text in the display<br />
Depicts icons in the display<br />
6<br />
14<br />
13<br />
12<br />
11<br />
10<br />
9<br />
8<br />
1<br />
2<br />
3<br />
4<br />
5<br />
6<br />
7<br />
1<br />
2<br />
3<br />
4<br />
5<br />
6
Icons in the display<br />
On: Connection to the base station exists<br />
Flashing: No connection to the base station<br />
On: Indicates the battery capacity<br />
Flashes: While handset is in the base station:<br />
Batteries are being charged<br />
On: Batteries need to be charged<br />
Flashing: Batteries must be charged immediately<br />
On: A call is in progress<br />
Flashing: A call has been received<br />
The ringing tone has been switched off<br />
On: An alarm time has been set<br />
Flashing: The set alarm time has been reached<br />
The key lock function is switched on<br />
On: The answering machine is switched on<br />
Flashing: New messages have been recorded<br />
Messages recorded in the mailbox set up by your<br />
<strong>telephone</strong> network provider<br />
On: Internal call is in progress<br />
Flashing: Internal call has been received<br />
While the call list is being displayed: New call<br />
While playing messages from TAM: New message<br />
More digits/characters to the left or right of those currently<br />
displayed. Press the relevant softkey to scroll to them.<br />
The functions assigned to the respective softkeys are displayed in the<br />
bottom line of the display; the functions available vary according to the<br />
current operating status.<br />
Open the menu<br />
Confirm the setting<br />
Make an internal call (only when several handsets are<br />
registered on a base station)<br />
<br />
<br />
Back to the previous menu or cancel programming<br />
Scroll back to delete characters during entry (press briefly<br />
to delete last character, press longer to delete entire line);<br />
switch muting function on/off during a call.<br />
Standby mode<br />
All descriptions in this operating manual assume that the handset is in<br />
Standby mode. Switch the system to Standby mode by pressing the <br />
button.<br />
Low−radiation operation (ECO mode)<br />
In Call mode, the radiation is reduced considerably as <strong>com</strong>pared<br />
to standard, cordless DECT <strong>telephone</strong>s.<br />
7
Navigating in the menu<br />
All the functions can be accessed via the various menus. Use the softkeys<br />
and arrow keys to navigate through the menu. Open the menu by pressing<br />
the left softkey . Use the arrow keys and to scroll<br />
through the menu options. Press the softkey to open a menu option. If<br />
you want to return to the previous menu, press the button briefly. Pressing<br />
the button longer returns you to Standby mode.<br />
5 Telephoning<br />
Taking a call<br />
Your <strong>telephone</strong> rings.<br />
If the handset is not in the base station:<br />
Press the Off−hook button.<br />
If the handset is in the base station and AUTO ANSWER is not activated:<br />
Press the Off−hook button.<br />
If the handset is in the base station and AUTO ANSWER is activated:<br />
Simply remove the handset from the base station, the call<br />
is taken automatically.<br />
Making a call<br />
Enter the phone number. Delete any wrong entries by<br />
pressing .<br />
The phone number is dialled.<br />
It is also possible to press the Off−hook button first to obtain<br />
the dialling tone. The digits then entered are dialled immediately.<br />
It is not possible to correct wrong digits individually using<br />
this dialling procedure.<br />
Ending a call (on−hook)<br />
/ Press the On−hook button or replace the handset in the<br />
base station.<br />
Redialling<br />
The <strong>telephone</strong> stores the last 5 phone numbers dialled. If a<br />
phone book entry has been setup for the phone number, the<br />
name is displayed. To display the phone number associated<br />
with the name, press the button. The phone number last<br />
dialled is at the top of the list.<br />
/ Open the redialling list.<br />
/ Select an entry from the list.<br />
The phone number is dialled.<br />
8
Dialling from the call list<br />
The <strong>telephone</strong> stores the last 10 in<strong>com</strong>ing calls in a call list.<br />
If a phone book entry has been setup for the phone number,<br />
the name of the caller is displayed. To display the phone number<br />
associated with the name, press the button. The<br />
number storing function can only work when the Calling Line<br />
Identification Presentation (CLIP)" function is active on your<br />
phone and the phone number has not been suppressed by<br />
the caller or not transmitted for other reasons.<br />
Open the call list.<br />
/ Select an entry from the list.<br />
The phone number is dialled.<br />
Dialling from the phone book<br />
Up to 20 entries can be stored in the phone book. To create<br />
entries in the phone book, refer to Section Phone Book".<br />
Open the phone book.<br />
/ Select an entry from the list.<br />
The phone number is dialled.<br />
Call timer<br />
The duration of a call is displayed in hours, minutes and seconds during<br />
the call.<br />
Setting the receiver/loudspeaker volume<br />
/ You can adjust the volume of a caller to one of five levels<br />
during a call. The settings are separate and are retained<br />
after a call has been ended.<br />
Deactivating the microphone (muting function)<br />
You can switch off the microphone during a call so that the<br />
caller cannot hear you. MUTED appears in the display. Press<br />
the button again to switch the microphone on again.<br />
Internal calls<br />
<br />
Internal calls, forwarding calls and conference calls are only<br />
possible when several handsets are registered. If this is not<br />
the case, NOT POSSIBLE appears in the display.<br />
Press the Int softkey. If two handsets are registered, the<br />
other handset is called immediately. If several handsets are<br />
registered, their internal call numbers are displayed (e.g. 2,<br />
3, 4). Press the internal call number of the handset<br />
required. If several handsets are registered and you press<br />
9", all the handsets are called simultaneously.<br />
9
Transferring an external call to another handset<br />
During an external call ...<br />
Press the Menu softkey.<br />
/ Select INTERCOM and press OK.<br />
Enter the internal call number. The external call is put on<br />
hold. When the handset called answers, you can announce<br />
the call transfer.<br />
Press the On−hook button. The call is transferred.<br />
Conference calls<br />
During an external call ...<br />
Press the Menu softkey.<br />
/ Select INTERCOM and press OK.<br />
Enter the internal call number.<br />
When the handset called answers, press and hold the Star<br />
button until CONFERENCE appears in the display.<br />
If one of the conference participants ends the call, the remaining<br />
participants remain connected.<br />
6 Other Features<br />
Key lock<br />
The key lock function prevents functions assigned to buttons<br />
being activated inadvertently. In<strong>com</strong>ing calls can be taken in<br />
the normal way.<br />
Press and hold the Star button until the key lock icon<br />
appears in the display. To deactivate the key lock function,<br />
press and hold the Star button again until the icon<br />
disappears.<br />
Deactivating the handset ringing tone<br />
You can deactivate the handset ringing tone using the HS<br />
SETTINGS > RING SETUP menu option.<br />
Press and hold the Hash button until the deactivated<br />
ringing tone icon appears in the display. To reactivate<br />
the ringing tone, press and hold the Hash button again until<br />
the icon disappears.<br />
Switching the handset off<br />
You can switch the handset off to save the batteries.<br />
<br />
Press and hold the On−hook button. The handset is<br />
switched off after a few seconds. The display illumination<br />
goes out. To switch the handset back on, press and hold<br />
the On−hook button until you hear an acoustic signal and<br />
the display lights up.<br />
10
7 Call List / Redialling<br />
Editing the call list<br />
Open the call list.<br />
/ Select an entry from the list.<br />
Press the Menu softkey.<br />
/ Select one of the following options and confirm by pressing<br />
OK:<br />
ADD TO PB The phone number is stored in the phone book. Enter a<br />
name, confirm or edit the phone number and select a<br />
ringing melody for this entry.<br />
DELETE The entry is deleted.<br />
DELETE ALL The entire list is deleted after confirming a prompt.<br />
DETAILS Date and time of the call are displayed.<br />
You can also open the call list using the menu:<br />
CALL LIST .<br />
Editing the redialling list<br />
Open the redialling list.<br />
/ Select an entry from the list.<br />
Press the Menu softkey.<br />
/ Select one of the following options and confirm by pressing<br />
OK:<br />
ADD TO PB The phone number is stored in the phone book. Enter a<br />
name, confirm or edit the phone number and select a<br />
ringing melody for this entry.<br />
DELETE The entry is deleted.<br />
DELETE ALL The entire list is deleted after confirming a prompt.<br />
8 Phone Book<br />
Creating phone book entries<br />
Up to 20 phone numbers with their associated names can be<br />
stored in the phone book. Each entry can be assigned a specific<br />
ringing melody which then identifies the call. Always enter<br />
the phone numbers with the local area code; this enables<br />
a correct display of the respective caller for whom there is an<br />
existing entry and whose phone number transmission to your<br />
connection is available.<br />
Creating a new entry<br />
Press the Phone Book button. If no entries yet exist, EMPTY<br />
is displayed. If entries already exist, the first entry is<br />
displayed.<br />
Press the Menu softkey.<br />
Confirm ADD by pressing OK.<br />
Enter the name (max. 12 characters). Letters are also<br />
imprinted on the digit keys. Enter letters and digits by<br />
pressing the relevant key the respective number of times.<br />
After entering a character, the cursor skips forward.<br />
Confirm the name entered by pressing OK.<br />
11
Enter the required phone number (max. 20 digits). If your<br />
<strong>telephone</strong> is connected to a PBX system, begin with the<br />
number for an outside line. If a dialling pause is required,<br />
press the 0 button for approx. 2 sec. after the number for<br />
an outside line. A P appears in the display.<br />
Confirm the phone number entered by pressing OK.<br />
/ Select a melody for the entry.<br />
Confirm by pressing OK.<br />
Return to Standby mode.<br />
You can also open the phone book using the menu:<br />
PHONEBOOK .<br />
Editing phone book entries<br />
Press the Phone Book button.<br />
/ Select an entry from the list.<br />
Press the Menu softkey.<br />
/ Select one of the following options and confirm by pressing<br />
OK.<br />
ADD You can create a new entry.<br />
VIEW You can view the entry. Use the arrow keys to display the<br />
name, phone number and melody.<br />
EDIT You can modify the entry. Delete letters and digits using the<br />
button, enter the correct new letters and digits with<br />
the digits keys. Details on this are provided in Creating a<br />
new entry".<br />
DELETE The entry is deleted.<br />
DELETE ALL The entire list is deleted after confirming a prompt.<br />
PB STATUS The current phone book status is displayed<br />
(e.g. 07/20 USED: 7 of 20 possible entries are stored).<br />
9 Setting Up the Telephone<br />
Date/Time<br />
Press the Menu softkey.<br />
/ Select HS SETTINGS and press OK.<br />
/ Select DATE & TIME and press OK.<br />
/ Select one of the following options and confirm by pressing<br />
OK.<br />
DATE FORMAT<br />
You can define the way the date is displayed:<br />
DD−MM−YY or MM−DD−YY.<br />
TIME FORMAT You can select the way the time is displayed: 24 or 12 hour<br />
clock.<br />
SET TIME Use the digit keys to enter the time.<br />
SET DATE. Use the digit keys to enter the date.<br />
The setting is lost in the event of a power failure if, at the same<br />
time, the handset is switched off or the batteries are empty.<br />
12
Alarm clock<br />
Press the Menu softkey.<br />
/ Select HS SETTINGS and press OK.<br />
/ Select ALARM and press OK.<br />
/ Select ON and press OK.<br />
Enter the alarm time using the digit keys.<br />
SNOOZE Press OK.<br />
/ Select ON or OFF and press OK.<br />
If Snooze" is switched on, it means that the alarm signal is<br />
repeated after each 7 minutes until the function is ended by<br />
pressing and holding the On−hook button. If Snooze" is<br />
switched off, the alarm signal is issued only once at the set<br />
time. Press any button to stop the alarm signal.<br />
Setting the ringing tone for the handset<br />
Press the Menu softkey.<br />
/ Select HS SETTINGS and press OK.<br />
/ Select RING SETUP and press OK.<br />
/ Select one of the following options and confirm by pressing<br />
OK.<br />
INT. RING Select a melody to indicate an internal call.<br />
EXT. RING Select a melody to indicate an external call.<br />
RING VOLUME Select the volume for the RING SETUP option. If you select<br />
VOLUME OFF, the icon appears in the display.<br />
Setting the alert tones<br />
Press the Menu softkey.<br />
/ Select HS SETTINGS and press OK.<br />
/ Select TONE SETUP and press OK.<br />
/ Select one of the following options and confirm by pressing<br />
OK.<br />
KEY TONE Switch the acknowledgement tone for pressing a button on<br />
or off.<br />
BATTERY TONE<br />
Switch the alert tone on or off. The tone indicates when the<br />
battery needs to be charged.<br />
OUT OF RANGE<br />
Switch the alert tone on or off. The tone indicates that the<br />
handset is at the limit of its range to the base station.<br />
Setting the display language<br />
Press the Menu softkey.<br />
/ Select HS SETTINGS and press OK.<br />
/ Select LANGUAGE and press OK.<br />
/ Select a language and confirm by pressing OK.<br />
Setting handset names<br />
Press the Menu softkey.<br />
/ Select HS SETTINGS and press OK.<br />
/ Select RENAME HS and press OK.<br />
Delete the old name with , enter anew name using the<br />
digit keys and confirm with OK.<br />
13
Setting the display<br />
Press the Menu softkey.<br />
/ Select HS SETTINGS and press OK.<br />
/ Select HS DISPLAY and press OK.<br />
/ Select whether you want to display the handset name or<br />
the time when in Standby mode and confirm by pressing<br />
OK.<br />
Setting auto answer<br />
Press the Menu softkey.<br />
/ Select HS SETTINGS and press OK.<br />
/ Select AUTO ANSWER and press OK.<br />
/ Select whether the Auto Answer function should be<br />
switched on or off and confirm by pressing OK.<br />
When Auto Answer is switched on, a call is taken immediately<br />
the handset is removed from the base station.<br />
Setting the ringing melody for the base station<br />
Press the Menu softkey.<br />
/ Select BS SETTINGS and press OK.<br />
/ Select BS RINGER and press OK.<br />
/ Select a melody and confirm by pressing OK.<br />
Setting the ringing volume for the base station<br />
Press the Menu softkey.<br />
/ Select BS SETTINGS and press OK.<br />
/ Select RING VOLUME and press OK.<br />
/ Select a volume and confirm by pressing OK.<br />
Setting the dialling mode<br />
Press the Menu softkey.<br />
/ Select BS SETTINGS and press OK.<br />
/ Select DIAL MODE and press OK.<br />
/ Select TONE or PULSE and confirm by pressing OK.<br />
TONE is correct for most connections.<br />
Setting the flash time<br />
Press the Menu softkey.<br />
/ Select BS SETTINGS and press OK.<br />
/ Select FLASH TIME and press OK.<br />
/ Select SHORT (100 ms), MEDIUM (300 ms) or LONG (600 ms)<br />
and confirm by pressing OK.<br />
Change PIN<br />
Press the Menu softkey.<br />
/ Select BS SETTINGS and press OK.<br />
/ Select CHANGE PIN and press OK.<br />
Enter the current PIN (default status: 0 0 0 0) and press<br />
OK.<br />
Enter the new PIN and press OK.<br />
14
Enter the new PIN again and press OK.<br />
The four−digit PIN protects certain functions from unauthorised<br />
access. If you forget the PIN, please contact our service<br />
hotline.<br />
Resetting the phone to its default status<br />
Press the Menu softkey.<br />
/ Select DEFAULT and press OK.<br />
Enter the current PIN and press OK. Confirm the<br />
subsequent prompt by pressing OK.<br />
The phone book is not deleted. Please delete the phone book<br />
contents using the Phone Book menu. Registered handsets<br />
remain registered.<br />
10 Telephone Answering Machine (TAM)<br />
Depending on the <strong>com</strong>pression rate* set, the integrated digital answering<br />
machine can provide a total recording time of up to 15 minutes for outgoing<br />
messages and in<strong>com</strong>ing messages. A maximum of 59 in<strong>com</strong>ing<br />
messages can be recorded. Memos recorded for internal purposes are<br />
also treated like messages. The answering machine can be operated<br />
from both the base station and handset. By using a phone which is<br />
DTMF−capable, you also have a PIN protected remote access to the<br />
answering machine. There are two operating modes available for selection:<br />
− outgoing message with message recording<br />
− answer only.<br />
In its default state on delivery, a standard outgoing message is already recorded<br />
for both operating modes. This means that the answering machine<br />
is immediately ready for use. If Answer and record" mode is active and<br />
you reach the end of the maximum recording capacity, the machine automatically<br />
switches to Answer only" mode.<br />
If the answering machine is switched off, the the outgoing message for<br />
Answer only" mode is played after approx. 10 rings.<br />
The corresponding icon in the handset display indicates whether the<br />
answering machine is switched on or not.<br />
The date and time of recording of the message are indicated in the display<br />
when playing the messages on the handset. A condition for this is<br />
that the date and time have been set correctly<br />
(menu option: HS SETTINGS > DATE & TIME).<br />
* HIGH > approx.15 minutes, MEDIUM > approx. 9.5 minutes, LOW > approx.<br />
7 minutes<br />
The following information appears on the base station display according<br />
to the operating status:<br />
− − Dashes on: The answering machine is off.<br />
Dashes flash: The answering machine is on, the time has<br />
not been set.<br />
XX Digits on: The number of old messages.<br />
Digits flash: The number of new messages.<br />
LA Flashing: Access is being made to the answering machine<br />
from a handset or via remote access/control.<br />
15
A1/A2 Outgoing message is being played (A1=Answer and<br />
record / A2 =Answer only)<br />
FF Flashing: The answering machine memory is fully.<br />
Lx When setting the answering machine volume on the base<br />
station: x=indicates the current volume setting. New<br />
messages are indicated in the handset display by the <br />
icon when being played.<br />
<strong>Operating</strong> options on the base station<br />
The operating elements on the base station enable you to switch the<br />
answering machine on/off, play and delete messages. The date and time<br />
the message was recorded are only displayed in the handset display in<br />
the case of remote access.<br />
Switch the answering machine on/off<br />
Set the volume for message playback.<br />
Start/Stop playback.<br />
Delete message.<br />
Skip to next message / previous message.<br />
Switching the answering machine on/off (on handset)<br />
Press the Menu softkey.<br />
/ Select ANS. MACHINE and press OK.<br />
/ Select TAM ON/OFF and press OK.<br />
/ Select ON or OFF and confirm by pressing OK.<br />
The icon appears in the display when the answering machine is<br />
switched on.<br />
Recording an outgoing message<br />
Press the Menu softkey.<br />
/ Select ANS. MACHINE and press OK.<br />
/ Select TAM SETTINGS and press OK.<br />
/ Select OGM SETTINGS and press OK.<br />
/ Select ANSWER ONlY for Answer only" mode or ANS & REC<br />
for Answer and record" mode and press OK.<br />
/ Select RECORD MESS and press OK. RECORDING appears in<br />
the display. Speak your message into the microphone and,<br />
when you have finished, press OK to end recording. The<br />
outgoing message is played.<br />
Playing the outgoing message<br />
Press the Menu softkey.<br />
/ Select ANS. MACHINE. and press OK.<br />
/ Select TAM SETTINGS and press OK.<br />
/ Select OGM SETTINGS and press OK.<br />
/ Select ANSWER ONlY for Answer only" mode or ANS & REC<br />
for Answer and record" mode and press OK.<br />
/ Select PLAYBACK and press OK. The outgoing message is<br />
played.<br />
If you want to delete your outgoing message, press during<br />
playback. The standard outgoing messages cannot be<br />
deleted.<br />
16
Playing messages / Deleting individual messages<br />
Press the Menu softkey.<br />
/ Select ANS. MACHINE and press OK.<br />
/ Select MSG PLAYBACK and press OK. The loudspeaker in<br />
the handset is switched on and the messages are played.<br />
The following options are available while the message is playing:<br />
/ Adjust the volume of the message being played.<br />
Press OK, use the arrow buttons to select one of the<br />
following options and confirm by pressing OK.<br />
STOP Stop playback.<br />
FORWARD To skip to the next message.<br />
PREVIOUS Skip to the previous message or skip to the start of the<br />
current message.<br />
DELETE Delete the message currently playing.<br />
These functions can also be executed using the digit keys:<br />
Key 5: Stop playback<br />
Key 6: To skip to the next message<br />
Key 4: Skip to the previous message or skip to the start of the<br />
current message (press Key 4 twice).<br />
Key 2: Delete message currently playing.<br />
Deleting all old messages<br />
Press the Menu softkey.<br />
/ Select ANS. MACHINE and press OK.<br />
/ Select DELETE ALL and press OK. All the old (already<br />
played) messages are deleted after confirming the prompt.<br />
Record memo<br />
Press the Menu softkey.<br />
/ Select ANS. MACHINE and press OK.<br />
/ Select MEMO and press OK. Speak your message into the<br />
microphone and then press OK. The memo is played.<br />
Answering machine settings<br />
Press the Menu softkey.<br />
/ Select ANS. MACHINE and press OK.<br />
/ Select TAM SETTINGS and press OK.<br />
/ Select one of the following options and confirm by pressing<br />
OK:<br />
ANSWER MODE<br />
Set the operating mode for the answering machine.<br />
TAM LANGUAGE<br />
Select the language for the standard outgoing message.<br />
OGM SETTINGS<br />
Record/Play your outgoing message.<br />
ANSWER DELAY<br />
Use the arrow buttons to select a delay period (number of<br />
rings) before the answering machine takes a call:<br />
2 RINGS (2, 4, 6, 8 rings): Take the call after 2, 4, 6 or 8 rings.<br />
TIME SAVER: If new messages have been recorded, the answering<br />
machine takes a call after two rings.<br />
17
If no new messages have been recorded, the call is taken<br />
after six rings. Therefore, when using the remote access<br />
feature, you can check if new messages have been<br />
recorded or end the call before a connection is established<br />
if no messages have been recorded.<br />
RECORD TIME Use the arrow buttons to define the time available for<br />
recording a message (60S, 120S, 180S, UNLIMITED).<br />
REMOTE ACC. Switch the remote access feature ON or OFF.<br />
COMPRESSION<br />
Use the arrow buttons to select the <strong>com</strong>pression of the<br />
voice recordings (LOW, MEDIUM, HIGH). This setting affects<br />
the recording capacity and quality. When LOW is set, the<br />
quality is very good but the recording time is at its shortest.<br />
Select HIGH <strong>com</strong>pression for the highest possible recording<br />
time.<br />
CHANGE PIN Enter the remote access PIN (default status 0 0 0 0). This<br />
PIN is required if remote access/control is made from an<br />
external DTMF−capable phone.<br />
Taking a call from the answering machine<br />
You can take a call on the handset and talk directly to the caller even if the<br />
caller has already started to record a message on the answering machine.<br />
Press the Off−hook button.<br />
Remote access/Remote control<br />
Remote access/remote control can be started from any DTMF−capable<br />
phone. Dial your own <strong>telephone</strong> number from the external phone. If the<br />
answering machine is switched off, it answers after 10 rings. If it is<br />
switched on, it answers after the preset answer delay. Press the Star button<br />
while the outgoing message is playing and enter the remote access<br />
PIN. When the PIN entered is correct, the following functions are available.<br />
If an incorrect PIN is entered three times in succession, the<br />
call is terminated.<br />
Key Function<br />
5 Start or stop playback.<br />
4 Skip back to the start of the current message. Press the<br />
key twice to skip to the previous message.<br />
6 Skip to the next message.<br />
2 Delete the message currently playing.<br />
8 Stop playback.<br />
7 Switch the answering machine on.<br />
9 Switch the answering machine off.<br />
18
11 Registering/Deregistering handsets<br />
Up to 5 handsets can be registered on the base station. The handsets<br />
supplied in the <strong>telephone</strong> set are already registered on the base station.<br />
To register an external" handset, please refer to the manual supplied with<br />
it.<br />
Registering another handset of the same type<br />
Press the Menu softkey.<br />
/ Select REGISTRATION and press OK.<br />
Enter the current base station PIN on the handset to be<br />
registered and press OK.<br />
Press and hold the Paging button on the base station until<br />
you hear the audible registration tone (approx. 5 s). After a<br />
short time, the antenna icon lights up in the display and the<br />
handset is registered.<br />
Deregistering a handset<br />
Press the Menu softkey.<br />
/ Select BS SETTINGS and press OK.<br />
/ Select DELETE HS and press OK.<br />
Enter the current PIN and press OK.<br />
/ Select one of the handsets displayed and press OK.<br />
The handset, which you are currently using, cannot be deregistered.<br />
12 <strong>Operating</strong> in a PBX / Supplementary Services<br />
<strong>Operating</strong> in a PBX<br />
If the <strong>telephone</strong> is connected to a private branch exchange, functions<br />
such as transferring calls and automatic call back can be used via the R<br />
button. Refer to the operating manual provided with your private branch<br />
exchange as to which Flash time must be set in order to use these functions.<br />
The sales outlet where you purchased the exchange can provide information<br />
as to whether the <strong>telephone</strong> will work properly with the exchange.<br />
Please remember that when entering numbers in the phone<br />
book, enter the number for an outside line and dialling pause (press 0"<br />
longer) too, if necessary.<br />
Supplementary services from the <strong>telephone</strong> network provider<br />
Your <strong>telephone</strong> supports supplementary services provided by your <strong>telephone</strong><br />
network provider, such as brokering, call waiting and conference<br />
facilities. These supplementary services can be used by implementing the<br />
R button. Please contact your <strong>telephone</strong> network provider as to which<br />
Flash time you must set to use the supplementary services offered. Also<br />
contact your <strong>telephone</strong> network provider with regard to enabling supplementary<br />
services.<br />
19
13 Appendix<br />
Menu Structure<br />
CALL LIST<br />
PHONEBOOK<br />
BS SETTINGS BS RINGER MELODY 1..5<br />
RING VOLUME VOLUME OFF<br />
VOLUME 1..5<br />
DELETE HS<br />
DIAL MODE TONE<br />
PULSE<br />
FLASH TIME SHORT<br />
MEDIUM<br />
LONG<br />
CHANGE PIN<br />
HS SETTINGS ALARM OFF/ON<br />
RING SETUP INT. RING MELODY 1..5<br />
EXT. RING MELODY 1..5<br />
RING VOLUME VOLUME OFF<br />
VOLUME 1..5<br />
TONE SETUP KEY TONE ON/OFF<br />
BATTERY TONE ON/OFF<br />
OUT OF RANGE ON/OFF<br />
LANGUAGE 13 LANGUAGEs<br />
RENAME HS<br />
HS DISPLAY HANDSET NAME<br />
TIME<br />
AUTO ANSWER ON/OFF<br />
DATE & TIME DATE FORMAT<br />
TIME FORMAT<br />
SET TIME<br />
SET DATE<br />
REGISTRATION<br />
DEFAULT<br />
ANS. MACHINE MSG PLAYBACK<br />
DELETE ALL<br />
MEMO<br />
TAM ON/OFF<br />
TAM SETTINGS ANSWER MODE ANS & REC.<br />
ANSWER ONLY<br />
TAM LANGUAGE DEUTSCH / FRANCAIS<br />
OGM SETTINGS ANS & REC PLAYBACK/RECORD MESS<br />
ANSWER ONLY PLAYBACK/RECORD MESS<br />
ANSWER DELAY. TIME SAVER<br />
2 RINGS....8 RINGS<br />
RECORD TIME<br />
REMOTE ACC.<br />
COMPRESSION<br />
CHANGE PIN<br />
60S/120S/180S<br />
UNLIMITED<br />
ON/OFF<br />
LOW/MEDIUM/HIGH<br />
20
Troubleshooting<br />
Should problems arise with the <strong>telephone</strong>, please refer to the following information<br />
first. In the case of technical problems, you can contact our hotline<br />
service, Tel. 0900 00 1675 within Switzerland (Swiss<strong>com</strong> fees, via<br />
landline, at time of going to print: CHF 2.60/min). In the case of claims<br />
under the terms of guarantee, please contact your sales outlet. There is a<br />
2 year period of guarantee.<br />
No dialling tone can be heard after actuating the Off−hook button, the<br />
line is not engaged.<br />
− Check the <strong>telephone</strong> connection at the base station and the <strong>telephone</strong><br />
line wall socket.<br />
− Check the power plug connection at the base station and the 230 V<br />
power socket.<br />
− The line is engaged by another handset. Wait until the connection is<br />
terminated.<br />
Display message SEARCHING.<br />
− Check the power plug connection at the base station and the 230 V<br />
power socket.<br />
− Reduce the range between handset and base station.<br />
− Register handset.<br />
Base station does not ring.<br />
− Ringing tone is switched off −> Switch it on.<br />
No indicators in the display.<br />
− Handset is switched off −> Switch it on.<br />
− Battery is empty −> Recharge it.<br />
Default settings/State on delivery<br />
Call list:<br />
No entries<br />
Phone book: No entries<br />
Alarm:<br />
Off<br />
Handset ringing tone: Internal calls: Melody 2<br />
External calls: Melody 1<br />
Ringing tone volume: 3<br />
Base ringing tone: Melody 1<br />
Ringing tone volume: 3<br />
Alert tones: Key tone: On<br />
Battery empty: On<br />
Range: On<br />
Language: German<br />
Handset name: DET 387x<br />
Display:<br />
Handset name<br />
Automatic answer: On<br />
Date & time: Date format: DD−MM−YY<br />
Time format: 24−hour clock<br />
Dialling mode: Tone dialling<br />
Flash time: Short (100 ms)<br />
PIN: 0 0 0 0<br />
21
Answering machine: On<br />
TAM language: German<br />
Answer delay: 6 rings<br />
Answering mode: With message recording<br />
Recording time: 120s<br />
Remote access: On<br />
Compression: High<br />
Remote access PIN: 0 0 0 0<br />
14 Technical Data<br />
Standard: DECT / GAP<br />
No. of channels: 120 duplex channels<br />
Frequencies: 1880 MHz to 1900 MHz<br />
Duplex method: Time multiplex, 10 ms frame length<br />
Channel raster: 1728 kHz<br />
Bit rate:<br />
1152 kBit / s<br />
Modulation: GFSK<br />
Voice encoding: 32 kBit / s<br />
Transmission power: 10 mW (medium performance per channel)<br />
Range:<br />
Up to 300 meters in open spaces, up to 50 in<br />
buildings<br />
Power supply, base station:<br />
230 V / 50 Hz (mains adapter VD060045D), 6 V /<br />
450 mA DC<br />
Power supply, charging station:<br />
230 V / 50 Hz<br />
(mains adapter VD060020J), 6 V / 200 mA DC<br />
Power supply, handset:<br />
2 x AAA NiMH / 1.2 V / 500 mAh<br />
<strong>Operating</strong> time, handset:<br />
Standby / Operation 500 mAh = approx. 100 h /<br />
approx. 10 h<br />
Charging time for batteries:<br />
Approx. 16 hours<br />
Permissible ambient conditions for handset operation:<br />
5 °C to 45 °C ; 20% to 75% relative humidity<br />
Permissible ambient conditions for base station operation:<br />
5 °C to 45 °C ; 20% to 75% relative humidity<br />
Permissible storage temperature: −10 °C to +60 °C<br />
Dialling mode: Tone / Pulse, R−button: Flash (100 ms / 300 ms /<br />
600 ms)<br />
Dimensions, base station: L / W / H = 125 x 115 x 45 mm<br />
Dimensions, handset: L / W / H = 157 x 45 x 26 mm<br />
Telephone line assignment:<br />
TSV on Pins 3 and 4 in accordance with CTR 37<br />
(Euro assignment)<br />
Adapter plug: European type mains connector<br />
22
15 Declaration of Conformity<br />
This device fulfils the requirements stipulated in the EU<br />
directive:<br />
1999/5/EC directive on radio equipment and tele<strong>com</strong>munications<br />
terminal equipment and the mutual recognition<br />
of their conformity. Conformity with the above mentioned<br />
directive is confirmed by the CE symbol on the<br />
device.<br />
To view the <strong>com</strong>plete Declaration of Conformity, please refer to the free<br />
download available on our web site www.switel.<strong>com</strong>.<br />
Maintenance<br />
Clean the housing surfaces with a soft, fluff−free cloth.<br />
Do not use any cleaning agents or solvents.<br />
16 Guarantee<br />
SWITEL equipment is produced and tested according to the latest production<br />
methods. The implementation of carefully chosen materials and<br />
highly developed technologies ensure trouble−free functioning and a long<br />
service life. The terms of guarantee do not apply where the cause of<br />
equipment malfunction is the fault of the <strong>telephone</strong> network operator or<br />
any interposed private branch extension system. The terms of guarantee<br />
do not apply to the batteries or power packs used in the products. The<br />
period of guarantee is 24 months from the date of purchase.<br />
All deficiencies related to material or manufacturing errors within the<br />
period of guarantee will be redressed free of charge. Rights to claims<br />
under the terms of guarantee are annulled following tampering by the purchaser<br />
or third parties. Damage caused as the result of improper handling<br />
or operation, normal wear and tear, incorrect positioning or storage, improper<br />
connection or installation or Acts of God and other external influences<br />
are excluded from the terms of guarantee. In the case of <strong>com</strong>plaints,<br />
we reserve the right to repair defect parts, replace them or replace<br />
the entire device. Replaced parts or devices be<strong>com</strong>e our property. Rights<br />
to <strong>com</strong>pensation in the case of damage are excluded where there is no<br />
evidence of intent or gross negligence by the manufacturer.<br />
If your device does show signs of a defect within the period of guarantee,<br />
please contact the sales outlet where you purchased the SWITEL device,<br />
producing the purchase receipt as evidence. All claims under the terms of<br />
guarantee in accordance with this agreement can only be asserted at the<br />
sales outlet. No claims under the terms of guarantee can be asserted<br />
after a period of two years from the date of purchase and hand−over of the<br />
product.<br />
23