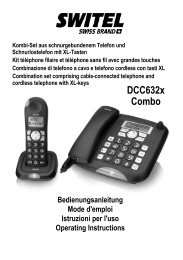
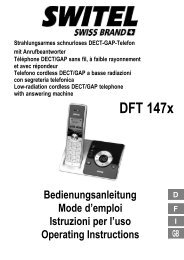
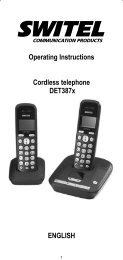
Cordless DECT/GAP telephone with digital answering ... - Switel.com
Cordless DECT/GAP telephone with digital answering ... - Switel.com
Cordless DECT/GAP telephone with digital answering ... - Switel.com

You also want an ePaper? Increase the reach of your titles
YUMPU automatically turns print PDFs into web optimized ePapers that Google loves.
<strong>Cordless</strong> <strong>DECT</strong>/<strong>GAP</strong> <strong>telephone</strong> <strong>with</strong><br />
<strong>digital</strong> <strong>answering</strong> machine<br />
A<br />
B<br />
C<br />
D<br />
E<br />
F<br />
G<br />
O<br />
DET187x<br />
Operating Instructions<br />
Unpacking your phone<br />
In the box you will find:<br />
- the cordless handset (two handsets <strong>with</strong> a Twin system, three <strong>with</strong> a<br />
Triple system and four <strong>with</strong> a Quad system).<br />
- the base unit<br />
- two rechargeable battery cells for each handset.<br />
- a battery <strong>com</strong>partment cover for each handset.<br />
- a <strong>telephone</strong> line cable for the base unit.<br />
- a mains power lead and adapter for the base unit.<br />
- charger pods, each <strong>with</strong> an attached mains power lead and adapter, for<br />
multihandset system.<br />
** Keep your sales receipt as it is your guarantee.<br />
Charging batteries for the first time<br />
Before you start to use your <strong>telephone</strong> make sure that all batteries are<br />
fully charged for 16 hours.<br />
Important note:<br />
This <strong>telephone</strong> is not designed for Emergency calls when the mains<br />
power fails.<br />
For Emergency calls you should have a basic phone that operates<br />
<strong>with</strong>out mains power, connected to your line so that you can make calls<br />
during a power failure.<br />
Phone Function Keys<br />
A Earpeace<br />
B OK Button<br />
- Select a menus entry<br />
H<br />
I<br />
J<br />
K<br />
L<br />
C Navigation Button<br />
- Up to increase volume and view CID<br />
- Down to decrease volume and access phonebook<br />
D Talk Button<br />
- Make a call<br />
- Accept a call<br />
M<br />
N<br />
E Menu Button<br />
- Access to main menu<br />
F [*] Button<br />
- Long press to activate or deactivate the key lock<br />
G Mute Button<br />
- Mute/unmute the microphone<br />
H Display<br />
I Back Button<br />
- Cancel a menu entry<br />
- Backspace the digit(s) or character(s)<br />
- Press and hold to toggle between handset name<br />
and date /time in idle mode<br />
J End Button<br />
- End a call<br />
- Press and hold to turn the handset on/off<br />
- Exit the menu/operation<br />
K R Button<br />
- Flash the phone line<br />
L Redial Button<br />
- Enter redial list and dial the recent number<br />
M [#] Button<br />
- Insert a pause<br />
- Long press to turn the ringer on /off<br />
N INT Button<br />
- Make the inter<strong>com</strong> call<br />
- Make the conference call<br />
O Microphone<br />
Base station<br />
What’s on the display?<br />
What the icons mean?<br />
Battery Charge Level<br />
Call<br />
Message<br />
Caller display<br />
Phonebook<br />
Alarm<br />
Ringer Off<br />
TAM<br />
Signal Level<br />
A<br />
B<br />
C<br />
D<br />
E<br />
F<br />
A Turn the <strong>answering</strong> machine on/off<br />
B Play/Stop message playback<br />
C Skip to next message<br />
D Go back to previous message or replay current<br />
message<br />
E Delete current message, long press to delete all<br />
read messages<br />
F Increase/Decrease speaker volume<br />
A Display Icons<br />
B Displays when in menu mode to confirm your<br />
selection.<br />
C Indicates that more options are available.<br />
Use the UP / DOWN keys to scroll up/down.<br />
D Displays when in menu mode.<br />
Select BACK to return to the previous menu level.<br />
Select BACK to delete the last digit/character<br />
entered.<br />
Indicates battery is fully charged.<br />
Indicates that an external call is connected or held.<br />
Icon blinks when receiving an in<strong>com</strong>ing call.<br />
Indicates you have a new Voice Mail message.<br />
Indicates you have new missed calls, or the call log is<br />
being viewed.<br />
Displays when the phonebook is accessed.<br />
Displays when the alarm clock is activated.<br />
Displays when ringer volume is turned off.<br />
Appears when the <strong>answering</strong> machine function is on.<br />
Flashes when a new message is received.<br />
Indicates that the handset is registered and <strong>with</strong>in<br />
range of the base station.<br />
Icon blinks when the handset is out of range or is<br />
searching for a base.<br />
Read First Before Use<br />
The base unit and charger pod(s) should be placed on a level surface, in<br />
a position where:<br />
- the mains adapter plug will reach an easily accessible 100-240 V AC<br />
switched mains supply socket - never try to lengthen the mains power<br />
cable.<br />
- the base unit’s <strong>telephone</strong> line cable will reach your <strong>telephone</strong> line<br />
socket or extension socket (the charger pod does not have a <strong>telephone</strong><br />
line connection).<br />
- it is not close to another <strong>telephone</strong> - this can cause radio interference.<br />
- it is not close to a sink, bath or shower, or anywhere else where it might<br />
get wet.<br />
- it is not close to other electrical equipment - fridges, washing machines,<br />
microwave ovens, fluorescent lights, televisions etc.<br />
- it is away from hot, humid conditions and strong sunlight.<br />
Radio signals between handset and base unit<br />
To use your handset and base unit together, you must be able to<br />
maintain a radio link between them. Be aware that any large metal<br />
objects, like a refrigerator, a mirror, filing cabinet, etc, between the<br />
handset and the base unit may block the radio signal. Other solid<br />
structures, like walls, may reduce the signal strength.<br />
Interference<br />
If the sound quality gets worse as you move around while on a call, this<br />
is probably caused by interference between the handset and the base<br />
unit, perhaps because you are too near to another phone or other<br />
electrical equipment. Move to a different position to clear the<br />
interference. If you do not move, it might cause a short break or your call<br />
may be cut off.<br />
ECO Mode<br />
Both in Call mode as well as in Standby mode, the radiation is<br />
reduced considerably as <strong>com</strong>pared to standard, cordless<br />
<strong>DECT</strong> <strong>telephone</strong>s.<br />
Mains power connection<br />
IMPORTANT - The base unit and charger pod must be used <strong>with</strong> the<br />
mains adapters supplied <strong>with</strong> the unit. Using any other adapter will result<br />
in non-<strong>com</strong>pliance <strong>with</strong> EN60950, and will invalidate any approval given<br />
to this apparatus.<br />
Your phone’s base station is supplied <strong>with</strong> an energy-efficient switching<br />
power supply IA5060G or S003IV0600050 (Input 100~240 V AC , Output<br />
6 V DC , 500 mA). The adaptor input power <strong>with</strong>out load is approx. 0.3 W.<br />
The average efficiency is approx. 69.12 %.<br />
The electrical consumption of the base is:<br />
- in operation mode (idle/call): approx. 1.1 / 1.4 W<br />
- during charging of the handset: approx. 1.7 W<br />
The charging station(s) supplied <strong>with</strong> a <strong>telephone</strong> set is (are) equipped<br />
<strong>with</strong> an energy-efficient switching power supply (Input 100~240 V AC ,<br />
Output 6 V DC , 150 mA). The zero load is approx. 0.3 W. The average<br />
efficiency is approx. 69.12 %. The charging station has the following<br />
power consumption levels:<br />
- <strong>with</strong>out a handset: Approx. 0.3 W<br />
- while charging the handset: Approx. 0.9 W<br />
Battery safety - CAUTION<br />
ONLY use the rechargeable batteries supplied <strong>with</strong> the handset. DO<br />
NOT use non-rechargeable batteries - they may explode and cause<br />
damage to your <strong>telephone</strong>.<br />
Installation and Set-up<br />
Fit the rechargeable batteries in each handset<br />
1) Install the AAA batteries (Brand name: HFR, Capacity: Ni-MH<br />
1.2V/400mAh, or Brand name: SANIK, Capacity: Ni-MH 1.2V/400mAh)<br />
into handset in accordance <strong>with</strong> the polarity marked in the battery<br />
<strong>com</strong>partment.<br />
2) Close the battery <strong>com</strong>partment cover, sliding it into place and<br />
pressing firmly to make sure it is secure.<br />
Connecting AC (electrical) power<br />
1. Plug the base power adaptor (Type: IA5060G or S003IV0600050,<br />
100-240 V AC / 6 V DC / 500 mA) cord into the power jack on rear panel of<br />
the base and the other end into a 100-240 V AC 50-60 Hz electrical<br />
outlet.<br />
2. Connect <strong>telephone</strong> line cord into the phone jack on rear panel of the<br />
base and the other end into a main socket, Plug the charger power<br />
adaptor into a 100-240 V AC 50-60 Hz electrical outlet.<br />
Before you use the cordless handset for the first time, it’s important to<br />
charge the batteries fully.<br />
Leave the handset on the charging cradle for 16 hours.<br />
The battery charge symbol will blink when you’re charging an empty<br />
battery.<br />
If you think that the symbol isn’t showing the correct battery charge level,<br />
first check that the handset is correctly positioned in the charging cradle.<br />
If you’re sure that it is, remove and refit the batteries. Please note that<br />
it’s normal for the mains adapter to be<strong>com</strong>e warm this doesn’t indicate a<br />
fault.<br />
CAUTION:<br />
Use only the power supply that came <strong>with</strong> this unit. Using other power<br />
supplies may damage the unit.<br />
Base adaptor type is IA5060G or S003IV0600050, 100-240 V AC /<br />
6 V DC / 500 mA.<br />
Your Telephone Operations<br />
Switching on/off<br />
Press and hold the END button for more than 2 seconds to<br />
switch on/off the handset in idle mode.<br />
** You can switch the handset off and save battery charge.<br />
Notes: When the handset is OFF, it cannot be used for making calls<br />
including emergency calls. There will be no ringing during an in<strong>com</strong>ing<br />
call. To answer a call, you will need to switch it back on. It may take<br />
some time for the handset to re-establish a radio link <strong>with</strong> the base unit.<br />
To lock/unlock the keypad<br />
Press and hold the STAR key for 1 second to lock/unlock<br />
the keypad in idle mode.<br />
Note: In<strong>com</strong>ing calls can still be answered even if the keypad was<br />
locked.<br />
Set time and date<br />
Note: If you subscribe to the Caller Display service, the time and date<br />
will be set automatically when you receive a call, but you may still need<br />
to set the correct year.<br />
1. Press MENU key to enter menu selection.<br />
2. Press the Navigation key to select CLOCK&ALARM and then press<br />
OK key to select.<br />
3. Press OK key to select DATE/TIME. The last stored date is displayed.<br />
Enter the current date (YY-MM-DD), press OK, then enter the time<br />
(HH-MM).<br />
4. Press the Navigation key to select AM or PM (if the time is in 12<br />
HOURS format) and then press OK key to confirm. A confirmation beep<br />
is played.<br />
Change your handset’s name<br />
1. Press MENU key to enter menu selection.<br />
2. Press the Navigation key to select PERSONAL SET and then press<br />
OK key to select.<br />
3. Press the Navigation key to select HANDSET NAME and then press<br />
OK key to select. The current handset name is displayed.<br />
4. Press BACK key to delete the characters one by one.<br />
Enter the new name (maximum 10 characters) and press OK key to<br />
confirm. A confirmation beep is played.<br />
Change the display language<br />
1. Press MENU key to enter menu selection.<br />
2. Press the Navigation key to select PERSONAL SET and then press<br />
OK key to select.<br />
3. Press the Navigation key to select LANGUAGE and then press OK<br />
key to select.<br />
4. Press the Navigation key to your desired language and press OK key<br />
to confirm. A confirmation beep is played.<br />
** Once the display language is set, the option menus on the handset<br />
will switch to display in the selected language immediately.<br />
Make and answer calls<br />
Make a call<br />
Predialling<br />
Direct dialling<br />
Call from redial list<br />
Dial the number (maximum 24 digits) and then press TALK<br />
key.<br />
Press TALK key to take the line and then dial the number<br />
(maximum 24 digits).<br />
Press Redial key in idle mode.<br />
Press the Navigation key to an entry in the redial list and<br />
then press TALK key.<br />
Call from the call log<br />
Press CALL LOG (UP) key in idle mode.<br />
Press the Navigation key to an entry in the call list and then<br />
press TALK key.<br />
Note: You need to subscribe to Caller Line Identification service to be<br />
able to see the caller’s number or name in the call log.<br />
Call from the phonebook<br />
Press PHONEBOOK (DOWN) key in idle mode.<br />
Press the Navigation key to an entry in the phonebook and<br />
then press TALK key.<br />
Answer and end a call<br />
1. When the phone rings, press TALK key.<br />
2. To end a conversation, press END key.<br />
Warning: When the handset rings during an in<strong>com</strong>ing call, please do not<br />
hold the handset too close to your ear as the volume of the ringing tone<br />
may damage your hearing.<br />
Important note:<br />
You can simply place the handset back on its base station or charger<br />
pod to end the call.<br />
Make sure that you have not deactivated the auto hang-up feature.<br />
Adjust the earpiece volume<br />
During a call, press the Navigation key to select from VOLUME 1 to<br />
VOLUME 3.<br />
Mute/unmute microphone<br />
When the microphone is muted, the handset displays MUTE ON, and<br />
your caller cannot hear you.<br />
During a call, press the MUTE key to turn on/off the microphone.<br />
Paging<br />
The paging feature enables you to locate a missing handset if the<br />
handset is in range and contains charged batteries.<br />
Press HANDSET LOCATOR key located at the back of the<br />
base station. All the registered handsets start to ring.<br />
Once retrieved, press any key on the handset or the HAND-<br />
SET LOCATOR key again to end the paging.<br />
Call waiting<br />
If you have subscribed to Call Waiting service, the earpiece will emit a<br />
beep tone to inform you that there is a second in<strong>com</strong>ing call. The<br />
number or name of the second caller will also be displayed on your<br />
phone if you have subscribed to Caller Line Identification service (CLI).<br />
Please contact your network provider for more information on this<br />
service.<br />
Using your phonebook<br />
Your phone can store up to 50 phonebook memories. Each phonebook<br />
entry can have a maximum of 24 digits for the phone number and 12<br />
characters for name.<br />
How to enter characters?<br />
When you select a field in which you can enter text, you can enter the<br />
letters that are printed on the keys by pressing the relevant key once or<br />
several times.<br />
For example, press 2 once to insert the letter A, press 2 twice to insert<br />
the letter B, and so on... Spaces and other symbols can be entered<br />
using the 1 or 0 key.<br />
Store a contact in the phonebook<br />
1. Press MENU key to enter menu selection.<br />
2. Press the Navigation key to select PHONEBOOK and then press OK<br />
key to select.<br />
3. Press OK key again to enter NEW ENTRY.<br />
4. Enter the name of the contact (maximum 12 characters). To edit,<br />
press BACK key to delete the last character entered. Press OK key to<br />
confirm the name entry.<br />
5. Enter the number of the contact (maximum 24 digits) and then press<br />
OK key to confirm. A confirmation beep is played.<br />
** You cannot store a new phonebook entry when the memory is full. In<br />
this case, you have to delete existing entries to make space for new<br />
entries.<br />
** When storing the number, enter the full number including the STD<br />
(area) code if you subscribe to caller display, otherwise it will not display<br />
the name when there is an in<strong>com</strong>ing call.<br />
Access phonebook<br />
1. Press PHONEBOOK (DOWN) key in idle mode to browse the<br />
phonebook entries. Alternatively, you can press the MENU key, to<br />
display PHONEBOOK and then press OK key to select.<br />
2. Press the Navigation key to select LIST and then press OK key to<br />
confirm. The phonebook entries will be listed in alphabetical order, and<br />
you can press Navigation key to scroll through the stored entries.<br />
3. Press OK key to view the details of the selected entry.<br />
** Instead of pressing the Navigation key to browse the phonebook<br />
entries, you can press the numeric key corresponding to the first letter of<br />
the entry you wish to locate. For example, pressing 2 will show the<br />
entries starting <strong>with</strong> A. Pressing 2 again will show the entries starting<br />
<strong>with</strong> B, and so on...<br />
Modify a phonebook entry<br />
1. Press MENU key to enter menu selection.<br />
2. Press the Navigation key to select PHONEBOOK and then press OK<br />
key to select.<br />
3. Press the Navigation key to select EDIT ENTRY and then press OK<br />
key to select.<br />
4. Press the Navigation key to select an entry to edit and then press OK<br />
key. The current name is displayed. Edit the name and then press OK<br />
key to confirm.<br />
5. Edit the number and then press OK key to confirm. A confirmation<br />
beep is played.<br />
Delete a phonebook entry<br />
1. Press MENU key to enter menu selection.<br />
2. Press the Navigation key to select PHONEBOOK and then press OK<br />
key to select.<br />
3. Press the Navigation key to select DELETE and then press OK key to<br />
select.<br />
4. Press the Navigation key to select an entry to delete and then press<br />
OK key.<br />
5. Press OK key again to confirm. A confirmation beep is played.<br />
Delete all entries from the phonebook list<br />
1. Press MENU key to enter menu selection.<br />
2. Press the Navigation key to select PHONEBOOK and then press OK<br />
key to select.<br />
3. Press the Navigation key to select DELETE ALL and then press OK<br />
key to select.<br />
4. Press OK key again to confirm. A confirmation beep is played.<br />
Direct access memory<br />
There are 2 direct access memories (Keys 1 & 2) in addition to the<br />
phonebook memory. A long press on the keys in idle mode will<br />
automatically dial the stored phone number.<br />
Add/edit direct access memory<br />
1. Press MENU key to enter menu selection.<br />
2. Press the Navigation key to select PHONEBOOK and then press OK<br />
key to select.<br />
3. Press the Navigation key to select DIRECT MEM. and then press OK<br />
key to select.<br />
4. Press the Navigation key to select KEY 1 or KEY 2 and then press<br />
OK key. The stored name is displayed, or NO NUMBER if it is empty. If<br />
there is no number stored for the selected key or if you want to change<br />
the name or number currently stored, press MENU key to enter direct<br />
memory menu to add/edit the name or number.<br />
5. Press the Navigation key to select EDIT NUMBER and then press OK<br />
key to select. The display shows the currently stored name, or ENTER<br />
NAME if there is no number stored. Edit or enter the name you want and<br />
then press OK key. The display shows the currently stored number, or<br />
ENTER NUMBER if there is no number stored. Edit or enter the number<br />
you want and then press OK key to confirm. A confirmation beep is<br />
played.<br />
Delete direct access memory<br />
1. Press MENU key to enter menu selection.<br />
2. Press the Navigation key to select PHONEBOOK and then press OK<br />
key to select.<br />
3. Press the Navigation key to select DIRECT MEM. and then press OK<br />
key to select.<br />
4. Press the Navigation key to select KEY 1 or KEY 2 and then press<br />
OK key. The stored name is displayed (or NO NUMBER if it is already<br />
empty).<br />
5. Press MENU key to enter direct memory menu.<br />
6. Press the Navigation key to select DELETE and then press OK key to<br />
select. Press OK key again to confirm. A confirmation beep is played.<br />
Using the redial list<br />
The redial list stores the last 5 numbers dialed. A maximum of 24 digits<br />
can be displayed for each entry.<br />
Access redial list<br />
1. Press Redial button in idle mode and press Navigation key to browse<br />
the redial list. The last number dialed will appear first in the redial list.<br />
2. Press OK key to view the details of the selected entry.<br />
Save a redial number into the phonebook<br />
1. Press Redial key in idle mode to go to the redial list.<br />
2. Press the Navigation key to select an entry.<br />
3. Press MENU key to display SAVE NUMBER, then press OK key to<br />
display ENTER NAME. Enter the name of the contact (maximum 12<br />
characters) and then press OK key to save the entry, and return the<br />
display to the redial list.<br />
Delete a redial number<br />
1. Press Redial key in idle mode to go to the redial list.<br />
2. Press the Navigation key to select an entry and then press MENU<br />
key.<br />
3. Press the Navigation key to select DELETE and then press OK key to<br />
select.<br />
4. Press OK key again to confirm. A confirmation beep is played.<br />
Delete the redial list<br />
1. Press Redial key in idle mode to go to the redial list.<br />
2. Press the MENU key.<br />
3. Press the Navigation key to select DELETE ALL and then press OK<br />
key to select.<br />
4. Press OK key again to confirm. A confirmation beep is played.<br />
Using the call log<br />
To receive Caller ID you may need to contact your <strong>telephone</strong> service<br />
provider, and they will inform you also of any charges for it.Caller ID lets<br />
you see the phone numbers of your callers on the handset display,<br />
before you answer and in your Call Log afterwards.The Call Log stores<br />
the last 10 external calls, whether or not you answered the call, so you<br />
can call them back later.<br />
Only the most recent call is saved if there are repeat calls from the same<br />
number. When the Call Log is full, the next new call will replace the<br />
oldest entry. If you’ve got a new call in the Call Log, the Caller Display<br />
icon will appear on the handset display.<br />
If the received number is the same as one in your phonebook, the name<br />
from the phonebook will display as well as the number.<br />
If a call is from someone who <strong>with</strong>held their number, the display will<br />
show WITHHOLD ID.<br />
If the call is from someone whose number is unavailable, or if you have<br />
not subscribed to Caller ID but have set the date and time, the display<br />
will show CALLING when it is received and UNAVAILABLE in the Call<br />
Log.<br />
Access call log<br />
Press CALL LOG(UP) key in idle mode and press Navigation key to<br />
browse the call list. The calls are displayed in chronological order <strong>with</strong><br />
the most recent call at the top of the list.<br />
1. Press OK key to display more details of the call, including the date<br />
and time.<br />
Save call list entry into the phonebook<br />
2. Press CALL LOG(UP) key in idle mode to go to the call list.<br />
3. Press the Navigation key to select an entry and then press MENU<br />
key.<br />
4. Press the Navigation key to select SAVE NUMBER and then press<br />
OK key to select. ( Enter the name of the contact (maximum 12<br />
characters) and then press OK key to confirm.<br />
Delete a Call Log entry<br />
1. Press CALL LOG(UP) key in idle mode to go to the call list.<br />
2. Press the Navigation key to select an entry and then press MENU<br />
key.<br />
3. Press the Navigation key to select DELETE and then press OK key to<br />
select. (Press OK key again to confirm. A confirmation beep is played.)<br />
Delete all entries in the Call Log<br />
1. Press CALL LOG (UP) key in idle mode to go to the call list.<br />
2. Press the MENU key.<br />
3. Press the Navigation key to select DELETE ALL and then press OK<br />
key to select. (Press OK key again to confirm. A confirmation beep is<br />
played.<br />
Answering machine operation by handset<br />
You can use the answer machine menu on the handset to access and<br />
change the settings for all the <strong>answering</strong> machine functions.<br />
Turn the <strong>answering</strong> machine on or off<br />
1. Press MENU key to enter menu selection.<br />
2. Press the Navigation key to select ANSW MACHINE and then press<br />
OK key to select.<br />
3. Press the Navigation key to select ANSW. ON/OFF and then press<br />
OK key to select.<br />
4. Press the Navigation key to select ON or OFF and then press OK key<br />
to confirm.<br />
5. A confirmation beep is played. Press END key to go back to idle<br />
mode.<br />
* You can also turn the <strong>answering</strong> machine on or off by pressing the<br />
ON/OFF key on the base.<br />
** If the <strong>answering</strong> machine is turned off and the master PIN is still set at<br />
its default 0000, the <strong>answering</strong> machine will not answer to any in<strong>com</strong>ing<br />
ringing, but if the master PIN has been changed, it will answer after<br />
10 rings to allow remote access.<br />
The outgoing message<br />
The model is supplied <strong>with</strong> two predefined outgoing messages (OGM)<br />
used for the different answer modes.<br />
There are 2 answer modes available: Answer Only and Answer &<br />
Record. By default, the answer mode is ANSW.&RECORD, which allows<br />
a caller to leave a message on the <strong>answering</strong> machine. This can be<br />
changed to ANSWER ONLY mode, which does not allow callers to leave<br />
any messages on the <strong>answering</strong> machine.<br />
Set the answer mode<br />
1. Press the MENU key to enter menu selection.<br />
2. Press the Navigation key to select ANSW MACHINE and then press<br />
OK key to select.<br />
3. Press the Navigation key to select ANSWER MODE and then press<br />
OK key to select.<br />
4. Press the Navigation key to select ANSWER ONLY or<br />
ANSW.&RECORD and then press OK key to confirm.<br />
Record a personalised outgoing message<br />
* You can choose to replace the predefined OGM <strong>with</strong> your own<br />
pre-recorded personalised messages.<br />
1. Press the MENU key to enter menu selection.<br />
2. Press the Navigation key to select ANSW MACHINE and then press<br />
OK key to select.<br />
3. Press the Navigation key to select RECORD OGM and then press OK<br />
key to select.<br />
4. Press the Navigation key to select ANSWER ONLY or<br />
ANSW.&RECORD and then press OK key to confirm.<br />
5. Press the Navigation key to select RECORD OGM.<br />
6. Press OK key to start recording your new outgoing message.<br />
7. Press OK key again to end the recording.<br />
* The maximum length of an outgoing message is 2 minutes.<br />
* To hear your outgoing message, select PLAY at step 5.<br />
* To delete a personalised outgoing message and return to the<br />
predefined one, select DELETE at step 5.
Playback and delete messages<br />
The last recorded message is played first via the loudspeaker on model.<br />
Old messages cannot be played again until after all new messages have<br />
been played.<br />
Playback recorded messages<br />
1. Press the MENU key to enter menu selection.<br />
2. Press the Navigation key to select ANSW MACHINE and then press<br />
OK key to select.<br />
3. Press the OK key to start playback.<br />
* During message playback you can press MENU key, then Navigation<br />
to select options to REPEAT the current message, skip forward to the<br />
NEXT message, skip back to the PREVIOUS message or DELETE the<br />
current message.<br />
Delete all recorded messages<br />
1. Press the MENU key to enter menu selection.<br />
2. Press the Navigation key to select ANSW MACHINE and then press<br />
OK key to select.<br />
3. Press the Navigation key to select DELETE ALL and then press OK<br />
key to select.<br />
Using the inter<strong>com</strong><br />
Inter<strong>com</strong>, call transfer and conference are only possible <strong>with</strong> at least 2<br />
handset registered to the same base station. It allows you to make free<br />
internal calls, transfer external calls from one handset to another, and<br />
set up a 3-way conference <strong>with</strong> two handsets and an external call.<br />
If you try to make a call while another handset is already on an external<br />
call, you’ll hear a busy tone for a few seconds before the display returns<br />
to idle.<br />
Inter<strong>com</strong> another handset<br />
Press INT key in idle mode.<br />
Inter<strong>com</strong> is established immediately if there are only 2 registered<br />
handsets.<br />
If there are more than 2 registered handsets, the handset numbers<br />
which are available for inter<strong>com</strong>, and a * , will be displayed. Press the<br />
specific handset number you wish to call, or press * to ring all handsets,<br />
to start inter<strong>com</strong>.<br />
Transfer an external call to another handset<br />
During the call, press INT key to put the external call on hold<br />
(the caller can no longer hear you).<br />
Inter<strong>com</strong> is established immediately if there are only 2 registered<br />
handsets. If there are more than 2 registered handsets, the handset<br />
numbers which are available for inter<strong>com</strong>, and a ’*’, will be displayed.<br />
Press the specific handset number you wish to call, or press ’*’ to ring all<br />
handsets, to start inter<strong>com</strong>.<br />
Press TALK key on the called handset to answer the internal<br />
call, where both internal callers can talk. Inter<strong>com</strong> is established.<br />
Press HANG-UP/EXIT button on the first handset to transfer<br />
the external call to the called handset. The external call is<br />
transferred.<br />
** If there is no answer from the called handset, press INT key to resume<br />
the external call.<br />
Answer an external call during inter<strong>com</strong><br />
During inter<strong>com</strong>, a new call tone is emitted when there is an in<strong>com</strong>ing<br />
external call.<br />
Press TALK key to answer the external call and end the inter<strong>com</strong>.<br />
Connection <strong>with</strong> the external call is established.<br />
** To put the internal call on hold and answer the in<strong>com</strong>ing external call,<br />
press INT key.<br />
Switch between an internal and external call<br />
During the call, press INT key to switch between an internal<br />
or external call.<br />
Establish a three-party conference call<br />
The conference call feature allows one external call to be shared <strong>with</strong><br />
two handsets (in inter<strong>com</strong>). The three parties can share the conversation<br />
and no additional network subscription is required.<br />
During an external call, press INT key to put the external call<br />
on hold (the caller can no longer hear you).<br />
If there are more than 2 registered handsets, the handset numbers<br />
which are available for inter<strong>com</strong> will be displayed. Press the specific<br />
handset number you wish to call to start inter<strong>com</strong>.<br />
Handset Tone<br />
Press TALK key on the called handset to answer the internal<br />
call, where both internal callers can talk. Inter<strong>com</strong> is established.<br />
Press and hold INT key for 2 seconds on the first handset to<br />
start the three-party conference.<br />
CONFERENCE will be displayed on the screen once the<br />
conference call is established.<br />
Set the ring volume<br />
There are 5 ringer volume options (OFF, LEVEL 1, LEVEL 2, LEVEL 3<br />
and LEVEL 4). The default level is LEVEL 3.<br />
1. Press MENU key to enter menu selection.<br />
2. Press the Navigation key to select PERSONAL SET and then press<br />
OK key to select.<br />
3. Press the Navigation key to select HANDSET TONE and then press<br />
OK key to select and show RING VOLUME. Press the OK key again to<br />
select.<br />
4. Press the Navigation key to your desired volume level and then press<br />
OK key to confirm. A confirmation beep is played.<br />
Set the ring melody<br />
There are 10 ring melodies available on your handset.<br />
1. Press MENU key to enter menu selection.<br />
2. Press the Navigation key to select PERSONAL SET and then press<br />
OK key to select.<br />
3. Press the Navigation key to select HANDSET TONE and then press<br />
OK key to select.<br />
4. Press the Navigation key to select RING TONES and then press OK<br />
to select.<br />
5. Press the Navigation key to your desired melody and then press OK<br />
key to confirm. A confirmation beep is played.<br />
Activate/deactivate key tone<br />
A single tone is emitted when a key is pressed. You can enable or<br />
disable the key tone. By default, the key tone is ON.<br />
1. Press MENU key to enter menu selection.<br />
2. Press the Navigation key to select PERSONAL SET and then press<br />
OK key to select.<br />
3. Press the Navigation key to select HANDSET TONE and then press<br />
OK key to select.<br />
4. Press the Navigation key to select KEY BEEP and then press OK to<br />
select.<br />
5. Press the Navigation key to select ON or OFF and then press OK key<br />
to confirm. A confirmation beep is played.<br />
Activate/deactivate auto hang-up<br />
This function enables you to end a call automatically by simply placing<br />
the handset on the base station. By default, the Auto Hang up feature is<br />
ON.<br />
1. Press MENU key to enter menu selection.<br />
2. Press the Navigation key to select PERSONAL SET and then press<br />
OK key to select.<br />
3. Press the Navigation key to select AUTO HANG-UP and then press<br />
OK key to select.<br />
4. Press the Navigation key to select ON or OFF and then press OK key<br />
to confirm. A confirmation beep is played.<br />
Set date/time format<br />
Set time format<br />
You can set your preferred date/time format for your phone. The default<br />
format is DD/MM and 24 HOURS.<br />
1. Press MENU key to enter menu selection.<br />
2. Press the Navigation key to select CLOCK&ALARM and then press<br />
OK key to select.<br />
3. Press the Navigation key to select SET FORMAT and then press OK<br />
key to select.<br />
4. Press OK key to enter TIME FORMAT. The current setting is<br />
displayed.<br />
5. Press the Navigation key to select 12 HOURS or 24 HOURS and then<br />
press OK key to confirm. A confirmation beep is played.<br />
Set date format<br />
1. Press MENU key to enter menu selection.<br />
2. Press the Navigation key to select CLOCK&ALARM and then press<br />
OK key to select.<br />
3. Press the Navigation key to select SET FORMAT and then press OK<br />
key to select.<br />
4. Press the Navigation key to select DATE FORMAT and then press OK<br />
key to select. The current setting is displayed.<br />
5. Press the Navigation key to select DD/MM or MM/DD and then press<br />
OK key to confirm. A confirmation beep is played.<br />
Set alarm<br />
The handset has an alarm clock feature, and when the alarm is set, the<br />
is shown on the handset display.<br />
When the alarm time is reached, the display flashes -ALARM- and the<br />
alarm melody is played for 1 minute or until any handset key is pressed.<br />
If the alarm is set for ON DAILY and the alarm will sound again on the<br />
next day. If the alarm was set for ON ONCE, the will be turned off.<br />
1. Press MENU key to enter menu selection.<br />
2. Press the Navigation key to select CLOCK&ALARM and then press<br />
OK key to select.<br />
3. Press the Navigation key to select ALARM and then press OK key to<br />
select.<br />
4. Press the Navigation key to select OFF, ON ONCE or ON DAILY and<br />
then press OK key to confirm.<br />
If you select ON ONCE or ON DAILY, enter the time (HH-MM) for the<br />
alarm and press the UP/DOWN key to select AM or PM if the time is in<br />
12 HOURS format.<br />
5. Press OK key to confirm. A confirmation beep is played.<br />
Set alarm tone<br />
1. Press MENU key to enter menu selection.<br />
2. Press the Navigation key to select CLOCK&ALARM and then press<br />
OK key to select.<br />
3. Press the Navigation key to select ALARM TONE and then press OK<br />
key to select.<br />
4. Press the Navigation key to select MELODY 1, MELODY 2 or<br />
MELODY 3 and then press OK key to confirm. A confirmation beep is<br />
played.<br />
Advanced use of your <strong>telephone</strong><br />
Change Master PIN<br />
The Master PIN is used for registration/unregistration of handsets and<br />
for accessing the <strong>answering</strong> machine remotely. The default Master PIN<br />
number is 0000. The maximum length of the Master PIN is 8 digits.<br />
Note: If you forget your PIN code, you can reset it to its default 0000<br />
using a handset Reset (page 15).<br />
1. Press MENU key to enter menu selection.<br />
2. Press the Navigation key to select ADVANCED SET and then press<br />
OK key to select.<br />
3. Press the Navigation key to select CHANGE PIN and then press OK<br />
key to select.<br />
Enter the current Master PIN when prompted and then press OK key to<br />
confirm. As you enter the PIN it will be shown as asterisks (*) on the<br />
screen.<br />
(Enter the new PIN and then press OK key to confirm. A confirmation<br />
beep is played.)<br />
Register your handset<br />
IMPORTANT:<br />
When you purchase a <strong>telephone</strong>, all handsets are already registered to<br />
the base, so you do not need to register them. Handset registration is<br />
only necessary when you buy extra handsets or if a handset has<br />
be<strong>com</strong>e faulty.<br />
The procedures described below are for a DET187x handset.<br />
They may be different if you want to register another handset model, in<br />
which case you should refer to its user guide.<br />
Additional handsets must be registered to the base unit before you can<br />
use them. Up to 4 handsets can be registered to one base station.<br />
The Master PIN is required before you can register or unregister<br />
handsets. By default, the Master PIN is 0000.<br />
On the base station, press and hold the HANDSET LOCATOR key for<br />
approximately 5 seconds.<br />
1. On the handset, press MENU key to enter menu selection.<br />
2. Press the Navigation key to select ADVANCED SET and then press<br />
OK key to select.<br />
3. Press the Navigation key to select REGISTRATION and then press<br />
OK key to select.<br />
** If no action is taken on the handset <strong>with</strong>in 10 seconds, the registration<br />
procedure will be aborted. If this happens, repeat the first step.<br />
Enter the Master PIN when prompted and then press OK key to confirm.<br />
(the default master PIN is 0000)<br />
WAITING is displayed on the screen. A confirmation beep is played to<br />
indicate successful registration, and the handset will return to idle mode,<br />
<strong>with</strong> its handset number displayed. ** If no base is found <strong>with</strong>in a certain<br />
period, there will be an error tone to indicate failed registration and the<br />
handset returns to idle mode, and you will need to repeat the registration<br />
sequence.<br />
Unregister your handset<br />
1. Press MENU key to enter menu selection.<br />
2. Press the Navigation key to select ADVANCED SET and then press<br />
OK key to select.<br />
3. Press the Navigation key to select UNREGISTER and then press OK<br />
key to select.<br />
4. Enter the Master PIN when prompted and then press OK key to<br />
confirm. (the default master PIN is 0000)<br />
5. Press the Navigation key to select the handset number to unregister<br />
and then press OK key to confirm.<br />
A confirmation beep is played to indicate successful unregistration.<br />
** If no action is taken on the handset <strong>with</strong>in 15 seconds, the<br />
unregistration procedure will be aborted and the handset returns to idle<br />
mode.<br />
You must use a DET187x handset to unregister handsets from the<br />
DET187x base.<br />
Set prefix<br />
This allows you to define a prefix number to be added to the beginning<br />
of any predialled number, and to define a detect string to prevent the<br />
prefix number being added unless the detect string matches the first<br />
digits of the predialled number, in which case the prefix number will<br />
replace the detect string digits.<br />
You can enter up to 5 digits for the detect string and up to 10 digits for<br />
the auto prefix number.<br />
1. Press MENU key to enter menu selection.<br />
2. Press the Navigation key to select ADVANCED SET and then press<br />
OK key to select.<br />
3. Press the Navigation key to select AUTO PREFIX and then press OK<br />
key to select.<br />
4. To enter a DETECT DIGIT string, press OK key again.<br />
The last stored detect string is displayed (if any).<br />
Enter a detect string number (maximum 5 digits) and then press OK key<br />
to confirm.<br />
To enter a PREFIX number, press Navigation to display PREFIX and<br />
then press OK key. The last stored prefix number is displayed (if any).<br />
5. Enter the prefix number (maximum 10 digits) and then press OK key<br />
to confirm. A confirmation beep is played.<br />
** If no detect string (blank) is entered, the prefix number will be<br />
automatically added to the predial number after TALK key is pressed.<br />
For numbers starting <strong>with</strong> *, # or P, the prefix number will not be added to<br />
the predial number after TALK key is pressed.<br />
Change recall time<br />
You may need the R button to send a Recall signal (also called Flash or<br />
Timed Break Recall) if you are connected to a PBX. You should normally<br />
leave the Recall Time at its default setting of SHORT (100ms), as this is<br />
the standard recall required in the <strong>telephone</strong> network, but it can be<br />
changed to MEDIUM (270ms) or LONG (600ms) if your <strong>telephone</strong> is<br />
connected to a PBX that requires a different recall time.<br />
1. Press MENU key to enter menu selection.<br />
2. Press the Navigation key to select ADVANCED SET and then press<br />
OK key to select.<br />
3. Press the Navigation key to select RECALL TIME and then press OK<br />
key to select.<br />
4. Press the Navigation key to select SHORT, MEDIUM or LONG and<br />
then press OK key to confirm. A confirmation beep is played.<br />
Change the dial mode (dual mode dialing version only)<br />
You should normally leave the dialling mode at its default setting of<br />
TONE (also called MF or DTMF).<br />
However, you can change to PULSE if necessary.<br />
Note: If PULSE dialling is set, you can press the * key to switch to TONE<br />
dialling for the rest of that call.<br />
1. Press MENU key to enter menu selection<br />
2. Press the Navigation key to select ADVANCED SET and then press<br />
OK key to select.<br />
3. Press the Navigation key to select DIAL MODE and then press OK<br />
key to select.<br />
4. Press the Navigation key to select TONE or PULSE and then press<br />
OK key to confirm. A confirmation beep is played.<br />
Set first ring<br />
When this function is set to Off, the first ring from an in<strong>com</strong>ing call will<br />
not sound. This is useful on exchanges where calling line identity is sent<br />
after the first ring.<br />
1. Press MENU key to enter menu selection.<br />
2. Press the Navigation key to select ADVANCED SET and then press<br />
OK key to select.<br />
3. Press the Navigation key to select FIRST RING and then press OK<br />
key to select.<br />
4. Press the Navigation key to select ON or OFF and then press OK key<br />
to confirm. A confirmation beep is played.<br />
Reset unit<br />
You can reset your phone to its default settings <strong>with</strong> this feature.<br />
Note: Upon reset, all your personal settings, call log and redial list<br />
entries will be deleted and the phone will return to its default settings.<br />
However, your phonebook will remain unchanged after reset. Also, if you<br />
have an <strong>answering</strong> machine model, any recorded messages will remain<br />
unchanged, but all other settings will be defaulted.<br />
1. Press MENU key to enter menu selection.<br />
2. Press the Navigation key to select ADVANCED SET and then press<br />
OK key to select.<br />
3. Press the Navigation key to select RESET and then press OK key to<br />
select.<br />
4. Press OK key again to confirm. A confirmation beep is played and the<br />
unit is reset to its default settings.<br />
Answering machine settings<br />
Set ring delay<br />
1. Press the MENU key to enter menu selection.<br />
2. Press the Navigation key to select ANSW MACHINE and then press<br />
OK key to select.<br />
3. Press the Navigation key to select SETTINGS and then press OK key<br />
to select.<br />
4. Press OK key to enter the RING DELAY option list.<br />
5. Press the Navigation key to select 2 - 7 RINGS or ECONOMY and<br />
then press OK key to confirm your choice.<br />
6. A confirmation beep is played. Press HANG-UP/EXIT key to go back<br />
to idle mode.<br />
* If you select Economy mode, the <strong>answering</strong> machine will answer calls<br />
and start playing the greeting message after 5 rings if you have no new<br />
messages, or after 3 rings if there is at least one new message<br />
recorded.<br />
To activate/deactivate remote control access<br />
1. Press the MENU key to enter menu selection.<br />
2. Press the Navigation key to select ANSW MACHINE and then press<br />
OK key to select.<br />
3. Press the Navigation key to select SETTINGS and then press OK key<br />
to select.<br />
4. Press the Navigation key to select REMOTE ACC. and then press OK<br />
key to select.<br />
5. Press the Navigation key to select ACTIVATE or DEACTIVATE and<br />
then press OK key to confirm.<br />
6. A confirmation beep is played. Press HANG-UP/EXIT key to go back<br />
to idle mode.<br />
* Once the remote control access is activated, you can check the<br />
messages of your <strong>answering</strong> machine when you are away from home,<br />
by calling from another phone.<br />
* If the <strong>answering</strong> machine is turned off, you must change your master<br />
PIN from its default 0000, before you can use the remote access feature.<br />
To check messages remotely<br />
1. When you are away from home, dial your home phone number from<br />
another phone. The <strong>answering</strong> machine answers and starts playing your<br />
greeting message.<br />
2. While the OGM is playing, press # key on the phone you used to dial<br />
and enter the remote access code (which is the same as your master<br />
PIN code).<br />
* The answer machine will drop the line immediately if there is no<br />
detection of the master PIN entry <strong>with</strong>in 8 seconds from pressing the #.<br />
* If the remote access code is correct, a confirmation beep can be<br />
heard, and then you need to press the 2 key, <strong>with</strong>in 8 seconds, to start<br />
playing any messages.<br />
The remote feature lets you perform the following functions:<br />
To<br />
Press this button<br />
Review message 1<br />
Play back messages 2<br />
Stop message playback 8<br />
Erase message<br />
6 (during message playback)<br />
Skip message 3<br />
Turn on answerer machine 7<br />
Turn off answerer machine 9<br />
* If the <strong>answering</strong> machine is off, and the master PIN has been changed<br />
from its default 0000, it will answer the call after 10 rings. Dial the master<br />
PIN code <strong>with</strong>in 8 seconds and you will hear a beep to confirm you have<br />
entered the remote access mode, as above.<br />
Set the OGM voice language<br />
1. Press the MENU key to enter menu selection.<br />
2. Press the Navigation key to select ANSW MACHINE and then press<br />
OK key to select.<br />
3. Press the Navigation key to select SETTINGS and then press OK key<br />
to select.<br />
4. Press the Navigation key to select LANGUAGE and then press OK<br />
key to select.<br />
5. Press the Navigation key to select your preferred language and then<br />
press OK key to confirm.<br />
6. A confirmation beep is played. Press HANG-UP/EXIT key to go back<br />
to idle mode.<br />
Call screening<br />
Call screening allows you to hear the caller while he is leaving a<br />
message. You can then decide if you want to talk to the caller directly. To<br />
adjust the speaker’s volume during call screening, press + and - keys on<br />
the base station. The lowest volume level turns call screening off.<br />
In Case of Problems<br />
Service Hotline<br />
Should problems arise <strong>with</strong> the <strong>telephone</strong>, please refer to the following<br />
information first. In the case of technical problems, you can contact our<br />
hotline service, Tel. 0900 00 1675 <strong>with</strong>in Switzerland (Swiss<strong>com</strong> fees at<br />
time of going to print: CHF 2.60/min). In the case of claims under the<br />
terms of guarantee, please contact your sales outlet. There is a 2 year<br />
period of guarantee.<br />
Problems and solutions<br />
Problems<br />
No connection to<br />
base station<br />
possible<br />
No <strong>telephone</strong> calls<br />
possible<br />
Connection is<br />
disturbed or cut off<br />
The system no<br />
longer responds<br />
The batteries are<br />
empty <strong>with</strong>in a<br />
short time<br />
The caller number<br />
display (CLIP)<br />
does not function<br />
The <strong>answering</strong><br />
machine does not<br />
record any<br />
messages<br />
Remote access is<br />
not possible<br />
Solutions<br />
- Check that the handset has been registered<br />
on the base station <strong>with</strong> the correct PIN code.<br />
- The <strong>telephone</strong> is not connected properly or is<br />
defective. Only use the <strong>telephone</strong> connection<br />
cable supplied.<br />
- Test whether the <strong>telephone</strong> connection is in<br />
order by using another <strong>telephone</strong>.<br />
- The power adaptor plug is not plugged in or<br />
there is a <strong>com</strong>plete power failure.<br />
- The rechargeable batteries are empty or<br />
defective.<br />
- The handset is too far from the base station.<br />
- The wrong dialling mode is set.<br />
- The handset is too far from the base station.<br />
- The base station is in an unsuitable location.<br />
- Reset all the functions to their default settings.<br />
- Disconnect the power adapter plug briefly from<br />
the power socket.<br />
- The batteries are empty or defective.<br />
- Place the handset in the base station properly.<br />
Clean the contact surfaces on the handset and<br />
base station <strong>with</strong> a soft, dry cloth.<br />
- Place the handset in the base station for<br />
16 hours.<br />
- The caller number display (CLIP) is a<br />
supplementary service offered by your<br />
<strong>telephone</strong> network provider. Contact your<br />
network provider for further information.<br />
- The caller has suppressed the transmission of<br />
their phone number.<br />
- Check whether the <strong>answering</strong> machine<br />
memory is full. Delete messages from the<br />
memory, if necessary.<br />
- Check that the correct security code has been<br />
entered for remote access.<br />
- The <strong>telephone</strong> used for remote access must<br />
be set to tone dialling.<br />
Declaration of Conformity<br />
This device fulfils the requirements stipulated in the EU<br />
directive: 1999/5/EC directive on radio equipment and<br />
tele<strong>com</strong>munications terminal equipment and the mutual recognition of<br />
their conformity. Conformity <strong>with</strong> the above mentioned directive is<br />
confirmed by the CE mark on the device.To view the <strong>com</strong>plete<br />
Declaration of Conformity, please refer to the free download available on<br />
our web site at www.switel.<strong>com</strong>.<br />
Maintenance / Guarantee<br />
Maintenance<br />
- Clean the housing surfaces <strong>with</strong> a soft, fluff-free cloth.<br />
- Do not use any cleaning agents or solvents.<br />
Guarantee<br />
SWITEL equipment is produced and tested according to the latest<br />
production methods. The implementation of carefully chosen materials<br />
and highly developed technologies ensure trouble-free functioning and a<br />
long service life. The terms of guarantee do not apply where the cause<br />
of equipment malfunction is the fault of the <strong>telephone</strong> network operator<br />
or any interposed private branch extension system. The terms of<br />
guarantee do not apply to the batteries or power packs used in the<br />
products. The period of guarantee is 24 months from the date of<br />
purchase.All deficiencies related to material or manufacturing errors<br />
<strong>with</strong>in the period of guarantee will be redressed free of charge. Rights to<br />
claims under the terms of guarantee are annulled following tampering by<br />
the purchaser or third parties. Damage caused as the result of improper<br />
handling or operation, normal wear and tear, incorrect positioning or<br />
storage, improper connection or installation or Acts of God and other<br />
external influences are excluded from the terms of guarantee. In the<br />
case of <strong>com</strong>plaints, we reserve the right to repair defect parts, replace<br />
them or replace the entire device. Replaced parts or devices be<strong>com</strong>e<br />
our property. Rights to <strong>com</strong>pensation in the case of damage are<br />
excluded where there is no evidence of intent or gross negligence by the<br />
manufacturer.If your device does show signs of a defect <strong>with</strong>in the<br />
period of guarantee, please contact the sales outlet where you<br />
purchased the SWITEL device, producing the purchase receipt as<br />
evidence. All claims under the terms of guarantee in accordance <strong>with</strong><br />
this agreement can only be asserted at the sales outlet. No claims under<br />
the terms of guarantee can be asserted after a period of two years from<br />
the date of purchase and hand-over of the product.<br />
Disposal<br />
In order to dispose of your device, take it to a collection point<br />
provided by your local public waste authorities (e.g. recycling<br />
centre). According to laws on the disposal of electronic and<br />
electrical devices, owners are obliged to dispose of old electronic<br />
and electrical devices in a separate waste container. The symbol<br />
indicates that the device must not be disposed of in normal<br />
domestic waste!<br />
Batteries represent a hazard to health and the<br />
environment!<br />
Never open, damage or swallow batteries or allow them to pollute the<br />
environment. They may contain toxic, ecologically hazardous heavy<br />
metals. You are legally obliged to dispose of power packs and batteries<br />
at the point of sale or in the corresponding containers at collection points<br />
provided by local public waste authorities. Disposal is free of charge.<br />
The symbols indicate that the batteries must not be disposed of in<br />
normal domestic waste and that they must be brought to collection<br />
points provided by local public waste authorities.<br />
Packaging materials must be disposed of according to local<br />
regulations.