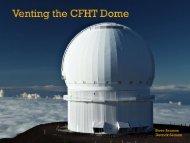
1 Overview 2 Details of the Model Construction - Canada France ...
1 Overview 2 Details of the Model Construction - Canada France ...
1 Overview 2 Details of the Model Construction - Canada France ...

You also want an ePaper? Increase the reach of your titles
YUMPU automatically turns print PDFs into web optimized ePapers that Google loves.
6.3 Video capture<br />
Two Panasonic Lumix ZS7 digital cameras were used for <strong>the</strong> video capture. This camera was selected<br />
based on a combination <strong>of</strong> video quality (1280:720 @ 30 Hz), flexibility (10X optical zoom), price<br />
($200) and ready availability. The video was captured in AVCHD “Lite” format (.MTS file extension)<br />
with <strong>the</strong> highest compression mode selected to minimize <strong>the</strong> amount <strong>of</strong> data to be handled later. It was<br />
determined that <strong>the</strong>se settings would not reduce <strong>the</strong> quality <strong>of</strong> <strong>the</strong> captured video in a meaningful way.<br />
The optical stabilization and GPS modes <strong>of</strong> <strong>the</strong> camera were disabled to maximize battery run time.<br />
Between <strong>the</strong> two cameras, three spare batteries were used with a typical run-time on a single charge<br />
being approximately two hours. The time required to charge <strong>the</strong> battery was ~1 hour. Both cameras<br />
were mounted on high quality, sturdy tripods. One camera viewed through <strong>the</strong> side <strong>of</strong> <strong>the</strong> tunnel (<strong>the</strong><br />
“sideview” camera), while <strong>the</strong> o<strong>the</strong>r was mounted close to <strong>the</strong> floor below <strong>the</strong> test section and looking<br />
up through <strong>the</strong> bottom window (<strong>the</strong> “bottom view” camera). The side view camera was mounted upside<br />
down so that <strong>the</strong> dome orientation appears correct in <strong>the</strong> video but <strong>the</strong> storyboard text is inverted.<br />
Two storyboards were made visible in <strong>the</strong> side-view video frame, each describing <strong>the</strong> relevant details <strong>of</strong><br />
<strong>the</strong> experimental setup for that video. The storyboard is correct in all instances except for <strong>the</strong><br />
“boundary layer investigation” experiment (described below) where <strong>the</strong> dome angle appearing on <strong>the</strong><br />
board is 0 degrees but is in fact at 90 degrees (which is clear from <strong>the</strong> video). White board markers and<br />
erasers were used to edit <strong>the</strong> storyboards (seen in Figure 12).<br />
6.4 The capture sequence<br />
Each video capture instance generally followed <strong>the</strong> sequence below:<br />
• The side-view camera was started first with <strong>the</strong> operator (Marc Baril) simultaneously calling<br />
out, “Start”. This call-out is not always heard on <strong>the</strong> video.<br />
• The bottom-view camera was started with <strong>the</strong> operator (Tom Benedict) calling out, “Rolling”.<br />
At this point both cameras were capturing video.<br />
• The dye probe operator (Karun Thanjavur) would start <strong>the</strong> slower <strong>of</strong> <strong>the</strong> two dye pumps running<br />
(assuming two dyes were used), wait a few seconds and <strong>the</strong>n start <strong>the</strong> faster pump. We <strong>the</strong>n<br />
waited a couple <strong>of</strong> seconds for <strong>the</strong> pressure in both dye lines to build up. The hose clamps on<br />
both lines were <strong>the</strong>n released simultaneously with Karun calling out, “Open”. Usually, ei<strong>the</strong>r<br />
Marc Baril, Robert Gordon or a UWAL student would assist with <strong>the</strong> task <strong>of</strong> opening one <strong>of</strong> <strong>the</strong><br />
hose clamps.<br />
For flushing time tests, <strong>the</strong> dye injection lasted for ~3sec, after which <strong>the</strong> hose clamps were shut <strong>of</strong>f (on<br />
<strong>the</strong> call, “close”), and <strong>the</strong> dye pumps turned <strong>of</strong>f. For flow visualization, dye flow was maintained long<br />
enough to provide adequate footage <strong>of</strong> <strong>the</strong> flow pattern that was being investigated. For visualizing <strong>the</strong><br />
flow upstream and downstream <strong>of</strong> <strong>the</strong> dome simultaneously, dye was injected through <strong>the</strong> downstream<br />
B7 probe first, <strong>the</strong>n B6 (with B7 still running); after a few seconds <strong>of</strong> both probes injecting, B7 was<br />
turned <strong>of</strong>f, <strong>the</strong>n B6 a few seconds later. For flow visualization around <strong>the</strong> dome using probes B1 to B5,<br />
<strong>the</strong> output <strong>of</strong> <strong>the</strong> micro-pump was connected to an aquarium air-line gang valve which <strong>the</strong>n fed all five<br />
probes. In this test, for <strong>the</strong> sake <strong>of</strong> visual clarity, dye was injected through only one probe at a time by<br />
opening <strong>the</strong> appropriate valve.<br />
7 Determination <strong>of</strong> <strong>the</strong> Operating Tunnel Flow Speed<br />
The first experiment carried out involved <strong>the</strong> determination <strong>of</strong> <strong>the</strong> water flow speed in <strong>the</strong> channel
![Documentation [PDF] - Canada France Hawaii Telescope ...](https://img.yumpu.com/26965302/1/190x245/documentation-pdf-canada-france-hawaii-telescope-.jpg?quality=85)