Rubik's Cube Solutions - mementoslangues.fr
Rubik's Cube Solutions - mementoslangues.fr
Rubik's Cube Solutions - mementoslangues.fr

Create successful ePaper yourself
Turn your PDF publications into a flip-book with our unique Google optimized e-Paper software.
Rubik’s <strong>Cube</strong> <strong>Solutions</strong><br />
Rubik’s <strong>Cube</strong> Solution – Useful Links<br />
http://www.geocities.com/jaapsch/puzzles/theory.htm<br />
http://www.ryanheise.com/cube/<br />
http://peter.stillhq.com/jasmine/rubikscubesolution.html<br />
http://en.wikibooks.org/wiki/How_to_solve_the_<strong>Rubik's</strong>_<strong>Cube</strong><br />
http://www.rubiks.com/World/~/media/Files/Solution_book_LOW_RES.ashx<br />
http://helm.lu/cube/MarshallPhilipp/index.htm<br />
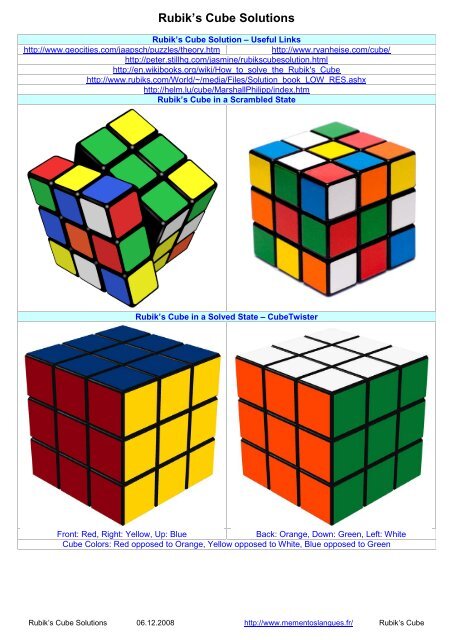
Rubik’s <strong>Cube</strong> in a Scrambled State<br />
Rubik’s <strong>Cube</strong> in a Solved State – <strong>Cube</strong>Twister<br />
Front: Red, Right: Yellow, Up: Blue<br />
Back: Orange, Down: Green, Left: White<br />
<strong>Cube</strong> Colors: Red opposed to Orange, Yellow opposed to White, Blue opposed to Green<br />
Rubik’s <strong>Cube</strong> <strong>Solutions</strong> 06.12.2008 http://www.<strong>mementoslangues</strong>.<strong>fr</strong>/ Rubik’s <strong>Cube</strong>
Commutators and Conjugates<br />
Introduction<br />
A Commutator is an algorithm of the form X Y X' Y', and a conjugate is an algorithm of the form X Y X', where X<br />
and Y denote arbitrary algorithms on a puzzle, and X', Y' denote their respective inverses. They are formal<br />
versions of the simple, intuitive idea of "do something to set up another task which does something useful, and<br />
undo the setup." Commutators can be used to generate algorithms that only modify specific portions of a cube,<br />
and are intuitively derivable. Many puzzle solutions are heavily or fully based on commutators.<br />
Commutator and Conjugate Notation<br />
[X, Y] is a commonly used notation to represent the sequence X Y X' Y'. [X: Y] is a well-accepted representation<br />
of the conjugate X Y X'.<br />
Since commutators and conjugates are often nested together, Lucas Garron has proposed the following system<br />
for compact notation: Brackets denote an entire algorithm, and within these, the comma delimits a commutator,<br />
and a colon or a semicolon a conjugate. The symbols are given order of precedence: colon, comma, semicolon.<br />
For example, [X; Y, Z: W] represents X ( Y (Z W Z') Y' (Z W' Y')) X'.<br />
Corner Twists<br />
On the Rubik’s <strong>Cube</strong>, commutators are applied for swapping and twisting corners and edges. Commutation<br />
works best when X and Y are nearly disjoint. Therefore, let us choose Y to be a turn of the Down Face (D) and X<br />
so that it affects only a single piece in the Down Face (D).<br />
An extremely useful choice of X is the monotwist X = L' U L F U F'. This twists only one corner (DLF) and does<br />
not affect anything else in the D Layer. The upper-half of the cube is messed up by the monotwist but this does<br />
not matter because of the commutation. We now have three very useful sequences for twisting two corners<br />
without affecting anything else on the cube:<br />
X Y X' Y' = (L' U L F U F') D (L' U L F U F')' D' = (DLF)+ (DBL)- (to twist adjacent corners in the D Layer)<br />
X Y2 X' Y2 = (L' U L F U F') D2 (L' U L F U F')' D2 = (DLF)+ (DRB)- (to twist opposed corners in the D Layer)<br />
X Y' X' Y = (L' U L F U F') D' (L' U L F U F')' D = (DLF)+ (DFR)- (to twist adjacent corners in the D Layer)<br />
Rubik’s <strong>Cube</strong> <strong>Solutions</strong> 2/48 http://www.<strong>mementoslangues</strong>.<strong>fr</strong>/ Rubik’s <strong>Cube</strong>
Solution 1: Layer-by-Layer (See Jaap’s Puzzle Page)<br />
Notation<br />
Let the faces be denoted by letters L, R, F, B, U and D (Left, Right, Front, Back, Up and Down). Clockwise<br />
quarter turns of a face are denoted by the appropriate letter, anti-clockwise quarter turns by the letter with an<br />
apostrophe (i.e. L', R', F', B', U' or D'). Half turns are denoted by a letter followed by number 2 (i.e. L2, R2, F2, B2,<br />
U2 or D2).<br />
Phase 1: Solve Top Layer Edges (First Cross)<br />
Find an edge piece that belongs to the Top Layer but which is not already located there. If there is an edge<br />
located on the Top Layer but not positioned correctly, then rotate the side (half-turn) containing this edge to place<br />
it in the Bottom Layer.<br />
Rotate the Bottom Layer to place the piece just below its destination location, and then hold the cube so that<br />
both the piece and its destination location are on the Front Face.<br />
1- To move DF to UF, do F2<br />
2- To move FD to UF without disturbing other First Layer edges, do U' F' R F U<br />
If the edge is in the Middle Layer, then hold the cube so that the piece is at the Front Right side, and do one of<br />
the following:<br />
1- To move RF to UF, do F'<br />
2- To move RF to UR, do U F' U'<br />
3- To move RF to UB, do U2 F' U2<br />
4- To move RF to UL, do U' F' U<br />
5- To move FR to UF, do U' R U<br />
6- To move FR to UR, do R<br />
7- To move FR to UB, do U R U'<br />
8- To move FR to UL, do U2 R U2<br />
With experience you can save many turns of the U Face and choose the order in which you solve the edges so<br />
that this phase should usually takes no more than 7 or 8 moves in total.<br />
Phase 2: Solve Top Layer Corners<br />
Find a corner piece in the Bottom Layer that belongs to the Top Layer. If there is a corner already located on the<br />
Top Layer but not positioned correctly, then hold the cube so that this corner is located at UFR.<br />
If the corner piece <strong>fr</strong>ont color is the same as the Front Face color, then do R' D R otherwise do R' D' R.<br />
Rotate the Bottom Layer to place the corner piece below its destination, and hold the cube so that the piece and<br />
its destination location are on the Front Right side. Then do one of the following:<br />
1- To move FRD to URF, do F D F'<br />
2- To move RDF to URF, do R' D' R<br />
3- To move DFR to URF, do F D' F' R' D2 R<br />
By first solving corners which do not display the U Face color on the D Face, the longer sequence of case 3 can<br />
often be avoided.<br />
Phase 3: Solve Middle Layer Edges<br />
Find an edge piece in the Bottom Layer that belongs to the Middle Layer. If there is an edge already located in<br />
the Middle Layer and if it is not positioned correctly, then choose any other valid edge <strong>fr</strong>om the bottom edges to<br />
displace this edge <strong>fr</strong>om the Middle Layer down to the Bottom Layer. Hold the cube so that the edge destination<br />
place is located at the Front Right side, then rotate the Bottom Layer to move the edge piece on the Front Face.<br />
Do one of the following to place the edge correctly:<br />
Rubik’s <strong>Cube</strong> <strong>Solutions</strong> 3/48 http://www.<strong>mementoslangues</strong>.<strong>fr</strong>/ Rubik’s <strong>Cube</strong>
1- To move FD to FR, do D' R' D R D F D' F'<br />
2- To move DF to FR, do D2 F D' F' D' R' D R<br />
Phase 4: Position Bottom Corners<br />
Rotate the Bottom Layer until at least two corners are positioned correctly, ignoring their orientations.<br />
If you need to swap two corners, then do one of the following:<br />
1- To swap DLF and DFR, do R' D' R F D F' R' D R D2<br />
2- To swap DLF and DRB, do R' D' R F D2 F' R' D R D<br />
Phase 5: Orient Bottom Corners<br />
1- If four corners are twisted, then hold the cube so that there is one clockwise twisted corner on the Front<br />
Left side (the D Face color is displayed on the left side of this corner).<br />
If there are three twisted corners, then hold the cube so that the corner which is not twisted is located on<br />
the Front Left side (the D Face color is displayed on the bottom side of this corner).<br />
If there are two twisted corners, then hold the cube so that the corner which is anticlockwise twisted is<br />
located on the Front Left side (the D Face color is displayed on the <strong>fr</strong>ont side of this corner)<br />
2- Perform R' D' R D' R' D2 R D2<br />
3- Repeat steps 1-2 until all four corners are correctly oriented.<br />
If there are only two twisted corners after Phase 4, there is a shorter alternative using a monotwist commutator<br />
as follows.<br />
If there are two adjacent twisted corners then hold the cube so that the corner which is twisted anti-clockwise is<br />
located on the Front Left side (the D Face color is displayed on the <strong>fr</strong>ont side of this corner).<br />
Perform (L' U L F U F') D (L' U L F U F')' D'<br />
If there are two opposed twisted corners then hold the cube so that the corner which is twisted anti-clockwise is<br />
located on the Front Left side (the D Face color is displayed on the <strong>fr</strong>ont side of this corner).<br />
Perform (L' U L F U F') D2 (L' U L F U F')' D2<br />
Phase 6: Position Bottom Edges<br />
Do one of the following:<br />
1- To swap DL-DR and DF-DB, do L2 R2 U2 L2 R2 D L2 R2 U2 L2 R2 D'<br />
2- To swap DF-DR and DL-DB, do R2 L2 U F2 R2 L2 B2 R2 L2 U' R2 L2<br />
3- To cycle DR->DB->DL->DR, do L' R F L R' D2 L' R F L R'<br />
4- To cycle DL->DB->DR->DL, do L' R F' L R' D2 L' R F' L R'<br />
You may not need to use sequences 1 and 2 because edges can be solved by applying sequences 3 or 4 twice.<br />
Phase 7: Orient Bottom Edges<br />
Do one of the following:<br />
1- To flip DF, DR, do F U' D R2 U2 D2 L D' L' D2 U2 R2 D' U F' D<br />
2- To flip DF, DB, do F U' D R2 U2 D2 L D2 L' D2 U2 R2 D' U F' D2<br />
3- To flip all four edges, apply either of the above sequences twice<br />
Rubik’s <strong>Cube</strong> <strong>Solutions</strong> 4/48 http://www.<strong>mementoslangues</strong>.<strong>fr</strong>/ Rubik’s <strong>Cube</strong>
Phase 8: Orient Face Centers<br />
This phase is only necessary for picture cubes or for <strong>Rubik's</strong> World cube, where face centers have a visible<br />
orientation.<br />
If two face centers need twisting, then hold the cube such that one of the centers is on located the Top Layer and<br />
the other one is located either on the Bottom layer or on the Right face. Then do one of the following:<br />
1- To turn centers U and R', do R L' F B' U D' R' U' D F' B R' L U<br />
2- To turn centers U2 and R2, do R L' F B' U D' R2 U' D F' B R' L U2<br />
3- To turn centers U' and R, do R L' F B' U D' R U' D F' B R' L U'<br />
4- To turn centers U and D', do R L' F2 B2 R L' U R L' F2 B2 R L' D'<br />
5- To turn centers U2 and D2, do R L' F2 B2 R L' U2 R L' F2 B2 R L' D2<br />
6- To turn centers U' and D, do R L' F2 B2 R L' U' R L' F2 B2 R L' D<br />
Note that it is possible to take care of the top and side centers during the first 7 phases, so that at most only the<br />
Bottom Face center needs twisting. This step is then unnecessary.<br />
If any face center needs a half turn, then hold the cube with that face on the top, and do the following:<br />
To turn center U2, do R L U2 R' L' U R L U2 R' L' U.<br />
Other <strong>Solutions</strong><br />
There are many similar solutions that solve the cube in layers. Many are a lot faster than this one. Speed can be<br />
improved in many ways:<br />
• Use more sequences for orienting the final corners, and in general use shorter sequences for phases 4-7.<br />
• Phase 2 and 3 can be combined, so that top corners and middle edges are first placed adjacent in the<br />
bottom layer and then slotted into position as a single unit.<br />
• Phase 2 and 3 can be combined in a different way: First solve 3 top corners. Then place the three<br />
adjacent middle edges correctly, which uses short move sequences because of the unsolved corner.<br />
Each edge is done by turning the U face to place the unsolved corner above the destination edge, and<br />
then using three (or four) moves to place the edge. Once these 3 edges are done, the final corner/edge<br />
pair is put together and solved as a unit.<br />
• It is also possible to combine phase 1 with 2 and 3, by first building a 2×2×2 block, then a 2×2×3 block,<br />
and only then the last edge of the Top Layer. See Lars Petrus' website.<br />
• Phase 4-7 can be combined in several different ways, nearly all of them involve memorizing a large<br />
number of sequences.<br />
• You could position all the bottom pieces correctly first (23 sequences), and then orient them (57<br />
sequences). See the book 'Winning Ways Vol.2' by Berlekamp, Conway and Guy.<br />
• You could do this in the opposite order too, which is a bit better: orient them first (57 sequences) and then<br />
position them (23 sequences). This is better because it is easier to recognize the situation in this order.<br />
See for example Jessica Fridrich's website.<br />
• You could solve corners first (42 sequences), then edges (29 sequences).<br />
• You could just do this in the opposite order too: edges first (21 sequences), then corners (86 sequences),<br />
but there are rather many sequences needed to do corners in one step. You could however position (4)<br />
and orient (7) corners in two steps (in either order) while leaving edges untouched.<br />
• Another approach is that used by Lars Petrus on his web pages. He solves the two top layers except one<br />
corner/edge pair. He then uses the unsolved column for orienting edges. After that, he solves the column,<br />
and the final layer like in phases 4-6, except that all the sequences he uses do not change edge<br />
orientations. His method seems to be the only fast solution that does not involve a large amount of<br />
memorization.<br />
Rubik’s <strong>Cube</strong> <strong>Solutions</strong> 5/48 http://www.<strong>mementoslangues</strong>.<strong>fr</strong>/ Rubik’s <strong>Cube</strong>
Solution 2: Corners First (See Jaap’s Puzzle Page)<br />
Below is a corners first solution, i.e. all corners are solved first, then edges. Conceptually this is a good idea,<br />
since slice moves can be used (a slice move is a middle layer move), which only involves edges. This kind of<br />
method is relatively easy to understand and remember. It can be quite fast, but generally uses more moves than<br />
a layer method because slice turns are often counted as two moves.<br />
Further Notation<br />
The only slice moves used in the following solution are moves of the middle layer M, i.e. the layer between U and<br />
D. Let M (or MU) denotes a clockwise quarter turn of the middle layer when looking <strong>fr</strong>om above, i.e. in the same<br />
direction as the U move.<br />
Phase 1: Solve Corners<br />
Use any method you like. Use parts of the Layer-by-Layer Solution, or use the method of the mini-cube.<br />
Afterwards the top and bottom centers should match their corners, but the centers in the Middle Layer need not<br />
match.<br />
Phase 2: Solve Edges in U/D Layers<br />
a. Find the edge piece that belongs to the top of the Front Face. If this edge is not found in the Middle Layer,<br />
then rotate the whole cube around the U/D axis to bring it to the Front Face and do F M2 F'.<br />
b. Hold the cube with the destination location of the piece at the top of the Front Face and turn M to bring<br />
the piece to the Back Right. Then do one of the following:<br />
1. To move BR to UF, do F M F'<br />
2. To move RB to UF, do F' M2 F.<br />
c. Find the edge piece that belongs to the bottom of the Front Face. If it already lies at the bottom of the<br />
Front Face and is not upside down, then do F'M'F M' FM'F' to flip it around. If it does not lie in the Middle<br />
Layer and is not at the <strong>fr</strong>ont of the Bottom Layer, then rotate the whole cube around the U/D axis to bring<br />
it to the Front Face and do FM2F'.<br />
d. Hold the cube with the destination location of the piece at the bottom of the Front Face and turn M to<br />
bring the piece to the right of the Back Face. Then do one of the following:<br />
1. To move BR to DF, do F'M'F M F'M F<br />
2. To move RB to DF, do F'M'F2M'F'<br />
e. Repeat a-d for each pair of edges in the U/D layers.<br />
Phase 3: Solve Middle Layer<br />
a. Turn M to place the centers correctly with respect to the U/D layers.<br />
b. Place the edges correctly by doing one of the following:<br />
1. To swap FR-BL, FL-BR do M L2R2 M' L2R2<br />
2. To swap FR-BR, FL-BL do R2 M2 R2 M2 or (R2 M2)2<br />
3. To cycle FL->FR->BR->FL do R2 M' R2 M<br />
4. To cycle FR->FL->BR->FR do M' R2 M R2.<br />
c. Orient the edges by doing one of the following:<br />
1. To flip FR and BR do RM' RM' RM' RM2 RM' RM' RM' R or (RM')3 RM2 (RM')3 R<br />
2. To flip FL and BR do RM' RM' RM' RM RM' RM' RM' RM or ((RM')3 RM)2<br />
3. To flip FR, FL, BR, BL do BUB' RM' RM' RM' RM' BU'B' or BUB' (RM')4 BU'B'<br />
There are not as many variations of the corners first algorithm as there were with the layers algorithm, but the<br />
speed of this algorithm can be improved in several ways.<br />
• Phase 2 can be speeded up simply by placing the edge belonging at UF in the FD position first, and when<br />
you next place the correct piece at FD, the first piece will be displaced and end up correctly at UF.<br />
• Another variation of phase 2 involves solving the edges one by one instead of in pairs. The basic idea is<br />
to rotate the layer opposite the destination layer to bring an unsolved edge to the Front Face. This way<br />
you can solve 3 edges in each layer singly without disturbing solved edges. The final two edges are then<br />
placed as before.<br />
• Phase 3 can be done quicker by using shorter sequences, or by memorizing sequences that place and<br />
flip edges at the same time. There are only 20 sequences needed for this.<br />
Rubik’s <strong>Cube</strong> <strong>Solutions</strong> 6/48 http://www.<strong>mementoslangues</strong>.<strong>fr</strong>/ Rubik’s <strong>Cube</strong>
Solution 1 Example<br />
Scrambling Sequence<br />
A 25-move scrambling sequence has been chosen for this example:<br />
U B' R2 D' U' R U2 B R' B2 L2 R F2 R2 U2 R B U2 F2 L2 F2 D R B2 R2<br />
Scrambled <strong>Cube</strong><br />
Initial State (CU' CF)<br />
Scrambled State<br />
Scrambling Sequence<br />
CU' CF U B' R2 D' U' R U2 B R' B2 L2 R F2 R2 U2 R B U2 F2 L2 F2 D R B2 R2<br />
Rubik’s <strong>Cube</strong> <strong>Solutions</strong> 7/48 http://www.<strong>mementoslangues</strong>.<strong>fr</strong>/ Rubik’s <strong>Cube</strong>
Phase 1: Solving Top Layer Edges<br />
The cube is held with the white center piece on the Top (U) Face. A white cross should first be created on the<br />
Top (U) Face. In this example, sections of the white cross are solved in the following order – blue, orange, green,<br />
red, as indicated in the Rubiks.com Solution Guide. However, this order may be different if shorter sequences<br />
are searched for.<br />
Phase 1 – Top Layer Edges 1 & 2<br />
Scrambled State (White-Blue Edge already solved)<br />
White-Orange Edge Solved<br />
Sequence (Conjugations)<br />
CU2 D (U' (F' R F) U)<br />
Phase 1 – Top Layer Edges 3 & 4<br />
White-Green Edge solved<br />
Sequence (Conjugations)<br />
CU F2 (U' (F' R F) U)<br />
White-Red Edge Solved<br />
Sequence<br />
R<br />
Rubik’s <strong>Cube</strong> <strong>Solutions</strong> 8/48 http://www.<strong>mementoslangues</strong>.<strong>fr</strong>/ Rubik’s <strong>Cube</strong>
Phase 2: Solving Top Layer Corners<br />
Phase 2 – Top Layer Corners 1 & 2<br />
White-Blue-Orange Corner already solved<br />
White-Red-Blue Corner solved<br />
Sequence (Conjugation)<br />
CU D (R' D' R)<br />
Phase 2 – Top Layer Corners 3 & 4<br />
White-Orange-Green Corner solved<br />
White-Green-Red Corner solved<br />
Sequence (Conjugation)<br />
Sequence (Conjugations)<br />
CU2 D2 (R' D' R) CU (F D' F') (R' D2 R)<br />
Rubik’s <strong>Cube</strong> <strong>Solutions</strong> 9/48 http://www.<strong>mementoslangues</strong>.<strong>fr</strong>/ Rubik’s <strong>Cube</strong>
Phase 3: Solving Middle Layer Edges<br />
Phase 3 – Middle Layer Edges 1 & 2<br />
Green-Red Edge solved<br />
Red-Blue Edge solved<br />
Sequence (Conjugation + Commutation)<br />
Sequence (Conjugation + Commutation)<br />
D' (F D' F') (D' R' D R) CU D2 (F D' F') (D' R' D R)<br />
Phase 3 – Middle Layer Edges 3 & 4<br />
Blue-Orange Edge solved<br />
Orange-Green Edge solved<br />
Sequence (Conjugation + Commutation)<br />
Sequence (Conjugation + Commutation)<br />
CU D' (R' D R) (D F D' F') CU D' (F D' F') (D' R' D R)<br />
Rubik’s <strong>Cube</strong> <strong>Solutions</strong> 10/48 http://www.<strong>mementoslangues</strong>.<strong>fr</strong>/ Rubik’s <strong>Cube</strong>
Phases 4 – 7: Bottom Corners & Edges<br />
Phases 4 & 5 – Positioning & Orienting Bottom Corners<br />
Four Corners Positioned – Two Corners Oriented<br />
Four Corners Oriented<br />
Sequence<br />
Sequence (Commutation – Monotwist)<br />
CU D<br />
(L' U L F U F') D (L' U L F U F')' D'<br />
Phases 6 & 7 – Positioning & Orienting Bottom Edges<br />
Three Bottom Edges Cycled Two Bottom Edges Flipped – <strong>Cube</strong> Solved !<br />
Sequence (Edge Cycling)<br />
Sequence (Edge Flips)<br />
CU' L' R F' L R' D2 L' R F' L R'<br />
CU F U' D R2 U2 D2 L D2 L' D2 U2 R2 D' U F' D2<br />
Rubik’s <strong>Cube</strong> <strong>Solutions</strong> 11/48 http://www.<strong>mementoslangues</strong>.<strong>fr</strong>/ Rubik’s <strong>Cube</strong>
Rubik’s <strong>Cube</strong> Basics (See Jaap’s Puzzle Page)<br />
Permutations<br />
Suppose you have the list of numbers (1,2,3,4,5,6,7,8). A permutation of these numbers is simply another list of<br />
these numbers in any order, for example (4,2,6,1,3,5,8,7). Every number on the list must be used exactly once.<br />
At first sight this is not related to the cube, but suppose you write down a list of a cube corner pieces. Any move<br />
on the cube then mixes the corner pieces, and therefore corresponds to a new list with the same corner pieces<br />
but in a different order. Any move (or move sequence) is therefore a permutation of the corner pieces. Of course,<br />
the same can be said of the twelve edge pieces.<br />
By examining what permutations can do, we can therefore examine how the pieces of the cube move. The<br />
numbers in our list which we permute are not really important. What is important is how they move. Usually a<br />
permutation uses numbers, but these numbers can represent any item, for example the moving pieces of the<br />
cube, or any other objects that can be rearranged. A permutation therefore embodies only the movement of the<br />
items.<br />
There are many different ways to write down a permutation. A common way is to write the original list of numbers<br />
on one line, and the new list directly below it on another line. For the list of numbers above, we get:<br />
1 2 3 4 5 6 7 8<br />
4 2 6 1 3 5 8 7<br />
To make this more visual, we can make a line diagram by drawing straight lines between numbers of the two lists<br />
to show exactly how each item on the list moves.<br />
In this example the lines cross 8 times, so we can say that 8 is the permutation crossing number.<br />
An important aspect of permutations is that they can be combined. On the cube, for example, one sequence of<br />
moves can be followed by another. In other words, the pieces are rearranged in one way, and <strong>fr</strong>om this new<br />
position they are rearranged in another way. Suppose we combine the permutation above with the following<br />
permutation:<br />
Only movements are important, so even though this second permutation is also written using numbers 1 to 8,<br />
when we combine them, we only look at the lines, i.e. at what movements the permutation indicates. To combine<br />
them, we draw the line diagrams one below the other and follow the lines. By straightening the lines we get:<br />
Rubik’s <strong>Cube</strong> <strong>Solutions</strong> 12/48 http://www.<strong>mementoslangues</strong>.<strong>fr</strong>/ Rubik’s <strong>Cube</strong>
Let’s look at the crossing numbers of these permutations. The first two have crossing numbers 8 and 15. The<br />
combined drawing therefore has 15 + 8 = 23 crosses but when the lines are straightened, we get a crossing<br />
number of 11. If you think of the lines as loose threads, and that you physically untangle them, you will see that<br />
each time you uncross two threads, the number of crossings always decreases by 2. When you untangle all the<br />
threads, the number of crossings then decreases by a multiple of 2. Therefore, although the final permutation's<br />
crossing number is not simply the sum, it will have the same parity as the sum (i.e. will also be even or also be<br />
odd). Lets call a permutation odd if its crossing number is odd, and even if its crossing number is even. This is<br />
the parity of the permutation.<br />
It is now easy to see that when combining permutations, their parities follow the same rules as numbers:<br />
odd + odd = even, even + even = even, odd + even = odd, even + odd = odd<br />
On the <strong>Rubik's</strong> <strong>Cube</strong>, a single quarter turn of a face is an even permutation. To see this, number the corners of<br />
the face 1-4 and the edges 5-8. A quarter turn is then represented by the permutation (2,3,4,1,6,7,8,5) which has<br />
crossing number 6 if you draw it. Combining even permutations will always give another even permutation, so<br />
only even permutations of the pieces of the <strong>Rubik's</strong> <strong>Cube</strong> are possible. This shows that it is impossible to swap<br />
two pieces (edges or corners) without modifying anything else.<br />
Disjoint Cycle Notation<br />
A different but very useful notation for permutations is disjoint cycle notation. In this notation, the first<br />
permutation we used becomes (14)(356)(78). This means that 1 moves to the position that 4 was in, and 4<br />
moves to the position that 1 was in. Piece 3 moves to the position that 5 was in, 5 moves to where 6 was in, and<br />
6 moves to where 3 used to be. Pieces 7 and 8 swap places just like pieces 1 and 4. Piece 2 does not move<br />
because it is not mentioned, although you could state so explicitly by including the 2 like this (14)(2)(356)(78).<br />
Each bracketed part of this is called a cycle. (14) and (78) is a 2-cycle, and (356) is a 3-cycle. These cycles are<br />
called disjoint because they use different numbers, and so act on different pieces. It is easy to see that the<br />
parity of a 2-cycle is odd, and that the parity of a 3-cycle is even. The combined permutation (14)(356)(78) is<br />
therefore odd + even + odd = even. In general the parity of an n-cycle will be the parity of number (n-1) for any<br />
number n.<br />
The order of a permutation<br />
The order of a permutation is the number of times it has to be performed before the pieces are back to their<br />
initial positions. This is where cycle notation is very useful.<br />
A 2-cycle is a single swap, so if this is performed twice then the pieces are back where they started. A 2-cycle<br />
therefore has order 2. Similarly, a 3-cycle will have order 3, and an n-cycle order n.<br />
Now let’s consider a permutation like (14)(356)(78) which is composed of several cycles. If it is performed twice,<br />
or in fact any even number of times then the 2-cycle will disappear. If it is performed three times or any multiple<br />
of three, then the 3-cycle will disappear. If it is performed 6 times, which is a multiple of both 2 and 3 then all<br />
cycles disappear and this permutation therefore has order 6. In general, the order of a permutation is the lowest<br />
common multiple of the lengths of the disjoint cycles.<br />
Let’s see how this applies to the cube. Consider the move sequence FR. If we look at how this sequence moves<br />
the pieces, we see that the UFL corner moves to position RUB, corner RUB moves to position RBD, and so on.<br />
In cycle notation this permutation is as follows: (UFL,RUB,RBD,RDF,DLF)(UF,RU,RB,RD,RF,DF,LF) This is a 5-<br />
cycle of corners and a 7-cycle of edges. Its order is therefore 35, which means that if you constantly repeat the<br />
moves FR on the cube, you will have to do it 35 times before the pieces come back to their original positions. If<br />
you try this out on a solved cube you will see that the cube is not restored because some corners are twisted.<br />
We have only looked at the location of the pieces, and not at their orientation.<br />
Groups<br />
The collection of all possible permutations of n items form a group. A group is simply a collection of things<br />
(usually called elements of the group) which satisfy various conditions, which I will list below. We use these<br />
conditions implicitly whenever we use permutations, so it is best to state them explicitly now.<br />
Rubik’s <strong>Cube</strong> <strong>Solutions</strong> 13/48 http://www.<strong>mementoslangues</strong>.<strong>fr</strong>/ Rubik’s <strong>Cube</strong>
1. Any two elements of the group can be combined, and this results in another element of the group. As you<br />
have seen, two permutations can be combined by performing one after the other, and this will always<br />
result in a permutation. If P and Q are permutations, then PQ will mean the permutation resulting <strong>fr</strong>om<br />
performing first P and then Q. Combining two elements of a group is usually called multiplication of the<br />
two elements.<br />
2. There is an identity, i.e. an element I in the group such that for any element P in the group we have<br />
PI = IP = P. In a permutation group the element I is simply the permutation that does not move anything.<br />
3. Every element has an inverse, i.e. if P is an element of the group then there is an element Q in the group<br />
such that PQ = QP = I. If you mirror the line diagram of a permutation vertically, you get the line diagram<br />
of its inverse. A permutation in cycle notation can be inverted just by writing each cycle in reverse. The<br />
inverse of permutation P is denoted by P -1 , or by P'. On puzzles, you can do the inverse of a move<br />
sequence just by undoing the moves in reverse order, i.e. taking back the moves you did.<br />
4. The multiplication is associative, i.e. if P, Q and R are elements of the group, then (PQ)R=P(QR). With<br />
permutations this is obviously true.<br />
If a group is commutative, i.e. we have PQ = QP for any P, Q in the group then it is called an Abelian group.<br />
This phenomenon occurs in the Lights Out and <strong>Rubik's</strong> Clock puzzles, and makes these much simpler to solve<br />
because the order in which the moves are performed does not matter. Generally, permutation groups occurring<br />
in puzzles are not Abelian.<br />
All possible movements of the pieces on the <strong>Rubik's</strong> cube also form a group, the <strong>Cube</strong> Group. At first sight this<br />
is not a simple permutation group because the orientation of the pieces matters, but you could consider it a<br />
permutation group of the 48 moving facelets instead of the 20 moving pieces. On a pedantic note, it is technically<br />
incorrect to say that the positions of the <strong>Rubik's</strong> cube form a group. A position is reached <strong>fr</strong>om the solved cube<br />
by moving the pieces in some way, and it is those movements that form the group because movements can be<br />
combined. On the standard <strong>Rubik's</strong> <strong>Cube</strong> this is not a very important distinction, but on other puzzles like the<br />
4x4x4 <strong>Cube</strong> it is. This puzzle has center pieces that look the same, and so there are positions which cannot be<br />
distinguished <strong>fr</strong>om others. Thus different permutations seem to correspond to the same position, or permutations<br />
which seem to do nothing in one position will change things in another. The permutations still form a group, but<br />
the positions do not (unless you mark the centre pieces so they can be distinguished).<br />
Conjugation<br />
If P and Q are elements of a group, then the conjugate of Q by P is the element PQP'. This is one of the most<br />
useful concepts for solving a puzzle like the Rubik’s <strong>Cube</strong>. Let’s illustrate this with an example on the <strong>Rubik's</strong><br />
<strong>Cube</strong>. Suppose you know that the move sequence Q = R' L F2 R L' U2 cycles three edges around, viz.<br />
(UB,UF,DF) but that you also want to cycle 3 more edges of the cube, for example (UR,UF,UL). We would like to<br />
know how to cycle them if they were placed at UB, UF and DF, so we simply put them there, for example by<br />
doing the sequence P = F2U. This sequence moves other pieces as well, but that does not matter. So after we<br />
placed them in position with P, cycled them with Q, we now move everything back in place by doing P'. The<br />
relevant edges have been cycled as we wanted and any other pieces that were moved by P are put back in<br />
place by P'. Therefore PQP' = F2 U R' L F2 R L' U F2 cycles just the three edges (UR,UF,UL).<br />
As you can see <strong>fr</strong>om this example, if you have a sequence that performs a certain task on particular pieces of the<br />
puzzle, conjugation will also allow you to perform the same task on any other similar pieces of the puzzle. So, if<br />
you can flip two edge pieces then you can flip any two of them, or if you can twist two corners then you can twist<br />
any two of them, and so on.<br />
Commutation<br />
Conjugation allows you to apply a specific sequence more generally, but you still need to find that specific<br />
sequence to begin with. This is where commutation is useful. If P and Q are elements of a group, then PQP'Q'<br />
is called a commutator. If P and Q do commute (for example if they are disjoint, like moves R and L on the cube)<br />
then PQP'Q' = QPP'Q = QIQ' = QQ' =I. The commutator can be seen as an indication of whether P and Q<br />
commute, and by how much. If P and Q are nearly disjoint, then the commutator will move a very few pieces,<br />
and it therefore often performs a useful function when solving a puzzle.<br />
The simplest commutator on the cube uses single face moves for P and Q, for example FR'F'R. This cycles three<br />
edges (FU,FR,UR), and two pairs of corners (UFL,BRU) and (URF,RDF). Note that corner UFL moves to BRU,<br />
which in turn moves to LUF. This is twisted anti-clockwise compared to the original position FLU, so if we<br />
perform this cycle twice, these two pieces will be back to their original positions but will both be twisted anti-<br />
Rubik’s <strong>Cube</strong> <strong>Solutions</strong> 14/48 http://www.<strong>mementoslangues</strong>.<strong>fr</strong>/ Rubik’s <strong>Cube</strong>
clockwise. The other corner 2-cycle of FR'F'R twists clockwise. We could adapt cycle notation to show this as<br />
follows:<br />
Doing this twice, we get:<br />
Doing this three times, we get:<br />
FR'F'R = (UFL,BRU)- (URF,RDF)+ (FU,FR,UR)<br />
(FR'F'R) 2 = (UFL)- (UBR)- (URF)+ (DFR)+ (FU,UR,FR)<br />
(FR'F'R) 3 = (UFL,UBR) (URF,DFR)<br />
Theoretically these moves and their conjugates are enough to perform any even permutation on the corners, and<br />
any even permutation on the edges. Any single quarter turn of a face is an odd permutation on both corners and<br />
edges, so just using what we have so far we could position all the pieces of the <strong>Cube</strong>. What remains is just to<br />
orient them.<br />
Commutation works best when P and Q are nearly disjoint.<br />
Therefore let’s choose Q to be a turn of the U face, and P so that it affects only a single piece in the U face. An<br />
extremely useful choice is the monotwist P = R'DRFDF'. This twists one corner (URF)+ and does not affect<br />
anything else in the U layer. The bottom half of the cube is messed up but that does not matter. We now have<br />
the following very useful sequences:<br />
You can now twist any two corners on the cube.<br />
PUP'U' = R'DRFDF' U FD'F'R'D'R U' = (URF)+ (UBR)-<br />
PU2P'U2 = R'DRFDF' U2 FD'F'R'D'R U2 = (URF)+ (ULB)-<br />
PU'P'U = R'DRFDF' U' FD'F'R'D'R U = (URF)+ (UFL)-<br />
Another good choice for P is the monoflip P = FUD'L2U2D2RU = (FU)+, which will allows you to flip any edge<br />
on the cube, and another one is P = R'DR which gives you a simple 3-cycle of corners.<br />
It is also productive to let Q be a move of a Middle Slice, for example MR (if you look squarely at the R face of<br />
the cube, MR is a clockwise quarter turn of the middle slice just behind the R layer). If we let P = F2, which is a<br />
monoswap of edges (DF,UF) and Q = MR, then we get a 3-cycle of edges PQP'Q' = F2MRF2MR' = (DB,DF,UF).<br />
If P = F2 and Q = MR2, we get the 2-H pattern PQP'Q' = F2MR2F2MR2 = (DF,UF) (DB,UB).<br />
If P = MF and Q = MR, we get the 6-spot pattern PQP'Q' = MFMRMF'MR' (swap of 6 adjacent centers).<br />
If P = MF2 and Q = MR, we get the 4-spot pattern PQP'Q' = MF2MRMF2MR' (swap of 4 opposed centers).<br />
Another good choice is P = FU'RF'U, a neat monoflip (FU)+.<br />
Size of the group<br />
You may have noticed that when you use a commutator for twisting corners, you will always twist two corners in<br />
opposite directions. Commutators can also flip only pairs of edges. It turns out that this is enough to solve the<br />
cube because it is impossible for a single piece to be turned without turning other pieces.<br />
Every corner piece has one facelet that belongs in the U or the D face. For a corner which has been moved<br />
anywhere on the cube, lets define its twist as follows:<br />
• Its twist is 0 if its U/D facelet is in the U or D face.<br />
• Its twist is +1 if the piece has been turned clockwise <strong>fr</strong>om the 0 twist orientation.<br />
• Its twist is -1 if the piece has been turned anti-clockwise <strong>fr</strong>om the 0 twist orientation.<br />
Twisting a corner clockwise will increase its twist by one. We have to work modulo 3 however, because 3 twists<br />
is the same as no twist at all, and so a twist value of +2 is really only a twist of + 2 - 3 = - 1.<br />
Similarly anti-clockwise twisting decreases the twist by 1 modulo 3 (i.e. a twist of -2 is just a twist of +1).<br />
If you turn the U or the D face, the twist of the corner pieces do not change. If you turn any other face by a<br />
quarter turn, then the twist of two of the corner pieces increases, and the twist of the other two corners<br />
decreases. In any case the total twist of all the corners does not change modulo 3. In the starting position the<br />
Rubik’s <strong>Cube</strong> <strong>Solutions</strong> 15/48 http://www.<strong>mementoslangues</strong>.<strong>fr</strong>/ Rubik’s <strong>Cube</strong>
cube has a total twist of 0, and therefore this remains equal to 0 however mixed up the cube can be. This shows<br />
that it is impossible to twist a single corner in isolation, and if you twist only 2 corners then they must go in<br />
opposite (twist) directions.<br />
A very similar method can be used for edges: define the flip of an edge as 0 or 1 (modulo 2) and show that the<br />
total flip remains 0 for any move performed, this means that no edge can be flipped in isolation. Another way is to<br />
look at the permutations of edge facelets. A quarter turn of a face is an even permutation of edge facelets (two 4-<br />
cycles) so any move sequence will give only even permutations of edge facelets. A single edge flip is an odd<br />
permutation of edge facelets and hence this is not possible without taking the cube apart.<br />
In all we have now seen three restrictions on the possible arrangements of the pieces of the <strong>Rubik's</strong> <strong>Cube</strong>. The<br />
total corner twist must be zero modulo 3, the total flip of edges must be zero modulo 2, and the parity of the<br />
piece permutation must be even. If you were to take the cube apart and randomly put it back together again,<br />
there would be a 1 in 3 chance of having the right corner twist (since all three possible twist values are likely<br />
equal). Similarly there is a 1 in 2 chance to get the total edge flip correct, and a 1 in 2 chance of getting the right<br />
permutation parity. Putting this together, we find there is a 1 in 12 chance that a randomly assembled cube is<br />
solvable.<br />
In a later section on Counting we shall count how many randomly assembled cubes there are. The actual<br />
number of cube positions is then one twelfth of that.<br />
Subgroups<br />
The <strong>Rubik's</strong> <strong>Cube</strong> Group is generated by the moves {F, B, R, L, U, D}, because by definition any movement of<br />
the pieces is done by moving the faces one at a time. Suppose instead that <strong>fr</strong>om a solved cube you only do half<br />
turns, i.e. you only use the moves {F2, B2, R2, L2, U2, D2}. Clearly this does not generate the whole <strong>Cube</strong><br />
Group; for a start each face of the cube never has more than two colors. Nevertheless, the permutations these<br />
moves generate do form a group because any two permutations made <strong>fr</strong>om half turns will combine to give<br />
another permutation made <strong>fr</strong>om half turns. This group is usually called the Square Group.<br />
The Square Group is called a subgroup of the <strong>Cube</strong> Group, because it is a subset of it and is a group in its own<br />
right. Of the four conditions listed earlier that define a group, we only need to check the first one – that combining<br />
two permutations of the square group also gives a position that can be solved using only square moves. The<br />
other three conditions are inherited automatically <strong>fr</strong>om the full <strong>Cube</strong> Group.<br />
There are many pretty patterns in the Square Group, and no doubt you already know some of them. The 4-spot<br />
pattern for example can be made by R2L2U2R2B2R2L2F2L2U2, which is 10 half turns. It can be reached in<br />
fewer turns if you allow the cube to temporarily leave the square group by using quarter turns. The 4-spot can be<br />
reached in 8 turns by R2L2UD'F2B2UD'.<br />
There are other interesting subgroups of the <strong>Cube</strong> Group, for example the Slice Group (generated by all slice<br />
moves: FB', RL', UD'), the Antislice Group (generated by all antislice moves: FB, RL, UD), and many others.<br />
It is a strange fact that you only need 5 faces to solve the cube. In other words, {F, B, R, L, U} generates the<br />
whole <strong>Cube</strong> Group. If you know how to solve the cube layer by layer, it is fairly easy to do it without turning the<br />
first layer at all. It is therefore fairly obvious that you can solve the position with just the first layer rotated without<br />
using any turns of that layer. So one face can be turned by using only the other five. A simple way to prove it is<br />
by means of the sequence P = R2L2U2R2B2R2L2F2L2U2, which does the 4-spot. It moves all the pieces <strong>fr</strong>om<br />
the D layer up to the U layer in the same relative positions without actually turning the D layer, so that PUP' has<br />
the same effect as D. The same reasoning shows that the whole Square Group is also generated by just 5 faces.<br />
Not all subgroups are generated by a restricted set of cube moves. In fact most subgroups are better described<br />
by the effects of its permutations on the cube. For example, consider all permutations that do not move the UFR<br />
corner. It is fairly easy to show that these form a group – any combination of such permutations still doesn't move<br />
that corner. A very often used subgroup is the U-Group – the set of all permutations that only move pieces in the<br />
U layer, and leave the bottom two layers intact. A lot of research has been done to find short move sequences<br />
for these permutations so that solving the last layer can be done as fast as possible.<br />
<strong>Cube</strong> Group Center<br />
One particular subgroup that is fascinating is the Center of the <strong>Cube</strong> Group. The Center of a Group includes all<br />
elements which commute with everything, i.e. if C lies in the Center, then CP = PC for all elements P in the<br />
Group. Since CP = PC means that PCP' = C, the element C does not change under any conjugation. The only<br />
Rubik’s <strong>Cube</strong> <strong>Solutions</strong> 16/48 http://www.<strong>mementoslangues</strong>.<strong>fr</strong>/ Rubik’s <strong>Cube</strong>
way for this to be true is if it does not move any piece <strong>fr</strong>om its place. Also, if C twists one corner, then by<br />
conjugation it must twist all corners in the same direction which is not possible on the cube. Similarly, if it flips<br />
one edge then it must flip all of them, but this is possible on the cube. The only elements in the center are<br />
therefore the identity I and the Superflip which flips all 12 edges.<br />
The Superflip can be done by the sequence: ((MR U)4 CR CD)3. This rather cryptic sequence will need a little<br />
explanation. The notation MR is used to denote a move of the middle slice adjacent to the R face in clockwise<br />
direction if you look at it <strong>fr</strong>om the R side. You have to do MRU four times. Now you have to do CRCD which are<br />
rotations of the whole cube in the same directions as the moves R and D (these two cube rotations together are<br />
the equivalent of a rotation about the UFL corner). Now you have to repeat everything you have done so far<br />
twice more (3 times all together).<br />
The fact that the Superflip commutes with everything can be used for some impressive tricks. Suppose you<br />
apparently mix the cube up, but actually perform the Superflip (S). You hand the cube to someone and ask them<br />
to do one or two random moves (P) and then hand it to you behind your back. You have not seen which moves<br />
he did, nor which way up the cube is handed to you, and yet you seem to solve it behind your back. Simply<br />
perform the Superflip again, and bring it out to the <strong>fr</strong>ont while you say that you are nearly finished. The cube will<br />
only need one or two moves to be solved which can be done instantly by sight.<br />
This works because SPS = SSP = IP = P so you only need to undo the few random moves that the cube was<br />
given.<br />
I explained the above trick to the wonderfully clever magician Jerry Sadowitz, and he very quickly came up with<br />
the following idea based on this. You show two <strong>Rubik's</strong> <strong>Cube</strong>s, both of which are mixed up differently. You ask<br />
someone to mix the cubes further, as long as every move that is performed on one is also performed on the<br />
other. You do not see these moves, and yet when you are handed either one of these cubes behind your back,<br />
then without even seeing the other cube you can mix yours so that it is the same as the other one. You should be<br />
able to figure out how this works now.<br />
Supergroup<br />
On the <strong>Rubik's</strong> <strong>Cube</strong> the center pieces of each face do not change position, but they do rotate. On a normal<br />
cube this is not visible, but there are cubes with pictures or other designs on them where the orientation of the<br />
face centers does matter. Each quarter turn is an odd permutation of the corners of the cube (and also odd of the<br />
edges), so it is impossible for a face center to move a quarter turn without moving any other pieces at the same<br />
time. It is possible however for a single center to do a half turn in isolation, or for two centers to do a quarter turn<br />
without moving other pieces.<br />
The group of all permutations of a cube with visible centers is called the Supergroup. It is 4 6 /2 = 2048 times as<br />
large as the normal <strong>Cube</strong> Group.<br />
We already saw that (FR) 35 leaves the pieces in the same position, but twists some corners. Doing this three<br />
times, i.e. (FR) 105 , will therefore not move any pieces. It does however turn the F and R face centers 105 times,<br />
so it leaves them both twisted by a quarter turn. Many other move sequences have an order (in the normal <strong>Cube</strong><br />
Group) that is not a multiple of 4, and they will usually cause centers to be twisted when repeated. These<br />
methods are not really practical however.<br />
By using commutators it is not very hard to find shorter move sequences for twisting face centers. For example<br />
let P be the 6-spot pattern (e.g. MRMFMR'MF') and Q a face turn (e.g. U). The result is then a sequence which<br />
turns one face center clockwise, and an adjacent face center in the opposite direction. The sequence<br />
RL'FB'UD'R'U'DF'BR'LU which turns centers U and R' is derived that way. For opposite faces you could use the<br />
4-spot instead, and this gives RL'F2B2RL'URL'F2B2RL'D' which turns U and D' centers. A short sequence for a<br />
half turn of a face center is more difficult to find. Let P be the sequence RLU2R'L'U2. This swaps one pair of<br />
opposite corners and one pair of opposite edges in the U layer. Commuting it with U therefore gives you a<br />
sequence which has the same effect as U2 on the corners and edges, but which does not move the U center.<br />
Follow it with U2 and you have only moved the U center. Thus (RLU2R'L'U) 2 will move the center U2.<br />
Metrics<br />
It would be nice if we could measure how far away a cube is <strong>fr</strong>om being solved. If we could do this perfectly, we<br />
would be able to solve the cube in the quickest possible way simply by doing any move that brings it closer to the<br />
Rubik’s <strong>Cube</strong> <strong>Solutions</strong> 17/48 http://www.<strong>mementoslangues</strong>.<strong>fr</strong>/ Rubik’s <strong>Cube</strong>
solved position. This quickest way is usually called God's Algorithm. It is of course not so simple to measure<br />
distances on the cube. In mathematics, a measure of some kind of distance between two points is called a metric.<br />
A metric D is a function which should satisfy a few fairly obvious conditions:<br />
1. D(a,b)>=0, or any distance is positive or 0.<br />
2. D(a,b)=D(b,a), or the distance <strong>fr</strong>om a to b is the same as <strong>fr</strong>om b to a.<br />
3. D(a,b)=0 if and only if b=a, or distances between differing points are always non-zero, and the distance<br />
<strong>fr</strong>om one point to itself is always zero.<br />
4. D(a,b)+D(b,c)>=D(a,c), also called the triangle inequality, means that if you go <strong>fr</strong>om a to c, the distance<br />
can only get longer if you detour via b.<br />
On a cube, a reasonable metric would be the minimal number of moves to get <strong>fr</strong>om one position to the other.<br />
You can check that the conditions above are true, provided that the inverse of a single move is also considered a<br />
single move.<br />
There are however several different opinions as to what constitutes a single move. Some people prefer the<br />
Quarter Turn Metric (QTM), i.e. only a quarter turn (in either direction) of a face is considered a single move,<br />
while other people use the Half Turn Metric (HTM) in which half turns are also considered to be a single move<br />
(this is also called the Face Turn Metric, and is often denoted by q + h). For example the Pons Asinorum or the<br />
6X pattern reached by the sequence U2D2F2B2R2L2 is 12 moves <strong>fr</strong>om start in QTM but 6 moves in HTM. Some<br />
people even consider a slice move as a single move, and in this Slice Move Metric (SMM) the Pons would be<br />
only 3 moves <strong>fr</strong>om start.<br />
The example of the 6X pattern above works only because it is known that it cannot be reached by a shorter route<br />
in any of the metrics used here. To prove this for the QTM, consider that each of the 12 edges needs 4 quarter<br />
turns to get into position, each move only moves 4 edges, and so you need at least 12 moves to reach/solve the<br />
6X position.<br />
Generally if you look at a move sequence, counting the number of moves in the sequence will only give you an<br />
upper bound for its distance <strong>fr</strong>om start. There may well be a shorter, more direct sequence. You can even prove<br />
this obvious result by using the triangle inequality.<br />
God's Algorithm<br />
God's Algorithm of a puzzle is the solving algorithm that solves it in the fewest number of moves <strong>fr</strong>om any<br />
position. In other words, <strong>fr</strong>om any position of the puzzle the algorithm gives a move that brings it closer to the<br />
starting position. Note that closeness is measured by a metric, which depends on exactly what is considered to<br />
be a single move. At the moment this algorithm is not known for the <strong>Rubik's</strong> <strong>Cube</strong>, but for several smaller<br />
puzzles like the Skewb, the Pyraminx, the Diamond, and the 2x2x2 <strong>Cube</strong> it is known.<br />
It is usually calculated by computer as follows:<br />
1. Set up a large array with entries for every possible position of the puzzle.<br />
2. Mark the solved position (or positions) as being at distance 0.<br />
3. If all positions of distance
This is of course an overestimate, because many positions can be reached in several ways. This number first<br />
exceeds the total number of positions the cube has when n = 17, so there are positions which need at least 17<br />
moves to solve. A better counting argument that takes into account that RL = LR etc., gives n = 18.<br />
If we use the QTM, then the same argument gives as an upper bound on the number of positions reachable after<br />
n moves:<br />
1+12+12·11+12·11 2 +12·11 3 +....+12·11 n-1<br />
Here we get n = 19, but this can be much improved because it does not take into account that no more than 2<br />
consecutive quarter turns of the same face is ever done. The best calculations show that some positions require<br />
at least 21 quarter turns.<br />
These lower bounds have been improved upon, mostly by computer searches, by showing that certain positions<br />
need more moves to be solved. The superflip for example has been shown to need at least 20 moves in HTM, or<br />
at least 24 moves in QTM. The position reached by combining the 4-spot pattern and the superflip needs at least<br />
26 moves in QTM.<br />
Every algorithm that can solve the cube will take longer than God's algorithm, and therefore we have upper<br />
bounds for God's algorithm too. The best known solving algorithms take 28 moves in HTM or 36 moves in QTM.<br />
These methods involve large computer databases and are not practical for humans.<br />
Thus God's algorithm will have a maximum length between 26 and 36 in QTM, or 20 and 28 in HTM.<br />
Counting<br />
It often happens that you want to find out how many positions a particular puzzle has. This can be tricky, but the<br />
difficulty mainly lies in determining the restrictions, such as parity restrictions or twist restrictions that we saw<br />
earlier. Apart <strong>fr</strong>om those, it is possible to count the number of positions is of a puzzle by imagining it taken apart,<br />
and counting the number of possible ways to put it together. To do this, we need to count the number of<br />
orientations, permutations, and combinations.<br />
The number of orientations<br />
Suppose you are assembling a <strong>Rubik's</strong> cube, and are inserting a corner piece. Wherever you put it, it has three<br />
possible orientations. You have this choice of three orientations for each of the eight pieces, and the total<br />
number of possibilities is multiplied by 3 for every corner you place. The total number of orientations for the<br />
corners is therefore 3 8 = 6561. As we have seen before there is a constraint (the total twist should be zero), so<br />
for the resulting position to be solvable we need the orientation of the last corner to be consistent with that of the<br />
other seven. There are therefore really only 3 7 = 2187 possible corner orientations.<br />
The number of edge orientations is calculated in much the same way. There are twelve edges, each with 2<br />
possible orientations, so at first sight there must be 2 12 = 4096 possibilities. Again there is a constraint so that the<br />
orientation of the last placed piece is dependent on that of the others in solvable cubes, so there are really only<br />
2 11 = 2048 edge orientations.<br />
Some puzzles do intrinsically have a constraint on the orientations, but also have some pieces of which the<br />
orientation is not visible. The best known example is the Pyramorphix. It is essentially a 2×2×2 cube, and half the<br />
pieces have no visible orientation. In this case you can still count the orientations of the normal pieces (giving 3 4<br />
orientations). The zero-twist constraint has no effect however, since you can simply imagine putting one of the<br />
monochrome pieces in last when you are assembling it so that it will automatically be solvable whichever way<br />
that piece is oriented. Generally, any puzzle where there is at least one piece without visible orientation will<br />
effectively have no constraint on the orientations of that type of piece.<br />
The number of permutations<br />
Again, let's suppose you are assembling a <strong>Rubik's</strong> cube, and are inserting all twelve edge pieces one by one.<br />
For the first edge there are 12 possible places to put it, for the next there are 11 possibilities left, for the third only<br />
10, and so on until the last edge which goes into the last remaining empty spot. The total number of<br />
arrangements is therefore 12·11·10·...·2·1, also called 12 factorial, and which is usually written as 12!.<br />
The corner permutations can be counted in the same way, so there are 8! of them. In general, there are n! ways<br />
of permuting of n items.<br />
Rubik’s <strong>Cube</strong> <strong>Solutions</strong> 19/48 http://www.<strong>mementoslangues</strong>.<strong>fr</strong>/ Rubik’s <strong>Cube</strong>
It is occasionally useful to know how many ways there are to place r pieces amongst n places where r
In more difficult cases there are too many to just count them like that. You could then calculate how many there<br />
might be (here we would get 16 because each of the 4 sides has 2 possibilities, red or blue), and then see which<br />
of these are symmetric and how many times too often they have been counted. Burnside's Lemma actually does<br />
something like this.<br />
The lemma states in mathematical terms that if G is a finite group acting on a finite set X, then the number of<br />
orbits under this action is given by taking the average number of the fixed points. In our example, the set X is<br />
simply all possible squares ignoring symmetries (i.e. all 16), the group G is all different ways we can rotate/reflect<br />
the squares, and each orbit is a complete set of squares which are the same under rotation/reflection. The<br />
number of orbits, which is what the Lemma calculates, is therefore the number of distinct squares when<br />
rotation/reflection is taken into account.<br />
Let's calculate it now. First we must find all the symmetries of the square, i.e. all ways of rotating or reflecting it.<br />
These are:<br />
A. Rotation through 90 degrees.<br />
B. Rotation through 180 degrees.<br />
C. Rotation through 270 degrees.<br />
D. Reflection through the horizontal midline.<br />
E. Reflection through the vertical midline.<br />
F. Reflection through one diagonal.<br />
G. Reflection through the other diagonal.<br />
H. The identity.<br />
We must include the identity (rotation through 0 degrees if you like) because we need to use the whole group of<br />
symmetries, and groups always have an identity element. Note that the pairs A and C are similar, as are D and E,<br />
and also F and G.<br />
Now we have to count the number of 'fixed points' that each symmetry has, in other words how many of the 16<br />
possible squares remain unchanged by each symmetry. A square can only remain the same under a 90 degree<br />
rotation if all its sides have the same color. Therefore symmetry A has exactly two 'fixed points', and so does<br />
symmetry C.<br />
Symmetry B has 4 'fixed points', because we must have opposite sides of the square the same color, and each<br />
pair of opposite sides can be either color. Note that this also includes the squares of one color that we had with<br />
symmetry A and C. Symmetries F and G each also have 4 'fixed points', D and E have 8, and finally H has 16<br />
because all squares remain the same if you do nothing to it.<br />
The average of these 8 numbers is therefore (2+4+2+8+8+4+4+16)/8 = 6, as we expected.<br />
Let's now try to apply the Lemma to a real puzzle. It could be applied to count the number of shapes of the<br />
Pyramorphix, but they are much easier to count by hand. Instead, lets count the number of distinct patterns on<br />
an Orbix puzzle. This is much like the earlier example, but now we have a dodecahedron with colored faces<br />
instead of a square with colored sides.<br />
To make things a bit easier we will only look at rotations, so patterns that are mirror images of each other will still<br />
be considered different. There are four types of rotational symmetries:<br />
A. Rotations around a face by a multiple of 1/5 of a turn.<br />
B. Rotations around a corner by a multiple of 1/3 of a turn.<br />
C. Rotations around an edge by a 1/2 of a turn.<br />
D. The identity.<br />
There are 6 axes through the faces, so 6 axes about which rotation A can take place. Note that a 2/5 turn will<br />
keep the same patterns unchanged as a 1/5 turn, because doing it three times give a 3*2/5 = 6/5 turn which has<br />
the same effect. Therefore all 6*4 = 24 type A rotations keep the same positions fixed. Under such a rotation, the<br />
faces move in two 5-cycles, and two 1-cycles. Each cycle must be all the same color, so there are 2 4 =16 fixed<br />
points for these rotations. Similarly the 20 B rotations have 2 4 fixed points, the 15 C rotations have 2 6 , and finally<br />
the identity has 2 12 fixed points.<br />
The average is therefore (24·2 4 + 20·2 4 + 15·2 6 + 2 12 ) / (24+20+15+1) = 96. There are 96 distinct Orbix positions<br />
(if mirror images are counted as well).<br />
Rubik’s <strong>Cube</strong> <strong>Solutions</strong> 21/48 http://www.<strong>mementoslangues</strong>.<strong>fr</strong>/ Rubik’s <strong>Cube</strong>
If you do the same thing for all mirror symmetries (it is easiest to use a point reflection through the centre of the<br />
dodecahedron followed by any normal rotation) then you get the result:<br />
(24·2 4 + 20·2 4 + 15·2 6 + 2 12 + 24·2 2 + 20·2 2 + 15·2 8 + 2 6 ) / 120 = 82.<br />
This means there are 82 positions if mirror images are considered the same, and therefore there are 96-82 = 14<br />
pairs of positions that are mirror images of each other.<br />
Burnside's Lemma can also be applied to the <strong>Rubik's</strong> cube. Whereas normally there are 12 positions that are a<br />
quarter turn <strong>fr</strong>om being solved, these are essentially the same. By applying the lemma, we find that there are<br />
only 901,083,404,981,813,616 essentially different positions.<br />
Rubik’s <strong>Cube</strong> <strong>Solutions</strong> 22/48 http://www.<strong>mementoslangues</strong>.<strong>fr</strong>/ Rubik’s <strong>Cube</strong>
Beginner’s Solution to the <strong>Rubik's</strong> <strong>Cube</strong><br />
Introduction<br />
There are many different methods for solving the <strong>Rubik's</strong> cube. They can be divided into two broad<br />
categories: layer methods and corners first methods (and there are sub-categories within these broad<br />
categories). The method I use for speedsolving is a layer based method. More specifically, the method I<br />
currently use is: cross, F2L, 3-look LL (I know some of the OLLs, so sometimes I can do a 2-look LL). If<br />
you are a newbie cuber then this description may not mean much to you, so I should add that it's the<br />
'Advanced Solution' I described in the Next Steps section at the end of this page.<br />
Many years ago when I wrote this webpage there were many great websites that explained advanced<br />
and expert methods for solving the cube (check out my Rubiks links page), however, there were very<br />
few that explained beginner methods. This is the reason I wrote this page. It's not meant to be a totally<br />
comprehensive explanation, it's really just some notes I threw together for some <strong>fr</strong>iends I was teaching.<br />
I thought it might be useful for others, so I've turned it into a webpage.<br />
This beginner method requires memorizing only a few algorithms, and when done efficiently can<br />
achieve solves of 60 seconds or faster. I know people who can solve in 20-30s with a method like this. I<br />
haven't been able to solve so fast with a beginner’s method, so don't be too distressed if you can't<br />
either. On the other hand, if you can do 30s solves with this method, then you are too good for this<br />
method and you should be learning an Advanced or Expert method!<br />
Aside <strong>fr</strong>om minimal memorization, another benefit of this method is that it is very scalable. More<br />
algorithms may be added later to develop it into an advanced method, or if you're really keen, an expert<br />
method. This means you don't need to scrap it and start again to move to an expert method. Everything<br />
you learn here will be useful for more advanced methods.<br />
Structure of the cube<br />
We all know that 3x3x3 = 27, however, rather than thinking about the cube as 27 little "cubies", think<br />
about it as 6 fixed centers (that can rotate on their own axis) with 8 corners and 12 edges which rotate<br />
around it. As the centers are fixed, the centre color defines the color for the face. It's important to<br />
remember this otherwise you'll end up trying to do illogical (mechanically impossible!) things like<br />
wondering why you can't work out how to put a corner piece in an edge position, or assuming that<br />
you're looking at the blue face merely because 8 of the 9 cubies on it are blue (if the center is white<br />
then it's the white face).<br />
Terminology<br />
When describing the solution for the 2nd and 3rd layers, standard cube notation will be used. Here's<br />
what you need to know to read it:<br />
F = Front face B = Back face R = Right face L = Left face U = Up face D = Down face<br />
In addition to a letter, each move may be accompanied by an apostrophe or the number two:<br />
• A letter by itself means turn that face 90 degrees clockwise (e.g. F).<br />
• A letter followed by an apostrophe means turn that face 90 degrees anti-clockwise (e.g. F').<br />
• A letter followed by the number 2 means turn that face 180 degrees (direction is irrelevant), (e.g. F2).<br />
Rubik’s <strong>Cube</strong> <strong>Solutions</strong> 23/48 http://www.<strong>mementoslangues</strong>.<strong>fr</strong>/ Rubik’s <strong>Cube</strong>
So R U' L2 is a shorthand for "turn the Right face 90 degrees clockwise, then turn the Up face 90<br />
degrees anti-clockwise, then turn the Left face 180 degrees". When thinking whether to turn<br />
clockwise/anti-clockwise, imagine that you are looking directly at the particular face you are turning.<br />
For each algorithm, the notation is written with the assumption that the core of the cube remains fixed<br />
throughout the whole algorithm, and the faces just turn around it. This means that you also need to<br />
know how to position the cube to start the algorithm.<br />
For pictures and further detail about cube notation, have a look at Jon Morris' cube notation page.<br />
The Solution<br />
The First Layer<br />
The first layer is solved in two stages:<br />
1. Form the cross<br />
2. Insert the 4 first layer corners (each corner is inserted individually)<br />
I believe that the first layer should be done intuitively. You need to understand it and solve it without<br />
learning algorithms. Until you can do this, I wouldn't bother attempting the rest of the cube! So, spend<br />
some time playing with the cube and familiarizing yourself with how to move the pieces around the<br />
cube.<br />
Now, here are some tips to get you started.<br />
The Cross<br />
I prefer to start with the white cross because I find white easier to quickly identify on a completely<br />
scrambled cube, however, you can use any color.<br />
There are 4 edge pieces with white (i.e. the 4 arms of the cross) which have specific positions. You<br />
can't put any white edge piece in an arm of the cross because the other color on the edge cubie must<br />
match up with it's center on the middle layer.<br />
Here is a pic of what a correctly formed cross<br />
looks like (grey denotes cubies that are irrelevant<br />
to the cross). Note that the white/red edge cubie<br />
matches up with the white centre and the red<br />
centre. Ditto re the white/blue cubie.<br />
Here's a pic on an incorrectly formed cross.<br />
Looking at the white face we do indeed see a<br />
white cross, however the white/red edge cubie<br />
does not match up with the red centre. Ditto re the<br />
white/blue cubie. This is bad!<br />
For a detailed explanation of the cross, check out Dan Harris' Solving the Cross page.<br />
The First Layer Corners<br />
Once you have completed the cross, completing the first layer requires inserting each of the 4 corners<br />
in separately. The first thing to do is examine your cube and locate all of the top layer edge pieces -<br />
they will be sitting in either the first layer or the last layer. Inserting the first layer corners should be<br />
Rubik’s <strong>Cube</strong> <strong>Solutions</strong> 24/48 http://www.<strong>mementoslangues</strong>.<strong>fr</strong>/ Rubik’s <strong>Cube</strong>
done intuitively, not by learning algorithms. To get you started, here's a step-by-step example of one<br />
way to insert a first layer corner.<br />
Step 1<br />
Step 2<br />
Step 3<br />
Step 4<br />
The blue/red/white<br />
corner is sitting in the<br />
bottom layer (the blue<br />
part is facing the bottom<br />
so we can't see it in this<br />
picture). Turn the blue<br />
face 90 degrees anticlockwise.<br />
Now your cube should<br />
look like this. Move the<br />
D face 90 degrees anticlockwise<br />
to line up the<br />
blue/white edge with<br />
the blue/white/red<br />
corner.<br />
Now that the blue/white<br />
edge and the<br />
blue/white/red corner<br />
have been lined up, reform<br />
the white cross by<br />
turning the blue face 90<br />
degrees clockwise.<br />
Now the blue/white/red<br />
corner is in its correct<br />
place.<br />
Here are some tips for inserting the top layer corners:<br />
• Start with a first layer corner that is sitting in the last layer.<br />
• If there are multiple first layer corners in the last layer (there usually will be), start with one that<br />
does not have the white part of the corner on the face opposite the white face. Or, if you were<br />
using a different color for the cross ('color X'), start with a corner that does not have the 'color X'<br />
part of the corner on the face opposite the 'color X' face.<br />
• When working with a first layer corner piece that is in the first layer (but in the wrong first layer<br />
corner position), you will need to get it out of the first layer into the last layer, then insert it into<br />
the correct first layer corner position. The same principle applies if a first layer corner piece is in<br />
the correct first layer corner position but needs to be flipped around. You need to get it out of the<br />
first layer (i.e. into the last layer), and then re-insert it into the first layer the correct way around.<br />
This is what the first layer should look like when finished.<br />
The Middle Layer<br />
The middle layer consists of one stage:<br />
1. Insert the 4 middle layer edges (each edge is inserted individually).<br />
You only need to learn one algorithm (plus the mirror algorithm) for the second layer. There are many<br />
more algorithms, but let's just learn the essential one first.<br />
First, locate a middle layer edge that is currently sitting in the last layer. I'm going to use the blue/red<br />
edge for this example.<br />
Rubik’s <strong>Cube</strong> <strong>Solutions</strong> 25/48 http://www.<strong>mementoslangues</strong>.<strong>fr</strong>/ Rubik’s <strong>Cube</strong>
This blue edge cubie in the last layer is the blue/red edge cubie.<br />
In this picture, U=white, L=red and F=blue. We can't see the other three faces, but obviously the R<br />
face is the one opposite the L face, the D face is opposite the U face and the B face is opposite the F<br />
face.<br />
Now, position the blue/red edge piece so that the color on the side of the cube (blue in this case) lines<br />
up with it's center. Now perform the following algorithm: D L D' L' D' F' D F<br />
If the blue/red edge piece was flipped the other way so that the blue was on the bottom rather than the<br />
red, you would position the cubie under the red centre and perform the following algorithm:<br />
D' F' D F D L D' L'. This is the mirror of the previous algorithm. The axis of symmetry lies diagonally<br />
across the white face, and along the line which divides the blue face and the red face.<br />
What if the edge piece is not in the last layer?<br />
The instructions above assume that the middle layer edge piece you<br />
are inserting is sitting somewhere in the last layer.<br />
If some middle edges are in the last layer and some are in the middle<br />
layer in the wrong spot, always start working with the edge pieces that<br />
are in the last layer. After you've done this, sometimes (but not too<br />
often) you'll be left with a middle layer edge piece that's in the middle<br />
layer but in the wrong spot. In this situation, you can use the same<br />
middle layer algorithms <strong>fr</strong>om above:<br />
(D L D' L' D' F' D F or D' F' D F D L D' L')<br />
to insert another edge piece into the middle layer edge position, thereby<br />
knocking the middle layer edge piece out of its spot and into the last<br />
layer. Once you've done this, the middle layer edge piece is in the last<br />
layer and you can deal with it in the usual way.<br />
The red/blue middle<br />
layer edge piece is in the<br />
middle layer but not<br />
oriented correctly. It<br />
needs to be moved to the<br />
last layer, then put back<br />
into the middle layer in<br />
the right way.<br />
There is a short-cut to this problem, but as this is a beginner solution<br />
with minimal memorization, I haven't included it here. If you really want<br />
to learn it, take a look at Case Dd2 on Dan Harris' site.<br />
The Last Layer<br />
The last layer ("LL") is done in 4 steps:<br />
1. Orient the edges (2 algorithms) - i.e. form a cross on the D face.<br />
2. Permute the corners (1 algorithm) - i.e. get the corners in the correct position in 3D space (don't worry if they still<br />
need to be rotated).<br />
3. Orient the corners (1 algorithm + 1 mirror algorithm) - i.e. flip the corners.<br />
4. Permute the edges (1 algorithm) - i.e. swap the edges around. The cube should now be solved! :)<br />
All last layer algorithms are performed with the cross (i.e. the first layer - white side in this example) on<br />
the bottom.<br />
Rubik’s <strong>Cube</strong> <strong>Solutions</strong> 26/48 http://www.<strong>mementoslangues</strong>.<strong>fr</strong>/ Rubik’s <strong>Cube</strong>
Orienting the LL Edges<br />
Once you have completed the first two layers ("F2L"), hold the cube so that the white side is on the<br />
bottom. The white side will be on the bottom for the remainder of the solution. This means that the<br />
white side is the D side for all last layer algorithms.<br />
On my cube, white is opposite yellow, therefore yellow is the U face for all last layer algorithms on my<br />
cube. Note that your cube may have a different color opposite white (e.g. blue). Now have a look at<br />
your last layer, and in particular, look at the last layer face - there are 4 possible patterns of LL edges<br />
that you may see.<br />
State 1 State 2 State 3 State 4<br />
Unlike with the initial cross (where all the edges must match up with the white center and with the<br />
centers on the middle layer), here all you need to worry about is getting all the last layer edges<br />
matching up with the last layer center. It doesn't matter if the other color on the LL edge piece does not<br />
match up with the color on the middle layer center. Also, ignore the LL corners too. It doesn't matter<br />
what they are doing at the moment. Now, let's consider each of these LL edge states separately.<br />
State 1<br />
All the edges are already oriented correctly. Move on to permuting the corners.<br />
State 2<br />
We are going to re-orient our faces for this algorithm. The face you are looking directly at<br />
in this picture is now the U face (it was the D face for when you were doing the second<br />
layer edges). Perform the following algorithm: F U R U' R' F'<br />
State 3<br />
As with State 2, the face you are looking directly at in this picture is now the U face.<br />
Perform the following algorithm: F R U R' U' F'<br />
State 4<br />
State 4 is really a combination of States 2 and 3, so all you need to do is perform the<br />
algorithm for either State 2 or State 3. Once you've done this, you'll see that your LL<br />
edges now look like State 2 or State 3, so just perform the appropriate algorithm and you<br />
will have a cross on the LL.<br />
Permuting the LL Corners<br />
The two possible states are:<br />
Rubik’s <strong>Cube</strong> <strong>Solutions</strong> 27/48 http://www.<strong>mementoslangues</strong>.<strong>fr</strong>/ Rubik’s <strong>Cube</strong>
• two adjacent LL corners need to be swapped; or<br />
• two diagonal LL corners need to be swapped.<br />
These are the only two possible states. If you cannot identify one of these two states with your LL<br />
corners then one or more of the following must be true:<br />
• You have not finished the F2L.<br />
• Someone has ripped out a corner of your cube and put it in the wrong way.<br />
• Someone has ripped off some of your stickers and put them back in the wrong place.<br />
• You are not looking hard enough. ;)<br />
Swapping adjacent corners<br />
Hold the cube with the white side on the bottom, and the two corners to be swapped are in the <strong>fr</strong>ont<br />
right top and the back right top positions. Perform the following algorithm: L U' R' U L' U' R U2. To see<br />
an animated version of this algorithm, see the first algorithm on Lars Petrus' Step 5 page. On Lars' site,<br />
the algorithm is being executed <strong>fr</strong>om a slightly different angle (the two corners being swapped are <strong>fr</strong>onttop-right<br />
and <strong>fr</strong>ont-top-left), but it is the same exact algorithm.<br />
Swapping diagonal corners<br />
Swapping diagonal corners can be done by executing the adjacent corner swap algorithm twice.<br />
Perform it once to swap any two LL corners. Re-examine you cube and you'll see that now there are<br />
just two LL corners that need to be swapped. Position it correctly for the final LL adjacent corner swap<br />
and perform the LL adjacent corner swap algorithm.<br />
Orienting the LL Corners<br />
There are 8 possible orientation states for the LL corners. One is where all 4 corners are correctly<br />
oriented. The other 7 look like this.<br />
State 1 State 2 State 3 State 4 State 5 State 6 State 7<br />
State 1. Twisting three corners anti-clockwise<br />
R' U' R U' R' U2 R U2<br />
State 2. Twisting three corners clockwise<br />
R U R' U R U2 R' U2<br />
To see an animated version of this algorithm, look at Lars Petrus' Sune algorithm.<br />
States 3-7<br />
Once you know the algorithms for States 1 and 2, you can solve any LL orientation State. The<br />
remaining States can be oriented using a maximum of 2 algorithms. You will need to do one of the<br />
Rubik’s <strong>Cube</strong> <strong>Solutions</strong> 28/48 http://www.<strong>mementoslangues</strong>.<strong>fr</strong>/ Rubik’s <strong>Cube</strong>
following (i) the State 1 algorithm twice, (ii) the State 2 algorithm twice, (iii) the State 1 algorithm, then<br />
the State 2 algorithm, or (iv) the State 2 algorithm, then the State 1 algorithm.<br />
In a previous edition of this solution, I had said that I'm not going to tell you exactly how to combine the<br />
State 1 and State 2 algorithms to solve States 3-7. My reason for this was because it is important that<br />
you try to understand how the State 1 and the State 2 algorithms work, and that once you do<br />
understand them you will be able to work out how to use them to solve all the States. I still believe this,<br />
however, I received emails <strong>fr</strong>om a few people who were having trouble with States 3-7, so I decided to<br />
write some extra tips. I still suggest that you try to work out States 3-7 by yourself, but if you are really<br />
stuck, have a look here: Orienting the Last Layer Corners: further tips.<br />
Permuting the LL Edges<br />
There are 5 possible permutation states for the LL edges. One is where all 4 edges are correctly<br />
permuted. The other 4 look like this.<br />
State 1<br />
State 2<br />
State 3<br />
State 4<br />
R2 U F B' R2 F' B U R2<br />
R2 U' F B' R2 F' B U' R2<br />
This is almost identical to<br />
the algorithm for State 1.<br />
Only difference is the 2nd<br />
move and the 2nd last<br />
move.<br />
Apply the algorithm for<br />
either State 1 or State 2.<br />
Re-examine your cube<br />
and it will now look like<br />
State 1 or State 2.<br />
Apply the algorithm<br />
for either State 1 or<br />
State 2. Re-examine<br />
your cube and it will<br />
now look like State 1<br />
or State 2.<br />
For an animated version of<br />
this algorithm, see the<br />
Lars Petrus' Allen algorithm.<br />
The algorithm is being<br />
executed <strong>fr</strong>om a slightly<br />
different angle, but it is the<br />
same exact algorithm.<br />
And that's all you really need to know to solve the <strong>Rubik's</strong> <strong>Cube</strong>! With practice, you should be able<br />
to achieve times of 60 seconds (or faster) using this method. Once your comfortable with this method<br />
and want to learn more, take a look at the following section.<br />
Rubik’s <strong>Cube</strong> <strong>Solutions</strong> 29/48 http://www.<strong>mementoslangues</strong>.<strong>fr</strong>/ Rubik’s <strong>Cube</strong>
Next Steps<br />
If this beginner method is too easy and boring for you then consider the following.<br />
Intermediate method<br />
• Solve each first layer corner + corresponding middle layer edge in one step. This means that<br />
after the cross you only have 4 steps (4 corner/edge pairs) to complete the F2L. With this<br />
beginner method there are 8 steps: solve each of the 4 first layer corners, then solve each of the<br />
4 middle layer edges. I'd suggest just playing around with your cube and figuring out the F2L<br />
corner/edge pairs yourself. For some hints about solving the F2L intuitively, have a look at Doug<br />
Reed's intuitive F2L guide. If you're still stuck and just want the algorithms, check out Dan<br />
Harris' F2L page and Jessica Fridrich's F2L page.<br />
• Learn the 4 specific algorithms (or rather, 3 algorithms plus one mirror algorithm) for each of the<br />
4 different permutation states of the LL edges. My beginner solution already shows you 2 of the<br />
4 last layer edge permutation algorithms, the other two last layer edge permutation algorithms<br />
are Case #5 and Case #17 on Dan Harris' PLL page.<br />
Advanced method<br />
• Learn everything <strong>fr</strong>om the Intermediate method.<br />
• Learn the 3-look LL. This requires learning the 7 specific algorithms for the 7 different orientation<br />
states of the LL corners, and learning the 21 PLL algorithms (permuting the last layer algorithms)<br />
so you can permute the LL edges and LL corners at the same time. A full 3-look LL uses 30<br />
algorithms.<br />
For more details about the advanced method, check out t Rubiks Galaxia 3-look LL, Dan Harris' site<br />
and Lars Vandenbergh's PLL page.<br />
Expert method<br />
• Do the F2L in 5 steps (first dot point <strong>fr</strong>om the Intermediate method).<br />
• Learn a full 2-look LL. This requires memorizing 21 PLL algorithms, plus 57 OLL algorithms<br />
(orienting the last layer algorithms).<br />
For more details about the expert method, check out Dan Harris' site, Joël van Noort's site and Lars<br />
Vandenbergh's site.<br />
Other stuff<br />
The method I've documented here is what I believe to be a good beginner’s method. The problem with<br />
some beginner’s methods is that they are not scalable - to improve your cubing you have to un-learn<br />
much of what you know and re-learn it in a different way. This method focuses on memorizing very few<br />
algorithms, but is structured in a way that allows for development into an intermediate or advanced<br />
method. Other thing I should say is that I didn't actually devise any of the last layer algorithms in this<br />
method. I merely chose a selection of existing algorithms (sourced <strong>fr</strong>om a variety of places including<br />
Jessica's site and Dan K's site) and organized them into a simple solution method.<br />
Celebrate your cubing success!<br />
When you are confident that you can solve the cube by yourself, time yourself so you can keep track of<br />
your progress. Also, consider submitting your time to the unofficial world records.<br />
Rubik’s <strong>Cube</strong> <strong>Solutions</strong> 30/48 http://www.<strong>mementoslangues</strong>.<strong>fr</strong>/ Rubik’s <strong>Cube</strong>
THE EDGE PIECE SERIES<br />
THE ULTIMATE SOLUTION TO THE RUBIK'S CUBE<br />
In this approach to solving a scrambled <strong>Rubik's</strong> <strong>Cube</strong> all 12 edge pieces are placed first. The<br />
first four are placed in Step One which is straightforward. Some of the others are moved into<br />
place with a simple replacement process. The remainder utilize a symmetric four turn series<br />
which moves three edge pieces around a corner of the cube.<br />
The red face of the cube in Fig. 1a is <strong>fr</strong>ont.The red/yellow edge piece at <strong>fr</strong>ont/top belongs at<br />
<strong>fr</strong>ont/right. We cannot simply rotate the <strong>fr</strong>ont face clockwise by 90 o because we have already<br />
placed four blue edge pieces on the bottom face and would not want to move any one of them<br />
out of place. But an Edge Piece Series will move the red/yellow, orange/yellow and red/green<br />
edge pieces around the <strong>fr</strong>ont/right/top corner of the cube without moving other edge pieces.<br />
(These edge pieces have been numbered #1, #2 and #3.) According to standard notation this<br />
series is F R' F' R.<br />
Fig. 1a<br />
Fig. 1b<br />
Applying this series gives the cube shown in Fig. 1b. We find that edge piece #1 is now in the<br />
position originally occupied by edge piece #2. That is, #1 replaced #2. Further, #2 replaced #3<br />
and #3 replaced #1. The three pieces moved about the <strong>fr</strong>ont/top/right corner of the cube in a<br />
counterclockwise direction. The blue edge pieces on the bottom of the cube are undisturbed.<br />
Some corner pieces have also moved but that is immaterial. At this time we are interested only<br />
in the movement of edge pieces.<br />
We can also describe this series in terms of the movement of edge pieces #1, #2 and #3.<br />
Turn one Front clockwise #1 replaces #2<br />
Turn two Right counterclockwise #3 replaces #1<br />
Turn three Front counterclockwise<br />
reverse turn one<br />
Turn four Right clockwise reverse turn two<br />
Now let us consider what has happened to these edge pieces. If the <strong>fr</strong>ont face in Fig. 1b is<br />
turned 90 o counterclockwise we find that edge piece #1 (red/yellow) has the same orientation as<br />
before. The same is true of edge piece #2 (turn the right face 90 o counterclockwise). But edge<br />
piece #3 is different. If we turn the top face 90 o counterclockwise we find that edge piece #3 has<br />
been inverted.<br />
This is always true of these edge pieces. Edge pieces #1 and #2 are not inverted while edge<br />
piece #3 is inverted. You are <strong>fr</strong>ee to number the three edge pieces in any way you want to. Then,<br />
provided you always follow the turn sequence given above, you will find that #1 replaces #2, #2<br />
replaces #3 and #3 replaces #1. Edge pieces #1 and #2 will not invert while #3 inverts.<br />
Look at the cube in Fig. 2a. This is the same cube as in Fig 1a except that the top face has been<br />
turned 90 o in a counterclockwise direction. We still want the red/yellow edge piece to move into<br />
Rubik’s <strong>Cube</strong> <strong>Solutions</strong> 31/48 http://www.<strong>mementoslangues</strong>.<strong>fr</strong>/ Rubik’s <strong>Cube</strong>
the <strong>fr</strong>ont/right position. But to be properly placed it must invert. Hence it must be edge piece #3.<br />
Since #3 replaces #1 then orange/yellow must be edge piece #1. Green/white then is edge piece<br />
#2.<br />
Fig. 2a<br />
Fig. 2b<br />
We will apply the series as before.<br />
turn one #1 replaces #2<br />
turn two #3 replaces #1<br />
turn three<br />
turn four<br />
reverse turn one<br />
reverse turn two<br />
Now examine the result, the cube in Fig. 2b. Again we have accomplished our main purpose, the<br />
movement of the red/yellow edge piece into its proper position and orientation at <strong>fr</strong>ont/right.<br />
The orange/yellow piece is involved in both instances but it moves to a different location.<br />
However, red/green is involved in the first case while the green/white piece has replaced it in the<br />
second series. In the second example, the three pieces have moved in a clockwise direction<br />
about the <strong>fr</strong>ont/right/top corner of the cube.<br />
The red/yellow edge piece may be moved into its correct position/orientation <strong>fr</strong>om a position<br />
above either the red or the yellow center pieces by an Edge Piece Series. Which version of the<br />
series you will want to use will depend on what else you are trying to accomplish. We will visit<br />
this situation again in Step Two of the Ultimate Solution to <strong>Rubik's</strong> <strong>Cube</strong>.<br />
THE CORNER PIECE SERIES<br />
The corner pieces are put into proper position/orientation following the placement of the 12<br />
edge pieces. After the edge pieces are placed we will find some corner pieces may already be<br />
correctly placed while some are properly positioned but not properly oriented. The remainder<br />
will be in the wrong position. The incorrectly placed corner pieces will be moved into proper<br />
position/orientation using the Corner Piece Series.<br />
The Corner Piece Series has eight 90 o turns and is perfectly symmetrical. The first turn is<br />
always a turn of the top face. Such a turn is indicated by a curved arrow on the top face of the<br />
cube with the point of the arrow ending on the back part of this face. The first figure in the set of<br />
eight below indicates that the top face is rotated clockwise. We will say that this face is turned<br />
to the right because the arrow at the back of the top face points to the right. This is simply a<br />
convention but it will enable you to more easily recall this series. The symbols below indicate<br />
the eight turns in one example of the series. You are looking down on the top face of the cube.<br />
Rubik’s <strong>Cube</strong> <strong>Solutions</strong> 32/48 http://www.<strong>mementoslangues</strong>.<strong>fr</strong>/ Rubik’s <strong>Cube</strong>
The first move of the top face may be either to the right or to the left , but the rules governing<br />
the succeeding moves are the same in either case. The second symbol shows that the top<br />
surface of the right face moves away <strong>fr</strong>om you.<br />
1. The first move is a turn of the top face, either to the right or to the left.<br />
2. The second move is a turn of the side face toward which the top was turned. It is turned away<br />
<strong>fr</strong>om you.<br />
3. The top is then turned in the direction opposite to the first turn.<br />
4. The side toward which the top was just turned is then turned away <strong>fr</strong>om you.<br />
5. The top is then turned in the same direction as the first turn.<br />
6. The side toward which the top was just turned is then turned back toward you.<br />
7. The top is turned in the opposite direction.<br />
8. The side toward which the top was just turned is turned back toward you.<br />
The top is turned every other turn, alternating directions. Each side face is first turned away and<br />
then back toward you. Note that each of the initial turns is later reversed.<br />
This series will cause three corner pieces on the top face of the cube to move about a triangle. If<br />
the first turn of the top face is to the right then the corner pieces will move in a<br />
counterclockwise direction about the triangle. If the first turn is to the left then three pieces (two<br />
are the same but one is different) will move in a clockwise direction about a triangle which is a<br />
mirror image of the first triangle.<br />
Let us apply a Corner Piece Series (with the first move being a turn of the top face to the right)<br />
to the cube in Fig. 3a. In this case the orange face is the <strong>fr</strong>ont of the cube. The result is the cube<br />
in Fig. 3b. We can see that the left/<strong>fr</strong>ont/top, the left/back/top and the right/back/top pieces have<br />
been moved. We get a another view of the changes by rotating the cube 180 o giving us Fig. 3c.<br />
Fig. 3a Fig. 3b Fig. 3c<br />
The red/green/white corner piece moved along the red/white edge and into the red/yellow/white<br />
corner. In the process it "rolled over" so that the white face is now on the side of the cube and<br />
in the yellow face. The red/yellow/white corner piece moved along the yellow/white edge and<br />
also "rolled over". The yellow/orange/white piece moved across the diagonal of the top face. In<br />
the process it's yellow face, which had been on the left (yellow) side, came to the top.<br />
Note that the two corner pieces on the back of the top face and the corner piece at left/top/<strong>fr</strong>ont<br />
are involved in this triangle. The pieces moved counterclockwise. All three "rolled over".<br />
If the first turn of the top face had been to the left the two pieces at the rear would still be<br />
involved but the third piece would be the one in the <strong>fr</strong>ont/right/top corner. This piece would<br />
Rubik’s <strong>Cube</strong> <strong>Solutions</strong> 33/48 http://www.<strong>mementoslangues</strong>.<strong>fr</strong>/ Rubik’s <strong>Cube</strong>
move across the diagonal to the left/back/top corner. The pieces would move in a clockwise<br />
direction about the triangle.<br />
Obviously the two pieces at the back of the top face are always involved along with one of the<br />
pieces at the <strong>fr</strong>ont. How can you tell which one? You should note that the first turn immediately<br />
moves the <strong>fr</strong>ont corner piece involved to the back of the top face. It is this piece which will<br />
eventually move across the diagonal of the top face.<br />
If the three out-of-position corner pieces were to move in the opposite direction about the same<br />
triangle they would move back into position/orientation. These three pieces illustrate what you<br />
will be looking for as you try to solve a scrambled cube.<br />
The red/white/green piece may be made to move along the red/white edge of the cube. As it<br />
does so it will roll over into its proper position/orientation. The yellow/white/red corner piece<br />
will do the same thing as it moves along the yellow/white edge of the cube.<br />
Fig. 3d<br />
The cube has been turned another 90 o in Fig. 3d. Now you see an example of a corner piece<br />
which can be moved across the face diagonal to its proper position and orientation. For this<br />
corner piece, the color of the top face (white) is on the right side. The orange and yellow colors<br />
do not match any side which is visible. But you should know that orange is opposite red and<br />
that yellow is opposite green. Hence this corner piece has the colors of the opposite corner.<br />
The Corner Piece Series which begins with a turn of the top face to the left will move the<br />
orange/white/yellow corner piece across the diagonal with the white face coming to the top. The<br />
other two pieces move along cube edges and roll over into their proper position and orientation.<br />
The cube is again complete.<br />
Of course you will not often find three corner pieces arranged so that all move into correct<br />
position/orientation in a single series. Most of the time you will find one which can move into<br />
place along a cube edge. Less often it will be a corner piece which can move across a face<br />
diagonal and into its proper position and orientation. At times there will be two pieces which<br />
can be moved into place in a single series and rarely three. But if you should find three in such<br />
an arrangement you certainly would want to take advantage of that fact.<br />
STEP ONE: THE CROSS<br />
This solution to <strong>Rubik's</strong> <strong>Cube</strong> begins, as many solutions do, with the formation of a cross on<br />
one face of the cube. You can choose any color but it is best to choose a face which already has<br />
an edge piece matching the center color of that face. The scrambled cube shown in Fig. 4a has<br />
three faces for which this is true. I have chosen the blue face but any one of the three could<br />
have been chosen. (On my cube, red is opposite orange, yellow is opposite green and white is<br />
opposite blue.)<br />
Rubik’s <strong>Cube</strong> <strong>Solutions</strong> 34/48 http://www.<strong>mementoslangues</strong>.<strong>fr</strong>/ Rubik’s <strong>Cube</strong>
Fig. 4a<br />
Fig. 4b<br />
Naturally it would be better if two edge pieces had their blue color on top but only if these two<br />
pieces are in the proper position relative to each other. More often than not this is not true and<br />
one edge piece would have to be changed. In two trials out of three, two will not be better than<br />
one.<br />
What is the best way to transform the cube to the one in Fig. 4b? Many solutions would tell you<br />
to begin by turning the top (blue) face one turn (90 o ) clockwise. The blue/green piece would<br />
move into its proper place on the cube. These solutions emphasize the bottom face. Target<br />
edge pieces are taken to the bottom of the cube, the bottom is turned and the target piece<br />
brought to the top in proper position and orientation. That approach would require eight moves<br />
to form the cross on the blue face of this cube.<br />
But it is better to emphasize the top face. Edge pieces are moved to the top face so as to be in<br />
the proper relationship to top edge piece(s) already on the top face. First, examine the cube. The<br />
blue/green edge piece is already on the top face; the blue/red piece is at <strong>fr</strong>ont/right; the<br />
blue/yellow piece is at bottom/<strong>fr</strong>ont; and the blue/orange piece is at back/bottom.<br />
The blue/yellow piece must be opposite the blue/green piece. In addition, the blue/red piece<br />
belongs where the green/orange piece is now. If the blue face is rotated 90 o counterclockwise<br />
then a 90 o clockwise rotation of the orange face will move the blue/red edge piece into place<br />
relative to the blue/green piece and a 180 o rotation of the green face moves the blue/yellow<br />
piece into place, also relative to the blue/green piece.<br />
Three edge pieces are in place on the blue face. We can now rotate the blue face by 180 o and<br />
then the yellow face by 90 o clockwise. Unfortunately this moves the blue/yellow edge piece out<br />
of position. After the blue/orange piece is moved into position/orientation by a 90 o<br />
counterclockwise rotation of the orange face, the blue/yellow edge piece is moved back into<br />
place by a 90 o counterclockwise rotation of the yellow face. This approach required seven<br />
moves.<br />
But it is still better to anticipate. The first move should have been a 90 o counterclockwise<br />
rotation of the yellow face. This moves the blue/orange edge piece into position so that,<br />
following placement of the blue/red and blue/yellow edge pieces, a clockwise rotation of the red<br />
face moves the blue/orange piece into its proper position/orientation relative to the other three.<br />
Finally, a 180 o rotation of the blue face moves all blue edge pieces into place. This approach<br />
requires six moves. In standard notation the moves are (back is B):<br />
B' T' R F 2 L T 2<br />
In actual practice, of course, how you proceed to form the cross is up to you. Just make sure<br />
that you can do it somehow. With sufficient practice you should be able to reduce the average<br />
number of moves required to about seven.<br />
STEP TWO: CENTER SECTION EDGE PIECES<br />
In Step Two of The Ultimate Solution to <strong>Rubik's</strong> <strong>Cube</strong> you will have two objectives which are to<br />
be met simultaneously. You will use the Edge Piece Series to move a central section edge piece<br />
Rubik’s <strong>Cube</strong> <strong>Solutions</strong> 35/48 http://www.<strong>mementoslangues</strong>.<strong>fr</strong>/ Rubik’s <strong>Cube</strong>
<strong>fr</strong>om the top face into its proper position and orientation in the center section. You will repeat<br />
this process until three of the center section edge pieces are in place.<br />
As you carry out this process some of the pieces you will be moving will be top section edge<br />
pieces. Make sure you carry out the Edge Piece Series so that, if possible, the top edge pieces<br />
wind up with their top color on the top face of the cube. This step is complete when:<br />
a. three edge pieces are in place in the center section,<br />
b. three top edge pieces have their top color on the top face of the cube,<br />
c. one top edge piece is in the center section and<br />
d. the fourth center section edge piece is in the top section of the cube.<br />
In the beginning it is possible that one or more center section edge pieces are already in place.<br />
Fine. But it is also possible that one or more are in the proper position but with the wrong<br />
orientation. Tough. You will have to remove it (them), also with an Edge Piece Series.<br />
Remember that a center section edge piece may be moved into proper position and orientation<br />
with that edge piece starting above either of the faces with one of the edge piece colors. The<br />
orange/green edge piece in Fig. 5a (at top/right) could be moved into place at <strong>fr</strong>ont/right if it is<br />
treated as Edge Piece #1. But this would be a bad idea because the white/red edge piece would<br />
be inverted in the process and we would have reduced the number of top edge pieces with their<br />
top color on top of the cube <strong>fr</strong>om one to none.<br />
Fig. 5a<br />
Fig. 5b<br />
On the other hand we could treat the orange/green edge piece as Edge Piece #2 in Fig. 5a<br />
(red/white would be #1) or rotate the top face 90 o clockwise (giving Fig. 5b) and treat<br />
orange/green as Edge Piece #3. The red/yellow edge piece would be #1. In either case the<br />
orange/green edge piece moves into the proper position and orientation and the red/white edge<br />
piece will continue to have its white color on the top face of the cube.<br />
But we need to get more white edge piece faces on the top face of the cube. In Fig. 5c the<br />
red/green edge piece belongs at <strong>fr</strong>ont/right. If we treat the red/green edge piece as #1 an Edge<br />
Piece Series will cause the orange/white edge piece to come to the top of the cube with its<br />
orange face on top, not white. On the other hand if we treat the yellow/red edge piece as #1<br />
then red/green is #2 and orange/white would be #3. Orange/white would come to the top of the<br />
cube with its white face on top (since edge piece #3 always inverts).<br />
Fig. 5c<br />
Fig. 5d<br />
Rubik’s <strong>Cube</strong> <strong>Solutions</strong> 36/48 http://www.<strong>mementoslangues</strong>.<strong>fr</strong>/ Rubik’s <strong>Cube</strong>
Or we could rotate the top face 90 o counterclockwise (giving Fig. 5d) and apply an Edge Piece<br />
Series with the red/green edge piece as #3. The orange/white edge piece will be #1 and the<br />
red/white edge piece will be #2. The orange/white edge piece will come to the top of the cube<br />
with its white face on top and the white face of the red/white edge piece will remain on top. We<br />
will now have two white faces on the top face of the cube.<br />
Continue this process until three center section edge pieces are in place, three top edge pieces<br />
have their top color on top and the fourth top edge piece is in the center section. The fourth<br />
center section edge piece will be on the top of the cube.<br />
If you should, by chance, properly place three center section edge pieces but have only two top<br />
edge pieces with their top colors on top, then apply one more Edge Piece Series in which all of<br />
the pieces involved are top edge pieces. The top edge piece in the center section comes to the<br />
top with its top color on top and the top edge piece which does not have its top color on top<br />
moves into the center section.<br />
You should note that you do not always have to complete the fourth turn of the Edge Piece<br />
Series. Whenever the fourth turn is a turn of the top face it does not need to be made because a<br />
turn of the top face can have no effect on the bottom face. Remember, the Edge Piece Series<br />
was devised not only to put center section edge pieces into proper position/orientation but also<br />
to prevent the movement of edge pieces on the bottom face.<br />
STEP THREE: THE TOP EDGE PIECES<br />
In this section we will place the fourth center section edge piece and the four top edge pieces in<br />
their proper positions and orientation.<br />
At the conclusion of Step Two, three top edge pieces were to have their top color on the top<br />
face of the cube. Those three edge pieces could be in any one of the following possible<br />
arrangements:<br />
1. All three could be out of order.<br />
2. Two adjacent pieces could be in the proper order relative to each other with the third out of<br />
order.<br />
3. Two opposite pieces could be in the proper order relative to each other with the third out of<br />
order.<br />
4. All three could be in the correct order relative to each other.<br />
The three white edge pieces on the top of the cube in Fig. 6a are all out of order. Note that the<br />
top edge piece face you cannot see on the back of the cube must be red. If the top face of the<br />
cube is turned 90 o clockwise then the yellow face of white/yellow would be adjacent to the<br />
yellow face center and white/yellow would be in the proper position/orientation.<br />
Fig. 6a<br />
Rubik’s <strong>Cube</strong> <strong>Solutions</strong> 37/48 http://www.<strong>mementoslangues</strong>.<strong>fr</strong>/ Rubik’s <strong>Cube</strong>
But neither of the other two white edge pieces would be in the correct position. The green color<br />
would be above the red face center and the red color would be above the orange face center. No<br />
matter which of the three top edge pieces is put into place the other two will be out of place.<br />
We can correct this by applying an Edge Piece Series to the cube. However, the series must<br />
involve three top (white) edge pieces. Rotate the top face until three white edge pieces are<br />
adjacent to the top/<strong>fr</strong>ont/right corner as they are in Fig. 6a. The cube obtained by rotating the<br />
top face 90 o clockwise would also be suitable.<br />
Always be sure that three white pieces are in the series and that it concludes with three white<br />
faces on top of the cube. In all cases the white edge piece in the center section will be edge<br />
piece #1. In Fig. 6a white/orange will be #1 and white/yellow will be #2. Any other choice would<br />
not leave three white edge pieces with their white faces on top of the cube at the end of the<br />
series. This series will change the top edge pieces to one of the other arrangements.<br />
In the case of the cube in Fig. 6a the series converts it to the cube in Fig. 6b. Here two adjacent<br />
edge pieces are in the proper order (white/yellow and white/orange) and one is out of order<br />
(white/red where red is above green). These pieces may be put in the proper order by turning<br />
the top face by 180 o and applying an Edge Piece Series to the top edge piece in the center<br />
section (white/green), the top edge piece which is out of order on the top face (the white/red<br />
piece) and the fourth center section edge piece (yellow/orange). The latter is moved into proper<br />
position/orientation and all four top edge pieces will be in their proper order. A 90 o<br />
counterclockwise turn of the top face will put all top edge pieces in their proper place. Step<br />
Three is complete.<br />
Fig. 6b<br />
Fig. 6c<br />
In the third case two opposite edge pieces are in position relative to each other and the third is<br />
out of place as shown in Fig. 6c. The white/yellow top edge piece is in place. By the process of<br />
elimination the color you cannot see on the white edge piece is green. Since the green face on<br />
my cube is opposite the yellow face the white/green piece must also be in its proper place. But<br />
the white/red piece is out of place. It belongs on the other side of the top face.<br />
The white/orange piece belongs where the white/red is now. The former can be put there by a<br />
simple 90 o rotation (clockwise) of the orange face. Turn the top face by 180 o and a 90 o<br />
counterclockwise turn of the orange face will move the white/red edge piece back to the top<br />
face and into its proper position relative to the other three. Finally another 180 o turn of the top<br />
face moves all white edge pieces into place. Step Three is complete.<br />
In the fourth case all three top edge pieces on the top face are in their proper position relative to<br />
each other. This is shown in Fig. 6d. The unseen color of the white edge piece is red and it<br />
clearly is in the red face of the cube. This arrangement is converted to one in which all four<br />
white edge pieces are in the proper order on the top face by a series of replacements.<br />
Rubik’s <strong>Cube</strong> <strong>Solutions</strong> 38/48 http://www.<strong>mementoslangues</strong>.<strong>fr</strong>/ Rubik’s <strong>Cube</strong>
Fig. 6d Fig. 6e Fig. 6f<br />
We begin by replacing a white edge piece on either end of the three on the top face with the<br />
white edge piece in the center section. For example, rotate the top face in Fig. 6d by 90 o<br />
clockwise giving Fig. 6e. Rotate the green face 90 o clockwise giving Fig. 6f. The white/red piece<br />
is replaced by the white/yellow piece and the former moves to the center section.<br />
Now turn the top face 90 o counterclockwise (Fig. 6g) and replace the white/green piece with the<br />
white/red piece (i.e. rotate the green face by 90 o counterclockwise) to give the cube shown in<br />
Fig. 6h. Continue in this fashion until, in the fourth turn of the green face the last white edge<br />
piece (in this case the white/orange piece) returns to the top face of the cube and the fourth<br />
center section edge piece moves into place at <strong>fr</strong>ont/right.<br />
Fig. 6g<br />
Fig. 6h<br />
You might ask how one knows that the fourth center section edge piece has the proper<br />
orientation and is not inverted. While you made sure that the top edge pieces had their white<br />
color on top you did nothing to ensure that the center section edge piece had the proper<br />
orientation. This is true for each of these examples. But you don't need to worry about the 12th<br />
edge piece. If 11 edge pieces are in the proper position and orientation then the 12th must be in<br />
the proper position and have the proper orientation as well. It cannot be otherwise.<br />
Turn the top face so that all top edge pieces are in position (in this case 90 o clockwise). Step<br />
Three is complete and all edge pieces have been properly positioned/oriented.<br />
STEP FOUR: FIVE CORNER PIECES<br />
Once the edge pieces have been correctly placed you will look for corner pieces which can be<br />
moved into position/orientation by a Corner Piece Series. In the discussion of that series we<br />
learned that one or more corner pieces will, almost inevitably, be situated so that this series will<br />
move that corner piece along a cube edge and into position/orientation. Others will be in a<br />
position, such that the series will move them across a face diagonal and into the correct<br />
position and orientation.<br />
Figure 7a shows the first kind of corner piece in the <strong>fr</strong>ont/top/right corner of the cube. The<br />
proper series will move the green/red/white corner piece along the green/red edge of the cube<br />
and into its correct position and orientation at the back/top/right corner of the cube. (That is, in<br />
the green/red/white corner.) In orienting these cubes we will always use the same convention.<br />
We will always show the <strong>fr</strong>ont, right and top of the cube. In this case that means blue is the <strong>fr</strong>ont,<br />
red is the right side and green is the top.<br />
Rubik’s <strong>Cube</strong> <strong>Solutions</strong> 39/48 http://www.<strong>mementoslangues</strong>.<strong>fr</strong>/ Rubik’s <strong>Cube</strong>
Fig. 7a Fig. 7b Fig. 7c<br />
If the entire cube is turned 90 o counterclockwise we obtain the cube in Fig. 7b. Now orange is<br />
<strong>fr</strong>ont and blue is right. A standard Corner Piece Series which begins with a turn of the top face<br />
to the right will move our target corner piece to the back/top/left corner. It will be correctly<br />
placed in the green/red/white corner of the cube.<br />
Turning the cube another 90 o counterclockwise gives the cube in Fig. 7c. The Corner Piece<br />
Series is the same (it begins with a turn of the top face to the right) but the target corner piece<br />
now moves along the left/top edge rather than the back/top edge. You can use either orientation<br />
of the cube and still move the green/red/white corner piece into place. The difference is that the<br />
blue/green/orange corner piece is involved in moving about the first triangle and the<br />
blue/red/yellow corner piece has replaced it in the second case.<br />
The red/yellow/blue corner piece is at <strong>fr</strong>ont/top/right in Fig. 7d. This corner piece belongs<br />
somewhere on the top face because of its blue color. But the red and yellow colors do not<br />
match the other two sides (<strong>fr</strong>ont and right) which we can see. Yellow is opposite green and red<br />
is opposite orange so this red/yellow/blue corner piece belongs in the back/top/left corner of the<br />
cube.<br />
Fig. 7d<br />
A Corner Piece Series which begins with a turn of the top face to the left will cause the<br />
red/yellow/blue piece to move across the diagonal of the top face and into place in the<br />
back/top/left corner. In this case there is only one way this can happen.<br />
If possible, one would like to place two corner pieces at the same time. You may find, by chance,<br />
that a piece goes along an edge while another goes across the face diagonal at the same time.<br />
Or perhaps two may move along adjacent cube edges. But most of the time you will have to<br />
arrange for these things to happen.<br />
While other solutions will use a relatively large number of series in solving a scrambled cube<br />
this method is able to solve a cube while using only two series because of the use of<br />
preliminary face turns which change the corner pieces involved in a Corner Piece Series.<br />
Turning the orange face in Fig. 7c by 180 o gives Fig. 7e. We apply the same Corner Piece Series<br />
as before (start with a turn of the top face to the right) but the blue/red/green piece has become<br />
a part of the triangle. This is the piece which belongs at back/top/left and it is not only moved to<br />
the correct position it is also properly oriented. Two corner pieces have moved into place at the<br />
same time. Following this series the orange face is again turned 180 o returning it to its original<br />
position.<br />
Rubik’s <strong>Cube</strong> <strong>Solutions</strong> 40/48 http://www.<strong>mementoslangues</strong>.<strong>fr</strong>/ Rubik’s <strong>Cube</strong>
Fig. 7e<br />
The problem with this approach is that you will have to search for the new piece without any<br />
clue as to where it will be found. Rather than trying to find the piece which will replace your<br />
target piece, it is better to work with the piece which the target piece is going to replace. This is<br />
true because a glance at the latter piece will immediately tell you where it must go.<br />
The target piece in Fig. 7c will replace the orange/yellow/blue corner piece at <strong>fr</strong>ont/top/left. The<br />
Corner Piece Series (first turn is to the right) will move this piece across the diagonal with its<br />
blue face coming to the top. But where does the orange/yellow/blue corner piece belong? Since<br />
none of its colors match any of the faces it touches it must belong in the opposite corner of the<br />
cube. And more specifically its blue color must be in the blue face of the cube.<br />
The <strong>fr</strong>ont of the cube is white so the back is blue. Turn the orange face (in Fig. 7c) 90 o<br />
counterclockwise and you get Fig. 7f. Apply the Corner Piece Series and the blue color of the<br />
orange/blue/yellow corner piece moves next to the blue color of the blue/orange edge piece.<br />
Turn the orange face 90 o clockwise and two corner pieces have been moved into place.<br />
Fig. 7f Fig. 8a Fig. 8b<br />
Fig. 8a shows another example. The orange/blue/green corner piece at back/top/right will move<br />
along the top/right edge of the cube and "roll over" into proper position/orientation in the<br />
<strong>fr</strong>ont/top/right corner of the cube. It replaces the yellow/blue/red corner piece. What needs to be<br />
done to cause the latter piece to move into position/orientation at the same time?<br />
According to its colors the yellow/blue/red piece belongs in the corner diagonally across the<br />
blue face of the cube. Rotate the yellow (left) face of the cube 180 o giving Fig. 8b. Apply the<br />
Corner Piece Series (first turn of the top face is to the left) and the yellow/blue/red piece moves<br />
into place with its red color next to the red edge piece color on the left side of the top face. A<br />
second 180 o turn of the left face and two corner pieces have moved into place during the same<br />
sequence of moves.<br />
Fig. 9a shows a potential problem. A Corner Piece Series (first turn of the top face is to the left)<br />
moves the red/yellow/blue piece across the blue (top) face of the cube to its correct position<br />
and orientation. But it would also move the yellow/blue/orange out of place. To avoid this, turn<br />
the orange face 90 o clockwise (giving the cube in Fig. 9b) and apply a Corner Piece Series which<br />
begins with a turn of the top face to the right. Reverse the preliminary turn of the orange face.<br />
The red/yellow/blue piece winds up in the correct place but the yellow/blue/orange piece is not<br />
disturbed.<br />
Rubik’s <strong>Cube</strong> <strong>Solutions</strong> 41/48 http://www.<strong>mementoslangues</strong>.<strong>fr</strong>/ Rubik’s <strong>Cube</strong>
Fig. 9a Fig. 9b Fig. 10a<br />
We could move three corner pieces on the top face of the cube in Fig. 10a about the<br />
triangle: <strong>fr</strong>ont/top/right; back/top/left; back/top/right. The yellow/orange/white piece at<br />
back/top/right moves along the top/right edge and rolls over into place at <strong>fr</strong>ont/top/right. The<br />
blue color of orange/green/blue comes to the top in the back/top/left corner. This piece belongs<br />
in the <strong>fr</strong>ont/bottom/left corner. The blue color of the orange/green/blue piece obviously must go<br />
in the blue (left) face of the cube. It must replace the red color of the piece which is now there.<br />
Turn the bottom face 90 o counterclockwise and then turn the left face 90 o clockwise. This gives<br />
the cube in Fig. 10b. A Corner Piece Series which begins with a turn of the top face to the left<br />
causes the blue color of the orange/green/blue piece to replace the red color we see in the<br />
back/top/left corner of the cube. Then reverse the two preliminary turns (left face 90 o<br />
counterclockwise, bottom face 90 o clockwise). Again we have placed two corner pieces during<br />
the same sequence.<br />
Fig. 10b Fig. 11<br />
The blue/yellow/red corner piece at <strong>fr</strong>ont/top/left in Fig. 11 could move along the <strong>fr</strong>ont/top edge<br />
and roll over into place at <strong>fr</strong>ont/top/right. But we do not have a triangle of three out-of-place<br />
corner pieces on the top face. No problem. Rotate the white face 90 o clockwise and the out-ofplace<br />
piece at back/bottom/right comes to the top face making a temporary triangle. Apply the<br />
Corner Piece Series and then turn the white face 90 o counterclockwise.<br />
The yellow/red/blue piece at <strong>fr</strong>ont/top/left in Fig. 12a will move along the <strong>fr</strong>ont/top edge and into<br />
place at <strong>fr</strong>ont/top/right. The green/red/blue piece has the most difficult situation you will find in<br />
trying to place two corner pieces at the same time. This is indicated by the checkerboard<br />
appearance it makes with the red/blue edge piece next to it. This corner piece belongs at<br />
back/top/right and its green face must be in the green face of the cube.<br />
Fig. 12a<br />
Fig. 12b<br />
It will replace the blue/green/orange corner piece which now has its blue face in the green face<br />
of the cube. This means we must find (create) a Corner Piece Series in which the green face of<br />
the green/red/blue piece replaces the blue face of the blue/orange/green piece. Turn the green<br />
Rubik’s <strong>Cube</strong> <strong>Solutions</strong> 42/48 http://www.<strong>mementoslangues</strong>.<strong>fr</strong>/ Rubik’s <strong>Cube</strong>
face 90 o counterclockwise; turn the white (bottom) face 90 o clockwise; and turn the green face<br />
90 o counterclockwise. We have the cube in Fig. 12b. As required, the blue face we are looking<br />
for is on the top face at back/top/left.<br />
Apply a Corner Piece Series moving corner pieces about the triangle: <strong>fr</strong>ont/top/left;<br />
<strong>fr</strong>ont/top/right; back/top/left. Now reverse the preliminary turns (green face 90 o clockwise; white<br />
face 90 o counterclockwise; green face 90 o clockwise). Again, two corner pieces have been<br />
moved into place at the same time.<br />
The cube in Fig. 13 shows an unusual arrangement. The pieces making a checkerboard<br />
pattern on opposite sides of the red/yellow edge piece need to be exchanged as do the pieces<br />
across the diagonal on the white face. We could put one of the first pair in place using the<br />
preliminary three turn sequence described in the previous paragraph. Or we could put one of<br />
the latter pair in place using a two turn sequence. We will do the latter simply because it is<br />
shorter.<br />
Fig. 13<br />
Move the green/red/white corner piece so that it is across the cube diagonal (not a face diagonal)<br />
<strong>fr</strong>om its proper position (turn the orange face 90 o counterclockwise). Next turn the blue (bottom)<br />
face 90 o counterclockwise. Note that this turn is at right angles to the first turn. Now the<br />
green/red/white corner piece is diagonally across the red face <strong>fr</strong>om its proper position and can<br />
be moved into position and orientation with the proper Corner Piece Series.<br />
If the second turn in the paragraph above had been 180 o instead of 90 o then the green/red/white<br />
piece could have been moved into place along a cube edge (the green/red edge) with the proper<br />
Corner Piece Series.<br />
When five corner pieces have been placed Step Four will be completed. If you can place two<br />
corner pieces at a time obviously the total number of applications of the Corner Piece Series<br />
will be reduced. However, anytime you find a piece in place but with the wrong orientation you<br />
will have to remove it. You can do this at the same time that you move another corner piece into<br />
place but you can't place two pieces while removing a third. And anytime you find two corner<br />
pieces are each located in the other's proper place you will be able to place only one corner<br />
piece while moving the other out of the way.<br />
STEP FIVE: THE END GAME<br />
With only three corner pieces remaining out of position all must be involved in the final Corner<br />
Piece Series. Further, each must move simultaneously into its correct position and with the<br />
right orientation.<br />
It is possible that the three target corner pieces are on the same face and will move into place<br />
via a Corner Piece Series without any preliminary moves. But that would be rare indeed. We<br />
won't even think of it. Rather, the first thing for you to do is to look for a corner piece which can<br />
move along a cube edge into its correct position while rolling over into its correct orientation.<br />
Surprising as it may seem, in about half of all instances you will find that such a piece exists.<br />
About one-fourth of the time you will even find two such pieces.<br />
Rubik’s <strong>Cube</strong> <strong>Solutions</strong> 43/48 http://www.<strong>mementoslangues</strong>.<strong>fr</strong>/ Rubik’s <strong>Cube</strong>
The corner piece at back/top/right in Fig. 14a is just such a piece. (Its color on the back side of<br />
the cube is blue.) The proper Corner Piece Series will cause it to move along the top/right edge<br />
to the <strong>fr</strong>ont/top/right corner of the cube where it will be in the correct position/orientation. There<br />
are two different cube faces which may be used as the <strong>fr</strong>ont face in the Corner Piece Series and<br />
two different triangles about which the corner pieces may move.<br />
Fig. 14a<br />
In one such case, the blue/red/yellow piece at <strong>fr</strong>ont/top/right will move to the back/top/left<br />
corner (i.e. the yellow/blue/red corner) with its yellow face on top of the cube. In that series, the<br />
green face is <strong>fr</strong>ont and the first move is a rotation of the blue (top) face to the left.<br />
In the other case, the <strong>fr</strong>ont face is red (the left side in Fig. 14a) and the first turn is again a<br />
rotation of the blue (top) face to the left. In this case the blue/red/yellow piece will move to the<br />
corner now occupied by the blue/green/red corner piece. Again the yellow face of the<br />
blue/red/yellow corner piece will come to the top of the cube.<br />
You should note that the first two corner pieces will be on the same face and will be adjacent to<br />
each other. The first will go into position/orientation replacing the second. The second will go to<br />
either of the two remaining corners on the top face with the color which is on the right side of<br />
the cube at the start of the Corner Piece Series coming to the top. We will refer to the third and<br />
fourth corners as the "target positions".<br />
Naturally the second corner piece must replace the third corner piece with the third replacing<br />
the first. But where is the third corner piece? A little thought should convince you that, in this<br />
case, the third piece is somewhere in the yellow face of the cube. Fig. 14b (the entire cube in Fig.<br />
14a has been rotated 90 o clockwise on an axis <strong>fr</strong>om top to bottom) shows that the third corner<br />
piece is in the yellow/blue/red corner. It should be clear that if the yellow face of the second<br />
corner piece replaces the orange face of the third corner piece (the face which is in the yellow<br />
face of the cube) the second piece would be in the right position and have the right orientation.<br />
Fig. 14b<br />
Fig. 14c<br />
How can we make that happen? We must bring that orange face to the top (blue) face of the<br />
cube in one of the target positions. This can be done with a 90 o clockwise rotation of the red<br />
face as shown in Fig. 14c. Then, with red as the <strong>fr</strong>ont face, a Corner Piece Series beginning with<br />
a turn of the blue face to the left will cause these three corner pieces to move clockwise about<br />
the <strong>fr</strong>ont/top/right; back/top/left; back/top/right triangle.<br />
The yellow face of the yellow/red/blue corner piece replaces the orange face of the<br />
orange/blue/yellow corner piece and when the red face is rotated 90 o counterclockwise (the<br />
preliminary turn is reversed) each of the corner pieces will be in its correct position and<br />
orientation.<br />
Rubik’s <strong>Cube</strong> <strong>Solutions</strong> 44/48 http://www.<strong>mementoslangues</strong>.<strong>fr</strong>/ Rubik’s <strong>Cube</strong>
But, you might say,..."You made sure that each of the first two pieces went to the right place but<br />
you did nothing about the third". You don't have to worry about the third corner piece for, when<br />
all other pieces on the cube have been properly placed, the last piece must be in position and<br />
must be properly oriented as well. It is physically impossible for it to be otherwise. Thus you<br />
must ensure that the first two pieces are correctly placed and the third one will take care of<br />
itself.<br />
As indicated above, when you reach the End Game, half the time at least one of the corner<br />
pieces will be in position such that a Corner Piece Series will cause it to move along a cube<br />
edge and into position/orientation. If you don't find such a corner piece you must create one.<br />
About 70% of the time you will do so with a single 90 o rotation of a cube face. And about 30% of<br />
the time you will do so with a 180 o rotation of a cube face.<br />
The cube in Fig. 15a does not have a corner piece which can be moved along a cube edge and<br />
into place. But the red/white/yellow corner piece is diagonally across the yellow face <strong>fr</strong>om the<br />
corner where it belongs. It could be made part of a triangle which would send it across the<br />
diagonal to its proper place. A corner piece in such a position may be moved to an adjacent<br />
corner so as to create a corner piece which can be moved along a cube edge and into place.<br />
You can do this with a 90 o rotation of either vertical face in which the corner piece is located.<br />
For example, the orange face could be rotated 90 o clockwise. Fig. 15b shows the resulting cube<br />
with white as the <strong>fr</strong>ont face.<br />
Fig. 15a Fig. 15b Fig. 16<br />
The cube in Fig. 16 does not have an appropriate corner piece adjacent to its correct position.<br />
Neither does it have a corner piece which could be moved across a face diagonal to its proper<br />
place. But it does have a corner piece which can be rotated 180 o and be in a position <strong>fr</strong>om which<br />
it can move along a cube face and into proper position/orientation. That corner piece in Fig. 16<br />
is the green/red/white piece in the back/top/left corner of the cube (all you can see is the green<br />
face).<br />
You can turn either of the faces, which (of the three remaining out-of-position corner pieces)<br />
contain only the green/red/white corner piece, by 180 o and that piece will be in position such<br />
that the proper Corner Piece Series will move it along a cube edge and into place. Turning the<br />
third face of the cube (yellow in this case) will not work.<br />
With this understanding we can construct the rules for successfully completing the End Game:<br />
1. Find a corner piece which may be moved along a cube edge and into place. If none can be<br />
found create one.<br />
2. Note the face color (of the second corner piece) which will come to the top face of the cube in<br />
a target position during a Corner Piece Series.<br />
3. Locate the third corner piece in the cube face of this same color and note the color of the<br />
third corner piece face which is in that cube face.<br />
4. Bring the third corner piece to the top of the cube, by various face turns, such that that color<br />
is in the top face of the cube.<br />
Rubik’s <strong>Cube</strong> <strong>Solutions</strong> 45/48 http://www.<strong>mementoslangues</strong>.<strong>fr</strong>/ Rubik’s <strong>Cube</strong>
5. Perform the Corner Piece Series so that the target color of the second corner piece replaces<br />
this color (named in 4 above).<br />
6. Reverse the preliminary face turns indicated in 4 above.<br />
This process is much easier to carry out than it is to describe. Several examples will be given<br />
below.<br />
The white/yellow/orange corner piece at <strong>fr</strong>ont/right/top of the cube in Fig. 17a may be moved<br />
along the white/yellow edge and into place. It will replace the red/green/blue piece. The latter will<br />
move to either of the target positions with its blue face coming to the top. We examine the blue<br />
face of the cube and find the yellow face of the white/red/yellow corner piece in that blue face.<br />
Hence we need to get the yellow face of the third corner piece into one of the two target<br />
positions. This is done by a 180 o rotation of the green face giving the cube in Fig. 17b (the entire<br />
cube has been rotated 180 o so you can see all three faces of the third corner piece).<br />
Fig. 17a<br />
Fig. 17b<br />
Now hold the cube with the green face in <strong>fr</strong>ont and begin the Corner Piece Series with a turn of<br />
the top (white) face to the right. The third corner piece goes across the diagonal of the white<br />
face (with its white face coming to the top) and into its proper position and orientation.<br />
You do not always have to examine the face of the cube which has the target color. When the<br />
white/yellow/red piece in Fig. 18a moves along the white/yellow edge of the cube the green face<br />
of the second corner piece comes to the top in either of the target positions. We need to move<br />
the face of the piece at the lower left of the cube which is now in the green face (we see only its<br />
white face) into one of the target positions.<br />
Fig. 18a<br />
Fig. 18b<br />
Rotate the bottom face by 90 o counterclockwise and then the left face 90 o clockwise. This gives<br />
Fig. 18b. The face we were looking for is yellow (we would have seen that if we had turned the<br />
cube to reveal the green face). The first turn of the top face is a rotation to the top left. When the<br />
series is completed reverse the original two turns and the cube is complete.<br />
The corner piece at back/top/left in Fig. 19a will move along the top/left edge of the cube and<br />
into place. The green face of the white/orange/green corner piece will come to the top in a target<br />
position. The yellow face of the third corner piece is in the green face of the cube. We can bring<br />
that yellow face to a target position by the three turn sequence we learned in Step Four. It is:<br />
green counterclockwise; blue (bottom) clockwise; and green counterclockwise.<br />
Rubik’s <strong>Cube</strong> <strong>Solutions</strong> 46/48 http://www.<strong>mementoslangues</strong>.<strong>fr</strong>/ Rubik’s <strong>Cube</strong>
Fig. 19a<br />
Fig. 19b<br />
There is the yellow color on the top face in the back/right corner of the cube (Fig. 19b). Apply<br />
the Corner Piece Series and reverse the three preliminary turns. The cube is restored.<br />
The cube in Fig. 20a has two corner pieces which can move along a cube edge and into position.<br />
We could use either one of them as the first corner piece. Note that all three of the final corner<br />
pieces have an orange face and, in each case it is in the orange face of the cube.<br />
Fig. 20a<br />
Fig. 20b<br />
We will use the yellow/white/orange piece as the first corner piece. Let us turn the entire cube<br />
90 o clockwise on an axis <strong>fr</strong>om top to bottom. Now turn the bottom (green) face 90 o clockwise<br />
and then the red face also 90 o clockwise. This gives the cube in Fig. 20b. (Again we chose this<br />
view so you could see all three faces of the third corner piece.) With red as <strong>fr</strong>ont, turn the top<br />
face to the right and complete the Corner Piece Series. Reverse the two preliminary turns and<br />
the cube will be done.<br />
In Fig. 21a none of the pieces is adjacent to any other. As a general rule this should be avoided<br />
but it is not much of a problem in this case because any one of the three corner pieces could be<br />
turned 90 o and thereby create a corner piece which could be moved along a cube edge and into<br />
its proper place. For example, turn the orange face 90 o counterclockwise (Fig. 21b shows the<br />
result except that the entire cube is turned clockwise in order to show all three faces of the<br />
green/white/red corner piece) or turn the red face 90 o clockwise.<br />
Fig. 21a<br />
Fig. 21b<br />
But if the orientation of each were to be changed so as to put a corner piece face into the cube<br />
face of the same color then things would change drastically. For example, the yellow color of<br />
the red/blue/yellow piece is moved to the yellow face of the cube at <strong>fr</strong>ont/top/left, the red face of<br />
red/white/green is moved to the red face of the cube and the white face of orange/white/yellow is<br />
moved to the white face of the cube. Although this arrangement is rare, it is the most difficult<br />
you will encounter. I will leave this for you to solve for yourself. But I'll give you a hint. You will<br />
have to move one of the corner pieces in two different directions.<br />
Rubik’s <strong>Cube</strong> <strong>Solutions</strong> 47/48 http://www.<strong>mementoslangues</strong>.<strong>fr</strong>/ Rubik’s <strong>Cube</strong>
<strong>Cube</strong> Scrambling Algorithms<br />
1) F' U L F D' B2 U2 D2 R2 D2 L2 R2 D L' F2 L2 D B D R' B R2 L D L'<br />
2) B' F U' R2 D U B2 U R D' L2 U' B U L' D2 B' D' U2 L U B L' U B<br />
3) L R2 D2 R' D2 L2 R2 F' B L' B' U2 D B U2 B' D2 L2 R U2 R' B2 L R2 D<br />
4) B2 F2 D' R' B' R F R L2 F' U B2 F R2 F U' B R' U D' L F2 D' U L<br />
5) B' R2 B' F2 U' R' F R2 D2 U' B D L2 U R F2 B' D2 R U2 L D2 F' U2 B2<br />
Superflip Algorithm<br />
20 Moves<br />
U R2 F B R B2 R U2 L B2 R U' D' R2 F R' L B2 U2 F2<br />
Rubik’s <strong>Cube</strong> <strong>Solutions</strong> 48/48 http://www.<strong>mementoslangues</strong>.<strong>fr</strong>/ Rubik’s <strong>Cube</strong>